- Puppeteer Tutorial
- Puppeteer - Home
- Puppeteer - Introduction
- Puppeteer - Element Handling
- Puppeteer - Usage of Google
- Puppeteer - NodeJS Installation
- Puppeteer VS Code Configuration
- Puppeteer - Installation
- Puppeteer - Basic Test
- Puppeteer - Non Headless Execution
- Comparison Between Puppeteer & Selenium
- Comparison Between Puppeteer & Protractor
- Comparison Between Puppeteer & Cypress
- Puppeteer - Browser Operations
- Puppeteer - Handling Tabs
- Puppeteer - Basic Commands
- Puppeteer - Firefox
- Puppeteer - Chrome
- Puppeteer - Handling Confirm Alerts
- Puppeteer - Handling Drop-downs
- Puppeteer - Locators
- Puppeteer - Xpath Functions
- Puppeteer - Xpath Attributes
- Puppeteer - Xpath Grouping
- Puppeteer - Absolute Xpath
- Puppeteer - Relative Xpath
- Puppeteer - Xpath Axes
- Puppeteer - Type Selector
- Name Selector & Class Name Selector
- Puppeteer - Id Selector
- Puppeteer - Attribute Selector
- Puppeteer - Handling Links/Button
- Handling Edit Boxes & Checkboxes
- Puppeteer - Handling Frames
- Puppeteer - Keyboard Simulation
- Puppeteer - Getting Element Text
- Puppeteer - Getting Element Attribute
- Puppeteer - Device Emulation
- Puppeteer - Disable JavaScript
- Puppeteer - Synchronization
- Puppeteer - Capture Screenshot
- Puppeteer Useful Resources
- Puppeteer - Quick Guide
- Puppeteer - Useful Resources
- Puppeteer - Discussion
Puppeteer - Handling Tabs
We can handle tabs in Puppeteer using the below methods −
newPage()
We can open a new tab using this method available in the browser object.
Syntax
The syntax is as follows −
const p = await browser.newPage()
close()
We can close the tab opened using this method.
Syntax
The syntax is as follows −
await p.close()
close()
We can close all the tabs opened using this method available in the browser object.
Syntax
The syntax is as follows −
await browser.close()
To begin, follow Steps 1 to 2 from the Chapter of Basic Test on Puppeteer which are as follows −
Step 1 − Create a new file within the directory where the node_modules folder is created (location where the Puppeteer and Puppeteer core have been installed).
The details on Puppeteer installation is discussed in the Chapter of Puppeteer Installation.
Right-click on the folder where the node_modules folder is created, then click on the New file button.
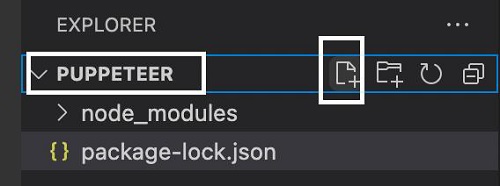
Step 2 − Enter a filename, say testcase1.js.
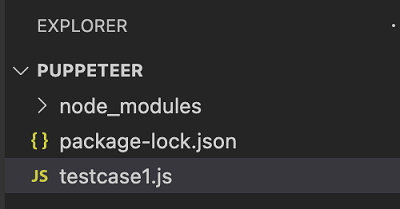
Step 3 − Add the below code within the testcase1.js file created.
//adding Puppeteer library
const pt = require('puppeteer')
pt.launch().then(async browser => {
   //browser new page
   const p = await browser.newPage();
   //set viewpoint of browser page
   await p.setViewport({ width: 1000, height: 500 })
   //launch URL
   await p.goto('https://www.tutorialspoint.com/index.htm')
   //capture screenshot
   await p.screenshot({
      path: 'tutorialspoint.png'
   });
   //browser close
   await browser.close()
})
Step 4 − Execute the code with the command given below −
node <filename>
So in our example, we shall run the following command −
node testcase1.js
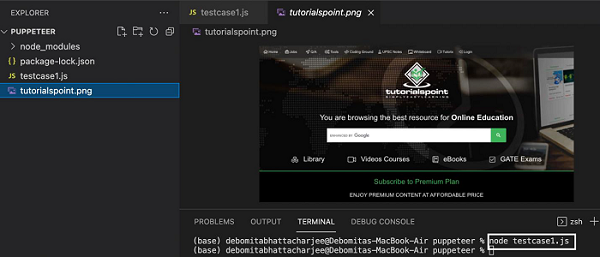
After the command has been successfully executed, a new file called the tutorialspoint.png gets created within the page directory. It contains the captured screenshot of the page launched in the browser.
To Continue Learning Please Login