- Basic Objective-C
- Objective-C - Home
- Objective-C - Overview
- Objective-C - Environment Setup
- Objective-C - Program Structure
- Objective-C - Basic Syntax
- Objective-C - Data Types
- Objective-C - Variables
- Objective-C - Constants
- Objective-C - Operators
- Objective-C - Loops
- Objective-C - Decision Making
- Objective-C - Functions
- Objective-C - Blocks
- Objective-C - Numbers
- Objective-C - Arrays
- Objective-C - Pointers
- Objective-C - Strings
- Objective-C - Structures
- Objective-C - Preprocessors
- Objective-C - Typedef
- Objective-C - Type Casting
- Objective-C - Log Handling
- Objective-C - Error Handling
- Command-Line Arguments
- Advanced Objective-C
- Objective-C - Classes & Objects
- Objective-C - Inheritance
- Objective-C - Polymorphism
- Objective-C - Data Encapsulation
- Objective-C - Categories
- Objective-C - Posing
- Objective-C - Extensions
- Objective-C - Protocols
- Objective-C - Dynamic Binding
- Objective-C - Composite Objects
- Obj-C - Foundation Framework
- Objective-C - Fast Enumeration
- Obj-C - Memory Management
- Objective-C Useful Resources
- Objective-C - Quick Guide
- Objective-C - Useful Resources
- Objective-C - Discussion
Objective-C Quick Guide
Objective-C Overview
Objective-C is general-purpose language that is developed on top of C Programming language by adding features of Small Talk programming language making it an object-oriented language. It is primarily used in developing iOS and Mac OS X operating systems as well as its applications.
Initially, Objective-C was developed by NeXT for its NeXTSTEP OS from whom it was taken over by Apple for its iOS and Mac OS X.
Object-Oriented Programming
Fully supports object-oriented programming, including the four pillars of object-oriented development −
- Encapsulation
- Data hiding
- Inheritance
- Polymorphism
Example Code
#import <Foundation/Foundation.h>

int main (int argc, const char * argv[]) {
   NSAutoreleasePool * pool = [[NSAutoreleasePool alloc] init];

   NSLog (@"hello world");
   [pool drain];
   return 0;
}
Foundation Framework
Foundation Framework provides large set of features and they are listed below.
It includes a list of extended datatypes like NSArray, NSDictionary, NSSet and so on.
It consists of a rich set of functions manipulating files, strings, etc.
It provides features for URL handling, utilities like date formatting, data handling, error handling, etc.
Learning Objective-C
The most important thing to do when learning Objective-C is to focus on concepts and not get lost in language technical details.
The purpose of learning a programming language is to become a better programmer; that is, to become more effective at designing and implementing new systems and at maintaining old ones.
Use of Objective-C
Objective-C, as mentioned earlier, is used in iOS and Mac OS X. It has large base of iOS users and largely increasing Mac OS X users. And since Apple focuses on quality first and its wonderful for those who started learning Objective-C.
Objective-C Environment Setup
Local Environment Setup
If you are still willing to set up your environment for Objective-C programming language, you need the following two softwares available on your computer, (a) Text Editor and (b) The GCC Compiler.
Text Editor
This will be used to type your program. Examples of few editors include Windows Notepad, OS Edit command, Brief, Epsilon, EMACS, and vim or vi.
Name and version of text editor can vary on different operating systems. For example, Notepad will be used on Windows, and vim or vi can be used on windows as well as Linux or UNIX.
The files you create with your editor are called source files and contain program source code. The source files for Objective-C programs are typically named with the extension ".m".
Before starting your programming, make sure you have one text editor in place and you have enough experience to write a computer program, save it in a file, compile it and finally execute it.
The GCC Compiler
The source code written in source file is the human readable source for your program. It needs to be "compiled" to turn into machine language, so that your CPU can actually execute the program as per instructions given.
This GCC compiler will be used to compile your source code into final executable program. I assume you have basic knowledge about a programming language compiler.
GCC compiler is available for free on various platforms and the procedure to set up on various platforms is explained below.
Installation on UNIX/Linux
The initial step is install gcc along with gcc Objective-C package. This is done by −
$ su -
$ yum install gcc
$ yum install gcc-objc
The next step is to set up package dependencies using following command −
$ yum install make libpng libpng-devel libtiff libtiff-devel libobjc
   libxml2 libxml2-devel libX11-devel libXt-devel libjpeg libjpeg-devel
In order to get full features of Objective-C, download and install GNUStep.
Now, we need to switch to the downloaded folder and unpack the file by −
$ tar xvfz gnustep-startup-.tar.gz
Now, we need to switch to the folder gnustep-startup that gets created using −
$ cd gnustep-startup-<version>
Next, we need to configure the build process −
$ ./configure
Then, we can build by −
$ make
We need to finally set up the environment by −
$ . /usr/GNUstep/System/Library/Makefiles/GNUstep.sh
We have a helloWorld.m Objective-C as follows −
#import <Foundation/Foundation.h>

int main (int argc, const char * argv[]) {
   NSAutoreleasePool * pool = [[NSAutoreleasePool alloc] init];

   NSLog (@"hello world");
   [pool drain];
   return 0;
}
Now, we can compile and run a Objective-C file say helloWorld.m by switching to folder containing the file using cd and then using the following steps −
$ gcc `gnustep-config --objc-flags`
-L/usr/GNUstep/Local/Library/Libraries
-lgnustep-base helloWorld.m -o helloWorld
$ ./helloWorld
We can see the following output −
2013-09-07 10:48:39.772 tutorialsPoint[12906] hello world
Installation on Mac OS
If you use Mac OS X, the easiest way to obtain GCC is to download the Xcode development environment from Apple's web site and follow the simple installation instructions. Once you have Xcode set up, you will be able to use GNU compiler for C/C++.
Xcode is currently available at developer.apple.com/technologies/tools/.
Installation on Windows
In order to run Objective-C program on windows, we need to install MinGW and GNUStep Core. Both are available at https://www.gnu.org/software/gnustep/windows/installer.html.
First, we need to install the MSYS/MinGW System package. Then, we need to install the GNUstep Core package. Both of which provide a windows installer, which is self-explanatory.
Then to use Objective-C and GNUstep by selecting Start -> All Programs -> GNUstep -> Shell
Switch to the folder containing helloWorld.m
We can compile the program by using −
$ gcc `gnustep-config --objc-flags`
-L /GNUstep/System/Library/Libraries hello.m -o hello -lgnustep-base -lobjc
We can run the program by using −
./hello.exe
We get the following output −
2013-09-07 10:48:39.772 tutorialsPoint[1200] hello world
Objective-C Program Structure
Before we study basic building blocks of the Objective-C programming language, let us look a bare minimum Objective-C program structure so that we can take it as a reference in upcoming chapters.
Objective-C Hello World Example
A Objective-C program basically consists of the following parts −
- Preprocessor Commands
- Interface
- Implementation
- Method
- Variables
- Statements & Expressions
- Comments
Let us look at a simple code that would print the words "Hello World" −
#import <Foundation/Foundation.h>

@interface SampleClass:NSObject
- (void)sampleMethod;
@end

@implementation SampleClass

- (void)sampleMethod {
   NSLog(@"Hello, World! \n");
}

@end

int main() {
   /* my first program in Objective-C */
   SampleClass *sampleClass = [[SampleClass alloc]init];
   [sampleClass sampleMethod];
   return 0;
}
Let us look various parts of the above program −
The first line of the program #import <Foundation/Foundation.h> is a preprocessor command, which tells a Objective-C compiler to include Foundation.h file before going to actual compilation.
The next line @interface SampleClass:NSObject shows how to create an interface. It inherits NSObject, which is the base class of all objects.
The next line - (void)sampleMethod; shows how to declare a method.
The next line @end marks the end of an interface.
The next line @implementation SampleClass shows how to implement the interface SampleClass.
The next line - (void)sampleMethod{} shows the implementation of the sampleMethod.
The next line @end marks the end of an implementation.
The next line int main() is the main function where program execution begins.
The next line /*...*/ will be ignored by the compiler and it has been put to add additional comments in the program. So such lines are called comments in the program.
The next line NSLog(...) is another function available in Objective-C which causes the message "Hello, World!" to be displayed on the screen.
The next line return 0; terminates main()function and returns the value 0.
Compile & Execute Objective-C Program
Now when we compile and run the program, we will get the following result.
2017-10-06 07:48:32.020 demo[65832] Hello, World!
Objective-C Basic Syntax
You have seen a basic structure of Objective-C program, so it will be easy to understand other basic building blocks of the Objective-C programming language.
Tokens in Objective-C
A Objective-C program consists of various tokens and a token is either a keyword, an identifier, a constant, a string literal, or a symbol. For example, the following Objective-C statement consists of six tokens −
NSLog(@"Hello, World! \n");
The individual tokens are −
NSLog
@
(
   "Hello, World! \n"
)
;
Semicolons ;
In Objective-C program, the semicolon is a statement terminator. That is, each individual statement must be ended with a semicolon. It indicates the end of one logical entity.
For example, following are two different statements −
NSLog(@"Hello, World! \n");
return 0;
Comments
Comments are like helping text in your Objective-C program and they are ignored by the compiler. They start with /* and terminate with the characters */ as shown below −
/* my first program in Objective-C */
You can not have comments with in comments and they do not occur within a string or character literals.
Identifiers
An Objective-C identifier is a name used to identify a variable, function, or any other user-defined item. An identifier starts with a letter A to Z or a to z or an underscore _ followed by zero or more letters, underscores, and digits (0 to 9).
Objective-C does not allow punctuation characters such as @, $, and % within identifiers. Objective-C is a case-sensitive programming language. Thus, Manpower and manpower are two different identifiers in Objective-C. Here are some examples of acceptable identifiers −
mohd       zara    abc   move_name  a_123
myname50   _temp   j     a23b9      retVal
Keywords
The following list shows few of the reserved words in Objective-C. These reserved words may not be used as constant or variable or any other identifier names.
| auto | else | long | switch |
| break | enum | register | typedef |
| case | extern | return | union |
| char | float | short | unsigned |
| const | for | signed | void |
| continue | goto | sizeof | volatile |
| default | if | static | while |
| do | int | struct | _Packed |
| double | protocol | interface | implementation |
| NSObject | NSInteger | NSNumber | CGFloat |
| property | nonatomic; | retain | strong |
| weak | unsafe_unretained; | readwrite | readonly |
Whitespace in Objective-C
A line containing only whitespace, possibly with a comment, is known as a blank line, and an Objective-C compiler totally ignores it.
Whitespace is the term used in Objective-C to describe blanks, tabs, newline characters and comments. Whitespace separates one part of a statement from another and enables the compiler to identify where one element in a statement, such as int, ends and the next element begins. Therefore, in the following statement −
int age;
There must be at least one whitespace character (usually a space) between int and age for the compiler to be able to distinguish them. On the other hand, in the following statement,
fruit = apples + oranges; // get the total fruit
No whitespace characters are necessary between fruit and =, or between = and apples, although you are free to include some if you wish for readability purpose.
Objective-C Data Types
In the Objective-C programming language, data types refer to an extensive system used for declaring variables or functions of different types. The type of a variable determines how much space it occupies in storage and how the bit pattern stored is interpreted.
The types in Objective-C can be classified as follows −
| Sr.No. | Types & Description |
|---|---|
| 1 | Basic Types − They are arithmetic types and consist of the two types: (a) integer types and (b) floating-point types. |
| 2 | Enumerated types − They are again arithmetic types and they are used to define variables that can only be assigned certain discrete integer values throughout the program. |
| 3 | The type void − The type specifier void indicates that no value is available. |
| 4 | Derived types − They include (a) Pointer types, (b) Array types, (c) Structure types, (d) Union types and (e) Function types. |
The array types and structure types are referred to collectively as the aggregate types. The type of a function specifies the type of the function's return value. We will see basic types in the following section whereas other types will be covered in the upcoming chapters.
Integer Types
Following table gives you details about standard integer types with its storage sizes and value ranges −
| Type | Storage size | Value range |
|---|---|---|
| char | 1 byte | -128 to 127 or 0 to 255 |
| unsigned char | 1 byte | 0 to 255 |
| signed char | 1 byte | -128 to 127 |
| int | 2 or 4 bytes | -32,768 to 32,767 or -2,147,483,648 to 2,147,483,647 |
| unsigned int | 2 or 4 bytes | 0 to 65,535 or 0 to 4,294,967,295 |
| short | 2 bytes | -32,768 to 32,767 |
| unsigned short | 2 bytes | 0 to 65,535 |
| long | 4 bytes | -2,147,483,648 to 2,147,483,647 |
| unsigned long | 4 bytes | 0 to 4,294,967,295 |
To get the exact size of a type or a variable on a particular platform, you can use the sizeof operator. The expression sizeof(type) yields the storage size of the object or type in bytes. Following is an example to get the size of int type on any machine −
#import <Foundation/Foundation.h>

int main() {
   NSLog(@"Storage size for int : %d \n", sizeof(int));
   return 0;
}
When you compile and execute the above program, it produces the following result on Linux −
2013-09-07 22:21:39.155 demo[1340] Storage size for int : 4
Floating-Point Types
Following table gives you details about standard float-point types with storage sizes and value ranges and their precision −
| Type | Storage size | Value range | Precision |
|---|---|---|---|
| float | 4 byte | 1.2E-38 to 3.4E+38 | 6 decimal places |
| double | 8 byte | 2.3E-308 to 1.7E+308 | 15 decimal places |
| long double | 10 byte | 3.4E-4932 to 1.1E+4932 | 19 decimal places |
The header file float.h defines macros that allow you to use these values and other details about the binary representation of real numbers in your programs. Following example will print storage space taken by a float type and its range values −
#import <Foundation/Foundation.h>

int main() {
   NSLog(@"Storage size for float : %d \n", sizeof(float));
   return 0;
}
When you compile and execute the above program, it produces the following result on Linux −
2013-09-07 22:22:21.729 demo[3927] Storage size for float : 4
The void Type
The void type specifies that no value is available. It is used in three kinds of situations −
| Sr.No. | Types and Description |
|---|---|
| 1 | Function returns as void
There are various functions in Objective-C which do not return value or you can say they return void. A function with no return value has the return type as void. For example, void exit (int status); |
| 2 | Function arguments as void
There are various functions in Objective-C which do not accept any parameter. A function with no parameter can accept as a void. For example, int rand(void); |
The void type may not be understood to you at this point, so let us proceed and we will cover these concepts in upcoming chapters.
Objective-C Variables
A variable is nothing but a name given to a storage area that our programs can manipulate. Each variable in Objective-C has a specific type, which determines the size and layout of the variable's memory; the range of values that can be stored within that memory; and the set of operations that can be applied to the variable.
The name of a variable can be composed of letters, digits, and the underscore character. It must begin with either a letter or an underscore. Upper and lowercase letters are distinct because Objective-C is case-sensitive. Based on the basic types explained in previous chapter, there will be the following basic variable types −
| Sr.No. | Type & Description |
|---|---|
| 1 | char Typically a single octet (one byte). This is an integer type. |
| 2 | int The most natural size of integer for the machine. |
| 3 | float A single-precision floating point value. |
| 4 | double A double-precision floating point value. |
| 5 | void Represents the absence of type. |
Objective-C programming language also allows to define various other types of variables, which we will cover in subsequent chapters like Enumeration, Pointer, Array, Structure, Union, etc. For this chapter, let us study only basic variable types.
Variable Definition in Objective-C
A variable definition means to tell the compiler where and how much to create the storage for the variable. A variable definition specifies a data type and contains a list of one or more variables of that type as follows −
type variable_list;
Here, type must be a valid Objective-C data type including char, w_char, int, float, double, bool or any user-defined object, etc., and variable_list may consist of one or more identifier names separated by commas. Some valid declarations are shown here −
int    i, j, k;
char   c, ch;
float  f, salary;
double d;
The line int i, j, k; both declares and defines the variables i, j and k; which instructs the compiler to create variables named i, j and k of type int.
Variables can be initialized (assigned an initial value) in their declaration. The initializer consists of an equal sign followed by a constant expression as follows −
type variable_name = value;
Some examples are −
extern int d = 3, f = 5;    // declaration of d and f.
int d = 3, f = 5;           // definition and initializing d and f.
byte z = 22;                // definition and initializes z.
char x = 'x';               // the variable x has the value 'x'.
For definition without an initializer: variables with static storage duration are implicitly initialized with NULL (all bytes have the value 0); the initial value of all other variables is undefined.
Variable Declaration in Objective-C
A variable declaration provides assurance to the compiler that there is one variable existing with the given type and name so that compiler proceed for further compilation without needing complete detail about the variable. A variable declaration has its meaning at the time of compilation only, compiler needs actual variable declaration at the time of linking of the program.
A variable declaration is useful when you are using multiple files and you define your variable in one of the files, which will be available at the time of linking of the program. You will use extern keyword to declare a variable at any place. Though you can declare a variable multiple times in your Objective-C program but it can be defined only once in a file, a function or a block of code.
Example
Try the following example, where variables have been declared at the top, but they have been defined and initialized inside the main function −
#import <Foundation/Foundation.h>

// Variable declaration:
extern int a, b;
extern int c;
extern float f;

int main () {
  /* variable definition: */
  int a, b;
  int c;
  float f;

  /* actual initialization */
  a = 10;
  b = 20;

  c = a + b;
  NSLog(@"value of c : %d \n", c);

  f = 70.0/3.0;
  NSLog(@"value of f : %f \n", f);

  return 0;
}
When the above code is compiled and executed, it produces the following result −
2013-09-07 22:43:31.695 demo[14019] value of c : 30
2013-09-07 22:43:31.695 demo[14019] value of f : 23.333334
Same concept applies on function declaration where you provide a function name at the time of its declaration and its actual definition can be given anywhere else. In the following example, it's explained using C function and as you know Objective-C supports C style functions also −
// function declaration
int func();

int main() {
   // function call
   int i = func();
}

// function definition
int func() {
   return 0;
}
Lvalues and Rvalues in Objective-C
There are two kinds of expressions in Objective-C −
lvalue − Expressions that refer to a memory location is called "lvalue" expression. An lvalue may appear as either the left-hand or right-hand side of an assignment.
rvalue − The term rvalue refers to a data value that is stored at some address in memory. An rvalue is an expression that cannot have a value assigned to it which means an rvalue may appear on the right- but not left-hand side of an assignment.
Variables are lvalues and so may appear on the left-hand side of an assignment. Numeric literals are rvalues and so may not be assigned and can not appear on the left-hand side. Following is a valid statement −
int g = 20;
But following is not a valid statement and would generate compile-time error −
10 = 20;
Objective-C Constants
The constants refer to fixed values that the program may not alter during its execution. These fixed values are also called literals.
Constants can be of any of the basic data types like an integer constant, a floating constant, a character constant, or a string literal. There are also enumeration constants as well.
The constants are treated just like regular variables except that their values cannot be modified after their definition.
Integer literals
An integer literal can be a decimal, octal, or hexadecimal constant. A prefix specifies the base or radix: 0x or 0X for hexadecimal, 0 for octal, and nothing for decimal.
An integer literal can also have a suffix that is a combination of U and L, for unsigned and long, respectively. The suffix can be uppercase or lowercase and can be in any order.
Here are some examples of integer literals −
212         /* Legal */
215u        /* Legal */
0xFeeL      /* Legal */
078         /* Illegal: 8 is not an octal digit */
032UU       /* Illegal: cannot repeat a suffix */
Following are other examples of various types of Integer literals −
85         /* decimal */
0213       /* octal */
0x4b       /* hexadecimal */
30         /* int */
30u        /* unsigned int */
30l        /* long */
30ul       /* unsigned long */
Floating-point literals
A floating-point literal has an integer part, a decimal point, a fractional part, and an exponent part. You can represent floating point literals either in decimal form or exponential form.
While representing using decimal form, you must include the decimal point, the exponent, or both and while representing using exponential form, you must include the integer part, the fractional part, or both. The signed exponent is introduced by e or E.
Here are some examples of floating-point literals −
3.14159       /* Legal */
314159E-5L    /* Legal */
510E          /* Illegal: incomplete exponent */
210f          /* Illegal: no decimal or exponent */
.e55          /* Illegal: missing integer or fraction */
Character constants
Character literals are enclosed in single quotes e.g., 'x' and can be stored in a simple variable of char type.
A character literal can be a plain character (e.g., 'x'), an escape sequence (e.g., '\t'), or a universal character (e.g., '\u02C0').
There are certain characters in C when they are proceeded by a backslash they will have special meaning and they are used to represent like newline (\n) or tab (\t). Here, you have a list of some of such escape sequence codes −
| Escape sequence | Meaning |
|---|---|
| \\ | \ character |
| \' | ' character |
| \" | " character |
| \? | ? character |
| \a | Alert or bell |
| \b | Backspace |
| \f | Form feed |
| \n | Newline |
| \r | Carriage return |
| \t | Horizontal tab |
| \v | Vertical tab |
| \ooo | Octal number of one to three digits |
| \xhh . . . | Hexadecimal number of one or more digits |
Following is the example to show few escape sequence characters −
#import <Foundation/Foundation.h>

int main() {
   NSLog(@"Hello\tWorld\n\n");
   return 0;
}
When the above code is compiled and executed, it produces the following result −
2013-09-07 22:17:17.923 demo[17871] Hello World
String literals
String literals or constants are enclosed in double quotes "". A string contains characters that are similar to character literals: plain characters, escape sequences, and universal characters.
You can break a long line into multiple lines using string literals and separating them using whitespaces.
Here are some examples of string literals. All the three forms are identical strings.
"hello, dear"

"hello, \

dear"

"hello, " "d" "ear"
Defining Constants
There are two simple ways in C to define constants −
Using #define preprocessor.
Using const keyword.
The #define Preprocessor
Following is the form to use #define preprocessor to define a constant −
#define identifier value
Following example explains it in detail −
#import <Foundation/Foundation.h>

#define LENGTH 10
#define WIDTH  5
#define NEWLINE '\n'

int main() {
   int area;
   area = LENGTH * WIDTH;
   NSLog(@"value of area : %d", area);
   NSLog(@"%c", NEWLINE);

   return 0;
}
When the above code is compiled and executed, it produces the following result −
2013-09-07 22:18:16.637 demo[21460] value of area : 50
2013-09-07 22:18:16.638 demo[21460]
The const Keyword
You can use const prefix to declare constants with a specific type as follows −
const type variable = value;
Following example explains it in detail −
#import <Foundation/Foundation.h>

int main() {
   const int  LENGTH = 10;
   const int  WIDTH  = 5;
   const char NEWLINE = '\n';
   int area;

   area = LENGTH * WIDTH;
   NSLog(@"value of area : %d", area);
   NSLog(@"%c", NEWLINE);

   return 0;
}
When the above code is compiled and executed, it produces the following result −
2013-09-07 22:19:24.780 demo[25621] value of area : 50
2013-09-07 22:19:24.781 demo[25621]
Note that it is a good programming practice to define constants in CAPITALS.
Objective-C Operators
An operator is a symbol that tells the compiler to perform specific mathematical or logical manipulations. Objective-C language is rich in built-in operators and provides following types of operators −
- Arithmetic Operators
- Relational Operators
- Logical Operators
- Bitwise Operators
- Assignment Operators
- Misc Operators
This tutorial will explain the arithmetic, relational, logical, bitwise, assignment and other operators one by one.
Arithmetic Operators
Following table shows all the arithmetic operators supported by Objective-C language. Assume variable A holds 10 and variable B holds 20, then −
| Operator | Description | Example |
|---|---|---|
| + | Adds two operands | A + B will give 30 |
| - | Subtracts second operand from the first | A - B will give -10 |
| * | Multiplies both operands | A * B will give 200 |
| / | Divides numerator by denominator | B / A will give 2 |
| % | Modulus Operator and remainder of after an integer division | B % A will give 0 |
| ++ | Increment operator increases integer value by one | A++ will give 11 |
| -- | Decrement operator decreases integer value by one | A-- will give 9 |
Relational Operators
Following table shows all the relational operators supported by Objective-C language. Assume variable A holds 10 and variable B holds 20, then −
| Operator | Description | Example |
|---|---|---|
| == | Checks if the values of two operands are equal or not; if yes, then condition becomes true. | (A == B) is not true. |
| != | Checks if the values of two operands are equal or not; if values are not equal, then condition becomes true. | (A != B) is true. |
| > | Checks if the value of left operand is greater than the value of right operand; if yes, then condition becomes true. | (A > B) is not true. |
| < | Checks if the value of left operand is less than the value of right operand; if yes, then condition becomes true. | (A < B) is true. |
| >= | Checks if the value of left operand is greater than or equal to the value of right operand; if yes, then condition becomes true. | (A >= B) is not true. |
| <= | Checks if the value of left operand is less than or equal to the value of right operand; if yes, then condition becomes true. | (A <= B) is true. |
Logical Operators
Following table shows all the logical operators supported by Objective-C language. Assume variable A holds 1 and variable B holds 0, then −
| Operator | Description | Example |
|---|---|---|
| && | Called Logical AND operator. If both the operands are non zero then condition becomes true. | (A && B) is false. |
| || | Called Logical OR Operator. If any of the two operands is non zero then condition becomes true. | (A || B) is true. |
| ! | Called Logical NOT Operator. Use to reverses the logical state of its operand. If a condition is true, then Logical NOT operator will make false. | !(A && B) is true. |
Bitwise Operators
Bitwise operator works on bits and perform bit by bit operation. The truth tables for &, |, and ^ are as follows −
| p | q | p & q | p | q | p ^ q |
|---|---|---|---|---|
| 0 | 0 | 0 | 0 | 0 |
| 0 | 1 | 0 | 1 | 1 |
| 1 | 1 | 1 | 1 | 0 |
| 1 | 0 | 0 | 1 | 1 |
Assume if A = 60; and B = 13; now in binary format they will be as follows −
A = 0011 1100
B = 0000 1101
-----------------
A&B = 0000 1100
A|B = 0011 1101
A^B = 0011 0001
~A = 1100 0011
The Bitwise operators supported by Objective-C language are listed in the following table. Assume variable A holds 60 and variable B holds 13 then −
| Operator | Description | Example |
|---|---|---|
| & | Binary AND Operator copies a bit to the result if it exists in both operands. | (A & B) will give 12, which is 0000 1100 |
| | | Binary OR Operator copies a bit if it exists in either operand. | (A | B) will give 61, which is 0011 1101 |
| ^ | Binary XOR Operator copies the bit if it is set in one operand but not both. | (A ^ B) will give 49, which is 0011 0001 |
| ~ | Binary Ones Complement Operator is unary and has the effect of 'flipping' bits. | (~A ) will give -61, which is 1100 0011 in 2's complement form. |
| << | Binary Left Shift Operator. The left operands value is moved left by the number of bits specified by the right operand. | A << 2 will give 240, which is 1111 0000 |
| >> | Binary Right Shift Operator. The left operands value is moved right by the number of bits specified by the right operand. | A >> 2 will give 15, which is 0000 1111 |
Assignment Operators
There are following assignment operators supported by Objective-C language −
| Operator | Description | Example |
|---|---|---|
| = | Simple assignment operator, Assigns values from right side operands to left side operand | C = A + B will assign value of A + B into C |
| += | Add AND assignment operator, It adds right operand to the left operand and assigns the result to left operand | C += A is equivalent to C = C + A |
| -= | Subtract AND assignment operator, It subtracts right operand from the left operand and assigns the result to left operand | C -= A is equivalent to C = C - A |
| *= | Multiply AND assignment operator, It multiplies right operand with the left operand and assigns the result to left operand | C *= A is equivalent to C = C * A |
| /= | Divide AND assignment operator, It divides left operand with the right operand and assigns the result to left operand | C /= A is equivalent to C = C / A |
| %= | Modulus AND assignment operator, It takes modulus using two operands and assigns the result to left operand | C %= A is equivalent to C = C % A |
| <<= | Left shift AND assignment operator | C <<= 2 is same as C = C << 2 |
| >>= | Right shift AND assignment operator | C >>= 2 is same as C = C >> 2 |
| &= | Bitwise AND assignment operator | C &= 2 is same as C = C & 2 |
| ^= | bitwise exclusive OR and assignment operator | C ^= 2 is same as C = C ^ 2 |
| |= | bitwise inclusive OR and assignment operator | C |= 2 is same as C = C | 2 |
Misc Operators ↦ sizeof & ternary
There are few other important operators including sizeof and ? : supported by Objective-C Language.
| Operator | Description | Example |
|---|---|---|
| sizeof() | Returns the size of an variable. | sizeof(a), where a is integer, will return 4. |
| & | Returns the address of an variable. | &a; will give actual address of the variable. |
| * | Pointer to a variable. | *a; will pointer to a variable. |
| ? : | Conditional Expression | If Condition is true ? Then value X : Otherwise value Y |
Operators Precedence in Objective-C
Operator precedence determines the grouping of terms in an expression. This affects how an expression is evaluated. Certain operators have higher precedence than others; for example, the multiplication operator has higher precedence than the addition operator −
For example, x = 7 + 3 * 2; here, x is assigned 13, not 20 because operator * has higher precedence than +, so it first gets multiplied with 3*2 and then adds into 7.
Here, operators with the highest precedence appear at the top of the table, those with the lowest appear at the bottom. Within an expression, higher precedence operators will be evaluated first.
| Category | Operator | Associativity |
|---|---|---|
| Postfix | () [] -> . ++ - - | Left to right |
| Unary | + - ! ~ ++ - - (type)* & sizeof | Right to left |
| Multiplicative | * / % | Left to right |
| Additive | + - | Left to right |
| Shift | << >> | Left to right |
| Relational | < <= > >= | Left to right |
| Equality | == != | Left to right |
| Bitwise XOR | ^ | Left to right |
| Bitwise OR | | | Left to right |
| Logical AND | && | Left to right |
| Logical OR | || | Left to right |
| Conditional | ?: | Right to left |
| Assignment | = += -= *= /= %=>>= <<= &= ^= |= | Right to left |
| Comma | , | Left to right |
Objective-C Loops
There may be a situation, when you need to execute a block of code several number of times. In general, statements are executed sequentially: The first statement in a function is executed first, followed by the second, and so on.
Programming languages provide various control structures that allow for more complicated execution paths.
A loop statement allows us to execute a statement or group of statements multiple times and following is the general form of a loop statement in most of the programming languages −
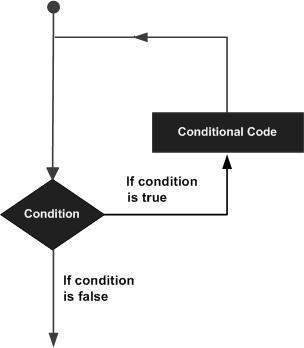
Objective-C programming language provides the following types of loop to handle looping requirements. Click the following links to check their details.
| Sr.No. | Loop Type & Description |
|---|---|
| 1 | while loop
Repeats a statement or group of statements while a given condition is true. It tests the condition before executing the loop body. |
| 2 | for loop
Execute a sequence of statements multiple times and abbreviates the code that manages the loop variable. |
| 3 | do...while loop
Like a while statement, except that it tests the condition at the end of the loop body. |
| 4 | nested loops
You can use one or more loops inside any another while, for or do..while loop. |
Loop Control Statements
Loop control statements change execution from its normal sequence. When execution leaves a scope, all automatic objects that were created in that scope are destroyed.
Objective-C supports the following control statements. Click the following links to check their details.
| Sr.No. | Control Statement & Description |
|---|---|
| 1 | break statement
Terminates the loop or switch statement and transfers execution to the statement immediately following the loop or switch. |
| 2 | continue statement
Causes the loop to skip the remainder of its body and immediately retest its condition prior to reiterating. |
The Infinite Loop
A loop becomes infinite loop if a condition never becomes false. The for loop is traditionally used for this purpose. Since none of the three expressions that form the for loop are required, you can make an endless loop by leaving the conditional expression empty.
#import <Foundation/Foundation.h>

int main () {

   for( ; ; ) {
      NSLog(@"This loop will run forever.\n");
   }

   return 0;
}
When the conditional expression is absent, it is assumed to be true. You may have an initialization and increment expression, but Objective-C programmers more commonly use the for(;;) construct to signify an infinite loop.
Objective-C Decision Making
Decision making structures require that the programmer specify one or more conditions to be evaluated or tested by the program, along with a statement or statements to be executed if the condition is determined to be true, and optionally, other statements to be executed if the condition is determined to be false.
Following is the general form of a typical decision making structure found in most of the programming languages −
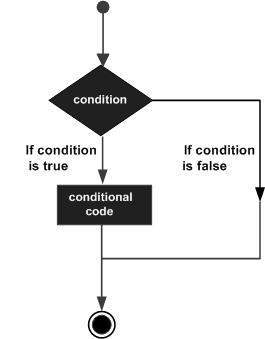
Objective-C programming language assumes any non-zero and non-null values as true, and if it is either zero or null, then it is assumed as false value.
Objective-C programming language provides following types of decision making statements. Click the following links to check their details −
| Sr.No. | Statement & Description |
|---|---|
| 1 | if statement
An if statement consists of a boolean expression followed by one or more statements. |
| 2 | if...else statement
An if statement can be followed by an optional else statement, which executes when the boolean expression is false. |
| 3 | nested if statements
You can use one if or else if statement inside another if or else if statement(s). |
| 4 | switch statement
A switch statement allows a variable to be tested for equality against a list of values. |
| 5 | nested switch statements
You can use one switch statement inside another switch statement(s). |
The ? : Operator
We have covered conditional operator ? : in previous chapter which can be used to replace if...else statements. It has the following general form −
Exp1 ? Exp2 : Exp3;
Where Exp1, Exp2, and Exp3 are expressions. Notice the use and placement of the colon.
The value of a ? expression is determined like this: Exp1 is evaluated. If it is true, then Exp2 is evaluated and becomes the value of the entire ? expression. If Exp1 is false, then Exp3 is evaluated and its value becomes the value of the expression.
Objective-C Functions
A function is a group of statements that together perform a task. Every Objective-C program has one C function, which is main(), and all of the most trivial programs can define additional functions.
You can divide up your code into separate functions. How you divide up your code among different functions is up to you, but logically the division usually is so each function performs a specific task.
A function declaration tells the compiler about a function's name, return type, and parameters. A function definition provides the actual body of the function.
Basically in Objective-C, we call the function as method.
The Objective-C foundation framework provides numerous built-in methods that your program can call. For example, method appendString() to append string to another string.
A method is known with various names like a function or a sub-routine or a procedure, etc.
Defining a Method
The general form of a method definition in Objective-C programming language is as follows −
- (return_type) method_name:( argumentType1 )argumentName1
joiningArgument2:( argumentType2 )argumentName2 ...
joiningArgumentn:( argumentTypen )argumentNamen {
   body of the function
}
A method definition in Objective-C programming language consists of a method header and a method body. Here are all the parts of a method −
Return Type − A method may return a value. The return_type is the data type of the value the function returns. Some methods perform the desired operations without returning a value. In this case, the return_type is the keyword void.
Method Name − This is the actual name of the method. The method name and the parameter list together constitute the method signature.
Arguments − A argument is like a placeholder. When a function is invoked, you pass a value to the argument. This value is referred to as actual parameter or argument. The parameter list refers to the type, order, and number of the arguments of a method. Arguments are optional; that is, a method may contain no argument.
Joining Argument − A joining argument is to make it easier to read and to make it clear while calling it.
Method Body − The method body contains a collection of statements that define what the method does.
Example
Following is the source code for a method called max(). This method takes two parameters num1 and num2 and returns the maximum between the two −
/* function returning the max between two numbers */
- (int) max:(int) num1 secondNumber:(int) num2 {

   /* local variable declaration */
   int result;

   if (num1 > num2) {
      result = num1;
   } else {
      result = num2;
   }

   return result;
}
Method Declarations
A method declaration tells the compiler about a function name and how to call the method. The actual body of the function can be defined separately.
A method declaration has the following parts −
- (return_type) function_name:( argumentType1 )argumentName1
joiningArgument2:( argumentType2 )argumentName2 ...
joiningArgumentn:( argumentTypen )argumentNamen;
For the above-defined function max(), following is the method declaration −
-(int) max:(int)num1 andNum2:(int)num2;
Method declaration is required when you define a method in one source file and you call that method in another file. In such case you should declare the function at the top of the file calling the function.
Calling a method
While creating a Objective-C method, you give a definition of what the function has to do. To use a method, you will have to call that function to perform the defined task.
When a program calls a function, program control is transferred to the called method. A called method performs defined task, and when its return statement is executed or when its function-ending closing brace is reached, it returns program control back to the main program.
To call a method, you simply need to pass the required parameters along with method name, and if method returns a value, then you can store returned value. For example −
#import <Foundation/Foundation.h>

@interface SampleClass:NSObject
/* method declaration */
- (int)max:(int)num1 andNum2:(int)num2;
@end

@implementation SampleClass

/* method returning the max between two numbers */
- (int)max:(int)num1 andNum2:(int)num2 {

   /* local variable declaration */
   int result;

   if (num1 > num2) {
      result = num1;
   } else {
      result = num2;
   }

   return result;
}

@end

int main () {

   /* local variable definition */
   int a = 100;
   int b = 200;
   int ret;

   SampleClass *sampleClass = [[SampleClass alloc]init];

   /* calling a method to get max value */
   ret = [sampleClass max:a andNum2:b];

   NSLog(@"Max value is : %d\n", ret );
   return 0;
}
I kept max() function along with main() function and complied the source code. While running final executable, it would produce the following result −
2013-09-07 22:28:45.912 demo[26080] Max value is : 200
Function Arguments
If a function is to use arguments, it must declare variables that accept the values of the arguments. These variables are called the formal parameters of the function.
The formal parameters behave like other local variables inside the function and are created upon entry into the function and destroyed upon exit.
While calling a function, there are two ways that arguments can be passed to a function −
| Sr.No. | Call Type & Description |
|---|---|
| 1 | Call by value
This method copies the actual value of an argument into the formal parameter of the function. In this case, changes made to the parameter inside the function have no effect on the argument. |
| 2 | Call by reference
This method copies the address of an argument into the formal parameter. Inside the function, the address is used to access the actual argument used in the call. This means that changes made to the parameter affect the argument. |
By default, Objective-C uses call by value to pass arguments. In general, this means that code within a function cannot alter the arguments used to call the function, and above-mentioned example while calling max() function used the same method.
Objective-C Blocks
An Objective-C class defines an object that combines data with related behavior. Sometimes, it makes sense just to represent a single task or unit of behavior, rather than a collection of methods.
Blocks are a language-level feature added to C, Objective-C and C++ which allow you to create distinct segments of code that can be passed around to methods or functions as if they were values. Blocks are Objective-C objects which means they can be added to collections like NSArray or NSDictionary. They also have the ability to capture values from the enclosing scope, making them similar to closures or lambdas in other programming languages
Simple Block declaration syntax
returntype (^blockName)(argumentType);
Simple block implementation
returntype (^blockName)(argumentType)= ^{
};
Here is a simple example
void (^simpleBlock)(void) = ^{
   NSLog(@"This is a block");
};
We can invoke the block using
simpleBlock();
Blocks Take Arguments and Return Values
Blocks can also take arguments and return values just like methods and functions.
Here is a simple example to implement and invoke a block with arguments and return values.
double (^multiplyTwoValues)(double, double) =
   ^(double firstValue, double secondValue) {
      return firstValue * secondValue;
   };

double result = multiplyTwoValues(2,4);
NSLog(@"The result is %f", result);
Blocks using type definitions
Here is a simple example using typedef in block. Please note this sample doesn't work on the online compiler for now. Use XCode to run the same.
#import <Foundation/Foundation.h>

typedef void (^CompletionBlock)();
@interface SampleClass:NSObject
- (void)performActionWithCompletion:(CompletionBlock)completionBlock;
@end

@implementation SampleClass

- (void)performActionWithCompletion:(CompletionBlock)completionBlock {

   NSLog(@"Action Performed");
   completionBlock();
}

@end

int main() {

   /* my first program in Objective-C */
   SampleClass *sampleClass = [[SampleClass alloc]init];
   [sampleClass performActionWithCompletion:^{
      NSLog(@"Completion is called to intimate action is performed.");
   }];

   return 0;
}
Let us compile and execute it, it will produce the following result −
2013-09-10 08:13:57.155 demo[284:303] Action Performed
2013-09-10 08:13:57.157 demo[284:303] Completion is called to intimate action is performed.
Blocks are used more in iOS applications and Mac OS X. So its more important to understand the usage of blocks.
Objective-C Numbers
In Objective-C programming language, in order to save the basic data types like int, float, bool in object form,
Objective-C provides a range of methods to work with NSNumber and important ones are listed in following table.
| Sr.No. | Method & Description |
|---|---|
| 1 | + (NSNumber *)numberWithBool:(BOOL)value Creates and returns an NSNumber object containing a given value, treating it as a BOOL. |
| 2 | + (NSNumber *)numberWithChar:(char)value Creates and returns an NSNumber object containing a given value, treating it as a signed char. |
| 3 | + (NSNumber *)numberWithDouble:(double)value Creates and returns an NSNumber object containing a given value, treating it as a double. |
| 4 | + (NSNumber *)numberWithFloat:(float)value Creates and returns an NSNumber object containing a given value, treating it as a float. |
| 5 | + (NSNumber *)numberWithInt:(int)value Creates and returns an NSNumber object containing a given value, treating it as a signed int. |
| 6 | + (NSNumber *)numberWithInteger:(NSInteger)value Creates and returns an NSNumber object containing a given value, treating it as an NSInteger. |
| 7 | - (BOOL)boolValue Returns the receiver's value as a BOOL. |
| 8 | - (char)charValue Returns the receiver's value as a char. |
| 9 | - (double)doubleValue Returns the receiver's value as a double. |
| 10 | - (float)floatValue Returns the receiver's value as a float. |
| 11 | - (NSInteger)integerValue Returns the receiver's value as an NSInteger. |
| 12 | - (int)intValue Returns the receiver's value as an int. |
| 13 | - (NSString *)stringValue Returns the receiver's value as a human-readable string. |
Here is a simple example for using NSNumber which multiplies two numbers and returns the product.
#import <Foundation/Foundation.h>

@interface SampleClass:NSObject
- (NSNumber *)multiplyA:(NSNumber *)a withB:(NSNumber *)b;
@end

@implementation SampleClass

- (NSNumber *)multiplyA:(NSNumber *)a withB:(NSNumber *)b {
   float number1 = [a floatValue];
   float number2 = [b floatValue];
   float product = number1 * number2;
   NSNumber *result = [NSNumber numberWithFloat:product];
   return result;
}

@end

int main() {
   NSAutoreleasePool * pool = [[NSAutoreleasePool alloc] init];

   SampleClass *sampleClass = [[SampleClass alloc]init];
   NSNumber *a = [NSNumber numberWithFloat:10.5];
   NSNumber *b = [NSNumber numberWithFloat:10.0];
   NSNumber *result = [sampleClass multiplyA:a withB:b];
   NSString *resultString = [result stringValue];
   NSLog(@"The product is %@",resultString);

   [pool drain];
   return 0;
}
Now when we compile and run the program, we will get the following result.
2013-09-14 18:53:40.575 demo[16787] The product is 105
Objective-C Arrays
Objective-C programming language provides a data structure called the array, which can store a fixed-size sequential collection of elements of the same type. An array is used to store a collection of data, but it is often more useful to think of an array as a collection of variables of the same type.
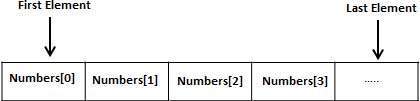
Instead of declaring individual variables, such as number0, number1, ..., and number99, you declare one array variable such as numbers and use numbers[0], numbers[1], and ..., numbers[99] to represent individual variables. A specific element in an array is accessed by an index.
All arrays consist of contiguous memory locations. The lowest address corresponds to the first element and the highest address to the last element.
Declaring Arrays
To declare an array in Objective-C, a programmer specifies the type of the elements and the number of elements required by an array as follows −
type arrayName [ arraySize ];
This is called a single-dimensional array. The arraySize must be an integer constant greater than zero and type can be any valid Objective-C data type. For example, to declare a 10-element array called balance of type double, use this statement −
double balance[10];
Now, balance is a variable array, which is sufficient to hold up to 10 double numbers.
Initializing Arrays
You can initialize an array in Objective-C either one by one or using a single statement as follows −
double balance[5] = {1000.0, 2.0, 3.4, 17.0, 50.0};
The number of values between braces { } can not be larger than the number of elements that we declare for the array between square brackets [ ]. Following is an example to assign a single element of the array −
If you omit the size of the array, an array just big enough to hold the initialization is created. Therefore, if you write −
double balance[] = {1000.0, 2.0, 3.4, 17.0, 50.0};
You will create exactly the same array as you did in the previous example.
balance[4] = 50.0;
The above statement assigns element number 5th in the array a value of 50.0. Array with 4th index will be 5th, i.e., last element because all arrays have 0 as the index of their first element which is also called base index. Following is the pictorial representation of the same array we discussed above −

Accessing Array Elements
An element is accessed by indexing the array name. This is done by placing the index of the element within square brackets after the name of the array. For example −
double salary = balance[9];
The above statement will take 10th element from the array and assign the value to salary variable. Following is an example, which will use all the above mentioned three concepts viz. declaration, assignment and accessing arrays −
#import <Foundation/Foundation.h>

int main () {
   int n[ 10 ];   /* n is an array of 10 integers */
   int i,j;

   /* initialize elements of array n to 0 */
   for ( i = 0; i < 10; i++ ) {
      n[ i ] = i + 100;    /* set element at location i to i + 100 */
   }

   /* output each array element's value */
   for (j = 0; j < 10; j++ ) {
      NSLog(@"Element[%d] = %d\n", j, n[j] );
   }

   return 0;
}
When the above code is compiled and executed, it produces the following result −
2013-09-14 01:24:06.669 demo[16508] Element[0] = 100
2013-09-14 01:24:06.669 demo[16508] Element[1] = 101
2013-09-14 01:24:06.669 demo[16508] Element[2] = 102
2013-09-14 01:24:06.669 demo[16508] Element[3] = 103
2013-09-14 01:24:06.669 demo[16508] Element[4] = 104
2013-09-14 01:24:06.669 demo[16508] Element[5] = 105
2013-09-14 01:24:06.669 demo[16508] Element[6] = 106
2013-09-14 01:24:06.669 demo[16508] Element[7] = 107
2013-09-14 01:24:06.669 demo[16508] Element[8] = 108
2013-09-14 01:24:06.669 demo[16508] Element[9] = 109
Objective-C Arrays in Detail
Arrays are important to Objective-C and need lots of more details. There are following few important concepts related to array which should be clear to a Objective-C programmer −
| Sr.No. | Concept & Description |
|---|---|
| 1 | Multi-dimensional arrays
Objective-C supports multidimensional arrays. The simplest form of the multidimensional array is the two-dimensional array. |
| 2 | Passing arrays to functions
You can pass to the function a pointer to an array by specifying the array's name without an index. |
| 3 | Return array from a function
Objective-C allows a function to return an array. |
| 4 | Pointer to an array
You can generate a pointer to the first element of an array by simply specifying the array name, without any index. |
Objective-C Pointers
Pointers in Objective-C are easy and fun to learn. Some Objective-C programming tasks are performed more easily with pointers, and other tasks, such as dynamic memory allocation, cannot be performed without using pointers. So it becomes necessary to learn pointers to become a perfect Objective-C programmer. Let's start learning them in simple and easy steps.
As you know, every variable is a memory location and every memory location has its address defined which can be accessed using ampersand (&) operator, which denotes an address in memory. Consider the following example, which will print the address of the variables defined −
#import <Foundation/Foundation.h>

int main () {
   int  var1;
   char var2[10];

   NSLog(@"Address of var1 variable: %x\n", &var1 );
   NSLog(@"Address of var2 variable: %x\n", &var2 );

   return 0;
}
When the above code is compiled and executed, it produces the result something as follows −
2013-09-13 03:18:45.727 demo[17552] Address of var1 variable: 1c0843fc
2013-09-13 03:18:45.728 demo[17552] Address of var2 variable: 1c0843f0
So, you understood what is memory address and how to access it, so base of the concept is over. Now let us see what is a pointer.
What Are Pointers?
A pointer is a variable whose value is the address of another variable, i.e., direct address of the memory location. Like any variable or constant, you must declare a pointer before you can use it to store any variable address. The general form of a pointer variable declaration is −
type *var-name;
Here, type is the pointer's base type; it must be a valid Objective-C data type and var-name is the name of the pointer variable. The asterisk * you used to declare a pointer is the same asterisk that you use for multiplication. However, in this statement the asterisk is being used to designate a variable as a pointer. Following are the valid pointer declaration −
int    *ip;    /* pointer to an integer */
double *dp;    /* pointer to a double */
float  *fp;    /* pointer to a float */
char   *ch     /* pointer to a character */
The actual data type of the value of all pointers, whether integer, float, character, or otherwise, is the same, a long hexadecimal number that represents a memory address. The only difference between pointers of different data types is the data type of the variable or constant that the pointer points to.
How to use Pointers?
There are few important operations, which we will do with the help of pointers very frequently. (a) we define a pointer variable, (b) assign the address of a variable to a pointer, and (c) finally access the value at the address available in the pointer variable. This is done by using unary operator * that returns the value of the variable located at the address specified by its operand. Following example makes use of these operations −
#import <Foundation/Foundation.h>

int main () {
   int  var = 20;    /* actual variable declaration */
   int  *ip;         /* pointer variable declaration */
   ip = &var;       /* store address of var in pointer variable*/

   NSLog(@"Address of var variable: %x\n", &var  );

   /* address stored in pointer variable */
   NSLog(@"Address stored in ip variable: %x\n", ip );

   /* access the value using the pointer */
   NSLog(@"Value of *ip variable: %d\n", *ip );

   return 0;
}
When the above code is compiled and executed, it produces the result something as follows −
2013-09-13 03:20:21.873 demo[24179] Address of var variable: 337ed41c
2013-09-13 03:20:21.873 demo[24179] Address stored in ip variable: 337ed41c
2013-09-13 03:20:21.874 demo[24179] Value of *ip variable: 20
NULL Pointers in Objective-C
It is always a good practice to assign a NULL value to a pointer variable in case you do not have exact address to be assigned. This is done at the time of variable declaration. A pointer that is assigned NULL is called a null pointer.
The NULL pointer is a constant with a value of zero defined in several standard libraries. Consider the following program −
#import <Foundation/Foundation.h>

int main () {
   int  *ptr = NULL;
   NSLog(@"The value of ptr is : %x\n", ptr  );
   return 0;
}
When the above code is compiled and executed, it produces the following result −
2013-09-13 03:21:19.447 demo[28027] The value of ptr is : 0
On most of the operating systems, programs are not permitted to access memory at address 0 because that memory is reserved by the operating system. However, the memory address 0 has special significance; it signals that the pointer is not intended to point to an accessible memory location. But by convention, if a pointer contains the null (zero) value, it is assumed to point to nothing.
To check for a null pointer, you can use an if statement as follows −
if(ptr)     /* succeeds if p is not null */
if(!ptr)    /* succeeds if p is null */
Objective-C Pointers in Detail
Pointers have many but easy concepts and they are very important to Objective-C programming. There are following few important pointer concepts, which should be clear to a Objective-C programmer −
| Sr.No. | Concept & Description |
|---|---|
| 1 | Objective-C - Pointer arithmetic
There are four arithmetic operators that can be used on pointers: ++, --, +, - |
| 2 | Objective-C - Array of pointers
You can define arrays to hold a number of pointers. |
| 3 | Objective-C - Pointer to pointer
Objective-C allows you to have pointer on a pointer and so on. |
| 4 | Passing pointers to functions in Objective-C
Passing an argument by reference or by address both enable the passed argument to be changed in the calling function by the called function. |
| 5 | Return pointer from functions in Objective-C
Objective-C allows a function to return a pointer to local variable, static variable and dynamically allocated memory as well. |
Objective-C Strings
The string in Objective-C programming language is represented using NSString and its subclass NSMutableString provides several ways for creating string objects. The simplest way to create a string object is to use the Objective-C @"..." construct −
NSString *greeting = @"Hello";
A simple example for creating and printing a string is shown below.
#import <Foundation/Foundation.h>

int main () {
   NSString *greeting = @"Hello";
   NSLog(@"Greeting message: %@\n", greeting );

   return 0;
}
When the above code is compiled and executed, it produces result something as follows −
2013-09-11 01:21:39.922 demo[23926] Greeting message: Hello
Objective-C supports a wide range of methods for manipulate strings −
| Sr.No. | Method & Purpose |
|---|---|
| 1 | - (NSString *)capitalizedString; Returns a capitalized representation of the receiver. |
| 2 | - (unichar)characterAtIndex:(NSUInteger)index; Returns the character at a given array position. |
| 3 | - (double)doubleValue; Returns the floating-point value of the receiver’s text as a double. |
| 4 | - (float)floatValue; Returns the floating-point value of the receiver’s text as a float. |
| 5 | - (BOOL)hasPrefix:(NSString *)aString; Returns a Boolean value that indicates whether a given string matches the beginning characters of the receiver. |
| 6 | - (BOOL)hasSuffix:(NSString *)aString; Returns a Boolean value that indicates whether a given string matches the ending characters of the receiver. |
| 7 | - (id)initWithFormat:(NSString *)format ...; Returns an NSString object initialized by using a given format string as a template into which the remaining argument values are substituted. |
| 8 | - (NSInteger)integerValue; Returns the NSInteger value of the receiver’s text. |
| 9 | - (BOOL)isEqualToString:(NSString *)aString; Returns a Boolean value that indicates whether a given string is equal to the receiver using a literal Unicode-based comparison. |
| 10 | - (NSUInteger)length; Returns the number of Unicode characters in the receiver. |
| 11 | - (NSString *)lowercaseString; Returns lowercased representation of the receiver. |
| 12 | - (NSRange)rangeOfString:(NSString *)aString; Finds and returns the range of the first occurrence of a given string within the receiver. |
| 13 | - (NSString *)stringByAppendingFormat:(NSString *)format ...; Returns a string made by appending to the receiver a string constructed from a given format string and the following arguments. |
| 14 | - (NSString *)stringByTrimmingCharactersInSet:(NSCharacterSet *)set; Returns a new string made by removing from both ends of the receiver characters contained in a given character set. |
| 15 | - (NSString *)substringFromIndex:(NSUInteger)anIndex; Returns a new string containing the characters of the receiver from the one at a given index to the end. |
Following example makes use of few of the above-mentioned functions −
#import <Foundation/Foundation.h>

int main () {
   NSString *str1 = @"Hello";
   NSString *str2 = @"World";
   NSString *str3;
   int  len ;

   NSAutoreleasePool * pool = [[NSAutoreleasePool alloc] init];

   /* uppercase string */
   str3 = [str2 uppercaseString];
   NSLog(@"Uppercase String :  %@\n", str3 );

   /* concatenates str1 and str2 */
   str3 = [str1 stringByAppendingFormat:@"World"];
   NSLog(@"Concatenated string:   %@\n", str3 );

   /* total length of str3 after concatenation */
   len = [str3 length];
   NSLog(@"Length of Str3 :  %d\n", len );

   /* InitWithFormat */
   str3 = [[NSString alloc] initWithFormat:@"%@ %@",str1,str2];
   NSLog(@"Using initWithFormat:   %@\n", str3 );
   [pool drain];

   return 0;
}
When the above code is compiled and executed, it produces result something as follows −
2013-09-11 01:15:45.069 demo[30378] Uppercase String :  WORLD
2013-09-11 01:15:45.070 demo[30378] Concatenated string:   HelloWorld
2013-09-11 01:15:45.070 demo[30378] Length of Str3 :  10
2013-09-11 01:15:45.070 demo[30378] Using initWithFormat:   Hello World
You can find a complete list of Objective-C NSString related methods in NSString Class Reference.
Objective-C Structures
Objective-C arrays allow you to define type of variables that can hold several data items of the same kind but structure is another user-defined data type available in Objective-C programming which allows you to combine data items of different kinds.
Structures are used to represent a record, Suppose you want to keep track of your books in a library. You might want to track the following attributes about each book −
- Title
- Author
- Subject
- Book ID
Defining a Structure
To define a structure, you must use the struct statement. The struct statement defines a new data type, with more than one member for your program. The format of the struct statement is this −
struct [structure tag] {
   member definition;
   member definition;
   ...
   member definition;
} [one or more structure variables];
The structure tag is optional and each member definition is a normal variable definition, such as int i; or float f; or any other valid variable definition. At the end of the structure's definition, before the final semicolon, you can specify one or more structure variables but it is optional. Here is the way you would declare the Book structure −
struct Books {
   NSString *title;
   NSString *author;
   NSString *subject;
   int   book_id;
} book;
Accessing Structure Members
To access any member of a structure, we use the member access operator (.). The member access operator is coded as a period between the structure variable name and the structure member that we wish to access. You would use struct keyword to define variables of structure type. Following is the example to explain usage of structure −
#import <Foundation/Foundation.h>

struct Books {
   NSString *title;
   NSString *author;
   NSString *subject;
   int   book_id;
};

int main() {
   struct Books Book1;        /* Declare Book1 of type Book */
   struct Books Book2;        /* Declare Book2 of type Book */

   /* book 1 specification */
   Book1.title = @"Objective-C Programming";
   Book1.author = @"Nuha Ali";
   Book1.subject = @"Objective-C Programming Tutorial";
   Book1.book_id = 6495407;

   /* book 2 specification */
   Book2.title = @"Telecom Billing";
   Book2.author = @"Zara Ali";
   Book2.subject = @"Telecom Billing Tutorial";
   Book2.book_id = 6495700;

   /* print Book1 info */
   NSLog(@"Book 1 title : %@\n", Book1.title);
   NSLog(@"Book 1 author : %@\n", Book1.author);
   NSLog(@"Book 1 subject : %@\n", Book1.subject);
   NSLog(@"Book 1 book_id : %d\n", Book1.book_id);

   /* print Book2 info */
   NSLog(@"Book 2 title : %@\n", Book2.title);
   NSLog(@"Book 2 author : %@\n", Book2.author);
   NSLog(@"Book 2 subject : %@\n", Book2.subject);
   NSLog(@"Book 2 book_id : %d\n", Book2.book_id);

   return 0;
}
When the above code is compiled and executed, it produces the following result −
2013-09-14 04:20:07.947 demo[20591] Book 1 title : Objective-C Programming
2013-09-14 04:20:07.947 demo[20591] Book 1 author : Nuha Ali
2013-09-14 04:20:07.947 demo[20591] Book 1 subject : Objective-C Programming Tutorial
2013-09-14 04:20:07.947 demo[20591] Book 1 book_id : 6495407
2013-09-14 04:20:07.947 demo[20591] Book 2 title : Telecom Billing
2013-09-14 04:20:07.947 demo[20591] Book 2 author : Zara Ali
2013-09-14 04:20:07.947 demo[20591] Book 2 subject : Telecom Billing Tutorial
2013-09-14 04:20:07.947 demo[20591] Book 2 book_id : 6495700
Structures as Function Arguments
You can pass a structure as a function argument in very similar way as you pass any other variable or pointer. You would access structure variables in the similar way as you have accessed in the above example −
#import <Foundation/Foundation.h>

struct Books {
   NSString *title;
   NSString *author;
   NSString *subject;
   int   book_id;
};

@interface SampleClass:NSObject
/* function declaration */
- (void) printBook:( struct Books) book ;
@end

@implementation SampleClass

- (void) printBook:( struct Books) book {
   NSLog(@"Book title : %@\n", book.title);
   NSLog(@"Book author : %@\n", book.author);
   NSLog(@"Book subject : %@\n", book.subject);
   NSLog(@"Book book_id : %d\n", book.book_id);
}

@end

int main() {
   struct Books Book1;        /* Declare Book1 of type Book */
   struct Books Book2;        /* Declare Book2 of type Book */

   /* book 1 specification */
   Book1.title = @"Objective-C Programming";
   Book1.author = @"Nuha Ali";
   Book1.subject = @"Objective-C Programming Tutorial";
   Book1.book_id = 6495407;

   /* book 2 specification */
   Book2.title = @"Telecom Billing";
   Book2.author = @"Zara Ali";
   Book2.subject = @"Telecom Billing Tutorial";
   Book2.book_id = 6495700;

   SampleClass *sampleClass = [[SampleClass alloc]init];
   /* print Book1 info */
   [sampleClass printBook: Book1];

   /* Print Book2 info */
   [sampleClass printBook: Book2];

   return 0;
}
When the above code is compiled and executed, it produces the following result −
2013-09-14 04:34:45.725 demo[8060] Book title : Objective-C Programming
2013-09-14 04:34:45.725 demo[8060] Book author : Nuha Ali
2013-09-14 04:34:45.725 demo[8060] Book subject : Objective-C Programming Tutorial
2013-09-14 04:34:45.725 demo[8060] Book book_id : 6495407
2013-09-14 04:34:45.725 demo[8060] Book title : Telecom Billing
2013-09-14 04:34:45.725 demo[8060] Book author : Zara Ali
2013-09-14 04:34:45.725 demo[8060] Book subject : Telecom Billing Tutorial
2013-09-14 04:34:45.725 demo[8060] Book book_id : 6495700
Pointers to Structures
You can define pointers to structures in very similar way as you define pointer to any other variable as follows −
struct Books *struct_pointer;
Now, you can store the address of a structure variable in the above-defined pointer variable. To find the address of a structure variable, place the & operator before the structure's name as follows −
struct_pointer = &Book1;
To access the members of a structure using a pointer to that structure, you must use the -> operator as follows −
struct_pointer->title;
Let us re-write above example using structure pointer, hope this will be easy for you to understand the concept −
#import <Foundation/Foundation.h>

struct Books {
   NSString *title;
   NSString *author;
   NSString *subject;
   int   book_id;
};

@interface SampleClass:NSObject
/* function declaration */
- (void) printBook:( struct Books *) book ;
@end

@implementation SampleClass
- (void) printBook:( struct Books *) book {
   NSLog(@"Book title : %@\n", book->title);
   NSLog(@"Book author : %@\n", book->author);
   NSLog(@"Book subject : %@\n", book->subject);
   NSLog(@"Book book_id : %d\n", book->book_id);
}

@end

int main() {
   struct Books Book1;        /* Declare Book1 of type Book */
   struct Books Book2;        /* Declare Book2 of type Book */

   /* book 1 specification */
   Book1.title = @"Objective-C Programming";
   Book1.author = @"Nuha Ali";
   Book1.subject = @"Objective-C Programming Tutorial";
   Book1.book_id = 6495407;

   /* book 2 specification */
   Book2.title = @"Telecom Billing";
   Book2.author = @"Zara Ali";
   Book2.subject = @"Telecom Billing Tutorial";
   Book2.book_id = 6495700;

   SampleClass *sampleClass = [[SampleClass alloc]init];
   /* print Book1 info by passing address of Book1 */
   [sampleClass printBook:&Book1];

   /* print Book2 info by passing address of Book2 */
   [sampleClass printBook:&Book2];

   return 0;
}
When the above code is compiled and executed, it produces the following result −
2013-09-14 04:38:13.942 demo[20745] Book title : Objective-C Programming
2013-09-14 04:38:13.942 demo[20745] Book author : Nuha Ali
2013-09-14 04:38:13.942 demo[20745] Book subject : Objective-C Programming Tutorial
2013-09-14 04:38:13.942 demo[20745] Book book_id : 6495407
2013-09-14 04:38:13.942 demo[20745] Book title : Telecom Billing
2013-09-14 04:38:13.942 demo[20745] Book author : Zara Ali
2013-09-14 04:38:13.942 demo[20745] Book subject : Telecom Billing Tutorial
2013-09-14 04:38:13.942 demo[20745] Book book_id : 6495700
Bit Fields
Bit Fields allow the packing of data in a structure. This is especially useful when memory or data storage is at a premium. Typical examples −
Packing several objects into a machine word. e.g. 1 bit flags can be compacted.
Reading external file formats -- non-standard file formats could be read in. E.g. 9 bit integers.
Objective-C allows us do this in a structure definition by putting :bit length after the variable. For example −
struct packed_struct {
   unsigned int f1:1;
   unsigned int f2:1;
   unsigned int f3:1;
   unsigned int f4:1;
   unsigned int type:4;
   unsigned int my_int:9;
} pack;
Here, the packed_struct contains 6 members: Four 1 bit flags f1..f3, a 4 bit type and a 9 bit my_int.
Objective-C automatically packs the above bit fields as compactly as possible, provided that the maximum length of the field is less than or equal to the integer word length of the computer. If this is not the case, then some compilers may allow memory overlap for the fields whilst other would store the next field in the next word.
Objective-C Preprocessors
The Objective-C Preprocessor is not part of the compiler, but is a separate step in the compilation process. In simplistic terms, an Objective-C Preprocessor is just a text substitution tool and it instructs compiler to do required pre-processing before actual compilation. We'll refer to the Objective-C Preprocessor as the OCPP.
All preprocessor commands begin with a pound symbol (#). It must be the first nonblank character, and for readability, a preprocessor directive should begin in first column. Following section lists down all important preprocessor directives −
| Sr.No. | Directive & Description |
|---|---|
| 1 | #define Substitutes a preprocessor macro |
| 2 | #include Inserts a particular header from another file |
| 3 | #undef Undefines a preprocessor macro |
| 4 | #ifdef Returns true if this macro is defined |
| 5 | #ifndef Returns true if this macro is not defined |
| 6 | #if Tests if a compile time condition is true |
| 7 | #else The alternative for #if |
| 8 | #elif #else an #if in one statement |
| 9 | #endif Ends preprocessor conditional |
| 10 | #error Prints error message on stderr |
| 11 | #pragma Issues special commands to the compiler using a standardized method |
Preprocessors Examples
Analyze the following examples to understand various directives.
#define MAX_ARRAY_LENGTH 20
This directive tells the OCPP to replace instances of MAX_ARRAY_LENGTH with 20. Use #define for constants to increase readability.
#import <Foundation/Foundation.h>
#include "myheader.h"
These directives tell the OCPP to get foundation.h from Foundation Framework and add the text to the current source file. The next line tells OCPP to get myheader.h from the local directory and add the content to the current source file.
#undef  FILE_SIZE
#define FILE_SIZE 42
This tells the OCPP to undefine existing FILE_SIZE and define it as 42.
#ifndef MESSAGE
   #define MESSAGE "You wish!"
#endif
This tells the OCPP to define MESSAGE only if MESSAGE isn't already defined.
#ifdef DEBUG
   /* Your debugging statements here */
#endif
This tells the OCPP to do the process the statements enclosed if DEBUG is defined. This is useful if you pass the -DDEBUG flag to gcc compiler at the time of compilation. This will define DEBUG, so you can turn debugging on and off on the fly during compilation.
Predefined Macros
ANSI C defines a number of macros. Although each one is available for your use in programming, the predefined macros should not be directly modified.
| Sr.No. | Macro & Description |
|---|---|
| 1 | __DATE__ The current date as a character literal in "MMM DD YYYY" format |
| 2 | __TIME__ The current time as a character literal in "HH:MM:SS" format |
| 3 | __FILE__ This contains the current filename as a string literal. |
| 4 | __LINE__ This contains the current line number as a decimal constant. |
| 5 | __STDC__ Defined as 1 when the compiler complies with the ANSI standard. |
Let's try the following example −
#import <Foundation/Foundation.h>

int main() {
   NSLog(@"File :%s\n", __FILE__ );
   NSLog(@"Date :%s\n", __DATE__ );
   NSLog(@"Time :%s\n", __TIME__ );
   NSLog(@"Line :%d\n", __LINE__ );
   NSLog(@"ANSI :%d\n", __STDC__ );

   return 0;
}
When the above code in a file main.m is compiled and executed, it produces the following result −
2013-09-14 04:46:14.859 demo[20683] File :main.m
2013-09-14 04:46:14.859 demo[20683] Date :Sep 14 2013
2013-09-14 04:46:14.859 demo[20683] Time :04:46:14
2013-09-14 04:46:14.859 demo[20683] Line :8
2013-09-14 04:46:14.859 demo[20683] ANSI :1
Preprocessor Operators
The Objective-C preprocessor offers following operators to help you in creating macros −
Macro Continuation (\)
A macro usually must be contained on a single line. The macro continuation operator is used to continue a macro that is too long for a single line. For example −
#define  message_for(a, b)  \
   NSLog(@#a " and " #b ": We love you!\n")
Stringize (#)
The stringize or number-sign operator ('#'), when used within a macro definition, converts a macro parameter into a string constant. This operator may be used only in a macro that has a specified argument or parameter list. For example −
#import <Foundation/Foundation.h>

#define  message_for(a, b)  \
   NSLog(@#a " and " #b ": We love you!\n")

int main(void) {
   message_for(Carole, Debra);
   return 0;
}
When the above code is compiled and executed, it produces the following result −
2013-09-14 05:46:14.859 demo[20683] Carole and Debra: We love you!
Token Pasting (##)
The token-pasting operator (##) within a macro definition combines two arguments. It permits two separate tokens in the macro definition to be joined into a single token. For example −
#import <Foundation/Foundation.h>

#define tokenpaster(n) NSLog (@"token" #n " = %d", token##n)

int main(void) {
   int token34 = 40;

   tokenpaster(34);
   return 0;
}
When the above code is compiled and executed, it produces the following result −
2013-09-14 05:48:14.859 demo[20683] token34 = 40
How it happened, because this example results in the following actual output from the preprocessor −
NSLog (@"token34 = %d", token34);
This example shows the concatenation of token##n into token34 and here we have used both stringize and token-pasting.
The defined() Operator
The preprocessor defined operator is used in constant expressions to determine if an identifier is defined using #define. If the specified identifier is defined, the value is true (non-zero). If the symbol is not defined, the value is false (zero). The defined operator is specified as follows −
#import <Foundation/Foundation.h>

#if !defined (MESSAGE)
   #define MESSAGE "You wish!"
#endif

int main(void) {
   NSLog(@"Here is the message: %s\n", MESSAGE);
   return 0;
}
When the above code is compiled and executed, it produces the following result −
2013-09-14 05:48:19.859 demo[20683] Here is the message: You wish!
Parameterized Macros
One of the powerful functions of the OCPP is the ability to simulate functions using parameterized macros. For example, we might have some code to square a number as follows −
int square(int x) {
   return x * x;
}
We can rewrite above code using a macro as follows −
#define square(x) ((x) * (x))
Macros with arguments must be defined using the #define directive before they can be used. The argument list is enclosed in parentheses and must immediately follow the macro name. Spaces are not allowed between macro name and open parenthesis. For example −
#import <Foundation/Foundation.h>

#define MAX(x,y) ((x) > (y) ? (x) : (y))

int main(void) {
   NSLog(@"Max between 20 and 10 is %d\n", MAX(10, 20));
   return 0;
}
When the above code is compiled and executed, it produces the following result −
2013-09-14 05:52:15.859 demo[20683] Max between 20 and 10 is 20
Objective-C Typedef
The Objective-C programming language provides a keyword called typedef, which you can use to give a type a new name. Following is an example to define a term BYTE for one-byte numbers −
typedef unsigned char BYTE;
After this type definition, the identifier BYTE can be used as an abbreviation for the type unsigned char, for example:.
BYTE b1, b2;
By convention, uppercase letters are used for these definitions to remind the user that the type name is really a symbolic abbreviation, but you can use lowercase, as follows −
typedef unsigned char byte;
You can use typedef to give a name to user-defined data type as well. For example, you can use typedef with structure to define a new data type and then use that data type to define structure variables directly as follows −
#import <Foundation/Foundation.h>

typedef struct Books {
   NSString *title;
   NSString *author;
   NSString *subject;
   int book_id;
} Book;

int main() {
   Book book;
   book.title = @"Objective-C Programming";
   book.author = @"TutorialsPoint";
   book.subject = @"Programming tutorial";
   book.book_id = 100;

   NSLog( @"Book title : %@\n", book.title);
   NSLog( @"Book author : %@\n", book.author);
   NSLog( @"Book subject : %@\n", book.subject);
   NSLog( @"Book Id : %d\n", book.book_id);

   return 0;
}
When the above code is compiled and executed, it produces the following result −
2013-09-12 12:21:53.745 demo[31183] Book title : Objective-C Programming
2013-09-12 12:21:53.745 demo[31183] Book author : TutorialsPoint
2013-09-12 12:21:53.745 demo[31183] Book subject : Programming tutorial
2013-09-12 12:21:53.745 demo[31183] Book Id : 100
typedef vs #define
The #define is a Objective-C directive, which is also used to define the aliases for various data types similar to typedef but with following differences −
The typedef is limited to giving symbolic names to types only whereas #define can be used to define alias for values as well, like you can define 1 as ONE, etc.
The typedef interpretation is performed by the compiler where as #define statements are processed by the pre-processor.
Following is a simplest usage of #define −
#import <Foundation/Foundation.h>

#define TRUE  1
#define FALSE 0

int main( ) {
   NSLog( @"Value of TRUE : %d\n", TRUE);
   NSLog( @"Value of FALSE : %d\n", FALSE);

   return 0;
}
When the above code is compiled and executed, it produces the following result −
2013-09-12 12:23:37.993 demo[5160] Value of TRUE : 1
2013-09-12 12:23:37.994 demo[5160] Value of FALSE : 0
Objective-C Type Casting
Type casting is a way to convert a variable from one data type to another data type. For example, if you want to store a long value into a simple integer then you can type cast long to int. You can convert values from one type to another explicitly using the cast operator as follows −
(type_name) expression
In Objective-C, we generally use CGFloat for doing floating point operation, which is derived from basic type of float in case of 32-bit and double in case of 64-bit. Consider the following example where the cast operator causes the division of one integer variable by another to be performed as a floating-point operation −
#import <Foundation/Foundation.h>

int main() {
   int sum = 17, count = 5;
   CGFloat mean;

   mean = (CGFloat) sum / count;
   NSLog(@"Value of mean : %f\n", mean );

   return 0;
}
When the above code is compiled and executed, it produces the following result −
2013-09-11 01:35:40.047 demo[20634] Value of mean : 3.400000
It should be noted here that the cast operator has precedence over division, so the value of sum is first converted to type double and finally it gets divided by count yielding a double value.
Type conversions can be implicit which is performed by the compiler automatically or it can be specified explicitly through the use of the cast operator. It is considered good programming practice to use the cast operator whenever type conversions are necessary.
Integer Promotion
Integer promotion is the process by which values of integer type "smaller" than int or unsigned int are converted either to int or unsigned int. Consider an example of adding a character in an int −
#import <Foundation/Foundation.h>

int main() {
   int  i = 17;
   char c = 'c';  /* ascii value is 99 */
   int sum;

   sum = i + c;
   NSLog(@"Value of sum : %d\n", sum );

   return 0;
}
When the above code is compiled and executed, it produces the following result −
2013-09-11 01:38:28.492 demo[980] Value of sum : 116
Here, value of sum is coming as 116 because compiler is doing integer promotion and converting the value of 'c' to ascii before performing actual addition operation.
Usual Arithmetic Conversion
The usual arithmetic conversions are implicitly performed to cast their values in a common type. Compiler first performs integer promotion, if operands still have different types then they are converted to the type that appears highest in the following hierarchy −
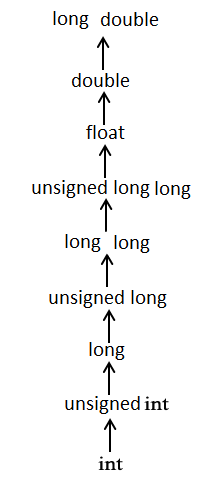
The usual arithmetic conversions are not performed for the assignment operators, nor for the logical operators && and ||. Let us take following example to understand the concept −
#import <Foundation/Foundation.h>

int main() {
   int  i = 17;
   char c = 'c';  /* ascii value is 99 */
   CGFloat sum;

   sum = i + c;
   NSLog(@"Value of sum : %f\n", sum );
   return 0;
}
When the above code is compiled and executed, it produces the following result −
2013-09-11 01:41:39.192 demo[15351] Value of sum : 116.000000
Here, it is simple to understand that first c gets converted to integer but because final value is float, so usual arithmetic conversion applies and compiler converts i and c into float and add them yielding a float result.
Objective-C Log Handling
NSLog method
In order to print logs, we use the NSLog method in Objective-C programming language which we have used right from the Hello World example.
Let us look at a simple code that would print the words "Hello World" −
#import <Foundation/Foundation.h>

int main() {
   NSLog(@"Hello, World! \n");
   return 0;
}
Now, when we compile and run the program, we will get the following result.
2013-09-16 00:32:50.888 demo[16669] Hello, World!
Disabling logs in Live apps
Since the NSLogs we use in our application, it will be printed in logs of device and it is not good to print logs in a live build. Hence, we use a type definition for printing logs and we can use them as shown below.
#import <Foundation/Foundation.h>

#if DEBUG == 0
#define DebugLog(...)
#elif DEBUG == 1
#define DebugLog(...) NSLog(__VA_ARGS__)
#endif

int main() {
   DebugLog(@"Debug log, our custom addition gets \
   printed during debug only" );
   NSLog(@"NSLog gets printed always" );
   return 0;
}
Now, when we compile and run the program in debug mode, we will get the following result.
2013-09-11 02:47:07.723 demo[618] Debug log, our custom addition gets printed during debug only
2013-09-11 02:47:07.723 demo[618] NSLog gets printed always
Now, when we compile and run the program in release mode, we will get the following result.
2013-09-11 02:47:45.248 demo[3158] NSLog gets printed always
Objective-C Error Handling
In Objective-C programming, error handling is provided with NSError class available in Foundation framework.
An NSError object encapsulates richer and more extensible error information than is possible using only an error code or error string. The core attributes of an NSError object are an error domain (represented by a string), a domain-specific error code and a user info dictionary containing application specific information.
NSError
Objective-C programs use NSError objects to convey information about runtime errors that users need to be informed about. In most cases, a program displays this error information in a dialog or sheet. But it may also interpret the information and either ask the user to attempt to recover from the error or attempt to correct the error on its own
NSError Object consists of −
Domain − The error domain can be one of the predefined NSError domains or an arbitrary string describing a custom domain and domain must not be nil.
Code − The error code for the error.
User Info − The userInfo dictionary for the error and userInfo may be nil.
The following example shows how to create a custom error
NSString *domain = @"com.MyCompany.MyApplication.ErrorDomain";
NSString *desc = NSLocalizedString(@"Unable to complete the process", @"");
NSDictionary *userInfo = @{ NSLocalizedDescriptionKey : desc };
NSError *error = [NSError errorWithDomain:domain code:-101 userInfo:userInfo];
Here is complete code of the above error sample passed as reference to an pointer −
#import <Foundation/Foundation.h>

@interface SampleClass:NSObject
-(NSString *) getEmployeeNameForID:(int) id withError:(NSError **)errorPtr;
@end

@implementation SampleClass

-(NSString *) getEmployeeNameForID:(int) id withError:(NSError **)errorPtr {
   if(id == 1) {
      return @"Employee Test Name";
   } else {
      NSString *domain = @"com.MyCompany.MyApplication.ErrorDomain";
      NSString *desc =@"Unable to complete the process";
      NSDictionary *userInfo = [[NSDictionary alloc]
      initWithObjectsAndKeys:desc,
      @"NSLocalizedDescriptionKey",NULL];
      *errorPtr = [NSError errorWithDomain:domain code:-101
      userInfo:userInfo];
      return @"";
   }
}

@end

int main() {
   NSAutoreleasePool * pool = [[NSAutoreleasePool alloc] init];
   SampleClass *sampleClass = [[SampleClass alloc]init];
   NSError *error = nil;
   NSString *name1 = [sampleClass getEmployeeNameForID:1 withError:&error];

   if(error) {
      NSLog(@"Error finding Name1: %@",error);
   } else {
      NSLog(@"Name1: %@",name1);
   }

   error = nil;
   NSString *name2 = [sampleClass getEmployeeNameForID:2 withError:&error];

   if(error) {
      NSLog(@"Error finding Name2: %@",error);
   } else {
      NSLog(@"Name2: %@",name2);
   }

   [pool drain];
   return 0;
}
In the above example, we return a name if the id is 1, otherwise we set the user-defined error object.
When the above code is compiled and executed, it produces the following result −
2013-09-14 18:01:00.809 demo[27632] Name1: Employee Test Name
2013-09-14 18:01:00.809 demo[27632] Error finding Name2: Unable to complete the process
Command-Line Arguments
It is possible to pass some values from the command line to your Objective-C programs when they are executed. These values are called command line arguments and many times they are important for your program, especially when you want to control your program from outside instead of hard coding those values inside the code.
The command line arguments are handled using main() function arguments where argc refers to the number of arguments passed, and argv[] is a pointer array, which points to each argument passed to the program. Following is a simple example, which checks if there is any argument supplied from the command line and take action accordingly −
#import <Foundation/Foundation.h>

int main( int argc, char *argv[] ) {
   if( argc == 2 ) {
      NSLog(@"The argument supplied is %s\n", argv[1]);
   } else if( argc > 2 ) {
      NSLog(@"Too many arguments supplied.\n");
   } else {
      NSLog(@"One argument expected.\n");
   }
}
When the above code is compiled and executed with a single argument, say "testing", it produces the following result.
2013-09-13 03:01:17.333 demo[7640] The argument supplied is testing
When the above code is compiled and executed with two arguments, say testing1 and testing2, it produces the following result.
2013-09-13 03:01:18.333 demo[7640] Too many arguments supplied.
When the above code is compiled and executed without passing any argument, it produces the following result.
2013-09-13 03:01:18.333 demo[7640] One argument expected
It should be noted that argv[0] holds the name of the program itself and argv[1] is a pointer to the first command-line argument supplied, and *argv[n] is the last argument. If no arguments are supplied, argc will be one, otherwise if you pass one argument, then argc is set at 2.
You pass all the command line arguments separated by a space, but if argument itself has a space, then you can pass such arguments by putting them inside double quotes "" or single quotes ''. Let us re-write above example once again where we will print program name and we also pass a command-line argument by putting inside double quotes −
#import <Foundation/Foundation.h>

int main( int argc, char *argv[] ) {
   NSLog(@"Program name %s\n", argv[0]);

   if( argc == 2 ) {
      NSLog(@"The argument supplied is %s\n", argv[1]);
   } else if( argc > 2 ) {
      NSLog(@"Too many arguments supplied.\n");
   } else {
      NSLog(@"One argument expected.\n");
   }

   return 0;
}
When the above code is compiled and executed with a single argument separated by space but inside double quotes say "Testing1 Testing2", it produces the following result.
2017-11-30 06:36:59.081 main[71010] Program name main
2017-11-30 06:36:59.082 main[71010] One argument expected.
Objective-C Classes & Objects
The main purpose of Objective-C programming language is to add object orientation to the C programming language and classes are the central feature of Objective-C that support object-oriented programming and are often called user-defined types.
A class is used to specify the form of an object and it combines data representation and methods for manipulating that data into one neat package. The data and methods within a class are called members of the class.
Objective-C characteristics
The class is defined in two different sections namely @interface and @implementation.
Almost everything is in form of objects.
Objects receive messages and objects are often referred as receivers.
Objects contain instance variables.
Objects and instance variables have scope.
Classes hide an object's implementation.
Properties are used to provide access to class instance variables in other classes.
Objective-C Class Definitions
When you define a class, you define a blueprint for a data type. This doesn't actually define any data, but it does define what the class name means, that is, what an object of the class will consist of and what operations can be performed on such an object.
A class definition starts with the keyword @interface followed by the interface(class) name; and the class body, enclosed by a pair of curly braces. In Objective-C, all classes are derived from the base class called NSObject. It is the superclass of all Objective-C classes. It provides basic methods like memory allocation and initialization. For example, we defined the Box data type using the keyword class as follows −
@interface Box:NSObject {
   //Instance variables
   double length;    // Length of a box
   double breadth;   // Breadth of a box
}
@property(nonatomic, readwrite) double height;  // Property

@end
The instance variables are private and are only accessible inside the class implementation.
Allocating and initializing Objective-C Objects
A class provides the blueprints for objects, so basically an object is created from a class. We declare objects of a class with exactly the same sort of declaration that we declare variables of basic types. Following statements declare two objects of class Box −
Box box1 = [[Box alloc]init];     // Create box1 object of type Box
Box box2 = [[Box alloc]init];     // Create box2 object of type Box
Both of the objects box1 and box2 will have their own copy of data members.
Accessing the Data Members
The properties of objects of a class can be accessed using the direct member access operator (.). Let us try the following example to make things clear −
#import <Foundation/Foundation.h>

@interface Box:NSObject {
   double length;    // Length of a box
   double breadth;   // Breadth of a box
   double height;    // Height of a box
}

@property(nonatomic, readwrite) double height;  // Property
-(double) volume;
@end

@implementation Box

@synthesize height;

-(id)init {
   self = [super init];
   length = 1.0;
   breadth = 1.0;
   return self;
}

-(double) volume {
   return length*breadth*height;
}

@end

int main() {
   NSAutoreleasePool * pool = [[NSAutoreleasePool alloc] init];
   Box *box1 = [[Box alloc]init];    // Create box1 object of type Box
   Box *box2 = [[Box alloc]init];    // Create box2 object of type Box

   double volume = 0.0;             // Store the volume of a box here

   // box 1 specification
   box1.height = 5.0;

   // box 2 specification
   box2.height = 10.0;

   // volume of box 1
   volume = [box1 volume];
   NSLog(@"Volume of Box1 : %f", volume);

   // volume of box 2
   volume = [box2 volume];
   NSLog(@"Volume of Box2 : %f", volume);

   [pool drain];
   return 0;
}
When the above code is compiled and executed, it produces the following result −
2013-09-22 21:25:33.314 ClassAndObjects[387:303] Volume of Box1 : 5.000000
2013-09-22 21:25:33.316 ClassAndObjects[387:303] Volume of Box2 : 10.000000
Properties
Properties are introduced in Objective-C to ensure that the instance variable of the class can be accessed outside the class.
The various parts are the property declaration are as follows.Properties begin with @property, which is a keyword
It is followed with access specifiers, which are nonatomic or atomic, readwrite or readonly and strong, unsafe_unretained or weak. This varies based on the type of the variable. For any pointer type, we can use strong, unsafe_unretained or weak. Similarly for other types we can use readwrite or readonly.
This is followed by the datatype of the variable.
Finally, we have the property name terminated by a semicolon.
We can add synthesize statement in the implementation class. But in the latest XCode, the synthesis part is taken care by the XCode and you need not include synthesize statement.
It is only possible with the properties we can access the instance variables of the class. Actually, internally getter and setter methods are created for the properties.
For example, let's assume we have a property @property (nonatomic ,readonly ) BOOL isDone. Under the hood, there are setters and getters created as shown below.
-(void)setIsDone(BOOL)isDone;
-(BOOL)isDone;
Objective-C Inheritance
One of the most important concepts in object-oriented programming is that of inheritance. Inheritance allows us to define a class in terms of another class which makes it easier to create and maintain an application. This also provides an opportunity to reuse the code functionality and fast implementation time.
When creating a class, instead of writing completely new data members and member functions, the programmer can designate that the new class should inherit the members of an existing class. This existing class is called the base class, and the new class is referred to as the derived class.
The idea of inheritance implements the is a relationship. For example, mammal IS-A animal, dog IS-A mammal, hence dog IS-A animal as well and so on.
Base & Derived Classes
Objective-C allows only multilevel inheritance, i.e., it can have only one base class but allows multilevel inheritance. All classes in Objective-C is derived from the superclass NSObject.
@interface derived-class: base-class
Consider a base class Person and its derived class Employee as follows −
#import <Foundation/Foundation.h>

@interface Person : NSObject {
   NSString *personName;
   NSInteger personAge;
}

- (id)initWithName:(NSString *)name andAge:(NSInteger)age;
- (void)print;

@end

@implementation Person

- (id)initWithName:(NSString *)name andAge:(NSInteger)age {
   personName = name;
   personAge = age;
   return self;
}

- (void)print {
   NSLog(@"Name: %@", personName);
   NSLog(@"Age: %ld", personAge);
}

@end

@interface Employee : Person {
   NSString *employeeEducation;
}

- (id)initWithName:(NSString *)name andAge:(NSInteger)age
  andEducation:(NSString *)education;
- (void)print;
@end

@implementation Employee

- (id)initWithName:(NSString *)name andAge:(NSInteger)age
   andEducation: (NSString *)education {
      personName = name;
      personAge = age;
      employeeEducation = education;
      return self;
   }

- (void)print {
   NSLog(@"Name: %@", personName);
   NSLog(@"Age: %ld", personAge);
   NSLog(@"Education: %@", employeeEducation);
}

@end

int main(int argc, const char * argv[]) {
   NSAutoreleasePool * pool = [[NSAutoreleasePool alloc] init];
   NSLog(@"Base class Person Object");
   Person *person = [[Person alloc]initWithName:@"Raj" andAge:5];
   [person print];
   NSLog(@"Inherited Class Employee Object");
   Employee *employee = [[Employee alloc]initWithName:@"Raj"
   andAge:5 andEducation:@"MBA"];
   [employee print];
   [pool drain];
   return 0;
}
When the above code is compiled and executed, it produces the following result −
2013-09-22 21:20:09.842 Inheritance[349:303] Base class Person Object
2013-09-22 21:20:09.844 Inheritance[349:303] Name: Raj
2013-09-22 21:20:09.844 Inheritance[349:303] Age: 5
2013-09-22 21:20:09.845 Inheritance[349:303] Inherited Class Employee Object
2013-09-22 21:20:09.845 Inheritance[349:303] Name: Raj
2013-09-22 21:20:09.846 Inheritance[349:303] Age: 5
2013-09-22 21:20:09.846 Inheritance[349:303] Education: MBA
Access Control and Inheritance
A derived class can access all the private members of its base class if it's defined in the interface class, but it cannot access private members that are defined in the implementation file.
We can summarize the different access types according to who can access them in the following way −
A derived class inherits all base class methods and variables with the following exceptions −
Variables declared in implementation file with the help of extensions is not accessible.
Methods declared in implementation file with the help of extensions is not accessible.
In case the inherited class implements the method in base class, then the method in derived class is executed.
Objective-C Polymorphism
The word polymorphism means having many forms. Typically, polymorphism occurs when there is a hierarchy of classes and they are related by inheritance.
Objective-C polymorphism means that a call to a member function will cause a different function to be executed depending on the type of object that invokes the function.
Consider the example, we have a class Shape that provides the basic interface for all the shapes. Square and Rectangle are derived from the base class Shape.
We have the method printArea that is going to show about the OOP feature polymorphism.
#import <Foundation/Foundation.h>

@interface Shape : NSObject {
   CGFloat area;
}

- (void)printArea;
- (void)calculateArea;
@end

@implementation Shape
- (void)printArea {
   NSLog(@"The area is %f", area);
}

- (void)calculateArea {

}

@end

@interface Square : Shape {
   CGFloat length;
}

- (id)initWithSide:(CGFloat)side;
- (void)calculateArea;

@end

@implementation Square
- (id)initWithSide:(CGFloat)side {
   length = side;
   return self;
}

- (void)calculateArea {
   area = length * length;
}

- (void)printArea {
   NSLog(@"The area of square is %f", area);
}

@end

@interface Rectangle : Shape {
   CGFloat length;
   CGFloat breadth;
}

- (id)initWithLength:(CGFloat)rLength andBreadth:(CGFloat)rBreadth;
@end

@implementation Rectangle
- (id)initWithLength:(CGFloat)rLength andBreadth:(CGFloat)rBreadth {
   length = rLength;
   breadth = rBreadth;
   return self;
}

- (void)calculateArea {
   area = length * breadth;
}

@end

int main(int argc, const char * argv[]) {
   NSAutoreleasePool * pool = [[NSAutoreleasePool alloc] init];
   Shape *square = [[Square alloc]initWithSide:10.0];
   [square calculateArea];
   [square printArea];
   Shape *rect = [[Rectangle alloc]
   initWithLength:10.0 andBreadth:5.0];
   [rect calculateArea];
   [rect printArea];
   [pool drain];
   return 0;
}
When the above code is compiled and executed, it produces the following result −
2013-09-22 21:21:50.785 Polymorphism[358:303] The area of square is 100.000000
2013-09-22 21:21:50.786 Polymorphism[358:303] The area is 50.000000
In the above example based on the availability of the method calculateArea and printArea, either the method in the base class or the derived class executed.
Polymorphism handles the switching of methods between the base class and derived class based on the method implementation of the two classes.
Objective-C Data Encapsulation
All Objective-C programs are composed of the following two fundamental elements −
Program statements (code) − This is the part of a program that performs actions and they are called methods.
Program data − The data is the information of the program which is affected by the program functions.
Encapsulation is an Object-Oriented Programming concept that binds together the data and functions that manipulate the data and that keeps both safe from outside interference and misuse. Data encapsulation led to the important OOP concept of data hiding.
Data encapsulation is a mechanism of bundling the data and the functions that use them, and data abstraction is a mechanism of exposing only the interfaces and hiding the implementation details from the user.
Objective-C supports the properties of encapsulation and data hiding through the creation of user-defined types, called classes. For example −
@interface Adder : NSObject {
   NSInteger total;
}

- (id)initWithInitialNumber:(NSInteger)initialNumber;
- (void)addNumber:(NSInteger)newNumber;
- (NSInteger)getTotal;

@end
The variable total is private and we cannot access from outside the class. This means that they can be accessed only by other members of the Adder class and not by any other part of your program. This is one way encapsulation is achieved.
Methods inside the interface file are accessible and are public in scope.
There are private methods, which are written with the help of extensions, which we will learn in upcoming chapters.
Data Encapsulation Example
Any Objective-C program where you implement a class with public and private members variables is an example of data encapsulation and data abstraction. Consider the following example −
#import <Foundation/Foundation.h>

@interface Adder : NSObject {
   NSInteger total;
}

- (id)initWithInitialNumber:(NSInteger)initialNumber;
- (void)addNumber:(NSInteger)newNumber;
- (NSInteger)getTotal;

@end

@implementation Adder
-(id)initWithInitialNumber:(NSInteger)initialNumber {
   total = initialNumber;
   return self;
}

- (void)addNumber:(NSInteger)newNumber {
   total = total + newNumber;
}

- (NSInteger)getTotal {
   return total;
}

@end

int main(int argc, const char * argv[]) {
   NSAutoreleasePool * pool = [[NSAutoreleasePool alloc] init];
   Adder *adder = [[Adder alloc]initWithInitialNumber:10];
   [adder addNumber:5];
   [adder addNumber:4];

   NSLog(@"The total is %ld",[adder getTotal]);
   [pool drain];
   return 0;
}
When the above code is compiled and executed, it produces the following result −
2013-09-22 21:17:30.485 DataEncapsulation[317:303] The total is 19
Above class adds numbers together and returns the sum. The public members addNum and getTotal are the interfaces to the outside world and a user needs to know them to use the class. The private member total is something that is hidden from the outside world, but is needed for the class to operate properly.
Designing Strategy
Most of us have learned through bitter experience to make class members private by default unless we really need to expose them. That's just good encapsulation.
It's important to understand data encapsulation since it's one of the core features of all Object-Oriented Programming (OOP) languages including Objective-C.
Objective-C Categories
Sometimes, you may find that you wish to extend an existing class by adding behavior that is useful only in certain situations. In order add such extension to existing classes, Objective-C provides categories and extensions.
If you need to add a method to an existing class, perhaps, to add functionality to make it easier to do something in your own application, the easiest way is to use a category.
The syntax to declare a category uses the @interface keyword, just like a standard Objective-C class description, but does not indicate any inheritance from a subclass. Instead, it specifies the name of the category in parentheses, like this −
@interface ClassName (CategoryName)

@end
Characteristics of category
A category can be declared for any class, even if you don't have the original implementation source code.
Any methods that you declare in a category will be available to all instances of the original class, as well as any subclasses of the original class.
At runtime, there's no difference between a method added by a category and one that is implemented by the original class.
Now, let's look at a sample category implementation. Let's add a category to the Cocoa class NSString. This category will make it possible for us to add a new method getCopyRightString which helps us in returning the copyright string. It is shown below.
#import <Foundation/Foundation.h>

@interface NSString(MyAdditions)
+(NSString *)getCopyRightString;
@end

@implementation NSString(MyAdditions)

+(NSString *)getCopyRightString {
   return @"Copyright TutorialsPoint.com 2013";
}

@end

int main(int argc, const char * argv[]) {
   NSAutoreleasePool * pool = [[NSAutoreleasePool alloc] init];
   NSString *copyrightString = [NSString getCopyRightString];
   NSLog(@"Accessing Category: %@",copyrightString);

   [pool drain];
   return 0;
}
Now when we compile and run the program, we will get the following result.
2013-09-22 21:19:12.125 Categories[340:303] Accessing Category: Copyright TutorialsPoint.com 2013
Even though any methods added by a category are available to all instances of the class and its subclasses, you'll need to import the category header file in any source code file where you wish to use the additional methods, otherwise you'll run into compiler warnings and errors.
In our example, since we just have a single class, we have not included any header files, in such a case we should include the header files as said above.
Objective-C Posing
Before starting about Posing in Objective-C, I would like to bring to your notice that Posing was declared deprecated in Mac OS X 10.5 and it's not available for use thereafter. So for those who are not concerned about these deprecated methods can skip this chapter.
Objective-C permits a class to wholly replace another class within a program. The replacing class is said to "pose as" the target class.
For the versions that supported posing, all messages sent to the target class are instead received by the posing class.
NSObject contains the poseAsClass: method that enables us to replace the existing class as said above.
Restrictions in Posing
A class may only pose as one of its direct or indirect superclasses.
The posing class must not define any new instance variables that are absent from the target class (though it may define or override methods).
The target class may not have received any messages prior to the posing.
A posing class can call overridden methods through super, thus incorporating the implementation of the target class.
A posing class can override methods defined in categories.
#import <Foundation/Foundation.h>

@interface MyString : NSString

@end

@implementation MyString

- (NSString *)stringByReplacingOccurrencesOfString:(NSString *)target
withString:(NSString *)replacement {
   NSLog(@"The Target string is %@",target);
   NSLog(@"The Replacement string is %@",replacement);
}

@end

int main() {
   NSAutoreleasePool * pool = [[NSAutoreleasePool alloc] init];
   [MyString poseAsClass:[NSString class]];
   NSString *string = @"Test";
   [string stringByReplacingOccurrencesOfString:@"a" withString:@"c"];

   [pool drain];
   return 0;
}
Now when we compile and run the program in a older Mac OS X (V_10.5 or earlier), we will get the following result.
2013-09-22 21:23:46.829 Posing[372:303] The Target string is a
2013-09-22 21:23:46.830 Posing[372:303] The Replacement string is c
In the above example, we just polluted the original method with our implementation and this will get affected throughout all the NSString operations with the above method.
Objective-C Extensions
A class extension bears some similarity to a category, but it can only be added to a class for which you have the source code at compile time (the class is compiled at the same time as the class extension).
The methods declared by a class extension are implemented in the implementation block for the original class, so you can't, for example, declare a class extension on a framework class, such as a Cocoa or Cocoa Touch class like NSString.
Extensions are actually categories without the category name. It's often referred as anonymous categories.
The syntax to declare a extension uses the @interface keyword, just like a standard Objective-C class description, but does not indicate any inheritance from a subclass. Instead, it just adds parentheses, as shown below −
@interface ClassName ()

@end
Characteristics of extensions
An extension cannot be declared for any class, only for the classes that we have original implementation of source code.
An extension is adding private methods and private variables that are only specific to the class.
Any method or variable declared inside the extensions is not accessible even to the inherited classes.
Extensions Example
Let's create a class SampleClass that has an extension. In the extension, let's have a private variable internalID.
Then, let's have a method getExternalID that returns the externalID after processing the internalID.
The example is shown below and this wont work on online compiler.
#import <Foundation/Foundation.h>

@interface SampleClass : NSObject {
   NSString *name;
}

- (void)setInternalID;
- (NSString *)getExternalID;

@end

@interface SampleClass() {
   NSString *internalID;
}

@end

@implementation SampleClass

- (void)setInternalID {
   internalID = [NSString stringWithFormat:
   @"UNIQUEINTERNALKEY%dUNIQUEINTERNALKEY",arc4random()%100];
}

- (NSString *)getExternalID {
   return [internalID stringByReplacingOccurrencesOfString:
   @"UNIQUEINTERNALKEY" withString:@""];
}

@end

int main(int argc, const char * argv[]) {
   NSAutoreleasePool * pool = [[NSAutoreleasePool alloc] init];
   SampleClass *sampleClass = [[SampleClass alloc]init];
   [sampleClass setInternalID];
   NSLog(@"ExternalID: %@",[sampleClass getExternalID]);
   [pool drain];
   return 0;
}
Now when we compile and run the program, we will get the following result.
2013-09-22 21:18:31.754 Extensions[331:303] ExternalID: 51
In the above example, we can see that the internalID is not returned directly. We here remove the UNIQUEINTERNALKEY and only make the remaining value available to the method getExternalID.
The above example just uses a string operation, but it can have many features like encryption/decryption and so on.
Objective-C Protocols
Objective-C allows you to define protocols, which declare the methods expected to be used for a particular situation. Protocols are implemented in the classes conforming to the protocol.
A simple example would be a network URL handling class, it will have a protocol with methods like processCompleted delegate method that intimates the calling class once the network URL fetching operation is over.
A syntax of protocol is shown below.
@protocol ProtocolName
@required
// list of required methods
@optional
// list of optional methods
@end
The methods under keyword @required must be implemented in the classes that conforms to the protocol and the methods under @optional keyword are optional to implement.
Here is the syntax for class conforming to protocol
@interface MyClass : NSObject <MyProtocol>
...
@end
This means that any instance of MyClass will respond not only to the methods declared specifically in the interface, but that MyClass also provides implementations for the required methods in MyProtocol. There's no need to redeclare the protocol methods in the class interface - the adoption of the protocol is sufficient.
If you need a class to adopt multiple protocols, you can specify them as a comma-separated list. We have a delegate object that holds the reference of the calling object that implements the protocol.
An example is shown below.
#import <Foundation/Foundation.h>

@protocol PrintProtocolDelegate
- (void)processCompleted;

@end

@interface PrintClass :NSObject {
   id delegate;
}

- (void) printDetails;
- (void) setDelegate:(id)newDelegate;
@end

@implementation PrintClass
- (void)printDetails {
   NSLog(@"Printing Details");
   [delegate processCompleted];
}

- (void) setDelegate:(id)newDelegate {
   delegate = newDelegate;
}

@end

@interface SampleClass:NSObject<PrintProtocolDelegate>
- (void)startAction;

@end

@implementation SampleClass
- (void)startAction {
   PrintClass *printClass = [[PrintClass alloc]init];
   [printClass setDelegate:self];
   [printClass printDetails];
}

-(void)processCompleted {
   NSLog(@"Printing Process Completed");
}

@end

int main(int argc, const char * argv[]) {
   NSAutoreleasePool * pool = [[NSAutoreleasePool alloc] init];
   SampleClass *sampleClass = [[SampleClass alloc]init];
   [sampleClass startAction];
   [pool drain];
   return 0;
}
Now when we compile and run the program, we will get the following result.
2013-09-22 21:15:50.362 Protocols[275:303] Printing Details
2013-09-22 21:15:50.364 Protocols[275:303] Printing Process Completed
In the above example we have seen how the delgate methods are called and executed. Its starts with startAction, once the process is completed, the delegate method processCompleted is called to intimate the operation is completed.
In any iOS or Mac app, we will never have a program implemented without a delegate. So its important we understand the usage of delegates. Delegates objects should use unsafe_unretained property type to avoid memory leaks.
Objective-C Dynamic Binding
Dynamic binding is determining the method to invoke at runtime instead of at compile time. Dynamic binding is also referred to as late binding.
In Objective-C, all methods are resolved dynamically at runtime. The exact code executed is determined by both the method name (the selector) and the receiving object.
Dynamic binding enables polymorphism. For example, consider a collection of objects including Rectangle and Square. Each object has its own implementation of a printArea method.
In the following code fragment, the actual code that should be executed by the expression [anObject printArea] is determined at runtime. The runtime system uses the selector for the method run to identify the appropriate method in whatever class of anObject turns out to be.
Let us look at a simple code that would explain dynamic binding.
#import <Foundation/Foundation.h>

@interface Square:NSObject {
   float area;
}

- (void)calculateAreaOfSide:(CGFloat)side;
- (void)printArea;
@end

@implementation Square
- (void)calculateAreaOfSide:(CGFloat)side {
   area = side * side;
}

- (void)printArea {
   NSLog(@"The area of square is %f",area);
}

@end

@interface Rectangle:NSObject {
   float area;
}

- (void)calculateAreaOfLength:(CGFloat)length andBreadth:(CGFloat)breadth;
- (void)printArea;
@end

@implementation  Rectangle

- (void)calculateAreaOfLength:(CGFloat)length andBreadth:(CGFloat)breadth {
   area = length * breadth;
}

- (void)printArea {
   NSLog(@"The area of Rectangle is %f",area);
}

@end

int main() {
   Square *square = [[Square alloc]init];
   [square calculateAreaOfSide:10.0];

   Rectangle *rectangle = [[Rectangle alloc]init];
   [rectangle calculateAreaOfLength:10.0 andBreadth:5.0];

   NSArray *shapes = [[NSArray alloc]initWithObjects: square, rectangle,nil];
   id object1 = [shapes objectAtIndex:0];
   [object1 printArea];

   id object2 = [shapes objectAtIndex:1];
   [object2 printArea];

   return 0;
}
Now when we compile and run the program, we will get the following result.
2013-09-28 07:42:29.821 demo[4916] The area of square is 100.000000
2013-09-28 07:42:29.821 demo[4916] The area of Rectangle is 50.000000
As you can see in the above example, printArea method is dynamically selected in runtime. It is an example for dynamic binding and is quite useful in many situations when dealing with similar kind of objects.
Objective-C Composite Objects
We can create subclass within a class cluster that defines a class that embeds within it an object. These class objects are composite objects.
So you might be wondering what's a class cluster. So we will first see what's a class cluster.
Class Clusters
Class clusters are a design pattern that the Foundation framework makes extensive use of. Class clusters group a number of private concrete subclasses under a public abstract superclass. The grouping of classes in this way simplifies the publicly visible architecture of an object-oriented framework without reducing its functional richness. Class clusters are based on the Abstract Factory design pattern.
To make it simple, instead of creating multiple classes for similar functions, we create a single class that will take care of its handling based on the value of input.
For example, in NSNumber we have many clusters of classes like char, int, bool and so on. We group all of them to a single class that takes care of handling the similar operations in a single class. NSNumber actually wraps the value of these primitive types into objects.
So what's exactly composite object?
By embedding a private cluster object in an object of our own design, we create a composite object. This composite object can rely on the cluster object for its basic functionality, only intercepting messages that the composite object wants to handle in some particular way. This architecture reduces the amount of code we must write and lets you take advantage of the tested code provided by the Foundation Framework.
This is explained in the following figure.
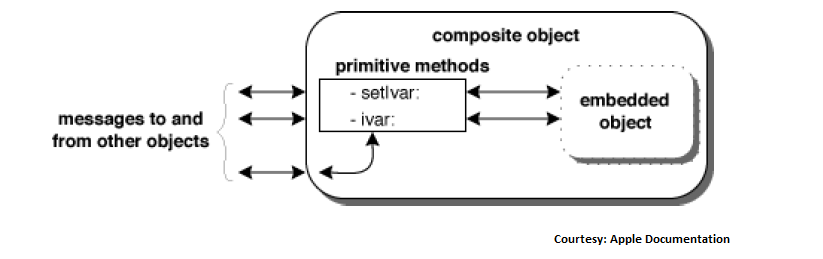
The composite object must declare itself to be a subclass of the cluster's abstract superclass. As a subclass, it must override the superclass' primitive methods. It can also override derived methods, but this isn't necessary because the derived methods work through the primitive ones.
The count method of the NSArray class is an example; the intervening object's implementation of a method it overrides can be as simple as −
- (unsigned)count  {
   return [embeddedObject count];
}
In the above example, embedded object is actually of type NSArray.
A Composite Object example
Now in order to see a complete example, let's look at the example from the Apple documentation which is given below.
#import <Foundation/Foundation.h>

@interface ValidatingArray : NSMutableArray {
   NSMutableArray *embeddedArray;
}

+ validatingArray;
- init;
- (unsigned)count;
- objectAtIndex:(unsigned)index;
- (void)addObject:object;
- (void)replaceObjectAtIndex:(unsigned)index withObject:object;
- (void)removeLastObject;
- (void)insertObject:object atIndex:(unsigned)index;
- (void)removeObjectAtIndex:(unsigned)index;

@end

@implementation ValidatingArray
- init {
   self = [super init];
   if (self) {
      embeddedArray = [[NSMutableArray allocWithZone:[self zone]] init];
   }
   return self;
}

+ validatingArray {
   return [[self alloc] init] ;
}

- (unsigned)count {
   return [embeddedArray count];
}

- objectAtIndex:(unsigned)index {
   return [embeddedArray objectAtIndex:index];
}

- (void)addObject:(id)object {
   if (object != nil) {
      [embeddedArray addObject:object];
   }
}

- (void)replaceObjectAtIndex:(unsigned)index withObject:(id)object; {
   if (index <[embeddedArray count] && object != nil) {
      [embeddedArray replaceObjectAtIndex:index withObject:object];
   }
}

- (void)removeLastObject; {
   if ([embeddedArray count] > 0) {
      [embeddedArray removeLastObject];
   }
}

- (void)insertObject:(id)object atIndex:(unsigned)index; {
   if (object != nil) {
      [embeddedArray insertObject:object atIndex:index];
   }
}

- (void)removeObjectAtIndex:(unsigned)index; {
   if (index <[embeddedArray count]) {
      [embeddedArray removeObjectAtIndex:index];
   }
}

@end

int main() {
   NSAutoreleasePool * pool = [[NSAutoreleasePool alloc] init];
   ValidatingArray *validatingArray = [ValidatingArray validatingArray];

   [validatingArray addObject:@"Object1"];
   [validatingArray addObject:@"Object2"];
   [validatingArray addObject:[NSNull null]];
   [validatingArray removeObjectAtIndex:2];
   NSString *aString = [validatingArray objectAtIndex:1];
   NSLog(@"The value at Index 1 is %@",aString);
   [pool drain];

   return 0;
}
Now when we compile and run the program, we will get the following result.
2013-09-28 22:03:54.294 demo[6247] The value at Index 1 is Object2
In the above example, we can see that validating array's one function would not allow adding null objects that will lead to crash in the normal scenario. But our validating array takes care of it. Similarly, each of the method in validating array adds validating processes apart from the normal sequence of operations.
Obj-C Foundation Framework
If you refer Apple documentation, you can see the details of Foundation framework as given below.
The Foundation framework defines a base layer of Objective-C classes. In addition to providing a set of useful primitive object classes, it introduces several paradigms that define functionality not covered by the Objective-C language. The Foundation framework is designed with these goals in mind −
Provide a small set of basic utility classes.
Make software development easier by introducing consistent conventions for things such as deallocation.
Support Unicode strings, object persistence, and object distribution.
Provide a level of OS independence to enhance portability.
The framework was developed by NeXTStep, which was acquired by Apple and these foundation classes became part of Mac OS X and iOS.
Since it was developed by NeXTStep, it has class prefix of "NS".
We have used Foundation Framework in all our sample programs. It is almost a must to use Foundation Framework.
Generally, we use something like #import <Foundation/NSString.h> to import a Objective-C class, but in order avoid importing too many classes, it's all imported in #import <Foundation/Foundation.h>.
NSObject is the base class of all objects including the foundation kit classes. It provides the methods for memory management. It also provides basic interface to the runtime system and ability to behave as Objective-C objects. It doesn't have any base class and is the root for all classes.
Foundation Classes based on functionality
| Sr.No. | Loop Type & Description |
|---|---|
| 1 | Data storage
NSArray, NSDictionary, and NSSet provide storage for Objective-C objects of any class. |
| 2 | Text and strings
NSCharacterSet represents various groupings of characters that are used by the NSString and NSScanner classes. The NSString classes represent text strings and provide methods for searching, combining, and comparing strings. An NSScanner object is used to scan numbers and words from an NSString object. |
| 3 | Dates and times
The NSDate, NSTimeZone, and NSCalendar classes store times and dates and represent calendrical information. They offer methods for calculating date and time differences. Together with NSLocale, they provide methods for displaying dates and times in many formats and for adjusting times and dates based on location in the world. |
| 4 | Exception handling
Exception handling is used to handle unexpected situations and it's offered in Objective-C with NSException. |
| 5 | File handling
File handling is done with the help of class NSFileManager. |
| 6 | URL loading system
A set of classes and protocols that provide access to common Internet protocols. |
Objective-C Fast Enumeration
Fast enumeration is an Objective-C's feature that helps in enumerating through a collection. So in order to know about fast enumeration, we need know about collection first which will be explained in the following section.
Collections in Objective-C
Collections are fundamental constructs. It is used to hold and manage other objects. The whole purpose of a collection is that it provides a common way to store and retrieve objects efficiently.
There are several different types of collections. While they all fulfil the same purpose of being able to hold other objects, they differ mostly in the way objects are retrieved. The most common collections used in Objective-C are −
- NSSet
- NSArray
- NSDictionary
- NSMutableSet
- NSMutableArray
- NSMutableDictionary
If you want to know more about these structures, please refer data storage in Foundation Framework.
Fast enumeration Syntax
for (classType variable in collectionObject ) {
  statements
}
Here is an example for fast enumeration.
#import <Foundation/Foundation.h>

int main() {
   NSAutoreleasePool * pool = [[NSAutoreleasePool alloc] init];
   NSArray *array = [[NSArray alloc]
   initWithObjects:@"string1", @"string2",@"string3",nil];

   for(NSString *aString in array) {
      NSLog(@"Value: %@",aString);
   }

   [pool drain];
   return 0;
}
Now when we compile and run the program, we will get the following result.
2013-09-28 06:26:22.835 demo[7426] Value: string1
2013-09-28 06:26:22.836 demo[7426] Value: string2
2013-09-28 06:26:22.836 demo[7426] Value: string3
As you can see in the output, each of the objects in the array is printed in an order.
Fast Enumeration Backwards
for (classType variable in [collectionObject reverseObjectEnumerator] ) {
  statements
}
Here is an example for reverseObjectEnumerator in fast enumeration.
#import <Foundation/Foundation.h>

int main() {
   NSAutoreleasePool * pool = [[NSAutoreleasePool alloc] init];
   NSArray *array = [[NSArray alloc]
   initWithObjects:@"string1", @"string2",@"string3",nil];

   for(NSString *aString in [array reverseObjectEnumerator]) {
      NSLog(@"Value: %@",aString);
   }

   [pool drain];
   return 0;
}
Now when we compile and run the program, we will get the following result.
2013-09-28 06:27:51.025 demo[12742] Value: string3
2013-09-28 06:27:51.025 demo[12742] Value: string2
2013-09-28 06:27:51.025 demo[12742] Value: string1
As you can see in the output, each of the objects in the array is printed but in the reverse order as compared to normal fast enumeration.
Obj-C Memory Management
Memory management is one of the most important process in any programming language. It is the process by which the memory of objects are allocated when they are required and deallocated when they are no longer required.
Managing object memory is a matter of performance; if an application doesn't free unneeded objects, its memory footprint grows and performance suffers.
Objective-C Memory management techniques can be broadly classified into two types.
- "Manual Retain-Release" or MRR
- "Automatic Reference Counting" or ARC
"Manual Retain-Release" or MRR
In MRR, we explicitly manage memory by keeping track of objects on our own. This is implemented using a model, known as reference counting, that the Foundation class NSObject provides in conjunction with the runtime environment.
The only difference between MRR and ARC is that the retain and release is handled by us manually in former while its automatically taken care of in the latter.
The following figure represents an example of how memory management work in Objective-C.
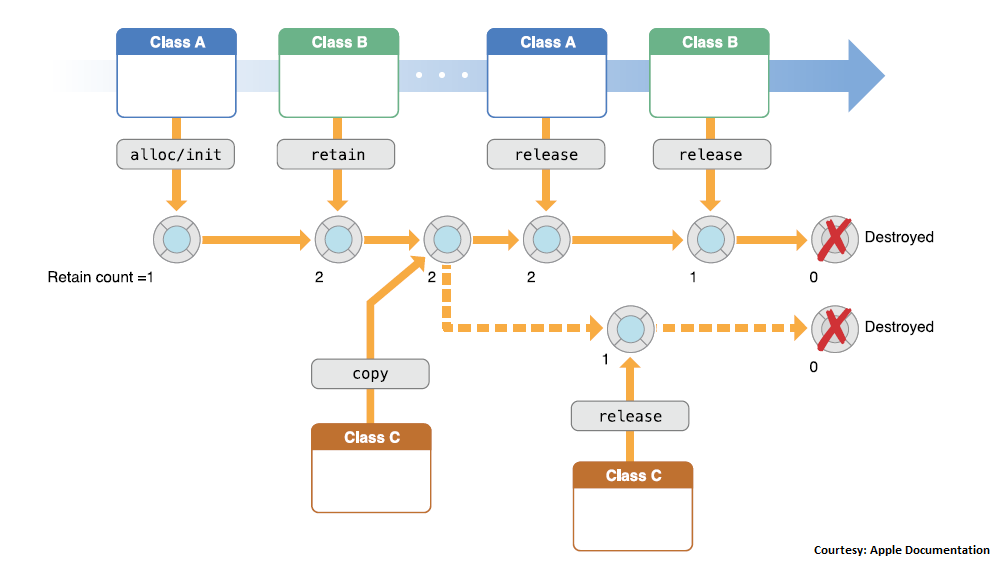
The memory life cycle of the Class A object is shown in the above figure. As you can see, the retain count is shown below the object, when the retain count of an object becomes 0, the object is freed completely and its memory is deallocated for other objects to use.
Class A object is first created using alloc/init method available in NSObject. Now, the retain count becomes 1.
Now, class B retains the Class A's Object and the retain count of Class A's object becomes 2.
Then, Class C makes a copy of the object. Now, it is created as another instance of Class A with same values for the instance variables. Here, the retain count is 1 and not the retain count of the original object. This is represented by the dotted line in the figure.
The copied object is released by Class C using the release method and the retain count becomes 0 and hence the object is destroyed.
In case of the initial Class A Object, the retain count is 2 and it has to be released twice in order for it to be destroyed. This is done by release statements of Class A and Class B which decrements the retain count to 1 and 0, respectively. Finally, the object is destroyed.
MRR Basic Rules
We own any object we create: We create an object using a method whose name begins with "alloc", "new", "copy", or "mutableCopy"
We can take ownership of an object using retain: A received object is normally guaranteed to remain valid within the method it was received in, and that method may also safely return the object to its invoker. We use retain in two situations −
In the implementation of an accessor method or an init method, to take ownership of an object we want to store as a property value.
To prevent an object from being invalidated as a side-effect of some other operation.
When we no longer need it, we must relinquish ownership of an object we own: We relinquish ownership of an object by sending it a release message or an autorelease message. In Cocoa terminology, relinquishing ownership of an object is therefore typically referred to as "releasing" an object.
You must not relinquish ownership of an object you do not own: This is just corollary of the previous policy rules stated explicitly.
#import <Foundation/Foundation.h>

@interface SampleClass:NSObject
- (void)sampleMethod;
@end

@implementation SampleClass
- (void)sampleMethod {
   NSLog(@"Hello, World! \n");
}

- (void)dealloc  {
  NSLog(@"Object deallocated");
  [super dealloc];
}

@end

int main() {

   /* my first program in Objective-C */
   SampleClass *sampleClass = [[SampleClass alloc]init];
   [sampleClass sampleMethod];

   NSLog(@"Retain Count after initial allocation: %d",
   [sampleClass retainCount]);
   [sampleClass retain];

   NSLog(@"Retain Count after retain: %d", [sampleClass retainCount]);
   [sampleClass release];
   NSLog(@"Retain Count after release: %d", [sampleClass retainCount]);
   [sampleClass release];
   NSLog(@"SampleClass dealloc will be called before this");

   // Should set the object to nil
   sampleClass = nil;
   return 0;
}
When we compile the above program, we will get the following output.
2013-09-28 04:39:52.310 demo[8385] Hello, World!
2013-09-28 04:39:52.311 demo[8385] Retain Count after initial allocation: 1
2013-09-28 04:39:52.311 demo[8385] Retain Count after retain: 2
2013-09-28 04:39:52.311 demo[8385] Retain Count after release: 1
2013-09-28 04:39:52.311 demo[8385] Object deallocated
2013-09-28 04:39:52.311 demo[8385] SampleClass dealloc will be called before this
"Automatic Reference Counting" or ARC
In Automatic Reference Counting or ARC, the system uses the same reference counting system as MRR, but it inserts the appropriate memory management method calls for us at compile-time. We are strongly encouraged to use ARC for new projects. If we use ARC, there is typically no need to understand the underlying implementation described in this document, although it may in some situations be helpful. For more about ARC, see Transitioning to ARC Release Notes.
As mentioned above, in ARC, we need not add release and retain methods since that will be taken care by the compiler. Actually, the underlying process of Objective-C is still the same. It uses the retain and release operations internally making it easier for the developer to code without worrying about these operations, which will reduce both the amount of code written and the possibility of memory leaks.
There was another principle called garbage collection, which is used in Mac OS-X along with MRR, but since its deprecation in OS-X Mountain Lion, it has not been discussed along with MRR. Also, iOS objects never had garbage collection feature. And with ARC, there is no use of garbage collection in OS-X too.
Here is a simple ARC example. Note this won't work on online compiler since it does not support ARC.
#import <Foundation/Foundation.h>

@interface SampleClass:NSObject
- (void)sampleMethod;
@end

@implementation SampleClass
- (void)sampleMethod {
   NSLog(@"Hello, World! \n");
}

- (void)dealloc  {
  NSLog(@"Object deallocated");
}

@end

int main() {
   /* my first program in Objective-C */
   @autoreleasepool {
      SampleClass *sampleClass = [[SampleClass alloc]init];
      [sampleClass sampleMethod];
      sampleClass = nil;
   }
   return 0;
}
When we compile the above program, we will get the following output.
2013-09-28 04:45:47.310 demo[8385] Hello, World!
2013-09-28 04:45:47.311 demo[8385] Object deallocated