- Hive Tutorial
- Hive - Home
- Hive - Introduction
- Hive - Installation
- Hive - Data Types
- Hive - Create Database
- Hive - Drop Database
- Hive - Create Table
- Hive - Alter Table
- Hive - Drop Table
- Hive - Partitioning
- Hive - Built-In Operators
- Hive - Built-In Functions
- Hive - Views And Indexes
- HiveQL
- HiveQL - Select Where
- HiveQL - Select Order By
- HiveQL - Select Group By
- HiveQL - Select Joins
- Hive Useful Resources
- Hive - Questions and Answers
- Hive - Quick Guide
- Hive - Useful Resources
Hive - Quick Guide
Hive - Introduction
The term ‘Big Data’ is used for collections of large datasets that include huge volume, high velocity, and a variety of data that is increasing day by day. Using traditional data management systems, it is difficult to process Big Data. Therefore, the Apache Software Foundation introduced a framework called Hadoop to solve Big Data management and processing challenges.
Hadoop
Hadoop is an open-source framework to store and process Big Data in a distributed environment. It contains two modules, one is MapReduce and another is Hadoop Distributed File System (HDFS).
MapReduce: It is a parallel programming model for processing large amounts of structured, semi-structured, and unstructured data on large clusters of commodity hardware.
HDFS:Hadoop Distributed File System is a part of Hadoop framework, used to store and process the datasets. It provides a fault-tolerant file system to run on commodity hardware.
The Hadoop ecosystem contains different sub-projects (tools) such as Sqoop, Pig, and Hive that are used to help Hadoop modules.
Sqoop: It is used to import and export data to and fro between HDFS and RDBMS.
Pig: It is a procedural language platform used to develop a script for MapReduce operations.
Hive: It is a platform used to develop SQL type scripts to do MapReduce operations.
Note: There are various ways to execute MapReduce operations:
- The traditional approach using Java MapReduce program for structured, semi-structured, and unstructured data.
- The scripting approach for MapReduce to process structured and semi structured data using Pig.
- The Hive Query Language (HiveQL or HQL) for MapReduce to process structured data using Hive.
What is Hive
Hive is a data warehouse infrastructure tool to process structured data in Hadoop. It resides on top of Hadoop to summarize Big Data, and makes querying and analyzing easy.
Initially Hive was developed by Facebook, later the Apache Software Foundation took it up and developed it further as an open source under the name Apache Hive. It is used by different companies. For example, Amazon uses it in Amazon Elastic MapReduce.
Hive is not
- A relational database
- A design for OnLine Transaction Processing (OLTP)
- A language for real-time queries and row-level updates
Features of Hive
- It stores schema in a database and processed data into HDFS.
- It is designed for OLAP.
- It provides SQL type language for querying called HiveQL or HQL.
- It is familiar, fast, scalable, and extensible.
Architecture of Hive
The following component diagram depicts the architecture of Hive:
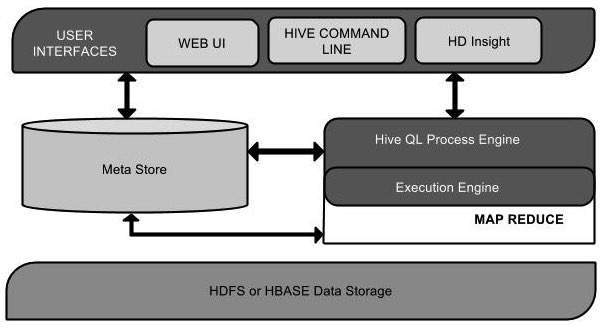
This component diagram contains different units. The following table describes each unit:
| Unit Name | Operation |
|---|---|
| User Interface | Hive is a data warehouse infrastructure software that can create interaction between user and HDFS. The user interfaces that Hive supports are Hive Web UI, Hive command line, and Hive HD Insight (In Windows server). |
| Meta Store | Hive chooses respective database servers to store the schema or Metadata of tables, databases, columns in a table, their data types, and HDFS mapping. |
| HiveQL Process Engine | HiveQL is similar to SQL for querying on schema info on the Metastore. It is one of the replacements of traditional approach for MapReduce program. Instead of writing MapReduce program in Java, we can write a query for MapReduce job and process it. |
| Execution Engine | The conjunction part of HiveQL process Engine and MapReduce is Hive Execution Engine. Execution engine processes the query and generates results as same as MapReduce results. It uses the flavor of MapReduce. |
| HDFS or HBASE | Hadoop distributed file system or HBASE are the data storage techniques to store data into file system. |
Working of Hive
The following diagram depicts the workflow between Hive and Hadoop.
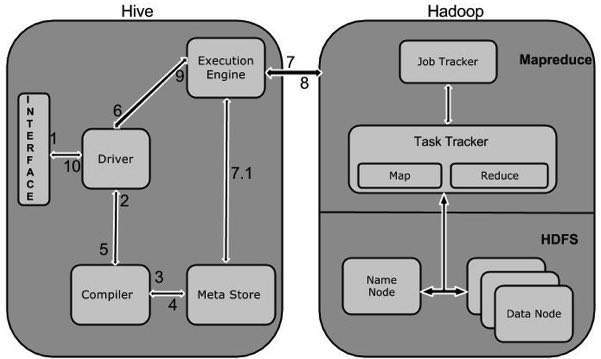
The following table defines how Hive interacts with Hadoop framework:
| Step No. | Operation |
|---|---|
| 1 | Execute Query
The Hive interface such as Command Line or Web UI sends query to Driver (any database driver such as JDBC, ODBC, etc.) to execute. |
| 2 | Get Plan
The driver takes the help of query compiler that parses the query to check the syntax and query plan or the requirement of query. |
| 3 | Get Metadata
The compiler sends metadata request to Metastore (any database). |
| 4 | Send Metadata
Metastore sends metadata as a response to the compiler. |
| 5 | Send Plan
The compiler checks the requirement and resends the plan to the driver. Up to here, the parsing and compiling of a query is complete. |
| 6 | Execute Plan
The driver sends the execute plan to the execution engine. |
| 7 | Execute Job
Internally, the process of execution job is a MapReduce job. The execution engine sends the job to JobTracker, which is in Name node and it assigns this job to TaskTracker, which is in Data node. Here, the query executes MapReduce job. |
| 7.1 | Metadata Ops
Meanwhile in execution, the execution engine can execute metadata operations with Metastore. |
| 8 | Fetch Result
The execution engine receives the results from Data nodes. |
| 9 | Send Results
The execution engine sends those resultant values to the driver. |
| 10 | Send Results
The driver sends the results to Hive Interfaces. |
Hive - Installation
All Hadoop sub-projects such as Hive, Pig, and HBase support Linux operating system. Therefore, you need to install any Linux flavored OS. The following simple steps are executed for Hive installation:
Step 1: Verifying JAVA Installation
Java must be installed on your system before installing Hive. Let us verify java installation using the following command:
$ java –version
If Java is already installed on your system, you get to see the following response:
java version "1.7.0_71"
Java(TM) SE Runtime Environment (build 1.7.0_71-b13)
Java HotSpot(TM) Client VM (build 25.0-b02, mixed mode)
If java is not installed in your system, then follow the steps given below for installing java.
Installing Java
Step I:
Download java (JDK <latest version> - X64.tar.gz) by visiting the following link http://www.oracle.com/technetwork/java/javase/downloads/jdk7-downloads-1880260.html.
Then jdk-7u71-linux-x64.tar.gz will be downloaded onto your system.
Step II:
Generally you will find the downloaded java file in the Downloads folder. Verify it and extract the jdk-7u71-linux-x64.gz file using the following commands.
$ cd Downloads/
$ ls
jdk-7u71-linux-x64.gz
$ tar zxf jdk-7u71-linux-x64.gz
$ ls
jdk1.7.0_71 jdk-7u71-linux-x64.gz
Step III:
To make java available to all the users, you have to move it to the location “/usr/local/”. Open root, and type the following commands.
$ su
password:
# mv jdk1.7.0_71 /usr/local/
# exit
Step IV:
For setting up PATH and JAVA_HOME variables, add the following commands to ~/.bashrc file.
export JAVA_HOME=/usr/local/jdk1.7.0_71
export PATH=PATH:$JAVA_HOME/bin
Now verify the installation using the command java -version from the terminal as explained above.
Step 2: Verifying Hadoop Installation
Hadoop must be installed on your system before installing Hive. Let us verify the Hadoop installation using the following command:
$ hadoop version
If Hadoop is already installed on your system, then you will get the following response:
Hadoop 2.4.1 Subversion https://svn.apache.org/repos/asf/hadoop/common -r 1529768
Compiled by hortonmu on 2013-10-07T06:28Z
Compiled with protoc 2.5.0
From source with checksum 79e53ce7994d1628b240f09af91e1af4
If Hadoop is not installed on your system, then proceed with the following steps:
Downloading Hadoop
Download and extract Hadoop 2.4.1 from Apache Software Foundation using the following commands.
$ su
password:
# cd /usr/local
# wget http://apache.claz.org/hadoop/common/hadoop-2.4.1/
hadoop-2.4.1.tar.gz
# tar xzf hadoop-2.4.1.tar.gz
# mv hadoop-2.4.1/* to hadoop/
# exit
Installing Hadoop in Pseudo Distributed Mode
The following steps are used to install Hadoop 2.4.1 in pseudo distributed mode.
Step I: Setting up Hadoop
You can set Hadoop environment variables by appending the following commands to ~/.bashrc file.
export HADOOP_HOME=/usr/local/hadoop
export HADOOP_MAPRED_HOME=$HADOOP_HOME
export HADOOP_COMMON_HOME=$HADOOP_HOME
export HADOOP_HDFS_HOME=$HADOOP_HOME
export YARN_HOME=$HADOOP_HOME
export HADOOP_COMMON_LIB_NATIVE_DIR=$HADOOP_HOME/lib/native export
PATH=$PATH:$HADOOP_HOME/sbin:$HADOOP_HOME/bin
Now apply all the changes into the current running system.
$ source ~/.bashrc
Step II: Hadoop Configuration
You can find all the Hadoop configuration files in the location “$HADOOP_HOME/etc/hadoop”. You need to make suitable changes in those configuration files according to your Hadoop infrastructure.
$ cd $HADOOP_HOME/etc/hadoop
In order to develop Hadoop programs using java, you have to reset the java environment variables in hadoop-env.sh file by replacing JAVA_HOME value with the location of java in your system.
export JAVA_HOME=/usr/local/jdk1.7.0_71
Given below are the list of files that you have to edit to configure Hadoop.
core-site.xml
The core-site.xml file contains information such as the port number used for Hadoop instance, memory allocated for the file system, memory limit for storing the data, and the size of Read/Write buffers.
Open the core-site.xml and add the following properties in between the <configuration> and </configuration> tags.
<configuration>

   <property>
      <name>fs.default.name</name>
      <value>hdfs://localhost:9000</value>
   </property>

</configuration>
hdfs-site.xml
The hdfs-site.xml file contains information such as the value of replication data, the namenode path, and the datanode path of your local file systems. It means the place where you want to store the Hadoop infra.
Let us assume the following data.
dfs.replication (data replication value) = 1

(In the following path /hadoop/ is the user name.
hadoopinfra/hdfs/namenode is the directory created by hdfs file system.)

namenode path = //home/hadoop/hadoopinfra/hdfs/namenode

(hadoopinfra/hdfs/datanode is the directory created by hdfs file system.)
datanode path = //home/hadoop/hadoopinfra/hdfs/datanode
Open this file and add the following properties in between the <configuration>, </configuration> tags in this file.
<configuration>

   <property>
      <name>dfs.replication</name>
      <value>1</value>
   </property>
   <property>
      <name>dfs.name.dir</name>
      <value>file:///home/hadoop/hadoopinfra/hdfs/namenode </value>
   </property>
   <property>
      <name>dfs.data.dir</name>
      <value>file:///home/hadoop/hadoopinfra/hdfs/datanode </value >
   </property>

</configuration>
Note: In the above file, all the property values are user-defined and you can make changes according to your Hadoop infrastructure.
yarn-site.xml
This file is used to configure yarn into Hadoop. Open the yarn-site.xml file and add the following properties in between the <configuration>, </configuration> tags in this file.
<configuration>

   <property>
      <name>yarn.nodemanager.aux-services</name>
      <value>mapreduce_shuffle</value>
   </property>

</configuration>
mapred-site.xml
This file is used to specify which MapReduce framework we are using. By default, Hadoop contains a template of yarn-site.xml. First of all, you need to copy the file from mapred-site,xml.template to mapred-site.xml file using the following command.
$ cp mapred-site.xml.template mapred-site.xml
Open mapred-site.xml file and add the following properties in between the <configuration>, </configuration> tags in this file.
<configuration>

   <property>
      <name>mapreduce.framework.name</name>
      <value>yarn</value>
   </property>

</configuration>
Verifying Hadoop Installation
The following steps are used to verify the Hadoop installation.
Step I: Name Node Setup
Set up the namenode using the command “hdfs namenode -format” as follows.
$ cd ~
$ hdfs namenode -format
The expected result is as follows.
10/24/14 21:30:55 INFO namenode.NameNode: STARTUP_MSG:
/************************************************************
STARTUP_MSG: Starting NameNode
STARTUP_MSG: host = localhost/192.168.1.11
STARTUP_MSG: args = [-format]
STARTUP_MSG: version = 2.4.1
...
...
10/24/14 21:30:56 INFO common.Storage: Storage directory
/home/hadoop/hadoopinfra/hdfs/namenode has been successfully formatted.
10/24/14 21:30:56 INFO namenode.NNStorageRetentionManager: Going to
retain 1 images with txid >= 0
10/24/14 21:30:56 INFO util.ExitUtil: Exiting with status 0
10/24/14 21:30:56 INFO namenode.NameNode: SHUTDOWN_MSG:
/************************************************************
SHUTDOWN_MSG: Shutting down NameNode at localhost/192.168.1.11
 ************************************************************/
Step II: Verifying Hadoop dfs
The following command is used to start dfs. Executing this command will start your Hadoop file system.
$ start-dfs.sh
The expected output is as follows:
10/24/14 21:37:56
Starting namenodes on [localhost]
localhost: starting namenode, logging to /home/hadoop/hadoop-2.4.1/logs/hadoop-hadoop-namenode-localhost.out
localhost: starting datanode, logging to /home/hadoop/hadoop-2.4.1/logs/hadoop-hadoop-datanode-localhost.out
Starting secondary namenodes [0.0.0.0]
Step III: Verifying Yarn Script
The following command is used to start the yarn script. Executing this command will start your yarn daemons.
$ start-yarn.sh
The expected output is as follows:
starting yarn daemons
starting resourcemanager, logging to /home/hadoop/hadoop-2.4.1/logs/yarn-hadoop-resourcemanager-localhost.out
localhost: starting nodemanager, logging to /home/hadoop/hadoop-2.4.1/logs/yarn-hadoop-nodemanager-localhost.out
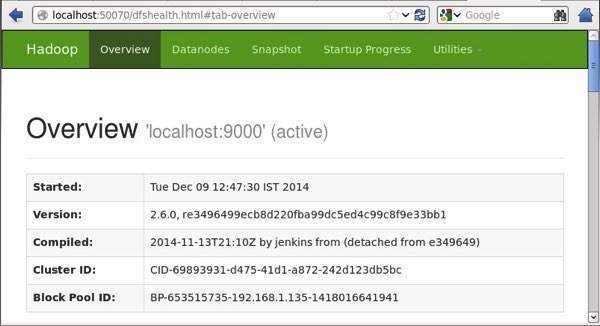
Step IV: Accessing Hadoop on Browser
The default port number to access Hadoop is 50070. Use the following url to get Hadoop services on your browser.
http://localhost:50070/
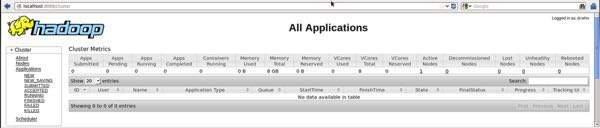
Step V: Verify all applications for cluster
The default port number to access all applications of cluster is 8088. Use the following url to visit this service.
http://localhost:8088/
Step 3: Downloading Hive
We use hive-0.14.0 in this tutorial. You can download it by visiting the following link http://apache.petsads.us/hive/hive-0.14.0/. Let us assume it gets downloaded onto the /Downloads directory. Here, we download Hive archive named “apache-hive-0.14.0-bin.tar.gz” for this tutorial. The following command is used to verify the download:
$ cd Downloads
$ ls
On successful download, you get to see the following response:
apache-hive-0.14.0-bin.tar.gz
Step 4: Installing Hive
The following steps are required for installing Hive on your system. Let us assume the Hive archive is downloaded onto the /Downloads directory.
Extracting and verifying Hive Archive
The following command is used to verify the download and extract the hive archive:
$ tar zxvf apache-hive-0.14.0-bin.tar.gz
$ ls
On successful download, you get to see the following response:
apache-hive-0.14.0-bin apache-hive-0.14.0-bin.tar.gz
Copying files to /usr/local/hive directory
We need to copy the files from the super user “su -”. The following commands are used to copy the files from the extracted directory to the /usr/local/hive” directory.
$ su -
passwd:

# cd /home/user/Download
# mv apache-hive-0.14.0-bin /usr/local/hive
# exit
Setting up environment for Hive
You can set up the Hive environment by appending the following lines to ~/.bashrc file:
export HIVE_HOME=/usr/local/hive
export PATH=$PATH:$HIVE_HOME/bin
export CLASSPATH=$CLASSPATH:/usr/local/Hadoop/lib/*:.
export CLASSPATH=$CLASSPATH:/usr/local/hive/lib/*:.
The following command is used to execute ~/.bashrc file.
$ source ~/.bashrc
Step 5: Configuring Hive
To configure Hive with Hadoop, you need to edit the hive-env.sh file, which is placed in the $HIVE_HOME/conf directory. The following commands redirect to Hive config folder and copy the template file:
$ cd $HIVE_HOME/conf
$ cp hive-env.sh.template hive-env.sh
Edit the hive-env.sh file by appending the following line:
export HADOOP_HOME=/usr/local/hadoop
Hive installation is completed successfully. Now you require an external database server to configure Metastore. We use Apache Derby database.
Step 6: Downloading and Installing Apache Derby
Follow the steps given below to download and install Apache Derby:
Downloading Apache Derby
The following command is used to download Apache Derby. It takes some time to download.
$ cd ~
$ wget http://archive.apache.org/dist/db/derby/db-derby-10.4.2.0/db-derby-10.4.2.0-bin.tar.gz
The following command is used to verify the download:
$ ls
On successful download, you get to see the following response:
db-derby-10.4.2.0-bin.tar.gz
Extracting and verifying Derby archive
The following commands are used for extracting and verifying the Derby archive:
$ tar zxvf db-derby-10.4.2.0-bin.tar.gz
$ ls
On successful download, you get to see the following response:
db-derby-10.4.2.0-bin db-derby-10.4.2.0-bin.tar.gz
Copying files to /usr/local/derby directory
We need to copy from the super user “su -”. The following commands are used to copy the files from the extracted directory to the /usr/local/derby directory:
$ su -
passwd:
# cd /home/user
# mv db-derby-10.4.2.0-bin /usr/local/derby
# exit
Setting up environment for Derby
You can set up the Derby environment by appending the following lines to ~/.bashrc file:
export DERBY_HOME=/usr/local/derby
export PATH=$PATH:$DERBY_HOME/bin
Apache Hive
18
export CLASSPATH=$CLASSPATH:$DERBY_HOME/lib/derby.jar:$DERBY_HOME/lib/derbytools.jar
The following command is used to execute ~/.bashrc file:
$ source ~/.bashrc
Create a directory to store Metastore
Create a directory named data in $DERBY_HOME directory to store Metastore data.
$ mkdir $DERBY_HOME/data
Derby installation and environmental setup is now complete.
Step 7: Configuring Metastore of Hive
Configuring Metastore means specifying to Hive where the database is stored. You can do this by editing the hive-site.xml file, which is in the $HIVE_HOME/conf directory. First of all, copy the template file using the following command:
$ cd $HIVE_HOME/conf
$ cp hive-default.xml.template hive-site.xml
Edit hive-site.xml and append the following lines between the <configuration> and </configuration> tags:
<property>
   <name>javax.jdo.option.ConnectionURL</name>
   <value>jdbc:derby://localhost:1527/metastore_db;create=true </value>
   <description>JDBC connect string for a JDBC metastore </description>
</property>
Create a file named jpox.properties and add the following lines into it:
javax.jdo.PersistenceManagerFactoryClass =

org.jpox.PersistenceManagerFactoryImpl
org.jpox.autoCreateSchema = false
org.jpox.validateTables = false
org.jpox.validateColumns = false
org.jpox.validateConstraints = false
org.jpox.storeManagerType = rdbms
org.jpox.autoCreateSchema = true
org.jpox.autoStartMechanismMode = checked
org.jpox.transactionIsolation = read_committed
javax.jdo.option.DetachAllOnCommit = true
javax.jdo.option.NontransactionalRead = true
javax.jdo.option.ConnectionDriverName = org.apache.derby.jdbc.ClientDriver
javax.jdo.option.ConnectionURL = jdbc:derby://hadoop1:1527/metastore_db;create = true
javax.jdo.option.ConnectionUserName = APP
javax.jdo.option.ConnectionPassword = mine
Step 8: Verifying Hive Installation
Before running Hive, you need to create the /tmp folder and a separate Hive folder in HDFS. Here, we use the /user/hive/warehouse folder. You need to set write permission for these newly created folders as shown below:
chmod g+w
Now set them in HDFS before verifying Hive. Use the following commands:
$ $HADOOP_HOME/bin/hadoop fs -mkdir /tmp
$ $HADOOP_HOME/bin/hadoop fs -mkdir /user/hive/warehouse
$ $HADOOP_HOME/bin/hadoop fs -chmod g+w /tmp
$ $HADOOP_HOME/bin/hadoop fs -chmod g+w /user/hive/warehouse
The following commands are used to verify Hive installation:
$ cd $HIVE_HOME
$ bin/hive
On successful installation of Hive, you get to see the following response:
Logging initialized using configuration in jar:file:/home/hadoop/hive-0.9.0/lib/hive-common-0.9.0.jar!/hive-log4j.properties
Hive history file=/tmp/hadoop/hive_job_log_hadoop_201312121621_1494929084.txt
………………….
hive>
The following sample command is executed to display all the tables:
hive> show tables;
OK
Time taken: 2.798 seconds
hive>
Hive - Data Types
This chapter takes you through the different data types in Hive, which are involved in the table creation. All the data types in Hive are classified into four types, given as follows:
- Column Types
- Literals
- Null Values
- Complex Types
Column Types
Column type are used as column data types of Hive. They are as follows:
Integral Types
Integer type data can be specified using integral data types, INT. When the data range exceeds the range of INT, you need to use BIGINT and if the data range is smaller than the INT, you use SMALLINT. TINYINT is smaller than SMALLINT.
The following table depicts various INT data types:
| Type | Postfix | Example |
|---|---|---|
| TINYINT | Y | 10Y |
| SMALLINT | S | 10S |
| INT | - | 10 |
| BIGINT | L | 10L |
String Types
String type data types can be specified using single quotes (' ') or double quotes (" "). It contains two data types: VARCHAR and CHAR. Hive follows C-types escape characters.
The following table depicts various CHAR data types:
| Data Type | Length |
|---|---|
| VARCHAR | 1 to 65355 |
| CHAR | 255 |
Timestamp
It supports traditional UNIX timestamp with optional nanosecond precision. It supports java.sql.Timestamp format “YYYY-MM-DD HH:MM:SS.fffffffff” and format “yyyy-mm-dd hh:mm:ss.ffffffffff”.
Dates
DATE values are described in year/month/day format in the form {{YYYY-MM-DD}}.
Decimals
The DECIMAL type in Hive is as same as Big Decimal format of Java. It is used for representing immutable arbitrary precision. The syntax and example is as follows:
DECIMAL(precision, scale)
decimal(10,0)
Union Types
Union is a collection of heterogeneous data types. You can create an instance using create union. The syntax and example is as follows:
UNIONTYPE<int, double, array<string>, struct<a:int,b:string>>

{0:1}
{1:2.0}
{2:["three","four"]}
{3:{"a":5,"b":"five"}}
{2:["six","seven"]}
{3:{"a":8,"b":"eight"}}
{0:9}
{1:10.0}
Literals
The following literals are used in Hive:
Floating Point Types
Floating point types are nothing but numbers with decimal points. Generally, this type of data is composed of DOUBLE data type.
Decimal Type
Decimal type data is nothing but floating point value with higher range than DOUBLE data type. The range of decimal type is approximately -10-308 to 10308.Null Value
Missing values are represented by the special value NULL.
Complex Types
The Hive complex data types are as follows:
Arrays
Arrays in Hive are used the same way they are used in Java.
Syntax: ARRAY<data_type>
Maps
Maps in Hive are similar to Java Maps.
Syntax: MAP<primitive_type, data_type>
Structs
Structs in Hive is similar to using complex data with comment.
Syntax: STRUCT<col_name : data_type [COMMENT col_comment], ...>
Hive - Create Database
Hive is a database technology that can define databases and tables to analyze structured data. The theme for structured data analysis is to store the data in a tabular manner, and pass queries to analyze it. This chapter explains how to create Hive database. Hive contains a default database named default.
Create Database Statement
Create Database is a statement used to create a database in Hive. A database in Hive is a namespace or a collection of tables. The syntax for this statement is as follows:
CREATE DATABASE|SCHEMA [IF NOT EXISTS] <database name>
Here, IF NOT EXISTS is an optional clause, which notifies the user that a database with the same name already exists. We can use SCHEMA in place of DATABASE in this command. The following query is executed to create a database named userdb:
hive> CREATE DATABASE [IF NOT EXISTS] userdb;
or
hive> CREATE SCHEMA userdb;
The following query is used to verify a databases list:
hive> SHOW DATABASES;
default
userdb
JDBC Program
The JDBC program to create a database is given below.
import java.sql.SQLException;
import java.sql.Connection;
import java.sql.ResultSet; 4. CREATE DATABASE
import java.sql.Statement;
import java.sql.DriverManager;

public class HiveCreateDb {
   private static String driverName =
   "org.apache.hadoop.hive.jdbc.HiveDriver";
   public static void main(String[] args) throws SQLException {
      // Register driver and create driver instance
      Class.forName(driverName);
      // get connection
      Connection con = DriverManager.
      getConnection("jdbc:hive://localhost:10000/default", "", "");
      Statement stmt = con.createStatement();
      stmt.executeQuery("CREATE DATABASE userdb");
      System.out.println(“Database userdb created successfully.”);
      con.close();
   }
}
Save the program in a file named HiveCreateDb.java. The following commands are used to compile and execute this program.
$ javac HiveCreateDb.java
$ java HiveCreateDb
Output:
Database userdb created successfully.
Hive - Drop Database
This chapter describes how to drop a database in Hive. The usage of SCHEMA and DATABASE are same.
Drop Database Statement
Drop Database is a statement that drops all the tables and deletes the database. Its syntax is as follows:
DROP DATABASE StatementDROP (DATABASE|SCHEMA) [IF EXISTS] database_name
[RESTRICT|CASCADE];
The following queries are used to drop a database. Let us assume that the database name is userdb.
hive> DROP DATABASE IF EXISTS userdb;
The following query drops the database using CASCADE. It means dropping respective tables before dropping the database.
hive> DROP DATABASE IF EXISTS userdb CASCADE;
The following query drops the database using SCHEMA.
hive> DROP SCHEMA userdb;
This clause was added in Hive 0.6.
JDBC Program
The JDBC program to drop a database is given below.
import java.sql.SQLException;
import java.sql.Connection;
import java.sql.ResultSet;
import java.sql.Statement;
import java.sql.DriverManager; 5. DROP DATABASE

public class HiveDropDb {
   private static String driverName =
   "org.apache.hadoop.hive.jdbc.HiveDriver";
   public static void main(String[] args) throws SQLException {
      // Register driver and create driver instance
      Class.forName(driverName);
      // get connection
      Connection con = DriverManager.
      getConnection("jdbc:hive://localhost:10000/default", "", "");
      Statement stmt = con.createStatement();
      stmt.executeQuery("DROP DATABASE userdb");
      System.out.println(“Drop userdb database successful.”);
      con.close();
   }
}
Save the program in a file named HiveDropDb.java. Given below are the commands to compile and execute this program.
$ javac HiveDropDb.java
$ java HiveDropDb
Output:
Drop userdb database successful.
Hive - Create Table
This chapter explains how to create a table and how to insert data into it. The conventions of creating a table in HIVE is quite similar to creating a table using SQL.
Create Table Statement
Create Table is a statement used to create a table in Hive. The syntax and example are as follows:
Syntax
CREATE [TEMPORARY] [EXTERNAL] TABLE [IF NOT EXISTS] [db_name.] table_name

[(col_name data_type [COMMENT col_comment], ...)]
[COMMENT table_comment]
[ROW FORMAT row_format]
[STORED AS file_format]
Example
Let us assume you need to create a table named employee using CREATE TABLE statement. The following table lists the fields and their data types in employee table:
| Sr.No | Field Name | Data Type |
|---|---|---|
| 1 | Eid | int |
| 2 | Name | String |
| 3 | Salary | Float |
| 4 | Designation | string |
The following data is a Comment, Row formatted fields such as Field terminator, Lines terminator, and Stored File type.
COMMENT ‘Employee details’
FIELDS TERMINATED BY ‘\t’
LINES TERMINATED BY ‘\n’
STORED IN TEXT FILE
The following query creates a table named employee using the above data.
hive> CREATE TABLE IF NOT EXISTS employee ( eid int, name String,
> salary String, destination String)
> COMMENT ‘Employee details’
> ROW FORMAT DELIMITED
> FIELDS TERMINATED BY ‘\t’
> LINES TERMINATED BY ‘\n’
> STORED AS TEXTFILE;
If you add the option IF NOT EXISTS, Hive ignores the statement in case the table already exists.
On successful creation of table, you get to see the following response:
OK
Time taken: 5.905 seconds
hive>
JDBC Program
The JDBC program to create a table is given example.
import java.sql.SQLException;
import java.sql.Connection;
import java.sql.ResultSet;
import java.sql.Statement;
import java.sql.DriverManager;

public class HiveCreateTable {
   private static String driverName =
   "org.apache.hadoop.hive.jdbc.HiveDriver";
   public static void main(String[] args) throws SQLException {
      // Register driver and create driver instance
      Class.forName(driverName);
      // get connection
      Connection con = DriverManager.
      getConnection("jdbc:hive://localhost:10000/userdb", "", "");
      // create statement
      Statement stmt = con.createStatement();
      // execute statement
      stmt.executeQuery("CREATE TABLE IF NOT EXISTS "
      +" employee ( eid int, name String, "
      +" salary String, destignation String)"
      +" COMMENT ‘Employee details’"
      +" ROW FORMAT DELIMITED"
      +" FIELDS TERMINATED BY ‘\t’"
      +" LINES TERMINATED BY ‘\n’"
      +" STORED AS TEXTFILE;");
      System.out.println(“ Table employee created.”);
      con.close();
   }
}
Save the program in a file named HiveCreateDb.java. The following commands are used to compile and execute this program.
$ javac HiveCreateDb.java
$ java HiveCreateDb
Output
Table employee created.
Load Data Statement
Generally, after creating a table in SQL, we can insert data using the Insert statement. But in Hive, we can insert data using the LOAD DATA statement.
While inserting data into Hive, it is better to use LOAD DATA to store bulk records. There are two ways to load data: one is from local file system and second is from Hadoop file system.
Syntex
The syntax for load data is as follows:
LOAD DATA [LOCAL] INPATH 'filepath' [OVERWRITE] INTO TABLE tablename
[PARTITION (partcol1=val1, partcol2=val2 ...)]
- LOCAL is identifier to specify the local path. It is optional.
- OVERWRITE is optional to overwrite the data in the table.
- PARTITION is optional.
Example
We will insert the following data into the table. It is a text file named sample.txt in /home/user directory.
1201  Gopal       45000    Technical manager
1202  Manisha     45000    Proof reader
1203  Masthanvali 40000    Technical writer
1204  Krian       40000    Hr Admin
1205  Kranthi     30000    Op Admin
The following query loads the given text into the table.
hive> LOAD DATA LOCAL INPATH '/home/user/sample.txt'
> OVERWRITE INTO TABLE employee;
On successful download, you get to see the following response:
OK
Time taken: 15.905 seconds
hive>
JDBC Program
Given below is the JDBC program to load given data into the table.
import java.sql.SQLException;
import java.sql.Connection;
import java.sql.ResultSet;
import java.sql.Statement;
import java.sql.DriverManager;

public class HiveLoadData {
   private static String driverName =
   "org.apache.hadoop.hive.jdbc.HiveDriver";
   public static void main(String[] args) throws SQLException {
      // Register driver and create driver instance
      Class.forName(driverName);
      // get connection
      Connection con = DriverManager.
      getConnection("jdbc:hive://localhost:10000/userdb", "", "");
      // create statement
      Statement stmt = con.createStatement();
      // execute statement
      stmt.executeQuery("LOAD DATA LOCAL INPATH '/home/user/sample.txt'"
      +"OVERWRITE INTO TABLE employee;");
      System.out.println("Load Data into employee successful");
      con.close();
   }
}
Save the program in a file named HiveLoadData.java. Use the following commands to compile and execute this program.
$ javac HiveLoadData.java
$ java HiveLoadData
Output:
Load Data into employee successful
Hive - Alter Table
This chapter explains how to alter the attributes of a table such as changing its table name, changing column names, adding columns, and deleting or replacing columns.
Alter Table Statement
It is used to alter a table in Hive.
Syntax
The statement takes any of the following syntaxes based on what attributes we wish to modify in a table.
ALTER TABLE name RENAME TO new_name
ALTER TABLE name ADD COLUMNS (col_spec[, col_spec ...])
ALTER TABLE name DROP [COLUMN] column_name
ALTER TABLE name CHANGE column_name new_name new_type
ALTER TABLE name REPLACE COLUMNS (col_spec[, col_spec ...])
Rename To… Statement
The following query renames the table from employee to emp.
hive> ALTER TABLE employee RENAME TO emp;
JDBC Program
The JDBC program to rename a table is as follows.
import java.sql.SQLException;
import java.sql.Connection;
import java.sql.ResultSet;
import java.sql.Statement;
import java.sql.DriverManager;

public class HiveAlterRenameTo {
   private static String driverName =
   "org.apache.hadoop.hive.jdbc.HiveDriver";
   public static void main(String[] args) throws SQLException {
      // Register driver and create driver instance
      Class.forName(driverName);
      // get connection
      Connection con = DriverManager.
      getConnection("jdbc:hive://localhost:10000/userdb", "", "");
      // create statement
      Statement stmt = con.createStatement();
      // execute statement
      stmt.executeQuery("ALTER TABLE employee RENAME TO emp;");
      System.out.println("Table Renamed Successfully");
      con.close();
   }
}
Save the program in a file named HiveAlterRenameTo.java. Use the following commands to compile and execute this program.
$ javac HiveAlterRenameTo.java
$ java HiveAlterRenameTo
Output:
Table renamed successfully.
Change Statement
The following table contains the fields of employee table and it shows the fields to be changed (in bold).
| Field Name | Convert from Data Type | Change Field Name | Convert to Data Type |
|---|---|---|---|
| eid | int | eid | int |
| name | String | ename | String |
| salary | Float | salary | Double |
| designation | String | designation | String |
The following queries rename the column name and column data type using the above data:
hive> ALTER TABLE employee CHANGE name ename String;
hive> ALTER TABLE employee CHANGE salary salary Double;
JDBC Program
Given below is the JDBC program to change a column.
import java.sql.SQLException;
import java.sql.Connection;
import java.sql.ResultSet;
import java.sql.Statement;
import java.sql.DriverManager;

public class HiveAlterChangeColumn {
   private static String driverName =
   "org.apache.hadoop.hive.jdbc.HiveDriver";
   public static void main(String[] args) throws SQLException {
      // Register driver and create driver instance
      Class.forName(driverName);
      // get connection
      Connection con = DriverManager.
      getConnection("jdbc:hive://localhost:10000/userdb", "", "");
      // create statement
      Statement stmt = con.createStatement();
      // execute statement
      stmt.executeQuery("ALTER TABLE employee CHANGE name ename String;");
      stmt.executeQuery("ALTER TABLE employee CHANGE salary salary Double;");
      System.out.println("Change column successful.");
      con.close();
   }
}
Save the program in a file named HiveAlterChangeColumn.java. Use the following commands to compile and execute this program.
$ javac HiveAlterChangeColumn.java
$ java HiveAlterChangeColumn
Output:
Change column successful.
Add Columns Statement
The following query adds a column named dept to the employee table.
hive> ALTER TABLE employee ADD COLUMNS (
   > dept STRING COMMENT 'Department name');
JDBC Program
The JDBC program to add a column to a table is given below.
import java.sql.SQLException;
import java.sql.Connection;
import java.sql.ResultSet;
import java.sql.Statement;
import java.sql.DriverManager;

public class HiveAlterAddColumn {
   private static String driverName =
   "org.apache.hadoop.hive.jdbc.HiveDriver";
   public static void main(String[] args) throws SQLException {
      // Register driver and create driver instance
      Class.forName(driverName);
      // get connection
      Connection con = DriverManager.
      getConnection("jdbc:hive://localhost:10000/userdb", "", "");
     // create statement
     Statement stmt = con.createStatement();
     // execute statement
     stmt.executeQuery("ALTER TABLE employee ADD COLUMNS "
     +" (dept STRING COMMENT 'Department name');");
     System.out.prinln("Add column successful.");
     con.close();
   }
}
Save the program in a file named HiveAlterAddColumn.java. Use the following commands to compile and execute this program.
$ javac HiveAlterAddColumn.java
$ java HiveAlterAddColumn
Output:
Add column successful.
Replace Statement
The following query deletes all the columns from the employee table and replaces it with emp and name columns:
hive> ALTER TABLE employee REPLACE COLUMNS (
   > eid INT empid Int,
   > ename STRING name String);
JDBC Program
Given below is the JDBC program to replace eid column with empid and ename column with name.
import java.sql.SQLException;
import java.sql.Connection;
import java.sql.ResultSet;
import java.sql.Statement;
import java.sql.DriverManager;

public class HiveAlterReplaceColumn {
   private static String driverName =
   "org.apache.hadoop.hive.jdbc.HiveDriver";
   public static void main(String[] args) throws SQLException {
      // Register driver and create driver instance
      Class.forName(driverName);
      // get connection
      Connection con = DriverManager.
      getConnection("jdbc:hive://localhost:10000/userdb", "", "");
      // create statement
      Statement stmt = con.createStatement();
      // execute statement
      stmt.executeQuery("ALTER TABLE employee REPLACE COLUMNS "
      +" (eid INT empid Int,"
      +" ename STRING name String);");
      System.out.println(" Replace column successful");
      con.close();
   }
}
Save the program in a file named HiveAlterReplaceColumn.java. Use the following commands to compile and execute this program.
$ javac HiveAlterReplaceColumn.java
$ java HiveAlterReplaceColumn
Output:
Replace column successful.
Hive - Drop Table
This chapter describes how to drop a table in Hive. When you drop a table from Hive Metastore, it removes the table/column data and their metadata. It can be a normal table (stored in Metastore) or an external table (stored in local file system); Hive treats both in the same manner, irrespective of their types.
Drop Table Statement
The syntax is as follows:
DROP TABLE [IF EXISTS] table_name;
The following query drops a table named employee:
hive> DROP TABLE IF EXISTS employee;
On successful execution of the query, you get to see the following response:
OK
Time taken: 5.3 seconds
hive>
JDBC Program
The following JDBC program drops the employee table.
import java.sql.SQLException;
import java.sql.Connection;
import java.sql.ResultSet;
import java.sql.Statement;
import java.sql.DriverManager;

public class HiveDropTable {
   private static String driverName =
   "org.apache.hadoop.hive.jdbc.HiveDriver";
   public static void main(String[] args) throws SQLException {
      // Register driver and create driver instance
      Class.forName(driverName);
      // get connection
      Connection con = DriverManager.
      getConnection("jdbc:hive://localhost:10000/userdb", "", "");
      // create statement
      Statement stmt = con.createStatement();
      // execute statement
      stmt.executeQuery("DROP TABLE IF EXISTS employee;");
     System.out.println("Drop table successful.");
     con.close();
   }
}
Save the program in a file named HiveDropTable.java. Use the following commands to compile and execute this program.
$ javac HiveDropTable.java
$ java HiveDropTable
Output:
Drop table successful
The following query is used to verify the list of tables:
hive> SHOW TABLES;
emp
ok
Time taken: 2.1 seconds
hive>
Hive - Partitioning
Hive organizes tables into partitions. It is a way of dividing a table into related parts based on the values of partitioned columns such as date, city, and department. Using partition, it is easy to query a portion of the data.
Tables or partitions are sub-divided into buckets, to provide extra structure to the data that may be used for more efficient querying. Bucketing works based on the value of hash function of some column of a table.
For example, a table named Tab1 contains employee data such as id, name, dept, and yoj (i.e., year of joining). Suppose you need to retrieve the details of all employees who joined in 2012. A query searches the whole table for the required information. However, if you partition the employee data with the year and store it in a separate file, it reduces the query processing time. The following example shows how to partition a file and its data:
The following file contains employeedata table.
/tab1/employeedata/file1
id, name, dept, yoj
1, gopal, TP, 2012
2, kiran, HR, 2012
3, kaleel,SC, 2013
4, Prasanth, SC, 2013
The above data is partitioned into two files using year.
/tab1/employeedata/2012/file2
1, gopal, TP, 2012
2, kiran, HR, 2012
/tab1/employeedata/2013/file3
3, kaleel,SC, 2013
4, Prasanth, SC, 2013
Adding a Partition
We can add partitions to a table by altering the table. Let us assume we have a table called employee with fields such as Id, Name, Salary, Designation, Dept, and yoj.
Syntax:
ALTER TABLE table_name ADD [IF NOT EXISTS] PARTITION partition_spec
[LOCATION 'location1'] partition_spec [LOCATION 'location2'] ...;

partition_spec:
: (p_column = p_col_value, p_column = p_col_value, ...)
The following query is used to add a partition to the employee table.
hive> ALTER TABLE employee
> ADD PARTITION (year=’2012’)
> location '/2012/part2012';
Renaming a Partition
The syntax of this command is as follows.
ALTER TABLE table_name PARTITION partition_spec RENAME TO PARTITION partition_spec;
The following query is used to rename a partition:
hive> ALTER TABLE employee PARTITION (year=’1203’)
   > RENAME TO PARTITION (Yoj=’1203’);
Dropping a Partition
The following syntax is used to drop a partition:
ALTER TABLE table_name DROP [IF EXISTS] PARTITION partition_spec, PARTITION partition_spec,...;
The following query is used to drop a partition:
hive> ALTER TABLE employee DROP [IF EXISTS]
   > PARTITION (year=’1203’);
Hive - Built-in Operators
This chapter explains the built-in operators of Hive. There are four types of operators in Hive:
- Relational Operators
- Arithmetic Operators
- Logical Operators
- Complex Operators
Relational Operators
These operators are used to compare two operands. The following table describes the relational operators available in Hive:
| Operator | Operand | Description |
|---|---|---|
| A = B | all primitive types | TRUE if expression A is equivalent to expression B otherwise FALSE. |
| A != B | all primitive types | TRUE if expression A is not equivalent to expression B otherwise FALSE. |
| A < B | all primitive types | TRUE if expression A is less than expression B otherwise FALSE. |
| A <= B | all primitive types | TRUE if expression A is less than or equal to expression B otherwise FALSE. |
| A > B | all primitive types | TRUE if expression A is greater than expression B otherwise FALSE. |
| A >= B | all primitive types | TRUE if expression A is greater than or equal to expression B otherwise FALSE. |
| A IS NULL | all types | TRUE if expression A evaluates to NULL otherwise FALSE. |
| A IS NOT NULL | all types | FALSE if expression A evaluates to NULL otherwise TRUE. |
| A LIKE B | Strings | TRUE if string pattern A matches to B otherwise FALSE. |
| A RLIKE B | Strings | NULL if A or B is NULL, TRUE if any substring of A matches the Java regular expression B , otherwise FALSE. |
| A REGEXP B | Strings | Same as RLIKE. |
Example
Let us assume the employee table is composed of fields named Id, Name, Salary, Designation, and Dept as shown below. Generate a query to retrieve the employee details whose Id is 1205.
+-----+--------------+--------+---------------------------+------+
| Id  | Name         | Salary | Designation               | Dept |
+-----+--------------+------------------------------------+------+
|1201 | Gopal        | 45000  | Technical manager         | TP   |
|1202 | Manisha      | 45000  | Proofreader               | PR   |
|1203 | Masthanvali  | 40000  | Technical writer          | TP   |
|1204 | Krian        | 40000  | Hr Admin                  | HR   |
|1205 | Kranthi      | 30000  | Op Admin                  | Admin|
+-----+--------------+--------+---------------------------+------+
The following query is executed to retrieve the employee details using the above table:
hive> SELECT * FROM employee WHERE Id=1205;
On successful execution of query, you get to see the following response:
+-----+-----------+-----------+----------------------------------+
| ID  | Name      | Salary    | Designation              | Dept  |
+-----+---------------+-------+----------------------------------+
|1205 | Kranthi   | 30000     | Op Admin                 | Admin |
+-----+-----------+-----------+----------------------------------+
The following query is executed to retrieve the employee details whose salary is more than or equal to Rs 40000.
hive> SELECT * FROM employee WHERE Salary>=40000;
On successful execution of query, you get to see the following response:
+-----+------------+--------+----------------------------+------+
| ID  | Name       | Salary | Designation                | Dept |
+-----+------------+--------+----------------------------+------+
|1201 | Gopal      | 45000  | Technical manager          | TP   |
|1202 | Manisha    | 45000  | Proofreader                | PR   |
|1203 | Masthanvali| 40000  | Technical writer           | TP   |
|1204 | Krian      | 40000  | Hr Admin                   | HR   |
+-----+------------+--------+----------------------------+------+
Arithmetic Operators
These operators support various common arithmetic operations on the operands. All of them return number types. The following table describes the arithmetic operators available in Hive:
| Operators | Operand | Description |
|---|---|---|
| A + B | all number types | Gives the result of adding A and B. |
| A - B | all number types | Gives the result of subtracting B from A. |
| A * B | all number types | Gives the result of multiplying A and B. |
| A / B | all number types | Gives the result of dividing B from A. |
| A % B | all number types | Gives the reminder resulting from dividing A by B. |
| A & B | all number types | Gives the result of bitwise AND of A and B. |
| A | B | all number types | Gives the result of bitwise OR of A and B. |
| A ^ B | all number types | Gives the result of bitwise XOR of A and B. |
| ~A | all number types | Gives the result of bitwise NOT of A. |
Example
The following query adds two numbers, 20 and 30.
hive> SELECT 20+30 ADD FROM temp;
On successful execution of the query, you get to see the following response:
+--------+
|   ADD  |
+--------+
|   50   |
+--------+
Logical Operators
The operators are logical expressions. All of them return either TRUE or FALSE.
| Operators | Operands | Description |
|---|---|---|
| A AND B | boolean | TRUE if both A and B are TRUE, otherwise FALSE. |
| A && B | boolean | Same as A AND B. |
| A OR B | boolean | TRUE if either A or B or both are TRUE, otherwise FALSE. |
| A || B | boolean | Same as A OR B. |
| NOT A | boolean | TRUE if A is FALSE, otherwise FALSE. |
| !A | boolean | Same as NOT A. |
Example
The following query is used to retrieve employee details whose Department is TP and Salary is more than Rs 40000.
hive> SELECT * FROM employee WHERE Salary>40000 && Dept=TP;
On successful execution of the query, you get to see the following response:
+------+--------------+-------------+-------------------+--------+
| ID   | Name         | Salary      | Designation       | Dept   |
+------+--------------+-------------+-------------------+--------+
|1201  | Gopal        | 45000       | Technical manager | TP     |
+------+--------------+-------------+-------------------+--------+
Complex Operators
These operators provide an expression to access the elements of Complex Types.
| Operator | Operand | Description |
|---|---|---|
| A[n] | A is an Array and n is an int | It returns the nth element in the array A. The first element has index 0. |
| M[key] | M is a Map<K, V> and key has type K | It returns the value corresponding to the key in the map. |
| S.x | S is a struct | It returns the x field of S. |
Hiveql Select...Where
The Hive Query Language (HiveQL) is a query language for Hive to process and analyze structured data in a Metastore. This chapter explains how to use the SELECT statement with WHERE clause.
SELECT statement is used to retrieve the data from a table. WHERE clause works similar to a condition. It filters the data using the condition and gives you a finite result. The built-in operators and functions generate an expression, which fulfils the condition.
Syntax
Given below is the syntax of the SELECT query:
SELECT [ALL | DISTINCT] select_expr, select_expr, ...
FROM table_reference
[WHERE where_condition]
[GROUP BY col_list]
[HAVING having_condition]
[CLUSTER BY col_list | [DISTRIBUTE BY col_list] [SORT BY col_list]]
[LIMIT number];
Example
Let us take an example for SELECT…WHERE clause. Assume we have the employee table as given below, with fields named Id, Name, Salary, Designation, and Dept. Generate a query to retrieve the employee details who earn a salary of more than Rs 30000.
+------+--------------+-------------+-------------------+--------+
| ID   | Name         | Salary      | Designation       | Dept   |
+------+--------------+-------------+-------------------+--------+
|1201  | Gopal        | 45000       | Technical manager | TP     |
|1202  | Manisha      | 45000       | Proofreader       | PR     |
|1203  | Masthanvali  | 40000       | Technical writer  | TP     |
|1204  | Krian        | 40000       | Hr Admin          | HR     |
|1205  | Kranthi      | 30000       | Op Admin          | Admin  |
+------+--------------+-------------+-------------------+--------+
The following query retrieves the employee details using the above scenario:
hive> SELECT * FROM employee WHERE salary>30000;
On successful execution of the query, you get to see the following response:
+------+--------------+-------------+-------------------+--------+
| ID   | Name         | Salary      | Designation       | Dept   |
+------+--------------+-------------+-------------------+--------+
|1201  | Gopal        | 45000       | Technical manager | TP     |
|1202  | Manisha      | 45000       | Proofreader       | PR     |
|1203  | Masthanvali  | 40000       | Technical writer  | TP     |
|1204  | Krian        | 40000       | Hr Admin          | HR     |
+------+--------------+-------------+-------------------+--------+
JDBC Program
The JDBC program to apply where clause for the given example is as follows.
import java.sql.SQLException;
import java.sql.Connection;
import java.sql.ResultSet;
import java.sql.Statement;
import java.sql.DriverManager;

public class HiveQLWhere {
   private static String driverName =
   "org.apache.hadoop.hive.jdbc.HiveDriver";
   public static void main(String[] args) throws SQLException {
      // Register driver and create driver instance
      Class.forName(driverName);
      // get connection
      Connection con = DriverManager.
      getConnection("jdbc:hive://localhost:10000/userdb", "", "");
      // create statement
      Statement stmt = con.createStatement();
      // execute statement
      Resultset res = stmt.executeQuery("SELECT * FROM employee WHERE
      salary>30000;");
      System.out.println("Result:");
      System.out.println(" ID \t Name \t Salary \t Designation \t Dept ");
      while (res.next()) {
         System.out.println(res.getInt(1)+" "+ res.getString(2)+" "+
         res.getDouble(3)+" "+ res.getString(4)+" "+ res.getString(5));
      }
      con.close();
   }
}
Save the program in a file named HiveQLWhere.java. Use the following commands to compile and execute this program.
$ javac HiveQLWhere.java
$ java HiveQLWhere
Output:
ID       Name           Salary      Designation          Dept
1201     Gopal          45000       Technical manager    TP
1202     Manisha        45000       Proofreader          PR
1203     Masthanvali    40000       Technical writer     TP
1204     Krian          40000       Hr Admin             HR
Hiveql Select...Order By
This chapter explains how to use the ORDER BY clause in a SELECT statement. The ORDER BY clause is used to retrieve the details based on one column and sort the result set by ascending or descending order.
Syntax
Given below is the syntax of the ORDER BY clause:
SELECT [ALL | DISTINCT] select_expr, select_expr, ...
FROM table_reference
[WHERE where_condition]
[GROUP BY col_list]
[HAVING having_condition]
[ORDER BY col_list]]
[LIMIT number];
Example
Let us take an example for SELECT...ORDER BY clause. Assume employee table as given below, with the fields named Id, Name, Salary, Designation, and Dept. Generate a query to retrieve the employee details in order by using Department name.
+------+--------------+-------------+-------------------+--------+
| ID   | Name         | Salary      | Designation       | Dept   |
+------+--------------+-------------+-------------------+--------+
|1201  | Gopal        | 45000       | Technical manager | TP     |
|1202  | Manisha      | 45000       | Proofreader       | PR     |
|1203  | Masthanvali  | 40000       | Technical writer  | TP     |
|1204  | Krian        | 40000       | Hr Admin          | HR     |
|1205  | Kranthi      | 30000       | Op Admin          | Admin  |
+------+--------------+-------------+-------------------+--------+
The following query retrieves the employee details using the above scenario:
hive> SELECT Id, Name, Dept FROM employee ORDER BY DEPT;
On successful execution of the query, you get to see the following response:
+------+--------------+-------------+-------------------+--------+
| ID   | Name         | Salary      | Designation       | Dept   |
+------+--------------+-------------+-------------------+--------+
|1205  | Kranthi      | 30000       | Op Admin          | Admin  |
|1204  | Krian        | 40000       | Hr Admin          | HR     |
|1202  | Manisha      | 45000       | Proofreader       | PR     |
|1201  | Gopal        | 45000       | Technical manager | TP     |
|1203  | Masthanvali  | 40000       | Technical writer  | TP     |
+------+--------------+-------------+-------------------+--------+
JDBC Program
Here is the JDBC program to apply Order By clause for the given example.
import java.sql.SQLException;
import java.sql.Connection;
import java.sql.ResultSet;
import java.sql.Statement;
import java.sql.DriverManager;

public class HiveQLOrderBy {
   private static String driverName =
   "org.apache.hadoop.hive.jdbc.HiveDriver";
   public static void main(String[] args) throws SQLException {
      // Register driver and create driver instance
      Class.forName(driverName);
      // get connection
      Connection con = DriverManager.
      getConnection("jdbc:hive://localhost:10000/userdb", "", "");
      // create statement
      Statement stmt = con.createStatement();
      // execute statement
      Resultset res = stmt.executeQuery("SELECT * FROM employee ORDER BY
      DEPT;");
      System.out.println(" ID \t Name \t Salary \t Designation \t Dept ");
      while (res.next()) {
         System.out.println(res.getInt(1)+" "+ res.getString(2)+" "+
         res.getDouble(3)+" "+ res.getString(4)+" "+ res.getString(5));
      }
      con.close();
   }
}
Save the program in a file named HiveQLOrderBy.java. Use the following commands to compile and execute this program.
$ javac HiveQLOrderBy.java
$ java HiveQLOrderBy
Output:
ID       Name           Salary      Designation          Dept
1205     Kranthi        30000       Op Admin             Admin
1204     Krian          40000       Hr Admin             HR
1202     Manisha        45000       Proofreader          PR
1201     Gopal          45000       Technical manager    TP
1203     Masthanvali    40000       Technical writer     TP
1204     Krian          40000       Hr Admin             HR
Hiveql Group By
This chapter explains the details of GROUP BY clause in a SELECT statement. The GROUP BY clause is used to group all the records in a result set using a particular collection column. It is used to query a group of records.
Syntax
The syntax of GROUP BY clause is as follows:
SELECT [ALL | DISTINCT] select_expr, select_expr, ...
FROM table_reference
[WHERE where_condition]
[GROUP BY col_list]
[HAVING having_condition]
[ORDER BY col_list]]
[LIMIT number];
Example
Let us take an example of SELECT…GROUP BY clause. Assume employee table as given below, with Id, Name, Salary, Designation, and Dept fields. Generate a query to retrieve the number of employees in each department.
+------+--------------+-------------+-------------------+--------+
| ID   | Name         | Salary      | Designation       | Dept   |
+------+--------------+-------------+-------------------+--------+
|1201  | Gopal        | 45000       | Technical manager | TP     |
|1202  | Manisha      | 45000       | Proofreader       | PR     |
|1203  | Masthanvali  | 40000       | Technical writer  | TP     |
|1204  | Krian        | 45000       | Proofreader       | PR     |
|1205  | Kranthi      | 30000       | Op Admin          | Admin  |
+------+--------------+-------------+-------------------+--------+
The following query retrieves the employee details using the above scenario.
hive> SELECT Dept,count(*) FROM employee GROUP BY DEPT;
On successful execution of the query, you get to see the following response:
+------+--------------+
| Dept | Count(*)     |
+------+--------------+
|Admin |    1         |
|PR    |    2         |
|TP    |    3         |
+------+--------------+
JDBC Program
Given below is the JDBC program to apply the Group By clause for the given example.
import java.sql.SQLException;
import java.sql.Connection;
import java.sql.ResultSet;
import java.sql.Statement;
import java.sql.DriverManager;

public class HiveQLGroupBy {
   private static String driverName =
   "org.apache.hadoop.hive.jdbc.HiveDriver";
   public static void main(String[] args) throws SQLException {
      // Register driver and create driver instance
      Class.forName(driverName);
      // get connection
      Connection con = DriverManager.
      getConnection("jdbc:hive://localhost:10000/userdb", "", "");
      // create statement
      Statement stmt = con.createStatement();
      // execute statement
      Resultset res = stmt.executeQuery(“SELECT Dept,count(*) ”
      +“FROM employee GROUP BY DEPT; ”);
      System.out.println(" Dept \t count(*)");
      while (res.next()) {
         System.out.println(res.getString(1)+" "+ res.getInt(2));
      }
      con.close();
   }
}
Save the program in a file named HiveQLGroupBy.java. Use the following commands to compile and execute this program.
$ javac HiveQLGroupBy.java
$ java HiveQLGroupBy
Output:
 Dept     Count(*)
 Admin       1
 PR          2
 TP          3
Hiveql Joins
JOINS is a clause that is used for combining specific fields from two tables by using values common to each one. It is used to combine records from two or more tables in the database.
Syntax
join_table:

   table_reference JOIN table_factor [join_condition]
   | table_reference {LEFT|RIGHT|FULL} [OUTER] JOIN table_reference
   join_condition
   | table_reference LEFT SEMI JOIN table_reference join_condition
   | table_reference CROSS JOIN table_reference [join_condition]
Example
We will use the following two tables in this chapter. Consider the following table named CUSTOMERS..
+----+----------+-----+-----------+----------+
| ID | NAME     | AGE | ADDRESS   | SALARY   |
+----+----------+-----+-----------+----------+
| 1  | Ramesh   | 32  | Ahmedabad | 2000.00  |
| 2  | Khilan   | 25  | Delhi     | 1500.00  |
| 3  | kaushik  | 23  | Kota      | 2000.00  |
| 4  | Chaitali | 25  | Mumbai    | 6500.00  |
| 5  | Hardik   | 27  | Bhopal    | 8500.00  |
| 6  | Komal    | 22  | MP        | 4500.00  |
| 7  | Muffy    | 24  | Indore    | 10000.00 |
+----+----------+-----+-----------+----------+
Consider another table ORDERS as follows:
+-----+---------------------+-------------+--------+
|OID  | DATE                | CUSTOMER_ID | AMOUNT |
+-----+---------------------+-------------+--------+
| 102 | 2009-10-08 00:00:00 |           3 | 3000   |
| 100 | 2009-10-08 00:00:00 |           3 | 1500   |
| 101 | 2009-11-20 00:00:00 |           2 | 1560   |
| 103 | 2008-05-20 00:00:00 |           4 | 2060   |
+-----+---------------------+-------------+--------+
There are different types of joins given as follows:
- JOIN
- LEFT OUTER JOIN
- RIGHT OUTER JOIN
- FULL OUTER JOIN
JOIN
JOIN clause is used to combine and retrieve the records from multiple tables. JOIN is same as OUTER JOIN in SQL. A JOIN condition is to be raised using the primary keys and foreign keys of the tables.
The following query executes JOIN on the CUSTOMER and ORDER tables, and retrieves the records:
hive> SELECT c.ID, c.NAME, c.AGE, o.AMOUNT
   > FROM CUSTOMERS c JOIN ORDERS o
   > ON (c.ID = o.CUSTOMER_ID);
On successful execution of the query, you get to see the following response:
+----+----------+-----+--------+
| ID | NAME     | AGE | AMOUNT |
+----+----------+-----+--------+
| 3  | kaushik  | 23  | 3000   |
| 3  | kaushik  | 23  | 1500   |
| 2  | Khilan   | 25  | 1560   |
| 4  | Chaitali | 25  | 2060   |
+----+----------+-----+--------+
LEFT OUTER JOIN
The HiveQL LEFT OUTER JOIN returns all the rows from the left table, even if there are no matches in the right table. This means, if the ON clause matches 0 (zero) records in the right table, the JOIN still returns a row in the result, but with NULL in each column from the right table.
A LEFT JOIN returns all the values from the left table, plus the matched values from the right table, or NULL in case of no matching JOIN predicate.
The following query demonstrates LEFT OUTER JOIN between CUSTOMER and ORDER tables:
hive> SELECT c.ID, c.NAME, o.AMOUNT, o.DATE
   > FROM CUSTOMERS c
   > LEFT OUTER JOIN ORDERS o
   > ON (c.ID = o.CUSTOMER_ID);
On successful execution of the query, you get to see the following response:
+----+----------+--------+---------------------+
| ID | NAME     | AMOUNT | DATE                |
+----+----------+--------+---------------------+
| 1  | Ramesh   | NULL   | NULL                |
| 2  | Khilan   | 1560   | 2009-11-20 00:00:00 |
| 3  | kaushik  | 3000   | 2009-10-08 00:00:00 |
| 3  | kaushik  | 1500   | 2009-10-08 00:00:00 |
| 4  | Chaitali | 2060   | 2008-05-20 00:00:00 |
| 5  | Hardik   | NULL   | NULL                |
| 6  | Komal    | NULL   | NULL                |
| 7  | Muffy    | NULL   | NULL                |
+----+----------+--------+---------------------+
RIGHT OUTER JOIN
The HiveQL RIGHT OUTER JOIN returns all the rows from the right table, even if there are no matches in the left table. If the ON clause matches 0 (zero) records in the left table, the JOIN still returns a row in the result, but with NULL in each column from the left table.
A RIGHT JOIN returns all the values from the right table, plus the matched values from the left table, or NULL in case of no matching join predicate.
The following query demonstrates RIGHT OUTER JOIN between the CUSTOMER and ORDER tables.
hive> SELECT c.ID, c.NAME, o.AMOUNT, o.DATE
   > FROM CUSTOMERS c
   > RIGHT OUTER JOIN ORDERS o
   > ON (c.ID = o.CUSTOMER_ID);
On successful execution of the query, you get to see the following response:
+------+----------+--------+---------------------+
| ID   | NAME     | AMOUNT | DATE                |
+------+----------+--------+---------------------+
| 3    | kaushik  | 3000   | 2009-10-08 00:00:00 |
| 3    | kaushik  | 1500   | 2009-10-08 00:00:00 |
| 2    | Khilan   | 1560   | 2009-11-20 00:00:00 |
| 4    | Chaitali | 2060   | 2008-05-20 00:00:00 |
+------+----------+--------+---------------------+
FULL OUTER JOIN
The HiveQL FULL OUTER JOIN combines the records of both the left and the right outer tables that fulfil the JOIN condition. The joined table contains either all the records from both the tables, or fills in NULL values for missing matches on either side.
The following query demonstrates FULL OUTER JOIN between CUSTOMER and ORDER tables:
hive> SELECT c.ID, c.NAME, o.AMOUNT, o.DATE
   > FROM CUSTOMERS c
   > FULL OUTER JOIN ORDERS o
   > ON (c.ID = o.CUSTOMER_ID);
On successful execution of the query, you get to see the following response:
+------+----------+--------+---------------------+
| ID   | NAME     | AMOUNT | DATE                |
+------+----------+--------+---------------------+
| 1    | Ramesh   | NULL   | NULL                |
| 2    | Khilan   | 1560   | 2009-11-20 00:00:00 |
| 3    | kaushik  | 3000   | 2009-10-08 00:00:00 |
| 3    | kaushik  | 1500   | 2009-10-08 00:00:00 |
| 4    | Chaitali | 2060   | 2008-05-20 00:00:00 |
| 5    | Hardik   | NULL   | NULL                |
| 6    | Komal    | NULL   | NULL                |
| 7    | Muffy    | NULL   | NULL                |
| 3    | kaushik  | 3000   | 2009-10-08 00:00:00 |
| 3    | kaushik  | 1500   | 2009-10-08 00:00:00 |
| 2    | Khilan   | 1560   | 2009-11-20 00:00:00 |
| 4    | Chaitali | 2060   | 2008-05-20 00:00:00 |
+------+----------+--------+---------------------+
Hive - Built-in Functions
This chapter explains the built-in functions available in Hive. The functions look quite similar to SQL functions, except for their usage.
Built-In Functions
Hive supports the following built-in functions:
| Return Type | Signature | Description |
|---|---|---|
| BIGINT | round(double a) | It returns the rounded BIGINT value of the double. |
| BIGINT | floor(double a) | It returns the maximum BIGINT value that is equal or less than the double. |
| BIGINT | ceil(double a) | It returns the minimum BIGINT value that is equal or greater than the double. |
| double | rand(), rand(int seed) | It returns a random number that changes from row to row. |
| string | concat(string A, string B,...) | It returns the string resulting from concatenating B after A. |
| string | substr(string A, int start) | It returns the substring of A starting from start position till the end of string A. |
| string | substr(string A, int start, int length) | It returns the substring of A starting from start position with the given length. |
| string | upper(string A) | It returns the string resulting from converting all characters of A to upper case. |
| string | ucase(string A) | Same as above. | string | lower(string A) | It returns the string resulting from converting all characters of B to lower case. |
| string | lcase(string A) | Same as above. |
| string | trim(string A) | It returns the string resulting from trimming spaces from both ends of A. |
| string | ltrim(string A) | It returns the string resulting from trimming spaces from the beginning (left hand side) of A. |
| string | rtrim(string A) | rtrim(string A) It returns the string resulting from trimming spaces from the end (right hand side) of A. |
| string | regexp_replace(string A, string B, string C) | It returns the string resulting from replacing all substrings in B that match the Java regular expression syntax with C. |
| int | size(Map<K.V>) | It returns the number of elements in the map type. |
| int | size(Array<T>) | It returns the number of elements in the array type. |
| value of <type> | cast(<expr> as <type>) | It converts the results of the expression expr to <type> e.g. cast('1' as BIGINT) converts the string '1' to it integral representation. A NULL is returned if the conversion does not succeed. |
| string | from_unixtime(int unixtime) | convert the number of seconds from Unix epoch (1970-01-01 00:00:00 UTC) to a string representing the timestamp of that moment in the current system time zone in the format of "1970-01-01 00:00:00" |
| string | to_date(string timestamp) | It returns the date part of a timestamp string: to_date("1970-01-01 00:00:00") = "1970-01-01" |
| int | year(string date) | It returns the year part of a date or a timestamp string: year("1970-01-01 00:00:00") = 1970, year("1970-01-01") = 1970 |
| int | month(string date) | It returns the month part of a date or a timestamp string: month("1970-11-01 00:00:00") = 11, month("1970-11-01") = 11 |
| int | day(string date) | It returns the day part of a date or a timestamp string: day("1970-11-01 00:00:00") = 1, day("1970-11-01") = 1 |
| string | get_json_object(string json_string, string path) | It extracts json object from a json string based on json path specified, and returns json string of the extracted json object. It returns NULL if the input json string is invalid. |
Example
The following queries demonstrate some built-in functions:
round() function
hive> SELECT round(2.6) from temp;
On successful execution of query, you get to see the following response:
3.0
floor() function
hive> SELECT floor(2.6) from temp;
On successful execution of the query, you get to see the following response:
2.0
ceil() function
hive> SELECT ceil(2.6) from temp;
On successful execution of the query, you get to see the following response:
3.0
Aggregate Functions
Hive supports the following built-in aggregate functions. The usage of these functions is as same as the SQL aggregate functions.
| Return Type | Signature | Description |
|---|---|---|
| BIGINT | count(*), count(expr), | count(*) - Returns the total number of retrieved rows. |
| DOUBLE | sum(col), sum(DISTINCT col) | It returns the sum of the elements in the group or the sum of the distinct values of the column in the group. |
| DOUBLE | avg(col), avg(DISTINCT col) | It returns the average of the elements in the group or the average of the distinct values of the column in the group. |
| DOUBLE | min(col) | It returns the minimum value of the column in the group. |
| DOUBLE | max(col) | It returns the maximum value of the column in the group. |
Hive - View and Indexes
This chapter describes how to create and manage views. Views are generated based on user requirements. You can save any result set data as a view. The usage of view in Hive is same as that of the view in SQL. It is a standard RDBMS concept. We can execute all DML operations on a view.
Creating a View
You can create a view at the time of executing a SELECT statement. The syntax is as follows:
CREATE VIEW [IF NOT EXISTS] view_name [(column_name [COMMENT column_comment], ...) ]
[COMMENT table_comment]
AS SELECT ...
Example
Let us take an example for view. Assume employee table as given below, with the fields Id, Name, Salary, Designation, and Dept. Generate a query to retrieve the employee details who earn a salary of more than Rs 30000. We store the result in a view named emp_30000.
+------+--------------+-------------+-------------------+--------+
| ID   | Name         | Salary      | Designation       | Dept   |
+------+--------------+-------------+-------------------+--------+
|1201  | Gopal        | 45000       | Technical manager | TP     |
|1202  | Manisha      | 45000       | Proofreader       | PR     |
|1203  | Masthanvali  | 40000       | Technical writer  | TP     |
|1204  | Krian        | 40000       | Hr Admin          | HR     |
|1205  | Kranthi      | 30000       | Op Admin          | Admin  |
+------+--------------+-------------+-------------------+--------+
The following query retrieves the employee details using the above scenario:
hive> CREATE VIEW emp_30000 AS
   > SELECT * FROM employee
   > WHERE salary>30000;
Dropping a View
Use the following syntax to drop a view:
DROP VIEW view_name
The following query drops a view named as emp_30000:
hive> DROP VIEW emp_30000;
Creating an Index
An Index is nothing but a pointer on a particular column of a table. Creating an index means creating a pointer on a particular column of a table. Its syntax is as follows:
CREATE INDEX index_name
ON TABLE base_table_name (col_name, ...)
AS 'index.handler.class.name'
[WITH DEFERRED REBUILD]
[IDXPROPERTIES (property_name=property_value, ...)]
[IN TABLE index_table_name]
[PARTITIONED BY (col_name, ...)]
[
   [ ROW FORMAT ...] STORED AS ...
   | STORED BY ...
]
[LOCATION hdfs_path]
[TBLPROPERTIES (...)]
Example
Let us take an example for index. Use the same employee table that we have used earlier with the fields Id, Name, Salary, Designation, and Dept. Create an index named index_salary on the salary column of the employee table.
The following query creates an index:
hive> CREATE INDEX inedx_salary ON TABLE employee(salary)
   > AS 'org.apache.hadoop.hive.ql.index.compact.CompactIndexHandler';
It is a pointer to the salary column. If the column is modified, the changes are stored using an index value.
Dropping an Index
The following syntax is used to drop an index:
DROP INDEX <index_name> ON <table_name>
The following query drops an index named index_salary:
hive> DROP INDEX index_salary ON employee;