
- Espresso Testing Framework Tutorial
- Espresso Testing - Home
- Introduction
- Setup Instructions
- Running Tests In Android Studio
- Overview of JUnit
- Architecture
- View Matchers
- Custom View Matchers
- View Assertions
- View Actions
- Testing AdapterView
- Testing WebView
- Testing Asynchronous Operations
- Testing Intents
- Testing UI for Multiple Application
- Test Recorder
- Testing UI Performance
- Testing Accessibility
- Espresso Testing Resources
- Espresso Testing - Quick Guide
- Espresso Testing - Useful Resources
- Espresso Testing - Discussion
Espresso Testing Framework - Quick Guide
Espresso Testing Framework - Introduction
In general, mobile automation testing is a difficult and challenging task. Android availability for different devices and platforms makes it things tedious for mobile automation testing. To make it easier, Google took on the challenge and developed Espresso framework. It provides a very simple, consistent and flexible API to automate and test the user interfaces in an android application. Espresso tests can be written in both Java and Kotlin, a modern programming language to develop android application.
The Espresso API is simple and easy to learn. You can easily perform Android UI tests without the complexity of multi-threaded testing. Google Drive, Maps and some other applications are currently using Espresso.
Features of Espresso
Some the salient features supported by Espresso are as follow,
Very simple API and so, easy to learn.
Highly scalable and flexible.
Provides separate module to test Android WebView component.
Provides separate module to validate as well as mock Android Intents.
Provides automatic synchronization between your application and tests.
Advantages of Espresso
Let us now what the benefits of Espresso are.
Backward compatibility
Easy to setup.
Highly stable test cycle.
Supports testing activities outside application as well.
Supports JUnit4
UI automation suitable for writing black box tests.
Espresso Testing Framework - Setup Instructions
In this chapter, let us understand how to install espresso framework, configure it to write espresso tests and execute it in our android application.
Prerequisites
Espresso is a user interface-testing framework for testing android application developed in Java / Kotlin language using Android SDK. Therefore, espresso’s only requirement is to develop the application using Android SDK in either Java or Kotlin and it is advised to have the latest Android Studio.
The list of items to be configured properly before we start working in espresso framework is as follows −
Install latest Java JDK and configure JAVA_HOME environment variable.
Install latest Android Studio (version 3.2. or higher).
Install latest Android SDK using SDK Manager and configure ANDROID_HOME environment variable.
Install latest Gradle Build Tool and configure GRADLE_HOME environment variable.
Configure EspressoTesting Framework
Initially, espresso testing framework is provided as part of the Android Support library. Later, the Android team provides a new Android library, AndroidX and moves the latest espresso testing framework development into the library. Latest development (Android 9.0, API level 28 or higher) of espresso testing framework will be done in AndroidX library.
Including espresso testing framework in a project is as simple as setting the espresso testing framework as a dependency in the application gradle file, app/build.gradle. The complete configuration is as follow,
Using Android support library,
android {
   defaultConfig {
      testInstrumentationRunner "android.support.test.runner.AndroidJUnitRunner"
   }
}
dependencies {
   testImplementation 'junit:junit:4.12'
   androidTestImplementation 'com.android.support.test:runner:1.0.2'
   androidTestImplementation 'com.android.support.test.espresso:espressocore:3.0.2'
}
Using AndroidX library,
android {
   defaultConfig {
      testInstrumentationRunner "androidx.test.runner.AndroidJUnitRunner"
   }
}
dependencies {
   testImplementation 'junit:junit:4.12'
   androidTestImplementation 'com.androidx.test:runner:1.0.2'
   androidTestImplementation 'com.androidx.espresso:espresso-core:3.0.2'
}
testInstrumentationRunner in the android/defaultConfig sets AndroidJUnitRunner class to run the instrumentation tests. The first line in the dependencies includes the JUnit testing framework, the second line in the dependencies includes the test runner library to run the test cases and finally the third line in the dependencies includes the espresso testing framework.
By default, Android studio sets the espresso testing framework (Android support library) as a dependency while creating the android project and gradle will download the necessary library from the Maven repository. Let us create a simple Hello world android application and check whether the espresso testing framework is configured properly.
The steps to create a new Android application are described below −
Start Android Studio.
Select File → New → New Project.
Enter Application Name (HelloWorldApp) and Company domain (espressosamples.tutorialspoint.com) and then click Next.
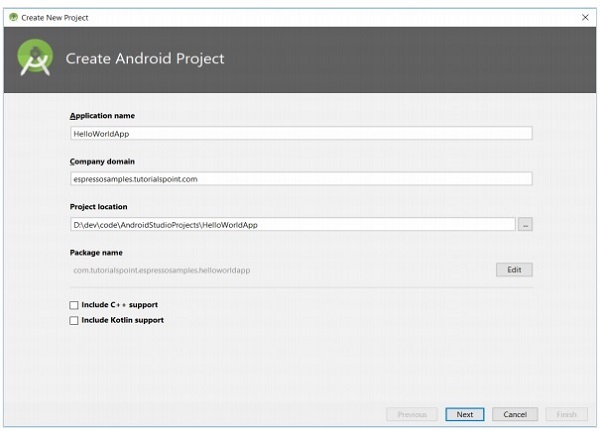
To create Android Project,
Select minimum API as API 15: Android 4.0.3 (IceCreamSandwich) and then click Next.
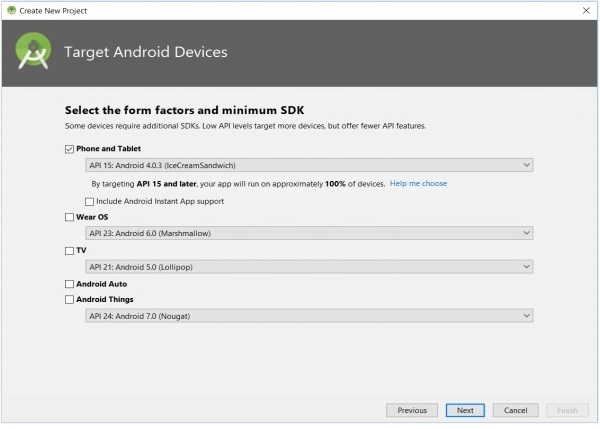
To target Android Devices,
Select Empty Activity and then click Next.
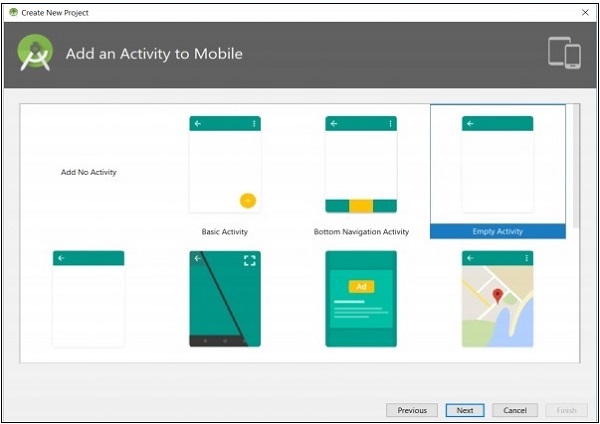
To add an activity to Mobile,
Enter name for main activity and then click Finish.
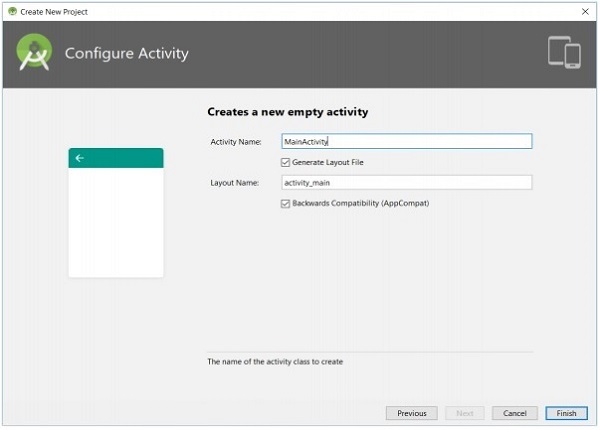
To configure Activity,
Once, a new project is created, open the app/build.gradle file and check its content. The content of the file is specified below,
apply plugin: 'com.android.application'
android {
   compileSdkVersion 28
   defaultConfig {
      applicationId "com.tutorialspoint.espressosamples.helloworldapp"
      minSdkVersion 15
      targetSdkVersion 28
      versionCode 1
      versionName "1.0"
      testInstrumentationRunner "android.support.test.runner.AndroidJUnitRunner"
   }
   buildTypes {
      release {
         minifyEnabled false
         proguardFiles getDefaultProguardFile('proguard-android.txt'),    'proguard-rules.pro'
      }
   }
}
dependencies {
   implementation fileTree(dir: 'libs', include: ['*.jar'])
   implementation 'com.android.support:appcompat-v7:28.0.0'
   implementation 'com.android.support.constraint:constraint-layout:1.1.3'
   testImplementation 'junit:junit:4.12'
   androidTestImplementation 'com.android.support.test:runner:1.0.2'
   androidTestImplementation 'com.android.support.test.espresso:espressocore:3.0.2'
}
The last line specifies the espresso testing framework dependency. By default, Android support library is configured. We can reconfigure the application to use AndroidX library by clicking Refactor → Migrate to AndroidX in the menu.
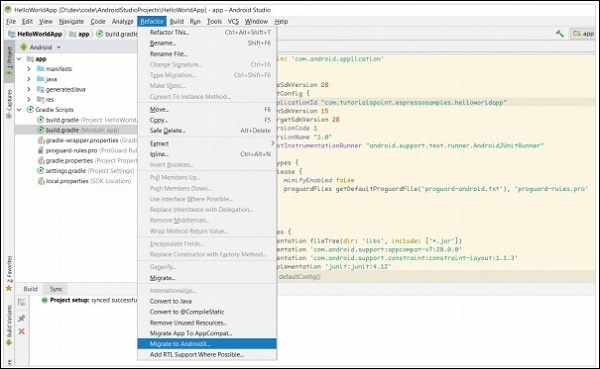
To migrate to Androidx,
Now, the app/build.gradle changes as specified below,
apply plugin: 'com.android.application'
android {
   compileSdkVersion 28
   defaultConfig {
      applicationId "com.tutorialspoint.espressosamples.helloworldapp"
      minSdkVersion 15
      targetSdkVersion 28
      versionCode 1
      versionName "1.0"
      testInstrumentationRunner "androidx.test.runner.AndroidJUnitRunner"
   }
   buildTypes {
      release {
         minifyEnabled false
         proguardFiles getDefaultProguardFile('proguard-android.txt'), 'proguard-rules.pro'
      }
   }
}
dependencies {
   implementation fileTree(dir: 'libs', include: ['*.jar'])
   implementation 'androidx.appcompat:appcompat:1.1.0-alpha01'
   implementation 'androidx.constraintlayout:constraintlayout:2.0.0-alpha3'
   testImplementation 'junit:junit:4.12'
   androidTestImplementation 'androidx.test:runner:1.1.1'
   androidTestImplementation 'androidx.test.espresso:espresso-core:3.1.1'
}
Now, the last line includes espresso testing framework from AndroidX library.
Device Settings
During testing, it is recommended to turn off the animation on the Android device, which is used for testing. This will reduce the confusions while checking ideling resources.
Let us see how to disable animation on Android devices – (Settings → Developer options),
Window animation scale
Transition animation scale
Animator duration scale
If Developer options menu is not available in the Settings screen, then click Build Number available inside the About Phone option several times. This enables the Developer Option menu.
Running Tests In Android Studio
In this chapter, let us see how to run tests using Android studio.
Every android application has two type of tests −
Functional / Unit tests
Instrumentation tests
Functional test does not need the actual android application to be installed and launched in the device or emulator and test the functionality. It can be launched in the console itself without invoking the actual application. However, instrumentation tests need the actual application to be launched to test the functionality like user interface and user interaction. By default, Unit tests are written in src/test/java/ folder and Instrumentation tests are written in src/androidTest/java/ folder. Android studio provides Run context menu for the test classes to run the test written in the selected test classes. By default, an Android application has two classes − ExampleUnitTest in src/test folder and ExampleInstrumentedTest in src/androidTest folder.
To run the default unit test, select ExampleUnitTest in the Android studio, right-click on it and then click the Run 'ExampleUnitTest' as shown below,
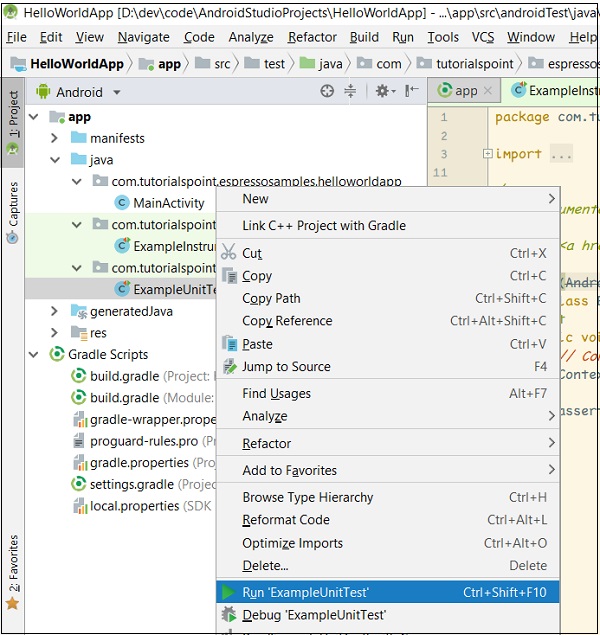
Run Unit Test
This will run the unit test and show the result in the console as in the following screenshot −

Unit Test Success
To run the default instrumentation test, select ExampleInstrumentationTest in the android studio, right-click it and then click the Run 'ExampleInstrumentationTest' as shown below,
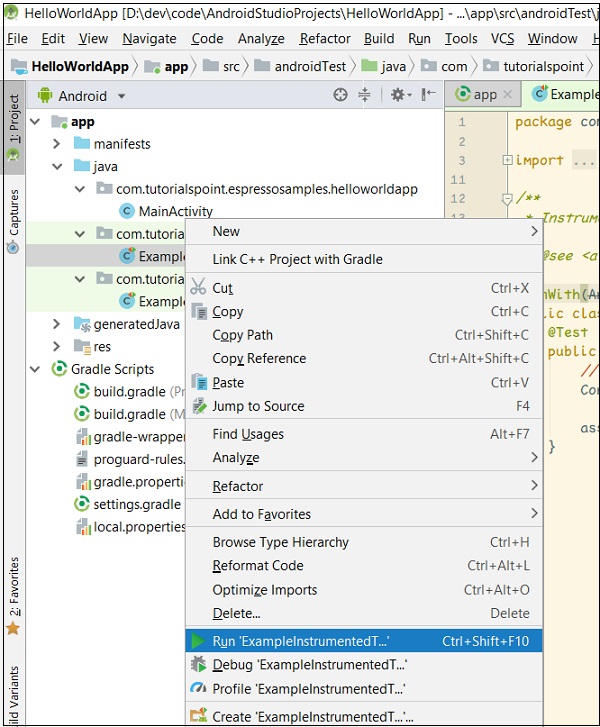
Run Instrumentation Test
This will run the unit test by launching the application in either device or emulator and show the result in the console as in the following screenshot −

The instrumentation test ran successful.
Espresso Testing Framework - Overview of JUnit
In this chapter, let us understand the basics of JUnit, the popular unit-testing framework developed by the Java community upon which the espresso testing framework is build.
JUnit is the de facto standard for unit testing a Java application. Even though, it is popular for unit testing, it has complete support and provision for instrumentation testing as well. Espresso testing library extends the necessary JUnit classes to support the Android based instrumentation testing.
Write a Simple Unit Test
Let us create a Java class, Computation (Computation.java) and write simple mathematical operation, Summation and Multiplication. Then, we will write test cases using JUnit and check it by running the test cases.
Start Android Studio.
Open HelloWorldApp created in the previous chapter.
Create a file, Computation.java in app/src/main/java/com/tutorialspoint/espressosamples/helloworldapp/ and write two functions – Sum and Multiply as specified below,
package com.tutorialspoint.espressosamples.helloworldapp;
public class Computation {
   public Computation() {}
   public int Sum(int a, int b) {
      return a + b;
   }
   public int Multiply(int a, int b) {
      return a * b;
   }
}
Create a file, ComputationUnitTest.java in app/src/test/java/com/tutorialspoint/espressosamples/helloworldapp and write unit test cases to test Sum and Multiply functionality as specified below
package com.tutorialspoint.espressosamples.helloworldapp;
import org.junit.Test;
import static org.junit.Assert.assertEquals;
public class ComputationUnitTest {
   @Test
   public void sum_isCorrect() {
      Computation computation = new Computation();
      assertEquals(4, computation.Sum(2,2));
   }
   @Test
   public void multiply_isCorrect() {
      Computation computation = new Computation();
      assertEquals(4, computation.Multiply(2,2));
   }
}
Here, we have used two new terms – @Test and assertEquals. In general, JUnit uses Java annotation to identify the test cases in a class and information on how to execute the test cases. @Test is one such Java annotation, which specifies that the particular function is a junit test case. assertEquals is a function to assert that the first argument (expected value) and the second argument (computed value) are equal and same. JUnit provides a number of assertion methods for different test scenarios.
Now, run the ComputationUnitTest in the Android studio by right-clicking the class and invoking the Run 'ComputationUnitTest' option as explained in the previous chapter. This will run the unit test cases and report success.
Result of computation unit test is as shown below −

Annotations
The JUnit framework uses annotation extensively. Some of the important annotations are as follows −
@Test
@Before
@After
@BeforeClass
@AfterClass
@Rule
@Test annotation
@Test is the very important annotation in the JUnit framework. @Test is used to differentiate a normal method from the test case method. Once a method is decorated with @Test annotation, then that particular method is considered as a Test case and will be run by JUnit Runner. JUnit Runner is a special class, which is used to find and run the JUnit test cases available inside the java classes. For now, we are using Android Studio’s build in option to run the unit tests (which in turn run the JUnit Runner). A sample code is as follows,
package com.tutorialspoint.espressosamples.helloworldapp;
import org.junit.Test;
import static org.junit.Assert.assertEquals;

public class ComputationUnitTest {
   @Test
   public void multiply_isCorrect() {
      Computation computation = new Computation();
      assertEquals(4, computation.Multiply(2,2));
   }
}
@Before
@Before annotation is used to refer a method, which needs to be invoked before running any test method available in a particular test class. For example in our sample, the Computation object can be created in a separate method and annotated with @Before so that it will run before both sum_isCorrect and multiply_isCorrect test case. The complete code is as follows,
package com.tutorialspoint.espressosamples.helloworldapp;
import org.junit.Before;
import org.junit.Test;
import static org.junit.Assert.assertEquals;

public class ComputationUnitTest {
   Computation computation = null;
   @Before
   public void CreateComputationObject() {
      this.computation = new Computation();
   }
   @Test
   public void sum_isCorrect() {
      assertEquals(4, this.computation.Sum(2,2));
   }
   @Test
   public void multiply_isCorrect() {
      assertEquals(4, this.computation.Multiply(2,2));
   }
}
@After
@After is similar to @Before, but the method annotated with @After will be called or executed after each test case is run. The sample code is as follows,
package com.tutorialspoint.espressosamples.helloworldapp;
import org.junit.After;
import org.junit.Before;
import org.junit.Test;
import static org.junit.Assert.assertEquals;

public class ComputationUnitTest {
   Computation computation = null;
   @Before
   public void CreateComputationObject() {
      this.computation = new Computation();
   }
   @After
   public void DestroyComputationObject() {
      this.computation = null;
   }
   @Test
   public void sum_isCorrect() {
      assertEquals(4, this.computation.Sum(2,2));
   }
   @Test
   public void multiply_isCorrect() {
      assertEquals(4, this.computation.Multiply(2,2));
   }
}
@BeforeClass
@BeforeClass is similar to @Before, but the method annotated with @BeforeClass will be called or executed only once before running all test cases in a particular class. It is useful to create resource intensive object like database connection object. This will reduce the time to execute a collection of test cases. This method needs to be static in order to work properly. In our sample, we can create the computation object once before running all test cases as specified below,
package com.tutorialspoint.espressosamples.helloworldapp;
import org.junit.BeforeClass;
import org.junit.Test;
import static org.junit.Assert.assertEquals;

public class ComputationUnitTest {
   private static Computation computation = null;
   @BeforeClass
   public static void CreateComputationObject() {
      computation = new Computation();
   }
   @Test
   public void sum_isCorrect() {
      assertEquals(4, computation.Sum(2,2));
   }
   @Test
   public void multiply_isCorrect() {
      assertEquals(4, computation.Multiply(2,2));
   }
}
@AfterClass
@AfterClass is similar to @BeforeClass, but the method annotated with @AfterClass will be called or executed only once after all test cases in a particular class are run. This method also needs to be static to work properly. The sample code is as follows −
package com.tutorialspoint.espressosamples.helloworldapp;
import org.junit.AfterClass;
import org.junit.BeforeClass;
import org.junit.Test;
import static org.junit.Assert.assertEquals;

public class ComputationUnitTest {
   private static Computation computation = null;
   @BeforeClass
   public static void CreateComputationObject() {
      computation = new Computation();
   }
   @AfterClass
   public static void DestroyComputationObject() {
      computation = null;
   }
   @Test
   public void sum_isCorrect() {
      assertEquals(4, computation.Sum(2,2));
   }
   @Test
   public void multiply_isCorrect() {
      assertEquals(4, computation.Multiply(2,2));
   }
}
@Rule
@Rule annotation is one of the highlights of JUnit. It is used to add behavior to the test cases. We can only annotate the fields of type TestRule. It actually provides feature set provided by @Before and @After annotation but in an efficient and reusable way. For example, we may need a temporary folder to store some data during a test case. Normally, we need to create a temporary folder before running the test case (using either @Before or @BeforeClass annotation) and destroy it after the test case is run (using either @After or @AfterClass annotation). Instead, we can use TemporaryFolder (of type TestRule) class provided by JUnit framework to create a temporary folder for all our test cases and the temporary folder will be deleted as and when the test case is run. We need to create a new variable of type TemporaryFolder and need to annotate with @Rule as specified below,
package com.tutorialspoint.espressosamples.helloworldapp;

import org.junit.AfterClass;
import org.junit.BeforeClass;
import org.junit.Rule;
import org.junit.Test;
import org.junit.rules.TemporaryFolder;
import java.io.File;
import java.io.IOException;
import static junit.framework.TestCase.assertTrue;
import static org.junit.Assert.assertEquals;

public class ComputationUnitTest {
   private static Computation computation = null;
   @Rule
   public TemporaryFolder folder = new TemporaryFolder();
   @Test
   public void file_isCreated() throws IOException {
      folder.newFolder("MyTestFolder");
      File testFile = folder.newFile("MyTestFile.txt");
      assertTrue(testFile.exists());
   }
   @BeforeClass
   public static void CreateComputationObject() {
      computation = new Computation();
   }
   @AfterClass
   public static void DestroyComputationObject() {
      computation = null;
   }
   @Test
   public void sum_isCorrect() {
      assertEquals(4, computation.Sum(2,2));
   }
   @Test
   public void multiply_isCorrect() {
      assertEquals(4, computation.Multiply(2,2));
   }
}
Order of Execution
In JUnit, the methods annotated with different annotation will be executed in specific order as shown below,
@BeforeClass
@Rule
@Before
@Test
@After
@AfterClass
Assertion
Assertion is a way of checking whether the expected value of the test case matches the actual value of the test case result. JUnit provides assertion for different scenario; a few important assertions are listed below −
fail() − To explicitly make a test case fail.
assertTrue(boolean test_condition) − Checks that the test_condition is true
assertFalse(boolean test_condition) − Checks that the test_condition is false
assertEquals(expected, actual) − Checks that both values are equal
assertNull(object) − Checks that the object is null
assertNotNull(object) − Checks that the object is not null
assertSame(expected, actual) − Checks that both refers same object.
assertNotSame(expected, actual) − Checks that both refers different object.
Espresso Testing Framework - Architecture
In this chapter, let us learn the terms of espresso testing framework, how to write a simple espresso test case and the complete workflow or architecture of the espresso testing framework.
Overview
Espresso provides a large number of classes to test user interface and the user interaction of an android application. They can be grouped into five categories as specified below −
JUnit runner
Android testing framework provides a runner, AndroidJUnitRunner to run the espresso test cases written in JUnit3 and JUnit4 style test cases. It is specific to android application and it transparently handles loading the espresso test cases and the application under test both in actual device or emulator, execute the test cases and report the result of the test cases. To use AndroidJUnitRunner in the test case, we need to annotate the test class using @RunWith annotation and then pass the AndroidJUnitRunner argument as specified below −
@RunWith(AndroidJUnit4.class)
   public class ExampleInstrumentedTest {
}
JUnit rules
Android testing framework provides a rule, ActivityTestRule to launch an android activity before executing the test cases. It launches the activity before each method annotated with @Test` and @Before. It will terminate the activity after method annotated with @After. A sample code is as follows,
@Rule
public ActivityTestRule<MainActivity> mActivityTestRule = new ActivityTestRule<>(MainActivity.class);
Here, MainActivity is the activity to be launched before running a test case and destroyed after the particular test case is run.
ViewMatchers
Espresso provides large number of view matcher classes (in androidx.test.espresso.matcher.ViewMatchers package) to match and find UI elements / views in an android activity screen’s view hierarchy. Espresso’s method onView takes a single argument of type Matcher (View matchers), finds the corresponding UI view and returns corresponding ViewInteraction object. ViewInteraction object returned by onView method can be further used to invoke actions like click on the matched view or can be used to assert the matched view. A sample code to find the view with text, “Hello World!” is as follows,
ViewInteraction viewInteraction = Espresso.onView(withText("Hello World!"));
Here, withText is a matcher, which can be used to match UI view having text “Hello World!”
ViewActions
Espresso provides large number of view action classes (in androidx.test.espresso.action.ViewActions) to invoke the different action on the selected / matched view. Once onView matches and returns ViewInteraction object, any action can be invoked by calling “perform” method of ViewInteraction object and pass it with proper view actions. A sample code to click the matched view is as follows,
ViewInteraction viewInteraction = Espresso.onView(withText("Hello World!"));
viewInteraction.perform(click());
Here, the click action of the matched view will be invoked.
ViewAssertions
Similar to view matchers and view actions, Espresso provides a large number of view assertion (in androidx.test.espresso.assertion.ViewAssertions package) to assert the matched view is what we expected. Once onView matches and returns the ViewInteraction object, any assert can be checked using check method of ViewInteraction by passing it with proper view assertion. A sample code to assert that the matched view is as follows,
ViewInteraction viewInteraction = Espresso.onView(withText("Hello World!"));
viewInteraction.check(matches(withId(R.id.text_view)));
Here, matches accept the view matcher and return view assertion, which can be checked by check method of ViewInteraction.
Workflow of Espresso Testing Framework
Let us understand how the espresso testing framework works and how it provides options to do any kind of user interaction in a simple and flexible way. Workflow of an espresso test case is as described below,
As we learned earlier, Android JUnit runner, AndroidJUnit4 will run the android test cases. The espresso test cases need to be marked with @RunWith(AndroidJUnut.class). First, AndroidJUnit4 will prepare the environment to run the test cases. It starts either the connected android device or emulator, installs the application and makes sure the application to be tested is in ready state. It will run the test cases and report the results.
Espresso needs at least a single JUnit rule of type ActivityTestRule to specify the activity. Android JUnit runner will start the activity to be launched using ActivityTestRule.
Every test case needs a minimum of single onView or onDate (used to find data based views like AdapterView) method invocation to match and find the desired view. onView or onData returns ViewInteraction object.
Once ViewInteraction object is returned, we can either invoke an action of the selected view or check the view for our expected view using assertion.
Action can be invoked using perform method of ViewInteraction object by passing any one of the available view actions.
Assertion can be invoked using check method of ViewInteraction object by passing any one of the available view assertions.
The diagram representation of the Workflow is as follows,

Example–view assertion
Let us write a simple test case to find the text view having “Hello World!” text in our “HelloWorldApp” application and then assert it using view assertion. The complete code is as follows,
package com.tutorialspoint.espressosamples.helloworldapp;

import android.content.Context;
import androidx.test.InstrumentationRegistry;
import androidx.test.rule.ActivityTestRule;
import androidx.test.runner.AndroidJUnit4;
import org.junit.Rule;
import org.junit.Test;
import org.junit.runner.RunWith;
import static androidx.test.espresso.Espresso.onView;
import static androidx.test.espresso.matcher.ViewMatchers.withText;;
import static androidx.test.espresso.assertion.ViewAssertions.matches;
import static org.junit.Assert.*;
/**
   * Instrumented test, which will execute on an Android device.
   *
   * @see <a href="http://d.android.com/tools/testing">Testing documentation</a>
*/
@RunWith(AndroidJUnit4.class)
public class ExampleInstrumentedTest {
   @Rule
   public ActivityTestRule<MainActivity> mActivityTestRule = new ActivityTestRule<>(MainActivity.class);
   @Test
   public void view_isCorrect() {
      onView(withText("Hello World!")).check(matches(isDisplayed()));
   }
   @Test
   public void useAppContext() {
      // Context of the app under test.
      Context appContext = InstrumentationRegistry.getTargetContext();
      assertEquals("com.tutorialspoint.espressosamples.helloworldapp", appContext.getPackageName());
   }
}
Here, we have used withText view matchers to find the text view having “Hello World!” text and matches view assertion to assert that the text view is properly displayed. Once the test case is invoked in Android Studio, it will run the test case and report the success message as below.
view_isCorrect test case

Espresso Testing Framework - View Matchers
Espresso framework provides many view matchers. The purpose of the matcher is to match a view using different attributes of the view like Id, Text, and availability of child view. Each matcher matches a particular attributes of the view and applies to particular type of view. For example, withId matcher matches the Id property of the view and applies to all view, whereas withText matcher matches the Text property of the view and applies to TextView only.
In this chapter, let us learn the different matchers provided by espresso testing framework as well as learn the Hamcrest library upon which the espresso matchers are built.
Hamcrest Library
Hamcrest library is an important library in the scope of espresso testing framework. Hamcrest is itself a framework for writing matcher objects. Espresso framework extensively uses the Hamcrest library and extend it whenever necessary to provide simple and extendable matchers.
Hamcrest provides a simple function assertThat and a collection of matchers to assert any objects. assertThat has three arguments and they are as shown below −
String (description of the test, optional)
Object (actual)
Matcher (expected)
Let us write a simple example to test whether a list object has expected value.
import static org.hamcrest.Matchers.hasItem;
import static org.hamcrest.MatcherAssert.assertThat;
@Test
public void list_hasValue() {
   ArrayList<String> list = new ArrayList<String>();
   list.add("John");
   assertThat("Is list has John?", list, hasItem("John"));
}
Here, hasItem returns a matcher, which checks whether the actual list has specified value as one of the item.
Hamcrest has a lot of built-in matchers and also options to create new matchers. Some of the important built-in matchers useful in espresso testing framework are as follows −
anything - always matchers
Logical based matchers
allOf − accept any number of matchers and matches only if all matchers are succeeded.
anyOf − accept any number of matchers and matches if any one matcher succeeded.
not − accept one matcher and matches only if the matcher failed and vice versa.
Text based matchers
equalToIgnoringCase − used to test whether the actual input equals the expected string ignoring case.
equalToIgnoringWhiteSpace − used to test whether the actual input equals the specified string ignoring case and white spaces.
containsString − used to test whether the actual input contains specified string.
endsWith − used to test whether the actual input starts with specified string.
startsWith − used to test whether actual the input ends with specified string.
Number based matchers
closeTo − used to test whether the actual input is close to the expected number.
greaterThan − used to test whether the actual input is greater than the expected number.
greaterThanOrEqualTo − used to test whether the actual input is greater than or equal to the expected number.
lessThan − used to test whether the actual input is less than the expected number.
lessThanOrEqualTo − used to test whether the actual input is less than or equal to the expected number.
Object based matchers
equalTo − used to test whether the actual input is equals to the expected object
hasToString − used to test whether the actual input has toString method.
instanceOf − used to test whether the actual input is the instance of expected class.
isCompatibleType − used to test whether the actual input is compatible with the expected type.
notNullValue − used to test whether the actual input is not null.
sameInstance − used to test whether the actual input and expected are of same instance.
hasProperty − used to test whether the actual input has the expected property
is − Sugar or short cut for equalTo
Matchers
Espresso provides the onView() method to match and find the views. It accepts view matchers and returns ViewInteraction object to interact with the matched view. The frequently used list of view matchers are described below −
withId()
withId() accepts an argument of type int and the argument refers the id of the view. It returns a matcher, which matches the view using the id of the view. The sample code is as follows,
onView(withId(R.id.testView))
withText()
withText() accepts an argument of type string and the argument refers the value of the view’s text property. It returns a matcher, which matches the view using the text value of the view. It applies to TextView only. The sample code is as follows,
onView(withText("Hello World!"))
withContentDescription()
withContentDescription() accepts an argument of type string and the argument refers the value of the view’s content description property. It returns a matcher, which matches the view using the description of the view. The sample code is as follows,
onView(withContentDescription("blah"))
We can also pass the resource id of the text value instead of the text itself.
onView(withContentDescription(R.id.res_id_blah))
hasContentDescription()
hasContentDescription() has no argument. It returns a matcher, which matches the view that has any content description. The sample code is as follows,
onView(allOf(withId(R.id.my_view_id), hasContentDescription()))
withTagKey()
withTagKey() accepts an argument of type string and the argument refers the view’s tag key. It returns a matcher, which matches the view using its tag key. The sample code is as follows,
onView(withTagKey("blah"))
We can also pass the resource id of the tag name instead of the tag name itself.
onView(withTagKey(R.id.res_id_blah))
withTagValue()
withTagValue() accepts an argument of type Matcher <Object> and the argument refers the view’s tag value. It returns a matcher, which matches the view using its tag value. The sample code is as follows,
onView(withTagValue(is((Object) "blah")))
Here, is is Hamcrest matcher.
withClassName()
withClassName() accepts an argument of type Matcher<String> and the argument refers the view’s class name value. It returns a matcher, which matches the view using its class name. The sample code is as follows,
onView(withClassName(endsWith("EditText")))
Here, endsWith is Hamcrest matcher and return Matcher<String>
withHint()
withHint() accepts an argument of type Matcher<String> and the argument refers the view’s hint value. It returns a matcher, which matches the view using the hint of the view. The sample code is as follows,
onView(withClassName(endsWith("Enter name")))
withInputType()
withInputType() accepts an argument of type int and the argument refers the input type of the view. It returns a matcher, which matches the view using its input type. The sample code is as follows,
onView(withInputType(TYPE_CLASS_DATETIME))
Here, TYPE_CLASS_DATETIME refers edit view supporting dates and times.
withResourceName()
withResourceName() accepts an argument of type Matcher<String> and the argument refers the view’s class name value. It returns a matcher, which matches the view using resource name of the view. The sample code is as follows,
onView(withResourceName(endsWith("res_name")))
It accepts string argument as well. The sample code is as follows,
onView(withResourceName("my_res_name"))
withAlpha()
withAlpha() accepts an argument of type float and the argument refers the alpha value of the view. It returns a matcher, which matches the view using the alpha value of the view. The sample code is as follows,
onView(withAlpha(0.8))
withEffectiveVisibility()
withEffectiveVisibility() accepts an argument of type ViewMatchers.Visibility and the argument refers the effective visibility of the view. It returns a matcher, which matches the view using the visibility of the view. The sample code is as follows,
onView(withEffectiveVisibility(withEffectiveVisibility.INVISIBLE))
withSpinnerText()
withSpinnerText() accepts an argument of type Matcher<String> and the argument refers the Spinner’s current selected view’s value. It returns a matcher, which matches the the spinner based on it’s selected item’s toString value. The sample code is as follows,
onView(withSpinnerText(endsWith("USA")))
It accepts string argument or resource id of the string as well. The sample code is as follows,
onView(withResourceName("USA"))
onView(withResourceName(R.string.res_usa))
withSubstring()
withSubString() is similar to withText() except it helps to test substring of the text value of the view.
onView(withSubString("Hello"))
hasLinks()
hasLinks() has no arguments and it returns a matcher, which matches the view having links. It applies to TextView only. The sample code is as follows,
onView(allOf(withSubString("Hello"), hasLinks()))
Here, allOf is a Hamcrest matcher. allOf returns a matcher, which matches all the passed in matchers and here, it is used to match a view as well as check whether the view has links in its text value.
hasTextColor()
hasTextColor() accepts a single argument of type int and the argument refers the resource id of the color. It returns a matcher, which matches the TextView based on its color. It applies to TextView only. The sample code is as follows,
onView(allOf(withSubString("Hello"), hasTextColor(R.color.Red)))
hasEllipsizedText()
hasEllipsizedText() has no argument. It returns a matcher, which matches the TextView that has long text and either ellipsized (first.. ten.. last) or cut off (first…). The sample code is as follows,
onView(allOf(withId(R.id.my_text_view_id), hasEllipsizedText()))
hasMultilineText()
hasMultilineText() has no argument. It returns a matcher, which matches the TextView that has any multi line text. The sample code is as follows,
onView(allOf(withId(R.id.my_test_view_id), hasMultilineText()))
hasBackground()
hasBackground() accepts a single argument of type int and the argument refers the resource id of the background resource. It returns a matcher, which matches the view based on its background resources. The sample code is as follows,
onView(allOf(withId("image"), hasBackground(R.drawable.your_drawable)))
hasErrorText()
hasErrorText() accepts an argument of type Matcher<String> and the argument refers the view’s (EditText) error string value. It returns a matcher, which matches the view using error string of the view. This applies to EditText only. The sample code is as follows,
onView(allOf(withId(R.id.editText_name), hasErrorText(is("name is required"))))
It accepts string argument as well. The sample code is as follows,
onView(allOf(withId(R.id.editText_name), hasErrorText("name is required")))
hasImeAction()
hasImeAction() accepts an argument of type Matcher<Integer> and the argument refers the view’s (EditText) supported input methods. It returns a matcher, which matches the view using supported input method of the view. This applies to EditText only. The sample code is as follows,
onView(allOf(withId(R.id.editText_name),
hasImeAction(is(EditorInfo.IME_ACTION_GO))))
Here, EditorInfo.IME_ACTION_GO is on of the input methods options. hasImeAction() accepts integer argument as well. The sample code is as follows,
onView(allOf(withId(R.id.editText_name),
hasImeAction(EditorInfo.IME_ACTION_GO)))
supportsInputMethods()
supportsInputMethods() has no argument. It returns a matcher, which matches the view if it supports input methods. The sample code is as follows,
onView(allOf(withId(R.id.editText_name), supportsInputMethods()))
isRoot()
isRoot() has no argument. It returns a matcher, which matches the root view. The sample code is as follows,
onView(allOf(withId(R.id.my_root_id), isRoot()))
isDisplayed()
isDisplayed() has no argument. It returns a matcher, which matches the view that are currently displayed. The sample code is as follows,
onView(allOf(withId(R.id.my_view_id), isDisplayed()))
isDisplayingAtLeast()
isDisplayingAtLeast() accepts a single argument of type int. It returns a matcher, which matches the view that are current displayed at least the specified percentage. The sample code is as follows,
onView(allOf(withId(R.id.my_view_id), isDisplayingAtLeast(75)))
isCompletelyDisplayed()
isCompletelyDisplayed() has no argument. It returns a matcher, which matches the view that are currently displayed completely on the screen. The sample code is as follows,
onView(allOf(withId(R.id.my_view_id), isCompletelyDisplayed()))
isEnabled()
isEnabled() has no argument. It returns a matcher, which matches the view that is enabled. The sample code is as follows,
onView(allOf(withId(R.id.my_view_id), isEnabled()))
isFocusable()
isFocusable() has no argument. It returns a matcher, which matches the view that has focus option. The sample code is as follows,
onView(allOf(withId(R.id.my_view_id), isFocusable()))
hasFocus()
hasFocus() has no argument. It returns a matcher, which matches the view that is currently focused. The sample code is as follows,
onView(allOf(withId(R.id.my_view_id), hasFocus()))
isClickable()
isClickable() has no argument. It returns a matcher, which matches the view that is click option. The sample code is as follows,
onView(allOf(withId(R.id.my_view_id), isClickable()))
isSelected()
isSelected() has no argument. It returns a matcher, which matches the view that is currently selected. The sample code is as follows,
onView(allOf(withId(R.id.my_view_id), isSelected()))
isChecked()
isChecked() has no argument. It returns a matcher, which matches the view that is of type CompoundButton (or subtype of it) and is in checked state. The sample code is as follows,
onView(allOf(withId(R.id.my_view_id), isChecked()))
isNotChecked()
isNotChecked() is just opposite to isChecked. The sample code is as *follows,
onView(allOf(withId(R.id.my_view_id), isNotChecked()))
isJavascriptEnabled()
isJavascriptEnabled() has no argument. It returns a matcher, which matches the WebView that is evaluating JavaScript. The sample code is as follows,
onView(allOf(withId(R.id.my_webview_id), isJavascriptEnabled()))
withParent()
withParent() accepts one argument of type Matcher<View>. The argument refers a view. It returns a matcher, which matches the view that specified view is parent view. The sample code is as follows,
onView(allOf(withId(R.id.childView), withParent(withId(R.id.parentView))))
hasSibling()
hasSibling() accepts one argument of type Matcher>View<. The argument refers a view. It returns a matcher, which matches the view that passed-in view is one of its sibling view. The sample code is as follows,
onView(hasSibling(withId(R.id.siblingView)))
withChild()
withChild() accepts one argument of type Matcher<View>. The argument refers a view. It returns a matcher, which matches the view that passed-in view is child view. The sample code is as follows,
onView(allOf(withId(R.id.parentView), withChild(withId(R.id.childView))))
hasChildCount()
hasChildCount() accepts one argument of type int. The argument refers the child count of a view. It returns a matcher, which matches the view that has exactly the same number of child view as specified in the argument. The sample code is as follows,
onView(hasChildCount(4))
hasMinimumChildCount()
hasMinimumChildCount() accepts one argument of type int. The argument refers the child count of a view. It returns a matcher, which matches the view that has at least the number of child view as specified in the argument. The sample code is as follows,
onView(hasMinimumChildCount(4))
hasDescendant()
hasDescendant() accepts one argument of type Matcher<View>. The argument refers a view. It returns a matcher, which matches the view that passed-in view is one of the descendant view in the view hierarchy. The sample code is as follows,
onView(hasDescendant(withId(R.id.descendantView)))
isDescendantOfA()
isDescendantOfA() accepts one argument of type Matcher<View>. The argument refers a view. It returns a matcher, which matches the view that passed-in view is one of the ancestor view in the view hierarchy. The sample code is as follows,
onView(allOf(withId(R.id.myView), isDescendantOfA(withId(R.id.parentView))))
Custom View Matchers
Espresso provides various options to create our own custom view matchers and it is based on Hamcrest matchers. Custom matcher is a very powerful concept to extend the framework and also to customize the framework to our taste. Some of the advantages of writing custom matchers are as follows,
To exploit the unique feature of our own custom views
Custom matcher helps in the AdapterView based test cases to match with the different type of underlying data.
To simplify the current matchers by combining features of multiple matcher
We can create new matcher as and when the demand arises and it is quite easy. Let us create a new custom matcher, which returns a matcher to test both id and text of a TextView.
Espresso provides the following two classes to write new matchers −
TypeSafeMatcher
BoundedMatcher
Both classes are similar in nature except that the BoundedMatcher transparently handles the casting of the object to correct type without manually checking for the correct type. We will create a new matcher, withIdAndText using BoundedMatcher class. Let us check the steps to write new matchers.
Add the below dependency in the app/build.gradle file and sync it.
dependencies {
   implementation 'androidx.test.espresso:espresso-core:3.1.1'
}
Create a new class to include our matchers (methods) and mark it as final
public final class MyMatchers {
}
Declare a static method inside the new class with the necessary arguments and set Matcher<View> as return type.
public final class MyMatchers {
   @NonNull
   public static Matcher<View> withIdAndText(final Matcher<Integer>
   integerMatcher, final Matcher<String> stringMatcher) {
   }
}
Create a new BoundedMatcher object (return value as well) with the below signature inside the static method,
public final class MyMatchers {
   @NonNull
   public static Matcher<View> withIdAndText(final Matcher<Integer>
   integerMatcher, final Matcher<String> stringMatcher) {
      return new BoundedMatcher<View, TextView>(TextView.class) {
      };
   }
}
Override describeTo and matchesSafely methods in the BoundedMatcher object. describeTo has single argument of type Description with no return type and it is used to error information regarding matchers. matchesSafely has a single argument of type TextView with return type boolean and it is used to match the view.
The final version of the code is as follows,
public final class MyMatchers {
   @NonNull
   public static Matcher<View> withIdAndText(final Matcher<Integer>
   integerMatcher, final Matcher<String> stringMatcher) {
      return new BoundedMatcher<View, TextView>(TextView.class) {
         @Override
         public void describeTo(final Description description) {
            description.appendText("error text: ");
            stringMatcher.describeTo(description);
            integerMatcher.describeTo(description);
         }
         @Override
         public boolean matchesSafely(final TextView textView) {
            return stringMatcher.matches(textView.getText().toString()) &&
            integerMatcher.matches(textView.getId());
         }
      };
   }
}
Finally, We can use our mew matcher to write the test case as sown below,
@Test
public void view_customMatcher_isCorrect() {
   onView(withIdAndText(is((Integer) R.id.textView_hello), is((String) "Hello World!")))
      .check(matches(withText("Hello World!")));
}
Espresso Testing Framework - View Assertions
As discussed earlier, view assertion is used to assert that both the actual view (found using view matchers) and expected views are the same. A sample code is as follows,
onView(withId(R.id.my_view)) .check(matches(withText("Hello")))
Here,
onView() returns ViewInteration object corresponding to matched view. ViewInteraction is used to interact with matched view.
withId(R.id.my_view) returns a view matcher that will match with the view (actual) having id attributes equals to my_view.
withText(“Hello”) also returns a view matcher that will match with the view (expected) having text attributes equals to Hello.
check is a method which accepts an argument of type ViewAssertion and do assertion using passed in ViewAssertion object.
matches(withText(“Hello”)) returns a view assertion, which will do the real job of asserting that both actual view (found using withId) and expected view (found using withText) are one and the same.
Let us learn some of the methods provided by espresso testing framework to assert view objects.
doesNotExist()
Returns a view assertion, which ensures that the view matcher does not find any matching view.
onView(withText("Hello")) .check(doesNotExist());
Here, the test case ensures that there is no view with text Hello.
matches()
Accepts a target view matcher and returns a view assertion, which ensures that the view matcher (actual) exists and matches with the view matched by the target view matcher.
onView(withId(R.id.textView_hello)) .check(matches(withText("Hello World!")));
Here, the test case ensures that the view having id, R.id.textView_hello exists and matches with the target view with text Hello World!
isBottomAlignedWith()
Accepts a target view matcher and returns a view assertion, which ensures that the view matcher (actual) exists and is bottom aligned with the target view matcher.
onView(withId(R.id.view)) .check(isBottomAlignedWith(withId(R.id.target_view)))
Here, the test case ensures that the view having id, R.id.view exists and is bottom aligned with view having id, R.id.target_view.
isCompletelyAbove()
Accepts a target view matcher and returns a view assertion, which ensures that the view matcher (actual) exists and is positioned completely above the target view matcher.
onView(withId(R.id.view)) .check(isCompletelyAbove(withId(R.id.target_view)))
Here, the test case ensures that the view having id, R.id.view exists and is positioned completely above the view having id, R.id.target_view
isCompletelyBelow()
Accepts a target view matcher and returns a view assertion, which ensures that the view matcher (actual) exists and is positioned completely below the target view matcher.
onView(withId(R.id.view)) .check(isCompletelyBelow(withId(R.id.target_view)))
Here, the test case ensures that the view having id, R.id.view exists and is positioned completely below the view having id, R.id.target_view.
isCompletelyLeftOf()
Accepts a target view matcher and returns a view assertion, which ensures that the view matcher (actual) exists and is positioned completely left of the target view matcher.
onView(withId(R.id.view)) .check(isCompletelyLeftOf(withId(R.id.target_view)))
Here, the test case ensures that the view having id, R.id.view exists and is positioned completely left of view having id, R.id.target_view
isCompletelyRightOf()
Accepts a target view matcher and returns a view assertion, which ensures that the view matcher (actual) exists and is positioned completely right of the target view matcher.
onView(withId(R.id.view)) .check(isCompletelyRightOf(withId(R.id.target_view)))
Here, the test case ensures that the view having id, R.id.view exists and is positioned completely right of the view having id, R.id.target_view.
isLeftAlignedWith()
Accepts a target view matcher and returns a view assertion, which ensures that the view matcher (actual) exists and is left aligned with the target view matcher.
onView(withId(R.id.view)) .check(isLeftAlignedWith(withId(R.id.target_view)))
Here, the test case ensures that the view having id, R.id.view exists and is left aligned with view having id, R.id.target_view
isPartiallyAbove()
Accepts a target view matcher and returns a view assertion, which ensures that the view matcher (actual) exists and is positioned partially above the target view matcher.
onView(withId(R.id.view)) .check(isPartiallyAbove(withId(R.id.target_view)))
Here, the test case ensures that the view having id, R.id.view exists and is positioned partially above the view having id, R.id.target_view
isPartiallyBelow()
Accepts a target view matcher and returns a view assertion, which ensures that the view matcher (actual) exists and is positioned partially below the target view matcher.
onView(withId(R.id.view)) .check(isPartiallyBelow(withId(R.id.target_view)))
Here, the test case ensures that the view having id, R.id.view exists and is positioned partially below the view having id, R.id.target_view.
isPartiallyLeftOf()
Accepts a target view matcher and returns a view assertion, which ensures that the view matcher (actual) exists and is positioned partially left of the target view matcher.
onView(withId(R.id.view)) .check(isPartiallyLeftOf(withId(R.id.target_view)))
Here, the test case ensures that the view having id, R.id.view exists and is positioned partially left of view having id, R.id.target_view.
isPartiallyRightOf()
Accepts a target view matcher and returns a view assertion, which ensures that the view matcher (actual) exists and is positioned partially right of the target view matcher
onView(withId(R.id.view)) .check(isPartiallyRightOf(withId(R.id.target_view)))
Here, the test case ensures that the view having id, R.id.view exists and is positioned partially right of view having id, R.id.target_view.
isRightAlignedWith()
Accepts a target view matcher and returns a view assertion, which ensures that the view matcher (actual) exists and is right aligned with the target view matcher.
onView(withId(R.id.view)) .check(isRightAlignedWith(withId(R.id.target_view)))
Here, the test case ensures that the view having id, R.id.view exists and is right aligned with view having id, R.id.target_view.
isTopAlignedWith()
Accepts a target view matcher and returns a view assertion, which ensures that the view matcher (actual) exists and is top aligned with the target view matcher.
onView(withId(R.id.view)) .check(isTopAlignedWith(withId(R.id.target_view)))
Here, the test case ensures that the view having id, R.id.view exists and is top aligned with view having id, R.id.target_view
noEllipsizedText()
Returns a view assertion, which ensures that the view hierarchy does not contain ellipsized or cut off text views.
onView(withId(R.id.view)) .check(noEllipsizedText());
noMultilineButtons()
Returns a view assertion, which ensures that the view hierarchy does not contain multi line buttons.
onView(withId(R.id.view)) .check(noMultilineButtons());
noOverlaps()
Returns a view assertion, which ensures that the descendant object assignable to TextView or ImageView does not overlap each other. It has another option, which accepts a target view matcher and returns a view assertion, which ensures that the descendant view matching the target view do not overlap.
Espresso Testing Framework - View Actions
As learned earlier, view actions automate all the possible actions performable by users in an android application. Espresso onView and “onData” provides the perform method, which accepts view actions and invokes/automates the corresponding user actions in the test environment. For example, “click()” is a view action, which when passed to the onView(R.id.myButton).perform(click()) method, will fire the click event of the button (with id: “myButton”) in the testing environment.
In this chapter, let us learn about the view actions provided by espresso testing framework.
typeText()
typeText() accepts one argument (text) of type String and returns a view action. The returned view action types the provided text into the view. Before placing the text, it taps the view once. The content may be placed at arbitrary position if it contains text already.
onView(withId(R.id.text_view)).perform(typeText("Hello World!"))
typeTextIntoFocusedView()
typeTextIntoFocusedView() is similar to typeText() except that it places the text right next to the cursor position in the view.
onView(withId(R.id.text_view)).perform(typeTextIntoFocusedView("Hello World!"))
replaceText()
replaceText() is similar to typeText() except that it replaces the content of the view.
onView(withId(R.id.text_view)).perform(typeTextIntoFocusedView("Hello World!"))
clearText()
clearText() has no arguments and returns a view action, which will clear the text in the view.
onView(withId(R.id.text_view)).perform(clearText())
pressKey()
pressKey() accepts key code (e.g KeyEvent.KEYCODE_ENTER) and returns a view action, which will press the key corresponds to the key code.
onView(withId(R.id.text_view)).perform(typeText(
   "Hello World!", pressKey(KeyEvent.KEYCODE_ENTER))
pressMenuKey()
pressMenuKey() has no arguments and returns a view action, which will press the hardware menu key.
onView(withId(R.id.text_view)).perform(typeText(
   "Hello World!", pressKey(KeyEvent.KEYCODE_ENTER), pressMenuKey())
closeSoftKeyboard()
closeSoftKeyboard() has no arguments and returns a view action, which will close the keyboard, if one is opened.
onView(withId(R.id.text_view)).perform(typeText(
   "Hello World!", closeSoftKeyboard())
click()
click() has no arguments and returns a view action, which will invoke the click action of the view.
onView(withId(R.id.button)).perform(click())
doubleClick()
doubleClick() has no arguments and returns a view action, which will invoke the double click action of the view.
onView(withId(R.id.button)).perform(doubleClick())
longClick()
longClick() has no arguments and returns a view action, which will invoke the long click action of the view.
onView(withId(R.id.button)).perform(longClick())
pressBack()
pressBack() has no arguments and returns a view action, which will click the back button.
onView(withId(R.id.button)).perform(pressBack())
pressBackUnconditionally()
pressBackUnconditionally() has no arguments and returns a view action, which will click the back button and does not throw an exception if the back button action exits the application itself.
onView(withId(R.id.button)).perform(pressBack())
openLink()
openLink() has two arguments. The first argument (link text) is of type Matcher and refers the text of the HTML anchor tag. The second argument (url) is of the type Matcher and refers the url of the HTML anchor tag. It is applicable for TextView only. It returns a view action, which collects all the HTML anchor tags available in the content of the text view, finds the anchor tag matching the first argument (link text) and the second argument (url) and finally opens the corresponding url. Let us consider a text view having the content as −
<a href="http://www.google.com/">copyright</a>
Then, the link can be opened and tested using the below test case,
onView(withId(R.id.text_view)).perform(openLink(is("copyright"),
   is(Uri.parse("http://www.google.com/"))))
Here, openLink will get the content of the text view, find the link having copyright as text, www.google.com as url and open the url in a browser.
openLinkWithText()
openLinkWithText() has one argument, which may be either of type **String* or Matcher. It is simply a short cut to the openLink *method.
onView(withId(R.id.text_view)).perform(openLinkWithText("copyright"))
openLinkWithUri()
openLinkWithUri() has one argument, which may be either of type String or Matcher. It is simply a short cut to the openLink* method.
onView(withId(R.id.text_view)).perform(openLinkWithUri("http://www.google.com/"))
pressImeActionButton()
pressImeActionButton() has no arguments and returns a view action, which will execute the action set in android:imeOptions configuration. For example, if the android:imeOptions equals actionNext, this will move the cursor to next possible EditText view in the screen.
onView(withId(R.id.text_view)).perform(pressImeActionButton())
scrollTo()
scrollTo() has no arguments and returns a view action, which will scroll the matched scrollView on the screen.
onView(withId(R.id.scrollView)).perform(scrollTo())
swipeDown()
swipeDown() has no arguments and returns a view action, which will fire swipe down action on the screen.
onView(withId(R.id.root)).perform(swipeDown())
swipeUp()
swipeUp() has no arguments and returns a view action, which will fire swipe up action on the screen.
onView(withId(R.id.root)).perform(swipeUp())
swipeRight()
swipeRight() has no arguments and returns a view action, which will fire swipe right action on the screen.
onView(withId(R.id.root)).perform(swipeRight())
swipeLeft()
swipeLeft() has no arguments and returns a view action, which will fire swipe left action on the screen.
onView(withId(R.id.root)).perform(swipeLeft())
Espresso Testing Framework - AdapterView
AdapterView is a special kind of view specifically designed to render a collection of similar information like product list and user contacts fetched from an underlying data source using Adapter. The data source may be simple list to complex database entries. Some of the view derived from AdapterView are ListView, GridView and Spinner.
AdapterView renders the user interface dynamically depending on the amount of data available in the underlying data source. In addition, AdapterView renders only the minimum necessary data, which can be rendered in the available visible area of the screen. AdapterView does this to conserve memory and to make the user interface look smooth even if the underlying data is large.
Upon analysis, the nature of the AdapterView architecture makes the onView option and its view matchers irrelevant because the particular view to be tested may not be rendered at all in the first place. Luckily, espresso provides a method, onData(), which accepts hamcrest matchers (relevant to the data type of the underlying data) to match the underlying data and returns object of type DataInteraction corresponding to the view o the matched data. A sample code is as follows,
onData(allOf(is(instanceOf(String.class)), startsWith("Apple"))).perform(click())
Here, onData() matches entry “Apple”, if it is available in the underlying data (array list) and returns DataInteraction object to interact with the matched view (TextView corresponding to “Apple” entry).
Methods
DataInteraction provides the below methods to interact with the view,
perform()
This accepts view actions and fires the passed in view actions.
onData(allOf(is(instanceOf(String.class)), startsWith("Apple"))).perform(click())
check()
This accepts view assertions and checks the passed in view assertions.
onData(allOf(is(instanceOf(String.class)), startsWith("Apple")))
   .check(matches(withText("Apple")))
inAdapterView()
This accepts view matchers. It selects the particular AdapterView based on the passed in view matchers and returns DataInteraction object to interact with the matched AdapterView
onData(allOf())
   .inAdapterView(withId(R.id.adapter_view))
   .atPosition(5)
   .perform(click())
atPosition()
This accepts an argument of type integer and refers the position of the item in the underlying data. It selects the view corresponding to the passed in positional value of the data and returns DataInteraction object to interact with the matched view. It will be useful, if we know the correct order of the underlying data.
onData(allOf())
   .inAdapterView(withId(R.id.adapter_view))
   .atPosition(5)
   .perform(click())
onChildView()
This accepts view matchers and matches the view inside the specific child view. For example, we can interact with specific items like Buy button in a product list based AdapterView.
onData(allOf(is(instanceOf(String.class)), startsWith("Apple")))
   .onChildView(withId(R.id.buy_button))
   .perform(click())
Write a Sample Application
Follow the steps shown below to write a simple application based on AdapterView and write a test case using the onData() method.
Start Android studio.
Create new project as discussed earlier and name it, MyFruitApp.
Migrate the application to AndroidX framework using Refactor → Migrate to AndroidX option menu.
Remove default design in the main activity and add ListView. The content of the activity_main.xml is as follows,
<?xml version = "1.0" encoding = "utf-8"?>
<RelativeLayout xmlns:android = "http://schemas.android.com/apk/res/android"
   xmlns:app = "http://schemas.android.com/apk/res-auto"
   xmlns:tools = "http://schemas.android.com/tools"
   android:layout_width = "match_parent"
   android:layout_height = "match_parent"
   tools:context = ".MainActivity">
   <ListView
      android:id = "@+id/listView"
      android:layout_width = "wrap_content"
      android:layout_height = "wrap_content" />
</RelativeLayout>
Add new layout resource, item.xml to specify the item template of the list view. The content of the item.xml is as follows,
<?xml version = "1.0" encoding = "utf-8"?>
<TextView xmlns:android = "http://schemas.android.com/apk/res/android"
   android:id = "@+id/name"
   android:layout_width = "fill_parent"
   android:layout_height = "fill_parent"
   android:padding = "8dp"
/>
Now, create an adapter having fruit array as underlying data and set it to the list view. This needs to be done in the onCreate() of MainActivity as specified below,
@Override
protected void onCreate(Bundle savedInstanceState) {
   super.onCreate(savedInstanceState);
   setContentView(R.layout.activity_main);

   // Find fruit list view
   final ListView listView = (ListView) findViewById(R.id.listView);

   // Initialize fruit data
   String[] fruits = new String[]{
      "Apple",
      "Banana",
      "Cherry",
      "Dates",
      "Elderberry",
      "Fig",
      "Grapes",
      "Grapefruit",
      "Guava",
      "Jack fruit",
      "Lemon",
      "Mango",
      "Orange",
      "Papaya",
      "Pears",
      "Peaches",
      "Pineapple",
      "Plums",
      "Raspberry",
      "Strawberry",
      "Watermelon"
   };

   // Create array list of fruits
   final ArrayList<String> fruitList = new ArrayList<String>();
   for (int i = 0; i < fruits.length; ++i) {
      fruitList.add(fruits[i]);
   }

   // Create Array adapter
   final ArrayAdapter adapter = new ArrayAdapter(this, R.layout.item, fruitList);

   // Set adapter in list view
   listView.setAdapter(adapter);
}
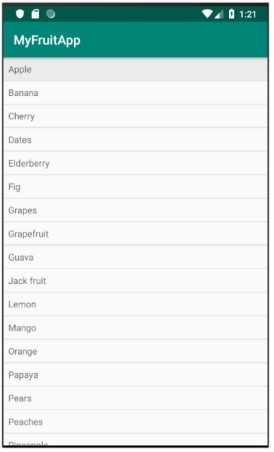
Now, compile the code and run the application. The screenshot of the My Fruit App is as follows,
Now, open ExampleInstrumentedTest.java file and add ActivityTestRule as specified below,
@Rule
public ActivityTestRule<MainActivity> mActivityRule =
   new ActivityTestRule<MainActivity>(MainActivity.class);
Also, make sure the test configuration is done in app/build.gradle −
dependencies {
   testImplementation 'junit:junit:4.12'
   androidTestImplementation 'androidx.test:runner:1.1.1'
   androidTestImplementation 'androidx.test:rules:1.1.1'
   androidTestImplementation 'androidx.test.espresso:espresso-core:3.1.1'
}
Add a new test case to test the list view as below,
@Test
public void listView_isCorrect() {
   // check list view is visible
   onView(withId(R.id.listView)).check(matches(isDisplayed()));
   onData(allOf(is(instanceOf(String.class)), startsWith("Apple"))).perform(click());
   onData(allOf(is(instanceOf(String.class)), startsWith("Apple")))
      .check(matches(withText("Apple")));
   // click a child item
   onData(allOf())
      .inAdapterView(withId(R.id.listView))
      .atPosition(10)
      .perform(click());
}
Finally, run the test case using android studio’s context menu and check whether all test cases are succeeding.
Espresso Testing Framework - WebView
WebView is a special view provided by android to display web pages inside the application. WebView does not provide all the features of a full-fledged browser application like chrome and firefox. However, it provides complete control over the content to be shown and exposes all the android features to be invoked inside the web pages. It enables WebView and provides a special environment where the UI can be easily designed using HTML technology and native features like camera and dial a contact. This feature set enables a WebView to provide a new kind of application called Hybrid application, where the UI is done in HTML and business logic is done in either JavaScript or through an external API endpoint.
Normally, testing a WebView needs to be a challenge because it uses HTML technology for its user interface elements rather than native user interface/views. Espresso excels in this area by providing a new set to web matchers and web assertions, which is intentionally similar to native view matchers and view assertions. At the same time, it provides a wellbalanced approach by including a web technology based testing environment as well.
Espresso web is built upon WebDriver Atom framework, which is used to find and manipulate web elements. Atom is similar to view actions. Atom will do all the interaction inside a web page. WebDriver exposes a predefined set of methods, like findElement(), getElement() to find web elements and returns the corresponding atoms (to do action in the web page).
A standard web testing statement looks like the below code,
onWebView()
   .withElement(Atom)
   .perform(Atom)
   .check(WebAssertion)
Here,
onWebView() − Similar to onView(), it exposes a set of API to test a WebView.
withElement() − One of the several methods used to locate web elements inside a web page using Atom and returns WebInteration object, which is similar to ViewInteraction.
perform() − Executes the action inside a web page using Atom and returns WebInteraction.
check() − This does the necessary assertion using WebAssertion.
A sample web testing code is as follows,
onWebView()
   .withElement(findElement(Locator.ID, "apple"))
   .check(webMatches(getText(), containsString("Apple")))
Here,
findElement() locate a element and returns an Atom
webMatches is similar to matches method
Write a Sample Application
Let us write a simple application based on WebView and write a test case using the onWebView() method. Follow these steps to write a sample application −
Start Android studio.
Create new project as discussed earlier and name it, MyWebViewApp.
Migrate the application to AndroidX framework using Refactor → Migrate to AndroidX option menu.
Add the below configuration option in the AndroidManifest.xml file to give permission to access Internet.
<uses-permission android:name = "android.permission.INTERNET" />
Espresso web is provided as a separate plugin. So, add the dependency in the app/build.gradle and sync it.
dependencies {
   androidTestImplementation 'androidx.test:rules:1.1.1'
   androidTestImplementation 'androidx.test.espresso:espresso-web:3.1.1'
}
Remove default design in the main activity and add WebView. The content of the activity_main.xml is as follows,
<?xml version = "1.0" encoding = "utf-8"?>
<RelativeLayout xmlns:android = "http://schemas.android.com/apk/res/android"
   xmlns:app = "http://schemas.android.com/apk/res-auto"
   xmlns:tools = "http://schemas.android.com/tools"
   android:layout_width = "match_parent"
   android:layout_height = "match_parent"
   tools:context = ".MainActivity">
   <WebView
      android:id = "@+id/web_view_test"
      android:layout_width = "fill_parent"
      android:layout_height = "fill_parent" />
</RelativeLayout>
Create a new class, ExtendedWebViewClient extending WebViewClient and override shouldOverrideUrlLoading method to load link action in the same WebView; otherwise, it will open a new browser window outside the application. Place it in MainActivity.java.
private class ExtendedWebViewClient extends WebViewClient {
   @Override
   public boolean shouldOverrideUrlLoading(WebView view, String url) {
      view.loadUrl(url);
      return true;
   }
}
Now, add the below code in the onCreate method of MainActivity. The purpose of the code is to find the WebView, properly configure it and then finally load the target url.
// Find web view
WebView webView = (WebView) findViewById(R.id.web_view_test);

// set web view client
webView.setWebViewClient(new ExtendedWebViewClient());

// Clear cache
webView.clearCache(true);

// load Url
webView.loadUrl("http://<your domain or IP>/index.html");
Here,
The content of index.html is as follows −
<html>
   <head>
      <title>Android Web View Sample</title>
   </head>
   <body>
      <h1>Fruits</h1>
      <ol>
         <li><a href = "apple.html" id = "apple">Apple</a></li>
         <li><a href = "banana.html" id = "banana">Banana</a></li>
         </ol>
   </body>
</html>
The content of the apple.html file referred in index.html is as follows −
<html>
   <head>
      <title>Android Web View Sample</title>
   </head>

   <body>
      <h1>Apple</h1>
   </body>
</html>
The content of the banana.html file referred in banana.html is as follows,
<html>
   <head>
      <title>Android Web View Sample</title>
   </head>

   <body>
      <h1>Banana</h1>
   </body>
</html>
Place index.html, apple.html and banana.html in a web server
Replace the url in loadUrl method with your configured url.
Now, run the application and manually check if everything is fine. Below is the screenshot of the WebView sample application −
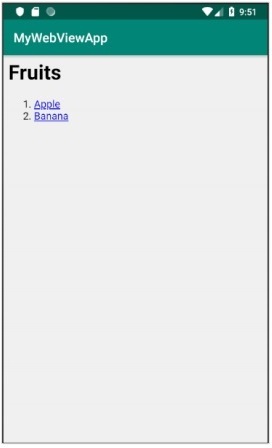
Now, open the ExampleInstrumentedTest.java file and add the below rule −
@Rule
public ActivityTestRule<MainActivity> mActivityRule =
   new ActivityTestRule<MainActivity>(MainActivity.class, false, true) {
   @Override
   protected void afterActivityLaunched() {
      onWebView(withId(R.id.web_view_test)).forceJavascriptEnabled();
   }
};
Here, we found the WebView and enabled JavaScript of the WebView because espresso web testing framework works exclusively through JavaScript engine to identify and manipulate web element.
Now, add the test case to test our WebView and its behavior.
@Test
public void webViewTest(){
   onWebView()
      .withElement(findElement(Locator.ID, "apple"))
      .check(webMatches(getText(), containsString("Apple")))
      .perform(webClick())
      .withElement(findElement(Locator.TAG_NAME, "h1"))
      .check(webMatches(getText(), containsString("Apple")));
}
Here, the testing was done in the following order,
found the link, apple using its id attribute through findElement() method and Locator.ID enumeration.
checks the text of the link using webMatches() method
performs click action on the link. It opens the apple.html page.
again found the h1 element using findElement() methods and Locator.TAG_NAME enumeration.
finally again checks the text of the h1 tag using webMatches() method.
Finally, run the test case using android studio context menu.
Asynchronous Operations
In this chapter, we will learn how to test asynchronous operations using Espresso Idling Resources.
One of the challenges of the modern application is to provide smooth user experience. Providing smooth user experience involves lot of work in the background to make sure that the application process does not take longer than few milliseconds. Background task ranges from the simple one to costly and complex task of fetching data from remote API / database. To encounter the challenge in the past, a developer used to write costly and long running task in a background thread and sync up with the main UIThread once background thread is completed.
If developing a multi-threaded application is complex, then writing test cases for it is even more complex. For example, we should not test an AdapterView before the necessary data is loaded from the database. If fetching the data is done in a separate thread, the test needs to wait until the thread completes. So, the test environment should be synced between background thread and UI thread. Espresso provides an excellent support for testing the multi-threaded application. An application uses thread in the following ways and espresso supports every scenario.
User Interface Threading
It is internally used by android SDK to provide smooth user experience with complex UI elements. Espresso supports this scenario transparently and does not need any configuration and special coding.
Async task
Modern programming languages support async programming to do light weight threading without the complexity of thread programming. Async task is also supported transparently by espresso framework.
User thread
A developer may start a new thread to fetch complex or large data from database. To support this scenario, espresso provides idling resource concept.
Let use learn the concept of idling resource and how to to it in this chapter.
Overview
The concept of idling resource is very simple and intuitive. The basic idea is to create a variable (boolean value) whenever a long running process is started in a separate thread to identify whether the process is running or not and register it in the testing environment. During testing, the test runner will check the registered variable, if any found and then find its running status. If the running status is true, test runner will wait until the status become false.
Espresso provides an interface, IdlingResources for the purpose of maintaining the running status. The main method to implement is isIdleNow(). If isIdleNow() returns true, espresso will resume the testing process or else wait until isIdleNow() returns false. We need to implement IdlingResources and use the derived class. Espresso also provides some of the built-in IdlingResources implementation to ease our workload. They are as follows,
CountingIdlingResource
This maintains an internal counter of running task. It exposes increment() and decrement() methods. increment() adds one to the counter and decrement() removes one from the counter. isIdleNow() returns true only when no task is active.
UriIdlingResource
This is similar to CounintIdlingResource except that the counter needs to be zero for extended period to take the network latency as well.
IdlingThreadPoolExecutor
This is a custom implementation of ThreadPoolExecutor to maintain the number active running task in the current thread pool.
IdlingScheduledThreadPoolExecutor
This is similar to IdlingThreadPoolExecutor, but it schedules a task as well and a custom implementation of ScheduledThreadPoolExecutor.
If any one of the above implementation of IdlingResources or a custom one is used in the application, we need to register it to the testing environment as well before testing the application using IdlingRegistry class as below,
IdlingRegistry.getInstance().register(MyIdlingResource.getIdlingResource());
Moreover, it can be removed once testing is completed as below −
IdlingRegistry.getInstance().unregister(MyIdlingResource.getIdlingResource());
Espresso provides this functionality in a separate package, and the package needs to be configured as below in the app.gradle.
dependencies {
   implementation 'androidx.test.espresso:espresso-idling-resource:3.1.1'
   androidTestImplementation "androidx.test.espresso.idling:idlingconcurrent:3.1.1"
}
Sample Application
Let us create a simple application to list the fruits by fetching it from a web service in a separate thread and then, test it using idling resource concept.
Start Android studio.
Create new project as discussed earlier and name it, MyIdlingFruitApp
Migrate the application to AndroidX framework using Refactor → Migrate to AndroidX option menu.
Add espresso idling resource library in the app/build.gradle (and sync it) as specified below,
dependencies {
   implementation 'androidx.test.espresso:espresso-idling-resource:3.1.1'
   androidTestImplementation "androidx.test.espresso.idling:idlingconcurrent:3.1.1"
}
Remove the default design in the main activity and add ListView. The content of the activity_main.xml is as follows,
<?xml version = "1.0" encoding = "utf-8"?>
<RelativeLayout xmlns:android = "http://schemas.android.com/apk/res/android"
   xmlns:app = "http://schemas.android.com/apk/res-auto"
   xmlns:tools = "http://schemas.android.com/tools"
   android:layout_width = "match_parent"
   android:layout_height = "match_parent"
   tools:context = ".MainActivity">
   <ListView
      android:id = "@+id/listView"
      android:layout_width = "wrap_content"
      android:layout_height = "wrap_content" />
</RelativeLayout>
Add new layout resource, item.xml to specify the item template of the list view. The content of the item.xml is as follows,
<?xml version = "1.0" encoding = "utf-8"?>
<TextView xmlns:android = "http://schemas.android.com/apk/res/android"
   android:id = "@+id/name"
   android:layout_width = "fill_parent"
   android:layout_height = "fill_parent"
   android:padding = "8dp"
/>
Create a new class – MyIdlingResource. MyIdlingResource is used to hold our IdlingResource in one place and fetch it whenever necessary. We are going to use CountingIdlingResource in our example.
package com.tutorialspoint.espressosamples.myidlingfruitapp;
import androidx.test.espresso.IdlingResource;
import androidx.test.espresso.idling.CountingIdlingResource;

public class MyIdlingResource {
   private static CountingIdlingResource mCountingIdlingResource =
      new CountingIdlingResource("my_idling_resource");
   public static void increment() {
      mCountingIdlingResource.increment();
   }
   public static void decrement() {
      mCountingIdlingResource.decrement();
   }
   public static IdlingResource getIdlingResource() {
      return mCountingIdlingResource;
   }
}
Declare a global variable, mIdlingResource of type CountingIdlingResource in the MainActivity class as below,
@Nullable
private CountingIdlingResource mIdlingResource = null;
Write a private method to fetch fruit list from the web as below,
private ArrayList<String> getFruitList(String data) {
   ArrayList<String> fruits = new ArrayList<String>();
   try {
      // Get url from async task and set it into a local variable
      URL url = new URL(data);
      Log.e("URL", url.toString());

      // Create new HTTP connection
      HttpURLConnection conn = (HttpURLConnection) url.openConnection();

      // Set HTTP connection method as "Get"
      conn.setRequestMethod("GET");

      // Do a http request and get the response code
      int responseCode = conn.getResponseCode();

      // check the response code and if success, get response content
      if (responseCode == HttpURLConnection.HTTP_OK) {
         BufferedReader in = new BufferedReader(new InputStreamReader(conn.getInputStream()));
         String line;
         StringBuffer response = new StringBuffer();
         while ((line = in.readLine()) != null) {
            response.append(line);
         }
         in.close();
         JSONArray jsonArray = new JSONArray(response.toString());
         Log.e("HTTPResponse", response.toString());
         for(int i = 0; i < jsonArray.length(); i++) {
            JSONObject jsonObject = jsonArray.getJSONObject(i);
            String name = String.valueOf(jsonObject.getString("name"));
            fruits.add(name);
         }
      } else {
         throw new IOException("Unable to fetch data from url");
      }
      conn.disconnect();
   } catch (IOException | JSONException e) {
      e.printStackTrace();
   }
   return fruits;
}
Create a new task in the onCreate() method to fetch the data from the web using our getFruitList method followed by the creation of a new adapter and setting it out to list view. Also, decrement the idling resource once our work is completed in the thread. The code is as follows,
// Get data
class FruitTask implements Runnable {
   ListView listView;
   CountingIdlingResource idlingResource;
   FruitTask(CountingIdlingResource idlingRes, ListView listView) {
      this.listView = listView;
      this.idlingResource = idlingRes;
   }
   public void run() {
      //code to do the HTTP request
      final ArrayList<String> fruitList = getFruitList("http://<your domain or IP>/fruits.json");
      try {
         synchronized (this){
            runOnUiThread(new Runnable() {
               @Override
               public void run() {
                  // Create adapter and set it to list view
                  final ArrayAdapter adapter = new
                     ArrayAdapter(MainActivity.this, R.layout.item, fruitList);
                  ListView listView = (ListView)findViewById(R.id.listView);
                  listView.setAdapter(adapter);
               }
            });
         }
      } catch (Exception e) {
         e.printStackTrace();
      }
      if (!MyIdlingResource.getIdlingResource().isIdleNow()) {
         MyIdlingResource.decrement(); // Set app as idle.
      }
   }
}
Here, the fruit url is considered as http://<your domain or IP/fruits.json and it is formated as JSON. The content is as follows,
[
   {
      "name":"Apple"
   },
   {
      "name":"Banana"
   },
   {
      "name":"Cherry"
   },
   {
      "name":"Dates"
   },
   {
      "name":"Elderberry"
   },
   {
      "name":"Fig"
   },
   {
      "name":"Grapes"
   },
   {
      "name":"Grapefruit"
   },
   {
      "name":"Guava"
   },
   {
      "name":"Jack fruit"
   },
   {
      "name":"Lemon"
   },
   {
      "name":"Mango"
   },
   {
      "name":"Orange"
   },
   {
      "name":"Papaya"
   },
   {
      "name":"Pears"
   },
   {
      "name":"Peaches"
   },
   {
      "name":"Pineapple"
   },
   {
      "name":"Plums"
   },
   {
      "name":"Raspberry"
   },
   {
      "name":"Strawberry"
   },
   {
      "name":"Watermelon"
   }
]
Note − Place the file in your local web server and use it.
Now, find the view, create a new thread by passing FruitTask, increment the idling resource and finally start the task.
// Find list view
ListView listView = (ListView) findViewById(R.id.listView);
Thread fruitTask = new Thread(new FruitTask(this.mIdlingResource, listView));
MyIdlingResource.increment();
fruitTask.start();
The complete code of MainActivity is as follows,
package com.tutorialspoint.espressosamples.myidlingfruitapp;

import androidx.annotation.NonNull;
import androidx.annotation.Nullable;
import androidx.annotation.VisibleForTesting;
import androidx.appcompat.app.AppCompatActivity;
import androidx.test.espresso.idling.CountingIdlingResource;

import android.os.Bundle;
import android.util.Log;
import android.widget.ArrayAdapter;
import android.widget.ListView;

import org.json.JSONArray;
import org.json.JSONException;
import org.json.JSONObject;

import java.io.BufferedReader;
import java.io.IOException;
import java.io.InputStreamReader;
import java.net.HttpURLConnection;
import java.net.URL;
import java.util.ArrayList;

public class MainActivity extends AppCompatActivity {
   @Nullable
   private CountingIdlingResource mIdlingResource = null;
   @Override
   protected void onCreate(Bundle savedInstanceState) {
      super.onCreate(savedInstanceState);
      setContentView(R.layout.activity_main);

      // Get data
      class FruitTask implements Runnable {
         ListView listView;
         CountingIdlingResource idlingResource;
         FruitTask(CountingIdlingResource idlingRes, ListView listView) {
            this.listView = listView;
            this.idlingResource = idlingRes;
         }
         public void run() {
            //code to do the HTTP request
            final ArrayList<String> fruitList = getFruitList(
               "http://<yourdomain or IP>/fruits.json");
            try {
               synchronized (this){
                  runOnUiThread(new Runnable() {
                     @Override
                     public void run() {
                        // Create adapter and set it to list view
                        final ArrayAdapter adapter = new ArrayAdapter(
                           MainActivity.this, R.layout.item, fruitList);
                        ListView listView = (ListView) findViewById(R.id.listView);
                        listView.setAdapter(adapter);
                     }
                  });
               }
            } catch (Exception e) {
               e.printStackTrace();
            }
            if (!MyIdlingResource.getIdlingResource().isIdleNow()) {
               MyIdlingResource.decrement(); // Set app as idle.
            }
         }
      }
      // Find list view
      ListView listView = (ListView) findViewById(R.id.listView);
      Thread fruitTask = new Thread(new FruitTask(this.mIdlingResource, listView));
      MyIdlingResource.increment();
      fruitTask.start();
   }
   private ArrayList<String> getFruitList(String data) {
      ArrayList<String> fruits = new ArrayList<String>();
      try {
         // Get url from async task and set it into a local variable
         URL url = new URL(data);
         Log.e("URL", url.toString());

         // Create new HTTP connection
         HttpURLConnection conn = (HttpURLConnection) url.openConnection();

         // Set HTTP connection method as "Get"
         conn.setRequestMethod("GET");

         // Do a http request and get the response code
         int responseCode = conn.getResponseCode();

         // check the response code and if success, get response content
         if (responseCode == HttpURLConnection.HTTP_OK) {
            BufferedReader in = new BufferedReader(new InputStreamReader(conn.getInputStream()));
            String line;
            StringBuffer response = new StringBuffer();
            while ((line = in.readLine()) != null) {
               response.append(line);
            }
            in.close();
            JSONArray jsonArray = new JSONArray(response.toString());
            Log.e("HTTPResponse", response.toString());

            for(int i = 0; i < jsonArray.length(); i++) {
               JSONObject jsonObject = jsonArray.getJSONObject(i);
               String name = String.valueOf(jsonObject.getString("name"));
               fruits.add(name);
            }
         } else {
            throw new IOException("Unable to fetch data from url");
         }
         conn.disconnect();
      } catch (IOException | JSONException e) {
         e.printStackTrace();
      }
      return fruits;
   }
}
Now, add below configuration in the application manifest file, AndroidManifest.xml
<uses-permission android:name = "android.permission.INTERNET" />
Now, compile the above code and run the application. The screenshot of the My Idling Fruit App is as follows,
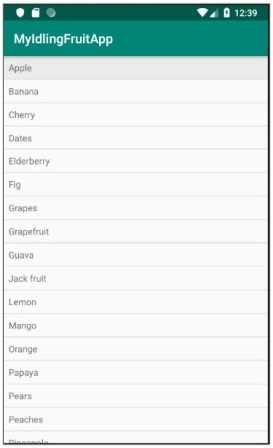
Now, open the ExampleInstrumentedTest.java file and add ActivityTestRule as specified below,
@Rule
public ActivityTestRule<MainActivity> mActivityRule =
   new ActivityTestRule<MainActivity>(MainActivity.class);
Also, make sure the test configuration is done in app/build.gradle
dependencies {
   testImplementation 'junit:junit:4.12'
   androidTestImplementation 'androidx.test:runner:1.1.1'
   androidTestImplementation 'androidx.test:rules:1.1.1'
   androidTestImplementation 'androidx.test.espresso:espresso-core:3.1.1'
   implementation 'androidx.test.espresso:espresso-idling-resource:3.1.1'
   androidTestImplementation "androidx.test.espresso.idling:idlingconcurrent:3.1.1"
}
Add a new test case to test the list view as below,
@Before
public void registerIdlingResource() {
   IdlingRegistry.getInstance().register(MyIdlingResource.getIdlingResource());
}
@Test
public void contentTest() {
   // click a child item
   onData(allOf())
   .inAdapterView(withId(R.id.listView))
   .atPosition(10)
   .perform(click());
}
@After
public void unregisterIdlingResource() {
   IdlingRegistry.getInstance().unregister(MyIdlingResource.getIdlingResource());
}
Finally, run the test case using android studio’s context menu and check whether all test cases are succeeding.
Espresso Testing Framework - Intents
Android Intent is used to open new activity, either internal (opening a product detail screen from product list screen) or external (like opening a dialer to make a call). Internal intent activity is handled transparently by the espresso testing framework and it does not need any specific work from the user side. However, invoking external activity is really a challenge because it goes out of our scope, the application under test. Once the user invokes an external application and goes out of the application under test, then the chances of user coming back to the application with predefined sequence of action is rather less. Therefore, we need to assume the user action before testing the application. Espresso provides two options to handle this situation. They are as follows,
intended
This allows the user to make sure the correct intent is opened from the application under test.
intending
This allows the user to mock an external activity like take a photo from the camera, dialing a number from the contact list, etc., and return to the application with predefined set of values (like predefined image from the camera instead of actual image).
Setup
Espresso supports the intent option through a plugin library and the library needs to be configured in the application’s gradle file. The configuration option is as follows,
dependencies {
   // ...
   androidTestImplementation 'androidx.test.espresso:espresso-intents:3.1.1'
}
intended()
Espresso intent plugin provides special matchers to check whether the invoked intent is the expected intent. The provided matchers and the purpose of the matchers are as follows,
hasAction
This accepts the intent action and returns a matcher, which matches the specified intent.
hasData
This accepts the data and returns a matcher, which matches the data provided to the intent while invoking it.
toPackage
This accepts the intent package name and returns a matcher, which matches the package name of the invoked intent.
Now, let us create a new application and test the application for external activity using intended() to understand the concept.
Start Android studio.
Create a new project as discussed earlier and name it, IntentSampleApp.
Migrate the application to AndroidX framework using Refactor → Migrate to AndroidX option menu.
Create a text box, a button to open contact list and another one to dial a call by changing the activity_main.xml as shown below,
<?xml version = "1.0" encoding = "utf-8"?>
<RelativeLayout xmlns:android = "http://schemas.android.com/apk/res/android"
   xmlns:app = "http://schemas.android.com/apk/res-auto"
   xmlns:tools = "http://schemas.android.com/tools"
   android:layout_width = "match_parent"
   android:layout_height = "match_parent"
   tools:context = ".MainActivity">
   <EditText
      android:id = "@+id/edit_text_phone_number"
      android:layout_width = "wrap_content"
      android:layout_height = "wrap_content"
      android:layout_centerHorizontal = "true"
      android:text = ""
      android:autofillHints = "@string/phone_number"/>
   <Button
      android:id = "@+id/call_contact_button"
      android:layout_width = "wrap_content"
      android:layout_height = "wrap_content"
      android:layout_centerHorizontal = "true"
      android:layout_below = "@id/edit_text_phone_number"
      android:text = "@string/call_contact"/>
   <Button
      android:id = "@+id/button"
      android:layout_width = "wrap_content"
      android:layout_height = "wrap_content"
      android:layout_centerHorizontal = "true"
      android:layout_below = "@id/call_contact_button"
      android:text = "@string/call"/>
</RelativeLayout>
Also, add the below item in strings.xml resource file,
<string name = "phone_number">Phone number</string>
<string name = "call">Call</string>
<string name = "call_contact">Select from contact list</string>
Now, add the below code in the main activity (MainActivity.java) under the onCreate method.
public class MainActivity extends AppCompatActivity {
   @Override
   protected void onCreate(Bundle savedInstanceState) {
      // ... code
      // Find call from contact button
      Button contactButton = (Button) findViewById(R.id.call_contact_button);
      contactButton.setOnClickListener(new View.OnClickListener() {
         @Override
         public void onClick(View view) {
            // Uri uri = Uri.parse("content://contacts");
            Intent contactIntent = new Intent(Intent.ACTION_PICK,
               ContactsContract.Contacts.CONTENT_URI);
            contactIntent.setType(ContactsContract.CommonDataKinds.Phone.CONTENT_TYPE);
            startActivityForResult(contactIntent, REQUEST_CODE);
         }
      });
      // Find edit view
      final EditText phoneNumberEditView = (EditText)
         findViewById(R.id.edit_text_phone_number);
      // Find call button
      Button button = (Button) findViewById(R.id.button);
      button.setOnClickListener(new View.OnClickListener() {
         @Override
         public void onClick(View view) {
            if(phoneNumberEditView.getText() != null) {
               Uri number = Uri.parse("tel:" + phoneNumberEditView.getText());
               Intent callIntent = new Intent(Intent.ACTION_DIAL, number);
               startActivity(callIntent);
            }
         }
      });
   }
   // ... code
}
Here, we have programmed the button with id, call_contact_button to open the contact list and button with id, button to dial the call.
Add a static variable REQUEST_CODE in MainActivity class as shown below,
public class MainActivity extends AppCompatActivity {
   // ...
   private static final int REQUEST_CODE = 1;
   // ...
}
Now, add the onActivityResult method in the MainActivity class as below,
public class MainActivity extends AppCompatActivity {
   // ...
   @Override
   protected void onActivityResult(int requestCode, int resultCode, Intent data) {
      if (requestCode == REQUEST_CODE) {
         if (resultCode == RESULT_OK) {
            // Bundle extras = data.getExtras();
            // String phoneNumber = extras.get("data").toString();
            Uri uri = data.getData();
            Log.e("ACT_RES", uri.toString());
            String[] projection = {
               ContactsContract.CommonDataKinds.Phone.NUMBER,
               ContactsContract.CommonDataKinds.Phone.DISPLAY_NAME };
            Cursor cursor = getContentResolver().query(uri, projection, null, null, null);
            cursor.moveToFirst();

            int numberColumnIndex =
               cursor.getColumnIndex(ContactsContract.CommonDataKinds.Phone.NUMBER);
            String number = cursor.getString(numberColumnIndex);

            int nameColumnIndex = cursor.getColumnIndex(
               ContactsContract.CommonDataKinds.Phone.DISPLAY_NAME);
            String name = cursor.getString(nameColumnIndex);
            Log.d("MAIN_ACTIVITY", "Selected number : " + number +" , name : "+name);

            // Find edit view
            final EditText phoneNumberEditView = (EditText)
               findViewById(R.id.edit_text_phone_number);
            phoneNumberEditView.setText(number);
         }
      }
   };
   // ...
}
Here, onActivityResult will be invoked when a user returns to the application after opening the contact list using the call_contact_button button and selecting a contact. Once the onActivityResult method is invoked, it gets the user selected contact, find the contact number and set it into the text box.
Run the application and make sure everything is fine. The final look of the Intent sample Application is as shown below,
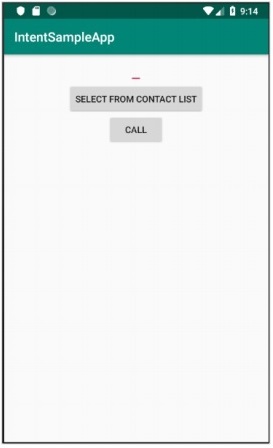
Now, configure the espresso intent in the application’s gradle file as shown below,
dependencies {
   // ...
   androidTestImplementation 'androidx.test.espresso:espresso-intents:3.1.1'
}
Click the Sync Now menu option provided by the Android Studio. This will download the intent test library and configure it properly.
Open ExampleInstrumentedTest.java file and add the IntentsTestRule instead of normally used AndroidTestRule. IntentTestRule is a special rule to handle intent testing.
public class ExampleInstrumentedTest {
   // ... code
   @Rule
   public IntentsTestRule<MainActivity> mActivityRule =
   new IntentsTestRule<>(MainActivity.class);
   // ... code
}
Add two local variables to set the test phone number and dialer package name as below,
public class ExampleInstrumentedTest {
   // ... code
   private static final String PHONE_NUMBER = "1 234-567-890";
   private static final String DIALER_PACKAGE_NAME = "com.google.android.dialer";
   // ... code
}
Fix the import issues by using Alt + Enter option provided by android studio or else include the below import statements,
import android.content.Context;
import android.content.Intent;

import androidx.test.InstrumentationRegistry;
import androidx.test.espresso.intent.rule.IntentsTestRule;
import androidx.test.runner.AndroidJUnit4;

import org.junit.Rule;
import org.junit.Test;
import org.junit.runner.RunWith;

import static androidx.test.espresso.Espresso.onView;
import static androidx.test.espresso.action.ViewActions.click;
import static androidx.test.espresso.action.ViewActions.closeSoftKeyboard;
import static androidx.test.espresso.action.ViewActions.typeText;
import static androidx.test.espresso.intent.Intents.intended;
import static androidx.test.espresso.intent.matcher.IntentMatchers.hasAction;
import static androidx.test.espresso.intent.matcher.IntentMatchers.hasData;
import static androidx.test.espresso.intent.matcher.IntentMatchers.toPackage;
import static androidx.test.espresso.matcher.ViewMatchers.withId;
import static org.hamcrest.core.AllOf.allOf;
import static org.junit.Assert.*;
Add the below test case to test whether the dialer is properly called,
public class ExampleInstrumentedTest {
   // ... code
   @Test
   public void validateIntentTest() {
      onView(withId(R.id.edit_text_phone_number))
         .perform(typeText(PHONE_NUMBER), closeSoftKeyboard());
      onView(withId(R.id.button)) .perform(click());
      intended(allOf(
         hasAction(Intent.ACTION_DIAL),
         hasData("tel:" + PHONE_NUMBER),
         toPackage(DIALER_PACKAGE_NAME)));
   }
   // ... code
}
Here, hasAction, hasData and toPackage matchers are used along with allOf matcher to succeed only if all matchers are passed.
Now, run the ExampleInstrumentedTest through content menu in Android studio.
intending()
Espresso provides a special method – intending() to mock an external intent action. intending() accept the package name of the intent to be mocked and provides a method respondWith to set how the mocked intent needs to be responded with as specified below,
intending(toPackage("com.android.contacts")).respondWith(result);
Here, respondWith() accepts intent result of type Instrumentation.ActivityResult. We can create new stub intent and manually set the result as specified below,
// Stub intent
Intent intent = new Intent();
intent.setData(Uri.parse("content://com.android.contacts/data/1"));
Instrumentation.ActivityResult result =
   new Instrumentation.ActivityResult(Activity.RESULT_OK, intent);
The complete code to test whether a contact application is properly opened is as follows,
@Test
public void stubIntentTest() {
   // Stub intent
   Intent intent = new Intent();
   intent.setData(Uri.parse("content://com.android.contacts/data/1"));
   Instrumentation.ActivityResult result =
      new Instrumentation.ActivityResult(Activity.RESULT_OK, intent);
   intending(toPackage("com.android.contacts")).respondWith(result);

   // find the button and perform click action
   onView(withId(R.id.call_contact_button)).perform(click());

   // get context
   Context targetContext2 = InstrumentationRegistry.getInstrumentation().getTargetContext();

   // get phone number
   String[] projection = { ContactsContract.CommonDataKinds.Phone.NUMBER,
      ContactsContract.CommonDataKinds.Phone.DISPLAY_NAME };
   Cursor cursor =
      targetContext2.getContentResolver().query(Uri.parse("content://com.android.cont
      acts/data/1"), projection, null, null, null);

   cursor.moveToFirst();
   int numberColumnIndex =
      cursor.getColumnIndex(ContactsContract.CommonDataKinds.Phone.NUMBER);
   String number = cursor.getString(numberColumnIndex);

   // now, check the data
   onView(withId(R.id.edit_text_phone_number))
   .check(matches(withText(number)));
}
Here, we have created a new intent and set the return value (when invoking the intent) as the first entry of the contact list, content://com.android.contacts/data/1. Then we have set the intending method to mock the newly created intent in place of contact list. It sets and calls our newly created intent when the package, com.android.contacts is invoked and the default first entry of the list is returned. Then, we fired the click() action to start the mock intent and finally checks whether the phone number from invoking the mock intent and number of the first entry in the contact list are same.
It there is any missing import issue, then fix those import issues by using Alt + Enter option provided by android studio or else include the below import statements,
import android.app.Activity;
import android.app.Instrumentation;
import android.content.Context;
import android.content.Intent;
import android.database.Cursor;
import android.net.Uri;
import android.provider.ContactsContract;

import androidx.test.InstrumentationRegistry;
import androidx.test.espresso.ViewInteraction;
import androidx.test.espresso.intent.rule.IntentsTestRule;
import androidx.test.runner.AndroidJUnit4;

import org.junit.Rule;
import org.junit.Test;
import org.junit.runner.RunWith;

import static androidx.test.espresso.Espresso.onView;
import static androidx.test.espresso.action.ViewActions.click;
import static androidx.test.espresso.action.ViewActions.closeSoftKeyboard;
import static androidx.test.espresso.action.ViewActions.typeText;
import static androidx.test.espresso.assertion.ViewAssertions.matches;
import static androidx.test.espresso.intent.Intents.intended;
import static androidx.test.espresso.intent.Intents.intending;
import static androidx.test.espresso.intent.matcher.IntentMatchers.hasAction;
import static androidx.test.espresso.intent.matcher.IntentMatchers.hasData;
import static androidx.test.espresso.intent.matcher.IntentMatchers.toPackage;
import static androidx.test.espresso.matcher.ViewMatchers.withId;
import static androidx.test.espresso.matcher.ViewMatchers.withText;
import static org.hamcrest.core.AllOf.allOf;
import static org.junit.Assert.*;
Add the below rule in the test class to provide permission to read contact list −
@Rule
public GrantPermissionRule permissionRule =
GrantPermissionRule.grant(Manifest.permission.READ_CONTACTS);
Add the below option in the application manifest file, AndroidManifest.xml −
<uses-permission android:name = "android.permission.READ_CONTACTS" />
Now, make sure the contact list has at least one entry and then run the test using context menu of the Android Studio.
UI for Multiple Application
Android supports user interface testing that involves more than one application. Let us consider our application have an option to move from our application to messaging application to send a message and then comes back to our application. In this scenario, UI automator testing framework helps us to test the application. UI automator can be considered as a good companion for espresso testing framework. We can exploit the intending() option in espresso testing framework before opting for UI automator.
Setup Instruction
Android provides UI automator as a separate plugin. It needs to be configured in the app/build.gradle as specified below,
dependencies {
   ...
   androidTestImplementation 'androidx.test.uiautomator:uiautomator:2.2.0'
}
Workflow for Writing Test Case
Let us understand how to write a UI Automator based test case,
Get UiDevice object by calling the getInstance() method and passing the Instrumentation object.
myDevice = UiDevice.getInstance(InstrumentationRegistry.getInstrumentation());
myDevice.pressHome();
Get UiObject object using the findObject() method. Before using this method, we can open the uiautomatorviewer application to inspect the target application UI components since understanding the target application enables us to write better test cases.
UiObject button = myDevice.findObject(new UiSelector()
   .text("Run")
   .className("android.widget.Button"));
Simulate user interaction by calling UiObject’s method. For example, setText() to edit a text field and click() to fire a click event of a button.
if(button.exists() && button.isEnabled()) {
   button.click();
}
Finally, we check whether the UI reflects the expected state.
Espresso Testing Framework - Test Recorder
Writing test case is a tedious job. Even though espresso provides very easy and flexible API, writing test cases may be a lazy and time-consuming task. To overcome this, Android studio provides a feature to record and generate espresso test cases. Record Espresso Test is available under the Run menu.
Let us record a simple test case in our HelloWorldApp by following the steps described below,
Open the Android studio followed by HelloWorldApp application.
Click Run → Record Espresso test and select MainActivity.
The Recorder screenshot is as follows,
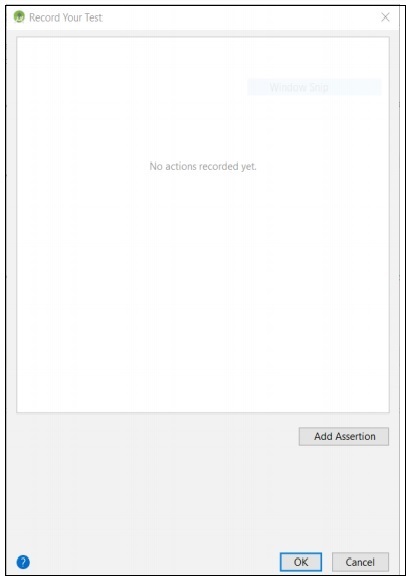
Click Add Assertion. It will open the application screen as shown below,
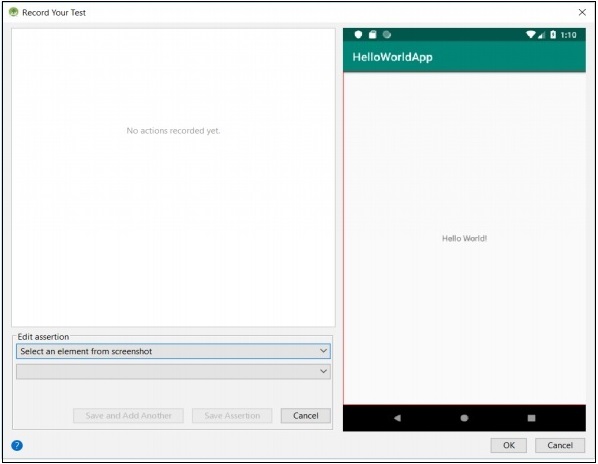
Click Hello World!. The Recorder screen to Select text view is as follows,
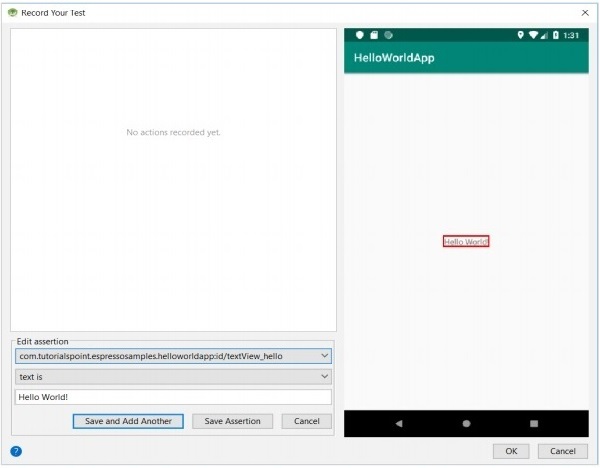
Again click Save Assertion This will save the assertion and show it as follows,
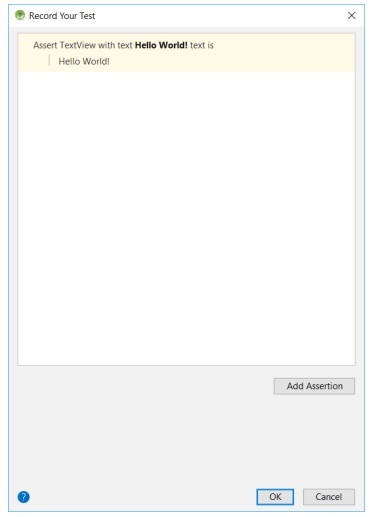
Click OK. It will open a new window and ask the name of the test case. The default name is MainActivityTest
Change the test case name, if necessary.
Again, click OK. This will generate a file, MainActivityTest with our recorded test case. The complete coding is as follows,
package com.tutorialspoint.espressosamples.helloworldapp;

import android.view.View;
import android.view.ViewGroup;
import android.view.ViewParent;

import org.hamcrest.Description;
import org.hamcrest.Matcher;
import org.hamcrest.TypeSafeMatcher;
import org.junit.Rule;
import org.junit.Test;
import org.junit.runner.RunWith;

import androidx.test.espresso.ViewInteraction;
import androidx.test.filters.LargeTest;
import androidx.test.rule.ActivityTestRule;
import androidx.test.runner.AndroidJUnit4;

import static androidx.test.espresso.Espresso.onView;
import static androidx.test.espresso.assertion.ViewAssertions.matches;
import static androidx.test.espresso.matcher.ViewMatchers.isDisplayed;
import static androidx.test.espresso.matcher.ViewMatchers.withId;
import static androidx.test.espresso.matcher.ViewMatchers.withText;
import static org.hamcrest.Matchers.allOf;

@LargeTest
@RunWith(AndroidJUnit4.class)
public class MainActivityTest {
   @Rule
   public ActivityTestRule<MainActivity> mActivityTestRule = new ActivityTestRule<>(MainActivity.class);
   @Test
   public void mainActivityTest() {
      ViewInteraction textView = onView(
         allOf(withId(R.id.textView_hello), withText("Hello World!"),
         childAtPosition(childAtPosition(withId(android.R.id.content),
         0),0),isDisplayed()));
      textView.check(matches(withText("Hello World!")));
   }
   private static Matcher<View> childAtPosition(
      final Matcher<View> parentMatcher, final int position) {
      return new TypeSafeMatcher<View>() {
         @Override
         public void describeTo(Description description) {
            description.appendText("Child at position " + position + " in parent ");
            parentMatcher.describeTo(description);
         }
         @Override
         public boolean matchesSafely(View view) {
            ViewParent parent = view.getParent();
            return parent instanceof ViewGroup &&
               parentMatcher.matches(parent)&& view.equals(((ViewGroup)
               parent).getChildAt(position));
         }
      };
   }
}
Finally, run the test using context menu and check whether the test case run.
Espresso Testing Framework - UI Performance
Positive User experience plays a very important role in the success of an application. User experience not only involves beautiful user interfaces but also how fast those beautiful user interfaces are rendered and what is the frame per second rate. User interface needs to run consistently at 60 frames per second to give good user experience.
Let us learn some of the option available in the android to analyze UI performance in this chapter.
dumpsys
dumpsys is an in-built tool available in the android device. It outputs current information about the system services. dumpsys has the option to dump information about particular category. Passing gfxinfo will provide animation information of the supplied package. The command is as follows,
> adb shell dumpsys gfxinfo <PACKAGE_NAME>
framestats
framestats is an option of the dumpsys command. Once dumpsys is invoked with framestats, it will dump detailed frame timing information of recent frames. The command is as follows,
> adb shell dumpsys gfxinfo <PACKAGE_NAME> framestats
It outputs the information as CSV (comma separated values). The output in CSV format helps to easily push the data into excel and subsequently extract useful information through excel formulas and charts.
systrace
systrace is also an in-build tool available in the android device. It captures and displays execution times of the application processes. systrace can be run using the below command in the android studio’s terminal,
python %ANDROID_HOME%/platform-tools/systrace/systrace.py --time=10 -o
my_trace_output.html gfx view res
Espresso Testing Framework - Accessibility
Accessibility feature is one of the key features for any application. The application developed by a vendor should support minimum accessibility guideline set by the android SDK to be a successful and useful application. Following the accessibility standard is very important and it is not an easy task. Android SDK provides great support by providing properly designed views to create accessible user interfaces.
Similarly, Espresso testing framework does a great favour for both developer and end user by transparently supporting the accessibility testing features into the core-testing engine.
In Espresso, a developer can enable and configure accessibility testing through the AccessibilityChecks class. The sample code is as follows,
AccessibilityChecks.enable();
By default, the accessibility checks run when you perform any view action. The check includes the view on which the action is performed as well as all descendant views. You can check the entire view hierarchy of a screen using the following code −
AccessibilityChecks.enable().setRunChecksFromRootView(true);
Conclusion
Espresso is a great tool for android developers to test their application completely in a very easy way and without putting extra efforts normally required by a testing framework. It even has recorder to create test case without writing the code manually. In addition, it supports all types of user interface testing. By using espresso testing framework, an android developer can confidently develop a great looking application as well as a successful application without any issues in a short period of time.