- AppML Tutorial
- AppML - Home
- AppML - Overview
- AppML - Environment Setup
- AppML - Architecture
- AppML - First Application
- AppML - Data
- AppML - Messages
- AppML - Including HTML
- AppML - Controller
- AppML - Models
- AppML - API
- AppML Useful Resources
- AppML - Quick Guide
- AppML - Useful Resources
- AppML - Discussion
AppML - Quick Guide
AppML - Overview
AppML stands for Application Modeling Language. It is developed for web application development. It extends HTML with data attributes and adds controllers to control the behavior of HTML data.
AppML is very easy to use understand and is used to make Single Page Application in an efficient way and quick manner. AppML focuses on fetching data to HTML applications from varying sources like javascript objects, json files, text files, xml files or database files.
Brief History
AppML first version was developed by Jan Egil Refsnes in 1991 and it was based on HTTP request communication between web client and web server. In february 2015, W3Schools made AppML public by re-launching it as a new product.
Design Goals
AppML is designed considering following concepts −
AppML based application will be primarily an internet based application.
It should use Internet Standards only for a web application i.e. HTML, CSS and JavaScript.
It should be platform independent.
It should be capable of handling application varying needs.
It should be easy to understand and self-descriptive.
It should be highly maintainable and easy to develop and should accomodate change easily.
It should be future ready.
Salient Features
AppML follows modern Web development by following up-to-date techniques. Following are the key features of AppML.
Low Cost of development and maintainance.
Facilitate Rapid and Agile Web Development.
It is optimized for cloud computing.
It is very fast and supports low bandwidth consumption.
Follows MVC (Model View Controller) Architecture.
Data layer can be completely separated from presentation layer.
Highly scalable.
Highly Testable.
Easy to configure or reconfigure.
AppML - Environment
It is very easy to use AppML. Simply refer the JavaScript file using <script> tag in HTML pages and deploy on a web server.
Web Server − PHP works with virtually all Web Server software, including Microsoft's Internet Information Server (IIS) but most often used is Apache Server. Download Apache for free here − https://httpd.apache.org/download.cgi
appml.js can be accessed in the following ways −
You can download appml.js from its official website
Now refer the file as shown in the following code.
<script type = 'text/javascript' src = 'appml.js'></script>
Update the src attribute to match the location where the downloaded files are kept.
You can refer to the appml.js library from W3Schools directly −
<script src = "https://www.w3schools.com/appml/2.0.3/appml.js"
   type = "text/javascript"></script>
Note − In all the chapters for this tutorial, we have referred to W3Schools version of the AppML library.
Example
AppML is based on Model-View-Controller (MVC) pattern. Let's take a look at a simple example of AppML.
<!DOCTYPE html>
<html lang="en-US">
   <title>Students</title>
   <style>
      table {
         border-collapse: collapse;
         width: 100%;
      }

      th, td {
         text-align: left;
         padding: 8px;
      }

      tr:nth-child(even) {background-color: #f2f2f2;}
   </style>
   <script src="https://www.w3schools.com/appml/2.0.3/appml.js"></script>
<body>
   <table appml-data="students">
      <tr>
         <th>Student</th>
         <th>Class</th>
         <th>Section</th>
      </tr>
      <tr appml-repeat="records">
         <td>{{studentName}}</td>
         <td>{{class}}</td>
         <td>{{section}}</td>
      </tr>
   </table>
   <script>
   var students = {
      "records":[
         {"studentName":"Ramesh","class":"12","section":"White"},
         {"studentName":"Suresh","class":"12","section":"Red"},
         {"studentName":"Mohan","class":"12","section":"Red"},
         {"studentName":"Robert","class":"12","section":"Red"},
         {"studentName":"Julie","class":"12","section":"White"},
         {"studentName":"Ali","class":"12","section":"White"},
         {"studentName":"Harjeet","class":"12","section":"White"}
   ]};
   </script>
</body>
</html>
The following line refers to AppML library.
<script src = "https://www.w3schools.com/appml/2.0.3/appml.js"
   type = "text/javascript"> </script>
This line refers AppML library.
We have added an attribute app-data to table to refers to students object. It can be json, txt, xml or even database model.
<p>First String: < input data-bind = "value: firstString" /> </p>
This is how we are binding values from ViewModel to HTML elements using 'app-data' attribute in the body section.
Output
Save the above code as my_first_appml_program.html. Open this file in your browser and you will see an output as the following.
Download appml.php
Download the file from W3Schools https://www.w3schools.com/appml/2.0.3/appml.php.txt Copy the file to your web site and rename it to appml.php. It will be used to load appml model in coming examples.
appml_config.php
Create appml_config.php with following contents.
<?php echo("Access Forbidden");exit();?>
{
"dateformat" : "yyyy-mm-dd"
}
AppML - Architecture
AppML uses MVC architecture. Following is a brief introduction to MVC Architecture.
The Model-View-Controller (MVC) is an architectural pattern that separates an application into three main logical components: the model, the view, and the controller. Each of these components are built to handle specific development aspects of an application. MVC is one of the most frequently used industry-standard web development framework to create scalable and extensible projects.
MVC Components
Following are the components of MVC −
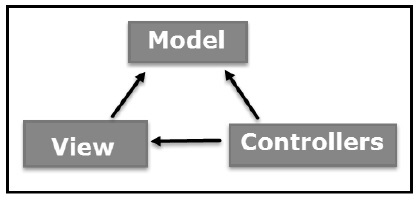
Model
The Model component corresponds to all the data-related logic that the user works with. This can represent either the data that is being transferred between the View and Controller components or any other business logic-related data. For example, a Customer object will retrieve the customer information from the database, manipulate it and update it data back to the database or use it to render data.
View
The View component is used for all the UI logic of the application. For example, the Customer view will include all the UI components such as text boxes, dropdowns, etc. that the final user interacts with.
Controller
Controllers act as an interface between Model and View components to process all the business logic and incoming requests, manipulate data using the Model component and interact with the Views to render the final output. For example, the Customer controller will handle all the interactions and inputs from the Customer View and update the database using the Customer Model. The same controller will be used to view the Customer data.
AppML Model
AppML defines a model as JSON and it is used to describe the application. Being plain text based, the model is platform independent and is independent to any presentation logic or User Interface. Following is an example of sample AppML model.
{
"rowsperpage" : 10,
"database" : {
   "connection" : "localsql",
   "sql" : "SELECT studentName, class, section FROM Students",
   "orderby" : "StudentName"
},
"filteritems" : [
   {"item" : "studentName", "label" : "Student"},
   {"item" : "class"},
   {"item" : "section"}
],
"sortitems" : [
   {"item" : "studentName", "label" : "Student"},
   {"item" : "class"},
   {"item" : "section"}
]
}
AppML View
AppML View is simple HTML to display UI styled by CSS styles. The appml-data attribute is used to refer to model. Following is an example of sample AppML View.
<!DOCTYPE html>
<html lang="en-US">
   <title>Students</title>
   <style>
      table {
         border-collapse: collapse;
         width: 100%;
      }
      th, td {
         text-align: left;
         padding: 8px;
      }
      tr:nth-child(even) {background-color: #f2f2f2;}
   </style>
   <script src="https://www.w3schools.com/appml/2.0.3/appml.js"></script>
<body>
<div class="w3-container" appml-data="local?model=model_students">
<h1>Customers</h1>
<table class="w3-table-all">
   <tr>
      <th>Student</th>
      <th>Class</th>
      <th>Section</th>
</tr>
<tr appml-repeat="records">
   <td>{{studentName}}</td>
   <td>{{class}}</td>
   <td>{{section}}</td>
</tr>
</table>
</div>
</body>
</html>
AppML Controller
AppML Controller is simple javascript function to control the UI data. AppML Controller can be a client side script function or a server side function.The appml-controller attribute is used to denote a controller function. Following is an example of sample AppML Controller.
<!DOCTYPE html>
<html lang="en-US">
   <title>Students</title>
   <style>
      table {
         border-collapse: collapse;
         width: 100%;
      }
      th, td {
         text-align: left;
         padding: 8px;
      }
      tr:nth-child(even) {background-color: #f2f2f2;}
   </style>
   <script src="https://www.w3schools.com/appml/2.0.3/appml.js"></script>
<body>
<div class="w3-container" appml-data="local?model=model_students" appml-controller="studentController">
<h1>Customers</h1>
<table class="w3-table-all">
   <tr>
      <th>Student</th>
      <th>Class</th>
      <th>Section</th>
</tr>
<tr appml-repeat="records">
   <td>{{studentName}}</td>
   <td>{{class}}</td>
   <td>{{section}}</td>
</tr>
</table>
<script>
function studentController($appml) {
   if ($appml.message == "display") {
      if ($appml.display.name == "studentName") {
         $appml.display.value = $appml.display.value.toUpperCase();
      }
   }
}
</script>
</div>
</body>
</html>
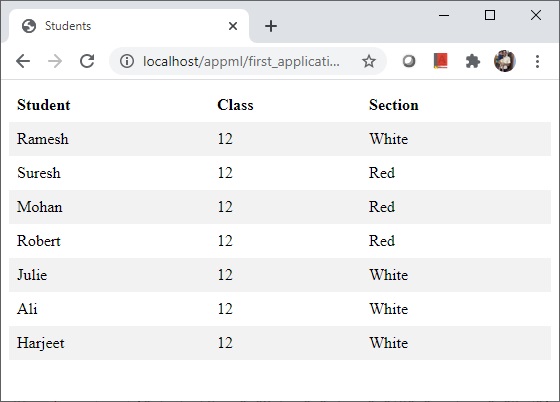
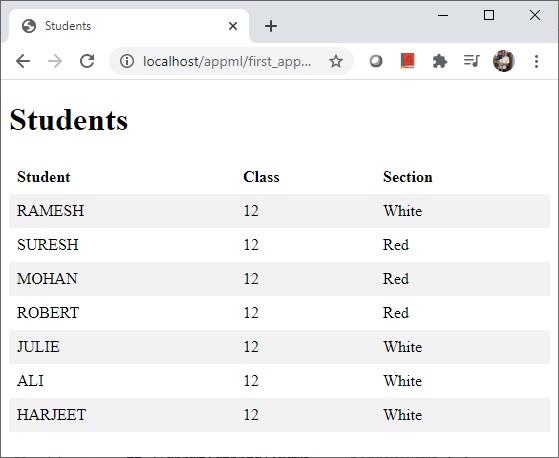
AppML - First Application
Let's start with a simple application.
Step 1: Create Data
The first step is to create a data file which will provide records to be displayed in application UI. Create a students-data.js
students_records.js
{
"students":[
   {"studentName":"Ramesh","class":"12","section":"White"},
   {"studentName":"Suresh","class":"12","section":"Red"},
   {"studentName":"Mohan","class":"12","section":"Red"},
   {"studentName":"Robert","class":"12","section":"Red"},
   {"studentName":"Julie","class":"12","section":"White"},
   {"studentName":"Ali","class":"12","section":"White"},
   {"studentName":"Harjeet","class":"12","section":"White"}
]}
Step 2: Create Application HTML
student_application.html
<!DOCTYPE html>
<html lang="en-US">
   <title>Students</title>
   <style>
      table {
         border-collapse: collapse;
         width: 100%;
      }

      th, td {
         text-align: left;
         padding: 8px;
      }

      tr:nth-child(even) {background-color: #f2f2f2;}
   </style>
   <script src="https://www.w3schools.com/appml/2.0.3/appml.js"></script>
<body>
   <table appml-data="students_records.js" appml-controller="myController">
      <tr>
         <th>Student</th>
         <th>Class</th>
         <th>Section</th>
      </tr>
      <tr appml-repeat="students">
         <td>{{studentName}}</td>
         <td>{{class}}</td>
         <td>{{section}}</td>
      </tr>
   </table>
   <script>
      function myController($appml) {
         if ($appml.message == "display") {
            if ($appml.display.name == "studentName") {
               $appml.display.value = $appml.display.value.toUpperCase();
            }
         }
      }
   </script>
</body>
</html>
Output
Deploy the application on Web Server and access the html page. Verify the output.
AppML - Data
AppML provides multiple ways to fetch data to be displayed on an html page. We need to pass appml-data attribute the relevant value. Following are the ways to access data in AppML application.
Using Javascript Variable
Using JSON File
Using Text File
Using XML File
Using Database
In the following sections, we will have a few examples to demonstrate the ways to access data in AppML Application.
Access Data
Here is a list of the ways to access data along with their description.
| Sr.No. | Data File & Description |
|---|---|
| 1 | Using Object
Use a javascript object to display records. |
| 2 | Using Json
Use a json file to display records. |
| 3 | Using Text
Use a CSV based text file to display records. |
| 4 | Using XML
Use a XML file to display records. |
Using Database
appml-data can be passed a server url which fetches data from database and returns data in json/xml format.
AppML - Using Object
AppML application can read data using a javascript object. Following is an example.
<!DOCTYPE html>
<html lang="en-US">
   <title>Students</title>
   <style>
      table {
         border-collapse: collapse;
         width: 100%;
      }

      th, td {
         text-align: left;
         padding: 8px;
      }

      tr:nth-child(even) {background-color: #f2f2f2;}
   </style>
   <script src="https://www.w3schools.com/appml/2.0.3/appml.js"></script>
<body>
   <table appml-data="students">
      <tr>
         <th>Student</th>
         <th>Class</th>
         <th>Section</th>
      </tr>
      <tr appml-repeat="records">
         <td>{{studentName}}</td>
         <td>{{class}}</td>
         <td>{{section}}</td>
      </tr>
   </table>
   <script>
   var students = {
      "records":[
         {"studentName":"Ramesh","class":"12","section":"White"},
         {"studentName":"Suresh","class":"12","section":"Red"},
         {"studentName":"Mohan","class":"12","section":"Red"},
         {"studentName":"Robert","class":"12","section":"Red"},
         {"studentName":"Julie","class":"12","section":"White"},
         {"studentName":"Ali","class":"12","section":"White"},
         {"studentName":"Harjeet","class":"12","section":"White"}
   ]};
   </script>
</body>
</html>
Output
Save the above code as my_first_appml_program.html. Open this file in your browser and you will see an output as the following.
AppML - Using JSON
AppML application can read data using a json file. Following is an example.
Step 1: Create Data
The first step is to create a json based data file which will provide records to be displayed in application UI. Create a students_records.js
students_records.js
{
"students":[
   {"studentName":"Ramesh","class":"12","section":"White"},
   {"studentName":"Suresh","class":"12","section":"Red"},
   {"studentName":"Mohan","class":"12","section":"Red"},
   {"studentName":"Robert","class":"12","section":"Red"},
   {"studentName":"Julie","class":"12","section":"White"},
   {"studentName":"Ali","class":"12","section":"White"},
   {"studentName":"Harjeet","class":"12","section":"White"}
]}
Step 2: Create Application HTML
student_application.html
<!DOCTYPE html>
<html lang="en-US">
   <title>Students</title>
   <style>
      table {
         border-collapse: collapse;
         width: 100%;
      }

      th, td {
         text-align: left;
         padding: 8px;
      }

      tr:nth-child(even) {background-color: #f2f2f2;}
   </style>
   <script src="https://www.w3schools.com/appml/2.0.3/appml.js"></script>
<body>
   <table appml-data="students_records.js" appml-controller="myController">
      <tr>
         <th>Student</th>
         <th>Class</th>
         <th>Section</th>
      </tr>
      <tr appml-repeat="students">
         <td>{{studentName}}</td>
         <td>{{class}}</td>
         <td>{{section}}</td>
      </tr>
   </table>
   <script>
      function myController($appml) {
         if ($appml.message == "display") {
            if ($appml.display.name == "studentName") {
               $appml.display.value = $appml.display.value.toUpperCase();
            }
         }
      }
   </script>
</body>
</html>
Output
Deploy the application on Web Server and access the html page. Verify the output.
AppML - Using Text
AppML application can read data using a text file. Following is an example.
Step 1: Create Data
The first step is to create a csv based data file which will provide records to be displayed in application UI. Create a students-records.txt
students_records.txt
Ramesh,12,White,
Suresh,12,Red,
Mohan,12,Red,
Robert,12,Red,
Julie,12,White,
Ali,12,White,
Harjeet,12,White,
Step 2: Create Model
Create student_model.js file which will act as model to describe record.
{
   "rowsperpage" : 7,
   "data" : {
      "type" : "csvfile",
      "filename" : "students_records.txt",
      "items" : [
         {"name" : "studentName", "index" : 1},
         {"name" : "class", "index" : 2},
         {"name" : "section", "index" : 3}
      ]
   }
}
student_application.html
<!DOCTYPE html>
<html lang="en-US">
   <title>Students</title>
   <style>
      table {
         border-collapse: collapse;
         width: 100%;
      }

      th, td {
         text-align: left;
         padding: 8px;
      }

      tr:nth-child(even) {background-color: #f2f2f2;}
   </style>
   <script src="https://www.w3schools.com/appml/2.0.3/appml.js"></script>
<body>
   <table appml-data="appml.php?model=students_model">
      <tr>
         <th>Student</th>
         <th>Class</th>
         <th>Section</th>
      </tr>
      <tr appml-repeat="records">
         <td>{{studentName}}</td>
         <td>{{class}}</td>
         <td>{{section}}</td>
      </tr>
   </table>
</body>
</html>
Output
Deploy the application on Web Server and access the html page. Verify the output.
AppML - Using XML
AppML application can read data using a xml file. Following is an example.
Step 1: Create Data
The first step is to create a xml based data file which will provide records to be displayed in application UI. Create a students-records.xml
students_records.xml
<?xml version="1.0" encoding="ISO-8859-1"?>
<STUDENTS>
<STUDENT>
   <NAME>Ramesh</NAME>
   <CLASS>12</CLASS>
   <SECTION>White</SECTION>
</STUDENT>
<STUDENT>
   <NAME>Suresh</NAME>
   <CLASS>12</CLASS>
   <SECTION>Red</SECTION>
</STUDENT>
<STUDENT>
   <NAME>Mohan</NAME>
   <CLASS>12</CLASS>
   <SECTION>Red</SECTION>
</STUDENT>
<STUDENT>
   <NAME>Robert</NAME>
   <CLASS>12</CLASS>
   <SECTION>Red</SECTION>
</STUDENT>
<STUDENT>
   <NAME>Julie</NAME>
   <CLASS>12</CLASS>
   <SECTION>White</SECTION>
</STUDENT>
<STUDENT>
   <NAME>Ali</NAME>
   <CLASS>12</CLASS>
   <SECTION>White</SECTION>
</STUDENT>
<STUDENT>
   <NAME>Harjeet</NAME>
   <CLASS>12</CLASS>
   <SECTION>White</SECTION>
</STUDENT>
</STUDENTS>
Step 2: Create Model
Create student_model.js file which will act as model to describe record.
{
   "rowsperpage" : 7,
      "data" : {
      "type" : "xmlfile",
      "filename" : "students_records.xml",
      "record" : "STUDENT",
      "items" : [
         {"name" : "studentName", "nodename" : "NAME"},
         {"name" : "class", "nodename" : "CLASS"},
         {"name" : "section", "nodename" : "SECTION"}
      ]
   }
}
student_application.html
<!DOCTYPE html>
<html lang="en-US">
   <title>Students</title>
   <style>
      table {
         border-collapse: collapse;
         width: 100%;
      }

      th, td {
         text-align: left;
         padding: 8px;
      }

      tr:nth-child(even) {background-color: #f2f2f2;}
   </style>
   <script src="https://www.w3schools.com/appml/2.0.3/appml.js"></script>
<body>
   <table appml-data="appml.php?model=students_model">
      <tr>
         <th>Student</th>
         <th>Class</th>
         <th>Section</th>
      </tr>
      <tr appml-repeat="records">
         <td>{{studentName}}</td>
         <td>{{class}}</td>
         <td>{{section}}</td>
      </tr>
   </table>
</body>
</html>
Output
Deploy the application on Web Server and access the html page. Verify the output.
AppML - Messages
Whenever AppML performs any action, it sends a signal via $application object to the controller. $application.message property describes the application state and we can act accordingly. For example:
function studentController($appml) {
   if ($appml.message == "ready") {alert ("Application loaded.");}
}
Messages
Following are the kind of messages that AppML sends to controller.
| Sr.No. | Message & Description |
|---|---|
| 1 | ready
When AppML is initialized and is ready to load data, then ready message is sent. |
| 2 | loaded
When AppML is fully loaded and is ready to display data, then loaded message is sent. |
| 3 | display
display message is sent before AppML is to display a data. |
| 4 | done
When AppML displayed data, then done message is sent. |
AppML properties
Following is the list of important AppML properties.
| Sr.No. | Property & Description |
|---|---|
| 1 | $appml.message − Represents the current state of AppML Application. |
| 2 | $appml.display.name − Represents the name of the data item about to be displayed. |
| 3 | $appml.display.value − Represents the value of the data item about to be displayed. |
| 4 | $appml.error.number − Error number |
| 5 | $appml.error.description − Error description |
AppML - message.ready
AppML application sends a ready message to the controller when it is loaded. Following is an example.
student_application.html
<!DOCTYPE html>
<html lang="en-US">
   <title>Students</title>
   <style>
      table {
         border-collapse: collapse;
         width: 100%;
      }

      th, td {
         text-align: left;
         padding: 8px;
      }

      tr:nth-child(even) {background-color: #f2f2f2;}
   </style>
   <script src="https://www.w3schools.com/appml/2.0.3/appml.js"></script>
<body>
   <h1>Students</h1>
   <table appml-data="students" appml-controller="studentController">
      <tr>
         <th>Student</th>
         <th>Class</th>
         <th>Section</th>
      </tr>
      <tr appml-repeat="records">
         <td>{{studentName}}</td>
         <td>{{class}}</td>
         <td>{{section}}</td>
      </tr>
   </table>
   <script>
      var students = {
         "records":[
            {"studentName":"Ramesh","class":"12","section":"White"},
            {"studentName":"Suresh","class":"12","section":"Red"},
            {"studentName":"Mohan","class":"12","section":"Red"},
            {"studentName":"Robert","class":"12","section":"Red"},
            {"studentName":"Julie","class":"12","section":"White"},
            {"studentName":"Ali","class":"12","section":"White"},
            {"studentName":"Harjeet","class":"12","section":"White"}
         ]};
      function studentController($appml) {
         if ($appml.message == "ready") {
            alert("AppML application is ready");
         }
      }
   </script>
</body>
</html>
Output
Deploy the application on Web Server and access the html page. Verify the output.

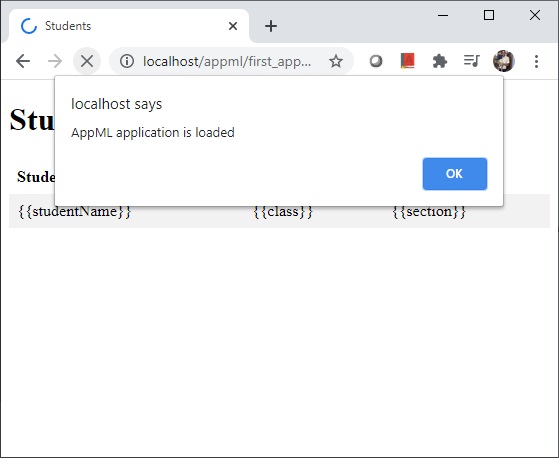
AppML - message.loaded
AppML application sends a loaded message to the controller when it is loaded with data. At this time, we can do the required computation. Following is an example.
student_application.html
<!DOCTYPE html>
<html lang="en-US">
   <title>Students</title>
   <style>
      table {
         border-collapse: collapse;
         width: 100%;
      }

      th, td {
         text-align: left;
         padding: 8px;
      }

      tr:nth-child(even) {background-color: #f2f2f2;}
   </style>
   <script src="https://www.w3schools.com/appml/2.0.3/appml.js"></script>
<body>
   <h1>Students</h1>
   <table appml-data="students" appml-controller="studentController">
      <tr>
         <th>Student</th>
         <th>Class</th>
         <th>Section</th>
      </tr>
      <tr appml-repeat="records">
         <td>{{studentName}}</td>
         <td>{{class}}</td>
         <td>{{section}}</td>
      </tr>
   </table>
   <script>
      var students = {
         "records":[
            {"studentName":"Ramesh","class":"12","section":"White"},
            {"studentName":"Suresh","class":"12","section":"Red"},
            {"studentName":"Mohan","class":"12","section":"Red"},
            {"studentName":"Robert","class":"12","section":"Red"},
            {"studentName":"Julie","class":"12","section":"White"},
            {"studentName":"Ali","class":"12","section":"White"},
            {"studentName":"Harjeet","class":"12","section":"White"}
         ]};
      function studentController($appml) {
         if ($appml.message == "loaded") {
            alert("AppML application is loaded");
         }
      }
   </script>
</body>
</html>
Output
Deploy the application on Web Server and access the html page. Verify the output.
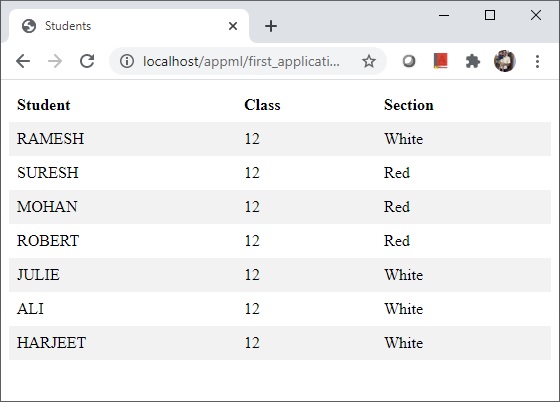
AppML - message.display
AppML application sends a display message to the controller when it is about to display a value. This is a suitable time to modify the value to be displayed. Following is an example.
student_application.html
<!DOCTYPE html>
<html lang="en-US">
   <title>Students</title>
   <style>
      table {
         border-collapse: collapse;
         width: 100%;
      }

      th, td {
         text-align: left;
         padding: 8px;
      }

      tr:nth-child(even) {background-color: #f2f2f2;}
   </style>
   <script src="https://www.w3schools.com/appml/2.0.3/appml.js"></script>
<body>
   <h1>Students</h1>
   <table appml-data="students" appml-controller="studentController">
      <tr>
         <th>Student</th>
         <th>Class</th>
         <th>Section</th>
      </tr>
      <tr appml-repeat="records">
         <td>{{studentName}}</td>
         <td>{{class}}</td>
         <td>{{section}}</td>
      </tr>
   </table>
   <script>
      var students = {
         "records":[
            {"studentName":"Ramesh","class":"12","section":"White"},
            {"studentName":"Suresh","class":"12","section":"Red"},
            {"studentName":"Mohan","class":"12","section":"Red"},
            {"studentName":"Robert","class":"12","section":"Red"},
            {"studentName":"Julie","class":"12","section":"White"},
            {"studentName":"Ali","class":"12","section":"White"},
            {"studentName":"Harjeet","class":"12","section":"White"}
         ]};
      function studentController($appml) {
         if ($appml.message == "display") {
            if ($appml.display.name == "studentName") {
               $appml.display.value = $appml.display.value.toUpperCase();
            }
         }
      }
   </script>
</body>
</html>
Output
Deploy the application on Web Server and access the html page. Verify the output.
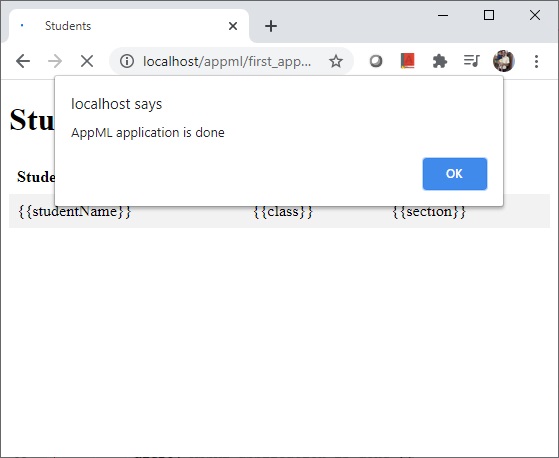
AppML - message.done
AppML application sends a dpne message to the controller when it is done with processng data. At this time, we can do the required computation or cleanup after displaying data. Following is an example.
student_application.html
<!DOCTYPE html>
<html lang="en-US">
   <title>Students</title>
   <style>
      table {
         border-collapse: collapse;
         width: 100%;
      }

      th, td {
         text-align: left;
         padding: 8px;
      }

      tr:nth-child(even) {background-color: #f2f2f2;}
   </style>
   <script src="https://www.w3schools.com/appml/2.0.3/appml.js"></script>
<body>
   <h1>Students</h1>
   <table appml-data="students" appml-controller="studentController">
      <tr>
         <th>Student</th>
         <th>Class</th>
         <th>Section</th>
      </tr>
      <tr appml-repeat="records">
         <td>{{studentName}}</td>
         <td>{{class}}</td>
         <td>{{section}}</td>
      </tr>
   </table>
   <script>
      var students = {
         "records":[
            {"studentName":"Ramesh","class":"12","section":"White"},
            {"studentName":"Suresh","class":"12","section":"Red"},
            {"studentName":"Mohan","class":"12","section":"Red"},
            {"studentName":"Robert","class":"12","section":"Red"},
            {"studentName":"Julie","class":"12","section":"White"},
            {"studentName":"Ali","class":"12","section":"White"},
            {"studentName":"Harjeet","class":"12","section":"White"}
         ]};
      function studentController($appml) {
         if ($appml.message == "done") {
            alert("AppML application is done");
         }
      }
   </script>
</body>
</html>
Output
Deploy the application on Web Server and access the html page. Verify the output.
AppML - Include HTML
AppML application allows to include an HTML page in a HTML page easily using appml-include-html tag.
Syntax
<div appml-include-html="footer.htm"></div>
Step 1: Create Footer HTML
footer.htm<hr style="margin-top:5px;"> <p style="font-size:12px">2021© tutorialspoint.com. All rights reserved.</p> <hr>
Step 2: Include footer in Application HTML
student_application.html
<!DOCTYPE html>
<html lang="en-US">
   <title>Students</title>
   <style>
      table {
         border-collapse: collapse;
         width: 100%;
      }

      th, td {
         text-align: left;
         padding: 8px;
      }

      tr:nth-child(even) {background-color: #f2f2f2;}
   </style>
   <script src="https://www.w3schools.com/appml/2.0.3/appml.js"></script>
<body>
   <h1>Students</h1>
   <table appml-data="students">
      <tr>
         <th>Student</th>
         <th>Class</th>
         <th>Section</th>
      </tr>
      <tr appml-repeat="records">
         <td>{{studentName}}</td>
         <td>{{class}}</td>
         <td>{{section}}</td>
      </tr>
   </table>
   <div appml-include-html="footer.htm"></div>
   <script>
      var students = {
         "records":[
            {"studentName":"Ramesh","class":"12","section":"White"},
            {"studentName":"Suresh","class":"12","section":"Red"},
            {"studentName":"Mohan","class":"12","section":"Red"},
            {"studentName":"Robert","class":"12","section":"Red"},
            {"studentName":"Julie","class":"12","section":"White"},
            {"studentName":"Ali","class":"12","section":"White"},
            {"studentName":"Harjeet","class":"12","section":"White"}
         ]};
   </script>
</body>
</html>
Output
Deploy the application on Web Server and access the html page. Verify the output.

AppML - Controller
AppML application allows to control the UI using the controller function. appml-controller tag provides the name of the javascript function which acts as a controller. AppML application may or may not have a controller.
Syntax
<table appml-controller="studentController"></table>
AppML sends messages to controller function via an application object denoted by $appml. Based on the properties of $appml we can perform various types of operations on HTML content. Following are some of the important examples.
Initialize data
Update application data
Input/output handling
Data validation
Data summarization
Error handling
Application start/stop
Example
student_application.html
<!DOCTYPE html>
<html lang="en-US">
   <title>Students</title>
   <style>
      table {
         border-collapse: collapse;
         width: 100%;
      }

      th, td {
         text-align: left;
         padding: 8px;
      }

      tr:nth-child(even) {background-color: #f2f2f2;}
   </style>
   <script src="https://www.w3schools.com/appml/2.0.3/appml.js"></script>
<body>
   <h1>Students</h1>
   <table appml-data="students" appml-controller="studentController">
      <tr>
         <th>Student</th>
         <th>Class</th>
         <th>Section</th>
      </tr>
      <tr appml-repeat="records">
         <td>{{studentName}}</td>
         <td>{{class}}</td>
         <td>{{section}}</td>
      </tr>
   </table>
   <script>
      var students = {
         "records":[
            {"studentName":"Ramesh","class":"12","section":"White"},
            {"studentName":"Suresh","class":"12","section":"Red"},
            {"studentName":"Mohan","class":"12","section":"Red"},
            {"studentName":"Robert","class":"12","section":"Red"},
            {"studentName":"Julie","class":"12","section":"White"},
            {"studentName":"Ali","class":"12","section":"White"},
            {"studentName":"Harjeet","class":"12","section":"White"}
         ]};
      function studentController($appml) {
         if ($appml.message == "display") {
            if ($appml.display.name == "studentName") {
               $appml.display.value = $appml.display.value.toUpperCase();
            }
         }
      }
   </script>
</body>
</html>
Output
Deploy the application on Web Server and access the html page. Verify the output.
AppML - Models
AppML Model describes an application. It is a JSON based format and we can define following functionalities.
Syntax
<table appml-data="local?model=model_students"></div>
Here model_students.js is the AppML data model file.
model_students.js
{
"rowsperpage" : 10,
"database" : {
   "connection" : "localsql",
   "sql" : "SELECT studentName, class, section FROM Students",
   "orderby" : "StudentName"
},
"filteritems" : [
   {"item" : "studentName", "label" : "Student"},
   {"item" : "class"},
   {"item" : "section"}
],
"sortitems" : [
   {"item" : "studentName", "label" : "Student"},
   {"item" : "class"},
   {"item" : "section"}
]
}
Following are the common uses of AppML models.
Define database connections to MySQL, Sql Server, MS Access and Oracle.
Define connection to access files like JSON, XML, csv based text file.
Define SQL statements for CRUD (Create, Read, Update, Delete) operations.
Apply Filter/Sorting restrictions on table.
Define data types, data formats and restrictions on them.
Apply security on application users. Define user groups.
Example Application
Following example shows the usage of AppML model to fetch data from a csv based text file.
Step 1: Create Data
The first step is to create a csv based data file which will provide records to be displayed in application UI. Create a students-records.txt
students_records.txt
Ramesh,12,White,
Suresh,12,Red,
Mohan,12,Red,
Robert,12,Red,
Julie,12,White,
Ali,12,White,
Harjeet,12,White,
Step 2: Create Model
Create student_model.js file which will act as model to describe record.
{
   "rowsperpage" : 7,
   "data" : {
      "type" : "csvfile",
      "filename" : "students_records.txt",
      "items" : [
         {"name" : "studentName", "index" : 1},
         {"name" : "class", "index" : 2},
         {"name" : "section", "index" : 3}
      ]
   }
}
student_application.html
<!DOCTYPE html>
<html lang="en-US">
   <title>Students</title>
   <style>
      table {
         border-collapse: collapse;
         width: 100%;
      }

      th, td {
         text-align: left;
         padding: 8px;
      }

      tr:nth-child(even) {background-color: #f2f2f2;}
   </style>
   <script src="https://www.w3schools.com/appml/2.0.3/appml.js"></script>
<body>
   <table appml-data="appml.php?model=students_model">
      <tr>
         <th>Student</th>
         <th>Class</th>
         <th>Section</th>
      </tr>
      <tr appml-repeat="records">
         <td>{{studentName}}</td>
         <td>{{class}}</td>
         <td>{{section}}</td>
      </tr>
   </table>
</body>
</html>
Output
Deploy the application on Web Server and access the html page. Verify the output.
AppML - API
Following is the list of AppML API for reference purpose.
Methods
Following are the AppML methods.
| Sr.No. | Method & Description |
|---|---|
| 1 | new AppML()
Used to create a new AppML object. |
| 2 | appml("name")
Used to return the appml object with the specified name. |
| 3 | displayMessage(text)
Used to display a specified message. |
| 4 | getData()
Used to fetch application data. |
| 5 | run()
Used to run application object. |
| 6 | setError(code, description)
Used to set an error with code and description. |
Properties
Following are the AppML properties.
| Sr.No. | Property & Description |
|---|---|
| 1 | appName
Name of the application, id of the container |
| 2 | container
Container object |
| 3 | controller
Controller object |
| 4 | data
data object. |
| 5 | dataSource
data source. |
| 6 | displayType
Application Type, form or list |
| 7 | message
message object |
| 8 | error
error object |
Data Object Properties
Following are the AppML data object properties.
| Sr.No. | Data Object Property & Description |
|---|---|
| 1 | data.model
application data model. |
| 2 | data.records
application records. |
Form Methods
Following are the AppML form methods.
| Sr.No. | Form Method & Description |
|---|---|
| 1 | newRecord()
Used to reset the current form. |
| 2 | saveRecord()
Used to save the current record. |
| 3 | deleteRecord()
Used to delete the current record. |
| 4 | closeForm()
Used to close the current form. |
Filter properties
Following are the AppML filter properties.
| Sr.No. | Filter Property & Description |
|---|---|
| 1 | orderBys
An array of order by field names. |
| 2 | orderByDirections
An array of order by directions . |
| 3 | queryFields
An array of query field names. |
| 4 | queryValues
An array of query values. |
| 5 | queryTypes
An array of query types. |
To Continue Learning Please Login