- WPF - Home
- WPF - Overview
- WPF - Environment Setup
- WPF - Hello World
- WPF - XAML Overview
- WPF - Elements Tree
- WPF - Dependency Properties
- WPF - Routed Events
- WPF - Controls
- WPF - Layouts
- WPF - Nesting Of Layout
- WPF - Input
- WPF - Command Line
- WPF - Data Binding
- WPF - Resources
- WPF - Templates
- WPF - Styles
- WPF - Triggers
- WPF - Debugging
- WPF - Custom Controls
- WPF - Exception Handling
- WPF - Localization
- WPF - Interaction
- WPF - 2D Graphics
- WPF - 3D Graphics
- WPF - Multimedia
WPF - Third Party Controls
Third-party controls are those which are not created by Microsoft but are created by some individual or company by using WPF User Control or Custom Control. Telerik and DevExpress are the most popular companies for creating third-party controls.
In this chapter, we will be using Telerik controls. So lets start by following the steps given below.
Go to the link Telerik which contains the Telerik WPF controls and download the UI for WPF.
Once the download is complete, install the files on your machine.
After the installation, open Visual Studio and create a new WPF project with the name WPF3rdPartyControls.
On Toolbox, you will see the Telerik UI controls. In addition, you will observe that in solution explorer, all the required dll are also added after installation.
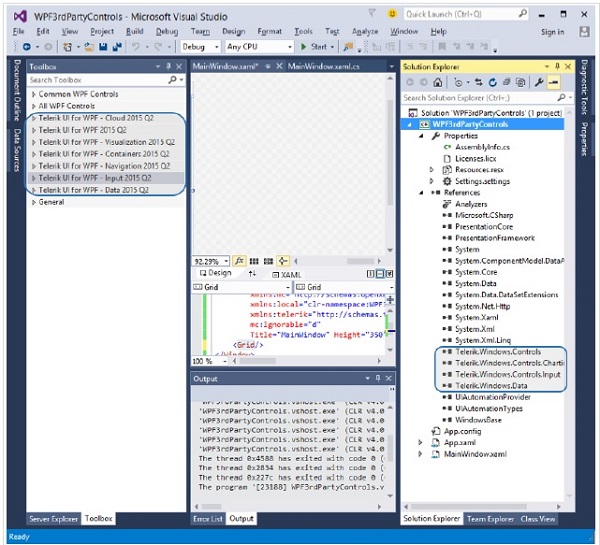
Lets expand the Telerik UI for WPF input 2015 Q2 in the toolbox. You will see many built-in controls.
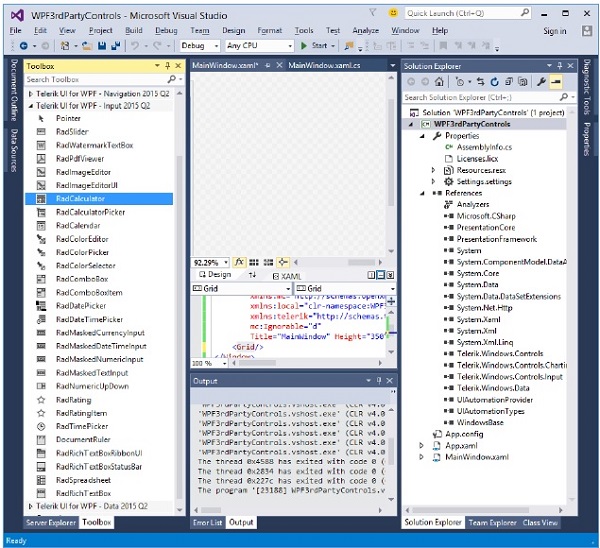
Now drag RadCalculator from toolbox box to the design window.
Take a look at your XAML window in which RadCalculator tag has been added.
<Window  x:Class = "WPF3rdPartyControls.MainWindow"
   xmlns = "http://schemas.microsoft.com/winfx/2006/xaml/presentation"
   xmlns:x = "http://schemas.microsoft.com/winfx/2006/xaml"
   xmlns:d = "http://schemas.microsoft.com/expression/blend/2008"
   xmlns:mc = "http://schemas.openxmlformats.org/markup-compatibility/2006"
   xmlns:local = "clr-namespace:WPF3rdPartyControls"
   xmlns:telerik = "http://schemas.telerik.com/2008/xaml/presentation"
   mc:Ignorable = "d" Title = "MainWindow" Height = "350" Width = "604">

   <Grid>
      <telerik:RadCalculator HorizontalAlignment = "Left" Margin = "174,25,0,0"
         VerticalAlignment = "Top" />
   </Grid>

</Window>
Lets compile and execute the above code. You will see a fully functional calculator on your window with just one line of code.
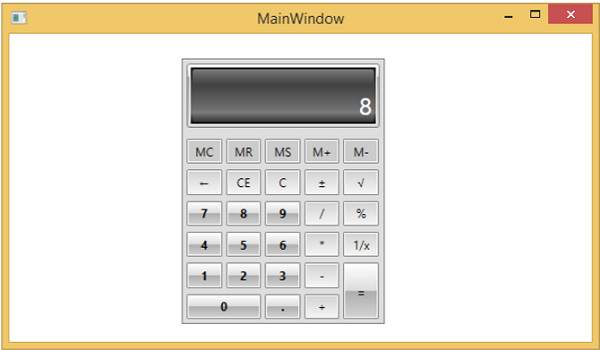
Thats the beauty of third-party controls. But it is not free, you will need to buy a licence if you want to use third-party controls in your application.
Lets have a look at another Telerik control. Create a new WPF project with the name WPF3rdPartyControls. Drag the RadDateTimePicker control from the toolbox. The XAML code is as follows −
<Window x:Class = "RadDateTimePickerDemo.MainWindow"
   xmlns = "http://schemas.microsoft.com/winfx/2006/xaml/presentation"
   xmlns:x = "http://schemas.microsoft.com/winfx/2006/xaml"
   xmlns:telerik = "http://schemas.telerik.com/2008/xaml/presentation"
   Title = "MainWindow" Height = "350" Width = "604">

   <Grid>
      <telerik:RadDateTimePicker VerticalAlignment = "Top"
         Name = "dateTimePicker" />
   </Grid>

</Window>
Here is the C# code in which selection changed event is implemented.
using System;
using System.Windows;
using System.Windows.Controls;

namespace RadDateTimePickerDemo {

   public partial class MainWindow : Window {

      public MainWindow() {
         InitializeComponent();
         dateTimePicker.SelectionChanged += dateTimePicker_SelectionChanged;
      }

      void dateTimePicker_SelectionChanged( object sender, SelectionChangedEventArgs e ) {
         DateTime? dt = dateTimePicker.SelectedValue;
         DateTime? date = dateTimePicker.SelectedDate;
         TimeSpan? time = dateTimePicker.SelectedTime;
         MessageBox.Show( "Selected date/time: " + dt.ToString() );
      }

   }
}
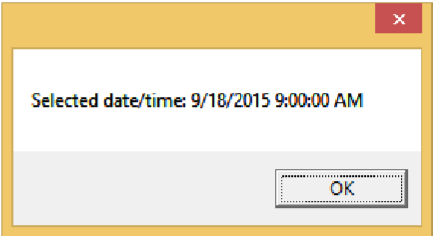
When you compile and execute the above code, it will produce the following window.
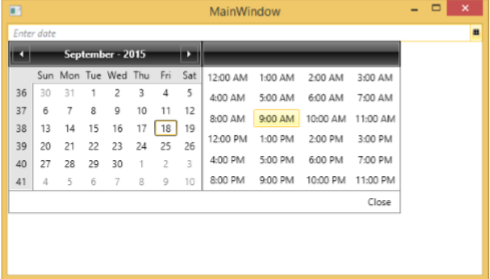
Select any time and date and it will be displayed on the message box.
Example
Here is an example of RichTextBox. The following XAML code creates three toggle buttons and a rich textbox.
<Window x:Class = "RichTextBoxDemo.MainWindow"
   xmlns = "http://schemas.microsoft.com/winfx/2006/xaml/presentation"
   xmlns:x = "http://schemas.microsoft.com/winfx/2006/xaml"
   xmlns:telerik = "http://schemas.telerik.com/2008/xaml/presentation"
   Title = "MainWindow" Height = "350" Width = "604">

   <Grid>
      <StackPanel>
         <StackPanel Orientation = "Horizontal">
            <ToggleButton Content = "B" x:Name = "BoldButton" Click = "BoldButton_Click" />
            <ToggleButton Content = "I" x:Name = "ItalicButton"
               Click = "ItalicButton_Click" />
            <ToggleButton Content = "U"x:Name = "UnderlineButton"
               Click = "UnderlineButton_Click" />
         </StackPanel>

         <telerik:RadRichTextBox Height = "250" Width = "400" Name = "richTextBox"/>
      </StackPanel>
   </Grid>

</Window>
Here is the implementation in C# for button click event.
using System.Windows;

namespace RichTextBoxDemo {
   /// <summary>
      /// Interaction logic for MainWindow.xaml
   /// </summary>

   public partial class MainWindow : Window {

      public MainWindow() {
         InitializeComponent();
      }

      private void BoldButton_Click( object sender, RoutedEventArgs e ) {
         richTextBox.ToggleBold();
      }

      private void ItalicButton_Click( object sender, RoutedEventArgs e ) {
         richTextBox.ToggleItalic();
      }

      private void UnderlineButton_Click( object sender, RoutedEventArgs e ) {
         richTextBox.ToggleUnderline();
      }

   }
}
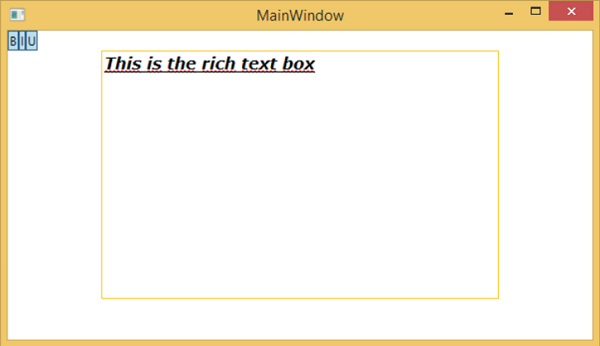
When you compile and execute the above code, it will produce the following window. With the help of the three buttons, you can format the text (bold, italic, underline) typed inside the rich textbox.
We recommend that you try to use the other controls available in your toolbox and experiment.
