
Article Categories
- All Categories
-
 Data Structure
-
 Networking
-
 RDBMS
RDBMS
-
 Operating System
-
 Java
Java
-
 MS Excel
-
 iOS
iOS
-
 HTML
HTML
-
 CSS
CSS
-
 Android
-
 Python
-
 C Programming
-
 C++
C++
-
 C#
C#
-
 MongoDB
-
 MySQL
MySQL
-
 Javascript
-
 PHP
PHP
-
 Economics & Finance
How to use the recyclerview with a database in Android using Kotlin?
This example demonstrates how to use the recyclerview with a database in Android using Kotlin.
Step 1 − Create a new project in Android Studio, go to File ⇒ New Project and fill all required details to create a new project.
Step 2 − Add the following code to res/layout/activity_main.xml.
<?xml version="1.0" encoding="utf-8"?>
<FrameLayout xmlns:android="http://schemas.android.com/apk/res/android"
   xmlns:tools="http://schemas.android.com/tools"
   android:layout_width="match_parent"
   android:layout_height="match_parent"
   android:padding="4dp"
   tools:context=".MainActivity">
   <androidx.recyclerview.widget.RecyclerView
      android:id="@+id/myContactList"
      android:layout_width="match_parent"
      android:layout_height="match_parent"
      android:layout_marginBottom="50dp"
      android:paddingBottom="8dp" />
   <Button
      android:id="@+id/btnAdd"
      android:layout_width="wrap_content"
      android:layout_height="wrap_content"
      android:layout_gravity="bottom|end"
      android:layout_marginEnd="16dp"
      android:layout_marginBottom="4dp"
      android:padding="2dp"
      android:text="ADD" />
</FrameLayout>
Step 3 − Add the following code to src/MainActivity.kt
import android.os.Bundle
import android.text.TextUtils
import android.view.LayoutInflater
import android.view.View
import android.widget.Button
import android.widget.EditText
import android.widget.Toast
import androidx.appcompat.app.AlertDialog
import androidx.appcompat.app.AppCompatActivity
import androidx.recyclerview.widget.LinearLayoutManager
import androidx.recyclerview.widget.RecyclerView
class MainActivity : AppCompatActivity() {
private lateinit var dataBase: SqliteDatabase
override fun onCreate(savedInstanceState: Bundle?) {
super.onCreate(savedInstanceState)
setContentView(R.layout.activity_main)
title = "KotlinApp"
val contactView: RecyclerView = findViewById(R.id.myContactList)
val linearLayoutManager = LinearLayoutManager(this)
contactView.layoutManager = linearLayoutManager
contactView.setHasFixedSize(true)
dataBase = SqliteDatabase(<Contacts>= dataBase.listContacts()
if (allContacts.size > 0) {
contactView.visibility = View.VISIBLE
val mAdapter = ContactAdapter(this, allContacts)
contactView.adapter = mAdapter
}
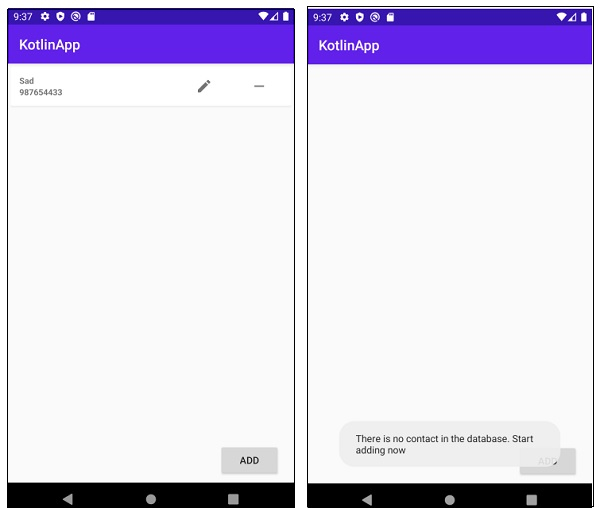
else {
contactView.visibility = View.GONE
Toast.makeText(
this,
"There is no contact in the database. Start adding now",
Toast.LENGTH_LONG
).show()
}
val btnAdd: Button = findViewById(R.id.btnAdd)
btnAdd.setOnClickListener { addTaskDialog() }
}
private fun addTaskDialog() {
val inflater = LayoutInflater.from(this)
val subView = inflater.inflate(R.layout.add_contacts, null)
val nameField: EditText = subView.findViewById(R.id.enterName)
val noField: EditText = subView.findViewById(R.id.enterPhoneNum)
val builder = AlertDialog.Builder(this)
builder.setTitle("Add new CONTACT")
builder.setView(subView)
builder.create()
builder.setPositiveButton("ADD CONTACT") { _, _ ->
val name = nameField.text.toString()
val phoneNum = noField.text.toString()
if (TextUtils.isEmpty(name)) {
Toast.makeText(
this@MainActivity,
"Something went wrong. Check your input values",
Toast.LENGTH_LONG
).show()
}
else {
val newContact = Contacts(name, phoneNum)
dataBase.addContacts(newContact)
finish()
startActivity(intent)
}
}
builder.setNegativeButton("CANCEL") { _, _ -> Toast.makeText(this@MainActivity, "Task cancelled",
Toast.LENGTH_LONG).show()}
builder.show()
}
override fun onDestroy() {
super.onDestroy()
dataBase.close()
}
}
Step 4 − Create kotlin class files as mentioned below and add the respective codes
Contacts.kt −
class Contacts {
   var id = 0
   var name: String
   var phno: String
   internal constructor(name: String, phno: String) {
      this.name = name
      this.phno = phno
   }
   internal constructor(id: Int, name: String, phno: String) {
      this.id = id
      this.name = name
      this.phno = phno
   }
}
ContactViewHolder.kt −
import android.view.View
import android.widget.ImageView
import android.widget.TextView
import androidx.recyclerview.widget.RecyclerView
class ContactViewHolder(itemView: View) : RecyclerView.ViewHolder(itemView) {
   var tvName: TextView = itemView.findViewById(R.id.contactName)
   var tvPhoneNum: TextView = itemView.findViewById(R.id.phoneNum)
   var deleteContact: ImageView = itemView.findViewById(R.id.deleteContact)
   var editContact: ImageView = itemView.findViewById(R.id.editContact)
}
ContactAdapter.kt −
import android.app.Activity
import android.content.Context
import android.text.TextUtils
import android.view.LayoutInflater
import android.view.ViewGroup
import android.widget.EditText
import android.widget.Filter
import android.widget.Filterable
import android.widget.Toast
import androidx.appcompat.app.AlertDialog
import androidx.recyclerview.widget.RecyclerView
import java.util.*
internal class ContactAdapter(private val context: Context, listContacts: ArrayList<Contacts>) :
RecyclerView.Adapter<ContactViewHolder>(), Filterable {
private var listContacts: ArrayList<Contacts>
private val mArrayList: ArrayList<Contacts>
private val mDatabase: SqliteDatabase
init {
this.listContacts = listContacts
this.mArrayList = listContacts
mDatabase = SqliteDatabase(context)
}
override fun onCreateViewHolder(parent: ViewGroup, viewType: Int): ContactViewHolder {
val view =
LayoutInflater.from(parent.context).inflate(R.layout.contact_list_layout, parent, false)
return ContactViewHolder(view)
}
override fun onBindViewHolder(holder: ContactViewHolder, position: Int) {
val contacts = listContacts[position]
holder.tvName.text = contacts.name
holder.tvPhoneNum.text = contacts.phno
holder.editContact.setOnClickListener { editTaskDialog(contacts) }
holder.deleteContact.setOnClickListener {
mDatabase.deleteContact(contacts.id)
(context as Activity).finish()
context.startActivity(context.intent)
}
}
override fun getFilter(): Filter {
return object : Filter() {
override fun performFiltering(charSequence: CharSequence): FilterResults {
val charString = charSequence.toString()
listContacts = if (charString.isEmpty()) {
mArrayList
}
else {
val filteredList = ArrayList<Contacts>()
for (contacts in mArrayList) {
if (contacts.name.toLowerCase().contains(charString)) {
filteredList.add(contacts)
}
}
filteredList
}
val filterResults = FilterResults()
filterResults.values = listContacts
return filterResults
}
override fun publishResults(
charSequence: CharSequence,
filterResults: FilterResults
)
{
listContacts =
filterResults.values as ArrayList<Contacts>
notifyDataSetChanged()
}
}
}
override fun getItemCount(): Int {
return listContacts.size
}
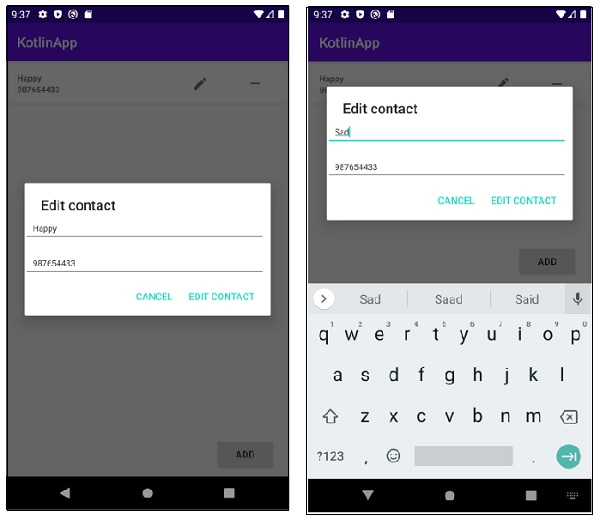
private fun editTaskDialog(contacts: Contacts) {
val inflater = LayoutInflater.from(context)
val subView = inflater.inflate(R.layout.add_contacts, null)
val nameField: EditText = subView.findViewById(R.id.enterName)
val contactField: EditText = subView.findViewById(R.id.enterPhoneNum)
nameField.setText(contacts.name)
contactField.setText(contacts.phno)
val builder = AlertDialog.Builder(context)
builder.setTitle("Edit contact")
builder.setView(subView)
builder.create()
builder.setPositiveButton(
"EDIT CONTACT"
) { _, _ ->
val name = nameField.text.toString()
val phNo = contactField.text.toString()
if (TextUtils.isEmpty(name)) {
Toast.makeText(
context,
"Something went wrong. Check your input values",
Toast.LENGTH_LONG
).show()
}
else {
mDatabase.updateContacts(
Contacts(
Objects.requireNonNull<Any>(contacts.id) as Int,
name,
phNo
)
)
(context as Activity).finish()
context.startActivity(context.intent)
}
}
builder.setNegativeButton(
"CANCEL"
) { _, _ -> Toast.makeText(context, "Task cancelled", Toast.LENGTH_LONG).show() }
builder.show()
}
}
SqliteDatabase.kt −
import android.content.ContentValues
import android.content.Context
import android.database.sqlite.SQLiteDatabase
import android.database.sqlite.SQLiteOpenHelper
import java.util.*
class SqliteDatabase internal constructor(context: Context?) :
SQLiteOpenHelper(
   context,
   DATABASE_NAME,
   null,
   DATABASE_VERSION
) {
   override fun onCreate(db: SQLiteDatabase) {
      val createContactTable = ("CREATE TABLE "
      + TABLE_CONTACTS + "(" + COLUMN_ID
      + " INTEGER PRIMARY KEY,"
      + COLUMN_NAME + " TEXT,"
      + COLUMN_NO + " INTEGER" + ")")
      db.execSQL(createContactTable)
   }
   override fun onUpgrade(
      db: SQLiteDatabase,
      oldVersion: Int,
      newVersion: Int
   ) {
      db.execSQL("DROP TABLE IF EXISTS $TABLE_CONTACTS")
      onCreate(db)
   }
   fun listContacts(): ArrayList<Contacts> {
      val sql = "select * from $TABLE_CONTACTS"
      val db = this.readableDatabase
      val storeContacts =
      ArrayList<Contacts>()
      val cursor = db.rawQuery(sql, null)
      if (cursor.moveToFirst()) {
         do {
            val id = cursor.getString(0).toInt()
            val name = cursor.getString(1)
            val phno = cursor.getString(2)
            storeContacts.add(Contacts(id, name, phno))
         }
         while (cursor.moveToNext())
      }
      cursor.close()
      return storeContacts
   }
   fun addContacts(contacts: Contacts) {
      val values = ContentValues()
      values.put(COLUMN_NAME, contacts.name)
      values.put(COLUMN_NO, contacts.phno)
      val db = this.writableDatabase
      db.insert(TABLE_CONTACTS, null, values)
   }
   fun updateContacts(contacts: Contacts) {
      val values = ContentValues()
      values.put(COLUMN_NAME, contacts.name)
      values.put(COLUMN_NO, contacts.phno)
      val db = this.writableDatabase
      db.update(
         TABLE_CONTACTS,
         values,
         "$COLUMN_ID = ?",
         arrayOf(contacts.id.toString())
      )
   }
   fun deleteContact(id: Int) {
      val db = this.writableDatabase
      db.delete(
         TABLE_CONTACTS,
         "$COLUMN_ID = ?",
         arrayOf(id.toString())
      )
   }
   companion object {
      private const val DATABASE_VERSION = 5
      private const val DATABASE_NAME = "Contacts"
      private const val TABLE_CONTACTS = "Contacts"
      private const val COLUMN_ID = "_id"
      private const val COLUMN_NAME = "contactName"
      private const val COLUMN_NO = "phoneNumber"
   }
}
Step 5 − Create a layout resource files (add_contacts.xml & contact_list_layout.xml) and add the following code
add_contacts.xml −
<?xml version="1.0" encoding="utf-8"?>
<LinearLayout xmlns:android="http://schemas.android.com/apk/res/android"
   android:layout_width="match_parent"
   android:layout_height="match_parent"
   android:orientation="vertical">
   <EditText
      android:id="@+id/enterName"
      android:layout_width="match_parent"
      android:layout_height="wrap_content"
      android:layout_marginEnd="8dp"
      android:hint="Enter Name"
      android:inputType="text"
      android:maxLines="1"
      android:padding="12dp"
      android:textSize="12dp" />
   <EditText
      android:id="@+id/enterPhoneNum"
      android:layout_width="match_parent"
      android:layout_height="wrap_content"
      android:layout_marginTop="10dp"
      android:layout_marginEnd="8dp"
      android:hint="Enter Number"
      android:inputType="phone"
      android:maxLines="1"
      android:padding="12dp"
      android:textSize="12sp" />
</LinearLayout>
contact_list_layout.xml −
<?xml version="1.0" encoding="utf-8"?>
<androidx.cardview.widget.CardView xmlns:android="http://schemas.android.com/apk/res/android"
   android:layout_width="match_parent"
   android:layout_height="wrap_content"
   android:layout_marginBottom="1dp"
   android:orientation="vertical">
   <LinearLayout
      android:layout_width="match_parent"
      android:layout_height="wrap_content"
      android:orientation="horizontal"
      android:padding="12dp">
   <RelativeLayout
      android:layout_width="wrap_content"
      android:layout_height="wrap_content">
   <TextView
      android:id="@+id/contactName"
      android:layout_width="220dp"
      android:layout_height="wrap_content"
      android:textSize="12sp"
      android:textStyle="bold" />
   <TextView
      android:id="@+id/phoneNum"
      android:layout_width="220dp"
      android:layout_height="wrap_content"
      android:layout_below="@+id/contactName"
      android:textSize="12sp"
      android:textStyle="bold" />
   </RelativeLayout>
   <ImageView
      android:id="@+id/editContact"
      android:layout_width="wrap_content"
      android:layout_height="wrap_content"
      android:layout_gravity="center_vertical"
      android:layout_weight="1"
      android:contentDescription="TODO"
      android:src="@drawable/ic_baseline_edit_24" />
   <ImageView
      android:id="@+id/deleteContact"
      android:layout_width="0dp"
      android:layout_height="wrap_content"
      android:layout_gravity="center"
      android:layout_weight="1"
      android:contentDescription="TODO"
      android:src="@drawable/ic_baseline_remove_24" />
   </LinearLayout>
</androidx.cardview.widget.CardView>
Step 6 − Add the following code to androidManifest.xml
<?xml version="1.0" encoding="utf-8"?>
<manifest xmlns:android="http://schemas.android.com/apk/res/android"
   package="com.example.q11">
   <application
      android:allowBackup="true"
      android:icon="@mipmap/ic_launcher"
      android:label="@string/app_name"
      android:roundIcon="@mipmap/ic_launcher_round"
      android:supportsRtl="true"
      android:theme="@style/AppTheme">
      <activity android:name=".MainActivity">
         <intent-filter>
            <action android:name="android.intent.action.MAIN" />
            <category android:name="android.intent.category.LAUNCHER" />
         </intent-filter>
      </activity>
   </application>
</manifest>
Let's try to run your application. I assume you have connected your actual Android Mobile device with your computer. To run the app from android studio, open one of your project's activity files and click the Run ![]() icon from the toolbar. Select your mobile device as an option and then check your mobile device which will display your default screen
icon from the toolbar. Select your mobile device as an option and then check your mobile device which will display your default screen

2K+ Views
