
Article Categories
- All Categories
-
 Data Structure
-
 Networking
-
 RDBMS
RDBMS
-
 Operating System
-
 Java
Java
-
 MS Excel
-
 iOS
iOS
-
 HTML
HTML
-
 CSS
CSS
-
 Android
-
 Python
-
 C Programming
-
 C++
C++
-
 C#
C#
-
 MongoDB
-
 MySQL
MySQL
-
 Javascript
-
 PHP
PHP
-
 Economics & Finance
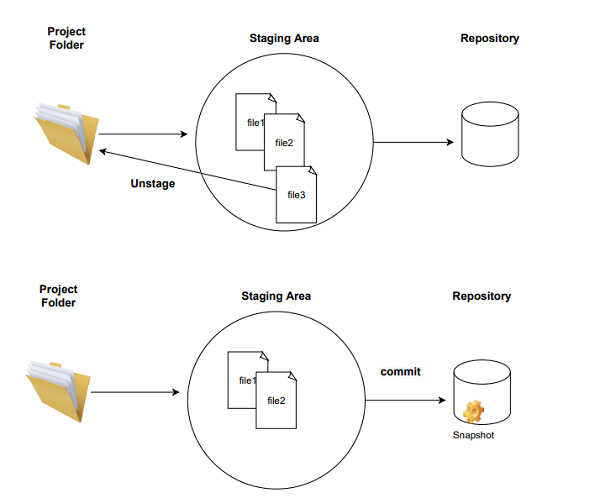
Why should you use git add command before using git commit command?
The git add command adds files to the staging area whereas the git commit command will write changes to the repository permanently.
When you have completed an important feature, you will need to create a snapshot of that change and save it to the Git repository. To achieve this, you will perform a commit.
In Git, there exists an intermediate step before commit which does not exist in other version control systems. This intermediate step is called a staging area. The staging area is also known as the index. The staging area can be used to build up a set of changes that you want to commit together. The git add command can be used to push changes in the working area to the staging area.
Simply put, the git add command is like a photographer positioning all people for a group photo while the git commit is like the photographer actually snapping the picture. The staging area allows us to preview changes before they are finalized.
Let us understand this with an example −
Step 1 − Create a folder “tut_repo” and use the cd command to point to this directory
Step 2 − Initialise an empty database.
$ mkdir tut_repo // Create a directory
$ cd tut_repo/ // Navigate to the director
$ git init //Initialize an empty database
A message stating that the repository is created is displayed to the user.
Initialized empty Git repository in E:/tut_repo/ .git
Step 3 − Create 3 files “file1.txt”, “file2.txt” and “file3.txt” and add some text to these files.
$ echo hello > file1.txt
$ echo hello > file2.txt
$ echo hello > file3.txt
Step 4 − Execute the command git status.
$ git status
A message that these files should be added to the staging area is displayed to the user (shown above). The files can be committed only if they are added to the staging area. This can be achieved using the git add command.
On branch master
No commits yet
Untracked files:
   (use “git add <file>...” to include in what will be committed)
   file1.txt
   file2.txt
   file3.txt
Step 5 − Execute the git add command to add the files to the staging area.
$ git add file1.txt file2.txt file3.tx
Execute the git status command to verify that the files are added to the staging area.
$ git status
Please refer to the following for output.
On branch master
No commits yet
Changes to be committed:
   (use “git rm −−cached<file>...” to unstage)
   new file: file1.txt
   new file: file2.txt
   new file: file3.txt
Step 6 − Let us say after review we decide not to include “file3.txt” as part of the final commit. This can be achieved by using the command git rm −−cached. The syntax for using this command is −
$ git rm −−cached <file_name>
The following command will remove “file3.txt” from the staging area.
$ git rm −−cached file3.txt
Execute the git status command to verify if the file has been removed from the staging area.
$ git status
The output suggests that the file has been removed from the staging area.
On branch master
No commits yet
Changes to be committed:
   (use “git rm −−cached<file>...” to unstage)
   new file: file1.txt
   new file: file2.txt
   new file: file3.txt
Untracked files: (use “git add <file>...” to include what will be committed)
   file3.txt
Step 7 − After the “file3.txt” is removed from the staging area you can check the status of the working tree and finally add “file1.txt” and “file2.txt” to the repository. Use the git commit command to achieve this.
$ git commit −m ‘snapshot of file1 and file 2’
The output from the above command is shown in the screenshot.
[master (root−commit)5552726 snapshot of file1 and file2
2 files changed, 2 insertions(+)
create mode 100644 file1.txt
create mode 100644 file2.txt
The above steps can be graphically presented as below −
5K+ Views
