
Article Categories
- All Categories
-
 Data Structure
-
 Networking
-
 RDBMS
RDBMS
-
 Operating System
-
 Java
Java
-
 MS Excel
-
 iOS
iOS
-
 HTML
HTML
-
 CSS
CSS
-
 Android
-
 Python
-
 C Programming
-
 C++
C++
-
 C#
C#
-
 MongoDB
-
 MySQL
MySQL
-
 Javascript
-
 PHP
PHP
-
 Economics & Finance
Using the WiFi Mode with ESP32
ESP32 microcontroller can connect to the internet and use the wifi. It can be used to see the network details of the available networks. It can also be used for advanced functions such as changing the MAC address of ESP32. In this article, using three different examples, the programs using the wifi with ESP32 are given. In example 1, a C program is used to scan the wifi networks available and the details are displayed. In example 2, the wifi connection is established by giving the SSID details, and in example 3, the current Mac address of ESP32 is seen and then it is changed using the wifi module of ESP32.
Example 1 ? Using ESP32 wifi module to find the available wifi networks.
Example 2 ? Using ESP32 wifi module to establish the internet connection with a wireless network.
Example 3 ? Using the ESP32 wifi module to set the new MAC address of the ESP32.
Circuit Design Steps and Coding:
Step 1 ? Connect the ESP32 to the breadboard and then connect it with a USB data cable to the computer.
Step 2 ? Download Arduino IDE if it is not installed on the Computer and set it ups.
Step 3 ? Start Arduino IDE. Write the C program and compile it using the tick sign.
Step 4 ? Upload the program to ESP32 by pressing the right arrow near the tick sign.
Step 5 ? Check the results on the Serial Monitor.
Example 1: Using ESP32 wifi module to find the available wifi networks
ESP32 can connect to internet using its wifi module. It is used here to first scan the available wifi networks, then display the SSID, RSSI, signal strength and also the type of encryption. For this a library wifi.h is used.
The Code
//library needed for wifi connectivity Using the WiFi Mode with ESP32
#include "WiFi.h"
void setup() {
   //set the baud rate
   Serial.begin(115200);
   //set wifi to the station mode
   WiFi.mode(WIFI_STA);
   //disconnect to start again
   WiFi.disconnect();
   delay(100);
}
void loop() {
   Serial.println("starting to scan now");
   // finding the networks available nearby
   int netCount = WiFi.scanNetworks();
   Serial.println("scan completed");
   if (netCount == 0) {
      Serial.println("no network detected");
   } else {
      Serial.print(netCount);
      Serial.println(" networks found");
      for (int nn = 0; nn < netCount; ++nn) {
         //The number should start from 1 and not 0
         Serial.print(nn + 1);
         Serial.print(" ---- ");
         // Print SSID(Service Set Identifier)
         Serial.print(WiFi.SSID(nn));
         Serial.print(" ---- ");
         //Print RSSI(Received Signal Strength Indicator)
         Serial.print(WiFi.RSSI(nn));
         // print the unit
         Serial.print(" dB ---- ");
         String enType="";
         wifi_auth_mode_t encryp_type=WiFi.encryptionType(nn);
         if (encryp_type == WIFI_AUTH_WPA_WPA2_PSK){
            enType="WPA_WPA2_PSK";
         }
         else if (encryp_type == WIFI_AUTH_WPA2_ENTERPRISE){
            enType="WPA2_ENTERPRISE";
         }
         else if (encryp_type == WIFI_AUTH_OPEN){
            enType="Open";
         }
         else if (encryp_type == WIFI_AUTH_WPA_PSK){
            enType="WPA_PSK";
         }
         else if (encryp_type == WIFI_AUTH_WPA2_PSK){
            enType="WPA2_PSK";
         }
         else if (encryp_type == WIFI_AUTH_WEP){
            enType="WEP";
         }
         //display encryption type
         Serial.println(enType);
         delay(50);
      }
   }
   Serial.println("");
   // Wait and scan again
   delay(5000);
}
Viewing The Result
The program is compiled, uploaded to ESP32 and the result can be seen on Serial Monitor.
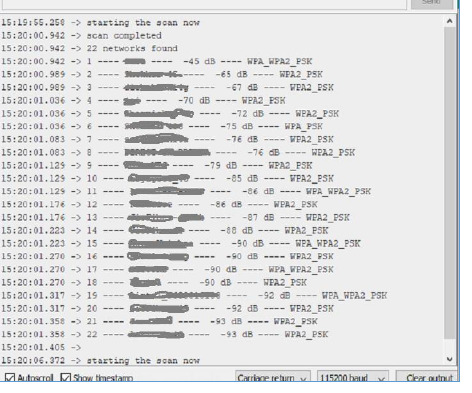
Fig 1: Showing the result on the Serial Monitor
Example 2: Using ESP32 wifi module to establish the internet connection with a wireless network.
ESP32 can connect to the internet using its wifi module. In this example, the connection with a wireless network is made by providing the SSID and wifi password for that wireless network. For this, a library wifi.h is used.
The Code
//library required for wifi connection
#include <WiFi.h>
//specify your wifi ssid and its password
#define WIFI_SSID "ABCD"
#define WIFI_PASSWORD "EFGH"
void setup(){
   Serial.begin(115200);
   delay(500);
   WiFi.begin(WIFI_SSID, WIFI_PASSWORD);
   while(WiFi.status() != WL_CONNECTED){
      Serial.print(".");
      delay(200);
   }
   if(WiFi.status() == WL_CONNECTED) {
      Serial.println("\nNow Connected to the WiFi ");
      //print SSID of wifi
      Serial.print("Wireless Network: ");
      Serial.println(WIFI_SSID);
      //print the MAC address of wireless router or access point (Basic Service Set Identifier)
      Serial.print("The Current MAC address is : " );
      Serial.println(WiFi.BSSIDstr());
      //print the private address of wireless router(Gateway IP)
      Serial.print("The router IP is : ");
      Serial.println(WiFi.gatewayIP());
      //print a 32-bit number by setting host bits to 0s and network bits to 1s.(Subnet Mask)
      Serial.print("This is the Subnet Mask : ");
      Serial.println(WiFi.subnetMask());
      //print received signal strength
      Serial.print("This is the signal strength : ");
      Serial.println(WiFi.RSSI() );
      //print ESP32 IP address
      Serial.print("This is the IP address of ESP32 : ");
      Serial.println(WiFi.localIP());
   }
}
Viewing The Result
The program is compiled, and uploaded to ESP32 and the result can be seen on Serial Monitor.
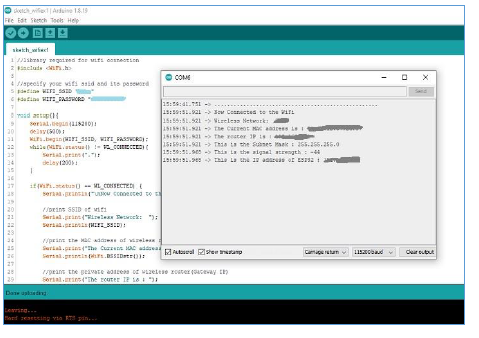
Fig 2: The result showing on Serial Monitor
Example 3: Using the ESP32 wifi module to set the new MAC address of the ESP32.
ESP32 can connect to the internet using its wifi module. A MAC (Media Access Control) address, is a 12-character physical address that is used to give devices identity on a network. Wifi library functions are used here to first show the current MAC address of ESP32. Secondly, it is used to specify a new MAC address and then set the new MAC address and display it. The libraries used here are WiFi.h and esp_wifi.h
The Code
//library required for wifi connection
//first library
#include <esp_wifi.h>
//second libray
#include <WiFi.h>
//specify the new mac address of ESP32
uint8_t new_mac_addr[] = {0x67C, 0x9D, 0xC2, 0x08, 0x5B, 0x33};
void setup(){
   Serial.begin(115200);
   WiFi.mode(WIFI_STA);
   //display the new MAC address
   Serial.print("This is the current MAC Address of ESP32: ");
   Serial.println(WiFi.macAddress());
   //setting the new MAC address
   esp_wifi_set_mac(ESP_IF_WIFI_STA, new_mac_addr);
   //display the new MAC address
   Serial.print("The new MAC Address is set now: ");
   Serial.println(WiFi.macAddress());
   delay(1500);
}
void loop(){}
Viewing The Result
The program is compiled, and uploaded to ESP32 and the result can be seen on Serial Monitor.
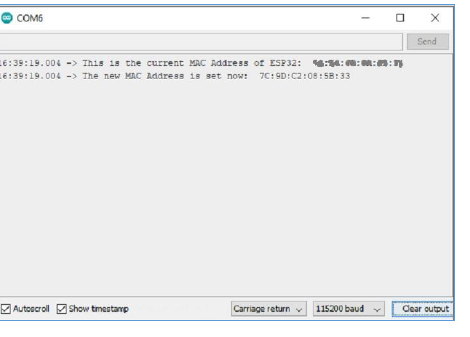
Fig 3: Showing the result on the Serial Monitor
In this article, the way to use the wifi module of ESP32 is given. In example 1, the way to show all the available wifi networks is specified. In example 2, the way to make the connection with a specific wireless network is explained. Further, in example 3, the advanced method of changing the MAC address is presented.

3K+ Views
