
Article Categories
- All Categories
-
 Data Structure
-
 Networking
-
 RDBMS
RDBMS
-
 Operating System
-
 Java
Java
-
 MS Excel
-
 iOS
iOS
-
 HTML
HTML
-
 CSS
CSS
-
 Android
-
 Python
-
 C Programming
-
 C++
C++
-
 C#
C#
-
 MongoDB
-
 MySQL
MySQL
-
 Javascript
-
 PHP
PHP
-
 Economics & Finance
Structs in Arduino program
A struct is simply a collection of different types of variable. Structs in Arduino mimic the structs in C language. So, if you are familiar with C structs, Arduino structs shouldn?t be an issue. The struct declaration syntax is as follows ?
Syntax
<span class="kwd">struct</span><span class="pln"> structName</span><span class="pun">{</span><span class="pln">
   item1_type item1_name</span><span class="pun">;</span><span class="pln">
   item2_type item2_name</span><span class="pun">;</span><span class="pln">
   </span><span class="pun">.</span><span class="pln">
   </span><span class="pun">.</span><span class="pln">
   </span><span class="pun">.</span><span class="pln">
   itemN_type itemN_name</span><span class="pun">;</span><span class="pln">
</span><span class="pun">}</span>
An example is given below ?
Example
<span class="kwd">struct</span><span class="pln"> student</span><span class="pun">{</span><span class="pln">
   </span><span class="typ">String</span><span class="pln"> name</span><span class="pun">;</span><span class="pln">
   </span><span class="kwd">int</span><span class="pln"> age</span><span class="pun">;</span><span class="pln">
   </span><span class="kwd">int</span><span class="pln"> roll_no</span><span class="pun">;</span><span class="pln">
</span><span class="pun">}</span>
The elements of a struct are accessed using the . (dot) notation. This notation can be used for both reading the elements of a struct, or changing them.
Example
The following example illustrates this ?
<span class="kwd">struct</span><span class="pln"> student</span><span class="pun">{</span><span class="pln">
   </span><span class="typ">String</span><span class="pln"> name</span><span class="pun">;</span><span class="pln">
   </span><span class="kwd">int</span><span class="pln"> age</span><span class="pun">;</span><span class="pln">
   </span><span class="kwd">int</span><span class="pln"> roll_no</span><span class="pun">;</span><span class="pln">
</span><span class="pun">};</span><span class="pln">

</span><span class="kwd">void</span><span class="pln"> setup</span><span class="pun">()</span><span class="pln"> </span><span class="pun">{</span><span class="pln">
   </span><span class="com">// put your setup code here, to run once:</span><span class="pln">
   </span><span class="typ">Serial</span><span class="pun">.</span><span class="kwd">begin</span><span class="pun">(</span><span class="lit">9600</span><span class="pun">);</span><span class="pln">
   </span><span class="typ">Serial</span><span class="pun">.</span><span class="pln">println</span><span class="pun">();</span><span class="pln">
   student A </span><span class="pun">=</span><span class="pln"> </span><span class="pun">{</span><span class="str">"Yash"</span><span class="pun">,</span><span class="pln"> </span><span class="lit">25</span><span class="pun">,</span><span class="pln"> </span><span class="lit">26</span><span class="pun">};</span><span class="pln">
   </span><span class="typ">Serial</span><span class="pun">.</span><span class="pln">println</span><span class="pun">(</span><span class="pln">A</span><span class="pun">.</span><span class="pln">name</span><span class="pun">);</span><span class="pln">
   </span><span class="typ">Serial</span><span class="pun">.</span><span class="pln">println</span><span class="pun">(</span><span class="pln">A</span><span class="pun">.</span><span class="pln">age</span><span class="pun">);</span><span class="pln">
   </span><span class="typ">Serial</span><span class="pun">.</span><span class="pln">println</span><span class="pun">(</span><span class="pln">A</span><span class="pun">.</span><span class="pln">roll_no</span><span class="pun">);</span><span class="pln">

   A</span><span class="pun">.</span><span class="pln">age </span><span class="pun">=</span><span class="pln"> </span><span class="lit">27</span><span class="pun">;</span><span class="pln">
   </span><span class="typ">Serial</span><span class="pun">.</span><span class="pln">println</span><span class="pun">(</span><span class="pln">A</span><span class="pun">.</span><span class="pln">age</span><span class="pun">);</span><span class="pln">
</span><span class="pun">}</span><span class="pln">

</span><span class="kwd">void</span><span class="pln"> loop</span><span class="pun">()</span><span class="pln"> </span><span class="pun">{</span><span class="pln">
   </span><span class="com">// put your main code here, to run repeatedly:</span><span class="pln">
</span><span class="pun">}</span>
Output
The Serial Monitor output is shown below ?
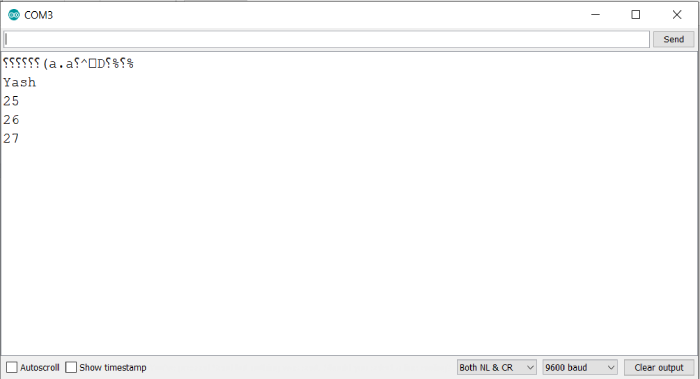
As you can see, we were able to both read the elements and change an element of the struct (age), using the dot notation.
Note that while the declaration of the struct contains a semi-colon between each variable, the creation of the struct contains a comma ?
student A = {"Yash", 25, 26};
Once a struct has been created, you can treat it like any other data type. You can even have functions returning the struct.
For example ?
student funcA(){
   student A = {"Yash", 25, 26};
   return A;
}
In some literature related to structs, you will come across the ? notation. This is used in place of dot notation when you are dealing with a pointer to the struct.
Example
The following example demonstrates that.
<span class="kwd">struct</span><span class="pln"> student</span><span class="pun">{</span><span class="pln">
   </span><span class="typ">String</span><span class="pln"> name</span><span class="pun">;</span><span class="pln">
   </span><span class="kwd">int</span><span class="pln"> age</span><span class="pun">;</span><span class="pln">
   </span><span class="kwd">int</span><span class="pln"> roll_no</span><span class="pun">;</span><span class="pln">
</span><span class="pun">};</span><span class="pln">

student increaseAge</span><span class="pun">(</span><span class="pln">student </span><span class="pun">*</span><span class="pln">B</span><span class="pun">){</span><span class="pln">
   B</span><span class="pun">?</span><span class="pln">age </span><span class="pun">=</span><span class="pln"> B</span><span class="pun">?</span><span class="pln">age </span><span class="pun">+</span><span class="pln"> </span><span class="lit">1</span><span class="pun">;</span><span class="pln">
   </span><span class="kwd">return</span><span class="pln"> </span><span class="pun">*</span><span class="pln">B</span><span class="pun">;</span><span class="pln">
</span><span class="pun">}</span><span class="pln">

</span><span class="kwd">void</span><span class="pln"> setup</span><span class="pun">()</span><span class="pln"> </span><span class="pun">{</span><span class="pln">
   </span><span class="com">// put your setup code here, to run once:</span><span class="pln">
   </span><span class="typ">Serial</span><span class="pun">.</span><span class="kwd">begin</span><span class="pun">(</span><span class="lit">9600</span><span class="pun">);</span><span class="pln">
   </span><span class="typ">Serial</span><span class="pun">.</span><span class="pln">println</span><span class="pun">();</span><span class="pln">

   student A </span><span class="pun">=</span><span class="pln"> </span><span class="pun">{</span><span class="str">"Yash"</span><span class="pun">,</span><span class="pln"> </span><span class="lit">25</span><span class="pun">,</span><span class="pln"> </span><span class="lit">26</span><span class="pun">};</span><span class="pln">
   </span><span class="typ">Serial</span><span class="pun">.</span><span class="pln">println</span><span class="pun">(</span><span class="pln">A</span><span class="pun">.</span><span class="pln">age</span><span class="pun">);</span><span class="pln">
   student </span><span class="pun">*</span><span class="pln">C </span><span class="pun">=</span><span class="pln"> </span><span class="pun">&</span><span class="pln">A</span><span class="pun">;</span><span class="pln">

   student D </span><span class="pun">=</span><span class="pln"> increaseAge</span><span class="pun">(</span><span class="pln">C</span><span class="pun">);</span><span class="pln">
   </span><span class="typ">Serial</span><span class="pun">.</span><span class="pln">println</span><span class="pun">(</span><span class="pln">A</span><span class="pun">.</span><span class="pln">age</span><span class="pun">);</span><span class="pln">
   </span><span class="typ">Serial</span><span class="pun">.</span><span class="pln">println</span><span class="pun">(</span><span class="pln">D</span><span class="pun">.</span><span class="pln">age</span><span class="pun">);</span><span class="pln">

</span><span class="pun">}</span><span class="pln">
</span><span class="kwd">void</span><span class="pln"> loop</span><span class="pun">()</span><span class="pln"> </span><span class="pun">{</span><span class="pln">
   </span><span class="com">// put your main code here, to run repeatedly:</span><span class="pln">
</span><span class="pun">}</span>
Output
The Serial Monitor output is ?
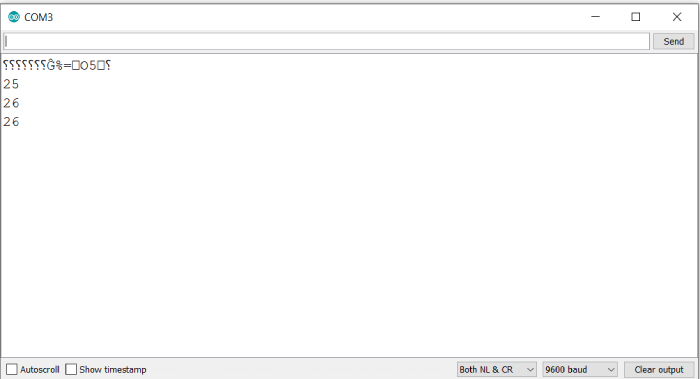
As you can see, the struct pointer C was pointing to A. When the age was incremented in the increaseAge function, it reflected in the struct A as well.

49K+ Views
