- Snowflake - Home
- Snowflake - Introduction
- Snowflake - Data Architecture
- Snowflake - Functional Architecture
- Snowflake - How to Access
- Snowflake - Editions
- Snowflake - Pricing Model
- Snowflake - Objects
- Snowflake - Table and View Types
- Snowflake - Login
- Snowflake - Warehouse
- Snowflake - Database
- Snowflake - Schema
- Snowflake - Table & Columns
- Snowflake - Load Data From Files
- Snowflake - Sample Useful Queries
- Snowflake - Monitor Usage and Storage
- Snowflake - Cache
- Unload Data from Snowflake to Local
- External Data Loading (from AWS S3)
- External Data Unloading (Into AWS S3)
- Snowflake Resources
- Snowflake - Quick Guide
- Snowflake - Useful Resources
- Snowflake - Discussion
Snowflake - Table & Columns
In a database, Schemas are created which are logical grouping of tables. Tables contain columns. Tables and columns are low-level and most important objects of a database. In this chapter, we will discuss about how to create a table and columns in Snowflake.
Snowflake provides the user two ways, to create a table and corresponding columns using user interface and SQL query. Without providing details of columns, user can't create a table.
Working with Tables and Columns using Snowflake's UI
Let's see how to work with tables and columns using Snowflake's UI.
Create Table and Columns
Login into Snowflake account using the unique URL. Click the Databases button, present at top ribbon. It navigates to database view screen.
Click the database name where you want to create a new table. It will navigate to database properties page where you can see tables/views/schemas etc. created inside the database.
Click the Tables if it is not selected, by default, Table is selected. You can see the list of tables created in the same database, otherwise it is blank.
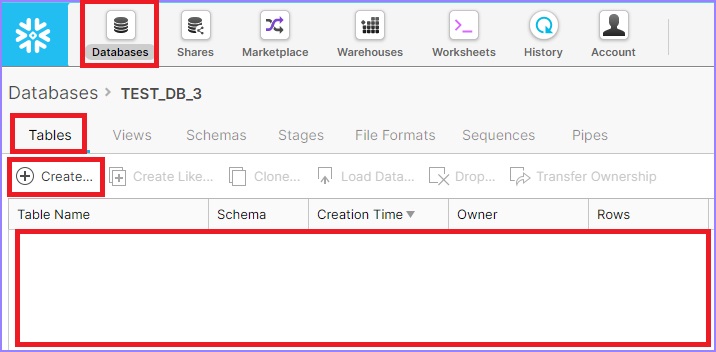
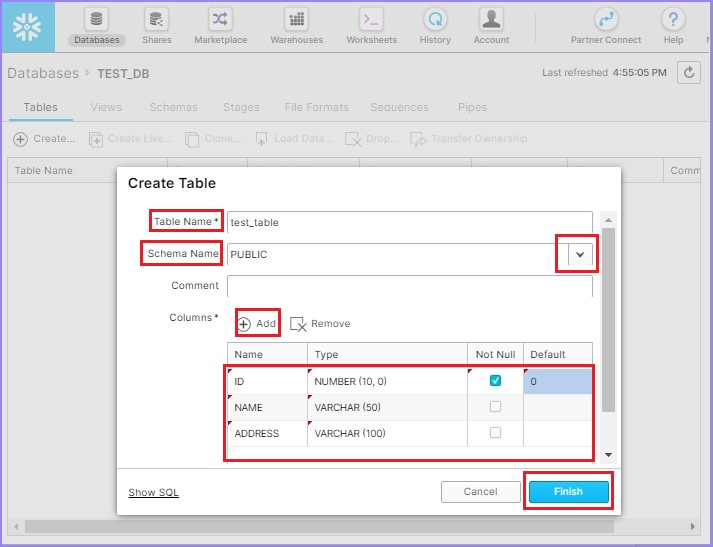
Click the Create button to add a table. It will pop up the Create Table dialog box. Enter the following fields −
Table Name − test_table
Schema Name − select from available list PUBLIC
Columns − Click the Add button, then enter Name, Type, Not Null or any default value.
To add multiple columns, keep clicking the Add button and then enter details. Now, click the Finish button.
The following screenshot depicts how to add table and columns −
You can see the created table in the view panel.
View Table and Columns
In this section, we will discuss how to view the details of tables and columns, how to create a like table, how to clone it, and how to delete a table.
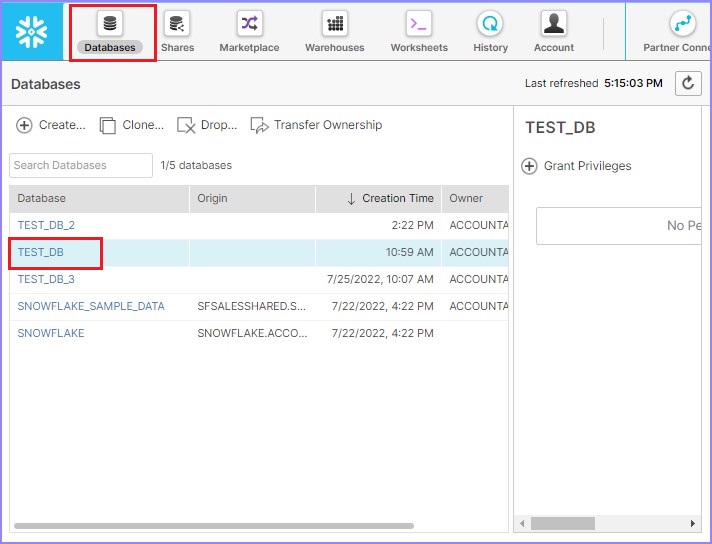
Click Databases present at the top ribbon. It will display the View panel of databases where all the databases are listed. Click the name of a database, where tables are present. For example, TEST_DB as shown in the following screenshot −
It will display all the listed tables in the database. Use the Create button for creating a new table. Use the Create Like button to create a table that has the same metadata as an existing table.
By clicking the Create Like button, the Create Table Like dialog box will pop up. Enter the name of new table and click on Finish button.
The following screenshot explains this functionality −
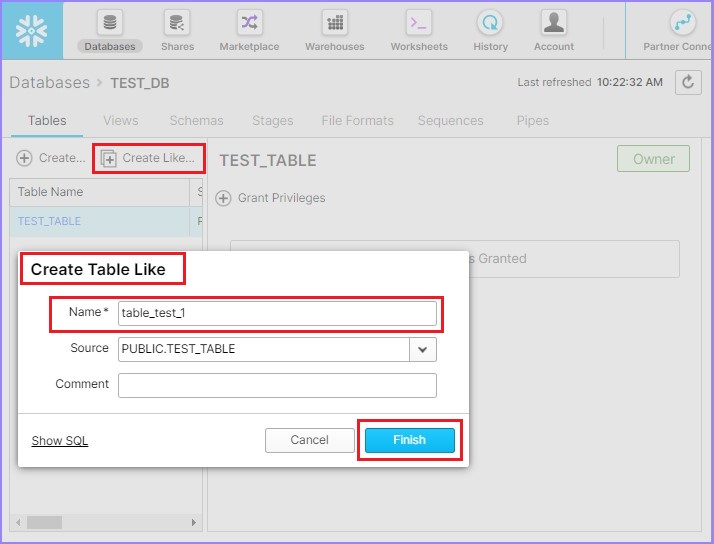
In the View panel, you can see the new table. In this case, TABLE_TEST_1.
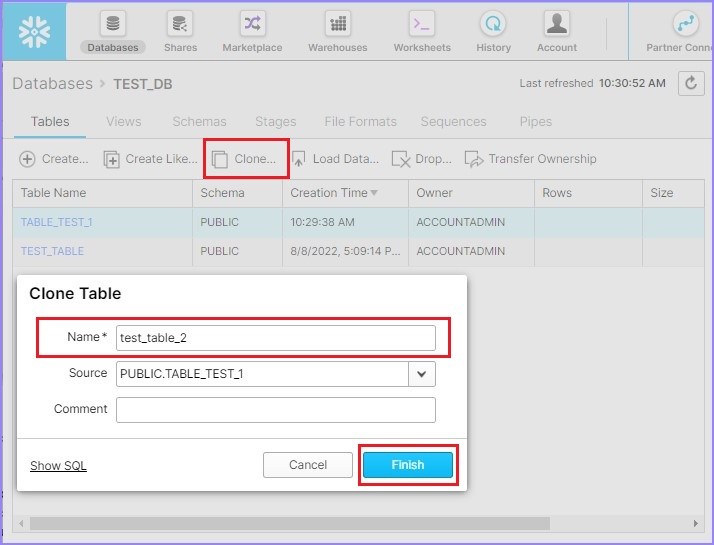
Use the Clone button to create another copy of the existing table. To perform this operation, select a table and click the Clone button.
Clone Table dialog box will pop up on the screen. Enter the name of the new table and click the Finish button.
The following screenshot displays the clone functionality.
You can see the new table in the View panel.
The difference in Clone and Create Like is "column data". Clone brings the actual data from the existing table, whereas Create Like copies only the metadata of a table. It doesn't copy existing data present in the table.
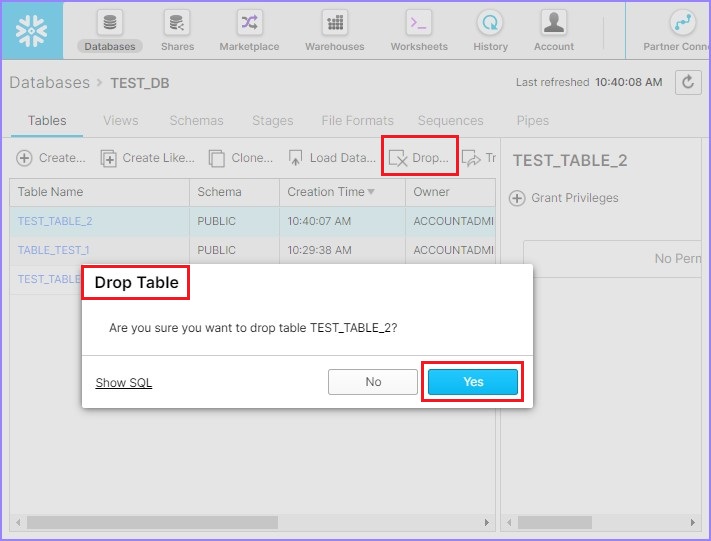
User can delete a table as well, by selecting a table and clicking the Drop button. The Drop Table dialog box pops-up for confirmation. Click YES for deletion, else NO.
Working on Tables and Columns using Snowflake's SQL Interface
Once the user starts working on tables and columns, respective databases and schemas become important factor. If details of database and schema is not provided, query won't execute successfully.
There are two ways to set up database and schema details One using Snowflake's UI and another is providing database name and schema name before table names in query as shown in following examples −
SELECT * FROM DATABSE_NAME.SCHEMA_NAME.TABLE_NAME.
In the UI, the following steps need to be performed −
Click at the Down arrow present at the top-right corner beside the Select Schema. It pops up a dialog box where the user can provide the following details −
- ROLE
- Warehouse
- Database
- Schema
The following screenshot describes the above steps −

Now, when the user runs a query without providing a database name and schema name in the query, it runs against set up database and schema as shown above. You can change it frequently if you need to switch over to another database/schema.
Setup Database, Warehouse and Schema in SQL
Use the following query to set up a warehouse for a session −
USE WAREHOUSE <WAREHOUSE_NAME>
Use the following query to set up a database for a session −
USE DATABASE <DATABASE_NAME>
Use the following query to set up a schema for a session −
USE SCHEMA <SCHEMA_NAME>
Create TABLE and COLUMNS
Login into Snowflake and navigate to Worksheets. By default, Worksheet is opened once you login, else click the Worksheets icon present at the top ribbon.
Use the following query to create a table and columns under the database TEST_DB and schema TEST_SCHEMA_1 −
CREATE TABLE "TEST_DB"."TEST_SCHEMA_1"."TEST_TABLE"
   ("ID" NUMBER (10,0) NOT NULL DEFAULT 0, "NAME" VARCHAR (50), "ADDRESS" VARCHAR (100))
Click the Run button to execute the query. Result will be displayed in the Results panel as TEST_TABLE was successfully created.
View Table and Columns
To view all the listed tables, you can use the following SQL. It brings details of all listed schemas.
SHOW TABLES
To view the column definition, use the following SQL −
DESCRIBE TABLE TEST_DB.TEST_SCHEMA_1.TEST_TABLE
To clone a table, use the following SQL −
CREATE TABLE "TEST_DB"."TEST_SCHEMA_1".TEST_TABLE_2 CLONE "TEST_DB"."TEST_SCHEMA_1"."TEST_TABL_1"
To create a Like table, use the following query −
CREATE TABLE "TEST_DB"."TEST_SCHEMA_1".TEST_TABL_1 LIKE "TEST_DB"."TEST_SCHEMA_1"."TEST_TABLE"
To delete a table, use the following SQL −
DROP TABLE "TEST_DB"."TEST_SCHEMA_1"."TEST_TABLE_2"
User can run SHOW TABLES query after each operation to verify whether operation is completed.
