- Snowflake - Home
- Snowflake - Introduction
- Snowflake - Data Architecture
- Snowflake - Functional Architecture
- Snowflake - How to Access
- Snowflake - Editions
- Snowflake - Pricing Model
- Snowflake - Objects
- Snowflake - Table and View Types
- Snowflake - Login
- Snowflake - Warehouse
- Snowflake - Database
- Snowflake - Schema
- Snowflake - Table & Columns
- Snowflake - Load Data From Files
- Snowflake - Sample Useful Queries
- Snowflake - Monitor Usage and Storage
- Snowflake - Cache
- Unload Data from Snowflake to Local
- External Data Loading (from AWS S3)
- External Data Unloading (Into AWS S3)
- Snowflake Resources
- Snowflake - Quick Guide
- Snowflake - Useful Resources
- Snowflake - Discussion
Snowflake - External Data Unloading
Snowflake supports cloud storage from the client side as well. It means that client can export data in their clouds from snowflake. As of now, Snowflake supports 3 clouds AWS S3, Microsoft Azure and Google Cloud Platform Location. These are known as External Stages. However, Snowflake provides snowflake managed stages those are known as Internal Stages.
External Stages are client-side location where internal stages are used when user working with their local system directory.
To unload data into external clouds, the following set up is required −
An existing database and schema in the Snowflake from where data must unload into AWS S3.
An external stage set up pointing to the AWS S3 bucket.
A file format defines the structure of files those are loaded into AWS S3.
In this chapter, we will discuss how to set up these requirements and unload the data from tables to S3.
We already created a database named as TEST_DB, schema as TEST_SCHEMA_1 and table as TEST_TABLE. If these are not available, please create these as explained in previous chapters.
External stage can be set up through Snowflake's user interface as well as using SQL.
Using UI
To create external stage, follow the instructions given below −
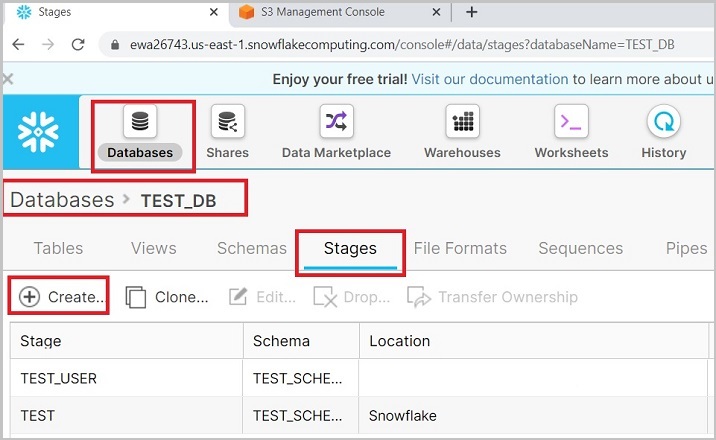
Login into Snowflake. Click Databases present at the top ribbon. In the Database view, click the database name as TEST_DB. Next, click the Stages tab and click the Create button present at top as shown in the following screenshot −
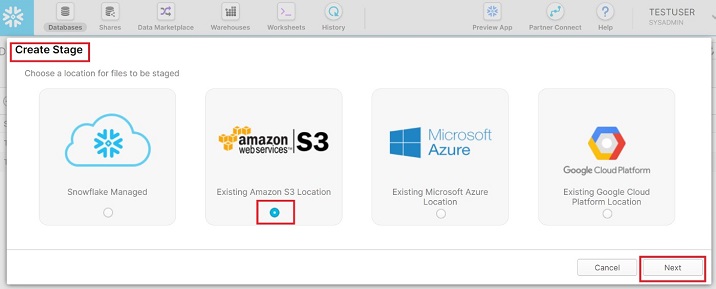
It will pop up the Create Stage dialog box, select amazon|s3 in the list and click on Next as shown below −
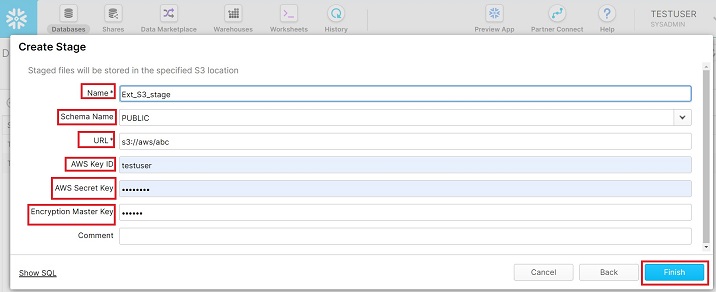
It will go to the next screen where the user should enter the following details −
Name − It is the user defined name of external stage. The same name will be used to copy the data from stage to table.
Schema Name − Select the schema name where table resides to load the data.
URL − Provide S3 url from Amazon. It is unique based on bucket name and keys.
AWS Key ID − Please enter your AWS Key ID.
AWS Secret Key − Enter your secret key to connect through your AWS.
Encryption Master Key − Provide encryption key if any.
After providing details, click the Finish button. The following screenshot describes the above steps −
User can see the newly created external stage in the View panel.
Using SQL
It is very easy to create an external stage using SQL. Just run the following query providing all the details such as Name, AWS Key, Password, Master Key, and it will create the stage.
CREATE STAGE "TEST_DB"."TEST_SCHEMA_1".Ext_S3_stage URL = 's3://***/*****
CREDENTIALS = (AWS_KEY_ID = '*********' AWS_SECRET_KEY = '********') ENCRYPTION = (MASTER_KEY = '******');
File Format defines the structure of uploaded file into S3. If the file structure doesn't match with the table structure, loading will be failed.
Using UI
To create a File Format, follow the instructions given below.
Login into Snowflake and click Databases present at the top ribbon. In the database view, click the database name TEST_DB.
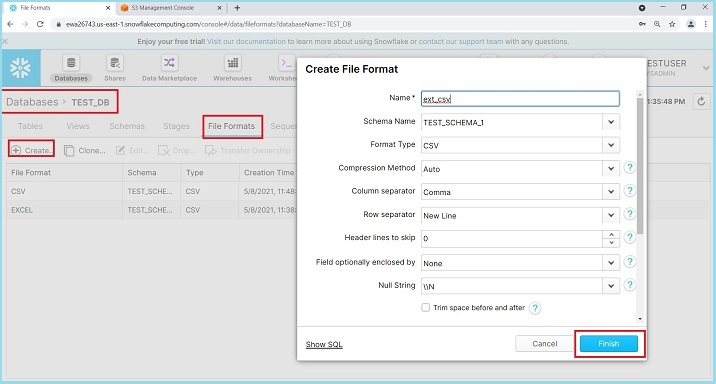
Next, click the File Format tab followed by the Create button present at the top. It pops-up the Create File Format dialog box. Enter the following details −
Name − Name of file format.
Schema Name − The create file format can be utilized in the given schema only.
Format Type − Name of file format.
Column separator − if csv file is separated, provide file delimiter.
Row separator − How to identify a new line.
Header lines to skip − if header is provided then 1 else 0.
Other things can be left as it is. Click the Finish button after entering these details.
The following screenshot displays the above details −
User will be able to see the created File Format in the View panel.
Using SQL
It is very easy to create a File Format using SQL. Just run the following query by providing all the necessary details as shown below.
CREATE FILE FORMAT "TEST_DB"."TEST_SCHEMA_1".ext_csv TYPE = 'CSV' COMPRESSION = 'AUTO'
FIELD_DELIMITER = ',' RECORD_DELIMITER = '\n' SKIP_HEADER = 0 FIELD_OPTIONALLY_ENCLOSED_BY =
'NONE' TRIM_SPACE = FALSE ERROR_ON_COLUMN_COUNT_MISMATCH = TRUE ESCAPE = 'NONE'
ESCAPE_UNENCLOSED_FIELD = '\134' DATE_FORMAT = 'AUTO' TIMESTAMP_FORMAT = 'AUTO' NULL_IF = ('\\N');
Unload Data into S3
In this chapter, we have discussed about setting up all required parameters like Stages, File Format, Database to unload data into S3.
Now, to unload the data, run the following query −
Syntax
COPY INTO @<database_name>.<schema_name>.<external_stage_name>
FROM (SELECT * FROM <table_name>)
FILE_FORMAT=(FORMAT_NAME=<database_name>.<schema_name>.<file_format_name>);
Example
COPY INTO @test_db.test_schema_1.EXT_Stage
FROM (SELECT * FROM TEST_TABLE)
FILE_FORMAT=(FORMAT_NAME=test_db.test_schema_1.CSV);
