- SAP BEx - Home
- SAP BEx - Overview
- SAP BEx - Architecture
- SAP BEx - Query Designer
- SAP BEx - Query Designer Features
- SAP BEx - Web
- SAP BEx - Web Integration
- SAP BEx - Analyzer
- SAP BEx - Analysis Functions
- SAP BEx - Objects
- SAP BEx - Accessibility Mode
- SAP BEx - Information Broadcasting
- SAP BEx - Integration With BO
SAP BEx - Quick Guide
SAP BEx - Overview
SAP Business Explorer (SAP BEx) provides you the set of tools to perform reporting, query analysis to support strategic decision. This tool provides a lot of queries and report designing functions. You can also develop Web applications on top of the SAP BI content using BEx Web Application Designer (WAD). Using the BEx Broadcast option, you can also broadcast the objects that are created using Business Explorer in email or in the form of a URL. This can also be published under the Knowledge Management Content on the NetWeaver portal.
The BI content is available in SAP NetWeaver BI system and the data is analyzed by defining the queries in BEx Query Designer. The BEx WAD can be used to develop Web Application based on the BI content available in the SAP BW system. The BEx Report Designer tool can be used to create formatted reports for printing and presentation.
The following tools are available under SAP Business Explorer −
- Analyzer
- Query Designer
- Report Designer
- Web Application Designer
Let us now understand in detail about the above given tools.
Analyzer
The Analyzer under Business Explorer is a reporting and designing tool, which provides integration with Microsoft Excel. You can use this tool to analyze data in an Info Provider under SAP BW. This can be used for planning by writing queries in a BEx Query Designer.
Query Designer
The BEx Query Designer can be used to analyze the data in InfoProviders under the SAP BW System. You can define the characteristics and the key figures in a Query Designer to analyze the data in any InfoProvider.
Report Designer
A Report Designer can be used to create formatted reports by using extensive formatting options and these reports can be used for printing and can be generated in different formats such as PDF.
For Example −
- Invoice
- Balance Sheets
- Sales Report, etc.
Web Application Designer
The Web Application Designer can be used to create web based applications using BI Content. These applications contain HTML pages which can be accessed via Web Browsers in the client machines or can also be published on the NetWeaver Portal under the Knowledge Management Content.
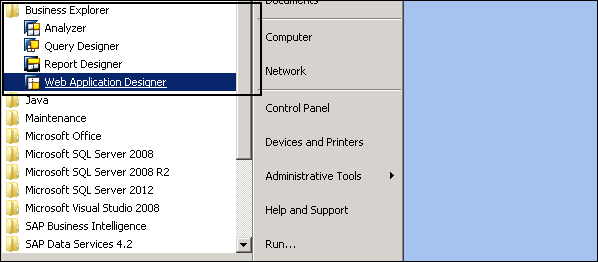
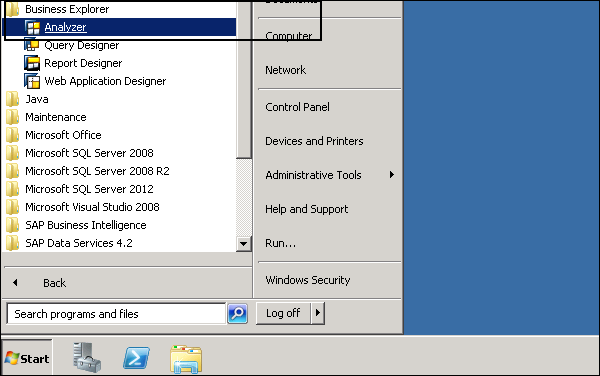
To see the list of tools under Business Explorer, navigate to Program Files in your SAP system → Business Explorer.
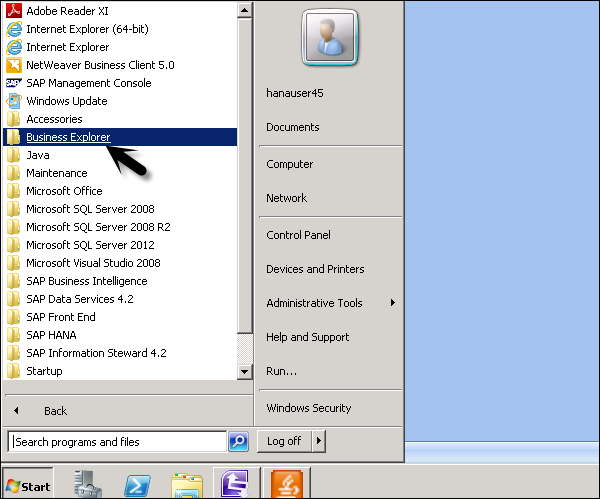
Once you expand this folder, you can see the full set of Business Explorer tools as mentioned in the previous topics.
Business Explorer Features
SAP Business Explorer is a frontend tool to design Data visualization on Business Intelligence information in SAP Business Warehouse system. It is a popular product that provides extensive report formatting and designing features along with Web Application Development and broadcasting of objects developed in Business Explorer.
The following is the list of features that are provided by SAP Business Explorer BEx Suite −
BEx Query Designer Key Features
You can use queries in the BEx Query Designer for OLAP reporting and for enterprise reporting.
Queries can contain different parameters like variables for characteristic values, hierarchies, formulas, text, etc.
In the Query Designer, you can apply a filter to restrict the whole query. While defining the filter, you can add characteristic values from one or more characteristics or also key figures in the filter. All the InfoProvider data is aggregated using the filter selection of the query.
You can also use user-defined characteristics and determine the content of the rows and columns of the query. This is used to specify the data areas of the InfoProvider through which you want to navigate.
You have an option of navigating through the query that allows you to generate different views of the InfoProvider data. This can be achieved by dragging any of the user defined characteristics into the rows or columns of the query.
BEx Analyzer Key Features
BEx Analyzer is divided into two modes for different purposes −
Analysis mode − It is used for executing OLAP analyses on queries.
Design mode − It is used for designing the interface for query applications.
Analysis Mode − You can perform the following tasks in the Analysis mode −
You can access the BEx Query Designer to define queries.
You can analyze the InfoProvider data by navigating in the queries.
You can use different functions like sorting, filtering, drilling, etc., which are common in OLAP.
Distribution of workbooks with BEx Broadcaster.
For advanced programming, you can embed your own customized VBA programs.
You can save workbooks on the server/locally on your computer or into favorites.
Design Mode − You can perform the following tasks in the design mode −
It can be used to design the query and you can embed different query design items like dropdown box, radio button groups, grid and buttons into your Microsoft Excel workbook.
You can also customize your workbook with Excels formatting and chart functionality.
BEx Report Designer Key Features
You can perform the following tasks with the report designer −
You can use formatting options to create report for printing and presentation.
Different Layout functions that can be used to design corporate reports to meet business requirements.
You can print web applications and reports in various formats.
BEx Web Application Designer (WAD) Key Features
You can perform the following tasks with the web application designer −
You can use BEx WAD to generate HTML pages which contain BI specific contents such as, Tables, Maps and different Chart types.
Web Applications can be published on the portal and can be accessed via a web browser.
Use of standard markup languages and Web Design API.
You can create and design web templates that can be saved and used in Web applications.
Business Explorer Product Suite
By using SAP BEx frontend tools, you can leverage various reporting and analysis capabilities on the BI information in SAP Business Warehouse. This allows you to write queries, format and design report for printing and presentation, develop web applications and broadcast these objects. The SAP BEx frontend tools can be installed with or without SAP GUI tools.
In older versions, SAP Business Explorer was delivered with SAP GUI installer as an add-on tool. Business Explorer can be installed independently of SAP GUI for Windows 7.10 or higher or together with SAP GUI for Windows 7.10 or higher version. When the installation is done independently for BEx frontend tools, the following tools are available under BEx −
- BEx Analyzer
- BEx Query Designer
- BEx Report Designer
When the installation is done as a part of the frontend package with SAP GUI, you can also use BEx Web Application Designer (WAD). This tool is not available in Release 7.10 or higher if SAP GUI is not installed on the client machine.
Hardware and Software Requirements
Hardware Requirements − System should meet all the requirements for Microsoft Excel 2003 and Windows XP or Vista.
Software Requirements −
- Windows XP or Vista
- Microsoft .Net Framework 2.0
- Microsoft Excel 2003 or higher
To perform the installation of the frontend tools, you need an installer or a CD which contains the setup file. The user should have an administrator privilege to run the installer file.
Start SapBISetup.exe by using run as administrator option if you are not logged in with an administrator user. This will open the setup wizard as shown in the following screenshot.

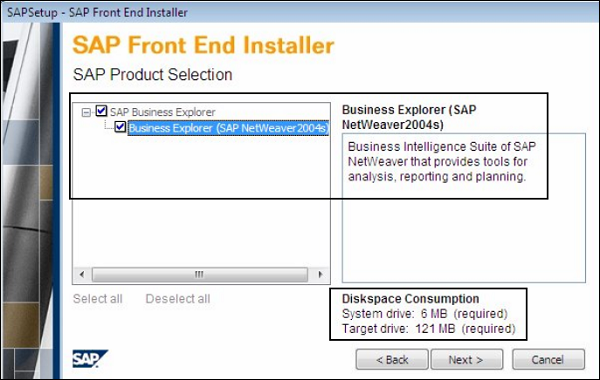
When you click on Next, you need to select the frontend tools that you want to install. Under the Product Selection, you should select SAP Business Explorer.
It also shows you the required disk space requirement.
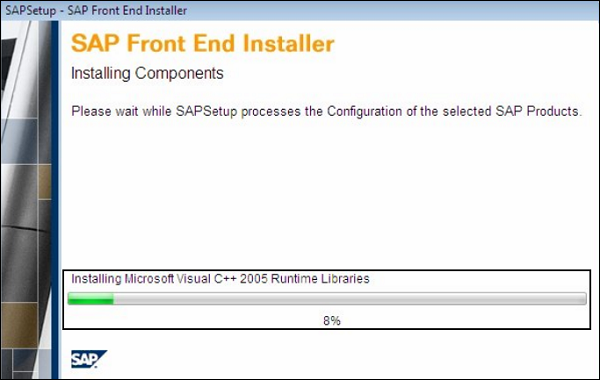
Make the selection of frontend tools, click on Next. You need to select the target drive where you want the installation to be done. Once you select the target drive, click on Next and it will start the setup installation.
You can see the status in the Progress bar, and once it is 100% done, installation is completed for the frontend tools.
Your Business Explorer is now successfully configured and ready to use. You can navigate to Business Explorer folder under Program Files and verify the installation by checking following tools shown in the screenshot given below.

SAP BEx - Architecture
In this chapter, we will discuss in detail about the architecture of SAP Business Explorer and how it can be integrated with SAP BusinessObjects.
Business Explorer Architecture
SAP Business Explorer consists of multiple tools that can be used to design queries and to perform report analysis, create web applications. The BEx Web Analyzer, Report Designer and Query Designer uses BI content in SAP NetWeaver BW system and communication happens using BI Consumer Service also called as BICS.
The content developed using Business Explorer can be published in the NetWeaver Portal or can also be used in Composite Applications.
The following image shows the functional area/ basic architecture of SAP Business Explorer suite −
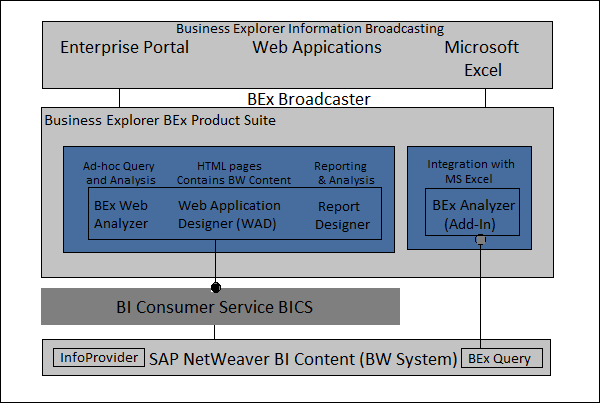
Components in SAP BEx Architecture
At the bottom, you have SAP NetWeaver BI content in the BW system. The BI Content is managed in the form of OLAP Cubes from InfoProviders. An InfoCube is defined as a multidimensional dataset which is used for analysis in a BEx query. An InfoCube consists of a set of relational tables which are logically joined to implement the star schema.
You can add data from one or more InfoSource or InfoProviders to an InfoCube. They are available as InfoProviders for analysis and reporting purposes.
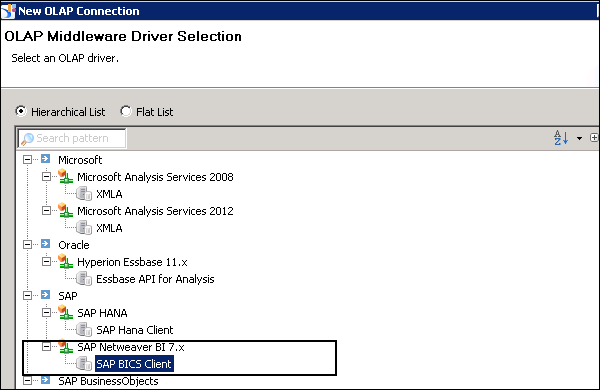
BI Consumer Service (BICS)
BICS is used to connect the Business Explorer queries to SAP NetWeaver BW system. While creating an OLAP connection in IDT, you can use BICS connectivity to connect to the SAP BW system.
The next in line is SAP Business Explorer Suite that contains multiple tools to perform query analysis and design and for Report formatting. The Web Application Development (WAD) can be used for application development and content can be published on to the portal or composite applications using Broadcasting Information.
The BEx Analyzer provides an option for excel integration and you can analyze selected InfoProvider data and use it for planning by navigating in queries created in a BEx Query Designer.
At the top, you have the presentation layer that is used to publish the objects that are created using SAP Business Explorer. The NetWeaver Portal can be used for publishing the project or you can also use them in composite applications or analyze further using Microsoft Excel.
Business Explorer Integration with BO
You can integrate SAP Business Warehouse system with SAP BusinessObjects, then the use of Business Explorer increases in terms of reporting and querying options. SAP BusinessObjects provide a complete set of Analytical reporting, Dashboard and Data Visualization tools.
The following integrations can be performed −
You can integrate SAP BusinessObjects Dashboard (Xcelsius) tool to create an interactive dashboard on top of the BI Content in the SAP BW server.
It is also possible to integrate a Crystal Report with BW that can be used to generate form based data on top of the BW content which can be used for printing purposes.
It is also possible to call Web Applications created using BEx Web Application Designer in SAP BusinessObjects BI Launchpad and to store and publish them into a BO repository server.
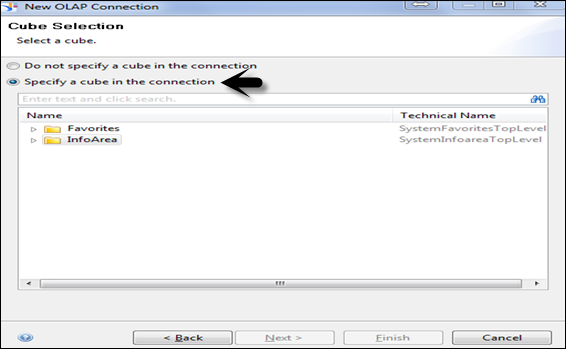
To integrate a SAP BW system to BusinessObjects tools, you can create a BICS connection to the BEx query. You can select a Cube while creating an OLAP connection using the BICS connection.
SAP BEx - Query Designer
In this chapter, we will discuss what a Query Designer is and understand its functions. We will also learn how to create new queries.
Business Explorer BEx Query Designer Overview
With the BEx Query Designer you can analyze the BI Content by combining characteristics and key figures along with other query elements. You can pass different parameters- hierarchies, variables, text and formulas in the query.
Filters can be applied in the query to restrict the data returned for the query. You can also insert query in workbook and that has been shown in the BEx Analyzer.
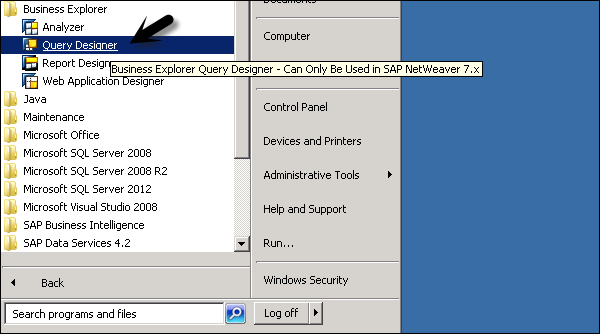
To open the BEx Query Designer, navigate to the Business Explorer → Query Designer → Run.
Select SAP logon screen, BW system as per your SAP GUI system.
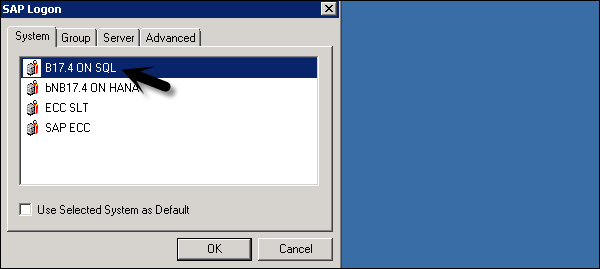
In the next window, you need to enter your Login Credentials. Enter the Client, User, Password and the Language.

This will open the SAP Business Explorer NetWeaver Query Designer. You will not be able to see the home screen for the SAP BEx Query Designer.

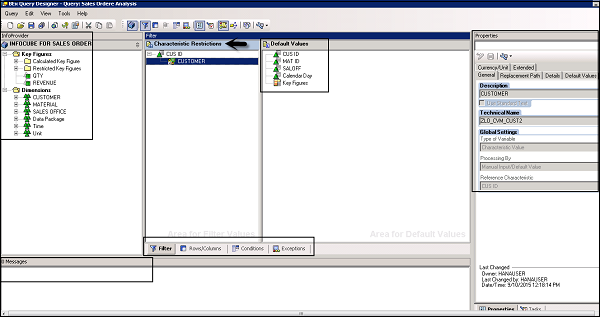
Business Explorer Functions in a Query Designer
On the left side of the home screen of the Query Designer, you have the InfoProvider pane it has the name of the Infocube and the list of all the characteristics and key figures available under that Infocube. It also shows all the Calculated Key figures and Restricted Key figures in the Infocube.
In the middle pane, you have the Characteristics Restrictions it shows all the filters that have been used in the query. You have 4 tabs under the characteristics restriction, which are −
- Filter
- Rows/Columns
- Conditions
- Exceptions
Let us now discuss each one of these in detail.
Filter − Here you can see the list of dimensions in the query on which the filter has been applied to restrict the values in the query.
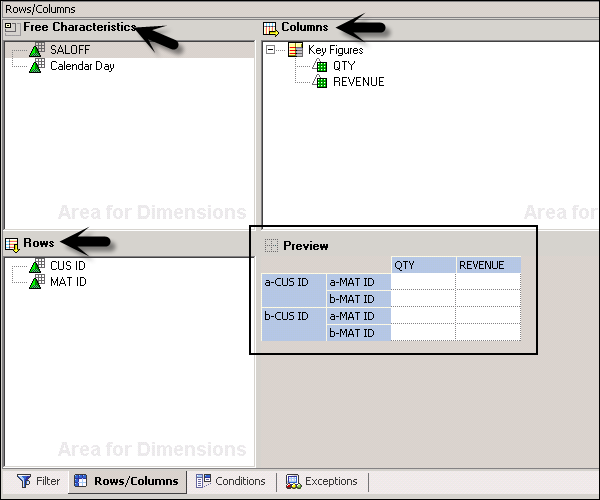
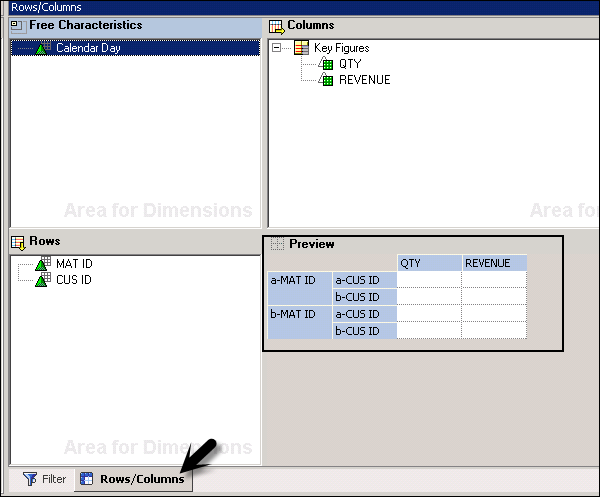
Rows/Columns − In this tab, you can see the list of dimensions and key figures under rows and columns section. You can also see the free characteristics and preview under this tab.
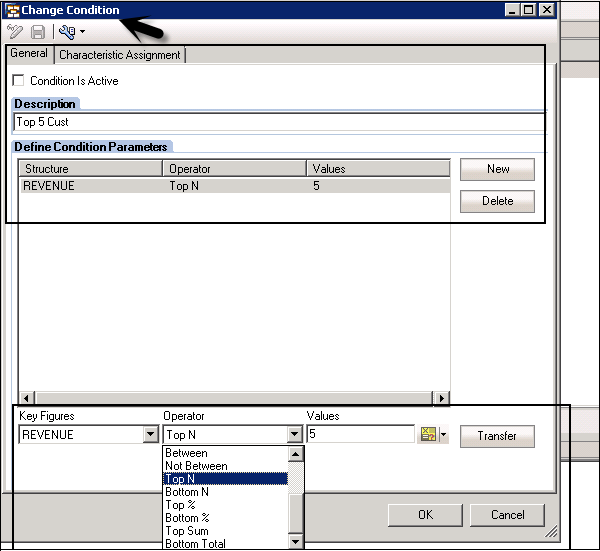
Conditions − In this tab, you define the Condition like ranking of the values under key figures. You can select Top 5 values, Top 10 values and under conditions in the query. You can select different Operator functions to pass these Conditions.
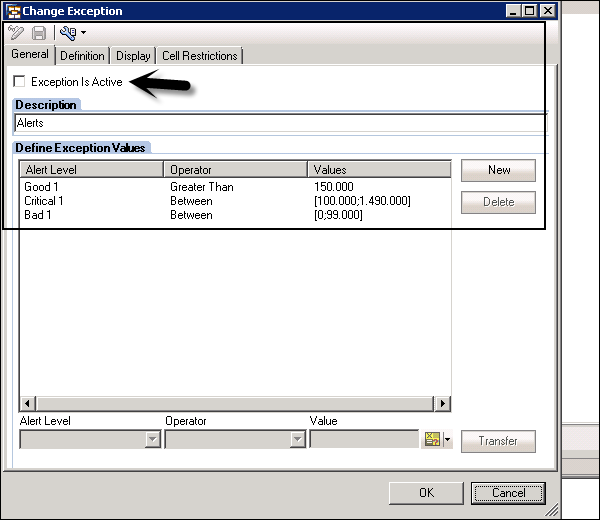
Exceptions − You can also add Exceptions/Alert to key figures. You can create an Exception and keep it inactive by unchecking the check box.
On the right side of the home screen, you have the Query Properties. You can see the description, technical name and the InfoProvider.
How to see BEx Query name, InfoProvider for a query?
To open the properties of a query, go to the Query button at the top → Open.

You will see the list of all the queries available. It shows the Query description and not Technical name of the query. Select the query for which you want to see the technical name and InfoProvider.
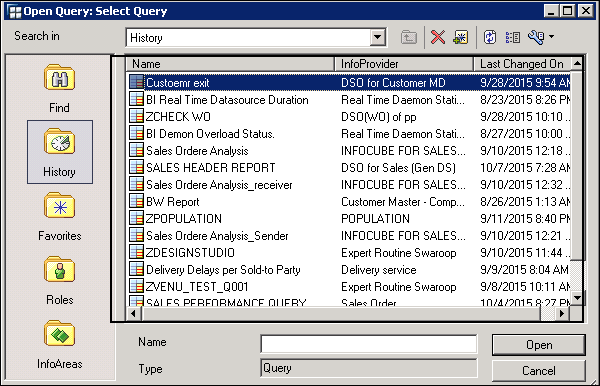
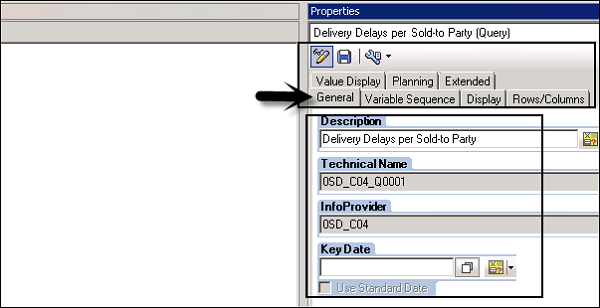
To see the technical name, description and InfoProvider name and other properties you should select the Query. On the right hand side, you can see the Query Properties. If you cant see the query properties, you can also use the Query Properties button at the top.
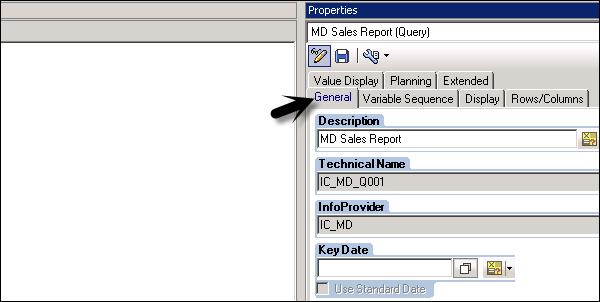
The Technical name, InfoProvider, Description and Key date is shown under the GENERAL tab.

At the bottom, you have the Message pane. It is used to check the query consistency. If there is any issue in the query, it shows an error message in red or any other warnings too.

Business Explorer Creating New Queries
You need to create a new query to analyze the data in BEx Analyzer or Web Applications. You can define new queries in the Query designer on the top of InfoProviders.
To create a new query, there should at least be an InfoProvider in the SAP BW system. The BEx Query Designer can also be called from other tools by navigating through the path given below −
Start → Programs → Business Explorer → Query Designer.

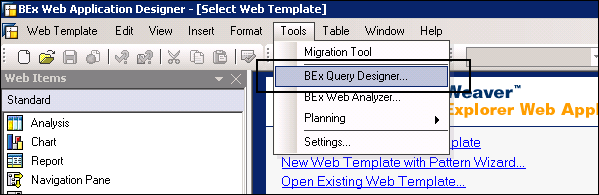
You can also open the BEx Query Designer from the BEx Web Application Designer. Navigate to Tools → BEx Query Designer in the Web Application Designer or It can also be accessed via the BEx Report Designer → Tools → BEx Query Designer.
To define a new query, you need to navigate to Query → New in the Query Designer.

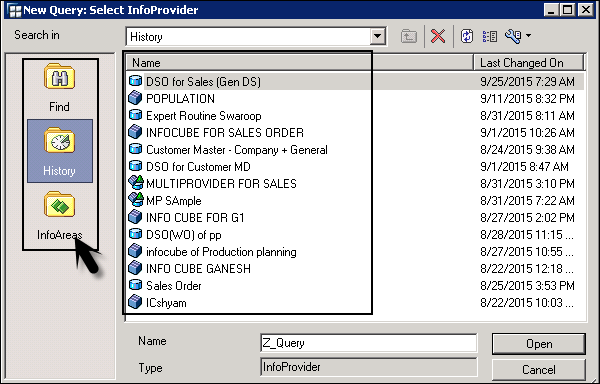
The next step is to make the selection screen for all the InfoProviders that you can define in a new query.
In the history tab, you can see all the recently used InfoProviders. From all the available InfoProviders under InfoAreas, select the InfoProvider that you want to use. You can also search for an InfoProvider in History or under InfoAreas.
Once you add the InfoProvider, it is added to the InfoProvider pane. The list of all the available objects are then shown in their hierarchical structure. Drag the characteristics that you want to add to the Character Restrictions.
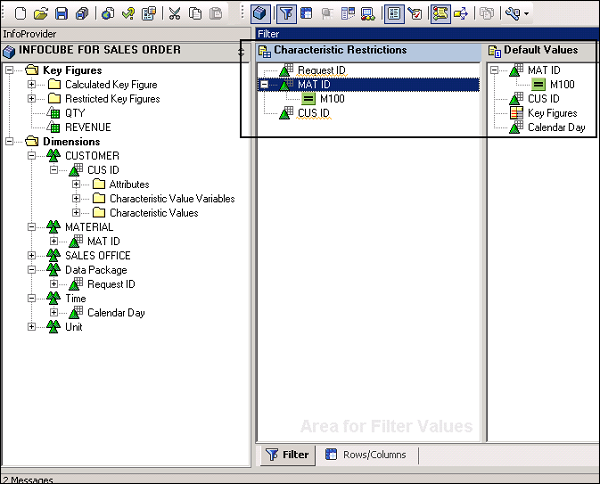
Note that the filter screen area contains empty directories for the filter selection and the Rows/Columns screen area contains empty directories for the rows, the columns, and the free characteristics of the query.
The preview of the results area for the query can be found at the bottom right of the screen.
The filter selection has a restricting effect on BEx query. All the data from the InfoProvider is aggregated with the filter selection.
You can also add the default values to the filter. You can double click on any of the characteristics and it will open a new window to make the default value selection.
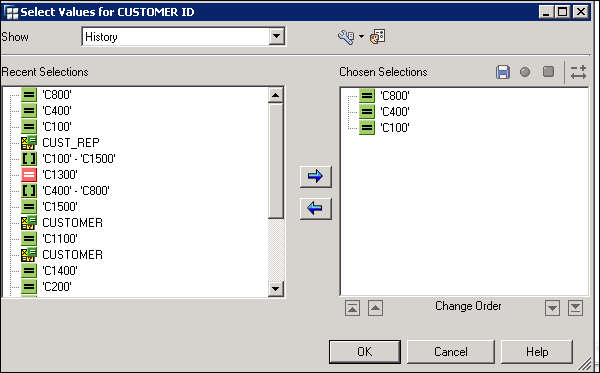
When you expand each characteristic value under the Default selection, you can see the selected default values.
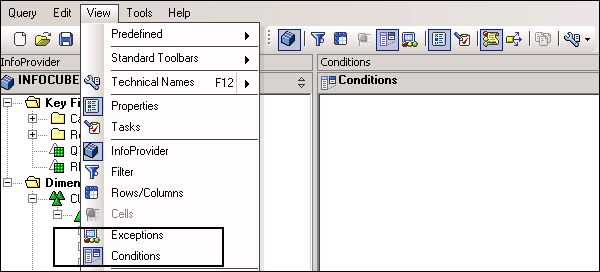
You can also add Conditions/Exceptions to a BEx query. Navigate to the View tab → Exceptions/Conditions.
It is also possible to drag and drop to change how the key figures and characteristics are arranged in the rows and columns until the preview displays the results area you want.
You can also define a new calculated key figure and can be added to the BEx Query in the Query Designer. To create a new calculated/restricted key figure, right click on the Key figure → Select.
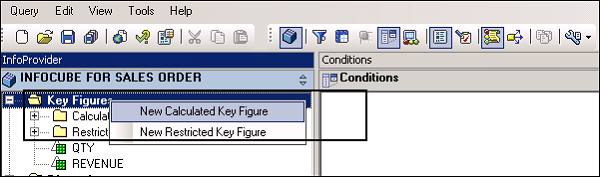
A Restricted Key figure is defined as the key figure which can be restricted with the Characteristics.
A Calculated Key figure is defined as the key figure which is calculated using other key figures based on some formula. A calculated key figure is global to all the queries in the InfoProvider.
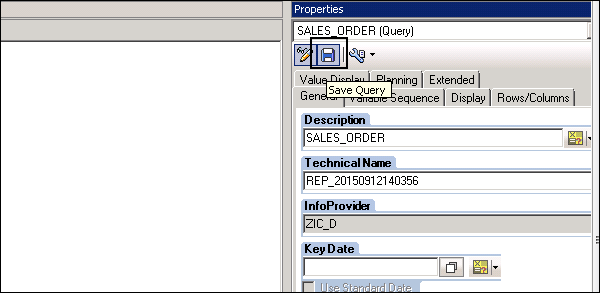
You can save the query by clicking on the save button at the top.
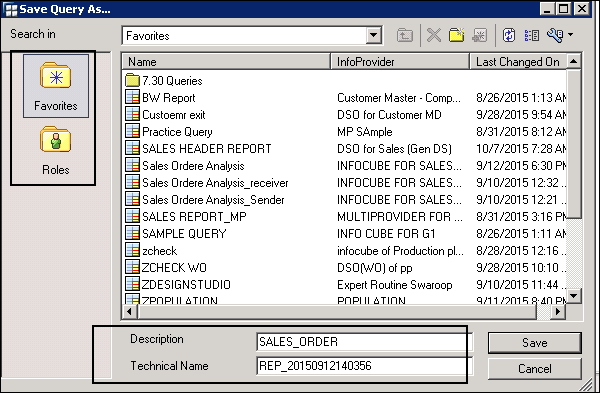
Enter the Technical Name and Description of the query. The technical name of the query should be unique to all the InfoProviders in the SAP BW system. You can add a name of up to 30 characters in length.
You can select the location where you want to save the query. You can choose the Favorite folder or can also assign to a specific role.
SAP BEx - Query Designer Features
In this chapter, we will discuss the various features of the BEx Query Designer and understand its functions. We will also learn the different Query Components in detail. In addition, we will learn how to set up the Query Properties and the various Properties of the Query Components.
Business Explorer Different Query Components
There are many objects in the Query Designer that can be reused at a global level. When objects are defined, it can be used in all the queries in a BW System. When these reusable objects are changed, these changes are applied in all the queries where it is used
The following object types can be created for reuse −
- Variables
- Restricted Key Figures
- Calculate Key Figures
To see the where the objects are used, you can select the Where Used List in the context menu.
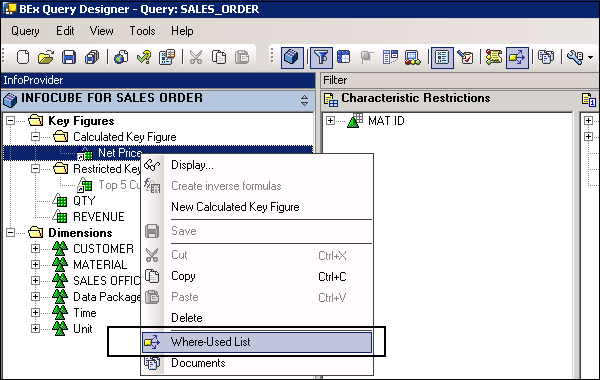
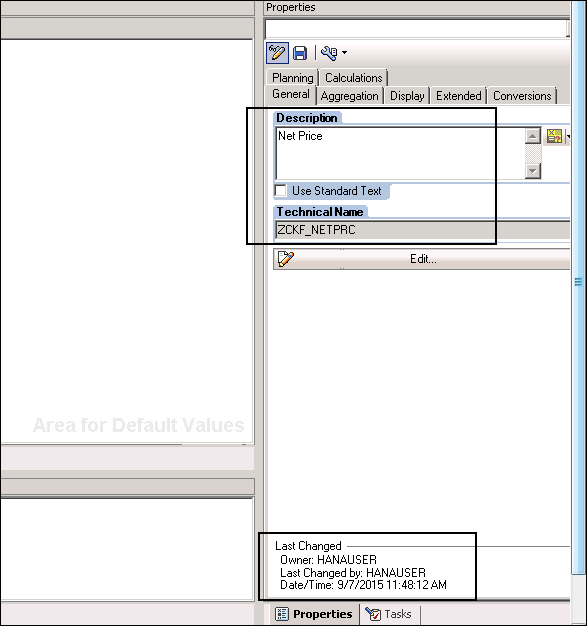
To check the details of an object, go to the context menu and click on the Display button. It shows you the following information −
- Technical name
- Identifier
- Last changed by
- Date/Time
As mentioned, various objects can be reused in queries at global level.
Variable
In a Query Designer, you can define Variables to pass the value at run time. They can be used in web applications and other queries as a placeholder. To define Variables for any of the objects in query, you must open the Variable Editor.
You can open the Variable editor by clicking on the below option in the Query Designer. This option is available in the Query Properties of all the components where you can pass constant values.
You can also click on the drop down button and can access different options to create/edit variables.
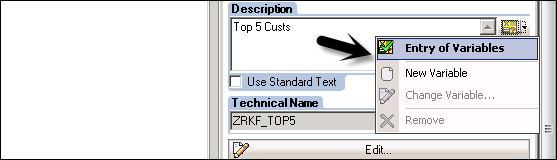
The following fields are available −
Entry of Variables − Using this field, you can use this dialog to select a variable.
New Variable − You can use this option to create a new variable in the BEx query.
Change Variable − You can select a variable and click on the Change Variable button to change the value of the variable.
Remove − This option can be used to remove a variable from the list.
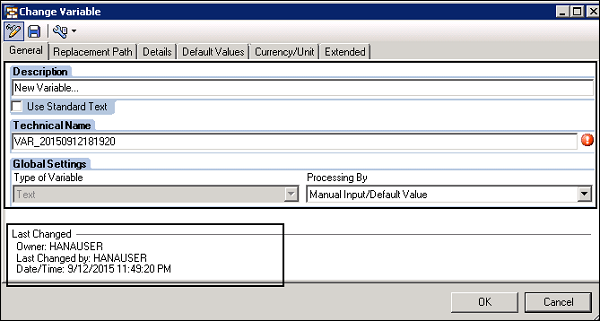
When you select New Variable/Change Variable, the following dialog box opens −
Restricted Key Figures
A Restricted Key Figure is defined as a key figure which can be used to restrict the values in a query based on the characteristics.
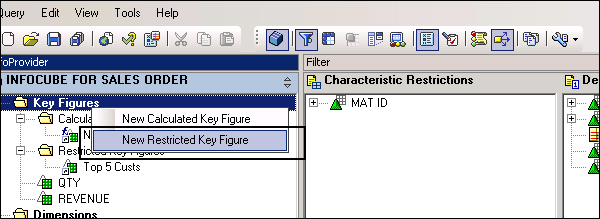
To define a new Restricted Key figure, navigate to Restricted Key figure folder → Context Menu and New Restricted Key Figure.
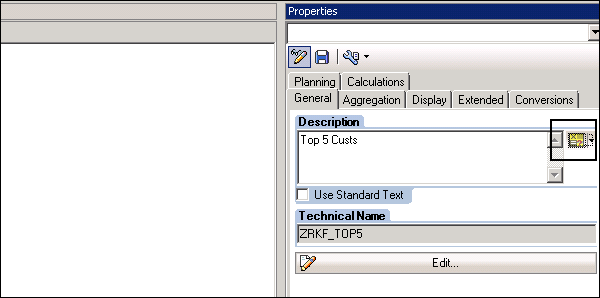
This will create a New Restricted Key Figure and the properties for the restricted key figure are displayed in the Properties screen area.
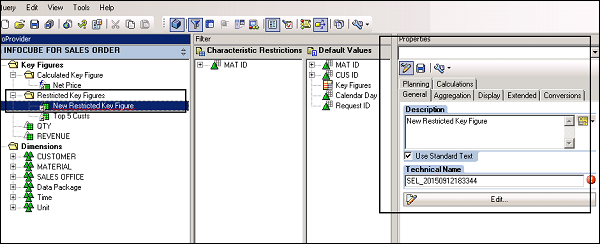
Define the technical name and description and click on the save button to save the key figure. To edit the restricted key figure, click on the Edit button or double click on the name in the hierarchical structure.
In the detailed view, you can see the directory of all objects available in the InfoProvider and on the right side you have an empty field to define the key figure.
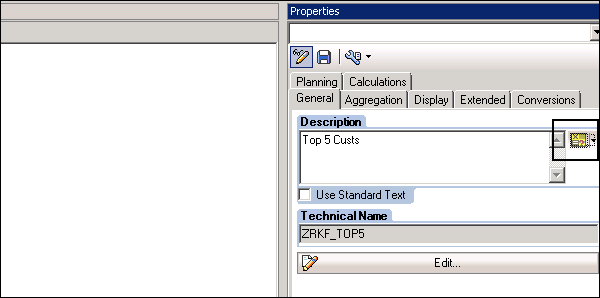
Calculated Key Figure
You can also calculate the key figures in InfoProvider by using some formulas. Calculated key figure can be based on other key figures, restricted key figures or pre-calculated key figures.
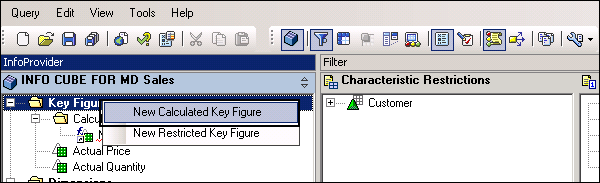
To define a new calculated key figure, right click on the Key figure folder → New.
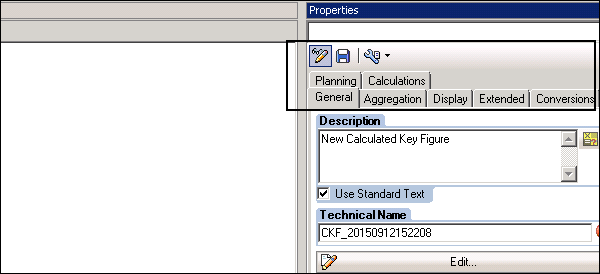
This will add the Calculated Key figure in the hierarchical structure and properties for the calculated key figure are displayed in the Properties screen area.
To define the calculation formula for the key figure, double click on the Calculate Key Figure. You have an option to define the Calculated Key figures in the General Tab.
Drag any other key figure and Operator from the Operators section. You have different Operators available under this section.
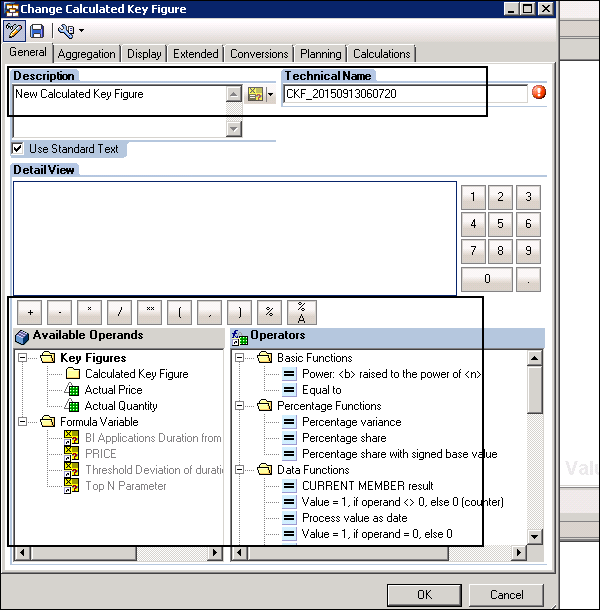
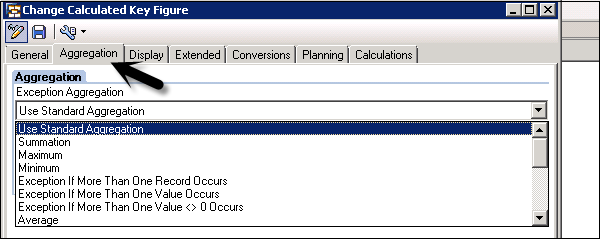
You can also define Aggregation for new Calculated Key figures.
The following function types are available under the General tab to define the calculation for the New Calculated Key Figures −
- Basic Functions
- Percentage Functions
- Data Functions
- Mathematical Functions
- Trigonometric Functions
- Boolean Operators
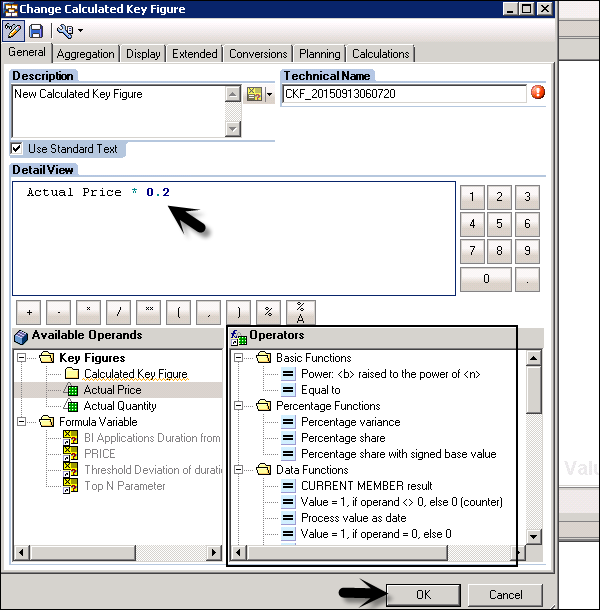
Once you define the formula, click on the OK button as shown in following screenshot.
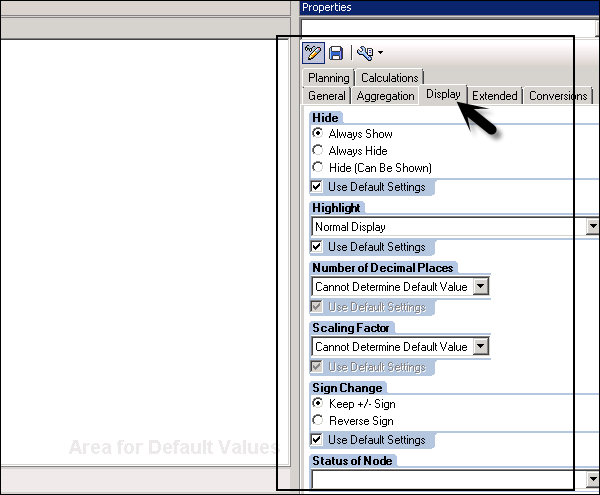
You can also go to the Properties tab of the Calculated Key figure. You can define different properties for a new key figure and can also edit an existing key figure −
- Description
- Display
- Number format
- Currency translation
- Local calculations
- Aggregation behavior
Business Explorer Setting Query Properties
You can access the query properties by selecting the icon as shown in the following screenshot.

The following tabs are available under the Query Properties −
General Tab − You can enter the Description, Technical Name, InfoProvider and the Key Date along with the Last Changed By details under the General tab.
Variable Sequence Tab − This tab consists of variables listed in the query. You can also arrange the Variable sequence defined in the query.

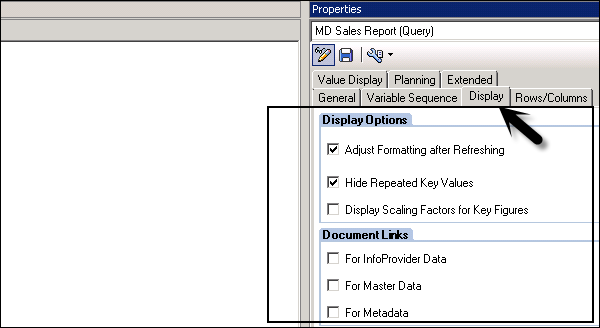
Display Tab − You have Display options and document links inside the Display tab. Under the Display Option, you can adjust formatting after Refreshing, Scaling Factor, or Hide Repeated Key Figures.
You can create a document link for Metadata, Master Data and InfoProvider for a query.
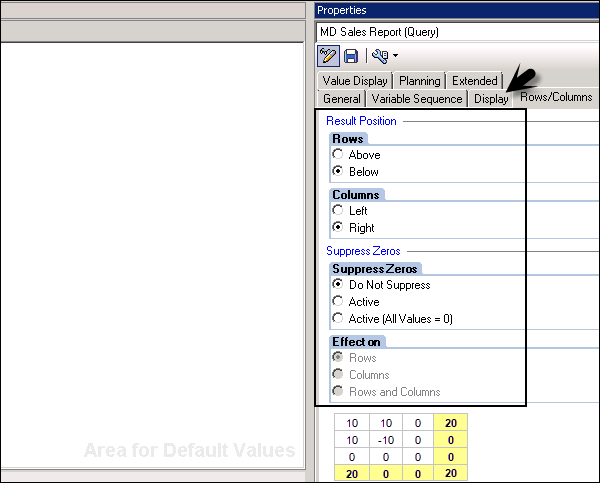
Rows/Column Tab − This is used to define where results are displayed for a query.
Rows − Above or Below
Column − Left or Right
Suppress Zeros − This option can be used to specify whether columns or rows containing zeros are to be displayed or not.
Effect on − This field can be used to specify whether suppression of zeros should be applied to both rows/columns or only to rows or columns.
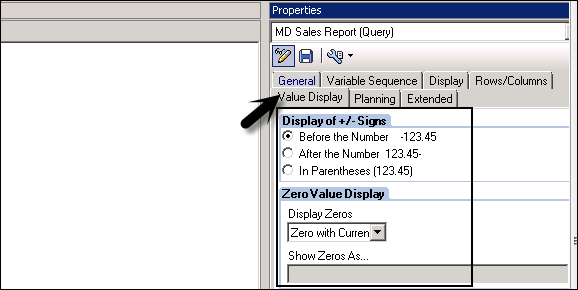
Value Display Tab − This tab is used to display the +/- value in the query and zero value display.
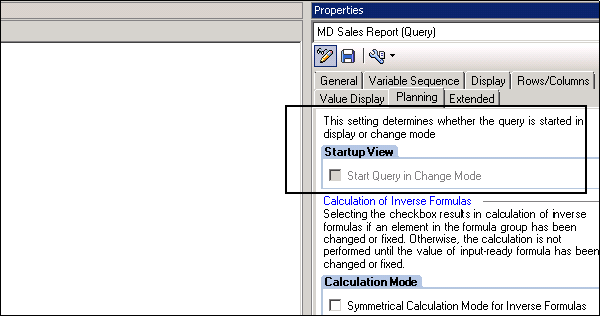
Planning Tab − You can define if a query should start in the change mode or the display mode.
For the queries that are not input ready, the Start Query in the Change Mode checkbox is always inactive and cannot be changed. When there is input ready queries, the check box is active.
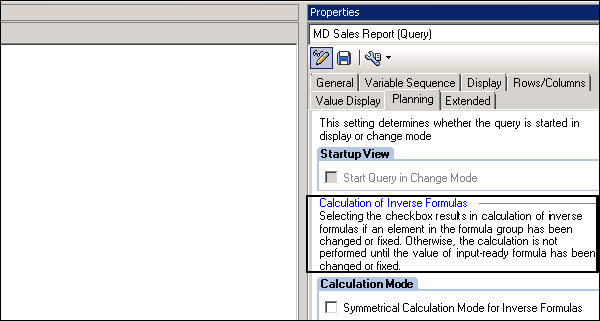
Calculate Inverse Formulas − Using this option, Inverse formulas are used to recalculate input-ready formulas in planning the applications.
Business Explorer Properties of Query Components
In the Business Explorer, you can define properties for each query component. Property dialog can be opened by clicking on the component in a hierarchical structure. You can define custom settings for each field or can also use default values.
The following component properties can be set in the BEx Query Designer −
- Characteristic Properties
- Properties of Characteristic Restrictions and Default Values
- Attribute Properties
- Selection/Formula/Cell Properties
- Structure Properties
- Filter Properties
- Variable Properties
- Condition Properties
- Exception Properties
- Row/Column Properties
In the Query Designer, you can derive properties of each component from the other object or can also set its value. You can also see the object name and can derive properties from the following objects −
The selection can derive properties from −
- Key figure in InfoProvider
- Restricted key figure
- Calculated Key Figure
The characteristics in the reusable filter can derive properties from the characteristics in the InfoProvider.
The restricted key figure can derive properties from −
- Key figure in InfoProvider
- Restricted key figure
- Calculated Key Figure
With this, we conclude the most commonly-used Properties of the Query Components.
SAP BEx - Web
In this chapter, we will discuss in detail about BEx Web and understand its functions. We will also learn how to use the Web Application Designer. In addition, we will learn how to do the Analysis and Reporting along with creating a Web Application and the various BEx Web Analyzer options.
Business Explorer Web Application Designer
Web Application Designer (WAD) is a tool under SAP Business Explorer which can be used to develop web applications based on BW content like Charts, Maps and Tables. Applications that are developed using the WAD can be saved as web templates and they are referred as Web Applications when called from the web browser.
These web templates can be edited in the Web Application Designer for any changes. The web templates are HTML pages which can be designed to meet individual requirement based on the standard markup language and Web Design API.
To open the Web Application Designer, you should navigate to Business Explorer folder → Web Application Designer.
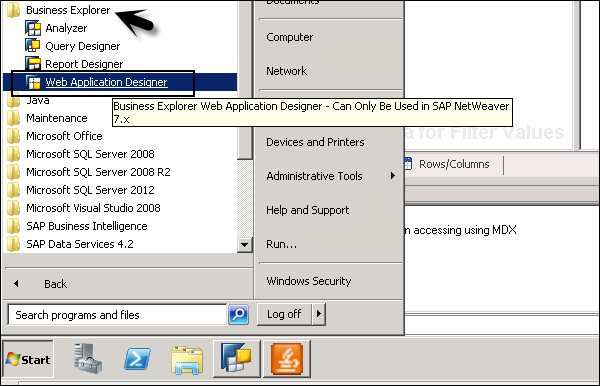
When you click on the Web Application Designer, you need to pass the details of the BW System −
- Client
- User Name
- Password
- Language
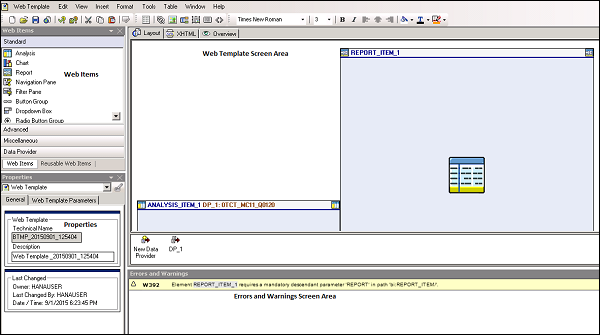
The BEx Web Application Designer (WAD) consists of the four screens that provides different functions to develop various web applications −
- Web Items Screen Area
- Web Template Screen Area
- Properties Screen Area
- Error and Warnings Screen Area
Web Items Screen Area
The web item screen provides the list of web items that can be used to develop web applications. You can define how data from a data provider is displayed in aweb application.
The Web Item screen is divided into different sections −
- Web-Item Grouping: Standard
- Web-Item Grouping: Advanced
- Web-Item Grouping: Miscellaneous

Under the Web Items Standard option, you can use the following item types −
- Analysis
- Chart
- Report
- Navigation area
- Filter area
- Button group
- Dropdown box
- Radio button groups
- Checkbox group
- List box
- Hierarchical filter selection
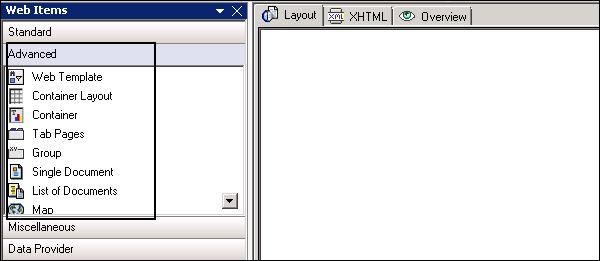
Under the Web Items Advance option, you can use the following item types −
- Web Template
- Container Layout
- Container
- Tab Pages
- Group
- Single Document
- Document List
- Map
- System Messages
- Information Field
- Input Field
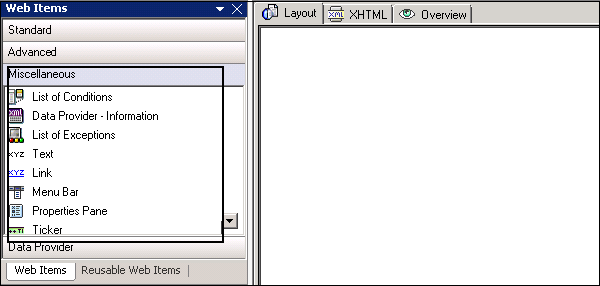
Under the web items miscellaneous option, you can use the following item types −
- Data Provider - Information
- Text
- Link
- List of Exceptions
- List of Conditions
- Menu Bar
- Properties Pane
- Ticker
- Context Menu
- Script
- Custom Enhancement
- Page Break
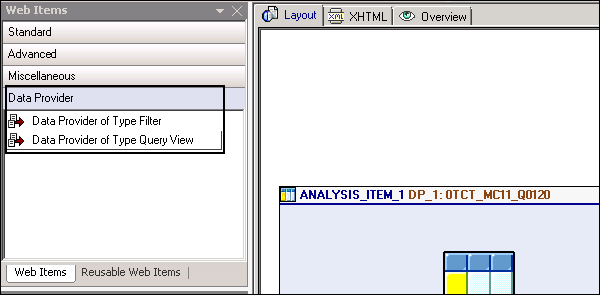
The Data Provider section can be used to create data providers of type Filter or of type Query View. To add a data provider, you can drag the required data provider type into your Web template.
Web Template Screen Area
This area contains web templates that you add to the web application. A web template is known as the HTML page that can be used to specify the structure of a web application.
In the Web Template screen area, you have three different tabs at the top −
- Layout tab
- XHTML tab
- Overview tab
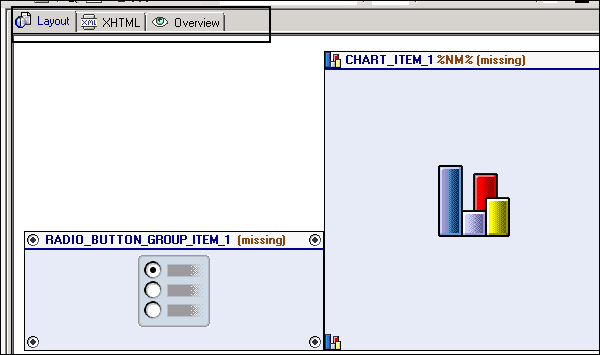
Layout tab − This tab is used to design the visual focus of a web template. You can drag and drop the items from the web item section into the web template.
XHTML tab page − This tab is used to view XHTML w.r.t the layout view of web items added to template. Each component in the XHTML code has different color.
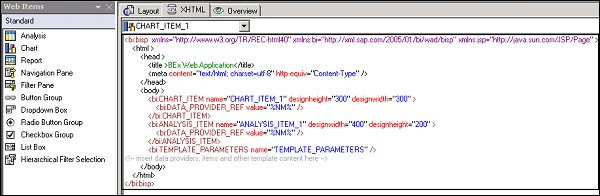
- Comments: Gray
- Attributes: Red
- Attribute values: Blue
- HTML tags: Black
- Web items, Commands, Data Providers: Dark red
- Texts: Green
- Hyperlinks: Violet
<bi:bisp  xmlns = "http://www.w3.org/TR/REC-html40"
   xmlns:bi = "http://xml.sap.com/2005/01/bi/wad/bisp" xmlns:jsp="http://java.sun.com/JSP/Page" >
   <html>
      <head>
         <title >BEx Web Application</title>
         <meta content = "text/html; charset = utf-8" http-equiv = "Content-Type" />
      </head>

      <body>
         <bi:CHART_ITEM name = "CHART_ITEM_1" designheight = "300" designwidth = "300" >
            <bi:DATA_PROVIDER_REF value = "%NM%" />
         </bi:CHART_ITEM>

         <bi:ANALYSIS_ITEM name = "ANALYSIS_ITEM_1" designwidth = "400" designheight = "200" >
            <bi:DATA_PROVIDER_REF value = "%NM%" />
         </bi:ANALYSIS_ITEM>

         <bi:TEMPLATE_PARAMETERS name = "TEMPLATE_PARAMETERS" />
         <!-- insert data providers, items and other template content here -->
      </body>
   </html>
</bi:bisp>
You can make changes to the XHTML of a web template and they are reflected directly in the Layout tab. In the above program, you can see the XHTML code of the web items added to the Web template.
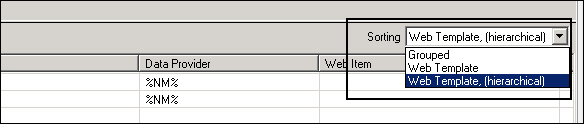
Overview − In overview tab, you can see all data providers, web items and commands. To display any of these field, you can select check box.

You can also select different sort order for each object −
Grouped − Using this, you can list the objects used by type: Data Providers, Web Items and Commands.
Web Template − Using this sort order, sequence of objects used in the web templates are displayed as a flat structure.
Web Template Hierarchical − The web template sequence is displayed in the form of the hierarchical structure.
Property Screen Area
This area is used to define properties of web items and web templates.
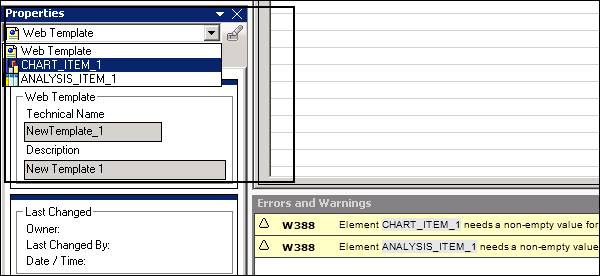
From the drop down list, you can select the web template or the individual web item. Under Properties, when you select a Web template from the dropdown box this allows you to set the parameters for web template.
When you select a web item from the drop down list, the following settings can be done −
General Tab Page − This option allows you to create a new data provider for the web item and assign it to web item of your web template.
Web Item Parameter Tab Page − This option is used to select parameter for selected web item. You can set different parameters for a web item related to display, internal display, data binding, chart text, etc.
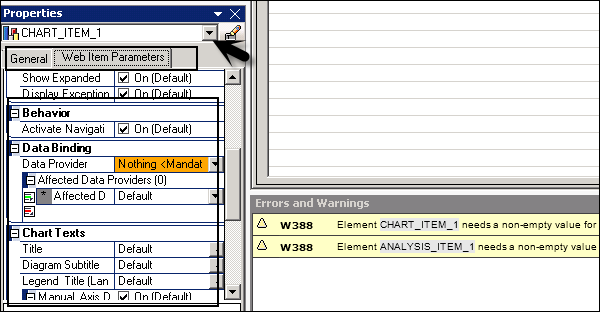
Error and Warning Screen Area
This option is used to view errors and warnings when you validate a web template in WAD.

Business Explorer Analysis and Reporting
Using BEx Web applications you can perform data analysis and reporting on the BW Content. To perform reporting and analysis, you should design the web applications and open it in a web browser.
Creating a Web application in WAD
To create a web application in the BEx Web Application Designer, you need to create a new web template. To create a new web template, you can go to Web Template → New.
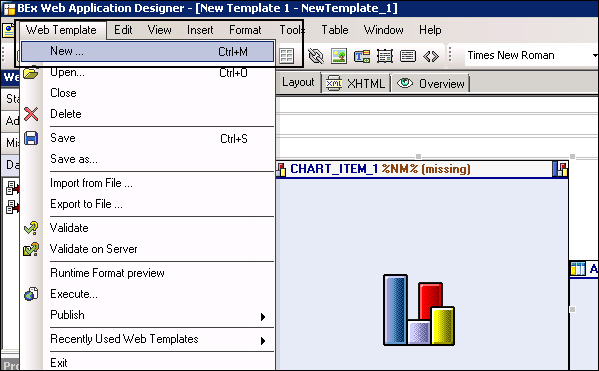
You can also open a new web template by clicking on the new icon in the Web Application tool bar. The next step is to assign a data provider to the web item. You can assign one data provider to multiple web items.
Assigning of Data Provider Using Different Options
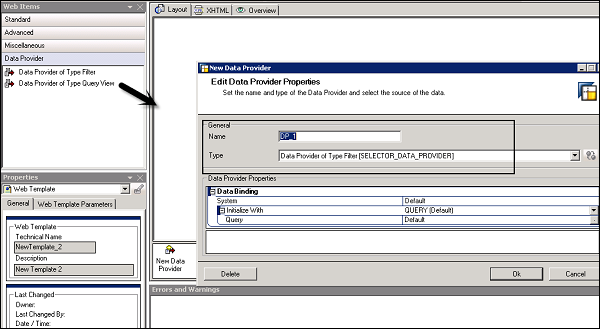
You can use the Data Provider option under the Web Item section. You can select if you want to create a data provider of type Filter or type Query View and drag the corresponding line into the lower data provider section of the Web template screen area. This opens the Data Provider dialog box.
Enter the name of the data provider in the dialog box and make the settings as per the data provider.
To add a web item, you can drag it from the Web Section: Under Standard, Advanced and Miscellaneous. The web item appears in the web template screen area. You can rename a web item by clicking on the Rename web item button under the Properties tab.
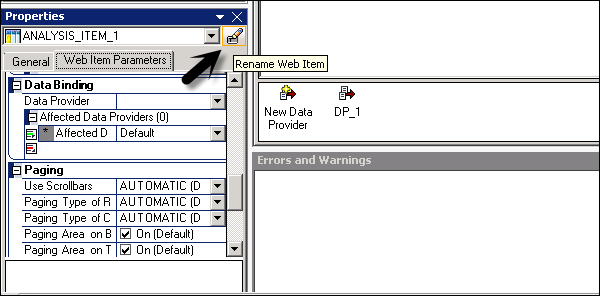
The next step is to navigate to Properties → Select General tab to make or change the assignment of a data provider for the corresponding Web item. The next step is to navigate to Web Item Parameters tab page where you can define the parameters for the web items.
To define the layout, you need to use the Format tab in the tool bar.
Click on the Format tab at the top → Select Align Left in the menu bar of the Web Application Designer that allows you to left justify the Web item.
Click on the Format tab at the top → Select Align Right in the menu bar of the Web Application Designer that allows you to right justify the Web item.
Click on the Format tab at the top → Select Align Center in the menu bar of the Web Application Designer that allows you to center justify the Web item.
You can also drag a web item to the Web template screen area to any position. You can also arrange web items in the HTML table by going to the Table tab.
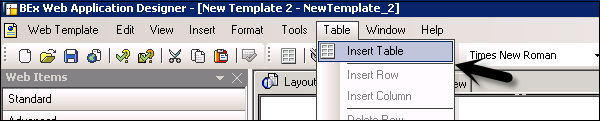
To arrange the web items, you need to drag different Web items into the individual table cells.

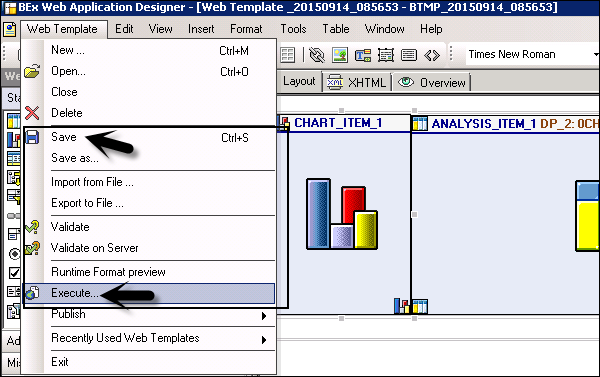
Now to save the web template, navigate to the web template, Select Web Template → Save it in the Web Application Designer menu bar.
To execute the web template, navigate to the Web Template → Execute to view your Web application in the browser. To execute the web template, you need to save the web template.
You can also print the web application by selecting the Print option in the context menu of the executed web application.
Business Explorer BEx Web Analyzer Options
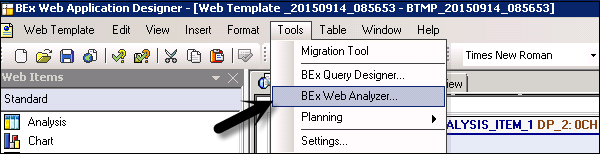
The Web Analyzer is a tool to perform data analysis and can be called using a URL. You can launch the BEx Web Analyzer from the Web Application Designer by navigating to Tools → BEx Web Analyzer.
You can perform the adhoc data analysis and can also use other Web analyzer functions like the broadcasting function that allows you to broadcast the analysis to other users.
In the Web Analyzer, you can also save the data view by selecting the save view option under the context menu.
You have a wide range of functions that are provided under the Web Analyzer which can be used to perform the adhoc analysis −
- Navigation Pane
- Links
- Push Buttons
- Context Menu

In the Web Analyzer, you can see different functions that can be performed at the push of a button. All these functions have been explained in detail −
New Analysis − With the use of the New Analysis push button, you can create a new analysis by selecting a data provider to base your analysis on. For New Analysis, you can select data providers either from a SAP BW system or a non-SAP data provider to be used in the New Analysis.
Open − This option is used to access the saved analysis. You can save your data analysis under the Favorites section to quickly access them.
Save As − You use this option to save the analysis in your portal favorites or inside the BEx portfolio by passing the name of the analysis. Using this option, you can save the type of data display and it can be further accessed during the analysis using the Open button.
Display As − This options allows you to view the saved data analysis in a different format. You specify the type of display using the drop down option. The following options are available under the Display drop down list −
- Table
- Graphic
- Table and Graphic
Information − This button can be used to view the information about the data provider in the analysis.
Send − This option provide broadcasting information for the analysis.
Print Version − This option can be used to make the setting for Print of your data analysis. You can make different selections and click OK and a PDF is generated.
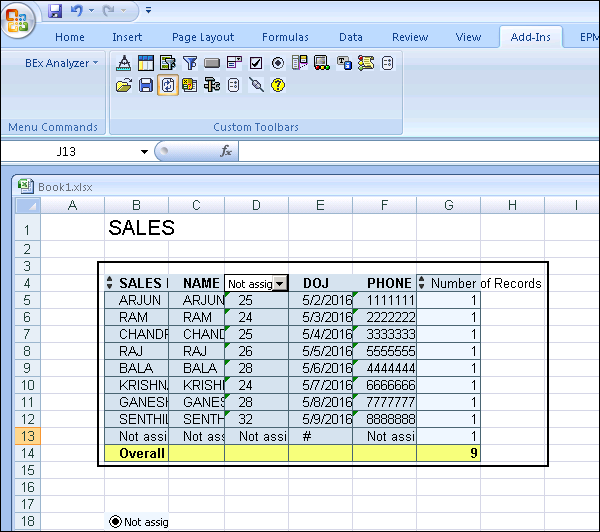
Export to Excel − This push button is used to display the query result to Microsoft Excel. It also shows you to filter restrictions and the exceptions are highlighted.
Comment − This option can be used to add a comment about the data provider in the analysis.
SAP BEx - Web Integration
In this chapter, we will discuss in detail about BEx Web integration and understand its various features. We will also learn the Pattern options in BEx and how to integrate BEx and BW objects in the portal. In addition, we will understand how to access the BEx Web Applications on mobile devices.
Business Explorer Pattern Options in BEx
It is also possible to configure different patterns from your web application which targets the specific user group. This is used to provide a uniform display of BI Content to user groups by applying the same function.
You can configure the patterns in the Web Application Designer. The following Pattern types are available that can be used −
Information Consumer Pattern − This BEx pattern is easy-to-use for the web application users and does not require any knowledge of BI.
Analysis Pattern − This pattern is used for web application to perform complex data analysis.
How to define BEx Pattern in WAD?
In Business Explorer the Pattern Wizard is a part of the Web Application Designer and can be called in the Web Application Designer tool. To open the Pattern wizard, select a web template with a pattern wizard.
You can select this option to access BI patterns via the Pattern Wizard.

Navigate to All Patterns and BEx Patterns tab page, choose a BEx pattern from under the BEx Patterns with Pattern Wizard node. The Pattern Wizard starts automatically.
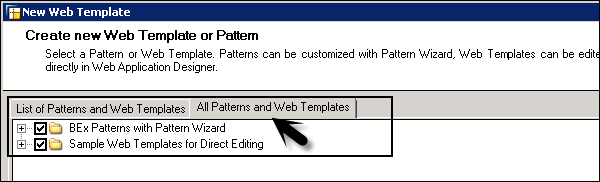
When using pattern wizard, you have the following options to select patterns and web templates −
List of BEx Patterns and Web Templates − Using this option, you can use all the predefined Web templates and patterns that have been saved in the Favorites folder.
All BEx Patterns and Web Templates − Using this option, you can list all the available predefined web templates and patterns.
This option provides you two editing mode options −
BEx Patterns with Pattern Wizard − When you select this option, it lists all the patterns that you can edit or configure with the Pattern wizard.
Sample Web Templates for Direct Editing − Using this option, it defines the web template that you can edit all the functions available in the Web Application Designer.
Business Explorer Integrating BEx and BW objects in the Portal
You can also integrate BI Content from the BW system with the NetWeaver portal. All the Web applications published to the NetWeaver portal can be from different systems. The integration of BEx and BW objects with NetWeaver portal allows multiple users to work closely with each other.
You can consider integration from two different views −
- Integration w.r.t users
- Integration w.r.t Administrators
The integration of BW objects and BEx with Portal is configured after the installation.
Log on/Log Off in NetWeaver Portal
SAP NetWeaver portal is one of the key components in the NetWeaver architecture and provides a single point of access to the organizations applications. Customers, partners, and the employees of the organization can use Enterprise Portal as a single point of access to the organizations services and information needed for performing their day-to-day task.
The SAP NetWeaver Portal allows the following types of authentication to the users −
- Username and password
- SAP Logon Tickets
- X.509 certificate using Secure Socket Layer (SSL)
- Client Certificate
- Assertion Ticket
The SAP NetWeaver portal provides two types of usage −
Application Portal EPC − This is applicable when the full enterprise portal capabilities are not required. It is also known as the EP Core. It consists of the Portal and Universal Worklist (UWL).
The portal provides a single access point to SAP and non-SAP information sources, organization applications, database and services. The user can access the portal from mobile devices like smartphones, tablets, as well as from desktop and laptops.
The portal allows the users like - employees, customers, partners and suppliers to manage role-based access in accessing the information specific to their daily work tasks.
A Universal Worklist (UWL) allows the business users to manage, operate and delegate their daily work items. These work items can be generated using an automated business processes. By using this UWL, it collects work items from multiple provider systems in one list for the one-stop access.
NetWeaver Enterprise Portal − The Enterprise Portal includes Knowledge management and Collaboration capabilities and is based on the EP Core.
Business Explorer BEx Mobile
You can also access BEx Web Applications on mobile devices. To access web applications, you need one of the following devices −
You can access your PDA (Personal Digital Assistant) Microsoft Windows Mobile Operating System and Pocket Internet Explorer.
It can also be accessed via WAP-enabled mobile devices such as Blackberry.
You can also access web applications on i-Mode-enabled mobiles.
Apart from the above-mentioned options, you can open web applications on the Mobile device with an EPOC32 OS as well.
SAP BEx - Analyzer
The BEx analyzer is an analysis based reporting and designing tool embedded with Microsoft Excel which can be used to the analyze data in the InfoProvider. You can also add different control types such as, Analysis Grids, Dropdown Boxes and Button in an Excel workbook.
The BEx Analyzer provides you two different function modes that can be used for executing OLAP Analysis or to develop interfaces for Query Applications.
Analysis Mode
This mode can be used for executing queries created in a query designer to perform OLAP analysis. You can also define new queries by launching the BEx Query Designer. You can also use planning functions and advanced planning functions written in VBA.
The workbooks created using the BEx analyzer can be saved on the server or you can also save it locally.
Design Mode
You can use the design mode to design the interface of your workbook where you can insert the Analysis Grid, Radio Buttons, Dropdown Boxes into a Microsoft Excel workbook. You can perform workbook formatting and customize the chart types in an excel workbook.
To access the BEx Analyzer, navigate to Program files → Business Explorer → Analyzer.
Business Explorer Analysis Mode in Analyzer
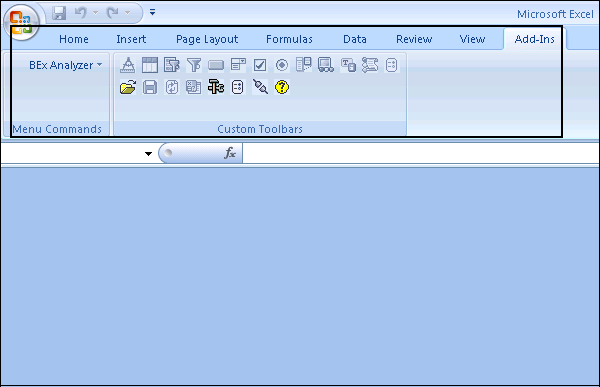
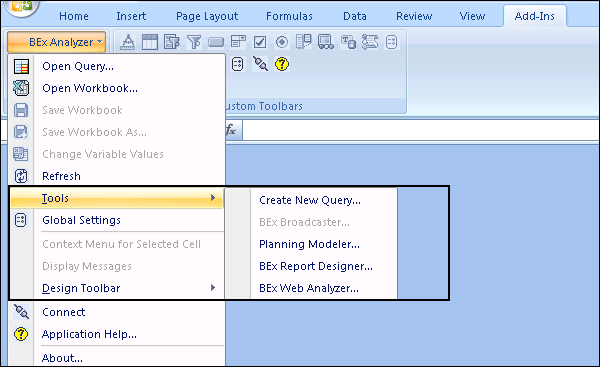
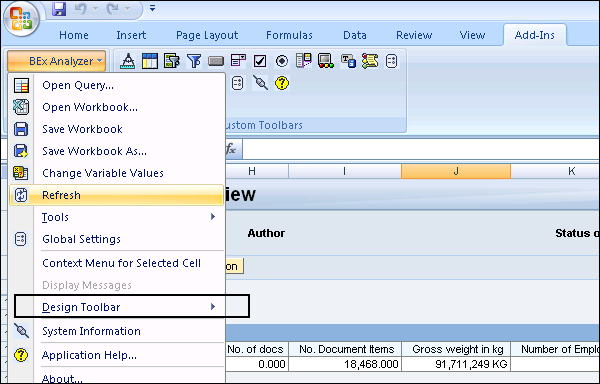
When BEx analyzer is started, the menu bar and the BEx Analyzer-tool bar is displayed. You can also access the BEx Report Designer and the Web analyzer from BEx analyzer → Tools option.
How to Open a Workbook and Query in the BEx Analyzer?
You can open a workbook or a query in the BEx Analyzer toolbar. To open a query, navigate to BEx Analyzer → Open Query.
To open a workbook, navigate to the BEx Analyzer → Open Workbook.

How to Save a Workbook?
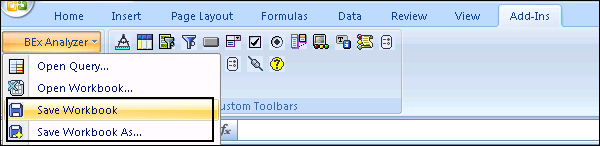
To save a workbook in the BEx Analyzer, you need to navigate to Save → Save Workbook in the analysis toolbar or you can also click on the BEx Analyzer → Save Workbook in the menu.
You can also save a workbook with a new name. To do so, select Save → Save Workbook As in the analysis toolbar or you can also click on BEx Analyzer → Save Workbook As in the menu.
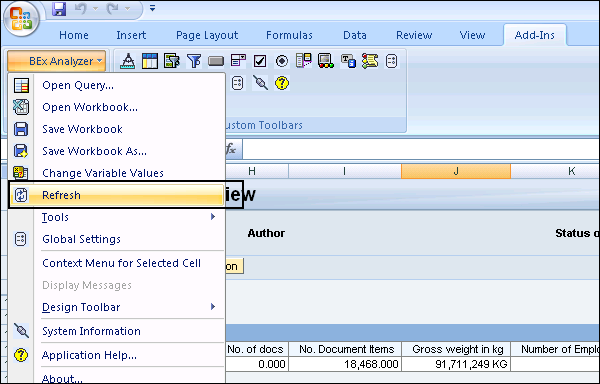
Refresh
You can also control the automatic refreshing of the workbook in the BEx Analyzer. For activating this, navigate to BEx Analyzer → Refresh.
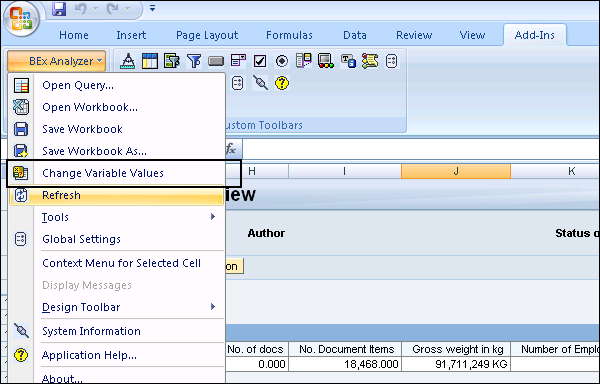
Changing Variable Values
You can use this option to change the variable values in your query. In the analysis toolbar, Select BEx Analyzer → Change Variable Values as shown in the following screenshot.
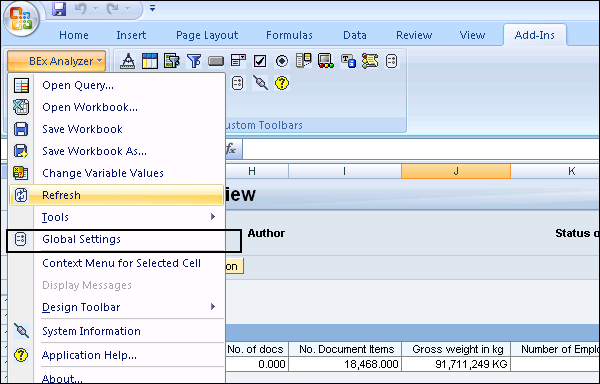
Global Settings
This option can be used to configure the Global settings and it allows you to enter the setting that is applicable to the full application.
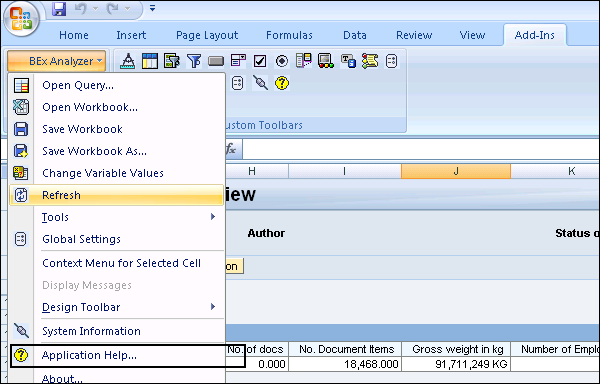
There are other options that you can select from the BEx Analyzer drop down box. You can access the SAP Documentation on the BEx Analyzer by going to the Application Help option.
Business Explorer Design Mode in Analyzer
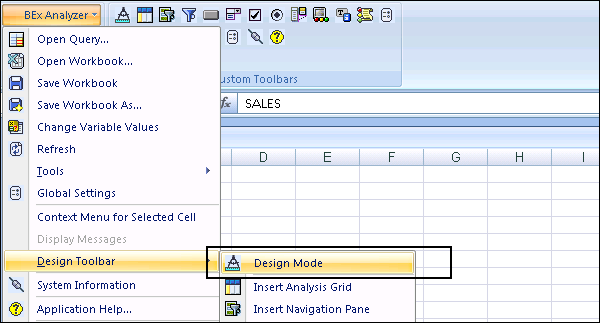
When you are in the Analysis mode, to switch to the design mode you should navigate to the BEx Analyzer → Design Toolbar → Design Mode in the menu as shown in the following screenshot.
There are 11 design items from which you can select under the Design Toolbar. When you click on the Design Toolbar, you can find the following options −
- Insert Analysis Grid
- Insert Navigation Pane
- Insert List of Filters
- Insert Button
- Insert Dropdown Box
- Insert Checkbox Group
- Insert Radio Button Group
- Insert List of Conditions
- Insert List of Exceptions
- Insert Text
- Insert Messages
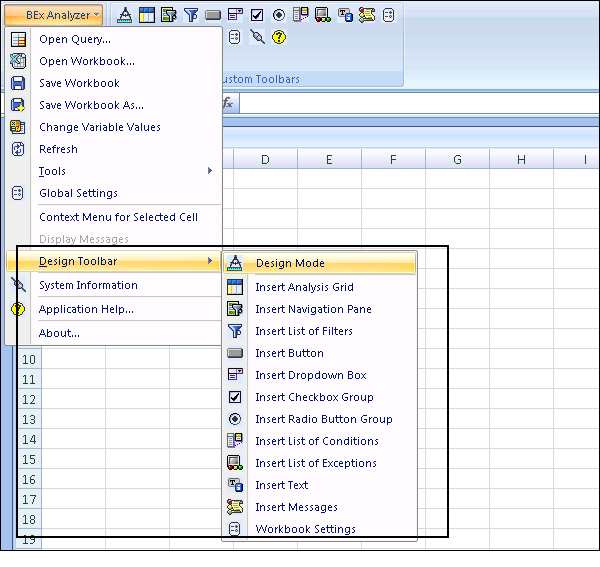
The last option is Workbook setting, which can be used to configure the general functions to workbooks in the Analyzer. All the design items that you insert in the workbook are shown in the end of the list under the Design Tools.
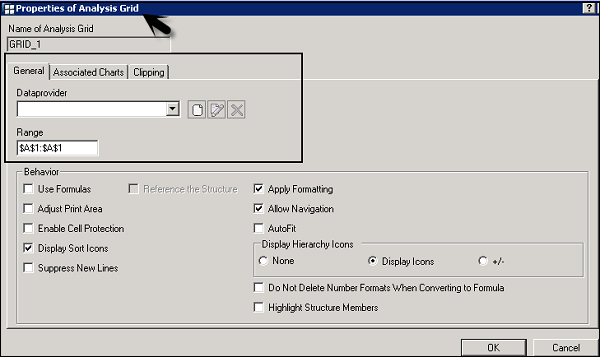
To open the properties of the design item, click on the design item in the list.
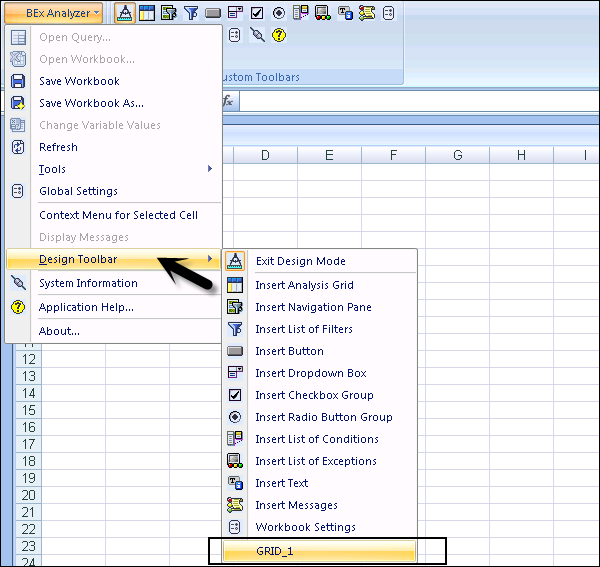
Under the Properties of the Design Item, you can define different fields such as −
- General
- Associated charts
- Clipping.
Business Explorer Creating Planning Applications
A Planning application can contain a planning function such as Copy, Save or Delete, or Selection List, etc. Let us see how to create a planning application.
To start with, you need to check the security settings. Choose Tools → Macro → Security and set the indicator for Trust access to the Visual Basic Project.
Create a new workbook and to put the title of workbook move to the required cell in the workbook → Enter the Title and assign a font to it.

To design the workbook, move to the Design mode. Navigate to Design Toolbar → Design Mode as shown in the following screenshot.
To show the query results with the actual and plan data, move to the relevant cell and select Insert Analysis Grid in the Design toolbar and open the properties of the design item as mentioned in the previous topic.
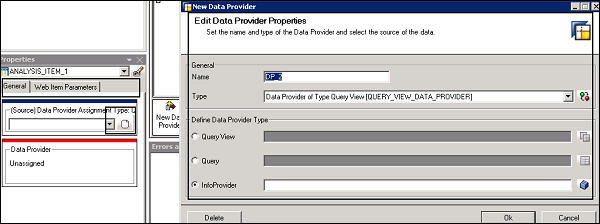
Go to the General tab of the Properties and select create a new data provider and it will open the dialog box which displays the name of current data provider.
To define start view of the data provider, click on the Query view and a dialog box appears.
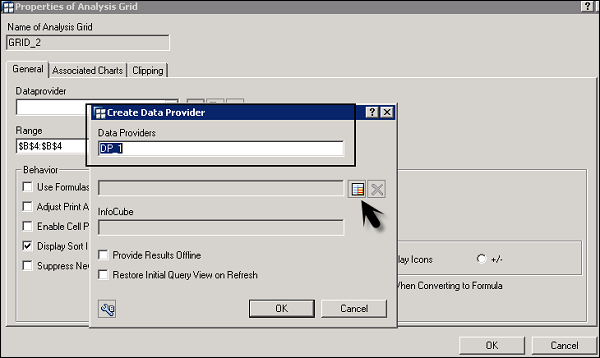
The next step is to select the required query or the query view and the select Open. This will allow the system to insert the name of the InfoProvider on which the query is created and this information is displayed in the InfoCube field as shown below −

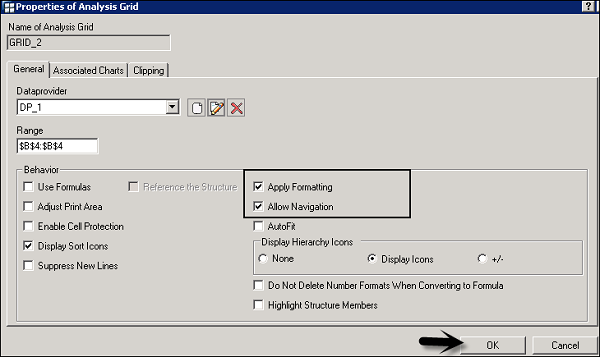
Once your data provider is configured, click OK and this will take to Properties of Analysis Grid design item. You should select the check box for Apply Formatting and Allow Navigation.
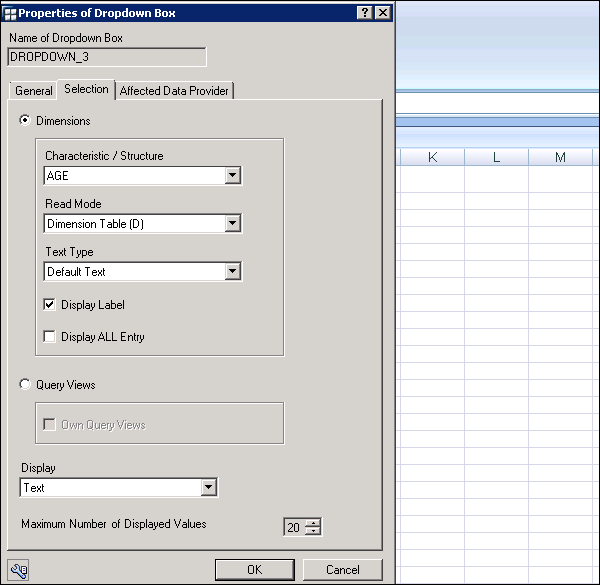
In a similar way, add the dropdown box to the required cell and select Properties. Select the configured data provider and check the option Label Indicator. Now, the next step is to go to the Dimensions tab page, you need to select the dimensions for which you want to be able to select values in the dropdown as shown in following screenshot.
The next step is to add the push button for this special function. Go to the Design Toolbar and add a design item type Button.
Go to the context menu of the button and select Planning specific command → Select the required planning function and data provider.
Planning function − PF_Copy
Planning function − PF_Revaluate01
Planning function − PF_Delete
Click on the Finish button and select the save button.
SAP BEx - Analysis Functions
In this chapter, we will discuss in detail about the different Analysis Functions in BEx. We will also learn how to perform local calculations, adding conditions to improve data analysis and Exception Reporting.
Business Explorer Performing Local Calculations
Using local calculations, you can perform calculations on the numbers based in the current report view. For example, to perform a sum of the top 10 products in the list.
There are a few functions that can be used to perform Local Calculations −
Calculate Result As
You can use this function to recalculate the result rows in the BEx Web Application as per certain criteria. You override the standard calculation using local calculations. It includes only those numbers in the calculation appear in the current application view.
This function can be used in the following areas −
- BEx Query Designer
- BEx Web Applications
- BEx Analyzer
Calculate Single Values As
This function is used to recalculate single values in web applications as per certain selection criteria.
This function can be used in the following areas −
- BEx Query Designer
- BEx Web Applications
- BEx Analyzer
Business Explorer Conditions
You can also add conditions to improve the data analysis and then the data is fetched only as per that condition. When a condition is applied, it just removes the unrequired rows from the returned data.
Note − This condition doesnt alter the values displayed or the key figures in the result rows.
You can also define multiple conditions in a query, which can be separated using a logical AND.
The function to define a condition is available in the following Business Explorer tools −
- BEx Query Designer
- BEx Web Analyzer
- BEx Analyzer
- In Web Applications
The following type of conditions exist −
- Ranked List Condition
- Threshold Value Condition
- Mixed Condition
There are different operators that can be used for Threshold Value Condition −
- = Equal To
- Not Equal To
- Greater Than
- >= Greater Than or Equal To
- < Less Than
- <= Less Than or Equal To
- [] Between
- ][ Not Between
There are different operators that can be used for Ranked List Condition −
- Top N
- Top %
- Top Total
- Bottom N
- Bottom %
- Bottom Total
Business Explorer Exception Reporting
You can also highlight the objects in the Business Explorer that are important as compared to other objects. This allows you to find any deviation from the predefined or expected results. Using Exception, you can highlight the objects which are critical to a query.
An Exception can be defined for the following areas of Business Explorer −
- BEx Query Designer
- BEx Web Analyzer
- Web Applications
Defining Exceptions in a Query Designer
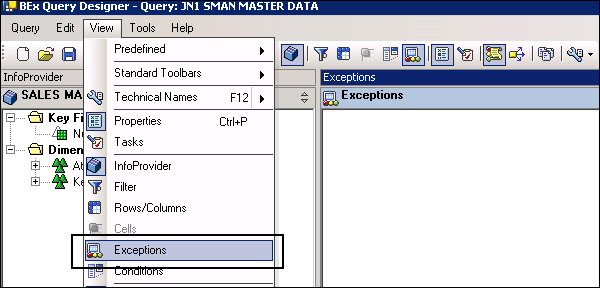
When you select a query in the Query Designer to add an exception, you need to navigate to View → Exceptions.
In the Exception section area, select New Exception from the context menu as shown in the following screenshot.

Select the Exception and Right Click → Edit. This will open the Change Exception window.
The next step is to define the Exception in the change exception window. There are different alert levels that you can select.
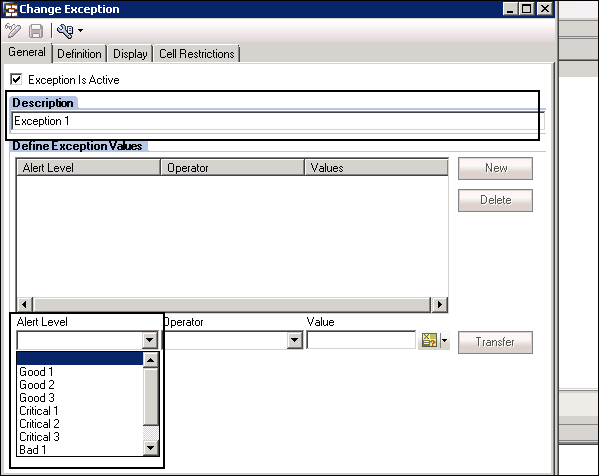
You can select from the following Operator types −
- = Equal To
- Not Equal To
- Greater Than
- >= Greater Than or Equal To
- < Less Than
- <= Less Than or Equal To
- [] Between
- ][ Not Between
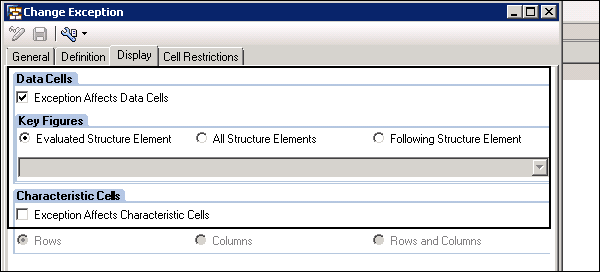
Display Tab
You can define if an exception affects the data cells or the characteristic cells. As per the defined setting, highlighting for the exception is displayed on the numbers for the selected key figure or the text for the most detailed characteristic value.
SAP BEx - Objects
In this chapter, we will discuss in detail about working with BEx Objects. We will also learn how to Open and Save Objects.
Business Explorer Working with BEx Objects
In Business Explorer, you can create several objects that comprises to make a web application. In each BEx tool, you can create different objects that perform multiple functions.
BEx Query
A BEx query contains characteristics and key figures that can be used to analyze data in the BW System. These objects in the query are imported from the InfoProvider. These queries are used in the BEx Applications.
You can open BEx Queries directly in the default view in the BEx Web Analyzer or BEx Analyzer and they can be executed to create planning applications and data analysis in the BEx Analyzer.
On the right side, under the Properties pane, you can see the query Properties −
- Description
- Technical Name
- Global Settings
- Type of Variable
- Processing By
- Reference Characteristic
Filters
Filters are used to apply data restrictions and they ensure that certain user groups have limited data access. It is also possible to create multiple filters for an InfoProvider. Filters can be applied on queries in Query Designer or in planning applications.
To apply filters in query, you can drag the characteristics or key figures to a filter pane. These can be further restricted by applying single values, range of values or multiple values.

Variables
In the Query Designer, you can define Variables to pass the value at run time. They can be used in web applications and other queries as a placeholder. To define Variables for any of the object in query, you must open the Variable Editor.
You can open the Variable editor by clicking on the following option in the Query Designer. This option is available in the Query Properties of all the components, where you can pass the constant values.
Structure
A structure in a BEx query is used to define the axes framework in a table. When you define structure, it defines the sequence of characteristics and key figures in rows and columns in a BEx query.
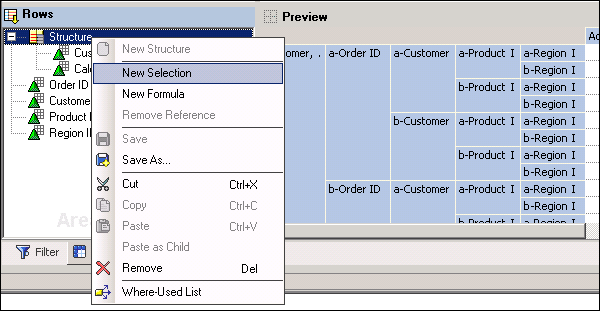
To define a new structure, you need to navigate to the Row/Column section in the Query Designer → Select New Structure from the context menu.
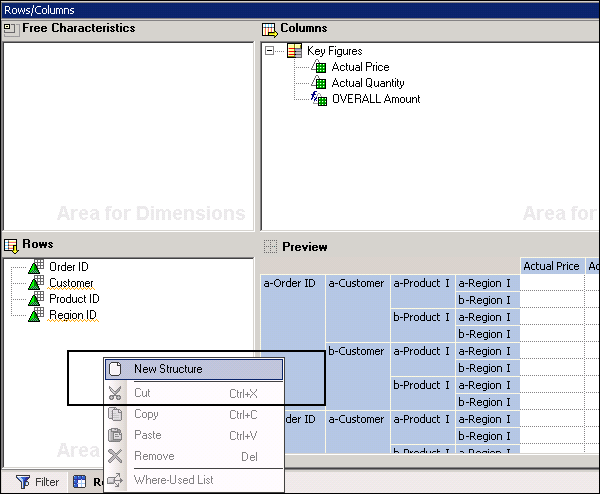
Right-click on Structure and go to New Selection. Here, you can add Key figures and characteristics and these can be added to the Preview tab under the Row and Column section.
There are various other objects that you can manage under different Business Explorer Tools.
- Query Views
- Data Providers
- Bookmarks
- Reusable Web Items
- Workbooks
- Broadcast Settings
- Dashboards
Business Explorer Opening and Saving Objects
In the Business Explorer tools, you can open and save the existing objects. You can also reuse the objects that are created in any of the Business Explorer tool.
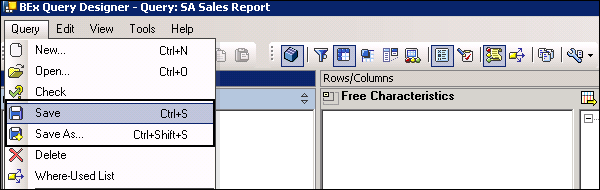
Saving and Publishing Queries
In the BEx Query Designer, you can save the queries in to your Favorites folder or to the roles in the Query Designer. To save a query, navigate to Save or Save As button as shown in the following screenshot.
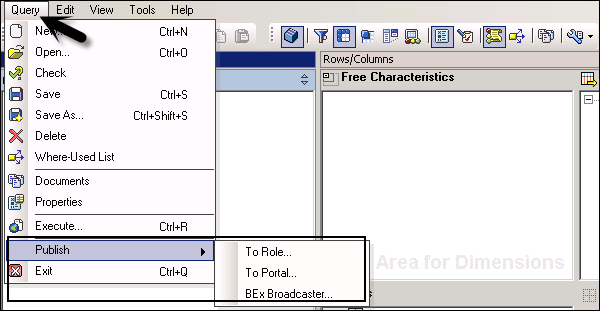
You can also publish the queries so that it can be used by other users or can also publish to Portal Content.
To publish a query, you need to navigate to the Publish option in the Query Designer. You can also share a query via the BEx Broadcaster.
Using a transport system, it is also possible to transport the BEx objects.
Saving Filters and Reusing Filters
In the Query Designer, you can save the filter locally or reuse in any other context. To save the filter locally, you can save the query.
To reuse the filter, you need to define a technical name and description of the filter.

In a similar way, you can also save and reuse other objects in a Business Explorer. The following objects can be saved and reused −
- Query Views
- Data Providers
- Bookmarks
- Reusable Web Items
- Workbooks
- Broadcast Settings
- Dashboards
In the next chapter, we will learn in detail about the accessibility mode in SAP Business Explorer.
SAP BEx - Accessibility Mode
To perform data analysis, you need to use the BEx Analyzer and you can add the data in a workbook. When you use the Web Applications, you can activate user profiles in the Portal configuration.

To show and hide the filter in a workbook area, you can use following keyboard shortcuts −
- Filter: ALT + F
- Information: ALT + I
In a filter, you can also define filter conditions. The following functions can be performed using key combinations as shown below −
- Display key/text: CTRL + SHIFT + P
- Settings: CTRL + SHIFT + E
- Move to the beginning CTRL + SHIFT + T
- Move up: CTRL + SHIFT + U
- Move down: CTRL + SHIFT + N
- Move to the end: CTRL + SHIFT + L
You can also define variables in a query and different key functions can be performed in a variable dialog box.
- Save variant: CTRL + S
- Save as new variant: CTRL + A
- Deleting variants: CTRL + D
- Attributes: CTRL + P
- Display Object Name as: CTRL + R
- Personalize Variables: CTRL + E
In the next chapter, we will learn in detail about the various Broadcasting Options in SAP Business Explorer.
SAP BEx - Information Broadcasting
Using broadcasting options in Business Explorer, you can make BEx objects available to a wide range of users. You can pre-calculate a workbook, web templates, reports and query views and broadcast them in an email to the NetWeaver Portal. These documents can be shared in different formats like HTML, MHTML and other formats, whereas you can also share the URL and online links.
You can call a BEx broadcaster from different Business Explorer tools.
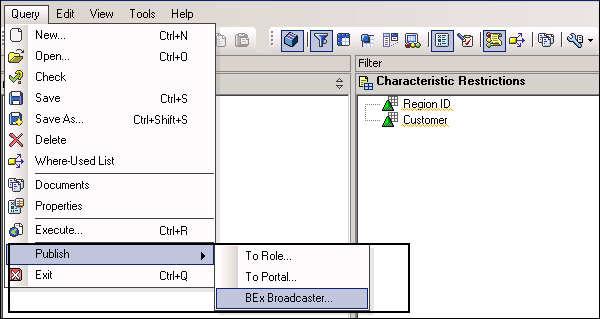
Calling Broadcaster from Query Designer
To call a BEx broadcaster from a Query designer, navigate to Publish → BEx Broadcaster.
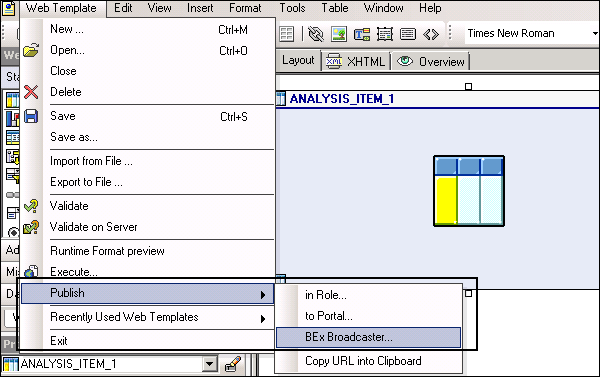
Calling Broadcaster from a Web Application Designer
You can view the list of all broadcast settings for the web application. In a Web Application Toolbar, navigate to Web Template → Publish → BEx Broadcaster.
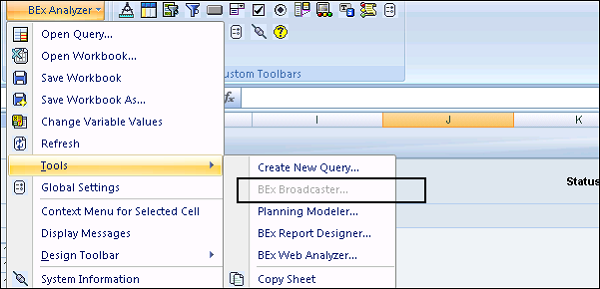
Calling Broadcaster in Analyzer
To view the Broadcaster settings, navigate to BEx Analyzer analysis toolbar, choose Tools → Broadcaster.
The BEx Broadcaster displays a list of the available broadcast settings for the workbook that you edited in the BEx Analyzer.
SAP BEx - Integration With BO
You can also integrate all BEx objects with SAP BusinessObjects tools. When you integrate BEx with BO tools, it broadens the scope for reporting and data analysis. You can perform the following integration with SAP BusinessObjects −
- Integration with SAP BO Dashboards
- Integration with SAP Crystal Reports
- Integration with SAP BusinessObjects Analysis.
When you open any of the BusinessObjects tools, you have an option to consume BEx Query to create a BI Report or Dashboard. You can use the existing queries in the Query Designer and can also create new queries in the BEx Query Designer tool.
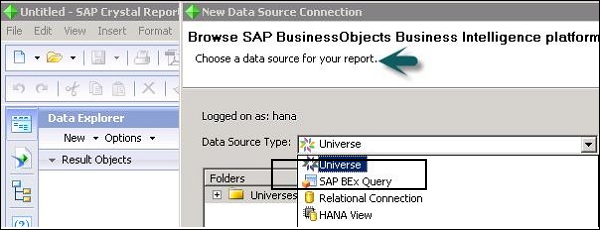
Open SAP Crystal Report Designer to integrate with the BEx Query. Navigate to Data Source → Select BEx Query.
To connect to a Data source, go to File → New → from the Data Source.
You can also connect to other SAP BusinessObjects tools to connect to BEx Query and you can import the characteristics and key figures to create dashboards and BI reports.
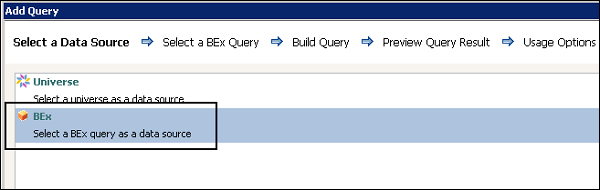
To connect the Dashboard to the BEx Query, you need to navigate to the Query Browser → Add Query → Select BEx.
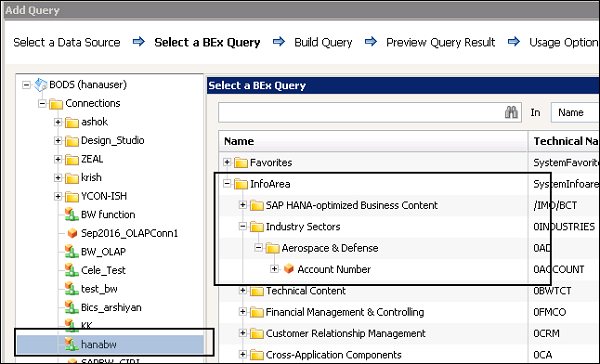
Next is to select the connection → Search for BEx Query that you should use based on the InfoProvider to use in the BO Tool.
This is how you can connect SAP BusinessObjects tools to BEx Objects.
