
Article Categories
- All Categories
-
 Data Structure
-
 Networking
-
 RDBMS
RDBMS
-
 Operating System
-
 Java
Java
-
 MS Excel
-
 iOS
iOS
-
 HTML
HTML
-
 CSS
CSS
-
 Android
-
 Python
-
 C Programming
-
 C++
C++
-
 C#
C#
-
 MongoDB
-
 MySQL
MySQL
-
 Javascript
-
 PHP
PHP
-
 Economics & Finance
Movie Web Application with ReactJS
Nowadays, OTT platforms are becoming more popular, and people are buying subscriptions to various OTT platforms to watch movies, TV shows, or services. Maybe, you can also start any OTT application.
In this tutorial, we will learn to create a movie web application using React JS. However, We will learn to write only the basic code of movie applications. If users want, they can start with the below code and make improvements to create an advanced version of the movie web application.
Users should follow the steps below to start with the movie web application.
Step 1 ? In the first step, we require to create react application. Users should execute the below command in the terminal to start with react movie application.
npx create-react-app movie-app
Step 2 ? Move to the project directory in the terminal by executing the below command.
cd movie-app
Step 3 ? Next, we need to install the required dependencies by executing the below command.
npm install react-router-dom axios
Here, axios is used to fetch data, and react-router-dom is used to configure the routing for the application.
Step 4 ? Next, we require to set up routers for the application in the App.js file.
Step 4.1 ? Import the required methods and components.
Step 4.2 ? show the Home component for the ?/? home route.
Step 4.3 ? Show the movieDetails component for the ?movie/:id? route. Here, id is a variable.
Step 4.4 ? Add the below code in the App.js file.
Filename - App.js
import { BrowserRouter, Routes, Route } from "react-router-dom";
import Home from "./components/home";
import MovieDetails from "./components/MovieDetails";

function App() {
   // creating routers using react-router-dom
   return (
      <BrowserRouter>
         <Routes>
            {/* home route */}
            <Route path = "/" element = {<Home />} />
            {/* movie route */}
            <Route path = "/movie/:id" element = {<MovieDetails />} />
         </Routes>
      </BrowserRouter>
   );
}

export default App;
Step 5 ? Next, create a component folder in the ?src? directory, and add the ?Home.Js? file.
Step 5.1 ? Import the required component and ?axios?.
Step 5.2 ? Create a state to store all the movies which we fetch from the API.
Step 5.3 ? Define the handleSearchInput() function, which handles the search input value.
Step 5.3 ? Define the executeSearch() function. In the function, check if users have pressed the ?enter? key. If yes, use the ?axios? to fetch the data and store it in the results variable. Also, update the state with the resultant value.
Step 5.4 ? Render the search input on the web page. Also, render the AllMovies component by passing the movie data we got from API on the web app.
Add the below code in the Home.js file.
Filename - Home.js
import React, { useState } from "react";
import AllMovies from "./AllMovies";
import axios from "axios";
import "../App.css";

function Home() {
   // create a state to store fetched data
   const [initial, setStateValues] = useState({
      searchValue: "sherlock",
      allMovies: [],
   });
   // movie api url with api key
   const movieApiURL = "https://www.omdbapi.com/?apikey=a2526df0";

   //  function to handle search input
   function handleSearchInput(event) {

      // get search value
      let searchValue = event.target.value;

      // set search value to the state
      setStateValues((rest) => {
         return { ...rest, searchValue: searchValue };
      });
   }

   //  function to execute a search
   async function executeSearch(event) {

      // check if enter key is pressed
      if (event.key === "Enter") {

         // fetch movies
         let movies = await axios(movieApiURL + "&s=" + initial.searchValue);

         // get results
         let results = movies.data.Search;

         // set results to state
         setStateValues((prevState) => {
            return { ...prevState, allMovies: results };
         });
      }
   }

   return (
      <div className = "App">
         <header className = "App-header">
         <h2> Web application for Movies </h2>
         </header>

         <main>
            {/* show search bar */}
            <div className = "search-div">
               <input
               type = "text"
               placeholder = "Search movie name..."
               className = "search-input"
               onChange = {handleSearchInput}
               onKeyPress = {executeSearch}
               />
            </div>
            {/* show resultant movies */}
            <AllMovies movies = {initial.allMovies} />
         </main>
      </div>
   );
}

export default Home;
Step 6 ? Create an AllMovies.js file in the ?component? directory to show movies in the form of cards.
Step 6.1 ? Here, we get the movie data as a prop. First, we need to check whether ?movies? contain data or are undefined. If undefined, it means any related movie not found in the database. So, show the message accordingly on the web page.
Step 6.2 ? If movies contain data, use the ?map? method to iterate through array, and create a card for every movie. On the card, we show the movie poster and title.
Step 6.3 ? Add the below code in the AllMovies.js file.
Filename - AllMovies.js
import React from "react";
import { Link } from "react-router-dom";

function AllMovies({ movies: movies }) {
   return (
      <div className = "allMovies">
         {/* show all movies using map method */}
         {typeof movies != "undefined" ? (
            movies.map((result) => (
               // render single movie
               <div className = "movie">
                  {/* set link for movie card */}
                  <Link to = {`/movie/${result.imdbID}`}>
                     {/* show movie poster and title */}
                     <img src = {result.Poster} alt = "movie poster" />
                     <h3> {result.Title} </h3>
                  </Link>
               </div>
            ))
         ) : (
            <div className = "no-movie">
               <h2>
                  Oops! We haven't listed the movie yet, or it might not exist in the
                  database. {" "}
               </h2>
               <h2> Kindly check the movie name once. </h2>
            </div>
         )}
      </div>
   );
}

export default AllMovies;
Step 7 ? Now, create a ?MovieDetails.js? file in the ?component? direction to show single movie details.
Step 7.1 ? Use the ?useParams? constructor to get parameters from the URL.
Step 7.2 ? Use the axios to fetch movie data using the movie id we got from the URL parameters.
Step 7.3 ? Render the movie information on the web page, which we got from API.
Step 7.4 ? Also, add the close button to go back.
Add the below code in the ?MovieDetails.js? file.
Filename - MovieDetails.js
import React from "react";
import { useParams } from "react-router-dom";
import axios from "axios";
import { useState } from "react";
import { Link } from "react-router-dom";

function MovieDetails() {
   // Get ID from URL
   const params = useParams();
   const movieApiURL = "https://www.omdbapi.com/?apikey=a2526df0";
   let [movieDetails, setMovieDetails] = useState({});

   // function to fetch data
   function fetchData() {

      // fetch movie details according to id
      axios(movieApiURL + "&i=" + params.id).then(({ data }) => {
         let result = data;
         setMovieDetails(result);
      });
   }
   fetchData();
   return (
      // show movie details with image, title, year, rating, type and plot
      <div className = "movieDetail">
         <div className = "description">
            {/* show poster */}
            <img src = {movieDetails.Poster} alt = "Movie poster" />
            <div className = "details">
               <h2> {movieDetails.Title} </h2>
               <p> Year : {movieDetails.Year} </p>
               <p className = "rating"> Rating: {movieDetails.imdbRating} </p>
               <p> Type: {movieDetails.Type} </p>
               <p> {movieDetails.Plot} </p>
               <button className = "back">
                  {/* link to home page */}
                  <Link to = {`/`}> Go back </Link>
               </button>
            </div>
         </div>
      </div>
   );
}

export default MovieDetails;
Step 8 ? Now, add CSS to the App.css file. Here, we styled the search bar, movie cards, and MovieDetails component to show the details properly.
Filename - App.css
* {
   box-sizing: border-box;
   margin: 0;
   padding: 0;
}
body {
   background: linear-gradient(to left, green, blue, red);
}
header {
   width: 90%;
   padding-top: 25px;
   padding-bottom: 15px;
   margin: 0 auto;
}
header h2 {
   color: white;
   font-size: 50px;
   font-weight: 600;
   text-align: center;
}
main {
   width: 100%;
   max-width: 90%;
   margin: 0 auto;
}
.allMovies {
   display: flex;
   flex-wrap: wrap;
   width: 95%;
   justify-content: center;
   align-items: center;
   text-decoration: none;
}
.allMovies .movie {
   width: clamp(300px, 20%, 500px);
   background: rgb(167, 0, 245);
   max-height: 500px;
   border-radius: 12px;
   padding: 10px;
   margin: 20px 25px;
   display: flex;
   flex-direction: column;
   cursor: pointer;
}
.allMovies .no-movie {
   display: flex;
   flex-direction: column;
   justify-content: center;
   margin: 2rem 0.5rem;
   align-items: center;
   text-align: center;
   color: white;
}
.allMovies .movie img {
   width: 100%;
   border-radius: 12px;
   padding: 10px 2px;
   margin: 0 auto;
   height: 350px;
}
.allMovies .movie h3 {
   text-decoration: none;
   color: white;
   font-size: 20px;
   font-weight: 600;
   border-radius: 12px;
   width: 100%;
   text-align: center;
   padding: 1rem;
   background: green;
   transition: 0.4s ease-out;
}
.movie:hover {
   box-shadow: 0 0 10px 4px yellow;
}
.allMovies .movie h3:hover {
   background: aqua;
   color: blue;
   box-shadow: 0 0 8px 3px #4484c4;
}
.movieDetail {
   margin: 3rem 5rem;
   overflow-y: auto;
   width: 90%;
}
.movieDetail .description .rating {
   margin: 10px 40px;
   font-size: 1.5rem;
   padding-bottom: 0;
}
.movieDetail .description {
   position: fixed;
   display: flex;
   top: 0;
   left: 0;
   width: 100%;
   height: 100%;
   padding: 25px;
   background: blue;
   color: white;
   overflow-y: auto;
}
.movieDetail .description .details h2 {
   padding: 2rem;
   margin-top: 1rem;
   font-size: 45px;
   padding-bottom: 0.5rem;
   font-weight: 600;
}
.movieDetail .description .details p {
   font-size: 1.4rem;
   color: white;
   margin-left: 40px;
}
.movieDetail .description img {
   max-width: 45%;
   padding: 0 15px;
   margin-left: 2rem;
   margin-right: 2rem;
   margin-top: 1rem;
}
.movieDetail .description .details .back {
   padding: 15px 30px;
   font-size: 28px;
   font-weight: 700;
   background: red;
   display: flex;
   margin: auto;
   margin-top: 5rem;
   color: white;
   border: none;
   outline: none;
   appearance: none;
   justify-content: center;
   align-items: center;
   border-radius: 5px;
   cursor: pointer;
   transition: 0.4s ease-out;
   width: 90%;
}
.movieDetail .description .details button:hover {
   background: #4484c4;
}
@media screen and (max-width: 1020px) {
   .allMovies {
      justify-content: center;
      align-items: center;
   }

   .movieDetail .description .back {
      width: 100%;
      display: flex;
      justify-content: center;
      align-items: center;
      border-radius: 5px;
      margin: auto;
   }
}

@media screen and (max-width: 720px) {
   .allMovies {
      justify-content: center;
      align-items: center;
   }
   .allMovies .movie {
      margin: 10px;
      justify-content: center;
      align-items: center;
   }
}

@media screen and (max-width: 480px) {
   header h1 {
      font-size: 2.9rem;
   }
   .allMovies {
      display: flex;
      flex-direction: column;
      justify-content: center;
      align-items: center;
   }
   .movieDetail {
      flex-direction: column;
      overflow-y: scroll;
   }
}
/* CSS for search */
.search-div {
   display: flex;
   justify-content: center;
   align-items: center;
   margin: 1rem 0;
}
.search-input {
   width: 70%;
   display: block;
   padding: 15px;
   border: none;
   font-size: 20px;
   font-weight: 300;
   outline: none;
   background: none;
   background-color: aqua;
   border-radius: 12px;
   color: blue;
   transition: 0.4s ease-out;
}
.search-input:focus {
   box-shadow: 0 0 8px 3px #4484c4;
}
@media screen and (max-width: 720px) {
   .search-input {
      width: 80%;
   }
}
@media screen and (max-width: 480px) {
   .search-input {
      width: 95%;
   }
}
Step 9 ? We have successfully created the movie web application. Now, it?s time to test the project. Use the below command in the terminal to run the project.
npm run start
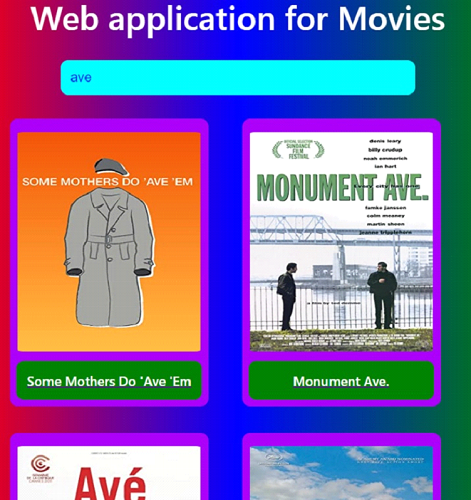
Step 10 ? Open the localhost: 3000 to see the below interface. In the search bar, search at least the first three characters of the movie name, and you will see the results below.
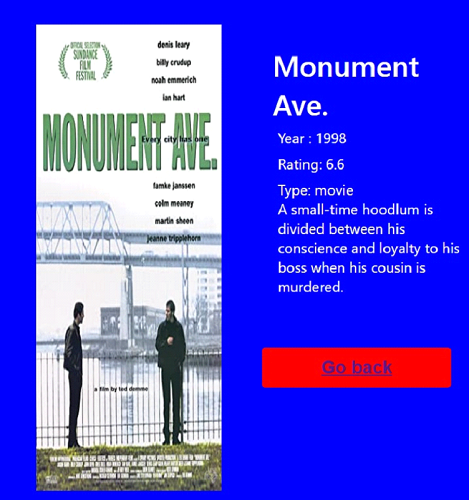
Step 11 ? If you click on any movie card, it will show you all movie-related details, as shown below.
We successfully created the movie web application using ReactJS. Developers can add extra features such as ?add to favorites? to advance the application. Developers should try using local storage to implement the ?add to favorite? feature. So, when users click on add to favorites button, we can store that movie data in the local storage.

994 Views
