- Home
- Introduction
- Getting Started
- CPU and GPU
- CNTK - Sequence Classification
- CNTK - Logistic Regression Model
- CNTK - Neural Network (NN) Concepts
- CNTK - Creating First Neural Network
- CNTK - Training the Neural Network
- CNTK - In-Memory and Large Datasets
- CNTK - Measuring Performance
- Neural Network Classification
- Neural Network Binary Classification
- CNTK - Neural Network Regression
- CNTK - Classification Model
- CNTK - Regression Model
- CNTK - Out-of-Memory Datasets
- CNTK - Monitoring the Model
- CNTK - Convolutional Neural Network
- CNTK - Recurrent Neural Network
- Microsoft Cognitive Toolkit Resources
- Microsoft Cognitive Toolkit - Quick Guide
- Microsoft Cognitive Toolkit - Resources
- Microsoft Cognitive Toolkit - Discussion
CNTK - Regression Model
Here, we will study about measuring performance with regards to a regression model.
Basics of validating a regression model
As we know that regression models are different than classification models, in the sense that, there is no binary measure of right or wrong for individuals samples. In regression models, we want to measure how close the prediction is to the actual value. The closer the prediction value is to the expected output, the better the model performs.
Here, we are going to measure the performance of NN used for regression using different error-rate functions.
Calculating error margin
As discussed earlier, while validating a regression model, we cant say whether a prediction is right or wrong. We want our prediction to be as close as possible to the real value. But, a small error margin is acceptable here.
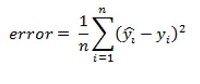
The formula for calculating the error margin is as follows −
Here,
Predicted value = indicated y by a hat
Real value = predicted by y
First, we need to calculate the distance between the predicted and the real value. Then, to get an overall error rate, we need to sum these squared distances and calculate the average. This is called the mean squared error function.
But, if we want performance figures that express an error margin, we need a formula that expresses the absolute error. The formula for mean absolute error function is as follows −
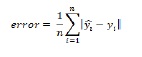
The above formula takes the absolute distance between the predicted and the real value.
Using CNTK to measure regression performance
Here, we will look at how to use the different metrics, we discussed in combination with CNTK. We will use a regression model, that predicts miles per gallon for cars using the steps given below.
Implementation steps−
Step 1 − First, we need to import the required components from cntk package as follows −
from cntk import default_option, input_variable
from cntk.layers import Dense, Sequential
from cntk.ops import relu
Step 2 − Next, we need to define a default activation function using the default_options functions. Then, create a new Sequential layer set and provide two Dense layers with 64 neurons each. Then, we add an additional Dense layer (which will act as the output layer) to the Sequential layer set and give 1 neuron without an activation as follows −
with default_options(activation=relu):
model = Sequential([Dense(64),Dense(64),Dense(1,activation=None)])
Step 3 − Once the network has been created, we need to create an input feature. We need to make sure that, it has the same shape as the features that we are going to be using for training.
features = input_variable(X.shape[1])
Step 4 − Now, we need to create another input_variable with size 1. It will be used to store the expected value for NN.
target = input_variable(1)
z = model(features)
Now, we need to train the model and in order to do so, we are going to split the dataset and perform preprocessing using the following implementation steps −
Step 5 −First, import StandardScaler from sklearn.preprocessing to get the values between -1 and +1. This will help us against exploding gradient problems in the NN.
from sklearn.preprocessing import StandardScalar
Step 6 − Next, import train_test_split from sklearn.model_selection as follows−
from sklearn.model_selection import train_test_split
Step 7 − Drop the mpg column from the dataset by using the dropmethod. At last split the dataset into a training and validation set using the train_test_split function as follows −
x = df_cars.drop(columns=[mpg]).values.astype(np.float32)
y=df_cars.iloc[: , 0].values.reshape(-1, 1).astype(np.float32)
scaler = StandardScaler()
X = scaler.fit_transform(x)
X_train, X_test, y_train, y_test = train_test_split(X, y, test_size=0.2)
Step 8 − Now, we need to create another input_variable with size 1. It will be used to store the expected value for NN.
target = input_variable(1)
z = model(features)
We have split as well as preprocessed the data, now we need to train the NN. As did in previous sections while creating regression model, we need to define a combination of a loss and metric function to train the model.
import cntk
def absolute_error(output, target):
   return cntk.ops.reduce_mean(cntk.ops.abs(output  target))
@ cntk.Function
def criterion_factory(output, target):
   loss = squared_error(output, target)
   metric = absolute_error(output, target)
   return loss, metric
Now, lets have a look at how to use the trained model. For our model, we will use criterion_factory as the loss and metric combination.
from cntk.losses import squared_error
from cntk.learners import sgd
from cntk.logging import ProgressPrinter
progress_printer = ProgressPrinter(0)
loss = criterion_factory (z, target)
learner = sgd(z.parameters, 0.001)
training_summary=loss.train((x_train,y_train),parameter_learners=[learner],callbacks=[progress_printer],minibatch_size=16,max_epochs=10)
Complete implementation example
from cntk import default_option, input_variable
from cntk.layers import Dense, Sequential
from cntk.ops import relu
with default_options(activation=relu):
model = Sequential([Dense(64),Dense(64),Dense(1,activation=None)])
features = input_variable(X.shape[1])
target = input_variable(1)
z = model(features)
from sklearn.preprocessing import StandardScalar
from sklearn.model_selection import train_test_split
x = df_cars.drop(columns=[mpg]).values.astype(np.float32)
y=df_cars.iloc[: , 0].values.reshape(-1, 1).astype(np.float32)
scaler = StandardScaler()
X = scaler.fit_transform(x)
X_train, X_test, y_train, y_test = train_test_split(X, y, test_size=0.2)
target = input_variable(1)
z = model(features)
import cntk
def absolute_error(output, target):
   return cntk.ops.reduce_mean(cntk.ops.abs(output  target))
@ cntk.Function
def criterion_factory(output, target):
loss = squared_error(output, target)
metric = absolute_error(output, target)
return loss, metric
from cntk.losses import squared_error
from cntk.learners import sgd
from cntk.logging import ProgressPrinter
progress_printer = ProgressPrinter(0)
loss = criterion_factory (z, target)
learner = sgd(z.parameters, 0.001)
training_summary=loss.train((x_train,y_train),parameter_learners=[learner],callbacks=[progress_printer],minibatch_size=16,max_epochs=10)
Output
-------------------------------------------------------------------
average  since   average   since  examples
loss     last    metric    last
------------------------------------------------------
Learning rate per minibatch: 0.001
690       690     24.9     24.9       16
654       636     24.1     23.7       48
[]
In order to validate our regression model, we need to make sure that, the model handles new data just as well as it does with the training data. For this, we need to invoke the test method on loss and metric combination with test data as follows −
loss.test([X_test, y_test])
Output−
{'metric': 1.89679785619, 'samples': 79}
