- Home
- Introduction
- Getting Started
- CPU and GPU
- CNTK - Sequence Classification
- CNTK - Logistic Regression Model
- CNTK - Neural Network (NN) Concepts
- CNTK - Creating First Neural Network
- CNTK - Training the Neural Network
- CNTK - In-Memory and Large Datasets
- CNTK - Measuring Performance
- Neural Network Classification
- Neural Network Binary Classification
- CNTK - Neural Network Regression
- CNTK - Classification Model
- CNTK - Regression Model
- CNTK - Out-of-Memory Datasets
- CNTK - Monitoring the Model
- CNTK - Convolutional Neural Network
- CNTK - Recurrent Neural Network
- Microsoft Cognitive Toolkit Resources
- Microsoft Cognitive Toolkit - Quick Guide
- Microsoft Cognitive Toolkit - Resources
- Microsoft Cognitive Toolkit - Discussion
Microsoft Cognitive Toolkit (CNTK) - Getting Started
Here, we will understand about the installation of CNTK on Windows and on Linux. Moreover, the chapter explains installing CNTK package, steps to install Anaconda, CNTK files, directory structure and CNTK library organisation.
Prerequisites
In order to install CNTK, we must have Python installed on our computers. You can go to the link https://www.python.org/downloads/ and select the latest version for your OS, i.e. Windows and Linux/Unix. For basic tutorial on Python, you can refer to the link https://www.tutorialspoint.com/python3/index.htm.

CNTK is supported for Windows as well as Linux so we will walk through both of them.
Installing on Windows
In order to run CNTK on Windows, we will be using the Anaconda version of Python. We know that, Anaconda is a redistribution of Python. It includes additional packages like Scipy andScikit-learn which are used by CNTK to perform various useful calculations.
So, first let see the steps to install Anaconda on your machine −
Step 1−First download the setup files from the public website https://www.anaconda.com/distribution/.
Step 2 − Once you downloaded the setup files, start the installation and follow the instructions from the link https://docs.anaconda.com/anaconda/install/.
Step 3 − Once installed, Anaconda will also install some other utilities, which will automatically include all the Anaconda executables in your computer PATH variable. We can manage our Python environment from this prompt, can install packages and run Python scripts.
Installing CNTK package
Once Anaconda installation is done, you can use the most common way to install the CNTK package through the pip executable by using following command −
pip install cntk
There are various other methods to install Cognitive Toolkit on your machine. Microsoft has a neat set of documentation that explains the other installation methods in detail. Please follow the link https://docs.microsoft.com/en-us/cognitive-toolkit/Setup-CNTK-on-your-machine.
Installing on Linux
Installation of CNTK on Linux is a bit different from its installation on Windows. Here, for Linux we are going to use Anaconda to install CNTK, but instead of a graphical installer for Anaconda, we will be using a terminal-based installer on Linux. Although, the installer will work with almost all Linux distributions, we limited the description to Ubuntu.
So, first let see the steps to install Anaconda on your machine −
Steps to install Anaconda
Step 1 − Before installing Anaconda, make sure that the system is fully up to date. To check, first execute the following two commands inside a terminal −
sudo apt update
sudo apt upgrade
Step 2 − Once the computer is updated, get the URL from the public website https://www.anaconda.com/distribution/ for the latest Anaconda installation files.
Step 3 − Once URL is copied, open a terminal window and execute the following command −
wget -0 anaconda-installer.sh url SHAPE \* MERGEFORMAT
     y


	             f


      x

|                     }
Replace the url placeholder with the URL copied from the Anaconda website.
Step 4 − Next, with the help of following command, we can install Anaconda −
sh ./anaconda-installer.sh
The above command will by default install Anaconda3 inside our home directory.
Installing CNTK package
Once Anaconda installation is done, you can use the most common way to install the CNTK package through the pip executable by using following command −
pip install cntk
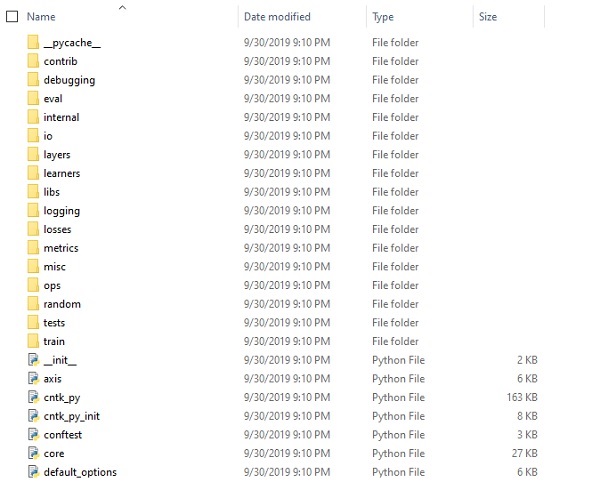
Examining CNTK files & directory structure
Once CNTK is installed as a Python package, we can examine its file and directory structure. Its at C:\Users\
Verifying CNTK installation
Once CNTK is installed as a Python package, you should verify that CNTK has been installed correctly. From Anaconda command shell, start Python interpreter by entering ipython. Then, import CNTK by entering the following command.
import cntk as c
Once imported, check its version with the help of following command −
print(c.__version__)
The interpreter will respond with installed CNTK version. If it doesnt respond, there will be a problem with the installation.
The CNTK library organisation
CNTK, a python package technically, is organised into 13 high-level sub-packages and 8 smaller sub-packages. Following table consist of the 10 most frequently used packages:
| Sr.No | Package Name & Description |
|---|---|
| 1 |
cntk.io Contains functions for reading data. For example: next_minibatch() |
| 2 |
cntk.layers Contains high-level functions for creating neural networks. For example: Dense() |
| 3 |
cntk.learners Contains functions for training. For example: sgd() |
| 4 |
cntk.losses Contains functions to measure training error. For example: squared_error() |
| 5 |
cntk.metrics Contains functions to measure model error. For example: classificatoin_error |
| 6 |
cntk.ops Contains low-level functions for creating neural networks. For example: tanh() |
| 7 |
cntk.random Contains functions to generate random numbers. For example: normal() |
| 8 |
cntk.train Contains training functions. For example: train_minibatch() |
| 9 |
cntk.initializer Contains model parameter initializers. For example: normal() and uniform() |
| 10 |
cntk.variables Contains low-level constructs. For example: Parameter() and Variable() |
