- Meteor - Home
- Meteor - Overview
- Meteor - Environment Setup
- Meteor - First Application
- Meteor - Templates
- Meteor - Collections
- Meteor - Forms
- Meteor - Events
- Meteor - Session
- Meteor - Tracker
- Meteor - Packages
- Meteor - Core API
- Meteor - Check
- Meteor - Blaze
- Meteor - Timers
- Meteor - EJSON
- Meteor - HTTP
- Meteor - Email
- Meteor - Assets
- Meteor - Security
- Meteor - Sorting
- Meteor - Accounts
- Meteor - Methods
- Meteor - Package.js
- Meteor - Publish & Subscribe
- Meteor - Structure
- Meteor - Deployment
- Meteor - Running on mobile
- Meteor - ToDo App
- Meteor - Best Practices
Meteor - Events
In this chapter, we will learn how to use tag, class and id as an event selector. Working with events is pretty straightforward.
Let's create three elements in the HTML template. The first one is p, the second one is myClass class and the last one is myId id.
meteorApp.html
<head>
   <title>meteorApp</title>
</head>

<body>
   <div>
      {{> myTemplate}}
   </div>
</body>

<template name = "myTemplate">
   <p>PARAGRAPH...</p>
   <button class = "myClass">CLASS</button>
   <button id = "myId">ID</button>
</template>
In our JavaScript file, we are setting three events for three elements that we created above. You can see that we are just adding p, .myClass and #myId after the click event. These are the selectors we mentioned above.
meteorApp.js
if (Meteor.isClient) {

   Template.myTemplate.events({

      'click p': function() {
         console.log("The PARAGRAPH is clicked...");
      },

      'click .myClass': function() {
         console.log("The CLASS is clicked...");
      },

      'click #myId': function() {
         console.log("The ID is clicked...");
      },
   });
}
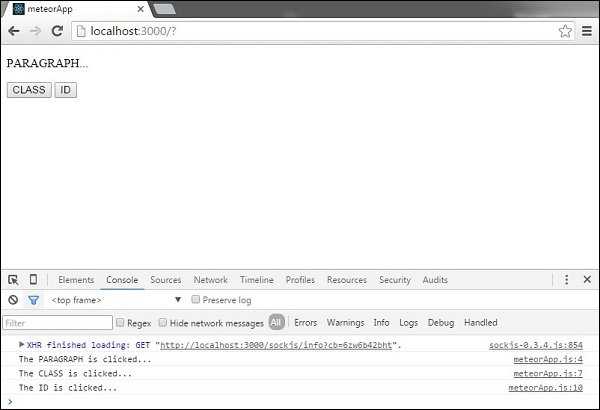
To test this, we can first click on PARAGRAPH, then the CLASS button and finally the ID button. We will get the following console log.
We can use all the other JavaScript events - click, dbclick, contextmenu, mousedown, mouseup, mouseover, mouseout, mousemove - following the example above.
