- Jython - Home
- Jython - Overview
- Jython - Installation
- Jython - Importing Java Libraries
- Jython - Variables and Data Types
- Jython - Using Java Collection Types
- Jython - Decision Control
- Jython - Loops
- Jython - Functions
- Jython - Modules
- Jython - Package
- Jython - Java Application
- Jython - Eclipse Plugin
- Jython - A Project in Eclipse
- Jython - NetBeans Plugin & Project
- Jython - Servlets
- Jython - JDBC
- Jython - Using the Swing GUI library
- Jython - Layout Management
- Jython - Event Handling
- Jython - Menus
- Jython - Dialogs
Jython - Useful Resources
Jython - Quick Guide
Jython - Overview
Jython is the JVM implementation of the Python programming language. It is designed to run on the Java platform. A Jython program can import and use any Java class. Just as Java, Jython program compiles to bytecode. One of the main advantages is that a user interface designed in Python can use GUI elements of AWT, Swing or SWT Package.
Jython, which started as JPython and was later renamed, follows closely the standard Python implementation called CPython as created by Guido Van Rossum. Jython was created in 1997 by Jim Hugunin. Jython 2.0 was released in 1999. Since then, Jython 2.x releases correspond to equivalent CPython releases. Jython 2.7.4 released in Aug 2024, corresponds to CPython 2.7. Development of Jython 3.x is under progress.
Difference between Python and Java
Following are the differences between Python and Java −
Python is a dynamically typed language. Hence, the type declaration of variable is not needed. Java on the other hand is a statically typed language, which means that the type declaration of variable is mandatory and cannot be changed.
Python has only unchecked exceptions, whereas Java has both checked and unchecked exceptions.
Python uses indents for scoping, while Java uses matching curly brackets.
Since Python is an interpreter-based language, it has no separate compilation steps. A Java program however needs to be compiled to bytecode and is in turn executed by a JVM.
Python supports multiple inheritance, but in Java, multiple inheritance is not possible. It however has implementation of an interface.
Compared to Java, Python has a richer built-in data structures (lists, dicts, tuples, everything is an object).
Difference between Python and Jython
Following are the differences between Python and Jython −
Reference implementation of Python, called CPython, is written in C language. Jython on the other hand is completely written in Java and is a JVM implementation.
Standard Python is available on multiple platforms. Jython is available for any platform with a JVM installed on it.
Standard Python code compiles to a .pyc file, while Jython program compiles to a .class file.
Python extensions can be written in C language. Extensions for Jython are written in Java.
Jython is truly multi-threaded in nature. Python however uses the Global Interpreter Lock (GIL) mechanism for the purpose.
Both implementations have different garbage collection mechanisms.
In the next chapter, we will learn how to import the Java libraries in Jython.
Jython - Installation
Before installation of Jython 2.7.4, ensure that the system has JDK 7 or more installed. Jython is available in the form of an executable jar file. Download it from - https://www.jython.org/download.html and either double click on its icon or run the following command −
java -jar jython_installer-2.7.4.jar
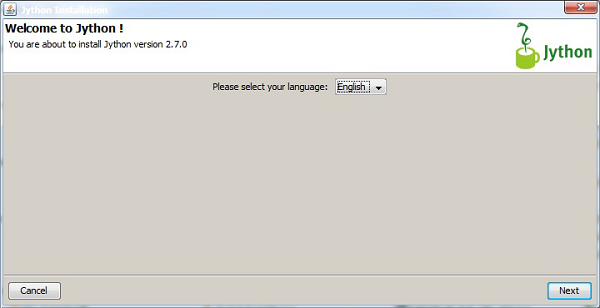
An installation wizard will commence with which installation options have to be given. Here is the systematic installation procedure.
The first step in the wizard asks you to select the language.
The second step prompts you to accept the licence agreement.

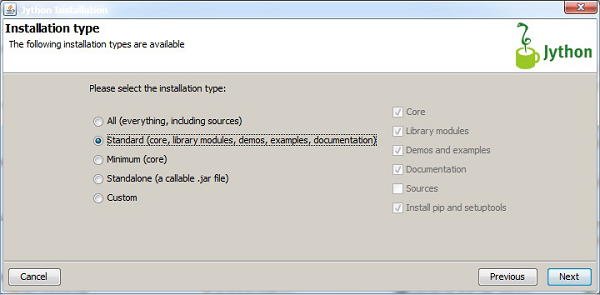
In the next step, choose the installation type. It is recommended to choose the Standard installation.
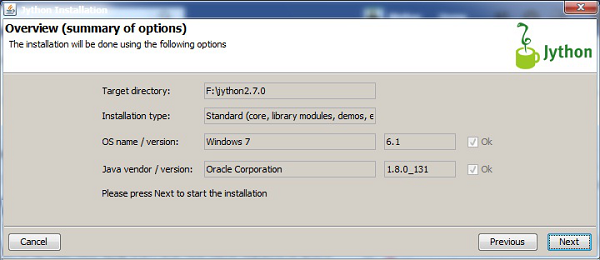
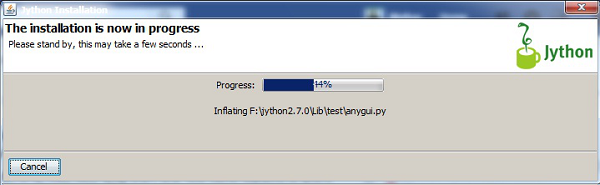
The next screen asks your confirmation about your options and proceeds to complete the installation.
The installation procedure might take some time to complete.
After the installation is complete, invoke jython.exe from the bin directory inside the destination directory. Assuming that Jython is installed in D:\jython2.7.4, execute the following from the command line.
D:\jython2.7.4\bin>jython
A Python prompt (>>>) will appear, in front of which any Python statement or Python script can be executed.
D:\jython2.7.4\bin>jython
Jython 2.7.4 (tags/v2.7.4:3f256f4a7, Aug 18 2024, 10:30:53)
[Java HotSpot(TM) 64-Bit Server VM (Oracle Corporation)] on java24.0.1
Type "help", "copyright", "credits" or "license" for more information.
>>> print("Hello World!")
Hello World!
>>>
Jython - Importing Java Libraries
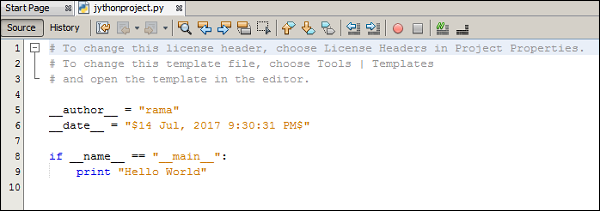
One of the most important features of Jython is its ability to import Java classes in a Python program. We can import any java package or class in Jython, just as we do in a Java program. The following example shows how the java.util packages are imported in Python (Jython) script to declare an object of the Date class.
UtilDate.py
from java.util import Date
d = Date()
print d
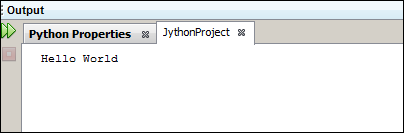
Output
Save and run the above code as UtilDate.py from the command line. Instance of the current date and time will be displayed.
D:\jython2.7.4\bin>jython UtilDate.py
Fri Dec 26 21:03:39 IST 2025
The following packages from the Java library are more often imported in a Jython program mainly because standard Python library either does not have their equivalents or are not as good.
- Servlets
- JMS
- J2EE
- Javadoc
- Swing is considered superior to other GUI toolkits
Any Java package for that matter can be imported in a Jython script. Here, the following java program is stored and compiled in a package called foo.
HelloWorld.java
package foo;

public class HelloWorld {
   public void hello() {
      System.out.println("Hello World!");
   }
   public void hello(String name) {
      System.out.printf("Hello %s!", name);
   }
}
This HelloWorld.class is imported in the following Jython Script. Methods in this class can be called from the Jython script importex.py.
importex.py
from foo import HelloWorld
h = HelloWorld()
h.hello()
h.hello("TutorialsPoint")
Output
Save and execute the above script from the command line to get following output.
D:\jython2.7.4\bin>jython importex.py
Hello World!
Hello TutorialsPoint!
Jython - Variables and Data Types
Variables are named locations in computers memory. Each variable can hold one piece of data in it. Unlike Java, Python is a dynamically typed language. Hence while using Jython also; prior declaration of data type of variable is not done. Rather than the type of variable deciding which data can be stored in it, the data decides the type of variable.
In the following example, a variable is assigned an integer value. Using the type() built-in function, we can verify that the type of variable is an integer. But, if the same variable is assigned a string, the type() function will string as the type of same variable.
>>> x =10
>>> type(x)
<type 'int'>
>>> x = "hello"
>>> type(x)
<type 'str'>
>>>
This explains why Python is called a dynamically typed language.
The following Python built-in data types can also be used in Jython −
- Number
- String
- List
- Tuple
- Dictionary
Python recognizes numeric data as a number, which may be an integer, a real number with floating point or a complex number. String, List and Tuple data types are called sequences.
Jython Numbers
In Python, any signed integer is said to be of type int. To express a long integer, letter L is attached to it. A number with a decimal point separating the integer part from a fractional component is called float. The fractional part may contain an exponent expressed in the scientific notation using E or e.
A Complex number is also defined as numeric data type in Python. A complex number contains a real part (a floating-point number) and an imaginary part having j attached to it.
In order to express a number in the Octal or the Hexadecimal representation, 0O or 0X is prefixed to it. The following code block gives examples of different representations of numbers in Python.
int     -> 10, 100, -786, 80
long    -> 51924361L, -0112L, 47329487234L
float   -> 15.2, -21.9, 32.3+e18, -3.25E+101
complex -> 3.14j, 45.j, 3e+26J, 9.322e-36j
Jython Strings
A string is any sequence of characters enclosed in single (e.g. hello), double (e.g. hello) or triple (e.g. hello o hello) quotation marks. Triple quotes are especially useful if content of the string spans over multiple lines.
The Escape sequence characters can be included verbatim in triple quoted string. The following examples show different ways to declare a string in Python.
main.py
str = "hello how are you?"
print(str)
str = 'Hello how are you?'
print(str)
str = """this is a long string that is made up of several lines and non-printable
characters such as TAB ( \t ) and they will show up that way when displayed. NEWLINEs
within the string, whether explicitly given like this within the brackets [ \n ], or just
a NEWLINE within the variable assignment will also show up.
"""
print(str)
Output
These strings when printed, will give the following output.
hello how are you?
Hello how are you?
this is a long string that is made up of several lines and non-printable
characters such as TAB ( 	 ) and they will show up that way when displayed. NEWLINEs
within the string, whether explicitly given like this within the brackets [
 ], or just
a NEWLINE within the variable assignment will also show up.
Jython Lists
A List is a sequence data type. It is a collection of comma-separated items, not necessarily of the same type, stored in square brackets. Individual item from the List can be accessed using the zero based index.
The following code block summarizes the usage of a List in Python.
main.py
list1 = ['physics', 'chemistry', 1997, 2000];
list2 = [1, 2, 3, 4, 5, 6, 7 ];
print "list1[0]: ", list1[0]
print "list2[1:5]: ", list2[1:5]
Output
Run the code and verify the output −
list1[0]:  physics
list2[1:5]:  [2, 3, 4, 5]
The following table describes some of the most common Jython Expressions related to Jython Lists.
| Jython Expression | Description |
|---|---|
| len(List) | Length |
| List[2]=10 | Updation |
| Del List[1] | Deletion |
| List.append(20) | Append |
| List.insert(1,15) | Insertion |
| List.sort() | Sorting |
Jython Tuples
A tuple is an immutable collection of comma-separated data items stored in parentheses. It is not possible to delete or modify an element in tuple, nor is it possible to add an element to the tuple collection. The following code block shows Tuple operations.
main.py
tup1 = ('physics','chemistry',1997,2000)
tup2 = (1, 2, 3, 4, 5, 6, 7 )
print "tup1[0]: ", tup1[0]
print "tup2[1:5]: ", tup2[1:5]
Output
Run the code and verify the output −
tup1[0]:  physics
tup2[1:5]:  (2, 3, 4, 5)
Jython Dictionary
The Jython Dictionary is similar to Map class in Java Collection framework. It is a collection of key-value pairs. Pairs separated by comma are enclosed in curly brackets. A Dictionary object does not follow zero based index to retrieve element inside it as they are stored by hashing technique.
The same key cannot appear more than once in a dictionary object. However, more than one key can have same associated values. Different functions available with Dictionary object are explained below −
main.py
dict = {'011':'New Delhi','022':'Mumbai','033':'Kolkata'}
print "dict[011]: ",dict['011']
Output
Run the code and verify the output −
dict[011]: New Delhi
The following table describes some of the most common Jython Expressions related to Dictionary.
| Jython Expression | Description |
|---|---|
| dict.get(011) | Search |
| len(dict) | Length |
| dict[044] = Chennai | Append |
| del dict[022] | Delete |
| dict.keys() | list of keys |
| dict.values() | List of values |
| dict.clear() | Removes all elements |
Jython - Using Java Collections
In addition to Pythons built-in data types, Jython has the benefit of using Java collection classes by importing the java.util package. The following code describes the classes given below −
- Java ArrayList object with add()
- remove()
- get() and set() methods of the ArrayList class.
main.py
import java.util.ArrayList as ArrayList
arr = ArrayList()
arr.add(10)
arr.add(20)
print "ArrayList:",arr
arr.remove(10) #remove 10 from arraylist
arr.add(0,5) #add 5 at 0th index
print "ArrayList:",arr
print "element at index 1:",arr.get(1) #retrieve item at index 1
arr.set(0,100) #set item at 0th index to 100
print "ArrayList:",arr
Output
The above Jython script produces the following output −
C:\jython27\bin>jython arrlist.py
ArrayList: [10, 20]
ArrayList: [5, 20]
element at index 1: 20
ArrayList: [100, 20]
Jarray Class
Jython also implements the Jarray Object, which allows construction of a Java array in Python. In order to work with a jarray, simply define a sequence type in Jython and pass it to the jarrayobject along with the type of object contained within the sequence. All values within a jarray must be of the same type.
The following table shows the character typecodes used with a jarray.
| Character Typecode | Corresponding Java Type |
|---|---|
| Z | Boolean |
| C | char |
| B | byte |
| H | short |
| I | int |
| L | long |
| F | float |
| D | double |
The following example shows construction of jarray.
main.py
my_seq = (1,2,3,4,5)
from jarray import array
arr1 = array(my_seq,'i')
print arr1
myStr = "Hello Jython"
arr2 = array(myStr,'c')
print arr2
Output
Here my_seq is defined as a tuple of integers. It is converted to Jarray arr1. The second example shows that Jarray arr2 is constructed from myStr string sequence. The output of the above script jarray.py is as follows −
array('i', [1, 2, 3, 4, 5])
array('c', 'Hello Jython')
Jython - Decision Control
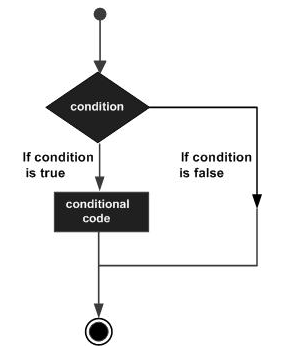
Decision making structures have one or more conditions to be evaluated or tested by the program, along with a statement or statements that are to be executed, if the condition is determined to be true, and optionally, other statements to be executed, if the condition is determined to be false.
The following illustration shows the general form of a typical decision making structure found in most of the programming languages −
Jython does not use curly brackets to indicate blocks of statements to be executed when the condition is true or false (as is the case in Java). Instead, uniform indent (white space from left margin) is used to form block of statements. Such a uniformly indented block makes the conditional code to be executed when a condition given in if statement is true.
A similar block may be present after an optional else statement. Jython also provides the elif statement using which successive conditions can be tested. Here, the else clause will appear last and will be executed only when all the preceding conditions fail. The general syntax of using if..elif..else is as follows.
if expression1:
   statement(s)
elif expression2:
   statement(s)
elif expression3:
   statement(s)
else:
   statement(s)
Example - Usage of if elif else construct
In the following example, if ..elif ..else construct is used to calculate discount on different values of amount input by user.
main.py
discount = 0
amount = input("Enter Amount: ")
if amount>1000:
   discount = amount*0.10
elif amount>500:
   discount = amount*0.05
else:
   discount = 0
print 'Discount = ',discount
print 'Net amount = ',amount-discount
Output
The output of above code will be as shown below.
Enter Amount: 1500
Discount = 150.0
Net amount = 1350.0
Enter Amount: 600
Discount = 30.0
Net amount = 570.0
Enter Amount: 200
Discount = 0
Net amount = 200
Jython - Loops
In general, statements in a program are executed sequentially: The first statement in a function is executed first, followed by the second, and so on. There may be a situation when you need to execute a block of code several number of times. Statements that provide such repetition capability are called looping statements.
In Jython, a loop can be formed by two statements, which are −
The while statement and
The for statement
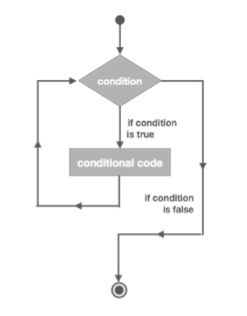
The WHILE Loop
A while loop statement in Jython is similar to that in Java. It repeatedly executes a block of statements as long as a given condition is true. The following flowchart describes the behavior of a while loop.
The general syntax of the while statement is given below.
while expression:
   statement(s)
The following Jython code uses the while loop to repeatedly increment and print value of a variable until it is less than zero.
main.py
count = 0
while count<10:
   count = count+1
   print "count = ",count
print "Good Bye!"
Output
The output would be as follows.
count =  1
count =  2
count =  3
count =  4
count =  5
count =  6
count =  7
count =  8
count =  9
count =  10
Good Bye!
The FOR Loop
The FOR loop in Jython is not a counted loop as in Java. Instead, it has the ability to traverse elements in a sequence data type such as string, list or tuple. The general syntax of the FOR statement in Jython is as shown below −
for iterating_var in sequence:
   statements(s)
We can display each character in a string, as well as each item in a List or Tuple by using the FOR statement as shown below −
main.py
#each letter in string
for letter in 'Python':
   print 'Current Letter :', letter
Output
The output would be as follows.
Current Letter : P
Current Letter : y
Current Letter : t
Current Letter : h
Current Letter : o
Current Letter : n
Let us consider another instance as follows.
main.py
#each item in list
libs = ['PyQt', 'WxPython',  'Tkinter']
for lib in libs:        # Second Example
   print 'Current library :', lib
Output
The output will be as follows.
Current library : PyQt
Current library : WxPython
Current library : Tkinter
In Jython, the for statement is also used to iterate over a list of numbers generated by range() function. The range() function takes following form −
range[([start],stop,[step])
The start and step parameters are 0 and 1 by default. The last number generated is stop step. The FOR statement traverses the list formed by the range() function. For example −
main.py
for num in range(5):
   print num
Output
It produces the following output −
0
1
2
3
4
Jython - Functions
A complex programming logic is broken into one or more independent and reusable blocks of statements called as functions. Pythons standard library contains large numbers of built-in functions. One can also define their own function using the def keyword. User defined name of the function is followed by a block of statements that forms its body, which ends with the return statement.
Example - Calling a Function
Once defined, it can be called from any environment any number of times. Let us consider the following code to make the point clear.
main.py
#definition of function
def SayHello():
   "optional documentation string"
   print "Hello World"
   return

#calling the function
SayHello()
Output
Run the code and verify the output −
Hello World
Example - Calling function with Multiple Parameters
A function can be designed to receive one or more parameters / arguments from the calling environment. While calling such a parameterized function, you need to provide the same number of parameters with similar data types used in the function definition, otherwise Jython interpreter throws a TypeError exception.
main.py
#defining function with two arguments
def area(l,b):
   area = l*b
   print "area = ",area
   return

#calling function
length = 10
breadth = 20
#with two arguments. This is OK
area(length, breadth)
#only one argument provided. This will throw TypeError
area(length)
Output
The output will be as follows −
area = 200 Warnings/Errors: Traceback (most recent call last): File "main.py", line 13, inarea(length) TypeError: area() takes exactly 2 arguments (1 given)
After performing the steps defined in it, the called function returns to the calling environment. It can return the data, if an expression is mentioned in front of the return keyword inside the definition of the function.
main.py
#defining function
def area(l,b):
   area = l*b
   print "area = ",area
   return area

#calling function
length = 10
breadth = 20
#calling function and obtaining its reurned value
result = area(length, breadth)
print "value returned by function : ", result
Output
The following output is obtained if the above script is executed from the Jython prompt.
area = 200
value returned by function : 200
Jython - Modules
A module is a Jython script in which one or more related functions, classes or variables are defined. This allows a logical organization of the Jython code. The Program elements defined in a module can be used in another Jython script by importing either the module or the specific element (function/class) from it.
In the following code (hello.py) a function SayHello() is defined.
hello.py
#definition of function
def SayHello(str):
   print "Hello ", str
   return
To use the SayHello() function from another script, import the hello.py module in it.
main.py
import hello
hello.SayHello("TutorialsPoint")
Output
Run the code and verify the output
Hello TutorialsPoint
Importing a Specific Function
Above code will import all functions defined in the module. In order to import specific function from module use following syntax.
from modname import name1[, name2[,... nameN]
For example, to import only the SayHello() function, change the above script as follows.
main.py
from hello import SayHello
SayHello("TutorialsPoint")
Output
Run the code and verify the output
Hello TutorialsPoint
There is no need to prefix the name of the module while calling the function.
Jython - Packages
Any folder containing one or more Jython modules is recognized as a package. However, it must have a special file called __init__.py, which provides the index of functions to be used.
Creating packages
Let us now understand, how to create and import package.
Step 1 − Create a folder called package1, then create and save the following g modules in it.
fact.py
#fact.py
def factorial(n):
   f = 1
   for x in range(1,n+1):
      f = f*x
   return f
sum.py
#sum.py
def add(x,y):
   s = x+y
   return s
mult.py
#mult.py
def multiply(x,y):
   s = x*y
   return s
Step 2 − In the package1 folder create and save the __init__.py file with the following content.
__init__.py
#__init__.py
from fact import factorial
from sum import add
from mult import multiply
Importing Packages
Step 3 − Create the following Jython script outside the package1 folder as main.py.
main.py
# Import your Package.
import package1

f = package1.factorial(5)
print "factorial = ",f
s = package1.add(10,20)
print "addition = ",s
m = package1.multiply(10,20)
print "multiplication = ",m
Output
Step 4 − Execute test.py from Jython prompt. The following output will be obtained.
factorial = 120
addition = 30
multiplication = 200
Jython - Java Application
Download jython-standalone-2.7.4.jar - For embedding Jython in Java applications from their official downloads page: https://www.jython.org/download.html and include this jar file in Java CLASSPATH environment variable.
This library contains the PythonInterpreter class. Using the object of this class, any Python script can be executed using the execfile() method. The PythonInterpreter enables you to make use of PyObjects directly. All objects known to the Jython runtime system are represented by an instance of the class PyObject or one of its subclasses.
Useful Methods of PythonInterpreter Class
The PythonInterpreter class has some regularly used methods, which are explained in the table given below.
| Sr.No. | Method & Description |
|---|---|
| 1 |
setIn(PyObject) Set the Python object to use for the standard input stream |
| 2 |
setIn(java.io.Reader) Set a java.io.Reader to use for the standard input stream |
| 3 |
setIn(java.io.InputStream) Set a java.io.InputStream to use for the standard input stream |
| 4 |
setOut(PyObject) Set the Python object to use for the standard output stream |
| 5 |
setOut(java.io.Writer) Set the java.io.Writer to use for the standard output stream |
| 6 |
setOut(java,io.OutputStream) Set the java.io.OutputStream to use for the standard output stream |
| 7 |
setErr(PyObject) Set a Python error object to use for the standard error stream |
| 8 |
setErr(java.io.Writer Set a java.io.Writer to use for the standard error stream |
| 9 |
setErr(java.io.OutputStream) Set a java.io.OutputStream to use for the standard error stream |
| 10 |
eval(String) Evaluate a string as Python source and return the result |
| 11 |
eval(PyObject) Evaluate a Python code object and return the result |
| 12 |
exec(String) Execute a Python source string in the local namespace |
| 13 |
exec(PyObject) Execute a Python code object in the local namespace |
| 14 |
execfile(String filename) Execute a file of Python source in the local namespace |
| 15 |
execfile(java.io.InputStream) Execute an input stream of Python source in the local namespace |
| 16 |
compile(String) Compile a Python source string as an expression or module |
| 17 |
compile(script, filename) Compile a script of Python source as an expression or module |
| 18 |
set(String name, Object value) Set a variable of Object type in the local namespace |
| 19 |
set(String name, PyObject value) Set a variable of PyObject type in the local namespace |
| 20 |
get(String) Get the value of a variable in the local namespace |
| 21 |
get(String name, Class Get the value of a variable in the local namespace. The value will be returned as an instance of the given Java class. |
Example - Using PythonInterpreter Object in Java Program
The following code block is a Java program having an embedded Jython script hello.py using execfile() method of the PythonInterpreter object. It also shows how a Python variable can be set or read using set() and get() methods.
main.java
import org.python.util.PythonInterpreter;
import org.python.core.*;

public class SimpleEmbedded {
   public static void main(String []args) throws PyException {
      PythonInterpreter interp = new PythonInterpreter();
      System.out.println("Hello, world from Java");
      interp.execfile("hello.py");
      interp.set("a", new PyInteger(42));
      interp.exec("print a");
      interp.exec("x = 2+2");
      PyObject x = interp.get("x");
      System.out.println("x: "+x);
      System.out.println("Goodbye ");
   }
}
hello.py
print "Hello World from Python"
Output
Compile and run the above Java program to obtain the following output.
Hello, world from Java
hello world from Python
42
x: 4
Goodbye
Jython - Eclipe Plugin
PyDev is an open source plugin for Eclipse IDE to enable development of projects in Python, Jython as well as IronPython. It is hosted at https://pydev.org. A step-by-step procedure to install PyDev plugin in Eclipse IDE is given below.
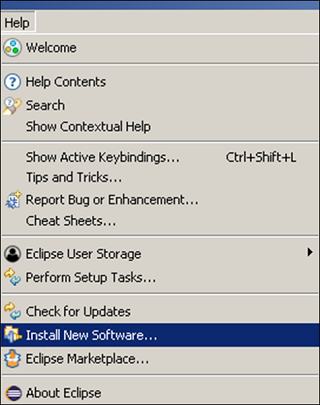
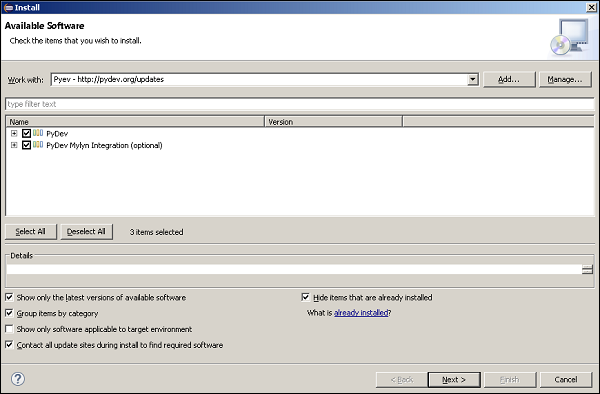
Step 1 − Open Eclipse IDE and choose the Install New Software option from the Help menu.
Step 2 − Enter http://pydev.org/updates in the textbox in front of work with label and click add. Choose all available entries in the list and click on Next. The Wizard will take a few minutes to complete the installation and it will prompt the IDE to be restarted.
Step 3 − Now choose the preferences option from the Window menu. The Preferences dialog will open as shown below.
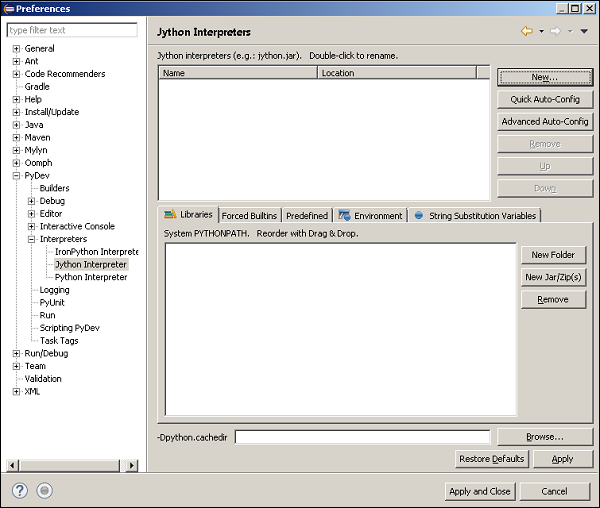
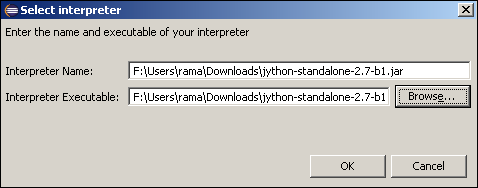
Step 4 − Expand the Interpreters node and select Jython Interpreter in the left pane. On the right pane, click on new to give path to the jython.jar file.
We are now ready to start a Jython project using Eclipse.
Jython - A Project in Eclipse
To make a project in eclipse, we should follow the steps given below.
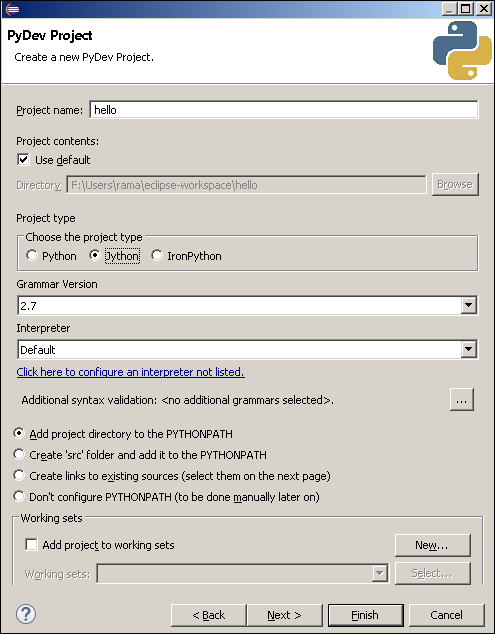
Step 1 − Choose File > New > Project. Choose PyDev from the filter dialog. Give project name, project type and click on Finish.
Step 2 − Hello project will now appear in the project explorer on the left. Right click to add hello.py in it.
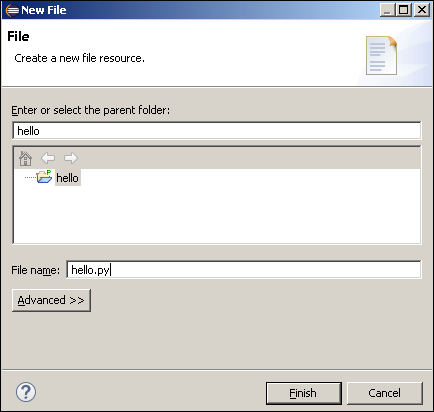
Step 3 − An empty hello.py will appear in the editor. Write the Jython code and save.
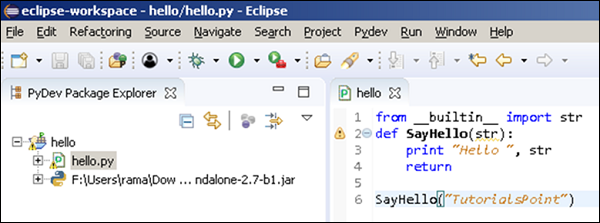
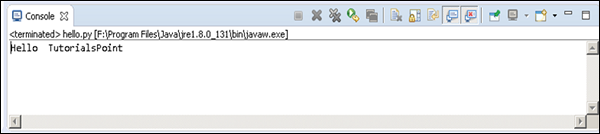
Step 4 − Click on the Run button on the menu bar. The output will appear in the console window as shown below.
Jython - NetBeans Plugin and Project
Python and Jython support for NetBeans is available via the nbPython plugin. Download the plugin from following URL - http://nbpython.org/. Unzip the downloaded archive in some folder. For example - d:\nbplugin. To install the NetBeans Plugin, let us follow the steps given below.
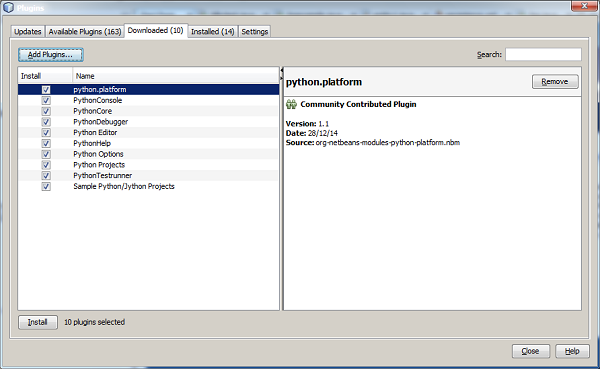
Step 1 − Start the Netbeans IDE and then go to Tools/Plugin to open the Plugin Manager. Choose Downloaded tab and browse to the folder in which the downloaded file has been unzipped. The NetBeans window will appear as shown below.
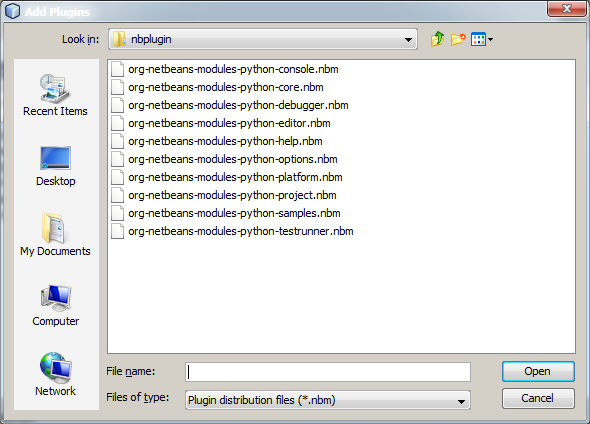
Step 2 − The next step is to select all the .nbm files and click open.
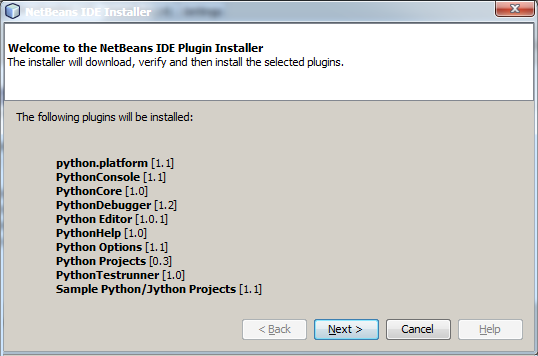
Step 3 − Click on the Install button.
Step 4 − Accept the following license agreement to continue.
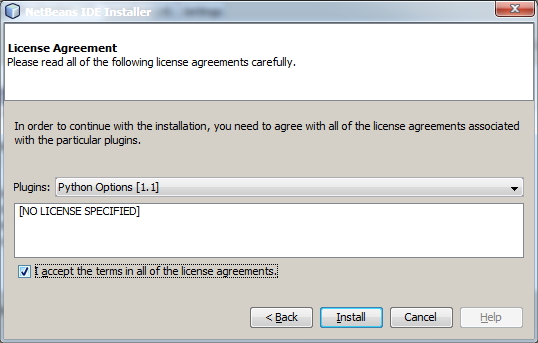
Ignore the warning about untrusted source of plugins and restart the IDE to proceed.
Jython Project in NetBeans
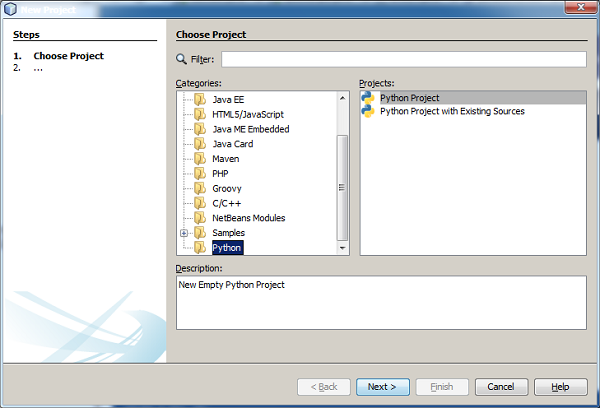
Once restarted, start a new project by choosing File/New. Python category will now be available in the categories list. Choose it to proceed.
If the system has Python installed, its version/versions will be automatically detected and shown in the Python platform dropdown list. However, Jython will not be listed. Click on the Manage button to add it.
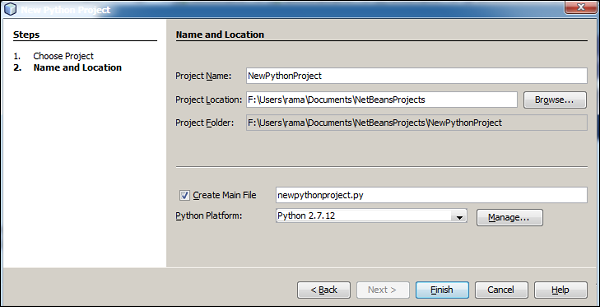
Click on the New button to add a platform name and path to Jython executable.
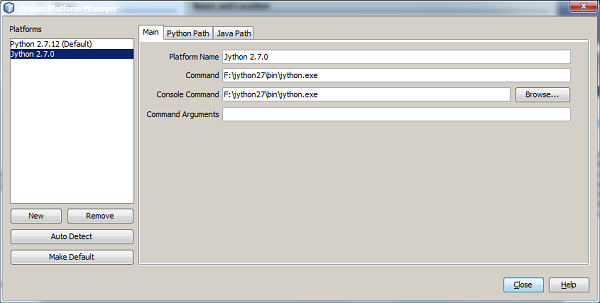
Jython will now be available in the platform list. Select from the dropdown list as shown in the following screenshot.

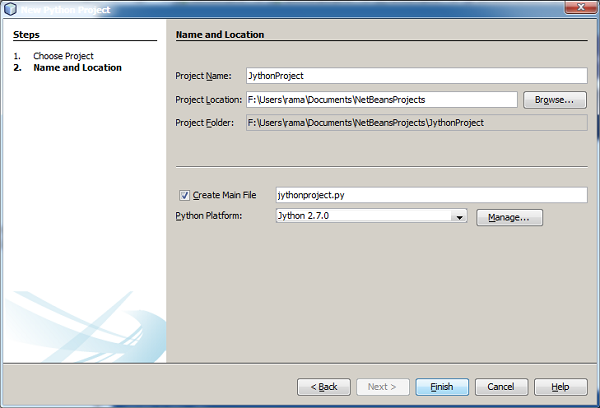
We can now fill in the project name, location and main file in the next window.
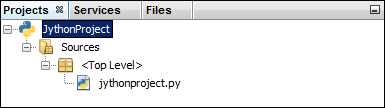
The project structure will appear in the projects window of the NetBeans IDE and a template Python code in the editor window.
Build and execute the Jython project to obtain the following result in the output window of the NetBeans IDE.
Jython - Servlets
A Java servlet is the most widely used web development technique. We can use Jython to write servlets and this adds many more advantages beyond what Java has to offer because now we can make use of the Python language features as well.
We shall use the NetBeans IDE to develop a Java web application with a Jython servlet. Ensure that the nbPython plugin is installed in the NetBeans installation. Start a new project to build a web application by choosing the following path - File → New Project → Java web → New Web Application.
Provide the Project name and location. The IDE will create the project folder structure. Add a Java servlet file (ServletTest.java) under the source packages node in the Projects window. This will add servlet-api.jar in the lib folder of the project. Also, let the IDE create the web.xml descriptor file. Add the following code in ServletTest.java.
ServletTest.java
import java.io.*;
import javax.servlet.*;
import javax.servlet.http.*;

public class ServletTest extends HttpServlet {

   public void doGet (HttpServletRequest request, HttpServletResponse response)
      throws ServletException, IOException {
      doPost(request, response);
   }

   public void doPost (HttpServletRequest request, HttpServletResponse response)
      throws ServletException, IOException {
      response.setContentType ("text/html");
      PrintWriter toClient = response.getWriter();

      toClient.println (
         "<html>
            <head>
               <title>Servlet Test</title>" + "
            </head>
            <body>
               <h1>Servlet Test</h1>
            </body>
         </html>"
      );
   }
}
web.xml
The web.xml file created by NetBeans will be as shown below −
<web-app>
   <servlet>
      <servlet-name>ServletTest</servlet-name>
      <servlet-class>ServletTest</servlet-class>
   </servlet>

   <servlet-mapping>
      <servlet-name>ServletTest</servlet-name>
      <url-pattern>/ServletTest</url-pattern>
   </servlet-mapping>
</web-app>
Output
Build and run the project to obtain the text Servlet Test appearing in <h1> tag in the browser window. Thus, we have added a regular Java servlet in the application.
Now, we shall add the Jython Servlet. Jython servlets work by means of an intermediate Java servlet is also known as PyServlet. The PyServlet.class is present in the jython standalone.jar. Add it in the WEB-INF/lib folder.
The next step is to configure the web.xml to invoke the PyServlet, whenever a request for any *.py file is raised. This should be done by adding the following xml code in it.
<servlet>
   <servlet-name>PyServlet</servlet-name>
   <servlet-class>org.python.util.PyServlet</servlet-class>
   <load-on-startup>1</load-on-startup>
</servlet>

<servlet-mapping>
   <servlet-name>PyServlet</servlet-name>
   <url-pattern>*.py</url-pattern>
</servlet-mapping>
web.xml
The full web.xml code will look as shown below.
<web-app>
   <servlet>
      <servlet-name>ServletTest</servlet-name>
      <servlet-class>ServletTest</servlet-class>
   </servlet>

   <servlet>
      <servlet-name>PyServlet</servlet-name>
      <servlet-class>org.python.util.PyServlet</servlet-class>
      <load-on-startup>1</load-on-startup>
   </servlet>

   <servlet-mapping>
      <servlet-name>ServletTest</servlet-name>
      <url-pattern>/ServletTest</url-pattern>
   </servlet-mapping>

   <servlet-mapping>
      <servlet-name>PyServlet</servlet-name>
      <url-pattern>*.py</url-pattern>
   </servlet-mapping>
</web-app>
JythonServlet.py
Place the following Jython code in the WEB-INF folder inside the project folder as JythonServlet.py, which is equivalent to the previous ServletTest.java.
from javax.servlet.http import HttpServlet

class JythonServlet (HttpServlet):

   def doGet(self,request,response):
      self.doPost (request,response)

   def doPost(self,request,response):
      toClient = response.getWriter()
      response.setContentType ("text/html")

      toClient.println (
         "<html>
            <head>
               <title>Servlet Test</title>" + "
            </head>
            <body>
               <h1>Servlet Test</h1>
            </body>
         </html>"
      )
Output
Build the project and in the browser open the following URL −
http://localhost:8080/jythonwebapp/jythonservlet.py
The browser will show the Servlet Test in <h1> tag as in case of Java Servlet output.
Jython - JDBC
Jython uses the zxJDBC package that provides an easy-to-use Python wrapper around JDBC. zxJDBC bridges two standards: JDBC is the standard platform for database access in Java, and DBI is the standard database API for Python apps.
ZxJDBC provides a DBI 2.0 standard compliant interface to JDBC. Over 200 drivers are available for JDBC and they all work with zxJDBC. High performance drivers are available for all major relational databases, including −
- DB2
- Derby
- MySQL
- Oracle
- PostgreSQL
- SQLite
- SQL Server and
- Sybase.
The ZxJDBC package can be downloaded from https://sourceforge.net/projects/zxjdbc/ or https://www.jython.org/. The downloaded archive contains the ZxJDBC.jar, which should be added to the CLASSPATH environment variable.
We intend to establish database connectivity with MySQL database. For this purpose, the JDBC driver for MySQL is required. Download the MySQL J connector from the following link - https://dev.mysql.com/downloads/connector/j/ and include the mysql connector java-9.5.0-bin.jar in the CLASSPATH.
Login to the MySQL server and create a student table in the test database with the following structure −
| Field | Type | Width |
|---|---|---|
| Name | Varchar | 10 |
| Age | Int | 3 |
| Marks | Int | 3 |
Add a few records in it.
| Name | Age | Marks |
|---|---|---|
| Ravi | 21 | 78 |
| Ashok | 20 | 65 |
| Anil | 22 | 71 |
dbconnect.py
Create the following Jython script as dbconnect.py.
import zxJDBC
import mysql

url = "jdbc:mysql://localhost/test"
user = "root"
password = "password"
driver = "com.mysql.jdbc.Driver"
con = zxJDBC.connect(url, user, password, driver)
mysqlConn = con.cursor()
mysqlConn.execute(select * from student)
for a in mysql.fetchall():
   print a
Output
Execute the above script from the Jython prompt. Records in the student table will be listed as shown below −
(Ravi, 21, 78)
(Ashok, 20, 65)
(Anil,22,71)
This explains the procedure of establishing JDBC in Jython.
Jython - Using the Swing GUI library
One of the major features of Jython is its ability to use the Swing GUI library in JDK. The Standard Python distribution (often called as CPython) has the Tkinter GUI library shipped with it. Other GUI libraries like PyQt and WxPython are also available for use with it, but the swing library offers a platform independent GUI toolkit.
Using the swing library in Jython is much easier compared to using it in Java. In Java the anonymous classes have to be used to create event binding. In Jython, we can simply pass a function for the same purpose.
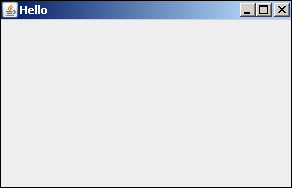
The basic top-level window is created by declaring an object of the JFrame class and set its visible property to true. For that, the Jframe class needs to be imported from the swing package.
from javax.swing import JFrame
The JFrame class has multiple constructors with varying number of arguments. We shall use the one, which takes a string as argument and sets it as the title.
frame = JFrame(Hello)
Set the frames size and location properties before setting its visible property to true. Store the following code as main.py.
Example - Using Swing Library
main.py
from javax.swing import JFrame

frame = JFrame("Hello")
frame.setDefaultCloseOperation(JFrame.EXIT_ON_CLOSE)
frame.setLocation(100,100)
frame.setSize(300,200)
frame.setVisible(True)
Output
Run the above script from the command prompt. It will display the following output showing a window.
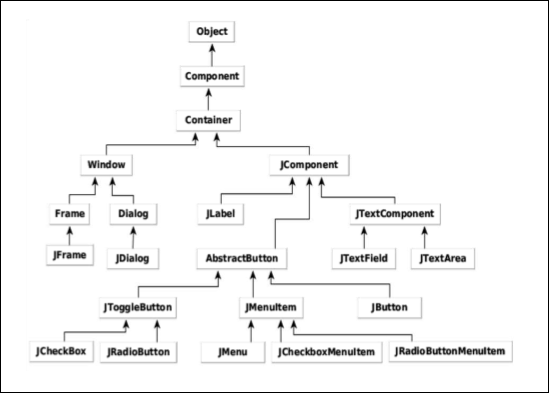
The swing GUI library is provided in the form of javax.swing package in Java. Its main container classes, JFrame and JDialog are respectively derived from Frame and Dialog classes, which are in the AWT library. Other GUI controls like JLabel, JButton, JTextField, etc., are derived from the JComponent class.
The following illustration shows the Swing Package Class hierarchy.
The following table summarizes different GUI control classes in a swing library −
| Sr.No. | Class & Description |
|---|---|
| 1 |
JLabel A JLabel object is a component for placing text in a container. |
| 2 |
JButton This class creates a labeled button. |
| 3 |
JColorChooser A JColorChooser provides a pane of controls designed to allow a user to manipulate and select a color. |
| 4 |
JCheckBox A JCheckBox is a graphical component that can be in either an on (true) or off (false) state. |
| 5 |
JRadioButton The JRadioButton class is a graphical component that can be either in an on (true) or off (false) state. in a group. |
| 6 |
JList A JList component presents the user with a scrolling list of text items. |
| 7 |
JComboBox A JComboBox component presents the user with drop down list of items |
| 8 |
JTextField A JTextField object is a text component that allows for the editing of a single line of text. |
| 9 |
JPasswordField A JPasswordField object is a text component specialized for password entry. |
| 10 |
JTextArea A JTextArea object is a text component that allows editing of a multiple lines of text. |
| 11 |
ImageIcon A ImageIcon control is an implementation of the Icon interface that paints Icons from Images |
| 12 |
JScrollbar A Scrollbar control represents a scroll bar component in order to enable the user to select from range of values. |
| 13 |
JOptionPane JOptionPane provides set of standard dialog boxes that prompt users for a value or informs them of something. |
| 14 |
JFileChooser A JFileChooser control represents a dialog window from which the user can select a file. |
| 15 |
JProgressBar As the task progresses towards completion, the progress bar displays the task's percentage of completion. |
| 16 |
JSlider A JSlider lets the user graphically select a value by sliding a knob within a bounded interval. |
| 17 |
JSpinner A JSpinner is a single line input field that lets the user select a number or an object value from an ordered sequence. |
We would be using some of these controls in subsequent examples.
Jython - Layout Management
Layout managers in Java are classes those, which manage the placement of controls in the container objects like Frame, Dialog or Panel. Layout managers maintain the relative positioning of controls in a frame, even if the resolution changes or the frame itself is resized.
These classes implement the Layout interface. The following Layout managers are defined in the AWT library −
- BorderLayout
- FlowLayout
- GridLayout
- CardLayout
- GridBagLayout
The following Layout Managers are defined in the Swing library −
- BoxLayout
- GroupLayout
- ScrollPaneLayout
- SpringLayout
We shall use AWT layout managers as well as swing layout managers in the following examples.
- Absolute Layout
- Flow Layout
- Grid Layout
- Border Layout
- Box Layout
- Group Layout
Let us now discuss each of these in detail.
Absolute Layout
Before we explore all the above Layout managers, we must look at absolute positioning of the controls in a container. We have to set the layout method of the frame object to None.
frame.setLayout(None)
Then place the control by calling the setBounds() method. It takes four arguments - x position, y position, width and height.
For example - To place a button object at the absolute position and with the absolute size.
btn = JButton("Add")
btn.setBounds(60,80,60,20)
Similarly, all controls can be placed by properly allocating position and size. This layout is relatively easy to use, but fails to retain its appearance when the window either is resized, or if the program is executed when screen resolution changes.
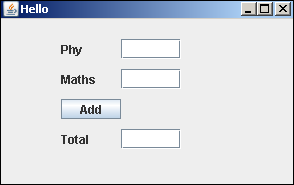
In the following Jython script, three Jlabel objects are used to display text phy, maths and Total respectively. In front of these three - JTextField objects are placed. A Button object is placed above the Total label.
First of all the JFrame window is created with a layout set to none.
frame = JFrame("Hello")
frame.setDefaultCloseOperation(JFrame.EXIT_ON_CLOSE)
frame.setLocation(100,100)
frame.setSize(300,200)
frame.setLayout(None)
Then different controls are added according to their absolute position and size. The complete code is given below −
from javax.swing import JFrame, JLabel, JButton, JTextField

frame = JFrame("Hello")
frame.setDefaultCloseOperation(JFrame.EXIT_ON_CLOSE)
frame.setLocation(100,100)
frame.setSize(300,200)
frame.setLayout(None)

lbl1 = JLabel("Phy")
lbl1.setBounds(60,20,40,20)
txt1 = JTextField(10)
txt1.setBounds(120,20,60,20)
lbl2 = JLabel("Maths")
lbl2.setBounds(60,50,40,20)
txt2 = JTextField(10)
txt2.setBounds(120, 50, 60,20)
btn = JButton("Add")
btn.setBounds(60,80,60,20)
lbl3 = JLabel("Total")
lbl3.setBounds(60,110,40,20)
txt3 = JTextField(10)
txt3.setBounds(120, 110, 60,20)

frame.add(lbl1)
frame.add(txt1)
frame.add(lbl2)
frame.add(txt2)
frame.add(btn)
frame.add(lbl3)
frame.add(txt3)
frame.setVisible(True)
The output for the above code is as follows.
Jython FlowLayout
The FlowLayout is the default layout manager for container classes. It arranges control from left to right and then from top to bottom direction.
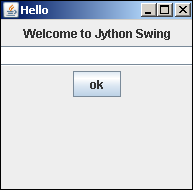
In following example, a Jlabel object, a JTextField object and a JButton object are to be displayed in a JFrame using FlowLayout manager. To start with, let us import the required classes from the javax.swing package and the java.awt package.
from javax.swing import JFrame, JLabel, JButton, JTextField
from java.awt import FlowLayout
Then create a JFrame object and set its Location as well as the size properties.
frame = JFrame("Hello")
frame.setDefaultCloseOperation(JFrame.EXIT_ON_CLOSE)
frame.setLocation(100,100)
frame.setSize(200,200)
Set the layout manager for the frame as FlowLayout.
frame.setLayout(FlowLayout())
Now declare objects for JLabel, JTextfield and JButton classes.
label = JLabel("Welcome to Jython Swing")
txt = JTextField(30)
btn = JButton("ok")
Finally add these controls in the frame by calling the add() method of the JFrame class.
frame.add(label)
frame.add(txt)
frame.add(btn)
To display the frame, set its visible property to true. The complete Jython script and its output is as given below −
from javax.swing import JFrame, JLabel, JButton, JTextField
from java.awt import FlowLayout

frame = JFrame("Hello")
frame.setDefaultCloseOperation(JFrame.EXIT_ON_CLOSE)
frame.setLocation(100,100)
frame.setSize(200,200)

frame.setLayout(FlowLayout())

label = JLabel("Welcome to Jython Swing")
txt = JTextField(30)
btn = JButton("ok")

frame.add(label)
frame.add(txt)
frame.add(btn)
frame.setVisible(True)
Jython GridLayout
The Gridlayout manager allows placement of controls in a rectangular grid. One control is placed in each cell of the grid.
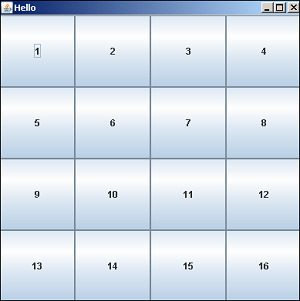
In following example, the GridLayout is applied to a JFrame object dividing it in to 4 rows and 4 columns. A JButton object is to be placed in each cell of the grid.
Let us first import the required libraries −
from javax.swing import JFrame, JButton
from java.awt import GridLayout
Then create the JFrame container −
frame = JFrame("Hello")
frame.setDefaultCloseOperation(JFrame.EXIT_ON_CLOSE)
frame.setLocation(100,100)
frame.setSize(400,400)
Now, apply GridLayout by specifying its dimensions as 4 by 4.
frame.setLayout(GridLayout(4,4))
We should now use two FOR loops, each going from 1 to 4, so sixteen JButton objects are placed in subsequent cells.
k = 0
frame.setLayout(GridLayout(4,4))
for i in range(1,5):
   for j in range(1,5):
      k = k+1
      frame.add(JButton(str(k)))
Finally set visibility of frame to true. The complete Jython code is given below.
from javax.swing import JFrame, JButton
from java.awt import GridLayout

frame = JFrame("Hello")
frame.setDefaultCloseOperation(JFrame.EXIT_ON_CLOSE)
frame.setLocation(100,100)
frame.setSize(400,400)

frame.setLayout(GridLayout(4,4))

k = 0
for i in range(1,5):
   for j in range(1,5):
      k = k+1
      frame.add(JButton(str(k)))

frame.setVisible(True)
The output of the above code is as follows −
Jython BorderLayout
The BorderLayout manager divides the container in five geographical regions and places with one component in each region. These regions are represented by defined constants as follows −
- BorderLayout.NORTH
- BorderLayout.SOUTH
- BorderLayout.EAST
- BorderLayout.WEST
- BorderLayout.CENTER
Let us consider the following example −
Jython BoxLayout
The BoxLayout class is defined in the javax.swing package. It is used to arrange components in the container either vertically or horizontally. The direction is determined by the following constants −
- X_AXIS
- Y_AXIS
- LINE_AXIS
- PAGE_AXIS
The integer constant specifies the axis along which the container's components should be laid out. When the container has the default component orientation, LINE_AXIS specifies that the components be laid out from left to right, and PAGE_AXIS specifies that the components be laid out from top to bottom.
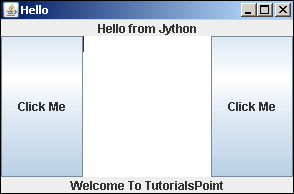
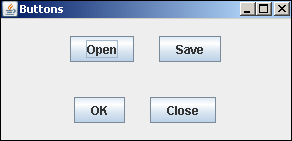
In the following example, panel (of JPanel class) is added in a JFrame object. Vertical BoxLayout is applied to it and two more panels, top and bottom, are added to it. These two internal panels have two buttons each added in the horizontal Boxlayout.
Let us first create the top-level JFrame window.
frame = JFrame()
frame.setTitle("Buttons")
frame.setDefaultCloseOperation(JFrame.EXIT_ON_CLOSE)
frame.setSize(300, 150)
The JPanel object is declared having a vertical BoxLayout. Add it in top-level frame.
panel = JPanel()
panel.setLayout(BoxLayout(panel, BoxLayout.Y_AXIS))
frame.add(panel)
In this panel, two more panels top and bottom are added to it. Each of them have two JButton objects added to them horizontally with a space holder of 25 pixels separating them.
###top panel
top = JPanel()
top.setLayout(BoxLayout(top, BoxLayout.X_AXIS))
b1 = JButton("OK")
b2 = JButton("Close")
top.add(Box.createVerticalGlue())
top.add(b1)
top.add(Box.createRigidArea(Dimension(25, 0)))
top.add(b2)
Similarly, the bottom panel is constructed.
###bottom panel
bottom = JPanel()
bottom.setLayout(BoxLayout(bottom, BoxLayout.X_AXIS))
b3 = JButton("Open")
b4 = JButton("Save")
bottom.add(b3)
bottom.add(Box.createRigidArea(Dimension(25, 0)))
bottom.add(b4)
bottom.add(Box.createVerticalGlue())
Note that the createRigidArea() function is used to create a space of 25 pixels between two buttons. Also the createVerticalGlue() function occupies the leading or the trailing space in the layout.
To start with, add the top and bottom panels and set the visibility property of the frame to true. The complete code is as follows −
from java.awt import Dimension
from javax.swing import JButton, JFrame,JPanel,BoxLayout,Box

frame = JFrame()
frame.setTitle("Buttons")
frame.setDefaultCloseOperation(JFrame.EXIT_ON_CLOSE)
frame.setSize(300, 150)

panel = JPanel()
panel.setLayout(BoxLayout(panel, BoxLayout.Y_AXIS))
frame.add(panel)

###top panel
top = JPanel()
top.setLayout(BoxLayout(top, BoxLayout.X_AXIS))
b1 = JButton("OK")
b2 = JButton("Close")
top.add(Box.createVerticalGlue())
top.add(b1)
top.add(Box.createRigidArea(Dimension(25, 0)))
top.add(b2)

###bottom panel
bottom = JPanel()
bottom.setLayout(BoxLayout(bottom, BoxLayout.X_AXIS))
b3 = JButton("Open")
b4 = JButton("Save")
bottom.add(b3)
bottom.add(Box.createRigidArea(Dimension(25, 0)))
bottom.add(b4)
bottom.add(Box.createVerticalGlue())

panel.add(bottom)
panel.add(top)
frame.setVisible(True)
The above code will generate the following output.
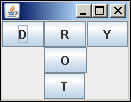
Jython GroupLayout
The GroupLayout manager groups the components in a hierarchical manner. The grouping is done by two classes, SequentialGroup and ParallelGroup, both implement Group interface in Java.
The layout procedure is divided in two steps. In one-step, components are placed along with the horizontal axis, and in second along vertical axis. Each component must be defined twice in the layout.
There are two types of arrangements, sequential and parallel. In both, we can arrange components sequentially or in parallel. In horizontal arrangement, row is called sequential group and column is called parallel group. On the other hand, in parallel arrangement, row of element is a parallel group and a column, which is called sequential.
In following example, five buttons are arranged in such a way that three each appear in row and column. To start with, Add a Jpanel object in a JFrame window and set its layout as Grouplayout.
frame =  JFrame()
panel =  JPanel()
frame.setDefaultCloseOperation(JFrame.EXIT_ON_CLOSE)
layout =  GroupLayout(panel)
panel.setLayout(layout)
Then construct the JButton objects −
buttonD = JButton("D")
buttonR = JButton("R")
buttonY = JButton("Y")
buttonO = JButton("O")
buttonT = JButton("T")
Next, we create a SequentialGroup named LeftToRight to which buttonD and buttonY are added. In between them, a ParallelGroup ColumnMiddle (with other three buttons added vertically) is placed.
leftToRight = layout.createSequentialGroup()
leftToRight.addComponent(buttonD)
columnMiddle = layout.createParallelGroup()
columnMiddle.addComponent(buttonR)
columnMiddle.addComponent(buttonO)
columnMiddle.addComponent(buttonT)
leftToRight.addGroup(columnMiddle)
leftToRight.addComponent(buttonY)
Now comes the definition of vertical SequentialGroup called TopToBottom. Add a ParallelGroup row of three buttons and then rest two buttons vertically.
topToBottom = layout.createSequentialGroup()
rowTop = layout.createParallelGroup()
rowTop.addComponent(buttonD)
rowTop.addComponent(buttonR)
rowTop.addComponent(buttonY)
topToBottom.addGroup(rowTop)
topToBottom.addComponent(buttonO)
topToBottom.addComponent(buttonT)
Finally, set LeftToRight group horizontally and TopToBottom group vertically to the layout object. The complete code is given below −
from javax.swing import JButton, JFrame,JPanel,GroupLayout

frame = JFrame()
panel = JPanel()
frame.setDefaultCloseOperation(JFrame.EXIT_ON_CLOSE)
layout = GroupLayout(panel)
panel.setLayout(layout)

buttonD = JButton("D")
buttonR = JButton("R")
buttonY = JButton("Y")
buttonO = JButton("O")
buttonT = JButton("T")

leftToRight = layout.createSequentialGroup()
leftToRight.addComponent(buttonD)
columnMiddle = layout.createParallelGroup()
columnMiddle.addComponent(buttonR)
columnMiddle.addComponent(buttonO)
columnMiddle.addComponent(buttonT)
leftToRight.addGroup(columnMiddle)
leftToRight.addComponent(buttonY)

topToBottom = layout.createSequentialGroup()
rowTop = layout.createParallelGroup()
rowTop.addComponent(buttonD)
rowTop.addComponent(buttonR)
rowTop.addComponent(buttonY)
topToBottom.addGroup(rowTop)
topToBottom.addComponent(buttonO)
topToBottom.addComponent(buttonT)

layout.setHorizontalGroup(leftToRight)
layout.setVerticalGroup(topToBottom)

frame.add(panel)
frame.pack()
frame.setVisible(True)
The output of the above code is as follows −
Jython - Event Handling
Event handling in Java swing requires that the control (like JButton or JList etc.) should be registered with the respective event listener. The event listener interface or corresponding Adapter class needs to be either implemented or subclassed with its event handling method overridden. In Jython, the event handling is very simple. We can pass any function as property of event handling function corresponding to the control.
Let us first see how a click event is handled in Java.
To begin with, we have to import the java.awt.event package. Next, the class extending JFrame must implement ActionListener interface.
public class btnclick extends JFrame implements ActionListener
Then, we have to declare the JButton object, add it to the ContentPane of frame and then register it with ActionListener by the addActionListener() method.
JButton b1 = new JButton("Click here");
   getContentPane().add(b1);
   b1.addActionListener(this);
Now, the actionPerformed() method of the ActionListener interface must be overridden to handle the ActionEvent.
Following is entire Java code −
import java.awt.event.*;
import javax.swing.*;
public class btnclick extends JFrame implements ActionListener {
   btnclick() {
      JButton b1 = new JButton("Click here");
      getContentPane().add(b1);
      b1.addActionListener(this);
   }

   public void actionPerformed(ActionEvent e) {
      System.out.println("Clicked");
   }

   public static void main(String args[]) {
      btnclick b = new btnclick();
      b.setSize(300,200);
      b.setDefaultCloseOperation(JFrame.EXIT_ON_CLOSE);
      b.setVisible(true);
   }
}
Now, we will write the Jython code equivalent to the same code.
To start with, we do not need to import the ActionEvent or the ActionListener, since Jythons dynamic typing allows us to avoid mentioning these classes in our code.
Secondly, there is no need to implement or subclass ActionListener. Instead, any user defined function is straightaway provided to the JButton constructor as a value of actionPerformed bean property.
button = JButton('Click here!', actionPerformed = clickhere)
The clickhere() function is defined as a regular Jython function, which handles the click event on the button.
def change_text(event):
print clicked!'
Here is the Jython equivalent code.
from javax.swing import JFrame, JButton

frame = JFrame("Hello")
frame.setDefaultCloseOperation(JFrame.EXIT_ON_CLOSE)
frame.setLocation(100,100)
frame.setSize(300,200)

def clickhere(event):
   print "clicked"

btn = JButton("Add", actionPerformed = clickhere)
frame.add(btn)

frame.setVisible(True)
The Output of Java and Jython code is identical. When the button is clicked, it will print the clicked message on the console.
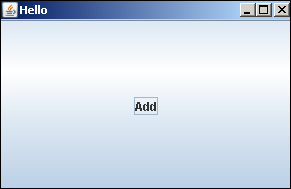
In the following Jython code, two JTextField objects are provided on the JFrame window to enter marks in phy and maths. The JButton object executes the add() function when clicked.
btn = JButton("Add", actionPerformed = add)
The add() function reads the contents of two text fields by the getText() method and parses them to integers, so that, addition can be performed. The result is then put in the third text field by the setText() method.
def add(event):
   print "add"
   ttl = int(txt1.getText())+int(txt2.getText())
   txt3.setText(str(ttl))
The complete code is given below −
from javax.swing import JFrame, JLabel, JButton, JTextField
from java.awt import Dimension

frame = JFrame("Hello")
frame.setDefaultCloseOperation(JFrame.EXIT_ON_CLOSE)
frame.setLocation(100,100)
frame.setSize(300,200)
frame.setLayout(None)

def add(event):
   print "add"
   ttl = int(txt1.getText())+int(txt2.getText())
   txt3.setText(str(ttl))

lbl1 = JLabel("Phy")
lbl1.setBounds(60,20,40,20)
txt1 = JTextField(10)
txt1.setBounds(120,20,60,20)
lbl2 = JLabel("Maths")
lbl2.setBounds(60,50,40,20)
txt2 = JTextField(10)
txt2.setBounds(120, 50, 60,20)
btn = JButton("Add", actionPerformed = add)
btn.setBounds(60,80,60,20)
lbl3 = JLabel("Total")
lbl3.setBounds(60,110,40,20)
txt3 = JTextField(10)
txt3.setBounds(120, 110, 60,20)

frame.add(lbl1)
frame.add(txt1)
frame.add(lbl2)
frame.add(txt2)
frame.add(btn)
frame.add(lbl3)
frame.add(txt3)
frame.setVisible(True)
When the above code is executed from the command prompt, the following window appears. Enter marks for Phy, Maths, and click on the Add button. The result will be displayed accordingly.
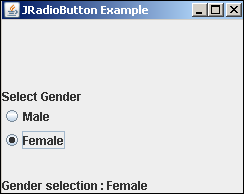
Jython JRadioButton Event
The JRadioButton class is defined in the javax.swing package. It creates a selectable toggle button with on or off states. If multiple radio buttons are added in a ButtonGroup, their selection is mutually exclusive.
In the following example, two objects of the JRadioButton class and two JLabels are added to a Jpanel container in a vertical BoxLayout. In the constructor of the JRadioButton objects, the OnCheck() function is set as the value of the actionPerformed property. This function is executed when the radio button is clicked to change its state.
rb1 = JRadioButton("Male", True,actionPerformed = OnCheck)
rb2 = JRadioButton("Female", actionPerformed = OnCheck)
Note that the default state of Radio Button is false (not selected). The button rb1 is created with its starting state as True (selected).
The two radio buttons are added to a radio ButtonGroup to make them mutually exclusive, so that if one is selected, other is deselected automatically.
grp = ButtonGroup()
grp.add(rb1)
grp.add(rb2)
These two radio buttons along with two labels are added to a panel object in the vertical layout with a separator area of 25 pixels in heights between rb2 and lbl2.
panel = JPanel()
panel.setLayout(BoxLayout(panel, BoxLayout.Y_AXIS))

panel.add(Box.createVerticalGlue())
panel.add(lbl)
panel.add(rb1)
panel.add(rb2)
panel.add(Box.createRigidArea(Dimension(0,25)))
panel.add(lbl1)
This panel is added to a top-level JFrame object, whose visible property is set to True in the end.
frame = JFrame("JRadioButton Example")
frame.setDefaultCloseOperation(JFrame.EXIT_ON_CLOSE)
frame.setLocation(100,100)
frame.setSize(250,200)
frame.setVisible(True)
The complete code of radio.py is given below:
from javax.swing import JFrame, JPanel, JLabel, BoxLayout, Box

from java.awt import Dimension
from javax.swing import JRadioButton,ButtonGroup
frame = JFrame("JRadioButton Example")
frame.setDefaultCloseOperation(JFrame.EXIT_ON_CLOSE)
frame.setLocation(100,100)
frame.setSize(250,200)
panel = JPanel()
panel.setLayout(BoxLayout(panel, BoxLayout.Y_AXIS))
frame.add(panel)

def OnCheck(event):
   lbl1.text = ""
   if rb1.isSelected():
      lbl1.text = lbl1.text+"Gender selection : Male"
   else:
      lbl1.text = lbl1.text+"Gender selection : Female "
      lbl = JLabel("Select Gender")

rb1 = JRadioButton("Male", True,actionPerformed = OnCheck)
rb2 = JRadioButton("Female", actionPerformed = OnCheck)
grp = ButtonGroup()
grp.add(rb1)
grp.add(rb2)

lbl1 = JLabel("Gender Selection :")

panel.add(Box.createVerticalGlue())
panel.add(lbl)
panel.add(rb1)
panel.add(rb2)
panel.add(Box.createRigidArea(Dimension(0,25)))
panel.add(lbl1)

frame.setVisible(True)
Run the above Jython script and change the radio button selection. The selection will appear in the label at the bottom.
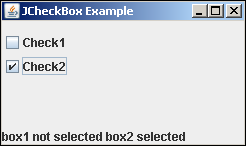
Jython JCheckBox Event
Like the JRadioButton, JCheckBox object is also a selectable button with a rectangular checkable box besides its caption. This is generally used to provide user opportunity to select multiple options from the list of items.
In the following example, two check boxes and a label from swing package are added to a JPanel in vertical BoxLayout. The label at bottom displays the instantaneous selection state of two check boxes.
Both checkboxes are declared with the constructor having the actionPerformed property set to the OnCheck() function.
box1 = JCheckBox("Check1", actionPerformed = OnCheck)
box2 = JCheckBox("Check2", actionPerformed = OnCheck)
The OnCheck() function verifies selection state of each check box and displays corresponding message on the label at the bottom.
def OnCheck(event):
   lbl1.text = ""
   if box1.isSelected():
      lbl1.text = lbl1.text + "box1 selected "
   else:
      lbl1.text = lbl1.text + "box1 not selected "
   if box2.isSelected():
      lbl1.text = lbl1.text + "box2 selected"
   else:
      lbl1.text = lbl1.text + "box2 not selected"
These boxes and a JLabel object are added to a JPanel with a spaceholder of 50 pixels in height added between them.
panel = JPanel()
panel.setLayout(BoxLayout(panel, BoxLayout.Y_AXIS))
panel.add(Box.createVerticalGlue())
panel.add(box1)
panel.add(box2)
panel.add(Box.createRigidArea(Dimension(0,50)))
panel.add(lbl1)
The panel itself is added to a top-level JFrame window, whose visible property is set to true in the end.
frame = JFrame("JCheckBox Example")
frame.setDefaultCloseOperation(JFrame.EXIT_ON_CLOSE)
frame.setLocation(100,100)
frame.setSize(250,150)
frame.add(panel)

frame.setVisible(True)
Run the above code and experiment with the selection of check boxes. The instantaneous state of both check boxes is displayed at the bottom.
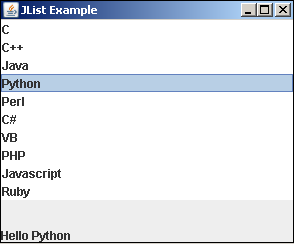
Jython JList Event
The JList control in the swing package provides the user with a scrollable list of items to choose. The JComboBox provides a drop down list of items. In Java, the selection event is processed by implementing the valueChanged() method in the ListSelectionListener. In Jython, an event handler is assigned to the valueChanged property of the JList object.
In the following example, a JList object and a label are added to a JFrame in the BorderLayout. The JList is populated with a collection of items in a tuple. Its valueChanged property is set to listSelect() function.
lang = ("C", "C++", "Java", "Python", "Perl", "C#", "VB", "PHP", "Javascript", "Ruby")
lst = JList(lang, valueChanged = listSelect)
The event handler function obtains the index of the selected item and fetches the corresponding item from the JList object to be displayed on the label at the bottom.
def listSelect(event):
   index = lst.selectedIndex
   lbl1.text = "Hello" + lang[index]
The JList and JLabel object are added to the JFrame using BorderLayout.
The entire code is given below −
from javax.swing import JFrame, JPanel, JLabel, JList
from java.awt import BorderLayout

frame = JFrame("JList Example")
frame.setDefaultCloseOperation(JFrame.EXIT_ON_CLOSE)
frame.setLocation(100,100)
frame.setSize(300,250)

frame.setLayout(BorderLayout())

def listSelect(event):
   index = lst.selectedIndex
   lbl1.text = "Hello" + lang[index]

lang = ("C", "C++", "Java", "Python", "Perl", "C#", "VB", "PHP", "Javascript", "Ruby")
lst = JList(lang, valueChanged = listSelect)
lbl1 = JLabel("box1 not selected box2 not selected")
frame.add(lst, BorderLayout.NORTH)
frame.add(lbl1, BorderLayout.SOUTH)

frame.setVisible(True)
The output of the following code is as follows.
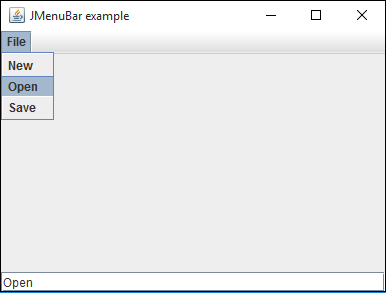
Jython - Menus
Most of the GUI based applications have a Menu bar at the top. It is found just below the title bar of the top-level window. The javax.swing package has elaborate facility to build an efficient menu system. It is constructed with the help of JMenuBar, JMenu and JMenuItem classes.
In following example, a menu bar is provided in the top-level window. A File menu consisting of three menu item buttons is added to the menu bar. Let us now prepare a JFrame object with the layout set to BorderLayout.
frame = JFrame("JMenuBar example")
frame.setDefaultCloseOperation(JFrame.EXIT_ON_CLOSE)
frame.setLocation(100,100)
frame.setSize(400,300)
frame.setLayout(BorderLayout())
Now, a JMenuBar object is activated by the SetJMenuBar() method.
bar = JMenuBar()
frame.setJMenuBar(bar)
Next, a JMenu object having File caption is declared. Three JMenuItem buttons are added to the File menu. When any of the menu items are clicked, the ActionEvent handler OnClick() function is executed. It is defined with the actionPerformed property.
file = JMenu("File")
newfile = JMenuItem("New",actionPerformed = OnClick)
openfile = JMenuItem("Open",actionPerformed = OnClick)
savefile = JMenuItem("Save",actionPerformed = OnClick)
file.add(newfile)
file.add(openfile)
file.add(savefile)
bar.add(file)
The OnClick() event handler retrieves the name of the JMenuItem button by the gwtActionCommand() function and displays it in the text box at the bottom of the window.
def OnClick(event):
   txt.text = event.getActionCommand()
The File menu object is added to menu bar. Finally, a JTextField control is added at the bottom of the JFrame object.
txt = JTextField(10)
frame.add(txt, BorderLayout.SOUTH)
The entire code of menu.py is given below −
menu.py
from javax.swing import JFrame, JMenuBar, JMenu, JMenuItem, JTextField
from java.awt import BorderLayout

frame = JFrame("JMenuBar example")
frame.setDefaultCloseOperation(JFrame.EXIT_ON_CLOSE)
frame.setLocation(100,100)
frame.setSize(400,300)
frame.setLayout(BorderLayout())

def OnClick(event):
   txt.text = event.getActionCommand()

bar = JMenuBar()
frame.setJMenuBar(bar)

file = JMenu("File")
newfile = JMenuItem("New",actionPerformed = OnClick)
openfile = JMenuItem("Open",actionPerformed = OnClick)
savefile = JMenuItem("Save",actionPerformed = OnClick)
file.add(newfile)
file.add(openfile)
file.add(savefile)
bar.add(file)

txt = JTextField(10)
frame.add(txt, BorderLayout.SOUTH)

frame.setVisible(True)
Output
When the above script is executed using the Jython interpreter, a window with the File menu appears. Click on it and its three menu items will drop down. If any button is clicked, its name will be displayed in the text box control.
Jython - Dialogs
A Dialog object is a window that appears on top of the base window with which the user interacts. In this chapter, we shall see the preconfigured dialogs defined in the swing library. They are MessageDialog, ConfirmDialog and InputDialog. They are available because of the static method of the JOptionPane class.
In the following example, the File menu has three JMenu items corresponding to the above three dialogs; each executes the OnClick event handler.
file = JMenu("File")
msgbtn = JMenuItem("Message",actionPerformed = OnClick)
conbtn = JMenuItem("Confirm",actionPerformed = OnClick)
inputbtn = JMenuItem("Input",actionPerformed = OnClick)
file.add(msgbtn)
file.add(conbtn)
file.add(inputbtn)
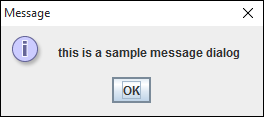
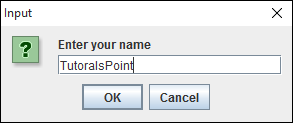
The OnClick() handler function retrieves the caption of Menu Item button and invokes the respective showXXXDialog() method.
def OnClick(event):
str = event.getActionCommand()
if str == 'Message':
JOptionPane.showMessageDialog(frame,"this is a sample message dialog")
if str == "Input":
x = JOptionPane.showInputDialog(frame,"Enter your name")
txt.setText(x)
if str == "Confirm":
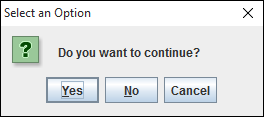
s = JOptionPane.showConfirmDialog (frame, "Do you want to continue?")
if s == JOptionPane.YES_OPTION:
txt.setText("YES")
if s == JOptionPane.NO_OPTION:
txt.setText("NO")
if s == JOptionPane.CANCEL_OPTION:
txt.setText("CANCEL")
If the message option from menu is chosen, a message pops up. If Input option is clicked, a dialog asking for the input pops up. The input text is then displayed in the text box in the JFrame window. If the Confirm option is selected, a dialog with three buttons, YES, NO and CANCEL comes up. The users choice is recorded in the text box.
The entire code is given below −
from javax.swing import JFrame, JMenuBar, JMenu, JMenuItem, JTextField
from java.awt import BorderLayout
from javax.swing import JOptionPane
frame = JFrame("Dialog example")
frame.setDefaultCloseOperation(JFrame.EXIT_ON_CLOSE)
frame.setLocation(100,100)
frame.setSize(400,300)
frame.setLayout(BorderLayout())

def OnClick(event):
   str = event.getActionCommand()
   if str == 'Message':
      JOptionPane.showMessageDialog(frame,"this is a sample message dialog")
   if str == "Input":
      x = JOptionPane.showInputDialog(frame,"Enter your name")
      txt.setText(x)
   if str == "Confirm":
      s = JOptionPane.showConfirmDialog (frame, "Do you want to continue?")
      if s == JOptionPane.YES_OPTION:
         txt.setText("YES")
      if s == JOptionPane.NO_OPTION:
         txt.setText("NO")
      if s == JOptionPane.CANCEL_OPTION:
         txt.setText("CANCEL")

bar = JMenuBar()
frame.setJMenuBar(bar)

file = JMenu("File")
msgbtn = JMenuItem("Message",actionPerformed = OnClick)
conbtn = JMenuItem("Confirm",actionPerformed = OnClick)
inputbtn = JMenuItem("Input",actionPerformed = OnClick)
file.add(msgbtn)
file.add(conbtn)
file.add(inputbtn)
bar.add(file)
txt = JTextField(10)
frame.add(txt, BorderLayout.SOUTH)
frame.setVisible(True)
When the above script is executed, the following window is displayed with three options in the menu −
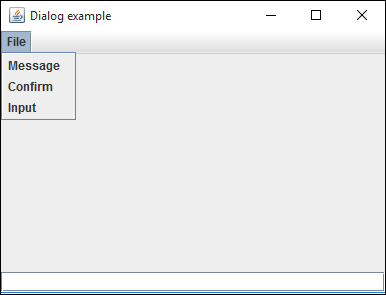
Message box
Input Box
Confirm Dialog