- Jython - Home
- Jython - Overview
- Jython - Installation
- Jython - Importing Java Libraries
- Jython - Variables and Data Types
- Jython - Using Java Collection Types
- Jython - Decision Control
- Jython - Loops
- Jython - Functions
- Jython - Modules
- Jython - Package
- Jython - Java Application
- Jython - Eclipse Plugin
- Jython - A Project in Eclipse
- Jython - NetBeans Plugin & Project
- Jython - Servlets
- Jython - JDBC
- Jython - Using the Swing GUI library
- Jython - Layout Management
- Jython - Event Handling
- Jython - Menus
- Jython - Dialogs
Jython - Useful Resources
Jython - Event Handling
Event handling in Java swing requires that the control (like JButton or JList etc.) should be registered with the respective event listener. The event listener interface or corresponding Adapter class needs to be either implemented or subclassed with its event handling method overridden. In Jython, the event handling is very simple. We can pass any function as property of event handling function corresponding to the control.
Let us first see how a click event is handled in Java.
To begin with, we have to import the java.awt.event package. Next, the class extending JFrame must implement ActionListener interface.
public class btnclick extends JFrame implements ActionListener
Then, we have to declare the JButton object, add it to the ContentPane of frame and then register it with ActionListener by the addActionListener() method.
JButton b1 = new JButton("Click here");
   getContentPane().add(b1);
   b1.addActionListener(this);
Now, the actionPerformed() method of the ActionListener interface must be overridden to handle the ActionEvent.
Following is entire Java code −
import java.awt.event.*;
import javax.swing.*;
public class btnclick extends JFrame implements ActionListener {
   btnclick() {
      JButton b1 = new JButton("Click here");
      getContentPane().add(b1);
      b1.addActionListener(this);
   }

   public void actionPerformed(ActionEvent e) {
      System.out.println("Clicked");
   }

   public static void main(String args[]) {
      btnclick b = new btnclick();
      b.setSize(300,200);
      b.setDefaultCloseOperation(JFrame.EXIT_ON_CLOSE);
      b.setVisible(true);
   }
}
Now, we will write the Jython code equivalent to the same code.
To start with, we do not need to import the ActionEvent or the ActionListener, since Jythons dynamic typing allows us to avoid mentioning these classes in our code.
Secondly, there is no need to implement or subclass ActionListener. Instead, any user defined function is straightaway provided to the JButton constructor as a value of actionPerformed bean property.
button = JButton('Click here!', actionPerformed = clickhere)
The clickhere() function is defined as a regular Jython function, which handles the click event on the button.
def change_text(event):
print clicked!'
Here is the Jython equivalent code.
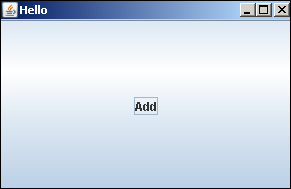
from javax.swing import JFrame, JButton

frame = JFrame("Hello")
frame.setDefaultCloseOperation(JFrame.EXIT_ON_CLOSE)
frame.setLocation(100,100)
frame.setSize(300,200)

def clickhere(event):
   print "clicked"

btn = JButton("Add", actionPerformed = clickhere)
frame.add(btn)

frame.setVisible(True)
The Output of Java and Jython code is identical. When the button is clicked, it will print the clicked message on the console.
In the following Jython code, two JTextField objects are provided on the JFrame window to enter marks in phy and maths. The JButton object executes the add() function when clicked.
btn = JButton("Add", actionPerformed = add)
The add() function reads the contents of two text fields by the getText() method and parses them to integers, so that, addition can be performed. The result is then put in the third text field by the setText() method.
def add(event):
   print "add"
   ttl = int(txt1.getText())+int(txt2.getText())
   txt3.setText(str(ttl))
The complete code is given below −
from javax.swing import JFrame, JLabel, JButton, JTextField
from java.awt import Dimension

frame = JFrame("Hello")
frame.setDefaultCloseOperation(JFrame.EXIT_ON_CLOSE)
frame.setLocation(100,100)
frame.setSize(300,200)
frame.setLayout(None)

def add(event):
   print "add"
   ttl = int(txt1.getText())+int(txt2.getText())
   txt3.setText(str(ttl))

lbl1 = JLabel("Phy")
lbl1.setBounds(60,20,40,20)
txt1 = JTextField(10)
txt1.setBounds(120,20,60,20)
lbl2 = JLabel("Maths")
lbl2.setBounds(60,50,40,20)
txt2 = JTextField(10)
txt2.setBounds(120, 50, 60,20)
btn = JButton("Add", actionPerformed = add)
btn.setBounds(60,80,60,20)
lbl3 = JLabel("Total")
lbl3.setBounds(60,110,40,20)
txt3 = JTextField(10)
txt3.setBounds(120, 110, 60,20)

frame.add(lbl1)
frame.add(txt1)
frame.add(lbl2)
frame.add(txt2)
frame.add(btn)
frame.add(lbl3)
frame.add(txt3)
frame.setVisible(True)
When the above code is executed from the command prompt, the following window appears. Enter marks for Phy, Maths, and click on the Add button. The result will be displayed accordingly.
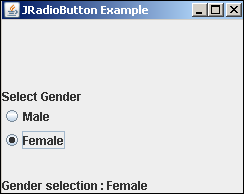
Jython JRadioButton Event
The JRadioButton class is defined in the javax.swing package. It creates a selectable toggle button with on or off states. If multiple radio buttons are added in a ButtonGroup, their selection is mutually exclusive.
In the following example, two objects of the JRadioButton class and two JLabels are added to a Jpanel container in a vertical BoxLayout. In the constructor of the JRadioButton objects, the OnCheck() function is set as the value of the actionPerformed property. This function is executed when the radio button is clicked to change its state.
rb1 = JRadioButton("Male", True,actionPerformed = OnCheck)
rb2 = JRadioButton("Female", actionPerformed = OnCheck)
Note that the default state of Radio Button is false (not selected). The button rb1 is created with its starting state as True (selected).
The two radio buttons are added to a radio ButtonGroup to make them mutually exclusive, so that if one is selected, other is deselected automatically.
grp = ButtonGroup()
grp.add(rb1)
grp.add(rb2)
These two radio buttons along with two labels are added to a panel object in the vertical layout with a separator area of 25 pixels in heights between rb2 and lbl2.
panel = JPanel()
panel.setLayout(BoxLayout(panel, BoxLayout.Y_AXIS))

panel.add(Box.createVerticalGlue())
panel.add(lbl)
panel.add(rb1)
panel.add(rb2)
panel.add(Box.createRigidArea(Dimension(0,25)))
panel.add(lbl1)
This panel is added to a top-level JFrame object, whose visible property is set to True in the end.
frame = JFrame("JRadioButton Example")
frame.setDefaultCloseOperation(JFrame.EXIT_ON_CLOSE)
frame.setLocation(100,100)
frame.setSize(250,200)
frame.setVisible(True)
The complete code of radio.py is given below:
from javax.swing import JFrame, JPanel, JLabel, BoxLayout, Box

from java.awt import Dimension
from javax.swing import JRadioButton,ButtonGroup
frame = JFrame("JRadioButton Example")
frame.setDefaultCloseOperation(JFrame.EXIT_ON_CLOSE)
frame.setLocation(100,100)
frame.setSize(250,200)
panel = JPanel()
panel.setLayout(BoxLayout(panel, BoxLayout.Y_AXIS))
frame.add(panel)

def OnCheck(event):
   lbl1.text = ""
   if rb1.isSelected():
      lbl1.text = lbl1.text+"Gender selection : Male"
   else:
      lbl1.text = lbl1.text+"Gender selection : Female "
      lbl = JLabel("Select Gender")

rb1 = JRadioButton("Male", True,actionPerformed = OnCheck)
rb2 = JRadioButton("Female", actionPerformed = OnCheck)
grp = ButtonGroup()
grp.add(rb1)
grp.add(rb2)

lbl1 = JLabel("Gender Selection :")

panel.add(Box.createVerticalGlue())
panel.add(lbl)
panel.add(rb1)
panel.add(rb2)
panel.add(Box.createRigidArea(Dimension(0,25)))
panel.add(lbl1)

frame.setVisible(True)
Run the above Jython script and change the radio button selection. The selection will appear in the label at the bottom.
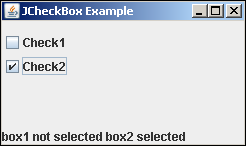
Jython JCheckBox Event
Like the JRadioButton, JCheckBox object is also a selectable button with a rectangular checkable box besides its caption. This is generally used to provide user opportunity to select multiple options from the list of items.
In the following example, two check boxes and a label from swing package are added to a JPanel in vertical BoxLayout. The label at bottom displays the instantaneous selection state of two check boxes.
Both checkboxes are declared with the constructor having the actionPerformed property set to the OnCheck() function.
box1 = JCheckBox("Check1", actionPerformed = OnCheck)
box2 = JCheckBox("Check2", actionPerformed = OnCheck)
The OnCheck() function verifies selection state of each check box and displays corresponding message on the label at the bottom.
def OnCheck(event):
   lbl1.text = ""
   if box1.isSelected():
      lbl1.text = lbl1.text + "box1 selected "
   else:
      lbl1.text = lbl1.text + "box1 not selected "
   if box2.isSelected():
      lbl1.text = lbl1.text + "box2 selected"
   else:
      lbl1.text = lbl1.text + "box2 not selected"
These boxes and a JLabel object are added to a JPanel with a spaceholder of 50 pixels in height added between them.
panel = JPanel()
panel.setLayout(BoxLayout(panel, BoxLayout.Y_AXIS))
panel.add(Box.createVerticalGlue())
panel.add(box1)
panel.add(box2)
panel.add(Box.createRigidArea(Dimension(0,50)))
panel.add(lbl1)
The panel itself is added to a top-level JFrame window, whose visible property is set to true in the end.
frame = JFrame("JCheckBox Example")
frame.setDefaultCloseOperation(JFrame.EXIT_ON_CLOSE)
frame.setLocation(100,100)
frame.setSize(250,150)
frame.add(panel)

frame.setVisible(True)
Run the above code and experiment with the selection of check boxes. The instantaneous state of both check boxes is displayed at the bottom.
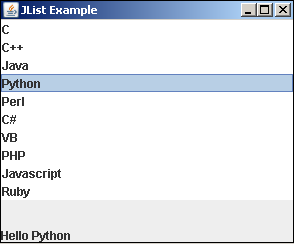
Jython JList Event
The JList control in the swing package provides the user with a scrollable list of items to choose. The JComboBox provides a drop down list of items. In Java, the selection event is processed by implementing the valueChanged() method in the ListSelectionListener. In Jython, an event handler is assigned to the valueChanged property of the JList object.
In the following example, a JList object and a label are added to a JFrame in the BorderLayout. The JList is populated with a collection of items in a tuple. Its valueChanged property is set to listSelect() function.
lang = ("C", "C++", "Java", "Python", "Perl", "C#", "VB", "PHP", "Javascript", "Ruby")
lst = JList(lang, valueChanged = listSelect)
The event handler function obtains the index of the selected item and fetches the corresponding item from the JList object to be displayed on the label at the bottom.
def listSelect(event):
   index = lst.selectedIndex
   lbl1.text = "Hello" + lang[index]
The JList and JLabel object are added to the JFrame using BorderLayout.
The entire code is given below −
from javax.swing import JFrame, JPanel, JLabel, JList
from java.awt import BorderLayout

frame = JFrame("JList Example")
frame.setDefaultCloseOperation(JFrame.EXIT_ON_CLOSE)
frame.setLocation(100,100)
frame.setSize(300,250)

frame.setLayout(BorderLayout())

def listSelect(event):
   index = lst.selectedIndex
   lbl1.text = "Hello" + lang[index]

lang = ("C", "C++", "Java", "Python", "Perl", "C#", "VB", "PHP", "Javascript", "Ruby")
lst = JList(lang, valueChanged = listSelect)
lbl1 = JLabel("box1 not selected box2 not selected")
frame.add(lst, BorderLayout.NORTH)
frame.add(lbl1, BorderLayout.SOUTH)

frame.setVisible(True)
The output of the following code is as follows.