
Article Categories
- All Categories
-
 Data Structure
-
 Networking
-
 RDBMS
RDBMS
-
 Operating System
-
 Java
Java
-
 MS Excel
-
 iOS
iOS
-
 HTML
HTML
-
 CSS
CSS
-
 Android
-
 Python
-
 C Programming
-
 C++
C++
-
 C#
C#
-
 MongoDB
-
 MySQL
MySQL
-
 Javascript
-
 PHP
PHP
-
 Economics & Finance
Java Program to take Screenshots
Java AWT (Abstract Window Toolkit) is a versatile package that contains all the classes required for creating user interfaces and painting graphic images. Buttons and scrollbar-like entities are called components in the AWT terminology. The Component class is the root of all the AWT components. Events are triggered in some components when a user interacts with them. The AWTEvent class and its subclasses represent the events that AWT components are capable of firing. In AWTEvent, the AWT event model is explained.
A container is a component that may also include other components and containers. Another choice for a container is a layout manager, which controls how components are visually arranged inside the container. The AWT package contains a number of layout manager classes as well as an interface for developing your own layout manager. Check out LayoutManager and Container for further information.
The values are kept as an integer, therefore each component object has a maximum size and location. A platform may also place further limitations on the maximum size and geographic region. The platform determines the precise maximum values. These maximum values cannot be altered, either in Java code or native code. Component layout is likewise constrained by these limits. It is impossible to organize Component objects within Container objects effectively if their limits exceed a platform restriction. Any object's position and size on a particular axis work together to establish the limits of the object.
Algorithm
For capturing screenshot without building a GUI
Import all the necessary java packages.
Create a ?Robot? object to capture the screenshot.
Create a ?Rectangle? object to specify the dimensions of the screen to be captured.
Capture the screen as a ?BufferedImage? object.
Print the message of the screenshot being captured.
For capturing screenshot by building a GUI and saving to a specific path
Import all the necessary libraries.
Create a ?JFrame? object to hold the GUI components.
Create a ?JButton? object to click and capture a screenshot.
Create a ?JFileChooser? object to hold the ?JButton? and add it to ?JFrame?.
Add ?ActionListener? to the ?JButton? that captures the screenshot and saves it to a specific file when the button is clicked.
Use a ?Robot? object to capture the screen as a ?BufferImage? object.
Display the ?save file? dialog box to allow the user to select the save location and file name.
Save the ?BufferedImage? object to the selected file using the ?ImageIO.write()? method.
Print the message of the screenshot being saved.
Specify the dimensions and visibility of the ?JFrame?.
Approaches
Capturing screenshot without building a GUI.
Capturing screenshot by building a GUI and saving to a specific path.
Capturing screenshot without creating a GUI
Example
import java.awt.Rectangle;
import java.awt.Robot;
import java.awt.Toolkit;
import java.awt.image.BufferedImage;
import java.io.File;
import javax.imageio.ImageIO;

public class ScreenCapture {
   public static void main(String[] args) throws Exception {
      // Create a Robot object to capture the screen
      Robot robot = new Robot();

      // Create a Rectangle object to define the area of the screen to capture
      Rectangle rectangle = new Rectangle(Toolkit.getDefaultToolkit().getScreenSize());

      // Use the robot.createScreenCapture() method to capture the screen as a BufferedImage object
      BufferedImage image = robot.createScreenCapture(rectangle);

      // Save the BufferedImage object to a file using the ImageIO.write() method
      File file = new File("screenshot.png");
      ImageIO.write(image, "png", file);

      // Print a message indicating that the screenshot has been saved
      System.out.println("Screenshot saved to screenshot.png");
   }
}
Output
Screenshot saved to screenshot.png
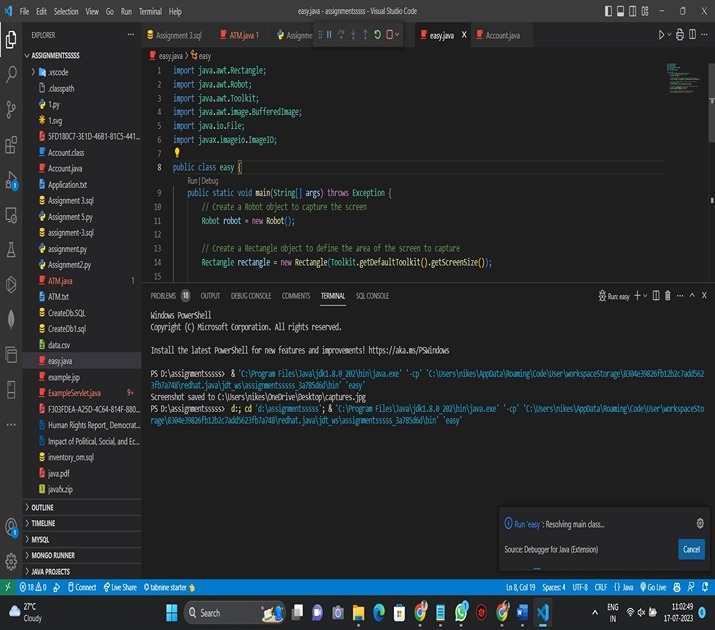
The Java.awt and Javax.imageIO packages are used to capture and preserve a snapshot of the screen. It initially creates a Robot object before attempting to capture the screen as a BufferedImage object. The portion of the screen to be captured in a later-created Rectangle object is defined as the complete screen, which was collected using the Toolkit.the getDefaultToolkit() function's getScreenSize.
The robot is then used by the code to capture the screen as a BufferedImage object.function called createScreenCapture(rectangle). The latest screenshot is replaced with this item.
Following that step within our process, we proceed to preserve a particular instance of a Buffered Image by means of ImageIO.write - specifically using its arguments ("png" and file). Execution of this requires utilization of two distinct objects: first being our representative Buffered Image known simply as "image", while secondly there is another referred to merely as "file", establishing precisely where output will be saved. Notably in this case we've selected PNG format for storage purposes.
The final message the programme generates states that the screenshot has been saved to the file screenshot.png.
Capturing screenshot by creating a GUI and saving to a specific path
Example
import java.awt.AWTException;
import java.awt.BorderLayout;
import java.awt.Dimension;
import java.awt.Rectangle;
import java.awt.Robot;
import java.awt.Toolkit;
import java.awt.image.BufferedImage;
import java.awt.event.ActionEvent;
import java.awt.event.ActionListener;
import java.io.File;
import javax.imageio.ImageIO;
import javax.swing.JButton;
import javax.swing.JFileChooser;
import javax.swing.JFrame;
import javax.swing.JPanel;

public class ScreenshotCapture {
   public static void main(String[] args) {
      // Create a JFrame object
      JFrame frame = new JFrame("Screenshot Capture");

      // Create a JButton object
      JButton captureButton = new JButton("Capture");

      // Create a JFileChooser object
      JFileChooser fileChooser = new JFileChooser();

      // Create a JPanel object
      JPanel panel = new JPanel();

      // Add the JButton and JPanel objects to the JFrame
      panel.add(captureButton);
      frame.add(panel, BorderLayout.CENTER);

      // Add an ActionListener to the JButton to capture the screenshot and save it to a file
      captureButton.addActionListener(new ActionListener() {
         @Override
         public void actionPerformed(ActionEvent e) {
            try {
               // Create a Robot object to capture the screen
               Robot robot = new Robot();

               // Create a Rectangle object to define the area of the screen to capture
               Rectangle rectangle = new Rectangle(Toolkit.getDefaultToolkit().getScreenSize());

               // Use the robot.createScreenCapture() method to capture the screen as a BufferedImage object
               BufferedImage image = robot.createScreenCapture(rectangle);

               // Show the save file dialog to allow the user to select the save location and file name
               int result = fileChooser.showSaveDialog(frame);
               if (result == JFileChooser.APPROVE_OPTION) {
                  // Get the selected file and save the BufferedImage object to it using the ImageIO.write() method
                  File file = fileChooser.getSelectedFile();
                  ImageIO.write(image, "png", file);

                  // Print a message indicating that the screenshot has been saved
                  System.out.println("Screenshot saved to " + file.getAbsolutePath());
               }
            } catch (AWTException ex) {
               ex.printStackTrace();
            } catch (Exception ex) {
               ex.printStackTrace();
            }
         }
      });

      // Set the size and visibility of the JFrame
      frame.setSize(new Dimension(300, 100));
      frame.setVisible(true);
   }
}
Output
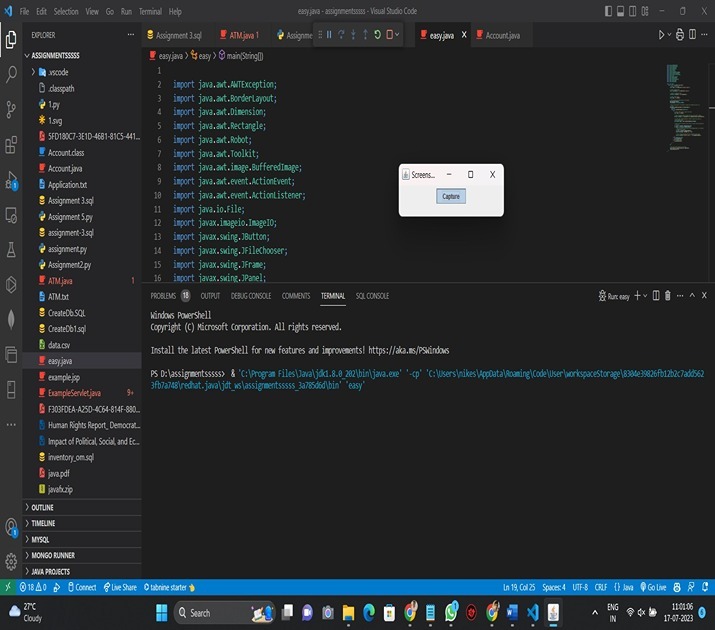
To record the screen, display the save file dialogue, and save the picture, the programme makes use of the Java.awt, Javax.swing, and Javax.imageio packages. It starts by creating a "Capture"-labeled JButton object and a JFrame object. Additionally, it generates a JFileChooser object to let the user choose where to store the snapshot and what to call it.
The JButton and JPanel objects are then added to the JFrame by the programme. Additionally, it adds an ActionListener to the JButton object so that whenever the button is pressed, a snapshot of the current screen is taken and saved to a file. To capture the screen as a BufferedImage object, the ActionListener first generates a Robot object. The save file dialogue is then displayed using the JFileChooser-returning fileChooser.showSaveDialog(frame) function.If the user chooses a file and clicks "Save" in the dialogue, APPROVE_OPTION is shown.
When a file is chosen by the user, fileChooser is used by the programme to obtain the chosen file.The BufferedImage object is saved to the file using the ImageIO.write(image, "png", file) function and getSelectedFile(). The "png" parameter specifies that the image's format is PNG.
The screenshot has been saved to the file path supplied by file, the programme concludes with a notice on the screen.getAbsolutePath().
Conclusion
In conclusion, using the Robot class to capture a BufferedImage object of the screen and the ImageIO.write() method to save the picture to a file, it is possible to take screenshots in Java. The user may also choose the save location and file name by utilizing a GUI application built using Swing components such a JFrame, JButton, and JFileChooser. The screenshot may be taken and saved to the chosen file by attaching an ActionListener to the JButton. Overall, Java offers a simple and adaptable method for taking and saving screenshots for a variety of uses.

3K+ Views
