
Article Categories
- All Categories
-
 Data Structure
-
 Networking
-
 RDBMS
RDBMS
-
 Operating System
-
 Java
Java
-
 MS Excel
-
 iOS
iOS
-
 HTML
HTML
-
 CSS
CSS
-
 Android
-
 Python
-
 C Programming
-
 C++
C++
-
 C#
C#
-
 MongoDB
-
 MySQL
MySQL
-
 Javascript
-
 PHP
PHP
-
 Economics & Finance
Snagit Tool: Taking Better Screenshots the Easy Way
A very common need for anyone who works on computers and laptops is taking screenshots of the browser or application window that they are working with. Although the task seems easy, it can be tedious at times. Generally, if you want to take a screenshot you will use the shortcut keys on your Windows system, paste it to Paint and then modify them accordingly. However, this comes with a few drawbacks:
- You have to use shortcut keys and paste to Paint.
- You can’t take screenshots of a part of screen (without cropping it in Paint later).
- If you are taking screenshot of a web page and you need to scroll to view it all, you will not be able to accommodate it in a single image. As a workaround you will have to take multiple screenshots of the web page and then combine them which is definitely a mundane task.
To overcome all these shortcomings, I generally use a tool called Snagit which allows you to:
- Capture images and videos just with a button click
- Capture selected windows, regions as well as scrolling windows
- Automatically save backup of all the screenshots using Snagit Library
- Easily edit captured images and videos (such as text editing, cropping, resizing, video trimming, special effects, etc.)
- Support Mobile capturing
- Share with ease
- Have cloud integration
Although Snagit can accomplish all that is mentioned above, we limit the discussion to the screenshot features in t his article.
Download Snagit
Step 1 − Download the free trial version of Snagit from this location: https://www.techsmith.com/download/snagit/
Step 2 − Follow the installation steps after downloading the setup. There are two things that will be set up: Snagit and Snagit Editor. The first one will be used to capture the images while the editor will be used to do any manipulations after capturing.
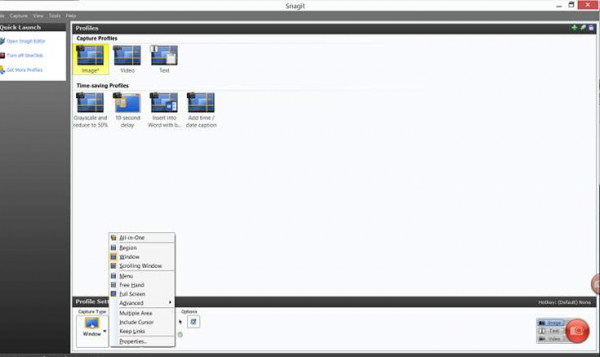
Step 3 − Once installed, open the Snagit application. You will see a red tray on the right side of your screen with a round red button (called “Start New Capture” button). Open the screen for which you would like to take the screenshot. In my example, I am taking a screenshot of the Tutorials Point website.
![]()
Step 4 − Click the “Start New Capture” button. You will be prompted to select the region of which you want to take the screenshot.

As soon as you select the region and free the mouse click, you will be prompted to select option for taking an image or a video. Click the Image option and you are done. The captured image will open up in Snagit editor.
Step 5 − From the editor, you can edit and save images. On the top menu you will see options of File, Tools, Image, Share and Library.

Explore Snagit Menus
Tools Menu
This menu contains options for editing image, text editing, drawing tools, clipboard and other settings. The following example shows an edited screenshot where the user has put up in.

Image Menu
This menu contains options for canvas editing (such as cropping, rotating, resizing, etc.), effects, styles and modifications (such as grayscale, watermark, etc.).
Share Menu
This menu allows sharing images via email, FTP, Word, Powerpoint, Youtube, Dropbox, Google Drive, OneNote, etc.
Library Menu
This menu stores all the images that you have taken using Snagit. The best part about this Library is that even if you forget to save your screenshots, you will always have a way to browse those images and get them back .
Take Scrolling Screenshots
Till now, we have been taking screenshots of selected regions and windows. However, you can also take scrolling screenshots of opened web pages. For this, follow the steps below:
Step 1 − Open the Snagit application.
Step 2 − Click on the “Capture Type” option. You will see sub-options of Region, Window and Scrolling Window. Select “Scrolling Window” from that.
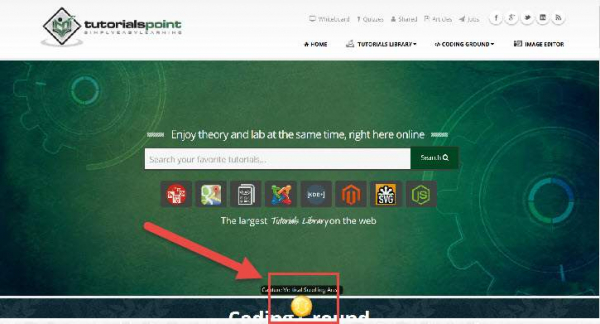
Step 3 − Click on the “Start New Capture” button. This time you will see a scroller at the end of the window (screenshot below). Click on this scroller and it will start scrolling the entire web page by itself and capture the screenshot of entire website’s opened window.
Step 4 − And we are done!! This is one of the best and useful features of Snagit.
Wrapping Up
We have explored a very useful tool today that will help you in your work with better image and video editing. Now that you know the basics of using Snagit, you can try out the other cool features offered by the tool.

419 Views
