
Article Categories
- All Categories
-
 Data Structure
-
 Networking
-
 RDBMS
RDBMS
-
 Operating System
-
 Java
Java
-
 MS Excel
-
 iOS
iOS
-
 HTML
HTML
-
 CSS
CSS
-
 Android
-
 Python
-
 C Programming
-
 C++
C++
-
 C#
C#
-
 MongoDB
-
 MySQL
MySQL
-
 Javascript
-
 PHP
PHP
-
 Economics & Finance
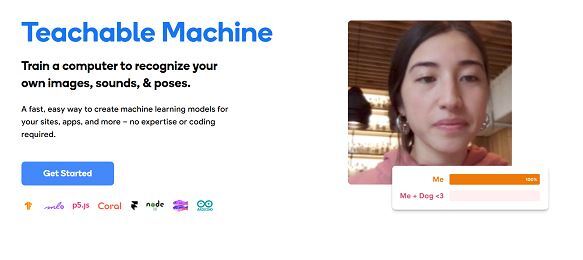
Image Classification using Google\'s Teachable Machine
In this article, you will learn about machine learning, image classification, and how to use Google's Teachable Machine to train models without writing code.
Machine Learning
Machine learning is a subset of artificial intelligence (AI) that enables computers to learn and make decisions from data without explicit programming. This approach allows machines to identify patterns, make predictions, and improve performance over time based on the provided data.
Image Classification
Image classification is a machine learning process that assigns labels to images based on their content. This technique is fundamental in computer vision and is used for tasks like:
Object detection and recognition
Face recognition systems
Scene identification
Medical image analysis
Google's Teachable Machine
Google's Teachable Machine is a web-based platform that provides an intuitive interface for training machine learning models. It allows users to create image, audio, and pose classification models without coding knowledge. The platform enables you to train models locally and export them for use in applications or deploy them online.
Creating an Image Classification Project
Step 1: Getting Started
Navigate to Google's Teachable Machine website and click "Get Started" to begin creating your project.
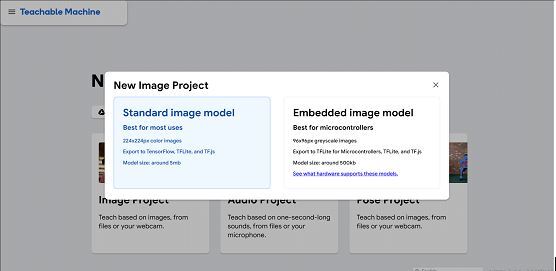
Step 2: Choosing Project Type
Select "Image Project" from the three available options (Image, Audio, Pose). Choose "Standard Image Model" which creates TensorFlow models suitable for web and mobile applications, rather than "Embedded Image Model" designed for microcontrollers.
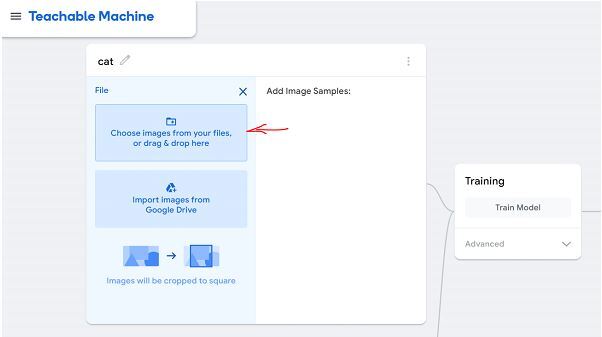
Step 3: Creating Classes
Define your classification categories by creating classes. For example, if you're building a cat vs. dog classifier, create two classes: "Cat" and "Dog". You can add as many classes as needed for your specific use case.

Step 4: Uploading Training Images
Upload high-quality images for each class using the upload button. Ensure images are properly categorized only upload cat images to the "Cat" class and dog images to the "Dog" class. The quality and variety of your training data directly impact model performance.
Step 5: Training the Model
Click "Train Model" to begin the training process. For advanced users, click the "Advanced" dropdown to customize training parameters:
Epochs Number of complete passes through the training dataset. Higher epochs generally improve accuracy but increase training time.
Batch Size Number of images processed in each training iteration. Smaller batches use less memory but may train slower.
Learning Rate Controls how quickly the model adjusts its parameters during training.
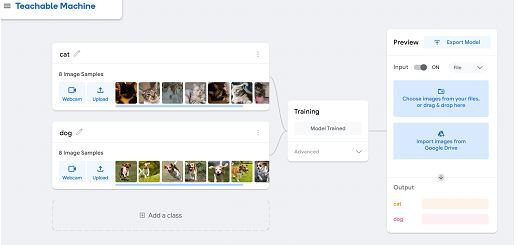
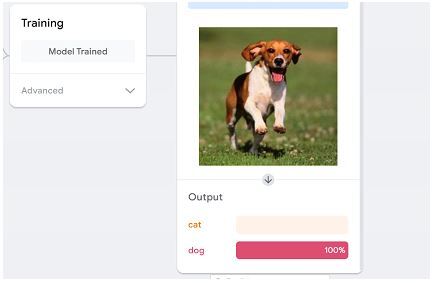
Step 6: Testing the Model
After training completes, test your model using the preview section. Upload test images or use your camera to see real-time predictions. The model displays confidence percentages for each prediction.
Best Practices
Use high-quality images Clear, well-lit images improve model accuracy
Provide diverse examples Include images with different angles, lighting conditions, and backgrounds
Balance your dataset Use similar numbers of images for each class
Test thoroughly Validate your model with images not used in training
Iterate and improve Add more training data if performance is unsatisfactory
Exporting Your Model
Once satisfied with performance, export your model in various formats:
TensorFlow.js For web applications
TensorFlow Lite For mobile apps
TensorFlow SavedModel For Python applications
Conclusion
Google's Teachable Machine democratizes machine learning by enabling anyone to create image classification models without coding. This platform is perfect for prototyping, educational purposes, and building simple AI applications. With proper training data and testing, you can create effective image recognition systems for various real-world applications.

805 Views
