- Arduino - Home
- Arduino - Overview
- Arduino - Board Description
- Arduino - Installation
- Arduino - Program Structure
- Arduino - Data Types
- Arduino - Variables & Constants
- Arduino - Operators
- Arduino - Control Statements
- Arduino - Loops
- Arduino - Functions
- Arduino - Strings
- Arduino - String Object
- Arduino - Time
- Arduino - Arrays
- Arduino Function Libraries
- Arduino - I/O Functions
- Arduino - Advanced I/O Function
- Arduino - Character Functions
- Arduino - Math Library
- Arduino - Trigonometric Functions
- Arduino Advanced
- Arduino - Due & Zero
- Arduino - Pulse Width Modulation
- Arduino - Random Numbers
- Arduino - Interrupts
- Arduino - Communication
- Arduino - Inter Integrated Circuit
- Arduino - Serial Peripheral Interface
- Arduino Projects
- Arduino - Blinking LED
- Arduino - Fading LED
- Arduino - Reading Analog Voltage
- Arduino - LED Bar Graph
- Arduino - Keyboard Logout
- Arduino - Keyboard Message
- Arduino - Mouse Button Control
- Arduino - Keyboard Serial
- Arduino Sensors
- Arduino - Humidity Sensor
- Arduino - Temperature Sensor
- Arduino - Water Detector / Sensor
- Arduino - PIR Sensor
- Arduino - Ultrasonic Sensor
- Arduino - Connecting Switch
- Motor Control
- Arduino - DC Motor
- Arduino - Servo Motor
- Arduino - Stepper Motor
- Arduino And Sound
- Arduino - Tone Library
- Arduino - Wireless Communication
- Arduino - Network Communication
Arduino - Inter Integrated Circuit
Inter-integrated circuit (I2C) is a system for serial data exchange between the microcontrollers and specialized integrated circuits of a new generation. It is used when the distance between them is short (receiver and transmitter are usually on the same printed board). Connection is established via two conductors. One is used for data transfer and the other is used for synchronization (clock signal).
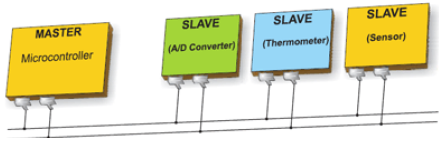
As seen in the following figure, one device is always a master. It performs addressing of one slave chip before the communication starts. In this way, one microcontroller can communicate with 112 different devices. Baud rate is usually 100 Kb/sec (standard mode) or 10 Kb/sec (slow baud rate mode). Systems with the baud rate of 3.4 Mb/sec have recently appeared. The distance between devices, which communicate over an I2C bus is limited to several meters.
Board I2C Pins
The I2C bus consists of two signals − SCL and SDA. SCL is the clock signal, and SDA is the data signal. The current bus master always generates the clock signal. Some slave devices may force the clock low at times to delay the master sending more data (or to require more time to prepare data before the master attempts to clock it out). This is known as clock stretching.
Following are the pins for different Arduino boards −
- Uno, Pro Mini A4 (SDA), A5 (SCL)
- Mega, Due 20 (SDA), 21 (SCL)
- Leonardo, Yun 2 (SDA), 3 (SCL)
Arduino I2C
We have two modes - master code and slave code - to connect two Arduino boards using I2C. They are −
- Master Transmitter / Slave Receiver
- Master Receiver / Slave Transmitter
Master Transmitter / Slave Receiver
Let us now see what is master transmitter and slave receiver.
Master Transmitter
The following functions are used to initialize the Wire library and join the I2C bus as a master or slave. This is normally called only once.
Wire.begin(address) − Address is the 7-bit slave address in our case as the master is not specified and it will join the bus as a master.
Wire.beginTransmission(address) − Begin a transmission to the I2C slave device with the given address.
Wire.write(value) − Queues bytes for transmission from a master to slave device (in-between calls to beginTransmission() and endTransmission()).
Wire.endTransmission() − Ends a transmission to a slave device that was begun by beginTransmission() and transmits the bytes that were queued by wire.write().
Example
#include <Wire.h> //include wire library

void setup() //this will run only once {
   Wire.begin(); // join i2c bus as master
}

short age = 0;

void loop() {
   Wire.beginTransmission(2);
   // transmit to device #2
   Wire.write("age is = ");
   Wire.write(age); // sends one byte
   Wire.endTransmission(); // stop transmitting
   delay(1000);
}
Slave Receiver
The following functions are used −
Wire.begin(address) − Address is the 7-bit slave address.
Wire.onReceive(received data handler) − Function to be called when a slave device receives data from the master.
Wire.available() − Returns the number of bytes available for retrieval with Wire.read().This should be called inside the Wire.onReceive() handler.
Example
#include <Wire.h> //include wire library

void setup() {  //this will run only once
   Wire.begin(2); // join i2c bus with address #2
   Wire.onReceive(receiveEvent); // call receiveEvent when the master send any thing
   Serial.begin(9600); // start serial for output to print what we receive
}

void loop() {
   delay(250);
}

//-----this function will execute whenever data is received from master-----//

void receiveEvent(int howMany) {
   while (Wire.available()>1) // loop through all but the last {
      char c = Wire.read(); // receive byte as a character
      Serial.print(c); // print the character
   }
}
Master Receiver / Slave Transmitter
Let us now see what is master receiver and slave transmitter.
Master Receiver
The Master, is programmed to request, and then read bytes of data that are sent from the uniquely addressed Slave Arduino.
The following function is used −
Wire.requestFrom(address,number of bytes) − Used by the master to request bytes from a slave device. The bytes may then be retrieved with the functions wire.available() and wire.read() functions.
Example
#include <Wire.h> //include wire library void setup() {
   Wire.begin(); // join i2c bus (address optional for master)
   Serial.begin(9600); // start serial for output
}

void loop() {
   Wire.requestFrom(2, 1); // request 1 bytes from slave device #2
   while (Wire.available()) // slave may send less than requested {
      char c = Wire.read(); // receive a byte as character
      Serial.print(c); // print the character
   }
   delay(500);
}
Slave Transmitter
The following function is used.
Wire.onRequest(handler) − A function is called when a master requests data from this slave device.
Example
#include <Wire.h>

void setup() {
   Wire.begin(2); // join i2c bus with address #2
   Wire.onRequest(requestEvent); // register event
}

Byte x = 0;

void loop() {
   delay(100);
}

// function that executes whenever data is requested by master
// this function is registered as an event, see setup()

void requestEvent() {
   Wire.write(x); // respond with message of 1 bytes as expected by master
   x++;
}