
Article Categories
- All Categories
-
 Data Structure
-
 Networking
-
 RDBMS
RDBMS
-
 Operating System
-
 Java
Java
-
 MS Excel
-
 iOS
iOS
-
 HTML
HTML
-
 CSS
CSS
-
 Android
-
 Python
-
 C Programming
-
 C++
C++
-
 C#
C#
-
 MongoDB
-
 MySQL
MySQL
-
 Javascript
-
 PHP
PHP
-
 Economics & Finance
How to validate a Date in ReactJS?
Sometimes, we require to take the date from the users in string format. Users can make mistakes while entering the date value into the input field, so we need to validate the date string in our application code.
Below, we will learn various solutions to validate dates in ReactJS.
Using the Validator NPM Package
The Validator is an NPM package that contains various methods to validate strings. It includes the isDate() method to validate date strings with any delimiter. It also contains methods to validate emails and phone numbers.
Use the below command to install the validator NPM package:
npm i validator
Syntax
let isValid = validator.isDate(inputDate)
The isValid variable stores a boolean value based on the isDate() method validation result.
Example
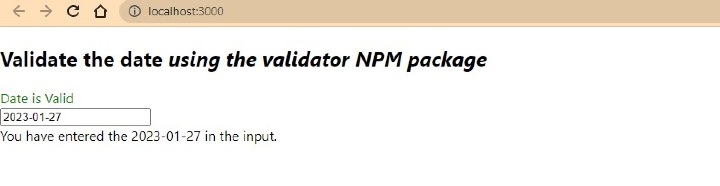
In this example, we use React hooks to manage dates. The text input accepts date strings, and when users enter text, it automatically executes the handleDate() function to validate the date and update the validation message color.
import React, { useState } from "react";
import validator from "validator";

const App = () => {
  const [dateString, setDateString] = useState("2023/01/27");
  const [message, setMessage] = useState(" ");
  const [messageColor, setMessageColor] = useState("green");

  function handleDate(event) {
    let inputDate = event.target.value;
    setDateString(inputDate);

    if (validator.isDate(inputDate)) {
      setMessage("Date is Valid");
      setMessageColor("green");
    } else {
      setMessage("Please, Enter a valid date!");
      setMessageColor("red");
    }
  }

  return (
    <div>
      <h2>
        Validate the date
        <i> using the validator NPM package </i>
      </h2>
      <div style = {{ color: messageColor }}> {message} </div>
      <input type = "text" value = {dateString} onChange = {handleDate} />
      <div> You have entered the {dateString} in the input. </div>
    </div>
  );
};

export default App;
Output
Using HTML Date Input
The HTML date input provides a built-in date picker with automatic validation. We can set minimum and maximum date limits using the min and max attributes.
Syntax
<input
   type = "date"
   value = {dateString}
   onChange = {handleDate}
   min = "2020-01-01"
   max = "2023-01-27"
/>
The min and max attributes define the acceptable date range, while type="date" creates a native date picker.
Example
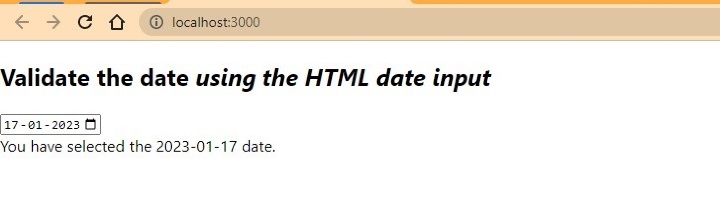
This example uses the HTML date input which automatically validates dates. No additional JavaScript validation is needed since the HTML input handles validation natively.
import React, { useState } from "react";

const App = () => {
  const [dateString, setDateString] = useState("2023-01-27");

  function handleDate(event) {
    let inputDate = event.target.value;
    setDateString(inputDate);
  }

  return (
    <div>
      <h2>
        Validate the date
        <i> using the HTML date input </i>
      </h2>
      <input
        type = "date"
        value = {dateString}
        onChange = {handleDate}
        min = "2020-01-01"
        max = "2023-01-27"
      />
      <div> You have selected the {dateString} date. </div>
    </div>
  );
};

export default App;
Output
Using React Date Picker NPM Package
The React date picker library provides customizable date picker styling and behavior with extensive features for different application requirements.
Install the react date picker NPM package:
npm i react-datepicker --save
Syntax
import DatePicker from "react-datepicker";
import "react-datepicker/dist/react-datepicker.css";

<DatePicker selected={dateString} onChange={handleDate} />
We import the DatePicker component and its CSS styling, then use it with selected and onChange props.
Example
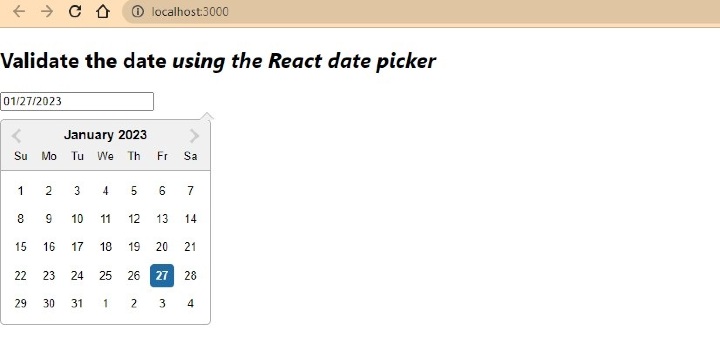
This example demonstrates the React DatePicker component with custom styling. The component accepts a Date object and provides additional props for customization like date ranges.
import React, { useState } from "react";
import DatePicker from "react-datepicker";
import "react-datepicker/dist/react-datepicker.css";

const App = () => {
  const [dateString, setDateString] = useState(new Date());

  function handleDate(date) {
    setDateString(date);
  }

  return (
    <div>
      <h2>
        Validate the date
        <i> using the React date picker </i>
      </h2>
      <DatePicker selected = {dateString} onChange = {handleDate} />
      <div> Selected date: {dateString.toLocaleDateString()} </div>
    </div>
  );
};

export default App;
Output
Comparison
| Method | Validation Type | Customization | Dependencies |
|---|---|---|---|
| Validator NPM | String validation | Limited | validator package |
| HTML Date Input | Native browser | Basic | None |
| React DatePicker | Component-based | Extensive | react-datepicker package |
Conclusion
Choose the validation method based on your needs: use Validator NPM for string validation, HTML date input for simple native validation, or React DatePicker for advanced customization. Each approach provides reliable date validation in ReactJS applications.

4K+ Views
