 Data Structure
 Networking
 RDBMS
RDBMS Operating System
 Java
Java MS Excel
 iOS
iOS HTML
HTML CSS
CSS Android
 Python
 C Programming
 C++
C++ C#
C# MongoDB
 MySQL
MySQL Javascript
 PHP
PHP
- Selected Reading
- UPSC IAS Exams Notes
- Developer's Best Practices
- Questions and Answers
- Effective Resume Writing
- HR Interview Questions
- Computer Glossary
- Who is Who
How to set the alignment of Check Mark in CheckBox in C#?
In a graphical user interface, a CheckBox control in C# enables users to pick a true/false or yes/no choice. The check mark in a CheckBox control is normally aligned to the left, but there are instances when you would wish to move it to the center or right.
Alignment of the Check Mark in a CheckBox
TextAlign Property
To set the alignment of the check mark in a CheckBox control, you need to use the TextAlign property. The TextAlign property is an enumeration that allows you to set the horizontal alignment of the text and check mark within the control.
Syntax
The syntax to change the alignment of a check mark is
checkBox1.TextAlign = ContentAlignment.MiddleRight;
Left ? Align the text and check mark to the left edge of the control.
Right ? Align the text and check mark to the right edge of the control.
Center ? Align the text and checkmark within the center of control.
Example
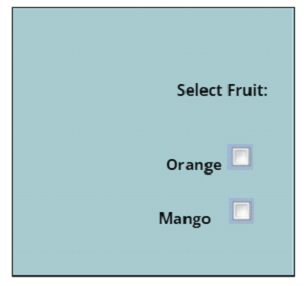
Following program aligns check marks on the right of a check box control
Algorithm
Step 1 ? Create a form.
Step 2 ? Load the form to show it on the screen.
Step 3 ? Insert the check box in the form and then create checkmarks in the check box. In this step specify the height and width of checkbox. Along with that you can also set the location of check box.
Step 4 ? Align the check marks to the right of the check box. For this purpose we will use checkalign property and set it to middleright so that the check box is aligned to the right of form.
public partial class Form1 : Form {     //start creating the form
   public Form1()  {   //form 1 is created on this line
      InitializeComponent();    //initialize form 1 components
   }
   private void Form1_Load(object sender, EventArgs e) { //code to load form

      // Creating and setting the properties of label
      Label a = new Label();  //create new label for form
      a.Text = "Select fruit:"; //text shown on label
      a.Location = new Point(233, 111); //location to show label on form

      // Adding label to form
      this.Controls.Add(a);

      // Creating and setting the properties of CheckBox
      CheckBox acheckbox = new CheckBox();  //create first checkbox
      acheckbox.Height = 70;   //customize height of checkbox
      acheckbox.Width = 150;   //customize width of checkbox
      acheckbox.Location = new Point(229, 136);// set location of checkbox on form
      acheckbox.Text = "Orange";  //text to show on checkbox
      //set checkbox alignment to middleright
      acheckbox.CheckAlign = ContentAlignment.Middleright;

      // Adding checkbox to form
      this.Controls.Add(acheckbox);

      // Creating and setting the properties of CheckBox
      CheckBox zcheckbox = new CheckBox();//create second checkbox
      zcheckbox.Height = 70;  //set height of second checkbox
      zcheckbox.Width = 150;  //set width of second checkbox
      //set location of checkbox on form
      zcheckbox.Location = new Point(230, 174);
      zcheckbox.Text = "Mango";  //text to show on checkbox
      //set checkbox alignment to Middleright
      zcheckbox.CheckAlign = ContentAlignment.MiddleRight;

      // Adding checkbox to form
      this.Controls.Add(zcheckbox);
   }
}
Output

Conclusion
In the example discussed in the article the checkbox control's TextAlign attribute was set to mddleRight and the text was set in a middle-right alignment. In addition to using the coding technique, you can also set the check box alignment in visual studio using the properties window.
To change alignment in visual studio select the CheckBox control on the form designer, open the Properties window, click the TextAlign property, and select the alignment from the drop-down list.
These properties also allow you to customize the check box control layout such as width height etc. Finally, it is simple to adjust the alignment of the check mark in a CheckBox control in C#. To fit the requirements of your application, you may alter the CheckBox control's look and functionality by utilizing the TextAlign property or changing the control's layout.

