
Article Categories
- All Categories
-
 Data Structure
-
 Networking
-
 RDBMS
RDBMS
-
 Operating System
-
 Java
Java
-
 MS Excel
-
 iOS
iOS
-
 HTML
HTML
-
 CSS
CSS
-
 Android
-
 Python
-
 C Programming
-
 C++
C++
-
 C#
C#
-
 MongoDB
-
 MySQL
MySQL
-
 Javascript
-
 PHP
PHP
-
 Economics & Finance
How to Install Subversion Server on Ubuntu 16.04
Subversion is a free/open supply variation manipulate process (VCS). That is, Subversion manages records and directories, and the alterations made to them, over time. This makes it possible for you to get better and older models of your information or evaluate the historical past of how your data is modified. On this regard, many people suppose of a variation to manage procedure as a variety of “time computing device.”
Before installing subversion, it should require apache. To install apache, use the following commands-
$ sudo apt-get update
$ sudo apt-get install apache2
To get more information about apache installation, read this article
To install SVN, use the following command –
$ sudo apt-get install subversion libapache2-mod-svn libapache2-svn libsvn-dev
The sample output should be like this –
libapache2-svn libsvn-dev
Reading package lists... Done
Building dependency tree
Reading state information... Done
The following packages were automatically installed and are no longer required:
   linux-headers-4.4.0-31 linux-headers-4.4.0-31-generic
   linux-image-4.4.0-31-generic linux-image-extra-4.4.0-31-generic
   linux-signed-image-4.4.0-31-generic
Use 'sudo apt autoremove' to remove them.
The following additional packages will be installed:
   libapr1-dev libaprutil1-dev libldap2-dev libsctp-dev libsctp1 libserf-1-1
   libsvn1 uuid-dev
Suggested packages:
   db5.3-util lksctp-tools libserf-dev libsvn-doc zlib1g-dev subversion-tools
The following NEW packages will be installed:
   libapache2-mod-svn libapache2-svn libapr1-dev libaprutil1-dev libldap2-dev
   libsctp-dev libsctp1 libserf-1-1 libsvn-dev libsvn1 subversion uuid-dev
0 upgraded, 12 newly installed, 0 to remove and 19 not upgraded.
Need to get 4,438 kB of archives.
After this operation, 29.6 MB of additional disk space will be used.
Do you want to continue? [Y/n] y
.............................................................................
Now create a directory for test project as shown below –
$ sudo mkdir -p /svn/repos/
To create a repository, use the following command –
$ sudo svnadmin create /svn/repos/testrepo
To change the privileges of repository, use the following command –
$ sudo chown -R www-data:www-data /svn/repos/testrepo
Create a file sample.conf in /etc/apache2/sites-available/ as shown below –
$ cd /etc/
/etc$ cd apache2
/etc/apache2$ cd sites-available
/etc/apache2/sites-available$ sudo nano testrepo.conf
Add the following command in testrepo.conf file as shown below –
<Location /svn>
   DAV svn
   SVNParentPath /svn/repos/
   AuthType Basic
   AuthName "Tutorials Point"
   AuthUserFile /etc/svnpasswd
   Require valid-user
</Location>
To enable the site (testrepo), use the following command –
$ sudo a2ensite testrepo
Use the following command to create user for accessing repository and add the user details to /etc/svnpasswd file as shown below –
$ sudo htpasswd -cm /etc/svnpasswd sai
In the above command, it create a use name as sai and asks for password as shown below –
$ sudo htpasswd -cm /etc/svnpasswd sai
New password:
Re-type new password:
Adding password for user sai
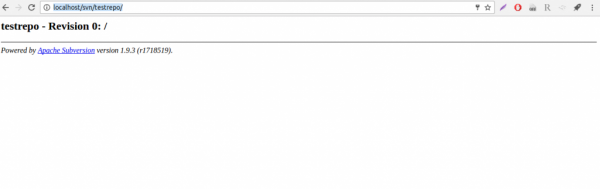
Now open your favorite browser and the following url as shown below –
http://localhost/svn/testrepo/
It will the following screen –
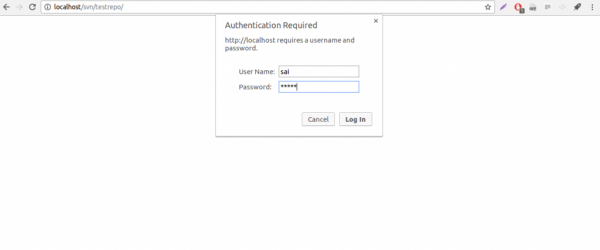
Add the credentials as given above and click on login button, it will promote the screen as shown below –
In the above article, we have learnt about – how to Install Subversion Server on Ubuntu 16.04. In our next articles, we will come up with more Linux based tricks and tips. Keep reading!

500 Views
