
Article Categories
- All Categories
-
 Data Structure
-
 Networking
-
 RDBMS
RDBMS
-
 Operating System
-
 Java
Java
-
 MS Excel
-
 iOS
iOS
-
 HTML
HTML
-
 CSS
CSS
-
 Android
-
 Python
-
 C Programming
-
 C++
C++
-
 C#
C#
-
 MongoDB
-
 MySQL
MySQL
-
 Javascript
-
 PHP
PHP
How to Implement Bottom Navigation With Activities in Android?
Bottom navigation in Android apps is a commonly required feature for designing navigable and user-friendly interfaces. It usually involves positioning a navigation bar at the bottom of the screen to allow fast access to different sections of the app.
This tutorial explores how to implement bottom navigation with activities in Android. It involves creating multiple activities, each representing a distinct screen or section of the app, and utilizing the bottom navigation view to switch between them. By the end of this tutorial, readers will gain a solid understanding of building an app with a bottom navigation bar using activities on Android.
Bottom Navigation
A commonly used design pattern in mobile app interfaces is bottom navigation. This UI feature involves placing a navigation bar at the bottom of the screen, usually with icons or labels representing different parts of the app. The purpose of bottom navigation is to allow users to easily access key features or screens within an app and navigate between sections without much effort.
Moreover, by placing it at the bottom, users can reach it comfortably, reducing any need for hand repositioning while interacting with the app. Typically used alongside various activities, fragments, or screens that represent different functionalities within an application.
Approaches
There are multiple methods to implement bottom navigation with activities in Android. Here are a few common approaches:
Using the Navigation Component
Managing Activities with Intents
Utilizing Fragments within Activities
Custom View and Event Handling
Using the Navigation Component
With the Navigation Component, you can define a navigation graph that represents the flow between activities or fragments. By incorporating a BottomNavigationView, you can easily handle the navigation between activities by specifying destinations in the graph and letting the Navigation Component manage the transitions.
Algorithm
Define a navigation graph that represents the flow between activities or fragments.
Include a BottomNavigationView in your layout.
Set up the Navigation Component to handle the navigation between activities or fragments based on the selected item in the BottomNavigationView.
Example
MainActivity.kt
class MainActivity : AppCompatActivity() {

   override fun onCreate(savedInstanceState: Bundle?) {
      super.onCreate(savedInstanceState)
      setContentView(R.layout.activity_main)

      val navController = findNavController(R.id.navHostFragment)
      val bottomNavigationView = findViewById<BottomNavigationView>(R.id.bottomNavigationView)
      bottomNavigationView.setupWithNavController(navController)
   }
}
activity_main.xml
<RelativeLayout
xmlns:android="http://schemas.android.com/apk/res/android"
   xmlns:app="http://schemas.android.com/apk/res-auto"
   xmlns:tools="http://schemas.android.com/tools"
   android:layout_width="match_parent"
   android:layout_height="match_parent"
   tools:context=".MainActivity">

   <androidx.fragment.app.FragmentContainerView
      android:id="@+id/navHostFragment"
      android:name="androidx.navigation.fragment.NavHostFragment"
      android:layout_width="match_parent"
      android:layout_height="match_parent"
      app:defaultNavHost="true"
      app:navGraph="@navigation/nav_graph" />

   <
com.google.android.material.bottomnavigation.BottomNavigationView
      android:id="@+id/bottomNavigationView"
      android:layout_width="match_parent"
      android:layout_height="wrap_content"
      android:layout_alignParentBottom="true"
      app:menu="@menu/bottom_navigation_menu" />

</RelativeLayout>
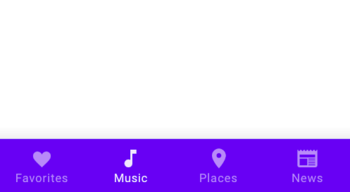
Output

Managing Activities with Intents
This method involves assigning click listeners to the items in the BottomNavigationView. When a user selects an item, you can use explicit intents to start the corresponding activity. This approach allows you to have separate activities for each section and navigate between them directly.
Algorithm
Assign click listeners to the items in the BottomNavigationView.
When a user selects an item, create an explicit intent to start the corresponding activity.
Start the activity using the intent, which will navigate the user to the desired section.
Example
MainActivity.kt
class MainActivity : AppCompatActivity() {

   override fun onCreate(savedInstanceState: Bundle?) {
      super.onCreate(savedInstanceState)
      setContentView(R.layout.activity_main)

      val bottomNavigationView = findViewById<
BottomNavigationView>(R.id.bottomNavigationView)
      bottomNavigationView.setOnNavigationItemSelectedListener {
menuItem ->
         when (menuItem.itemId) {
            R.id.homeItem -> {
               val intent = Intent(this, HomeActivity::class.java)
               startActivity(intent)
               true
            }
            R.id.profileItem -> {
               val intent = Intent(this,
ProfileActivity::class.java)
               startActivity(intent)
               true
            }
            else -> false
         }
      }
   }
}
Output
Utilizing Fragments within Activities
Instead of having multiple activities, you can use a single activity and employ fragments to represent different sections of your app. By replacing the fragment container within the activity, you can dynamically switch between different fragments based on the selected item in the BottomNavigationView.
Algorithm
Create a single activity that hosts a fragment container.
Define separate fragments for each section of your app.
Replace the fragment container with the selected fragment when an item in the BottomNavigationView is clicked, providing a seamless transition between sections.
Example
MainActivity.kt
class MainActivity : AppCompatActivity() {

   override fun onCreate(savedInstanceState: Bundle?) {
      super.onCreate(savedInstanceState)
      setContentView(R.layout.activity_main)

      val bottomNavigationView = findViewById<
BottomNavigationView>(R.id.bottomNavigationView)
      bottomNavigationView.setOnNavigationItemSelectedListener {
menuItem ->
         when (menuItem.itemId) {
            R.id.homeItem -> {
               supportFragmentManager.beginTransaction()
                  .replace(R.id.fragmentContainer, HomeFragment())
                  .commit()
               true
            }
            R.id.profileItem -> {
               supportFragmentManager.beginTransaction()
                  .replace(R.id.fragmentContainer,
ProfileFragment())
                  .commit()
               true
            }
            else -> false
         }
      }
   }
}
activity_main.xml
<RelativeLayout
xmlns:android="http://schemas.android.com/apk/res/android"
   xmlns:tools="http://schemas.android.com/tools"
   android:layout_width="match_parent"
   android:layout_height="match_parent"
   tools:context=".MainActivity">

   <FrameLayout
      android:id="@+id/fragmentContainer"
      android:layout_width="match_parent"
      android:layout_height="match_parent" />

   <
com.google.android.material.bottomnavigation.BottomNavigationView
      android:id="@+id/bottomNavigationView"
      android:layout_width="match_parent"
      android:layout_height="wrap_content"
      android:layout_alignParentBottom="true"
      app:menu="@menu/bottom_navigation_menu" />

</RelativeLayout>
Output

Custom View and Event Handling
For a more customized approach, you can create a custom view that resembles a bottom navigation bar. This involves designing a layout with buttons or icons at the bottom and handling user clicks manually. You'll need to manage the visibility and state of different sections within the activity and handle the navigation logic yourself. This method provides greater flexibility but requires more manual implementation.
Algorithm
Design a custom view to resemble a bottom navigation bar.
Implement click listeners for the buttons or icons in the custom view.
Maintain the state and visibility of different sections within the activity.
Update the content or UI based on the selected button or icon, manually managing the navigation logic and transitions.
Example
MainActivity.kt
class MainActivity : AppCompatActivity() {

   override fun onCreate(savedInstanceState: Bundle?) {
      super.onCreate(savedInstanceState)
      setContentView(R.layout.activity_main)

      val customBottomNavigationView = findViewById<CustomBottomNavigationView>(R.id.customBottomNavigationView)
      customBottomNavigationView.setOnButtonClickListener { button ->
         when (button) {
            Button.HOME -> {
               // Handle home button click
               Toast.makeText(this, "Home Button Clicked", Toast.LENGTH_SHORT).show()
            }
            Button.PROFILE -> {
               // Handle profile button click
               Toast.makeText(this, "Profile Button Clicked", Toast.LENGTH_SHORT).show()
            }
         }
      }
   }
}
custom_bottom_navigation_view.xml
<LinearLayout
xmlns:android="http://schemas.android.com/apk/res/android"
   android:layout_width="match_parent"
   android:layout_height="wrap_content"
   android:orientation="horizontal">

   <Button
      android:id="@+id/homeButton"
      android:layout_width="0dp"
      android:layout_height="wrap_content"
      android:layout_weight="1"
      android:text="Home" />

   <Button
      android:id="@+id/profileButton"
      android:layout_width="0dp"
      android:layout_height="wrap_content"
      android:layout_weight="1"
      android:text="Profile" />

</LinearLayout>
CustomBottomNavigationView.kt
class CustomBottomNavigationView(context: Context, attrs: AttributeSet) : LinearLayout(context, attrs) {

   init {
      LayoutInflater.from(context).inflate(R.layout.custom_bottom_navigation_view, this, true)
      setListeners()
   }

   private fun setListeners() {
      val homeButton = findViewById<Button>(R.id.homeButton)
      val profileButton = findViewById<Button>(R.id.profileButton)

      homeButton.setOnClickListener {
         onButtonClickListener?.invoke(Button.HOME)
      }

      profileButton.setOnClickListener {
         onButtonClickListener?.invoke(Button.PROFILE)
      }
   }

   private var onButtonClickListener: ((Button) -> Unit)? = null

   fun setOnButtonClickListener(listener: (Button) -> Unit) {
      onButtonClickListener = listener
   }

   companion object {
      enum class Button {
         HOME,
         PROFILE
      }
   }
}
Output

Conclusion
In this tutorial, implementing bottom navigation in Android can be achieved through different methods such as using the Navigation Component, managing activities with intents, utilizing fragments within activities, or creating a custom view and event handling.
Each method offers its own advantages and flexibility in achieving seamless navigation between sections of an app. Developers can choose the most suitable approach based on their project requirements and preferences to create a user-friendly and intuitive navigation experience for their Android applications.

2K+ Views
