
Article Categories
- All Categories
-
 Data Structure
-
 Networking
-
 RDBMS
RDBMS
-
 Operating System
-
 Java
Java
-
 MS Excel
-
 iOS
iOS
-
 HTML
HTML
-
 CSS
CSS
-
 Android
-
 Python
-
 C Programming
-
 C++
C++
-
 C#
C#
-
 MongoDB
-
 MySQL
MySQL
-
 Javascript
-
 PHP
PHP
-
 Economics & Finance
How to Create Bottom Navigation using Kivymd and Python?
KivyMD is a commonly known library of Python which offers us with a collection of Material Design (MD) compliant widgets. These widgets can be used along with the kivy framework which is another library and is used for creating multi-touch applications. The large number of UI elements that kivyMD provides us with, include buttons, cards, dialogs, menus and many more such elements, all of which are designed to give an appealing look and feel.
A navigation bar is a UI element that allows users to "navigate" between different screens/sections of an application. They are normally present on the top or bottom of our screen. We might often see the 3 buttons on the bottom of the screen if we use an android phone. When we use WhatsApp or any feature on iOS, we see the features below like status, calls, communities, chats, and settings which "navigate" us to different screens. In KivyMD, the MDBottomNavigation widget enables us to add MDBottomNavigationItem widgets to it. Each such item has a unique name associated with it and a text label which describes the screen it represents. Icons can also be added to each of these items to help users instantly understand and identify the screens briefly.
In this article, we are going to see how a bottom navigation bar can be created with the help of KivyMD and Python.
Installation
Before going forward, it is necessary to install the certain libraries as they are not part of the standard library packages ?
pip install kivy
pip install kivymd
Step 1: Importing Necessary Packages
The kivymd.app module contains the MDApp class which is the base class for KivyMD applications. The kivymd.uix.bottomnavigation contains the requirements for creating the navigation bar in KivyMD applications ?
from kivymd.app import MDApp
from kivy.uix.screenmanager import Screen, ScreenManager
from kivymd.uix.bottomnavigation import MDBottomNavigation
from kivy.lang import Builder
Step 2: Layout Design Using KV Language
Just the way in websites we use HTML and XML in android to design our layouts, similarly here we use the KV language to design our layouts. The first part of this is the MDBottomNavigation class. Depending upon how many widgets will be required inside the navigation bar, we will declare those many sub classes or MDBottomNavigationItem each of them with a name, text and an icon ?
KV = '''
<MDBottomNavigation>:
    MDBottomNavigationItem:
        name: 'screen1'
        text: 'Android'
        icon: 'android'
        MDLabel:
            text: 'Android'
            halign: 'center'

    MDBottomNavigationItem:
        name: 'screen2'
        text: 'Apple'
        icon: 'apple'
        MDLabel:
            text: 'Apple'
            halign: 'center'

    MDBottomNavigationItem:
        name: 'screen3'
        text: 'Linux'
        icon: 'linux'
        MDLabel:
            text: 'Linux'
            halign: 'center'

    MDBottomNavigationItem:
        name: 'screen4'
        text: 'Windows'
        icon: 'microsoft-windows'
        MDLabel:
            text: 'Windows'
            halign: 'center'
'''
Step 3: Creating the Application Class
In this step, we declare the respective screen classes and create the main application class. The Builder.load_string() function loads the KV string and generates the widget tree ?
class Screen1(Screen):
    pass

class Screen2(Screen):
    pass

class Screen3(Screen):
    pass

class Screen4(Screen):
    pass

class TutorialsPointApp(MDApp):
    def build(self):
        Builder.load_string(KV)
        return MDBottomNavigation()

if __name__ == '__main__':
    TutorialsPointApp().run()
Complete Example
from kivymd.app import MDApp
from kivy.uix.screenmanager import Screen, ScreenManager
from kivymd.uix.bottomnavigation import MDBottomNavigation
from kivy.lang import Builder

KV = '''
<MDBottomNavigation>:
    MDBottomNavigationItem:
        name: 'screen1'
        text: 'Android'
        icon: 'android'
        MDLabel:
            text: 'Android'
            halign: 'center'

    MDBottomNavigationItem:
        name: 'screen2'
        text: 'Apple'
        icon: 'apple'
        MDLabel:
            text: 'Apple'
            halign: 'center'

    MDBottomNavigationItem:
        name: 'screen3'
        text: 'Linux'
        icon: 'linux'
        MDLabel:
            text: 'Linux'
            halign: 'center'

    MDBottomNavigationItem:
        name: 'screen4'
        text: 'Windows'
        icon: 'microsoft-windows'
        MDLabel:
            text: 'Windows'
            halign: 'center'
'''

class Screen1(Screen):
    pass

class Screen2(Screen):
    pass

class Screen3(Screen):
    pass

class Screen4(Screen):
    pass

class TutorialsPointApp(MDApp):
    def build(self):
        Builder.load_string(KV)
        return MDBottomNavigation()

if __name__ == '__main__':
    TutorialsPointApp().run()
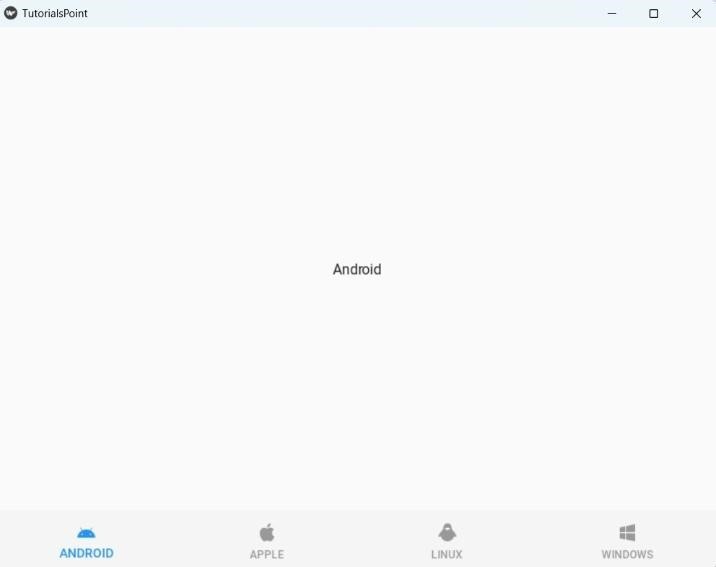
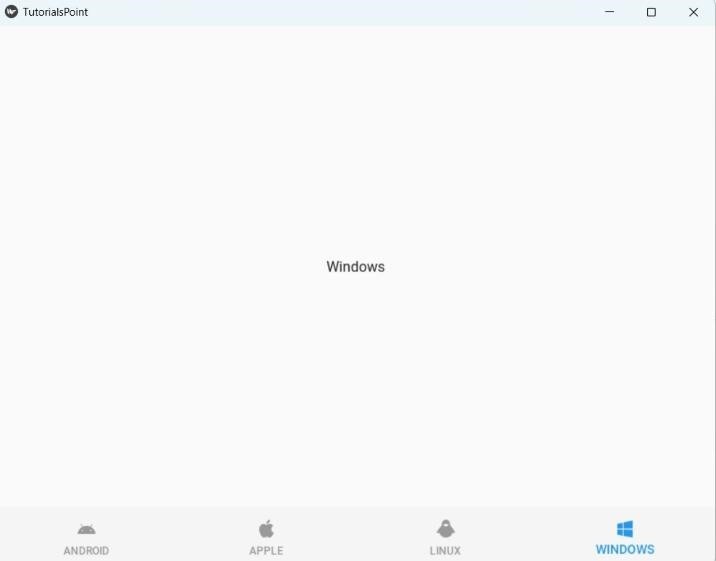
Output
1. On start/on clicking the 1st option which is android
2. On clicking windows
3. On clicking Apple

Key Points
- Each
MDBottomNavigationItemmust have a uniquenameattribute - The
iconproperty uses Material Design icon names - The
textproperty is displayed as the label for each tab -
MDLabelis used to display content within each navigation item
Conclusion
The KivyMD library provides an excellent MDBottomNavigation widget for creating Material Design compliant bottom navigation bars. Each navigation item can contain custom content and is easily configured using the KV language syntax. This approach enables developers to create modern, responsive user interfaces for cross-platform applications.

770 Views
