
Article Categories
- All Categories
-
 Data Structure
-
 Networking
-
 RDBMS
RDBMS
-
 Operating System
-
 Java
Java
-
 MS Excel
-
 iOS
iOS
-
 HTML
HTML
-
 CSS
CSS
-
 Android
-
 Python
-
 C Programming
-
 C++
C++
-
 C#
C#
-
 MongoDB
-
 MySQL
MySQL
-
 Javascript
-
 PHP
PHP
-
 Economics & Finance
How to enable / Disable Enhanced Protection Mode in Internet Explorer using PowerShell?
Internet Explorer (IE) supports the enhanced protection mode for more security of the browser and the same can be enabled/disabled using PowerShell. Let see when we can find this setting in IE.
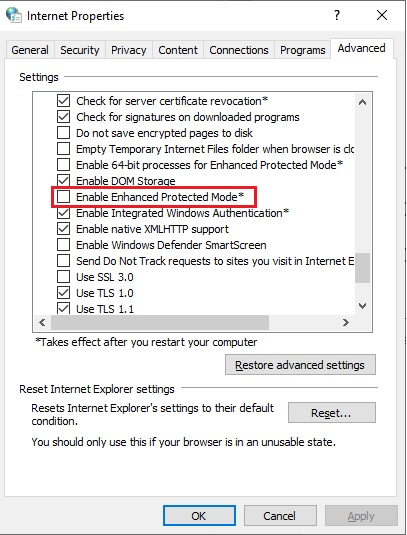
Internet Explorer → Internet Options → Advanced → Enable Enhanced Protection Mode
We can modify this setting using PowerShell and for that registry settings need to be done. Registry value can be found under Computer\HKEY_LOCAL_MACHINE\SOFTWARE\Microsoft\Internet Explorer\Main and the key name is Isolation for enhanced protection mode.
PMIL – To disable IE enhanced protection Mode
PMEM – To Enable IE enhanced protection mode
To make the changes using the script.
Enable IE EP mode
If there is no Isolation Key exists you can use the below command to create a new key and value.
New-ItemProperty 'HKCU:\SOFTWARE\Microsoft\Internet Explorer\Main' `
   -Name Isolation -Value "PMEM" -ErrorAction Ignore -Verbose
If the Isolation key already exists then you just need to set the registry value. For example,
Set-ItemProperty 'HKCU:\SOFTWARE\Microsoft\Internet Explorer\Main' `
   -Name Isolation -Value "PMEM" -ErrorAction Ignore -Verbose
Disable IE IP mode
If there is no Isolation Key exists you can use the below command to create a new key and value.
New-ItemProperty 'HKCU:\SOFTWARE\Microsoft\Internet Explorer\Main' `
   -Name Isolation -Value "PMIL" -ErrorAction Ignore -Verbose
If the Isolation key already exists then you just need to set the registry value. For example,
Set-ItemProperty 'HKCU:\SOFTWARE\Microsoft\Internet Explorer\Main' `
   -Name Isolation -Value "PMIL" -ErrorAction Ignore -Verbose

1K+ Views
