
Article Categories
- All Categories
-
 Data Structure
-
 Networking
-
 RDBMS
RDBMS
-
 Operating System
-
 Java
Java
-
 MS Excel
-
 iOS
iOS
-
 HTML
HTML
-
 CSS
CSS
-
 Android
-
 Python
-
 C Programming
-
 C++
C++
-
 C#
C#
-
 MongoDB
-
 MySQL
MySQL
-
 Javascript
-
 PHP
PHP
-
 Economics & Finance
How to Delete SmartArt Only in Excel
Excel's SmartArt tool allows you to generate visually appealing drawings and diagrams to enhance your data presentations. While SmartArt is a terrific tool, you may need to remove or delete a SmartArt object from your Excel worksheet at some point. This tutorial will walk you through the process of uninstalling SmartArt so that you can make changes to your spreadsheet as needed. To delete only one SmartArt click on the specific art and click Delete Button.
Whether you wish to remove a specific SmartArt graphic that is no longer relevant to your data or just make changes to your worksheet layout, this course will provide you the knowledge and abilities to do so. We'll look at how to erase SmartArt using various techniques, including the Ribbon interface and the right?click context menu. By the end of this session, you'll be able to confidently remove SmartArt components, ensuring that your Excel spreadsheets are personalised to your specific needs. Let's get started by learning how to remove SmartArt from Excel!
Deleting SmartArt Only in Excel
Here we will complete the task using the find and select function. So let us see a simple process to learn how you can delete SmartArt only in Excel.
Step 1
Consider an Excel sheet where you have smart art.
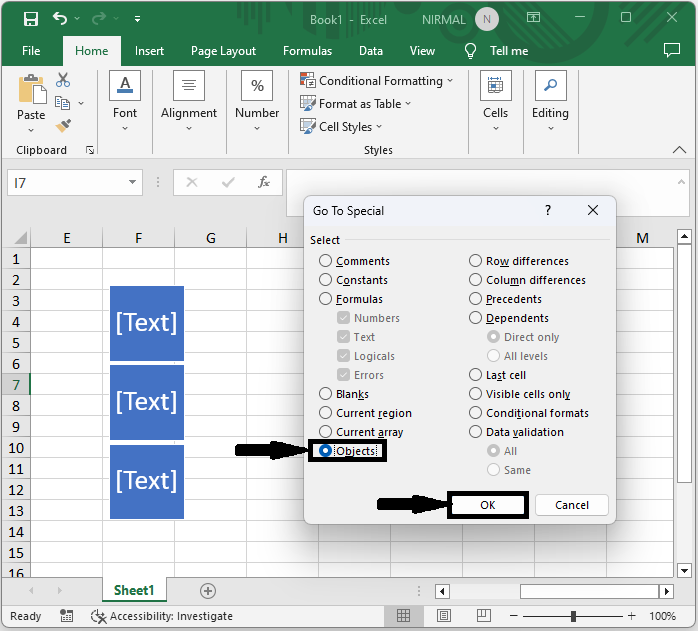
First, click on "Home" and click on Find and Select," then click on Go to Specials.
Home > Find and Select > Go To Special

Step 2
Then select objects and click OK. Then you can see that all the smart art will be selected.
Objects > Ok.
Step 3
Then click Delete to complete the task.
This is how you can delete smart art only in Excel.
Conclusion
In this tutorial, we have used a simple example to demonstrate how you can delete SmartArt only in Excel.

332 Views
