
Article Categories
- All Categories
-
 Data Structure
-
 Networking
-
 RDBMS
RDBMS
-
 Operating System
-
 Java
Java
-
 MS Excel
-
 iOS
iOS
-
 HTML
HTML
-
 CSS
CSS
-
 Android
-
 Python
-
 C Programming
-
 C++
C++
-
 C#
C#
-
 MongoDB
-
 MySQL
MySQL
-
 Javascript
-
 PHP
PHP
-
 Economics & Finance
How does Constraint Layout works in android?
In simple words, constraint layout is an advanced version of a Relative layout. It is used to reduce the child view hierarchies and improve the performance.
Properties of constraint layout as shown below -
Wrap Content –It wrap the view size according to data. ![]()
Any Size – This is very similar to match parent. ![]()
Fixed Size – This allows standard height and width(fixed sizes). ![]()
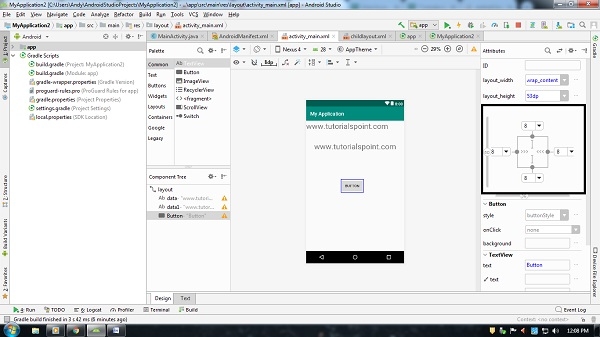
In the above example we have shown the button with all properties, now look into code level as shown below -
<Button
   android:layout_width="wrap_content"
   android:layout_height="53dp"
   android:layout_marginStart="8dp"
   android:layout_marginTop="8dp"
   android:layout_marginEnd="8dp"
   android:layout_marginBottom="8dp"
   android:text="Button"
   app:layout_constraintBottom_toBottomOf="parent"
   app:layout_constraintEnd_toEndOf="parent"
   app:layout_constraintHorizontal_bias="0.391"
   app:layout_constraintStart_toStartOf="@+id/data1"
   app:layout_constraintTop_toTopOf="parent" />
In the above, we have declare layout margin-top, bottom, start and end. those are the standard distance (Similar to match parent)
There is two bias available in constraint layout as horizontal and vertical. Gravity space in a horizontal way and Vertical way.
By clicking view, it shows all hierarchies which are connected to the view.
By clicking view, you will get "X" color icon button to remove hierarchy with other view or parent view.
This example demonstrates how to use constraint layout in android.
Step 1 − Create a new project in Android Studio, go to File ⇒ New Project and fill all required details to create a new project.
Step 2 − Add the following code to res/layout/activity_main.xml
<?xml version="1.0" encoding="utf-8"?>
<android.support.constraint.ConstraintLayout  xmlns:android="http://schemas.android.com/apk/res/android"
   xmlns:app="http://schemas.android.com/apk/res-auto"
   xmlns:tools="http://schemas.android.com/tools"
   android:layout_width="match_parent"
   android:id="@+id/layout"
   android:gravity="center"
   android:layout_height="match_parent"
   android:orientation="vertical">
   <TextView
      android:id="@+id/data"
      android:layout_width="wrap_content"
      android:gravity="center"
      android:textSize="30sp"
      android:text="www.tutorialspoint.com"
      android:layout_height="wrap_content" />
   <TextView
      android:id="@+id/data1"
      android:layout_width="wrap_content"
      android:layout_height="wrap_content"
      android:layout_marginStart="8dp"
      android:layout_marginTop="80dp"
      android:layout_marginEnd="8dp"
      android:gravity="center"
      android:text="www.tutorialspoint.com"
      android:textSize="30sp"
      app:layout_constraintEnd_toEndOf="parent"
      app:layout_constraintStart_toStartOf="parent"
      app:layout_constraintTop_toTopOf="parent" />
   <Button
      android:layout_width="wrap_content"
      android:layout_height="53dp"
      android:layout_marginStart="8dp"
      android:layout_marginTop="8dp"
      android:layout_marginEnd="8dp"
      android:layout_marginBottom="8dp"
      android:text="Button"
      app:layout_constraintBottom_toBottomOf="parent"
      app:layout_constraintEnd_toEndOf="parent"
      app:layout_constraintHorizontal_bias="0.43"
      app:layout_constraintStart_toStartOf="@+id/data1"
      app:layout_constraintTop_toTopOf="parent" />
</android.support.constraint.ConstraintLayout>
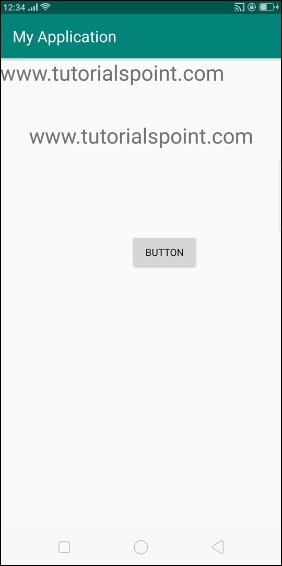
Let's try to run your application. I assume you have connected your actual Android Mobile device with your computer. To run the app from the android studio, open one of your project's activity files and click Run Icon ![]() from the toolbar. Select your mobile device as an option and then check your mobile device which will display your default screen −
from the toolbar. Select your mobile device as an option and then check your mobile device which will display your default screen −
Click here to download the project code

1K+ Views
