
Article Categories
- All Categories
-
 Data Structure
-
 Networking
-
 RDBMS
RDBMS
-
 Operating System
-
 Java
Java
-
 MS Excel
-
 iOS
iOS
-
 HTML
HTML
-
 CSS
CSS
-
 Android
-
 Python
-
 C Programming
-
 C++
C++
-
 C#
C#
-
 MongoDB
-
 MySQL
MySQL
-
 Javascript
-
 PHP
PHP
-
 Economics & Finance
How to use appbar layout in android?
This example demonstrate about How to use appbar layout in android
Step 1 − Create a new project in Android Studio, go to File ⇒ New Project and fill all required details to create a new project.
Step 2 − Add the following code to res/layout/activity_main.xml.
<?xml version = "1.0" encoding = "utf-8"?>
<android.support.design.widget.CoordinatorLayout android:layout_width = "match_parent"
   android:layout_height = "match_parent"
   xmlns:android = "http://schemas.android.com/apk/res/android"
   xmlns:app = "http://schemas.android.com/apk/res-auto">
   <android.support.design.widget.AppBarLayout
      android:layout_width = "match_parent"
      android:layout_height = "wrap_content">
      <android.support.v7.widget.Toolbar
         android:id = "@+id/appbarlayout_tool_bar"
         android:background = "@color/colorPrimary"
         android:layout_width = "match_parent"
         android:layout_height = "?attr/actionBarSize"
         app:layout_scrollFlags = "scroll|snap|enterAlways"
         app:theme = "@style/ThemeOverlay.AppCompat.Dark.ActionBar"
         app:popupTheme = "@style/ThemeOverlay.AppCompat.Light" />
   </android.support.design.widget.AppBarLayout>
   <android.support.v7.widget.RecyclerView
      android:id = "@+id/recycler_view"
      android:layout_width = "match_parent"
      android:layout_height = "match_parent"
      app:layout_behavior = "@string/appbar_scrolling_view_behavior"/>
</android.support.design.widget.CoordinatorLayout>
In the above code, we have taken app bar layout and recycler view.
Step 3 − Add the following code to src/MainActivity.java
<?xml version = "1.0" encoding = "utf-8"?>
import android.annotation.TargetApi;
import android.app.Activity;
import android.content.Intent;
import android.content.SharedPreferences;
import android.net.Uri;
import android.os.Build;
import android.os.Bundle;
import android.support.v4.content.pm.ShortcutInfoCompat;
import android.support.v4.content.pm.ShortcutManagerCompat;
import android.support.v4.graphics.drawable.IconCompat;
import android.support.v7.app.AppCompatActivity;
import android.support.v7.widget.DefaultItemAnimator;
import android.support.v7.widget.DividerItemDecoration;
import android.support.v7.widget.LinearLayoutManager;
import android.support.v7.widget.RecyclerView;
import android.view.View;
import android.widget.TextView;
import android.widget.Toast;
import android.support.v7.widget.Toolbar;
import java.util.ArrayList;

public class MainActivity extends AppCompatActivity {
   private RecyclerView recyclerView;
   private customAdapter mAdapter;
   TextView text;
   ArrayList<String> list = new ArrayList<>();
   @TargetApi(Build.VERSION_CODES.LOLLIPOP)
   @Override
   public void onCreate(Bundle savedInstanceState) {
      super.onCreate(savedInstanceState);
      setContentView(R.layout.activity_main);
      Toolbar toolbar = (android.support.v7.widget.Toolbar)findViewById(R.id.appbarlayout_tool_bar);
      toolbar.setTitle("This is toolbar.");
      setSupportActionBar(toolbar);
      recyclerView = (RecyclerView) findViewById(R.id.recycler_view);
      RecyclerView.LayoutManager mLayoutManager = new LinearLayoutManager(getApplicationContext());
      recyclerView.setLayoutManager(mLayoutManager);
      recyclerView.setItemAnimator(new DefaultItemAnimator());
      mAdapter = new customAdapter(this,list);
      recyclerView.setAdapter(mAdapter);
      recyclerView.addItemDecoration(new DividerItemDecoration(recyclerView.getContext(), DividerItemDecoration.VERTICAL));
      list.add("sairamm");
      list.add("Krishna");
      list.add("prasad");
      list.add("sairamm");
      list.add("Krishna");
      list.add("prasad");
      list.add("sairamm");
      list.add("Krishna");
      list.add("prasad");
      list.add("sairamm");
      list.add("Krishna");
      list.add("prasad");
      list.add("Krishna");
      list.add("prasad");
      list.add("sairamm");
      list.add("Krishna");
      list.add("prasad");
      list.add("sairamm");
      list.add("Krishna");
      list.add("prasad");
   }
}
Step 4 − Add the following code to Manifest.xml
<?xml version = "1.0" encoding = "utf-8"?>
<manifest xmlns:android = "http://schemas.android.com/apk/res/android"
   package = "com.example.myapplication">
   <uses-permission android:name = "android.permission.INTERNET" />
   <uses-permission android:name = "com.android.launcher.permission.INSTALL_SHORTCUT" />
   <application
      android:allowBackup = "true"
      android:theme = "@style/AppTheme.NoActionBar"
      android:icon = "@mipmap/ic_launcher"
      android:label = "@string/app_name"
      android:roundIcon = "@mipmap/ic_launcher_round"
      android:supportsRtl = "true">
      <activity
         android:name = ".MainActivity"
         android:configChanges = "keyboardHidden|orientation|screenSize">
         <intent-filter>
            <action android:name = "android.intent.action.MAIN" />
            <action android:name = "android.intent.action.CREATE_SHORTCUT" />
            <category android:name = "android.intent.category.LAUNCHER" />
         </intent-filter>
      </activity>
   </application>
</manifest>
Step 5 − Add the following code to customAdapter.java
<?xml version = "1.0" encoding = "utf-8"?>
import android.content.Context;
import android.support.annotation.NonNull;
import android.support.v7.widget.RecyclerView;
import android.view.LayoutInflater;
import android.view.View;
import android.view.ViewGroup;
import android.widget.TextView;
import java.util.ArrayList;

public class customAdapter extends RecyclerView.Adapter<customAdapter.MyViewHolder> {
   Context context;
   ArrayList<String> list;
   public class MyViewHolder extends RecyclerView.ViewHolder {
      public TextView title;
      public MyViewHolder(View view) {
         super(view);
         title = (TextView) view.findViewById(R.id.title);
      }
   }
   public customAdapter(Context context, ArrayList<String> list) {
      this.context = context;
      this.list = list;
   }
   @NonNull
   @Override
   public MyViewHolder onCreateViewHolder(@NonNull ViewGroup viewGroup, int i) {
      View itemView = LayoutInflater.from(viewGroup.getContext()).inflate(R.layout.list_row, viewGroup, false);
      return new MyViewHolder(itemView);
   }
   @Override
   public void onBindViewHolder(@NonNull MyViewHolder myViewHolder, int i) {
      myViewHolder.title.setText(list.get(i));
   }
   @Override
   public int getItemCount() {
      return list.size();
   }
}
Step 6 − Add the following code to list_row.xml
<?xml version = "1.0" encoding = "utf-8"?>
<LinearLayout xmlns:android = "http://schemas.android.com/apk/res/android"
   android:orientation = "vertical" android:layout_width = "match_parent"
   android:layout_height = "wrap_content">
   <TextView
      android:id = "@+id/title"
      android:layout_width = "wrap_content"
      android:textSize = "30sp"
      android:layout_marginLeft = "10dp"
      android:layout_height = "wrap_content" />
</LinearLayout>
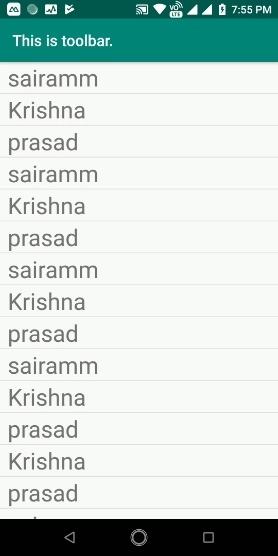
Let's try to run your application. I assume you have connected your actual Android Mobile device with your computer. To run the app from android studio, open one of your project's activity files and click Run ![]() icon from the toolbar. Select your mobile device as an option and then check your mobile device which will display your default screen –
icon from the toolbar. Select your mobile device as an option and then check your mobile device which will display your default screen –
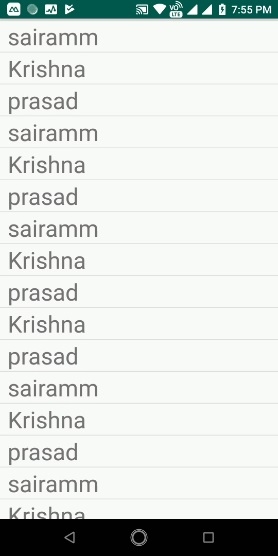
Now scroll up it will give the result as shown below –

3K+ Views
