- FastAPI - Home
- FastAPI - Introduction
- FastAPI - Hello World
- FastAPI - OpenAPI
- FastAPI - Uvicorn
- FastAPI - Type Hints
- FastAPI - IDE Support
- FastAPI - Rest Architecture
- FastAPI - Path Parameters
- FastAPI - Query Parameters
- FastAPI - Parameter Validation
- FastAPI - Pydantic
- FastAPI - Request Body
- FastAPI - Templates
- FastAPI - Static Files
- FastAPI - HTML Form Templates
- FastAPI - Accessing Form Data
- FastAPI - Uploading Files
- FastAPI - Cookie Parameters
- FastAPI - Header Parameters
- FastAPI - Response Model
- FastAPI - Nested Models
- FastAPI - Dependencies
- FastAPI - CORS
- FastAPI - Crud Operations
- FastAPI - SQL Databases
- FastAPI - Using MongoDB
- FastAPI - Using GraphQL
- FastAPI - Websockets
- FastAPI - FastAPI Event Handlers
- FastAPI - Mounting A Sub-App
- FastAPI - Middleware
- FastAPI - Mounting Flast App
- FastAPI - Deployment
FastAPI Useful Resources
FastAPI - Quick Guide
FastAPI - Introduction
FastAPI is a modern Python web framework, very efficient in building APIs. It is based on Pythons type hints feature that has been added since Python 3.6 onwards. It is one of the fastest web frameworks of Python.
As it works on the functionality of Starlette and Pydantic libraries, its performance is amongst the best and on par with that of NodeJS and Go.
In addition to offering high performance, FastAPI offers significant speed for development, reduces human-induced errors in the code, is easy to learn and is completely production-ready.
FastAPI is fully compatible with well-known standards of APIs, namely OpenAPI and JSON schema.
FastAPI has been developed by Sebastian Ramirez in Dec. 2018. FastAPI 0.127.0 is the currently available version.
FastAPI Environment Setup
To install FastAPI (preferably in a virtual environment), use pip3 installer.
pip3 install fastapi

Collecting fastapi
  Downloading fastapi-0.127.0-py3-none-any.whl.metadata (30 kB)
Collecting starlette<0.51.0,>=0.40.0 (from fastapi)
  Downloading starlette-0.50.0-py3-none-any.whl.metadata (6.3 kB)
Collecting pydantic>=2.7.0 (from fastapi)
  Downloading pydantic-2.12.5-py3-none-any.whl.metadata (90 kB)
Collecting typing-extensions>=4.8.0 (from fastapi)
  Downloading typing_extensions-4.15.0-py3-none-any.whl.metadata (3.3 kB)
Collecting annotated-doc>=0.0.2 (from fastapi)
  Downloading annotated_doc-0.0.4-py3-none-any.whl.metadata (6.6 kB)
Collecting anyio<5,>=3.6.2 (from starlette<0.51.0,>=0.40.0->fastapi)
  Downloading anyio-4.12.0-py3-none-any.whl.metadata (4.3 kB)
Requirement already satisfied: idna>=2.8 in d:\projects\python\myenv\lib\site-packages (from anyio<5,>=3.6.2->starlette<0.51.0,>=0.40.0->fastapi) (3.11)
Collecting annotated-types>=0.6.0 (from pydantic>=2.7.0->fastapi)
  Downloading annotated_types-0.7.0-py3-none-any.whl.metadata (15 kB)
Collecting pydantic-core==2.41.5 (from pydantic>=2.7.0->fastapi)
  Downloading pydantic_core-2.41.5-cp314-cp314-win_amd64.whl.metadata (7.4 kB)
Collecting typing-inspection>=0.4.2 (from pydantic>=2.7.0->fastapi)
  Downloading typing_inspection-0.4.2-py3-none-any.whl.metadata (2.6 kB)
Downloading fastapi-0.127.0-py3-none-any.whl (112 kB)
Downloading starlette-0.50.0-py3-none-any.whl (74 kB)
Downloading anyio-4.12.0-py3-none-any.whl (113 kB)
Downloading annotated_doc-0.0.4-py3-none-any.whl (5.3 kB)
Downloading pydantic-2.12.5-py3-none-any.whl (463 kB)
Downloading pydantic_core-2.41.5-cp314-cp314-win_amd64.whl (2.0 MB)
   ━━━━━━━━━━━━━━━━━━━━━━━━━━━━━━━━━━━━━━━━ 2.0/2.0 MB 6.1 MB/s  0:00:00
Downloading annotated_types-0.7.0-py3-none-any.whl (13 kB)
Downloading typing_extensions-4.15.0-py3-none-any.whl (44 kB)
Downloading typing_inspection-0.4.2-py3-none-any.whl (14 kB)
Installing collected packages: typing-extensions, anyio, annotated-types, annotated-doc, typing-inspection, starlette, pydantic-core, pydantic, fastapi
Successfully installed annotated-doc-0.0.4 annotated-types-0.7.0 anyio-4.12.0 fastapi-0.127.0 pydantic-2.12.5 pydantic-core-2.41.5 starlette-0.50.0 typing-extensions-4.15.0 typing-inspection-0.4.2
FastAPI depends on Starlette and Pydantic libraries, hence they also get installed.
Installing Uvicorn using PIP
FastAPI doesnt come with any built-in server application. To run FastAPI app, you need an ASGI server called uvicorn, so install the same too, using pip3 installer. It will also install uvicorns dependencies - asgiref, click, h11, and typing-extensions
pip3 install uvicorn

Collecting uvicorn
  Downloading uvicorn-0.40.0-py3-none-any.whl.metadata (6.7 kB)
Collecting click>=7.0 (from uvicorn)
  Downloading click-8.3.1-py3-none-any.whl.metadata (2.6 kB)
Collecting h11>=0.8 (from uvicorn)
  Downloading h11-0.16.0-py3-none-any.whl.metadata (8.3 kB)
Collecting colorama (from click>=7.0->uvicorn)
  Downloading colorama-0.4.6-py2.py3-none-any.whl.metadata (17 kB)
Downloading uvicorn-0.40.0-py3-none-any.whl (68 kB)
Downloading click-8.3.1-py3-none-any.whl (108 kB)
Downloading h11-0.16.0-py3-none-any.whl (37 kB)
Downloading colorama-0.4.6-py2.py3-none-any.whl (25 kB)
Installing collected packages: h11, colorama, click, uvicorn
Successfully installed click-8.3.1 colorama-0.4.6 h11-0.16.0 uvicorn-0.40.0
With these two libraries installed, we can check all the libraries installed so far.
pip3 freeze

annotated-doc==0.0.4
annotated-types==0.7.0
anyio==4.12.0
asgiref==3.11.0
certifi==2025.11.12
cffi==2.0.0
charset-normalizer==3.4.4
click==8.3.1
colorama==0.4.6
crypto==1.4.1
cryptography==46.0.3
Django==6.0
django-embed-video==1.4.10
easy-thumbnails==2.10.1
fastapi==0.127.0
h11==0.16.0
idna==3.11
Naked==0.1.32
onetimepad==1.4
paperclip==2.7.4
pillow==12.0.0
pycparser==2.23
pycryptodome==3.23.0
pydantic==2.12.5
pydantic_core==2.41.5
pyDes==2.0.1
pyperclip==1.11.0
python-magic==0.4.27
PyYAML==6.0.3
requests==2.32.5
shellescape==3.8.1
sqlparse==0.5.5
starlette==0.50.0
typing-inspection==0.4.2
typing_extensions==4.15.0
tzdata==2025.3
urllib3==2.6.2
uvicorn==0.40.0
FastAPI - Hello World
Getting Started
The first step in creating a FastAPI app is to declare the application object of FastAPI class.
from fastapi import FastAPI
app = FastAPI()
This app object is the main point of interaction of the application with the client browser. The uvicorn server uses this object to listen to clients request.
The next step is to create path operation. Path is a URL which when visited by the client invokes visits a mapped URL to one of the HTTP methods, an associated function is to be executed. We need to bind a view function to a URL and the corresponding HTTP method. For example, the index() function corresponds to / path with get operation.
@app.get("/")
async def root():
   return {"message": "Hello World"}
The function returns a JSON response, however, it can return dict, list, str, int, etc. It can also return Pydantic models.
Example - API returning 'Hello World'
Save the following code as main.py
main.py
from fastapi import FastAPI

app = FastAPI()

@app.get("/")
async def index():
   return {"message": "Hello World"}
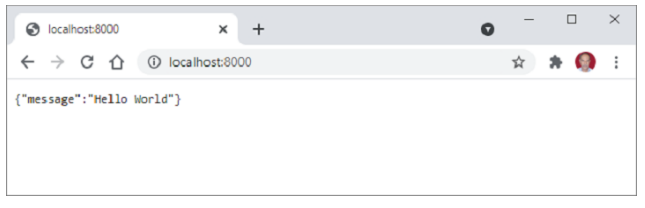
Start the Server
Start the uvicorn server by mentioning the file in which the FastAPI application object is instantiated.
uvicorn main:app --reload

INFO:     Will watch for changes in these directories: ['D:\\Projects\\python\\myenv']
INFO:     Uvicorn running on http://127.0.0.1:8000 (Press CTRL+C to quit)
INFO:     Started reloader process [10888] using StatReload
INFO:     Started server process [13932]
INFO:     Waiting for application startup.
INFO:     Application startup complete.
Output
Open the browser and visit http://localhost:/8000. You will see the JSON response in the browser window.
FastAPI - OpenAPI
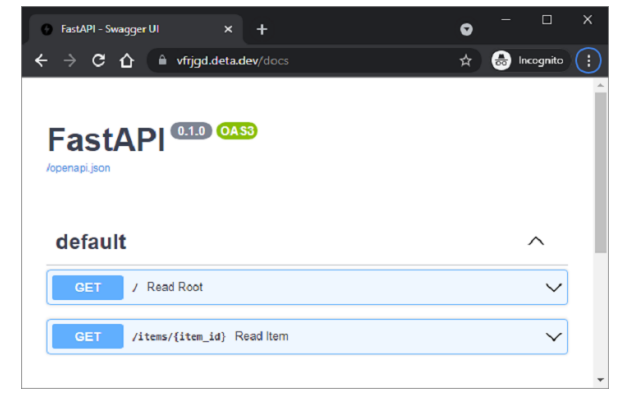
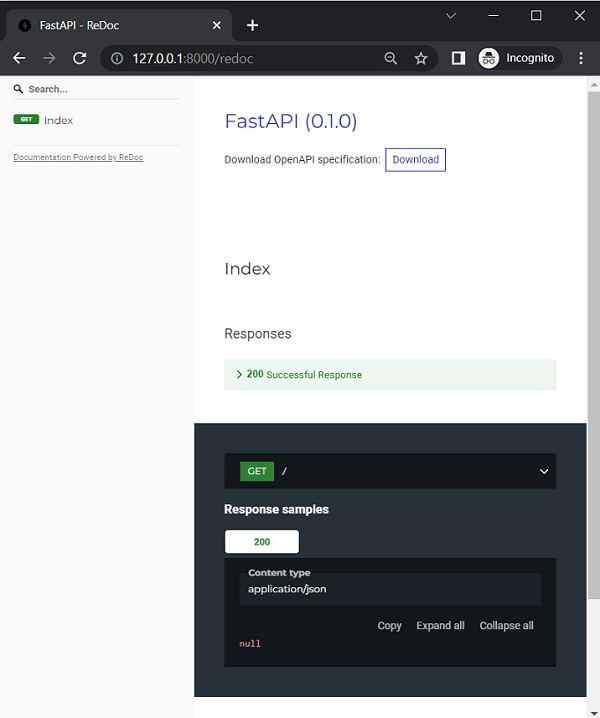
Enter the following URL in the browser to generate automatically the interactive documentation.
http://127.0.0.1:8000/docs
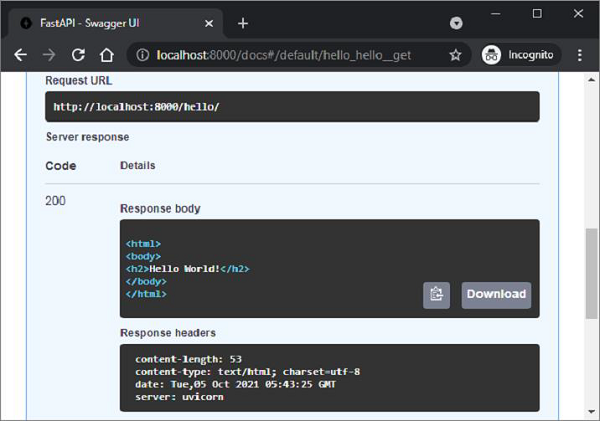
FastAPI uses Swagger UI to produce this documentation. The browser will display the following −
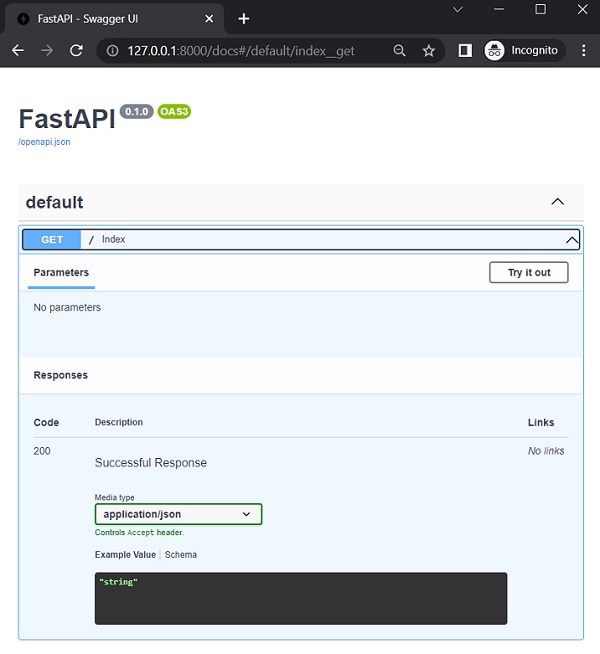
Click the 'try it out' button and then 'Execute' button that appears afterward.
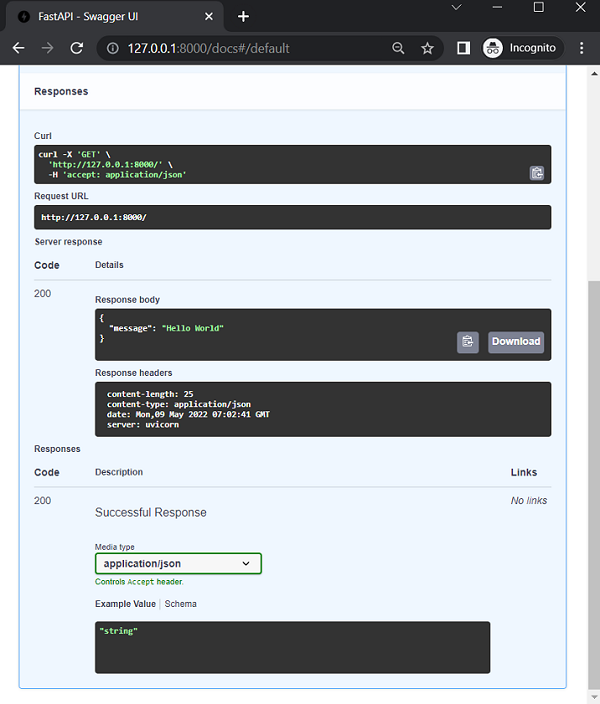
You can see the Curl command internally executed, the request URL, the response headers, and the JSON format of the servers response.
FastAPI generates a schema using OpenAPI specifications. The specification determines how to define API paths, path parameters, etc. The API schema defined by the OpenAPI standard decides how the data is sent using JSON Schema. Visit http://127.0.0.1:8000/openapi.json from your browser. A neatly formatted JSON response as follows will be displayed −
{
   "openapi": "3.1.0",
   "info": {
      "title": "FastAPI",
      "version": "0.1.0"
   },
   "paths": {
      "/": {
         "get": {
            "summary": "Index",
            "operationId": "index__get",
            "responses": {
               "200": {
                  "description": "Successful Response",
                  "content": {
                     "application/json": {
                        "schema": {}
                     }
                  }
               }
            }
         }
      }
   }
}
FastAPI also supports another automatic documentation method provided by Redoc ( https://github.com/Redocly/redoc).
Enter http://localhost:8000/redoc as URL in the browsers address bar.
FastAPI - Uvicorn
Unlike the Flask framework, FastAPI doesnt contain any built-in development server. Hence we need Uvicorn. It implements ASGI standards and is lightning fast. ASGI stands for Asynchronous Server Gateway Interface.
The WSGI (Web Server Gateway Interface the older standard) compliant web servers are not suitable for asyncio applications. Python web frameworks (such as FastAPI) implementing ASGI specifications provide high speed performance, comparable to web apps built with Node and Go.
Uvicorn uses uvloop and httptools libraries. It also provides support for HTTP/2 and WebSockets, which cannot be handled by WSGI. uvloop id similar to the built-in asyncio event loop. httptools library handles the http protocols.
Installing Standard Version of Uvicorn
The installation of Uvicorn as described earlier will install it with minimal dependencies. However, standard installation will also install cython based dependencies along with other additional libraries.
pip3 install uvicorn[standard]

Requirement already satisfied: uvicorn[standard] in d:\projects\python\myenv\lib\site-packages (0.40.0)
Requirement already satisfied: click>=7.0 in d:\projects\python\myenv\lib\site-packages (from uvicorn[standard]) (8.3.1)
Requirement already satisfied: h11>=0.8 in d:\projects\python\myenv\lib\site-packages (from uvicorn[standard]) (0.16.0)
Requirement already satisfied: colorama>=0.4 in d:\projects\python\myenv\lib\site-packages (from uvicorn[standard]) (0.4.6)
Collecting httptools>=0.6.3 (from uvicorn[standard])
  Downloading httptools-0.7.1-cp314-cp314-win_amd64.whl.metadata (3.6 kB)
Collecting python-dotenv>=0.13 (from uvicorn[standard])
  Downloading python_dotenv-1.2.1-py3-none-any.whl.metadata (25 kB)
Requirement already satisfied: pyyaml>=5.1 in d:\projects\python\myenv\lib\site-packages (from uvicorn[standard]) (6.0.3)
Collecting watchfiles>=0.13 (from uvicorn[standard])
  Downloading watchfiles-1.1.1-cp314-cp314-win_amd64.whl.metadata (5.0 kB)
Collecting websockets>=10.4 (from uvicorn[standard])
  Downloading websockets-15.0.1-py3-none-any.whl.metadata (6.8 kB)
Requirement already satisfied: anyio>=3.0.0 in d:\projects\python\myenv\lib\site-packages (from watchfiles>=0.13->uvicorn[standard]) (4.12.0)
Requirement already satisfied: idna>=2.8 in d:\projects\python\myenv\lib\site-packages (from anyio>=3.0.0->watchfiles>=0.13->uvicorn[standard]) (3.11)
Downloading httptools-0.7.1-cp314-cp314-win_amd64.whl (88 kB)
Downloading python_dotenv-1.2.1-py3-none-any.whl (21 kB)
Downloading watchfiles-1.1.1-cp314-cp314-win_amd64.whl (287 kB)
Downloading websockets-15.0.1-py3-none-any.whl (169 kB)
Installing collected packages: websockets, python-dotenv, httptools, watchfiles
Successfully installed httptools-0.7.1 python-dotenv-1.2.1 watchfiles-1.1.1 websockets-15.0.1
With this, the WebSockets protocol will be supported. Also, PyYAML will be installed to allow you to provide a .yaml file.
As mentioned earlier, the application is launched on the Uvicorn server with the following command −
uvicorn main:app reload
The --reload option enables the debug mode so that any changes in app.pywill be automatically reflected and the display on the client browser will be automatically refreshed. In addition, the following command-line options may be used −
| Sr.No | Command & Description |
|---|---|
| 1 |
--host TEXT Bind socket to this host. [default 127.0.0.1] |
| 2 |
--port INTEGER Bind socket to this port. [default 8000] |
| 3 |
--uds TEXT Bind to a UNIX domain socket. |
| 4 |
--fd INTEGER Bind to socket from this file descriptor. |
| 5 |
--reload Enable auto-reload. |
| 6 |
--reload-dir PATH Set reload directories explicitly, default current working directory. |
| 7 |
--reload-include TEXT Include files while watching. Includes '*.py' by default |
| 8 |
-reload-exclude TEXT Exclude while watching for files. |
| 9 |
--reload-delay FLOAT Delay between previous and next check default 0.25 |
| 10 |
-loop [auto|asyncio|uvloop] Event loop implementation. [default auto] |
| 11 |
--http [auto|h11|httptools] HTTP protocol implementation. [default auto] |
| 12 |
--interface auto|asgi|asgi|wsgi Select application interface. [default auto] |
| 13 |
--env-file PATH Environment configuration file. |
| 14 |
--log-config PATH Logging configuration file. Supported formats .ini, .json, .yaml. |
| 15 |
--version Display the uvicorn version and exit. |
| 16 |
--app-dir TEXT Look for APP in the specified directory default current directory |
| 17 |
--help Show this message and exit. |
Starting Uvicorn Server Programmatically
Instead of starting Uvicorn server from command line, it can be launched programmatically also.
main.py
In the Python code, call uvicorn.run() method, using any of the parameters listed above −
import uvicorn
from fastapi import FastAPI
app = FastAPI()

@app.get("/")
async def index():
   return {"message": "Hello World"}

if __name__ == "__main__":
   uvicorn.run("main:app", host="127.0.0.1", port=8000, reload=True)
Output
Now run this main.py as Python script as follows −
py main.py

INFO:     Will watch for changes in these directories: ['D:\\Projects\\python\\myenv']
INFO:     Uvicorn running on http://127.0.0.1:8000 (Press CTRL+C to quit)
INFO:     Started reloader process [21620] using WatchFiles
INFO:     Started server process [4772]
INFO:     Waiting for application startup.
INFO:     Application startup complete.
Uvicorn server will thus be launched in debug mode.
FastAPI - Type Hints
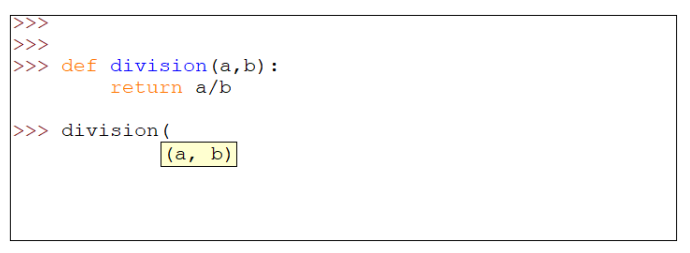
FastAPI makes extensive use of the Type hinting feature made available in Pythons version 3.5 onwards. As a matter of fact, Python is known to be a dynamically typed language. It also happens to be Pythons distinct feature. In a Python code, a variable need not be declared to be belonging to a certain type, and its type is determined dynamically by the instantaneous value assigned to it. Pythons interpreter doesnt perform type checks and hence it is prone to runtime exceptions.
In the following example, a division() function is defined with two parameters and returns their division, assuming that the parameters will be numeric.
>>> def division(a, b):
   return a/b
>>> division(10, 4)
2.5
>>> division(10, 2.5)
4.0
However, if one of the values passed to the function happen to be nonnumeric, it results in TypeError as shown below −
>>> division("Python",5)
TypeError: unsupported operand type(s) for /: 'str' and 'int'
Even a basic coding environment such as IDLE indicates that the function requires two parameters but wont specify the types as they havent been declared.
Pythons new type hinting feature helps in prompting the user with the expected type of the parameters to be passed. This is done by adding a colon and data type after the parameter. Well redefine the division() function as follows −
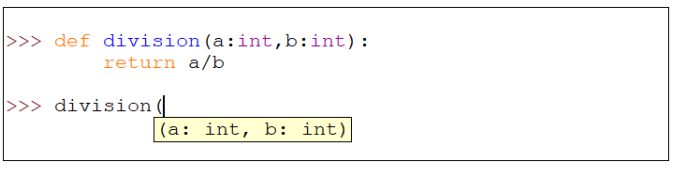
Note that while calling the function, Python hints at the expected type of each parameter to be passed. However, this doesnt prevent the TypeError from appearing if an incompatible value is passed. You will have to use a static type checker such as MyPy to check for compatibility before running.
Just as the formal parameters in the functions definition, it is possible to provide type hint for a functions return value. Just before the colon symbol in the functions definition statement (after which the function block starts) add an arrow (->) and the type.
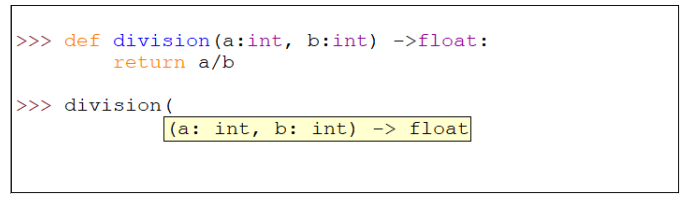
However, as mentioned earlier, if incompatible values are passed to the function, or returned by the function, Python reports TypeError. Use of MyPy static type checker can detect such errors. Install mypy package first.
pip3 install mypy

Collecting mypy
  Downloading mypy-1.19.1-cp314-cp314-win_amd64.whl.metadata (2.3 kB)
Requirement already satisfied: typing_extensions>=4.6.0 in d:\projects\python\myenv\lib\site-packages (from mypy) (4.15.0)
Collecting mypy_extensions>=1.0.0 (from mypy)
  Downloading mypy_extensions-1.1.0-py3-none-any.whl.metadata (1.1 kB)
Collecting pathspec>=0.9.0 (from mypy)
  Downloading pathspec-0.12.1-py3-none-any.whl.metadata (21 kB)
Collecting librt>=0.6.2 (from mypy)
  Downloading librt-0.7.4-cp314-cp314-win_amd64.whl.metadata (1.4 kB)
Downloading mypy-1.19.1-cp314-cp314-win_amd64.whl (10.3 MB)
   ━━━━━━━━━━━━━━━━━━━━━━━━━━━━━━━━━━━━━━━━ 10.3/10.3 MB 10.0 MB/s  0:00:01
Downloading librt-0.7.4-cp314-cp314-win_amd64.whl (45 kB)
Downloading mypy_extensions-1.1.0-py3-none-any.whl (5.0 kB)
Downloading pathspec-0.12.1-py3-none-any.whl (31 kB)
Installing collected packages: pathspec, mypy_extensions, librt, mypy
Successfully installed librt-0.7.4 mypy-1.19.1 mypy_extensions-1.1.0 pathspec-0.12.1
Save the following code as main.py
main.py
def division(x:int, y:int) -> int:
   return (x//y)
a=division(10,2)
print (a)
b=division(5,2.5)
print (b)
c=division("Hello",10)
print (c)
Check this code for type errors using mypy.
mypy main.py

main.py:5: error: Argument 2 to "division" has incompatible type "float"; expected "int"  [arg-type]
main.py:7: error: Argument 1 to "division" has incompatible type "str"; expected "int"  [arg-type]
Found 2 errors in 1 file (checked 1 source file)
There are errors in second and third calls to the function. In second, value passed to y is float when int is expected. In third, value passed to x is str when int is expected. (Note that // operator returns integer division)
All standard data types can be used as type hints. This can be done with global variables, variables as function parameters, inside function definition etc.
x: int = 3
y: float = 3.14
nm: str = 'abc'
married: bool = False
names: list = ['a', 'b', 'c']
marks: tuple = (10, 20, 30)
marklist: dict = {'a': 10, 'b': 20, 'c': 30}
A new addition in newer versions of Python (version 3.5 onwards) standard library is the typing module. It defines special types for corresponding standard collection types. The types on typing module are List, Tuple, Dict, and Sequence. It also consists of Union and Optional types. Note that standard names of data types are all in small case, whereas ones in typing module have first letter in upper case. Using this feature, we can ask a collection of a particular type.
from typing import List, Tuple, Dict
# following line declares a List object of strings.
# If violated, mypy shows error
cities: List[str] = ['Mumbai', 'Delhi', 'Chennai']
# This is Tuple with three elements respectively
# of str, int and float type)
employee: Tuple[str, int, float] = ('Ravi', 25, 35000)
# Similarly in the following Dict, the object key should be str
# and value should be of int type, failing which
# static type checker throws error
marklist: Dict[str, int] = {'Ravi': 61, 'Anil': 72}
FastAPI - IDE Support
The Type Hinting feature of Python is most effectively used in almost all IDEs (Integrated Development Environments) such as PyCharm and VS Code to provide dynamic autocomplete features.
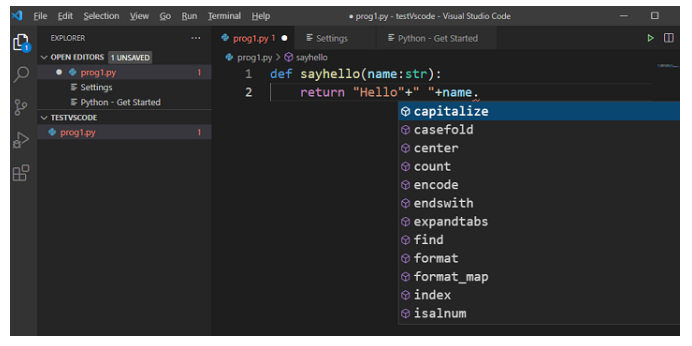
Let us see how VS Code uses the type hints to provide autocomplete suggestions while writing a code. In the example below, a function named as sayhello with name as an argument has been defined. The function returns a string by concatenating Hello to the name parameter by adding a space in between. Additionally, it is required to ensure that the first letter of the name be in upper case.
Pythons str class has a capitalize() method for the purpose, but if one doesnt remember it while typing the code, one has to search for it elsewhere. If you give a dot after name, you expect the list of attributes but nothing is shown because Python doesnt know what will be the runtime type of name variable.
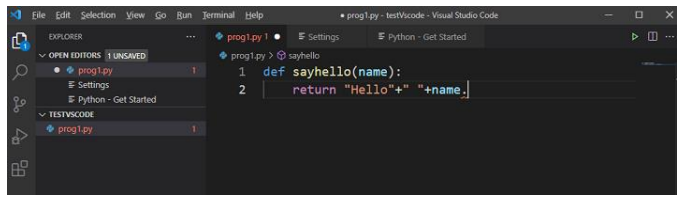
Here, type hint comes handy. Include str as the type of name in the function definition. Now when you press dot (.) after name, a drop down list of all string methods appears, from which the required method (in this case capitalize()) can be picked.
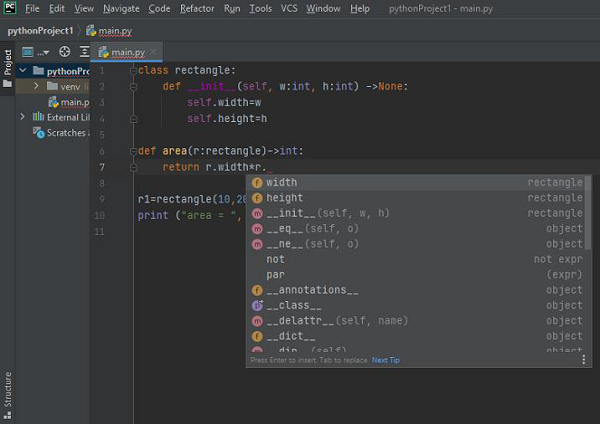
It is also possible to use type hints with a user defined class. In the following example a rectangle class is defined with type hints for arguments to the __init__() constructor.
class rectangle:
   def __init__(self, w:int, h:int) ->None:
      self.width=w
      self.height=h
Following is a function that uses an object of above rectangle class as an argument. The type hint used in the declaration is the name of the class.
def area(r:rectangle)->int:
   return r.width*r.height
r1=rectangle(10,20)
print ("area = ", area(r1))
In this case also, the IDE editor provides autocomplete support prompting list of the instance attributes. Following is a screenshot of PyCharm editor.
FastAPI makes extensive use of the type hints. This feature is found everywhere, such as path parameters, query parameters, headers, bodies, dependencies, etc. as well as validating the data from the incoming request. The OpenAPI document generation also uses type hints.
FastAPI - REST Architecture
RElational State Transfer (REST) is a software architectural style. REST defines how the architecture of a web application should behave. It is a resource based architecture where everything that the REST server hosts, (a file, an image, or a row in a table of a database), is a resource, having many representations.
Architectural Constraints
REST recommends certain architectural constraints.
Uniform interface
Statelessness
Client-server
Cacheability
Layered system
Code on demand
Advantages of REST Constraints
REST constraints has the following advantages −
Scalability
Simplicity
Modifiability
Reliability
Portability
Visibility
REST uses HTTP verbs or methods for the operation on the resources. The POST, GET, PUT and DELETE methods perform respectively CREATE, READ, UPDATE and DELETE operations respectively.
FastAPI - Path Parameters
Modern web frameworks use routes or endpoints as a part of URL instead of file-based URLs. This helps the user to remember the application URLs more effectively. In FastAPI, it is termed a path. A path or route is the part of the URL trailing after the first /.
For example, in the following URL,
http://localhost:8000/hello/TutorialsPoint
the path or the route would be
/hello/TutorialsPoint
In FastAPI, such a path string is given as a parameter to the operation decorator. The operation here refers to the HTTP verb used by the browser to send the data. These operations include GET, PUT, etc. The operation decorator (for example, @app.get("/")) is immediately followed by a function that is executed when the specified URL is visited. In the below example −
from fastapi import FastAPI

app = FastAPI()

@app.get("/")
async def index():
   return {"message": "Hello World"}
Here, ("/") is the path, get is the operation, @app.get("/") is the path operation decorator, and the index() function just below it is termed as path operation function.
Any of the following HTTP verbs can be used as operations.
| Sr.No. | Method & Description |
|---|---|
| 1 |
GET Sends data in unencrypted form to the server. Most common method. |
| 2 |
HEAD Same as GET, but without the response body. |
| 3 |
POST Used to send HTML form data to the server. Data received by the POST method is not cached by the server. |
| 4 |
PUT Replaces all current representations of the target resource with the uploaded content. |
| 5 |
DELETE Removes all current representations of the target resource given by a URL. |
The async keyword in the functions definition tells FastAPI that it is to be run asynchronously i.e. without blocking the current thread of execution. However, a path operation function can be defined without the async prefix also.
This decorated function returns a JSON response. Although it can return almost any of Pythons objects, it will be automatically converted to JSON. Further in this tutorial, we shall see how such a function returns Pydantic model objects.
The URLs endpoint or path can have one or more variable parameters. They can be accepted by using Pythons string formatting notation. In the above example URL http://localhost:8000/hello/TutorialsPoint, the last value may change in every client request. This variable parameter can be accepted in a variable as defined in the path and passed to the formal parameters defined in the function bound to the operation decorator.
Example - Usage of Path Parameter
Add another path decorator with a variable parameter in the route, and bind hello() function to have name parameter. Modify the main.py as per the following.
main.py
from fastapi import FastAPI

app = FastAPI()

@app.get("/")
async def index():
   return {"message": "Hello World"}

@app.get("/hello/{name}")
async def hello(name):
   return {"name": name}
Output
Start the Uvicorn server and visit http://localhost:8000/hello/Tutorialspoint URL. The browser shows the following JSON response.
{"name":"Tutorialspoint"}
Change the variable path parameter to something else such as http://localhost:8000/hello/Python so that the browser shows −
{"name":"Python"}
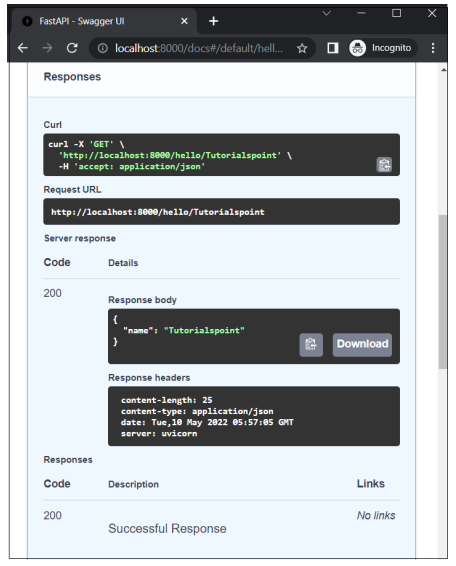
Check OpenAPI docs
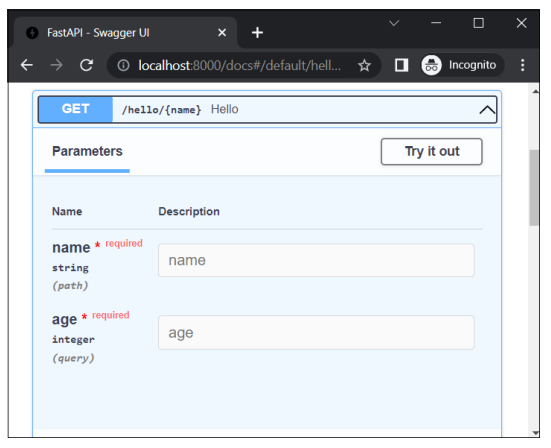
Now if we check the OpenAPI documentation by entering the URL as http://localhost:8000/docs, it will show two routes and their respective view functions. Click the try out button below /hello/{name} button and give Tutorialspoint as the value of the name parameters description and then click the Execute button.
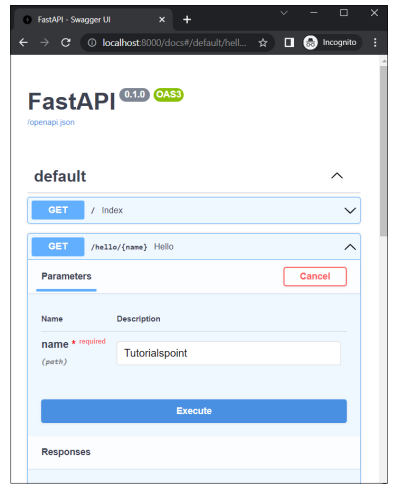
It will then show the Curl command, the request URL and the details of servers response with response body and response headers.
main.py
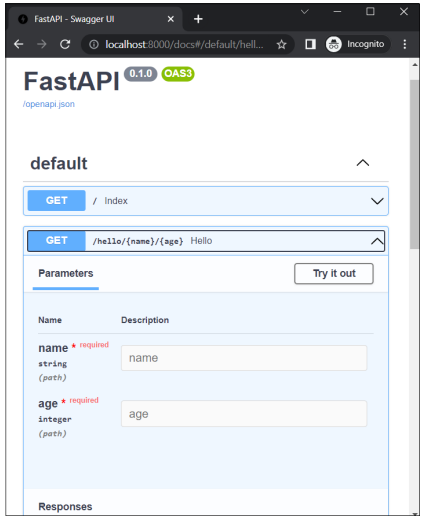
A route can have multiple parameters separated by "/" symbol.
from fastapi import FastAPI

app = FastAPI()

@app.get("/hello/{name}/{age}")
async def hello(name,age):
   return {"name": name, "age":age}
Output
In this case, /hello is the route, followed by two parameters put in curly brackets. If the URL given in the browsers address bar is http://localhost:8000/hello/Ravi/20, The data of Ravi and 20 will be assigned to variables name and age respectively. The browser displays the following JSON response −
{"name":"Ravi","age":"20"}
Example - Path Parameters with Types
You can use Pythons type hints for the parameters of the function to be decorated. In this case, define name as str and age as int.
main.py
from fastapi import FastAPI

app = FastAPI()

@app.get("/hello/{name}/{age}")
async def hello(name:str,age:int):
   return {"name": name, "age":age}
Output
This will result in the browser displaying an HTTP error message in the JSON response if the types dont match. Try entering http://localhost:8000/hello/20/Ravi as the URL. The browsers response will be as follows −
{
  "detail": [
    {
      "type": "int_parsing",
      "loc": [
        "path",
        "age"
      ],
      "msg": "Input should be a valid integer, unable to parse string as an integer",
      "input": "Ravi"
    }
  ]
}
Output
The reason is obvious as age being integer, cant accept a string value. This will also be reflected in the Swagger UI (OpenAPI) documentation.
FastAPI - Query Parameters
A classical method of passing the request data to the server is to append a query string to the URL. Assuming that a Python script (hello.py) on a server is executed as CGI, a list of key-value pairs concatenated by the ampersand (&) forms the query string, which is appended to the URL by putting a question mark (?) as a separator. For example −
http://localhost/cgi-bin/hello.py?name=Ravi&age=20
The trailing part of the URL, after (?), is the query string, which is then parsed by the server-side script for further processing.
As mentioned, the query string is a list of parameter=value pairs concatenated by & symbol. FastAPI automatically treats the part of the endpoint which is not a path parameter as a query string and parses it into parameters and its values. These parameters are passed to the function below the operation decorator.
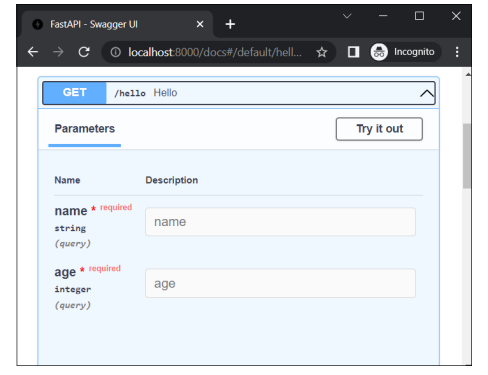
Example - Usage of Query Parameters
main.py
from fastapi import FastAPI

app = FastAPI()
@app.get("/hello")
async def hello(name:str,age:int):
   return {"name": name, "age":age}
Output
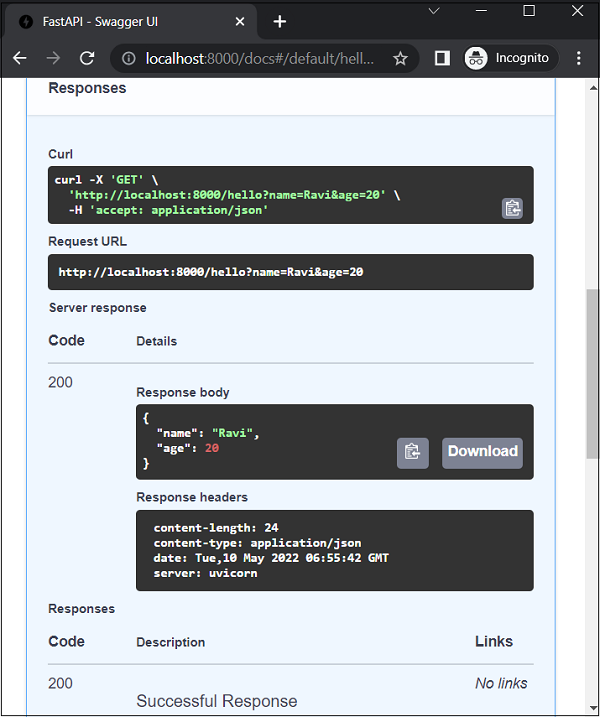
Start the Uvicorn server and this URL in the browser −
http://localhost:8000/hello?name=Ravi&age=20
{"name":"Ravi","age":20}
You should get the same JSON response as for Path Parameters. However, checking the tells you that FastAPI has detected that /hello endpoint has no path parameters, but query parameters.
Click the Try it out button, enter "Ravi" and "20" as values, and press the Execute button. The documentation page now shows Curl command, request URL, and the body and headers of HTTP response.
Example - Using Python Type Hints
You can use Pythons type hints for the parameters of the function to be decorated. In this case, define name as str and age as int.
main.py
from fastapi import FastAPI

app = FastAPI()

@app.get("/hello/{name}")
async def hello(name:str,age:int):
   return {"name": name, "age":age}
Try entering http://localhost:8000/docs as the URL. This will open the Swagger UI (OpenAPI) documentation. The parameter 'name' is a path parameter and 'age' is a query parameter
FastAPI - Parameter Validation
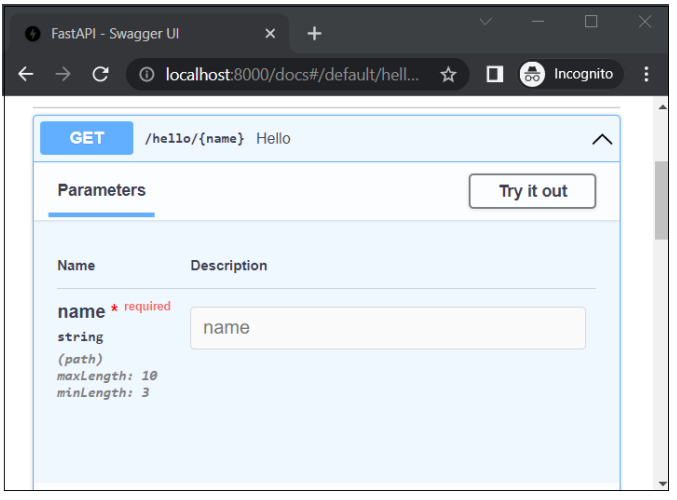
It is possible to apply validation conditions on path parameters as well as query parameters of the URL. In order to apply the validation conditions on a path parameter, you need to import the Path class. In addition to the default value of the parameter, you can specify the maximum and minimum length in the case of a string parameter.
Example - Applying Validations on Parameters
main.py
from fastapi import FastAPI, Path
app = FastAPI()

@app.get("/hello/{name}")
async def hello(name:str=Path(...,min_length=3, max_length=10)):
   return {"name": name}
Output
If the browsers URL contains the parameter with a length less than 3 or more than 10, as in
(http://localhost:8000/hello/Tutorialspoint)
there will be an appropriate error message such as −
{
  "detail": [
    {
      "type": "string_too_long",
      "loc": [
        "path",
        "name"
      ],
      "msg": "String should have at most 10 characters",
      "input": "Tutorialspoint",
      "ctx": {
        "max_length": 10
      }
    }
  ]
}
The OpenAPI docs also shows the validations applied −
Validatiion Rules using Operators
Validation rules can be applied on numeric parameters too, using the operators as given below −
gt − greater than
ge − greater than or equal
lt − less than
le − less than or equal
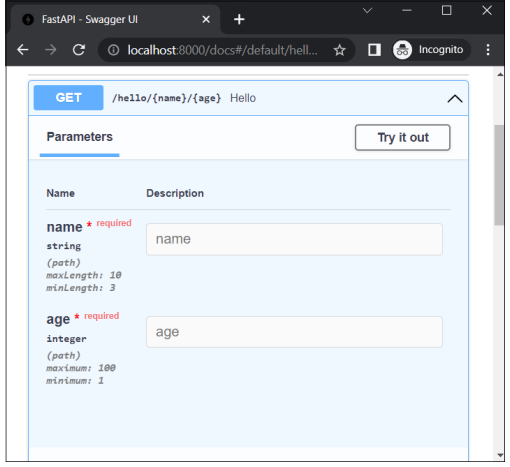
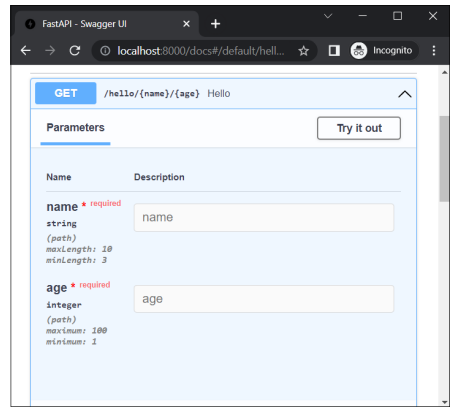
Let us modify the above operation decorator to include age as a path parameter and apply the validations.
main.py
from fastapi import FastAPI, Path

app = FastAPI()

@app.get("/hello/{name}/{age}")
async def hello(*, name: str=Path(...,min_length=3 , max_length=10), age: int = Path(..., ge=1, le=100)):
   return {"name": name, "age":age}
In this case, validation rules are applied for both the parameters name and age. If the URL entered is
http://localhost:8000/hello/hi/110
then the JSON response shows following explanations for validation failure −
{
  "detail": [
    {
      "type": "string_too_short",
      "loc": [
        "path",
        "name"
      ],
      "msg": "String should have at least 3 characters",
      "input": "hi",
      "ctx": {
        "min_length": 3
      }
    },
    {
      "type": "less_than_equal",
      "loc": [
        "path",
        "age"
      ],
      "msg": "Input should be less than or equal to 100",
      "input": "110",
      "ctx": {
        "le": 100
      }
    }
  ]
}
The swagger UI documentation also identifies the constraints.
Example - Validation on Query Parameters
The query parameters can also have the validation rules applied to them. You have to specify them as the part of arguments of Query class constructor.
Let us add a query parameter called percent in the above function and apply the validation rules as ge=0 (i.e., greater then equal to 0) and lt=100 (less than or equal to 100)
from fastapi import FastAPI, Path, Query
@app.get("/hello/{name}/{age}")
async def hello(*, name: str=Path(...,min_length=3 ,
max_length=10), \
      age: int = Path(..., ge=1, le=100), \
      percent:float=Query(..., ge=0, le=100)):
   return {"name": name, "age":age}
Output
If the URL entered is
http://localhost:8000/hello/Ravi/20?percent=79
then the browser displays following JSON response −
{"name":"Ravi","age":20}
FastAPI correctly identifies percent as a query parameter with validation conditions applied. It is reflected in the OpenAPI documentation as follows −
While the client can send the path and query parameters to the API server using GET method, we need to apply POST method to send some binary data as a part of the HTTP request. This binary data may be in the form of an object of any Python class. It forms the request body. FastAPI uses Pydantic library for this purpose.
FastAPI - Pydantic
Pydantic is a Python library for data parsing and validation. It uses the type hinting mechanism of the newer versions of Python (version 3.6 onwards) and validates the types during the runtime. Pydantic defines BaseModel class. It acts as the base class for creating user defined models.
Following code defines a Student class as a model based on BaseModel.
from typing import List
from pydantic import BaseModel
class Student(BaseModel):
   id: int
   name :str
   subjects: List[str] = []
The attributes of the Student class are declared with type hints. Note that the subjects attribute is of List type defined in typing module and of builtin list type.
Example - Usage of Pydantic
We can populate an object of Student class with a model_dump with matching structure as follows −
main.py
from typing import List
from pydantic import BaseModel

class Student(BaseModel):
   id: int
   name :str
   subjects: List[str] = []

data = {
   'id': 1,
   'name': 'Ravikumar',
   'subjects': ["Eng", "Maths", "Sci"],
}

s1=Student(**data)

print(s1)

print(s1.model_dump())
Output
Run the code and verify the output.
id=1 name='Ravikumar' subjects=['Eng', 'Maths', 'Sci']
{'id': 1, 'name': 'Ravikumar', 'subjects': ['Eng', 'Maths', 'Sci']}
Example - Error in case Conversion is not feasible
Pydantic will automatically get the data types converted whenever possible. For example, even if the id key in the dictionary is assigned a string representation of a number (such as '123'), it will coerce it into an integer. But whenever not possible, an exception will be raised.
main.py
from typing import List
from pydantic import BaseModel

class Student(BaseModel):
   id: int
   name :str
   subjects: List[str] = []

data = {
   'id': 1,
   'name': 'Ravikumar',
   'subjects': ["Eng", "Maths", "Sci"],
}

s1=Student(**data)
Output
Run the code and verify the output.
Traceback (most recent call last): File "D:\Projects\python\myenv\main.py", line 15, ins1=Student(**data) File "D:\Projects\python\myenv\Lib\site-packages\pydantic\main.py", line 250, in __init__ validated_self = self.__pydantic_validator__.validate_python(data, self_instance=self) pydantic_core._pydantic_core.ValidationError: 1 validation error for Student id Input should be a valid integer [type=int_type, input_value=[1, 2], input_type=list] For further information visit https://errors.pydantic.dev/2.12/v/int_type
Example - Validation Error
Pydantic also contains a Field class to declare metadata and validation rules for the model attributes. First modify the Student class to apply Field type on "name" attribute as follows −
from typing import List
from pydantic import BaseModel, Field

class Student(BaseModel):
   id: int
   name :str = Field(None, title="The description of the item", max_length=10)
   subjects: List[str] = []
Populate the data as shown below. The name here is exceeding the max_length stipulated. Pydantic throws ValidationError as expected.
main.py
from typing import List
from pydantic import BaseModel, Field

class Student(BaseModel):
   id: int
   name :str = Field(None, title="The description of the item", max_length=10)
   subjects: List[str] = []

data = {
   'id': 1,
   'name': 'Ravikumar Sharma',
   'subjects': ["Eng", "Maths", "Sci"],
}
s1=Student(**data)
Output
Run the code and verify the output.
Traceback (most recent call last): File "D:\Projects\python\myenv\main.py", line 14, ins1=Student(**data) File "D:\Projects\python\myenv\Lib\site-packages\pydantic\main.py", line 250, in __init__ validated_self = self.__pydantic_validator__.validate_python(data, self_instance=self) pydantic_core._pydantic_core.ValidationError: 1 validation error for Student name String should have at most 10 characters [type=string_too_long, input_value='Ravikumar Sharma', input_type=str] For further information visit https://errors.pydantic.dev/2.12/v/string_too_long
Pydantic models can be used to map with ORM models like SQLAlchemy or Peewee.
FastAPI - Request Body
We shall now use the Pydantic model object as a request body of the clients request. As mentioned earlier, we need to use POST operation decorator for the purpose.
main.py
from fastapi import FastAPI
from typing import List
from pydantic import BaseModel, Field
app = FastAPI()
class Student(BaseModel):
id: int
name :str = Field(None, title="name of student", max_length=10)
subjects: List[str] = []
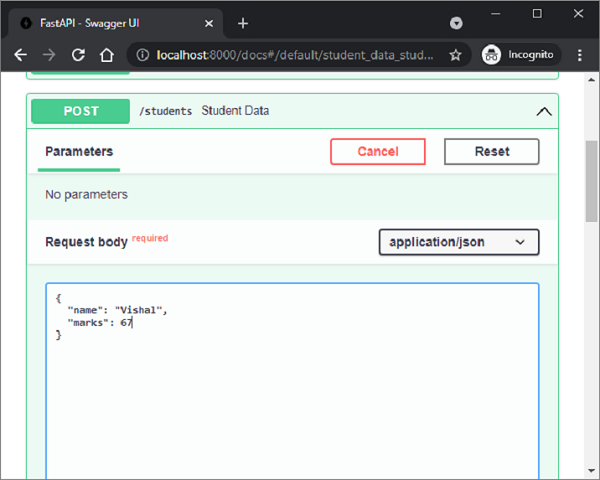
@app.post("/students/")
async def student_data(s1: Student):
return s1
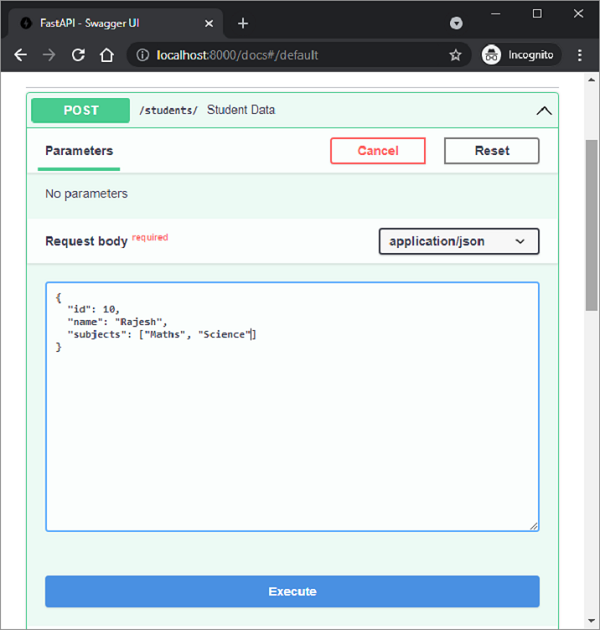
As it can be seen, the student_data() function is decorated by @app.post() decorator having the URL endpoint as "/students/". It receives an object of Student class as Body parameter from the clients request. To test this route, start the Uvicorn server and open the Swagger UI documentation in the browser by visiting http://localhost:8000/docs
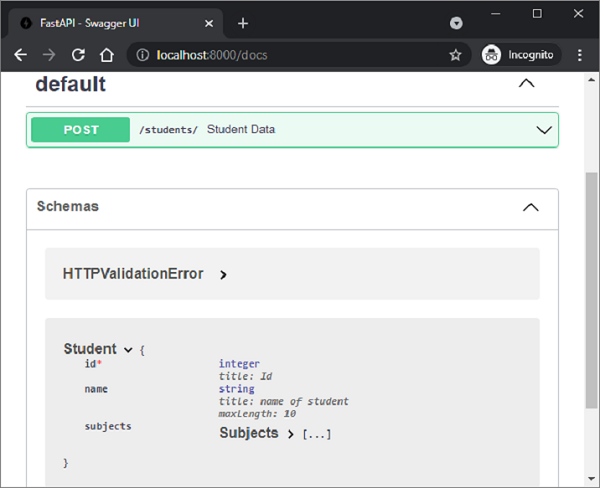
The documentation identifies that "/students/" route is attached with student_data() function with POST method. Under the schemas section the Student model will be listed.
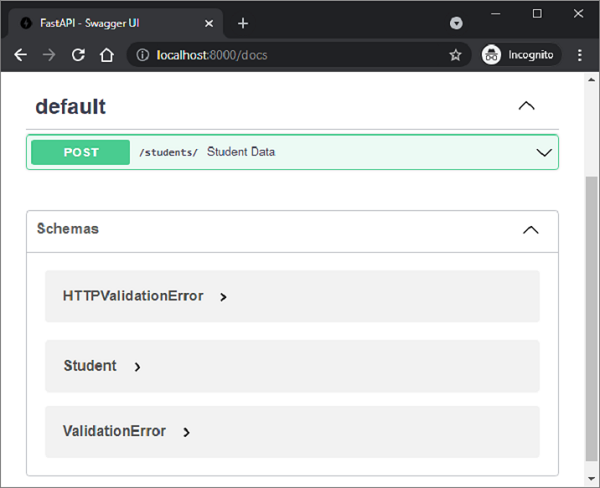
Expand the node in front of it to reveal the structure of the model
Click the Try it out button to fill in the test values in the request body.
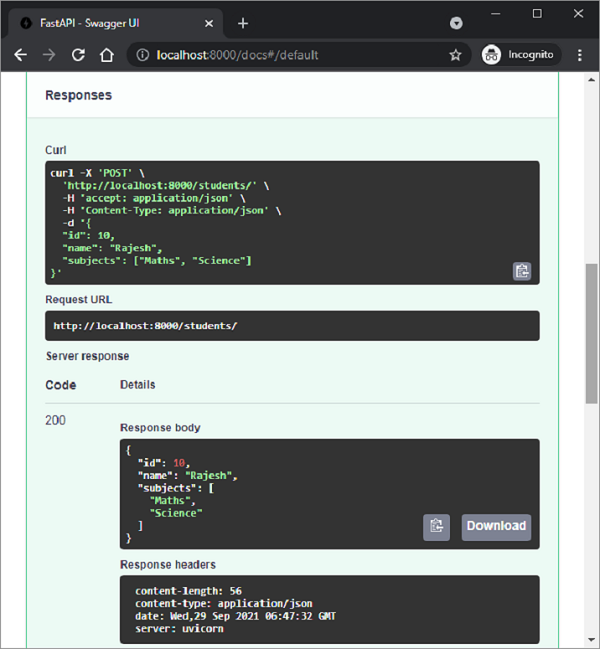
Click the Execute button and get the servers response values.
While a Pydantic model automatically populates the request body, it is also possible to use singular values to add attributes to it. For that purpose, we need to use Body class objects as the parameters of the operation function to be decorated.
First, we need to import Body class from fastapi. As shown in the following example, declare 'name' and 'marks' as the Body parameters in the definition of student_data() function below the @app.post() decorator.
main.py
from fastapi import FastAPI, Body
from typing import List
from pydantic import BaseModel, Field

app = FastAPI()

class Student(BaseModel):
   id: int
   name :str = Field(None, title="name of student", max_length=10)
   subjects: List[str] = []

@app.post("/students/")
async def student_data(name:str=Body(...), marks:int=Body(...)):
   return {"name":name,"marks": marks}
If we check the Swagger UI documentation, we should be able to find this POST method associated to student_data() function and having a request body with two parameters.
It is also possible to declare an operation function to have path and/or query parameters along with request body. Let us modify the student_data() function to have a path parameter 'college, 'age' as query parameter and a Student model object as body parameter.
main.py
from fastapi import FastAPI, Body
from typing import List
from pydantic import BaseModel, Field

app = FastAPI()

class Student(BaseModel):
   id: int
   name :str = Field(None, title="name of student", max_length=10)
   subjects: List[str] = []

@app.post("/students/{college}")
async def student_data(college:str, age:int, student:Student):
   retval={"college":college, "age":age, **student.model_dump()}
   return retval
The function adds values of college and age parameters along with the dictionary representation of Student object and returns it as a response. We can check the API documentation as follows −

As it can be seen, college is the path parameter, age is a query parameter, and the Student model is the request body.
FastAPI - Templates
By default, FastAPI renders a JSON response to the client. However, it can be cast to a HTML response. For this purpose, FastAPI has HTMLResponse class defined in fastapi.responses module. We need to add response_class as an additional parameter to operation decorator, with HTMLResponse object as its value.
Example - Using HTML Content
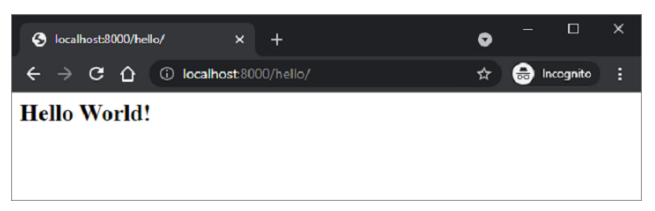
In the following example, the @app.get() decorator has "/hello/" endpoint and the HTMLResponse as response_class. Inside the hello() function, we have a string representation of a HTML code of Hello World message. The string is returned in the form of HTML response.
main.py
from fastapi.responses import HTMLResponse
from fastapi import FastAPI

app = FastAPI()

@app.get("/hello/")
async def hello():
   ret='''
   <html>
   <body>
   <h2>Hello World!</h2>
   </body>
   </html>
   '''
   return HTMLResponse(content=ret)
Output
On examining the API docs, it can be seen that the servers response body is in HTML.
The request URL (http://localhost:8000/hello/) should also render the message in the browser. However, rendering a raw HTML response is very tedious. Alternately, it is possible to render prebuilt HTML pages as templates. For that we need to use a web template library.
Web template library has a template engine that merges a static web page having place holder variables. Data from any source such as database is merged to dynamically generate and render the web page. FastAPI doesnt have any prepackaged template library. So one is free to use any one that suits his needs. In this tutorial, we shall be using jinja2, a very popular web template library. Let us install it first using pip installer.
pip3 install jinja2

Collecting jinja2
  Downloading jinja2-3.1.6-py3-none-any.whl.metadata (2.9 kB)
Collecting MarkupSafe>=2.0 (from jinja2)
  Downloading markupsafe-3.0.3-cp314-cp314-win_amd64.whl.metadata (2.8 kB)
Downloading jinja2-3.1.6-py3-none-any.whl (134 kB)
Downloading markupsafe-3.0.3-cp314-cp314-win_amd64.whl (15 kB)
Installing collected packages: MarkupSafe, jinja2
Successfully installed MarkupSafe-3.0.3 jinja2-3.1.6
FastAPIs support for Jinja templates comes in the form of jinja2Templates class defined in fastapi.templates module.
from fastapi.templating import Jinja2Templates
To declare a template object, the folder in which the html templates are stored, should be provided as parameter. Inside the current working directory, we shall create a templates directory.
templates = Jinja2Templates(directory="templates")
Example - Using External HTML Page
A simple web page hello.html to render Hello World message is also put in templates folder.
hello.html
<html>
<body>
<h2>Hello World!</h2>
</body>
</html>
We are now going to render html code from this page as HTMLResponse. Let us modify the hello() function as follows −
main.py
from fastapi.responses import HTMLResponse
from fastapi.templating import Jinja2Templates
from fastapi import FastAPI, Request

app = FastAPI()
templates = Jinja2Templates(directory="templates")

@app.get("/hello/", response_class=HTMLResponse)
async def hello(request: Request):
   return templates.TemplateResponse("hello.html", {"request": request})
Output
Here, templateResponse() method of template object collects the template code and the request context to render the http response. When we start the server and visit the http://localhost:8000/hello/ URL, we get to see the Hello World message in the browser, which is in fact the output of hello.html
As mentioned earlier, jinja2 template allows certain place holders to be embedded in the HTML code. The jinja2 code elements are put inside the curly brackets. As soon as the HTML parser of the browser encounters this, the template engine takes over and populates these code elements by the variable data provided by the HTTP response. Jinja2 provides following code elements −
{% %} Statements
{{ }} Expressions to print to the template output
{# #} − Comments which are not included in the template output
# # # − Line statements
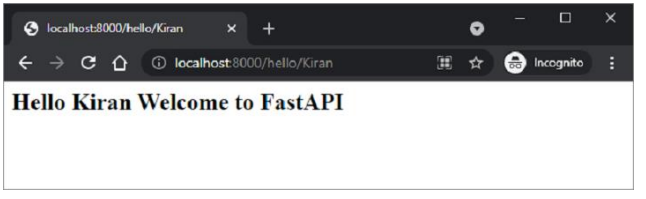
The hello.html is modified as below to display a dynamic message by substituting the name parameter.
hello.html
<html>
<body>
<h2>Hello {{name}} Welcome to FastAPI</h2>
</body>
</html>
The operation function hello() is also modified to accept name as a path parameter. The TemplateResponse should also include the JSON representation of name:name along with the request context.
main.py
from fastapi.responses import HTMLResponse
from fastapi.templating import Jinja2Templates
from fastapi import FastAPI, Request

app = FastAPI()
templates = Jinja2Templates(directory="templates")

@app.get("/hello/{name}", response_class=HTMLResponse)
async def hello(request: Request, name:str):
   return templates.TemplateResponse("hello.html", {"request": request, "name":name})
Output
Restart the server and go to http://localhost:8000/hello/Kiran. The browser now fills the jinja2 place holder with the path parameter in this URL.
FastAPI - Static Files
Often it is required to include in the template response some resources that remain unchanged even if there is a certain dynamic data. Such resources are called static assets. Media files (.png, .jpg etc), JavaScript files to be used for executing some front end code, or stylesheets for formatting HTML (.CSS files) are the examples of static files.
In order to handle static files, you need a library called aiofiles
pip3 install aiofiles

Collecting aiofiles
  Downloading aiofiles-25.1.0-py3-none-any.whl.metadata (6.3 kB)
Downloading aiofiles-25.1.0-py3-none-any.whl (14 kB)
Installing collected packages: aiofiles
Successfully installed aiofiles-25.1.0
Next, import StaticFiles class from the fastapi.staticfiles module. Its object is one of the parameters for the mount() method of the FastAPI application object to assign "static" subfolder in the current application folder to store and serve all the static assets of the application.
app.mount(app.mount("/static", StaticFiles(directory="static"), name="static")
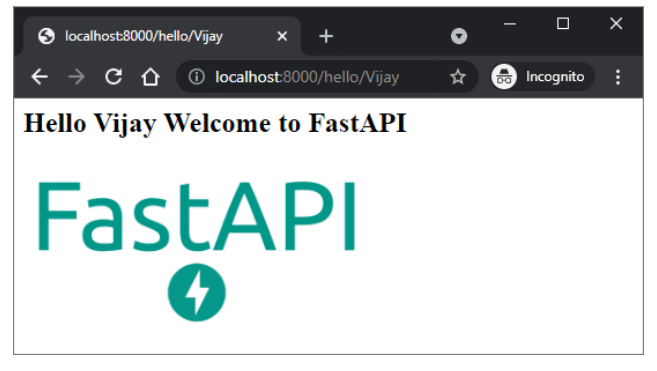
Example - Using static files
In the following example, FastAPI logo is to be rendered in the hello.html template. Hence, fa-logo.png file is first placed in static folder. It is now available for using as src attribute of <img> tag in HTML code.
main.py
from fastapi import FastAPI, Request
from fastapi.responses import HTMLResponse
from fastapi.templating import Jinja2Templates
from fastapi.staticfiles import StaticFiles

app = FastAPI()
templates = Jinja2Templates(directory="templates")
app.mount("/static", StaticFiles(directory="static"), name="static")

@app.get("/hello/{name}", response_class=HTMLResponse)
async def hello(request: Request, name:str):
   return templates.TemplateResponse("hello.html", {"request": request, "name":name})
The HTML code of \templates\hello.html is as follows −
hello.html
<html>
   <body>
      <h2>Hello {{name}} Welcome to FastAPI</h2>
      <img src="{{ url_for('static', path='fa-logo.png') }}" alt="" width="300">
   </body>
</html>
Output
Run the Uvicorn server and visit the URL as http://localhost/hello/Vijay. The Logo appears in the browser window as shown.
Example - Using static javascript code
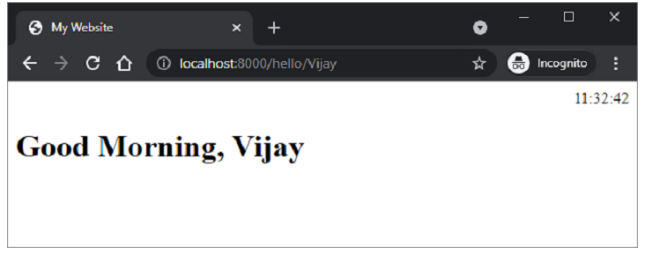
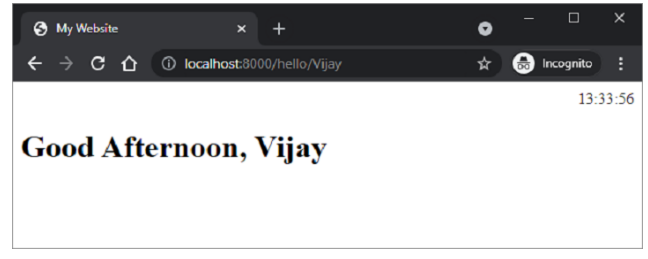
Here is another example of a static file. A JavaScript code hello.js contains a definition of myfunction() to be executed on the onload event in following HTML script (\templates\hello.html)
<html>
   <head>
      <title>My Website</title>
      <script src="{{ url_for('static', path='hello.js') }}"></script>
   </head>
   <body onload="myFunction()">
      <div id="time" style="text-align:right; width="100%"></div>
      <h1><div id="ttl">{{ name }}</div></h1>
   </body>
</html>
The hello.js code is as follows − (\static\hello.js)
function myFunction() {
   var today = new Date();
   var h = today.getHours();
   var m = today.getMinutes();
   var s = today.getSeconds();
   var msg="";
   if (h<12) {
      msg="Good Morning, ";
   }
   if (h>=12 && h<18) {
      msg="Good Afternoon, ";
   }
   if (h>=18) {
      msg="Good Evening, ";
   }
   var x=document.getElementById('ttl').innerHTML;
   document.getElementById('ttl').innerHTML = msg+x;
   document.getElementById('time').innerHTML = h + ":" + m + ":" + s;
}
The function detects the value of current time and assigns appropriate value to msg variable (good morning, good afternoon or good evening) depending on the time of the day.
Save /static/hello.js, modify \templates\hello.html and restart the server. The browser should show the current time and corresponding message below it.
FastAPI - HTML Form Templates
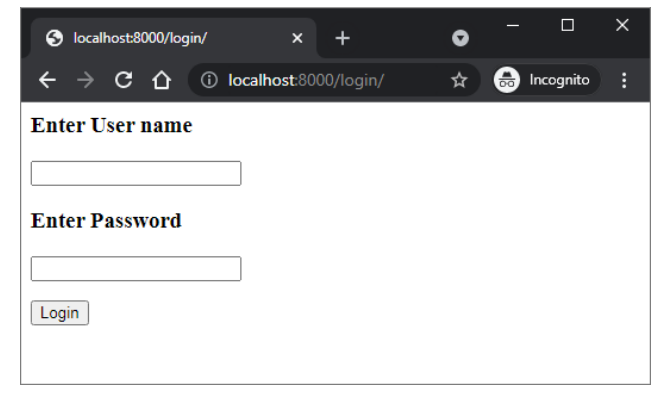
Let us add another route "/login" to our application created in FastAPI - Static Files Chapter which renders a html template having a simple login form. The HTML code for login page is as follows −
Example - Adding Login Page
login.html
<html>
   <body>
      <form action="/submit" method="POST">
         <h3>Enter User name</h3>
         <p><input type='text' name='nm'/></p>
         <h3>Enter Password</h3>
         <p><input type='password' name='pwd'/></p>
         <p><input type='submit' value='Login'/></p>
      </form>
   </body>
</html>
Note that the action parameter is set to "/submit" route and action set to POST. This will be significant for further discussion.
Add login() function in the main.py file as under −
main.py
from fastapi import FastAPI, Request
from fastapi.responses import HTMLResponse
from fastapi.templating import Jinja2Templates
from fastapi.staticfiles import StaticFiles

app = FastAPI()
templates = Jinja2Templates(directory="templates")
app.mount("/static", StaticFiles(directory="static"), name="static")

@app.get("/hello/{name}", response_class=HTMLResponse)
async def hello(request: Request, name:str):
   return templates.TemplateResponse("hello.html", {"request": request, "name":name})

@app.get("/login/", response_class=HTMLResponse)
async def login(request: Request):
   return templates.TemplateResponse("login.html", {"request": request})
Output
The URL http://localhost:8000/login will render the login form as follows −
FastAPI - Accessing Form Data
Now we shall see how the HTML form data can be accessed in a FastAPI operation function. In the example updated in FastAPI - HTML Form Templates Chapter, the /login route renders a login form. The data entered by the user is submitted to /submit URL with POST as the request method. Now we have to provide a view function to process the data submitted by the user.
FastAPI has a Form class to process the data received as a request by submitting an HTML form. However, you need to install the python-multipart module. It is a streaming multipart form parser for Python.
pip3 install python-multipart

Collecting python-multipart
  Downloading python_multipart-0.0.21-py3-none-any.whl.metadata (1.8 kB)
Downloading python_multipart-0.0.21-py3-none-any.whl (24 kB)
Installing collected packages: python-multipart
Successfully installed python-multipart-0.0.21
Add Form class to the imported resources from FastAPI
from fastapi import Form
Let us define a submit() function to be decorated by @app.post(). In order to receive the form data, declare two parameters of Form type, having the same name as the form attributes.
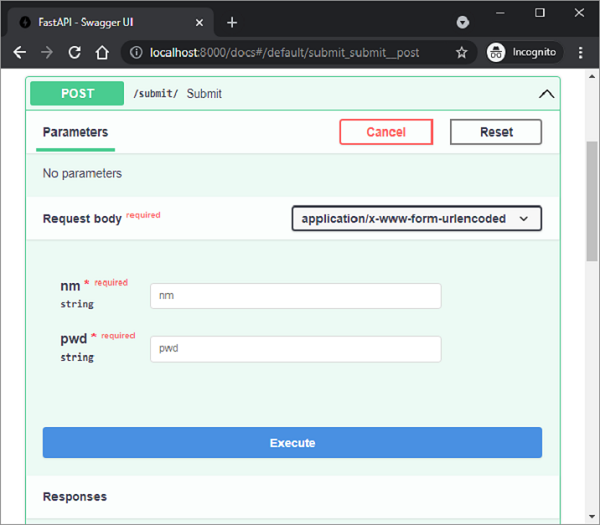
@app.post("/submit/")
async def submit(nm: str = Form(...), pwd: str = Form(...)):
   return {"username": nm}
Press submit after filling the text fields. The browser is redirected to /submit URL and the JSON response is rendered. Check the Swagger API docs of the /submit route. It correctly identifies nm and pwd as the request body parameters and the forms "media type" as application/x-www-form-urlencoded.
It is even possible to populate and return Pydantic model with HTML form data. In the following code, we declare User class as a Pydantic model and send its object as the server response.
main.py
from fastapi import FastAPI, Request
from fastapi.responses import HTMLResponse
from fastapi.templating import Jinja2Templates
from fastapi.staticfiles import StaticFiles
from fastapi import Form
from pydantic import BaseModel

app = FastAPI()
templates = Jinja2Templates(directory="templates")
app.mount("/static", StaticFiles(directory="static"), name="static")

@app.get("/hello/{name}", response_class=HTMLResponse)
async def hello(request: Request, name:str):
   return templates.TemplateResponse("hello.html", {"request": request, "name":name})

@app.get("/login/", response_class=HTMLResponse)
async def login(request: Request):
   return templates.TemplateResponse("login.html", {"request": request})

class User(BaseModel):
   username:str
   password:str

@app.post("/submit/", response_model=User)
async def submit(nm: str = Form(...), pwd: str = Form(...)):
   return User(username=nm, password=pwd)
FastAPI - Uploading Files
First of all, to send a file to the server you need to use the HTML forms enctype as multipart/form-data, and use the input type as the file to render a button, which when clicked allows you to select a file from the file system.
uploadfile.html
<html>
   <body>
      <form action="http://localhost:8000/uploader" method="POST" enctype="multipart/form-data">
         <input type="file" name="file" />
         <input type="submit"/>
      </form>
   </body>
</html>
Note that the forms action parameter to the endpoint http://localhost:8000/uploader and the method is set to POST.
This HTML form is rendered as a template with following code −
main.py
from fastapi import FastAPI, File, UploadFile, Request
from fastapi.responses import HTMLResponse
from fastapi.templating import Jinja2Templates

app = FastAPI()

templates = Jinja2Templates(directory="templates")

@app.get("/upload/", response_class=HTMLResponse)
async def upload(request: Request):
   return templates.TemplateResponse("uploadfile.html", {"request": request})
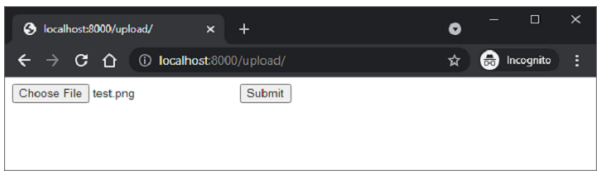
Visit http://localhost:8000/upload/. You should get the form with Choose File button. Click it to open the file to be uploaded.
The upload operation is handled by UploadFile function in FastAPI
main.py
from fastapi import FastAPI, File, UploadFile, Request
from fastapi.responses import HTMLResponse
from fastapi.templating import Jinja2Templates
import shutil

app = FastAPI()

templates = Jinja2Templates(directory="templates")

@app.get("/upload/", response_class=HTMLResponse)
async def upload(request: Request):
   return templates.TemplateResponse("uploadfile.html", {"request": request})

@app.post("/uploader/")
async def create_upload_file(file: UploadFile = File(...)):
   with open("destination.png", "wb") as buffer:
      shutil.copyfileobj(file.file, buffer)
   return {"filename": file.filename}
We shall use shutil library in Python to copy the received file in the server location by the name destination.png
FastAPI - Cookie Parameters
A cookie is one of the HTTP headers. The web server sends a response to the client, in addition to the data requested, it also inserts one or more cookies. A cookie is a very small amount of data, that is stored in the clients machine. On subsequent connection requests from the same client, this cookie data is also attached along with the HTTP requests.
The cookies are useful for recording information about clients browsing. Cookies are a reliable method of retrieving stateful information in otherwise stateless communication by HTTP protocol.
Syntax
In FastAPI, the cookie parameter is set on the response object with the help of set_cookie() method
response.set_cookie(key, value)
Example - Setting Cookie
Here is an example of set_cookie() method. We have a JSON response object called content. Call the set_cookie() method on it to set a cookie as key="usrname" and value="admin" −
main.py
from fastapi import FastAPI
from fastapi.responses import JSONResponse
app = FastAPI()
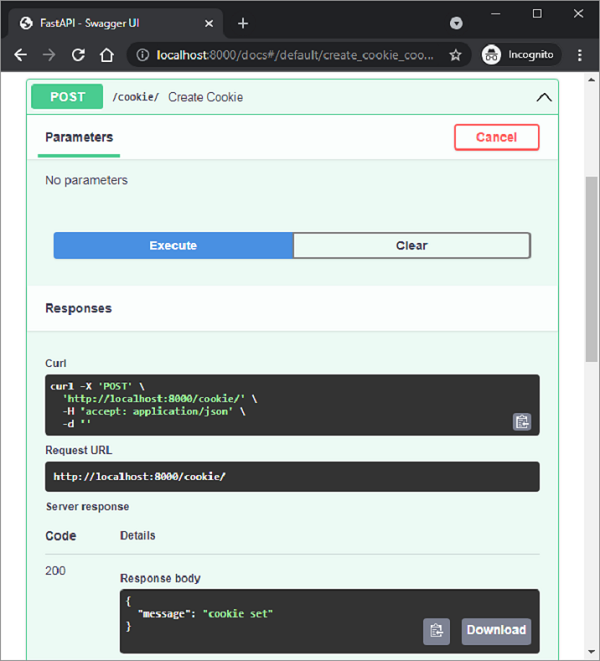
@app.post("/cookie/")
def create_cookie():
content = {"message": "cookie set"}
response = JSONResponse(content=content)
response.set_cookie(key="username", value="admin")
return response
Example - Reading Cookie Back
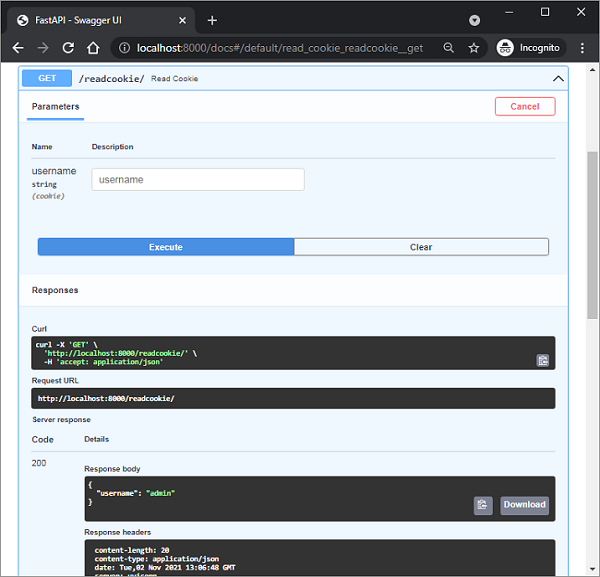
To read back the cookie on a subsequent visit, use the Cookie object in the FastAPI library.
from fastapi import FastAPI, Cookie
from fastapi.responses import JSONResponse

app = FastAPI()

@app.post("/cookie/")
def create_cookie():
   content = {"message": "cookie set"}
   response = JSONResponse(content=content)
   response.set_cookie(key="username", value="admin")
   return response

@app.get("/readcookie/")
async def read_cookie(username: str = Cookie(None)):
   return {"username": username}
Output
Inspect these two endpoints in the Swagger API. There are these two routes "/cookies" and "/readcookie". Execute the create_cookie() function bound to "/cookies". The response is just the content, although the cookie is set.
When the read_cookie() function is executed, the cookie is read back and appears as the response. Also, not that the documentation identifies the user name as a cookie parameter.
FastAPI - Header Parameters
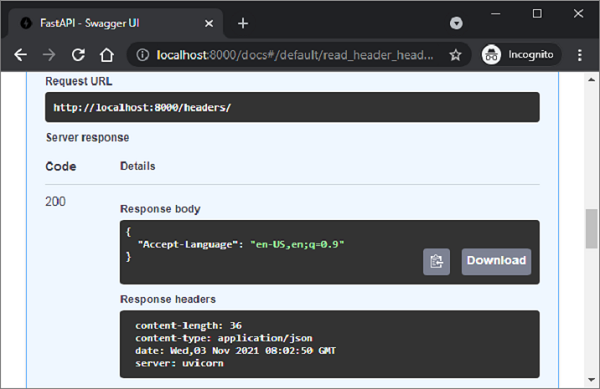
In order to read the values of an HTTP header that is a part of the client request, import the Header object from the FastAPI library, and declare a parameter of Header type in the operation function definition. The name of the parameter should match with the HTTP header converted in camel_case.
In the following example, the "accept-language" header is to be retrieved. Since Python doesnt allow "-" (dash) in the name of identifier, it is replaced by "_" (underscore)
main.py
from typing import Optional
from fastapi import FastAPI, Header

app = FastAPI()

@app.get("/headers/")
async def read_header(accept_language: Optional[str] = Header(None)):
   return {"Accept-Language": accept_language}
Output
As the following Swagger documentation shows, the retrieved header is shown as the response body.
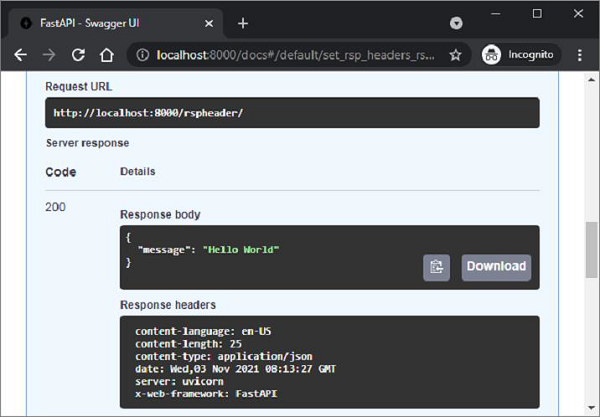
You can push custom as well as predefined headers in the response object. The operation function should have a parameter of Response type. In order to set a custom header, its name should be prefixed with "X". In the following case, a custom header called "X-Web-Framework" and a predefined header Content-Language" is added along with the response of the operation function.
main.py
from fastapi import FastAPI
from fastapi.responses import JSONResponse

app = FastAPI()

@app.get("/rspheader/")
def set_rsp_headers():
   content = {"message": "Hello World"}
   headers = {"X-Web-Framework": "FastAPI", "Content-Language": "en-US"}
   return JSONResponse(content=content, headers=headers)
Output
The newly added headers will appear in the response header section of the documentation.
FastAPI - Response Model
An operation function returns A JSON response to the client. The response can be in the form of Python primary types, i.e., numbers, string, list or dict, etc. It can also be in the form of a Pydantic model. For a function to return a model object, the operation decorator should declare a respone_model parameter.
With the help of response_model, FastAPI Converts the output data to a structure of a model class. It validates the data, adds a JSON Schema for the response, in the OpenAPI path operation.
One of the important advantages of response_model parameter is that we can format the output by selecting the fields from the model to cast the response to an output model.
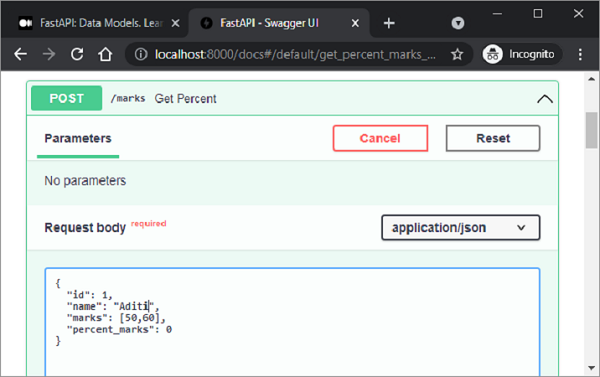
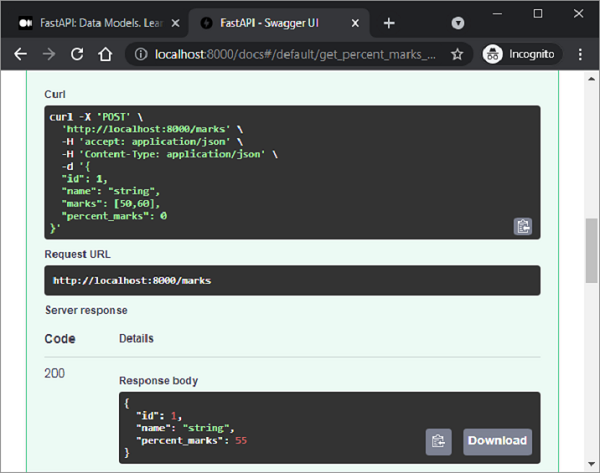
Example - Formatting Response Model
In the following example, the POST operation decorator receives the request body in the form of an object of the student class (a subclass of BaseModel). As one of the fields in this class, i.e. marks (a list of marks) is not needed in the response, we define another model called percent and use it as the response_model parameter.
main.py
from typing import List
from fastapi import FastAPI
from pydantic import BaseModel, Field

app = FastAPI()

class student(BaseModel):
   id: int
   name :str = Field(None, title="name of student", max_length=10)
   marks: List[int] = []
   percent_marks: float

class percent(BaseModel):
   id:int
   name :str = Field(None, title="name of student", max_length=10)
   percent_marks: float

@app.post("/marks", response_model=percent)
async def get_percent(s1:student):
   s1.percent_marks=sum(s1.marks)/2
   return s1
Output
If we check the Swagger documentation, it shows that the "/marks" route gets an object of student class as the request body. Populate the attributes with appropriate values and execute the get_percent() function.
The server response is cast to the percent class as it has been used as the response_model.
FastAPI - Nested Model
Each attribute of a Pydantic model has a type. The type can be a built-in Python type or a model itself. Hence it is possible to declare nested JSON "objects" with specific attribute names, types, and validations.
Example - Constructing a Nested Model
In the following example, we construct a customer model with one of the attributes as product model class. The product model in turn has an attribute of supplier class.
from typing import Tuple
from fastapi import FastAPI
from pydantic import BaseModel

app = FastAPI()

class supplier(BaseModel):
   supplierID:int
   supplierName:str

class product(BaseModel):
   productID:int
   prodname:str
   price:int
   supp:supplier

class customer(BaseModel):
   custID:int
   custname:str
   prod:Tuple[product]
The following POST operation decorator renders the object of the customer model as the server response.
@app.post('/invoice')
async def getInvoice(c1:customer):
   return c1
main.py
from typing import Tuple
from fastapi import FastAPI
from pydantic import BaseModel

app = FastAPI()

class supplier(BaseModel):
   supplierID:int
   supplierName:str

class product(BaseModel):
   productID:int
   prodname:str
   price:int
   supp:supplier

class customer(BaseModel):
   custID:int
   custname:str
   prod:Tuple[product]

@app.post('/invoice')
async def getInvoice(c1:customer):
   return c1
Output
The swagger UI page reveals the presence of three schemas, corresponding to three BaseModel classes.
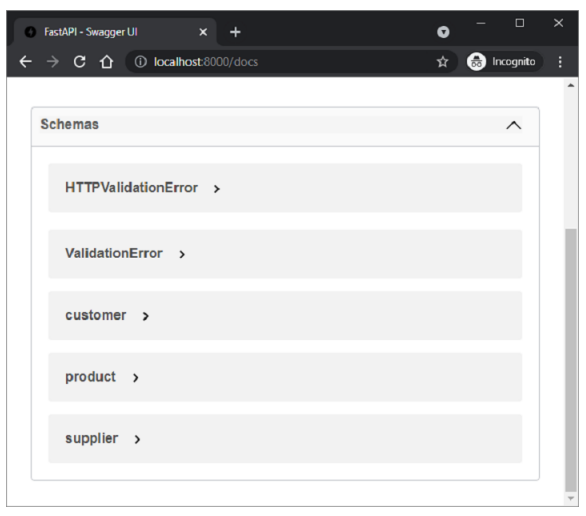
The Customer schema when expanded to show all the nodes looks like this −

An example response of "/invoice" route should be as follows −
{
   "custID": 1,
   "custname": "Jay",
   "prod": [
      {
         "productID": 1,
         "prodname": "LAPTOP",
         "price": 40000,
         "supp": {
            "supplierID": 1,
            "supplierName": "Dell"
         }
      }
   ]
}
FastAPI - Dependencies
The built-in dependency injection system of FastAPI makes it possible to integrate components easier when building your API. In programming, Dependency injection refers to the mechanism where an object receives other objects that it depends on. The other objects are called dependencies. Dependency injection has the following advantages −
reuse the same shared logic
share database connections
enforce authentication and security features
Example - Using a Function as Dependency
Assuming that a FastAPI app has two operation functions both having the same query parameters id, name and age.
main.py
from fastapi import FastAPI, Depends

app = FastAPI()

@app.get("/user/")
async def user(id: str, name: str, age: int):
   return {"id": id, "name": name, "age": age}

@app.get("/admin/")
async def admin(id: str, name: str, age: int):
   return {"id": id, "name": name, "age": age}
In case of any changes such as adding/removing query parameters, both the route decorators and functions need to be changed.
FastAPI provides Depends class and its object is used as a common parameter in such cases. First import Depends from FastAPI and define a function to receive these parameters −
async def dependency(id: str, name: str, age: int):
   return {"id": id, "name": name, "age": age}
Now we can use the return value of this function as a parameter in operation functions
@app.get("/user/")
async def user(dep: dict = Depends(dependency)):
   return dep
For each new Request, FastAPI calls the dependency function using the corresponding parameters, returns the result, and assigns the result to your operation.
Example - Using a Class as Dependency
You can use a class for managing dependencies instead of a function. Declare a class with id, name and age as attributes.
class dependency:
   def __init__(self, id: str, name: str, age: int):
      self.id = id
      self.name = name
      self.age = age
Use this class as the type of parameters.
@app.get("/user/")
async def user(dep: dependency = Depends(dependency)):
   return dep

@app.get("/admin/")
async def admin(dep: dependency = Depends(dependency)):
   return dep
Here, we used the dependency injection in the operation function. It can also be used as operation decoration. For example, we want to check if the value of query parameter age is less than 21. If yes it should throw an exception. So, we write a function to check it and use it as a dependency.
async def validate(dep: dependency = Depends(dependency)):
   if dep.age > 18:
      raise HTTPException(status_code=400, detail="You are not eligible")

@app.get("/user/", dependencies=[Depends(validate)])
async def user():
   return {"message": "You are eligible"}
In FastAPI dependency management, you can use yield instead of return to add some extra steps. For example, the following function uses database dependency with yield.
async def get_db():
   db = DBSession()
      try:
         yield db
      finally:
            db.close()
FastAPI - CORS
Cross-Origin Resource Sharing (CORS) is a situation when a frontend application that is running on one client browser tries to communicate with a backend through JavaScript code, and the backend is in a different "origin" than the frontend. The origin here is a combination of protocol, domain name, and port numbers. As a result, http://localhost and https://localhost have different origins.
If the browser with a URL of one origin sends a request for the execution of JavaScript code from another origin, the browser sends an OPTIONS HTTP request.
If the backend authorizes the communication from this different origin by sending the appropriate headers it will let the JavaScript in the frontend send its request to the backend. For that, the backend must have a list of "allowed origins".
Example - Using CORS
To specify explicitly the allowed origins, import CORSMiddleware and add the list of origins to the app's middleware.
main.py
from fastapi import FastAPI
from fastapi.middleware.cors import CORSMiddleware

app = FastAPI()

origins = [
   "http://192.168.211.:8000",
   "http://localhost",
   "http://localhost:8080",
]

app.add_middleware(
   CORSMiddleware,
   allow_origins=origins,
   allow_credentials=True,
   allow_methods=["*"],
   allow_headers=["*"],
)

@app.get("/")
async def main():
   return {"message": "Hello World"}
FastAPI - CRUD Operations
The REST architecture uses HTTP verbs or methods for the operation on the resources. The POST, GET, PUT and DELETE methods perform respectively CREATE, READ, UPDATE and DELETE operations respectively.
In the following example, we shall use a Python list as an in-memory database and perform the CRUD operations on it. First, let us set up a FastAPI app object and declare a Pydantic model called Book.
from fastapi import FastAPI
from pydantic import BaseModel
app = FastAPI()
data = []
class Book(BaseModel):
   id: int
   title: str
   author: str
   publisher: str
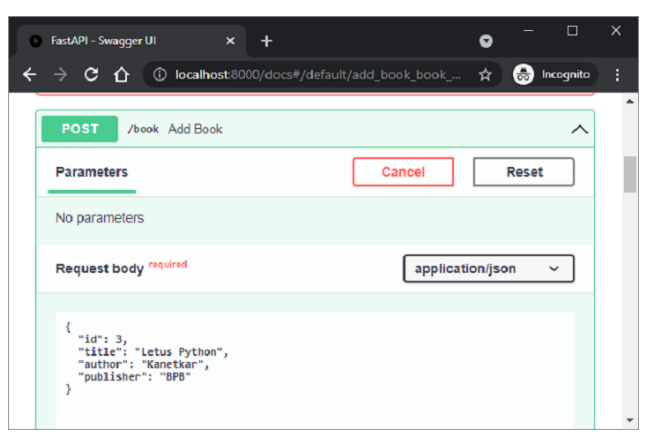
An object of this model is populated using the @app.post() decorator and it is appended to the list of books (data is declared for the list of books)
@app.post("/book")
def add_book(book: Book):
   data.append(book.dict())
   return data
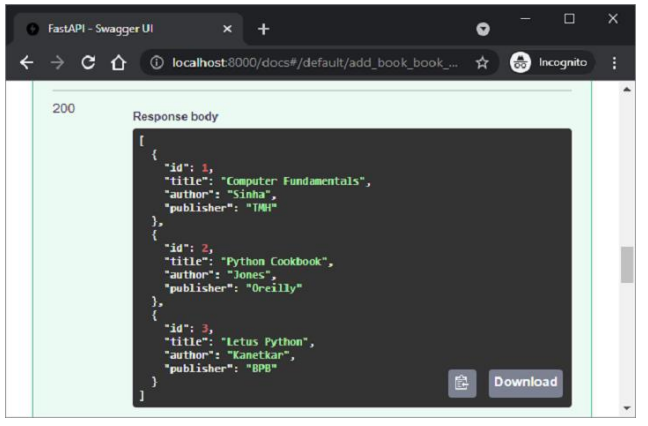
In the Swagger UI, execute this operation function a couple of times and add some data.
The servers JSON response shows the list of books added so far.
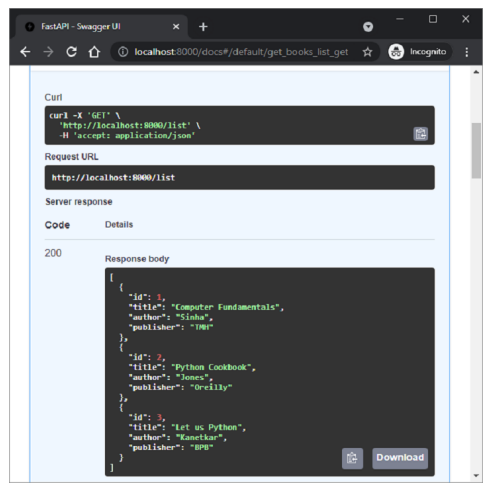
To retrieve the list, define an operation function bound to the @app.get() decorator as follows −
@app.get("/list")
def get_books():
   return data
To retrieve a book with its id as a path parameter, define the get() operation decorator and get_book() function as below −
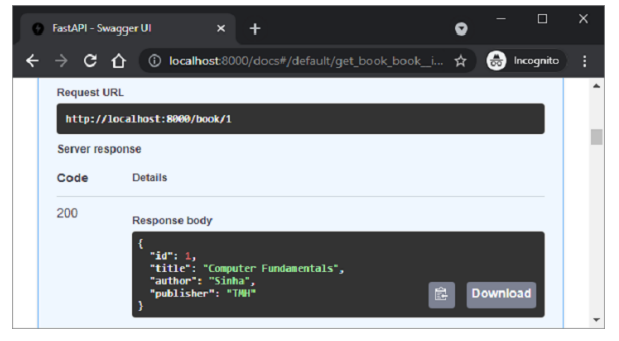
@app.get("/book/{id}")
def get_book(id: int):
   id = id - 1
   return data[id]
The /list route retrieves all the books.
On the other hand, use "id" as the path parameter in the "/book/1" route.
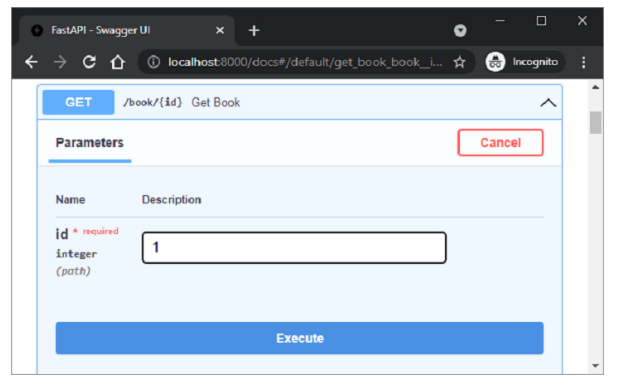
The book with "id=1" will be retrieved as can be seen in the server response of Swagger UI
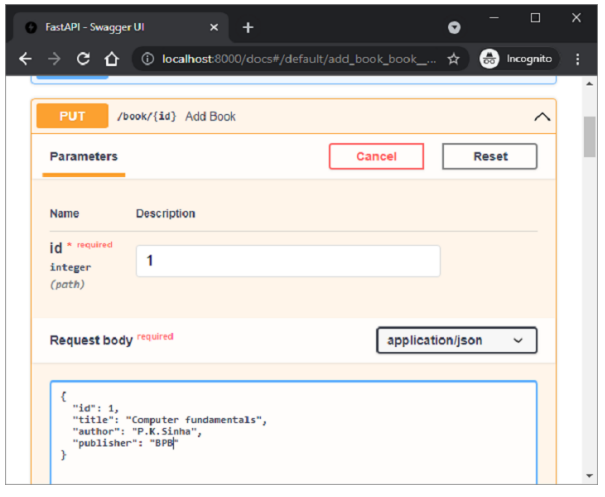
Next, define @app.put() decorator that modifies an object in the data list. This decorator too has a path parameter for the id field.
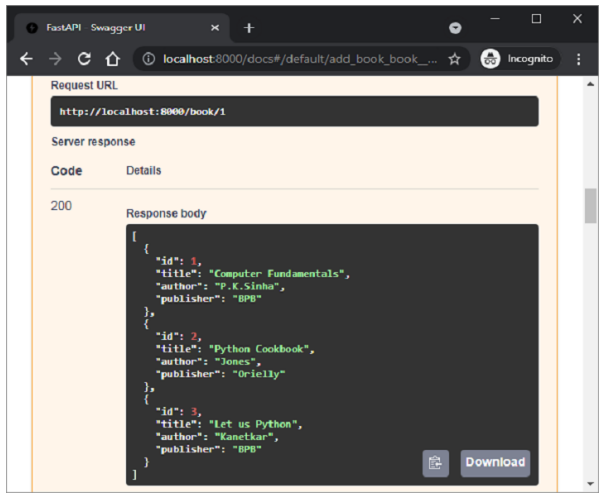
@app.put("/book/{id}")
def add_book(id: int, book: Book):
   data[id-1] = book
   return data
Inspect this operation function in the swagger UI. Give id=1, and change value of publisher to BPB in the request body.
When executed, the response shows the list with object with id=1 updated with the new values.
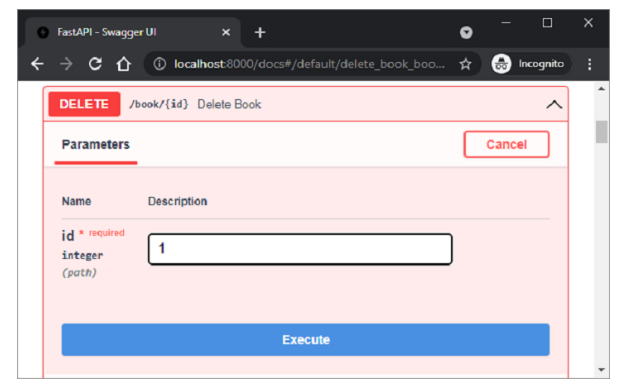
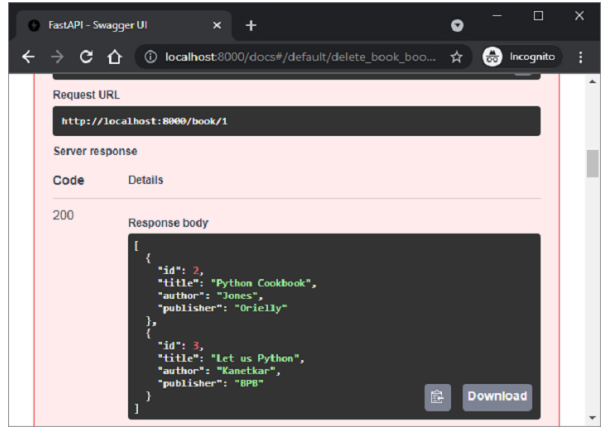
Finally, we define the @app.delete() decorator to delete an object corresponding to the path parameter.
@app.delete("/book/{id}")
def delete_book(id: int):
   data.pop(id-1)
   return data
Give id=1 as the path parameter and execute the function.
Upon execution, the list now shows only two objects
FastAPI - SQL Databases
In the previous chapter, a Python list has been used as an in-memory database to perform CRUD operations using FastAPI. Instead, we can use any relational database (such as MySQL, Oracle, etc.) to perform store, retrieve, update and delete operations.
Instead of using a DB-API compliant database driver, we shall use SQLAlchemy as an interface between Python code and a database (we are going to use SQLite database as Python has in-built support for it). SQLAlchemy is a popular SQL toolkit and Object Relational Mapper.
Object Relational Mapping is a programming technique for converting data between incompatible type systems in object-oriented programming languages. Usually, the type system used in an Object-Oriented language like Python contains non-scalar types. However, data types in most of the database products such as Oracle, MySQL, etc., are of primitive types such as integers and strings.
In an ORM system, each class maps to a table in the underlying database. Instead of writing tedious database interfacing code yourself, an ORM takes care of these issues for you while you can focus on programming the logics of the system.
In order to use SQLAlchemy, we need to first install the library using the PIP installer.
pip3 install sqlalchemy

Collecting sqlalchemy
  Downloading sqlalchemy-2.0.45-cp314-cp314-win_amd64.whl.metadata (9.8 kB)
Collecting greenlet>=1 (from sqlalchemy)
  Downloading greenlet-3.3.0-cp314-cp314-win_amd64.whl.metadata (4.2 kB)
Requirement already satisfied: typing-extensions>=4.6.0 in d:\projects\python\myenv\lib\site-packages (from sqlalchemy) (4.15.0)
Downloading sqlalchemy-2.0.45-cp314-cp314-win_amd64.whl (2.1 MB)
   ━━━━━━━━━━━━━━━━━━━━━━━━━━━━━━━━━━━━━━━━ 2.1/2.1 MB 10.9 MB/s  0:00:00
Downloading greenlet-3.3.0-cp314-cp314-win_amd64.whl (305 kB)
Installing collected packages: greenlet, sqlalchemy
Successfully installed greenlet-3.3.0 sqlalchemy-2.0.45
SQLAlchemy is designed to operate with a DBAPI implementation built for a particular database. It uses dialect system to communicate with various types of DBAPI implementations and databases. All dialects require that an appropriate DBAPI driver is installed.
The following are the dialects included −
Firebird
Microsoft SQL Server
MySQL
Oracle
PostgreSQL
SQLite
Sybase
Since we are going to use SQLite database, we need to create a database engine for our database called test.db. Import create_engine() function from sqlalchemy module.
Using SQLAlchemy
from sqlalchemy import create_engine
from sqlalchemy.dialects.sqlite import *

SQLALCHEMY_DATABASE_URL = "sqlite:///./test.db"
engine = create_engine(SQLALCHEMY_DATABASE_URL, connect_args = {"check_same_thread": False})
In order to interact with the database, we need to obtain its handle. A session object is the handle to database. Session class is defined using sessionmaker() − a configurable session factory method which is bound to the engine object.
from sqlalchemy.orm import sessionmaker, Session
session = sessionmaker(autocommit=False, autoflush=False, bind=engine)
Next, we need a declarative base class that stores a catalog of classes and mapped tables in the Declarative system.
from sqlalchemy.ext.declarative import declarative_base
Base = declarative_base()
Books, a subclass of Base, is mapped to a book table in the database. Attributes in the Books class correspond to the data types of the columns in the target table. Note that the id attribute corresponds to the primary key in the book table.
from sqlalchemy import Column, Integer, String

class Books(Base):
   __tablename__ = 'book'
   id = Column(Integer, primary_key=True, nullable=False)
   title = Column(String(50), unique=True)
   author = Column(String(50))
   publisher = Column(String(50))
   Base.metadata.create_all(bind=engine)
The create_all() method creates the corresponding tables in the database.
We now have to declare a Pydantic model that corresponds to the declarative base subclass (Books class defined above).
from typing import List
from pydantic import BaseModel, constr

class Book(BaseModel):
   id: int
   title: str
   author:str
   publisher: str
   class Config:
      orm_mode = True
Note the use of orm_mode=True in the config class indicating that it is mapped with the ORM class of SQLAlchemy.
Rest of the code is just similar to in-memory CRUD operations, with the difference being the operation functions interact with the database through SQLalchemy interface. The POST operation on the FastAPI application object is defined below −
from fastapi import FastAPI, Depends

app=FastAPI()

def get_db():
   db = session()
   try:
      yield db
   finally:
   db.close()

@app.post('/add_new', response_model=Book)
def add_book(b1: Book, db: Session = Depends(get_db)):
   bk=Books(id=b1.id, title=b1.title, author=b1.author,publisher=b1.publisher)
   db.add(bk)
   db.commit()
   db.refresh(bk)
   return Books(**b1.model_dump())
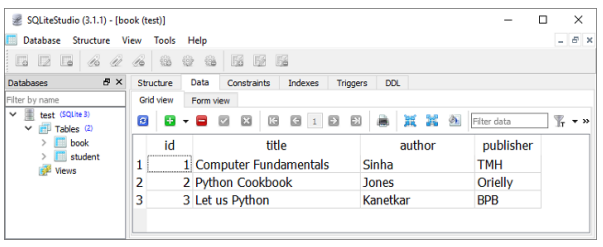
A database session is first established. Data from the POST request body is added to the book table as a new row. Execute the add_book() operation function to add sample data to the books table. To verify, you can use SQLiteStudio, a GUI tool for SQLite databases.
Two operation functions for GET operation are defined, one for fetching all the records, and one for the record matching a path parameter.
Following is the get_books() function bound to the /list route. When executed, its server response is the list of all records.
@app.get('/list', response_model=List[Book])
def get_books(db: Session = Depends(get_db)):
   recs = db.query(Books).all()
   return recs
The /book/{id} route calls the get_book() function with id as path parameter. The SQLAlchemys query returns an object corresponding to the given id.
@app.get('/book/{id}', response_model=Book)
def get_book(id:int, db: Session = Depends(get_db)):
   return db.query(Books).filter(Books.id == id).first()
The following image shows the result of get_books() function executed from the Swagger UI.
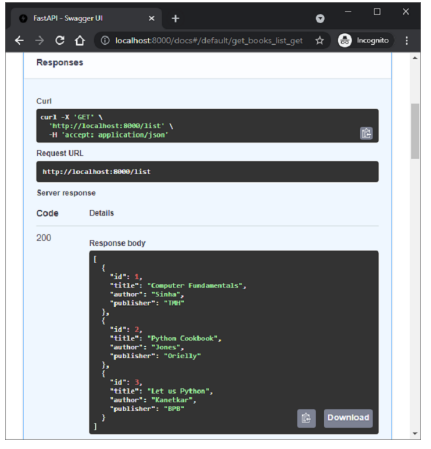
The update and delete operations are performed by update_book() function (executed when /update/{id} route is visited) and del_book() function called when the route /delete/{id} is given in as the URL.
@app.put('/update/{id}', response_model=Book)
def update_book(id:int, book:Book, db: Session = Depends(get_db)):
   b1 = db.query(Books).filter(Books.id == id).first()
   b1.id=book.id
   b1.title=book.title
   b1.author=book.author
   b1.publisher=book.publisher
   db.commit()
   return db.query(Books).filter(Books.id == id).first()
@app.delete('/delete/{id}')
def del_book(id:int, db: Session = Depends(get_db)):
   try:
      db.query(Books).filter(Books.id == id).delete()
      db.commit()
   except Exception as e:
      raise Exception(e)
   return {"delete status": "success"}
If you intend to use any other database in place of SQLite, you need to only the change the dialect definition accordingly. For example, to use MySQL database and pymysql driver, change the statement of engine object to the following −
engine = create_engine('mysql+pymysql://user:password@localhost/test')
FastAPI - Using MongoDB
FastAPI can also use NoSQL databases such as MongoDB, Cassandra, CouchDB, etc. as the backend for the CRUD operations of a REST app. In this topic, we shall see how to use MongoDB in a FastAPI application.
MongoDB is a document oriented database, in which the semi-structured documents are stored in formats like JSON. Documents can contain many different key-value pairs, or key-array pairs, or even nested documents. It is a collection of key-value pairs, similar to Python dictionary object. One or more such documents are stored in a Collection.
A Collection in MongoDB is equivalent to a table in relational database. However, MongoDB (as do all the NoSQL databases) doesn't have a predefined schema. A Document is similar to single row in a table of SQL based relational database. Each document may be of variable number of key-value pairs. Thus MongoDB is a schema-less database.
Installing Python Driver for MongoDB
To use MongoDB with FastAPI, MongoDB server must be installed on the machine. We also need to install PyMongo, an official Python driver for MongoDB.
pip3 install pymongo
Verift MongoDB installation
Before interacting with MongoDB database through Python and FastAPI code, ensure that MongoDB is running by issuing following command (assuming that MongoDB server is installed in e:\mongodb folder).
E:\mongodb\bin>mongod
..
waiting for connections on port 27017
Using MongoClient with FastAPI
An object of MongoClient class in the PyMongo module is the handle using which Python interacts with MongoDB server.
from pymongo import MongoClient
client=MongoClient()
We define Book as the BaseModel class to populate the request body (same as the one used in the SQLite example)
from pydantic import BaseModel
from typing import List
class Book(BaseModel):
   bookID: int
   title: str
   author:str
   publisher: str
Set up the FastAPI application object −
from fastapi import FastAPI, status
app = FastAPI()
The POST operation decorator has "/add_new" as URL route and executes add_book() function. It parses the Book BaseModel object into a dictionary and adds a document in the BOOK_COLLECTION of test database.
@app.post("/add_new", status_code=status.HTTP_201_CREATED)
def add_book(b1: Book):
   """Post a new message to the specified channel."""
   with MongoClient() as client:
      book_collection = client[DB][BOOK_COLLECTION]
      result = book_collection.insert_one(b1.dict())
      ack = result.acknowledged
      return {"insertion": ack}
Add a few documents using the web interface of Swagger UI by visiting http://localhost:8000/docs. You can verify the collection in the Compass GUI front end for MongoDB.
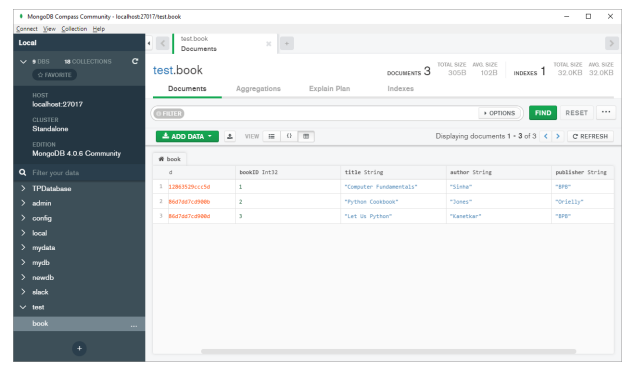
To retrieve the list of all books, let us include the following get operation function − get_books(). It will be executed when "/books" URL route is visited.
@app.get("/books", response_model=List[str])
def get_books():
   """Get all books in list form."""
   with MongoClient() as client:
      book_collection = client[DB][BOOK_COLLECTION]
      booklist = book_collection.distinct("title")
      return booklist
In this case, the server response will be the list of all titles in the books collection.
[
   "Computer Fundamentals",
   "Python Cookbook",
   "Let Us Python"
]
This following GET decorator retrieves a book document corresponding to given ID as path parameter −
@app.get("/books/{id}", response_model=Book)
def get_book(id: int):
   """Get all messages for the specified channel."""
   with MongoClient() as client:
      book_collection = client[DB][BOOK_COLLECTION]
      b1 = book_collection.find_one({"bookID": id})
      return b1
Output
Swagger UI documentation page shows the following interface −
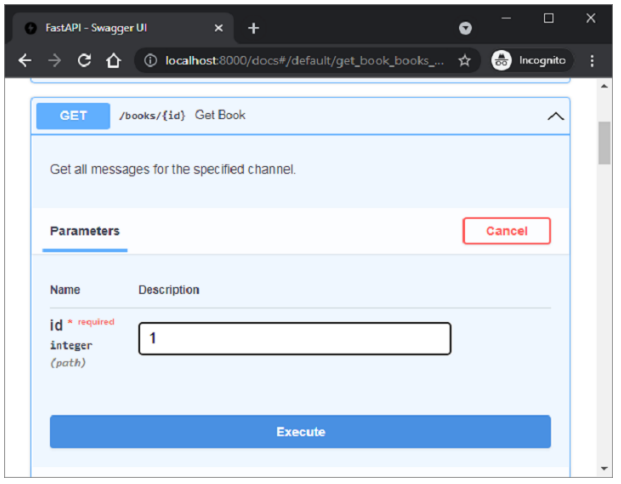
The servers JSON response, when the above function is executed, is as follows −
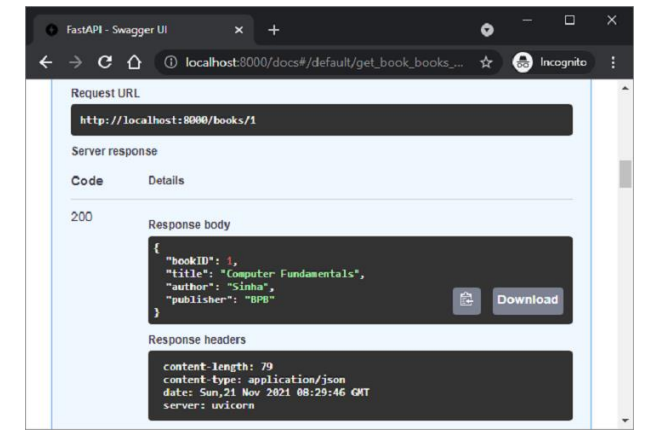
FastAPI - Using GraphQL
Facebook developed GraphQL in 2012, a new API standard with the intention of optimizing RESTful API Calls. GraphQL is the data query and manipulation language for the API. GraphQL is more flexible, efficient, and accurate as compared to REST. A GraphQL server provides only a single endpoint and responds with the precise data required by the client.
As GraphQL is compatible with ASGI, it can be easily integrated with a FastAPI application. There are many Python libraries for GraphQL. Some of them are listed below −
Strawberry
Ariadne
Tartiflette
Graphene
Using Strawberry to Integrate GraphQL
FastAPIs official documentation recommends using Strawberry library as its design is also based on type annotations (as in the case of FastAPI itself).
In order to integrate GraphQL with a FastAPI app, first decorate a Python class as Strawberry type.
@strawberry.type
class Book:
   title: str
   author: str
   price: int
Next, declare a Query class containing a function that returns a Book object.
@strawberry.type
class Query:
   @strawberry.field
   def book(self) -> Book:
   return Book(title="Computer Fundamentals", author="Sinha", price=300)
Use this Query class as the parameter to obtain Strawberry.Schema object
schema = strawberry.Schema(query=Query)
Then declare the objects of both GraphQL class and FastAPI application class.
graphql_app = GraphQL(schema)
app = FastAPI()
Finally, add routes to the FastAPI object and run the server.
app.add_route("/book", graphql_app)
app.add_websocket_route("/book", graphql_app)
Output
Visit http://localhost:8000/book in the browser. An in-browser GraphQL IDE opens up.

Below the commented section, enter the following query using the Explorer bar of the Graphiql IDE. Run the query to display the result in the output pane.
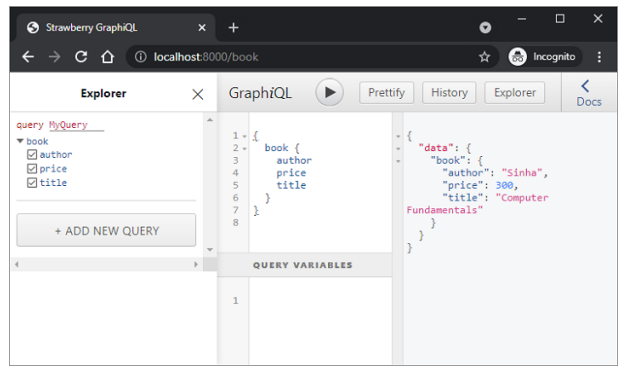
FastAPI - WebSockets
A WebSocket is a persistent connection between a client and server to provide bidirectional, full-duplex communication between the two. The communication takes place over HTTP through a single TCP/IP socket connection. It can be seen as an upgrade of HTTP instead of a protocol itself.
One of the limitations of HTTP is that it is a strictly half-duplex or unidirectional protocol. With WebSockets, on the other hand, we can send message-based data, similar to UDP, but with the reliability of TCP. WebSocket uses HTTP as the initial transport mechanism, but keeps the TCP connection alive the connection after the HTTP response is received. Same connection object it can be used two-way communication between client and server. Thus, real-time applications can be built using WebSocket APIs.
FastAPI supports WebSockets through WebSocket class in FastAPI module. Following example demonstrates functioning of WebSocket in FastAPI application.
Example - Usage of WebSockets
First we have an index() function that renders a template (socket.html). It is bound to "/" route. The HTML file socket.html is placed in the templates folder.
main.py
from fastapi import FastAPI, Request
from fastapi.responses import HTMLResponse
from fastapi.templating import Jinja2Templates
from fastapi.staticfiles import StaticFiles

templates = Jinja2Templates(directory="templates")

app = FastAPI()
app.mount("/static", StaticFiles(directory="static"), name="static")
@app.get("/", response_class=HTMLResponse)
async def index(request: Request):
   return templates.TemplateResponse("socket.html", {"request": request})
The template file renders a text box and a button.
socket.html
<!DOCTYPE html>
<html>
   <head>
      <title>Chat</title>
      <script src="{{ url_for('static', path='ws.js') }}"></script>
   </head>
   <body>
      <h1>WebSocket Chat</h1>
      <form action="" onsubmit="sendMessage(event)">
      <input type="text" id="messageText" autocomplete="off"/>
      <button>Send</button>
      </form>
      <ul id='messages'>
      </ul>
   </body>
</html>
Inside the socket.html, there is a call to the JavaScript function to be executed on the forms submit. Hence, to serve JavaScript, the "static" folder is first mounted. The JavaScript file ws.js is placed in the "static" folder.
ws.js
var ws = new WebSocket("ws://localhost:8000/ws");
ws.onmessage = function(event) {
   var messages = document.getElementById('messages')
   var message = document.createElement('li')
   var content = document.createTextNode(event.data)
   message.appendChild(content)
   messages.appendChild(message)
};
function sendMessage(event) {
   var input = document.getElementById("messageText")
   ws.send(input.value)
   input.value = ''
   event.preventDefault()
}
As the JavaScript code is loaded, it creates a websocket listening at "ws://localhost:8000/ws". The sendMessage() function directs the input message to the WebSocket URL.
This route invokes the websocket_endpoint() function in the application code. The incoming connection request is accepted and the incoming message is echoed on the client browser. Add the below code to main.py.
from fastapi import WebSocket

@app.websocket("/ws")
async def websocket_endpoint(websocket: WebSocket):
   await websocket.accept()
   while True:
      data = await websocket.receive_text()
      await websocket.send_text(f"Message text was: {data}")
Output
Save the FastAPI code file (main.py), template (socket.html) and JavaScript file (ws.js). Run the Uvicorn server and visit http://localhost:8000/ to render the chat window as below −
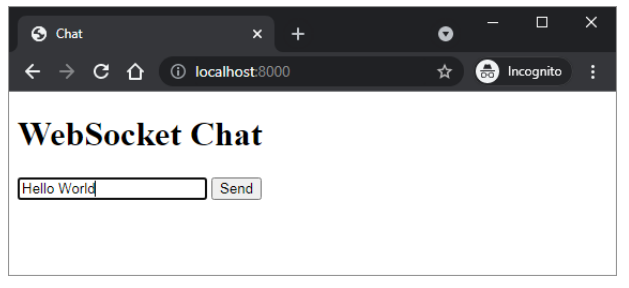
Type a certain text and press Send button. The input message will be redirected on the browser through the websocket.
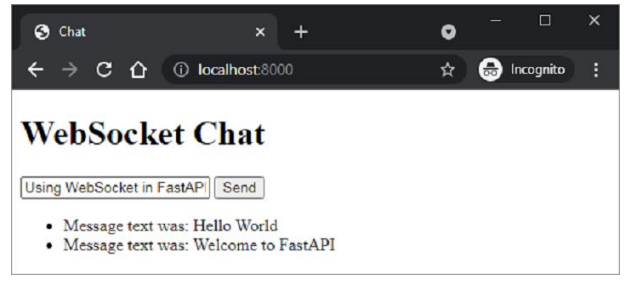
FastAPI - Event Handlers
Event handlers are the functions to be executed when a certain identified event occurs. In FastAPI, two such events are identified − startup and shutdown. FastAPIs application object has on_event() decorator that uses one of these events as an argument. The function registered with this decorator is fired when the corresponding event occurs.
The startup event occurs before the development server starts and the registered function is typically used to perform certain initialization tasks, establishing connection with the database etc. The event handler of shutdown event is called just before the application shutdown.
Example - Handling Startup and Shutdown Events
Here is a simple example of startup and shutdown event handlers. As the app starts, the starting time is echoed in the console log. Similarly, when the server is stopped by pressing ctrl+c, the shutdown time is also displayed.
main.py
from fastapi import FastAPI
import datetime

app = FastAPI()

@app.on_event("startup")
async def startup_event():
   print('Server started :', datetime.datetime.now())

@app.on_event("shutdown")
async def shutdown_event():
   print('server Shutdown :', datetime.datetime.now())
Output
It will produce the following output −
uvicorn main:app --reload

INFO: Uvicorn running on http://127.0.0.1:8000 (Press CTRL+C to quit)
INFO: Started reloader process [28720]
INFO: Started server process [28722]
INFO: Waiting for application startup.
Server started: 2021-11-23 23:51:45.907691
INFO: Application startup complete.
INFO: Shutting down
INFO: Waiting for application
server Shutdown: 2021-11-23 23:51:50.82955
INFO: Application shutdown com
INFO: Finished server process
FastAPI - Mounting a Sub App
If you have two independent FastAPI apps, one of them can be mounted on top of the other. The one that is mounted is called a sub-application. The app.mount() method adds another completely "independent" application in a specific path of the main app. It then takes care of handling everything under that path, with the path operations declared in that sub-application.
Example - Creating Nested Applications
Let us first declare a simple FastAPI application object to be used as a top level application.
main.py
from fastapi import FastAPI
app = FastAPI()

@app.get("/app")
def mainindex():
   return {"message": "Hello World from Top level app"}
Then create another application object subapp and add its own path operations.
subapp = FastAPI()

@subapp.get("/sub")
def subindex():
   return {"message": "Hello World from sub app"}
Mount this subapp object on the main app by using mount() method. Two parameters needed are the URL route and name of the sub application.
app.mount("/subapp", subapp)
Output
Both the main and sub application will have its own docs as can be inspected using Swagger UI.
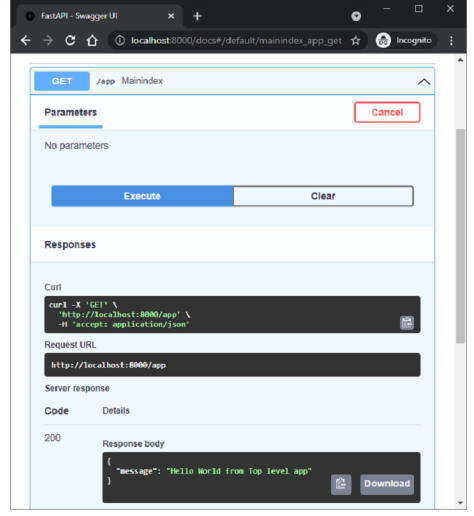
The sub applications docs are available at http://localhost:8000/subapp/docs
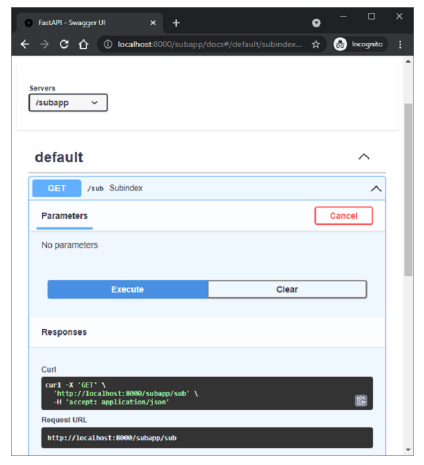
FastAPI - Middleware
A middleware is a function that is processed with every request (before being processed by any specific path operation) as well as with every response before returning it. This function takes each request that comes to your application. It may perform some process with the request by running a code defined in it and then passes the request to be processed by the corresponding operation function. It can also process the response generated by the operation function before returning it.
Following are some of the middleware available in FastAPI library −
CORSMiddleware
HTTPSRedirectMiddleware
TrustedHostMiddleware
GZipMiddleware
FastAPI provides app.add_middleware() function to handle server errors and custom exception handlers. In addition to the above integrated middleware, it is possible to define a custom middleware. The following example defines the addmiddleware() function and decorates it into a middleware by decorating it with @app.middleware() decorator
The function has two parameters, the HTTP request object, and the call_next() function that will send the API request to its corresponding path and return a response.
In addition to the middleware function, the application also has two operation functions.
Example - Creating a middleware
main.py
import time
from fastapi import FastAPI, Request

app = FastAPI()

@app.middleware("http")
async def addmiddleware(request: Request, call_next):
   print("Middleware works!")
   response = await call_next(request)
   return response

@app.get("/")
async def index():
   return {"message":"Hello World"}

@app.get("/{name}")
async def hello(name:str):
   return {"message":"Hello "+name}
As the application runs, for each request made by the browser, the middleware output (Middleware works!) will appear in the console log before the response output.
FastAPI - Mounting a Flask App
A WSGI application written in Flask or Django framework can be wrapped in WSGIMiddleware and mounted it on a FastAPI app to make it ASGI compliant.
First install the Flask package in the current FastAPI environment.
Installing Flask
pip3 install flask
Example - A Flask Based Application
The following code is a minimal Flask application −
main.py
from flask import Flask

flask_app = Flask(__name__)

@flask_app.route("/")
def index_flask():
   return "Hello World from Flask!"
Then declare app as a FastAPI application object and define an operation function for rendering Hello World message.
from fastapi import FastAPI

app = FastAPI()

@app.get("/")
def index():
   return {"message": "Hello World from FastAPI!"}
Next, mount the flask application as a sub application of FastAPI main app using mount() method.
from fastapi.middleware.wsgi import WSGIMiddleware

app.mount("/flask", WSGIMiddleware(flask_app))
Output
Run the Uvicorn development server.
uvicorn flaskapp:app reload
The main FastAPI application is available at the URL http://localhost:8000/ route.
{"message":"Hello World from FastAPI!"}
The Flask sub application is mounted at the URL http://localhost:8000/flask.
Hello World from Flask!
FastAPI - Deployment
So far, we have been using a local development server "Uvicorn" to run our FastAPI application. In order to make the application publicly available, it must be deployed on a remote server with a static IP address. It can be deployed to different platforms such as Heroku, Google Cloud, nginx, etc. using either free plans or subscription based services.
In this chapter, we are going to use Deta cloud platform. Its free to use deployment service is very easy to use.
Example - Deployment on Deta Cloud Platform
First of all, to use Deta, we need to create an account on its website with a suitable username and password of choice.

Once the account is created, install Deta CLI (command line interface) on the local machine. Create a folder for your application (c:\fastapi_deta_app) If you are using Linux, use the following command in the terminal −
iwr https://get.deta.dev/cli.ps1 -useb | iex
If you are using Windows, run the following command from Windows PowerShell terminal −
PS C:\fastapi_deta_app> iwr https://get.deta.dev/cli.ps1 -useb | iex
Deta was installed successfully to
C:\Users\User\.deta\bin\deta.exe
Run 'deta --help' to get started
Use the login command and authenticate your username and password.
PS C:\fastapi_deta_app> deta login
Please, log in from the web page. Waiting...
https://web.deta.sh/cli/60836
Logged in successfully.
In the same application folder, create a minimal FastAPI application in main.pyfile
# main.py
from fastapi import FastAPI\

app = FastAPI()

@app.get("/")
def read_root():
   return {"Hello": "World"}

@app.get("/items/{item_id}")
def read_item(item_id: int):
   return {"item_id": item_id}
Now we are ready to deploy our application. Use deta new command from the power shell terminal.
PS C:\fastapi_deta_app> deta new
Successfully created a new micro
{
   "name": "fastapi_deta_app",
   "id": "2b236e8f-da6a-409b-8d51-7c3952157d3c",
   "project": "c03xflte",
   "runtime": "python3.9",
   "endpoint": "https://vfrjgd.deta.dev",
   "region": "ap-southeast-1",
   "visor": "enabled",
   "http_auth": "disabled"
}
Adding dependencies...
..
Installing collected packages: typing-extensions, pydantic, idna, sniffio, anyio, starlette, fastapi
Successfully installed anyio-3.4.0 fastapi-0.70.0 idna-3.3 pydantic-1.8.2 sniffio-1.2.0 starlette-0.16.0 typingextensions-4.0.0
Deta deploys the application at the given endpoint (which may be randomly created for each application). It first installs the required dependencies as if it is installed on the local machine. After successful deployment, open the browser and visit the URL as shown in front of endpoint key. The Swagger UI documentation can also be found at https://vfrigd.deta.dev/docs.