 Data Structure
 Networking
 RDBMS
RDBMS Operating System
 Java
Java MS Excel
 iOS
iOS HTML
HTML CSS
CSS Android
 Python
 C Programming
 C++
C++ C#
C# MongoDB
 MySQL
MySQL Javascript
 PHP
PHP
- Selected Reading
- UPSC IAS Exams Notes
- Developer's Best Practices
- Questions and Answers
- Effective Resume Writing
- HR Interview Questions
- Computer Glossary
- Who is Who
Dynamically add checkboxes with tkinter
Tkinter, a standard GUI toolkit for Python, provides a versatile set of tools for building interactive applications. In this article, we'll demonstrate how you can create dynamic checkboxes using Tkinter.
Understanding Tkinter
Tkinter is Python's de facto standard GUI toolkit, offering a simple way to create windows, dialogs, buttons, and other GUI elements. Tkinter is platform-independent, making it a preferred choice for developing cross-platform applications.
One of Tkinter's strengths lies in its ability to handle dynamic elements efficiently, making it well-suited for scenarios where checkboxes need to be added or removed dynamically based on user input or data.
Basic Structure of Tkinter GUI
Before diving into dynamic checkboxes, let's briefly explore the basic structure of a Tkinter GUI. At the core, a Tkinter application consists of a main window, widgets (such as buttons, labels, and checkboxes), and an event loop. The event loop continuously listens for user interactions and responds accordingly.
Static Checkboxes
To set the stage, let's first look at how to create static checkboxes in Tkinter. A static checkbox remains constant throughout the lifetime of the GUI and is defined at the time of GUI creation.
Example
import tkinter as tk

def on_checkbox_change():
   print("Checkbox is checked"
      if checkbox_var.get()
      else "Checkbox is unchecked")

# Create the main window
root = tk.Tk()
root.title("Static Checkbox Example")
root.geometry("720x250")

# Create a static checkbox
checkbox_var = tk.BooleanVar()
checkbox = tk.Checkbutton(
   root, text="Static Checkbox", variable=checkbox_var,
   command=on_checkbox_change)
checkbox.pack(pady=10)

# Start the Tkinter event loop
root.mainloop()
Output
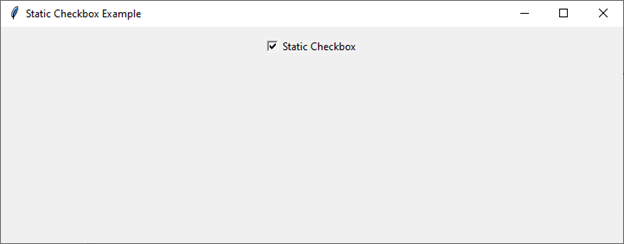
Once you run the above script, the on_checkbox_change function is called whenever a checkbox state changes, and it prints whether the checkbox is checked or unchecked.

Dynamic Checkboxes
The real power of Tkinter becomes evident when checkboxes are added dynamically. Consider a scenario where the number of checkboxes or their options is not known in advance. We can use a loop to create checkboxes dynamically, allowing for greater flexibility.
Example
import tkinter as tk

def on_checkbox_change(checkbox_value, variable):
   print(f"Checkbox {checkbox_value} is {'checked' if variable.get() else 'unchecked'}")

def add_checkboxes():
   for i in range(5):
      checkbox_value = f"Checkbox {i + 1}"
      checkbox_var = tk.BooleanVar()
      checkbox_var.set(False)  # Set the initial state (unchecked)

      checkbox = tk.Checkbutton(
         root, text=checkbox_value, variable=checkbox_var,
         command=lambda v=checkbox_value: on_checkbox_change(v, checkbox_var))
      checkbox.pack(pady=5)

# Create the main window
root = tk.Tk()
root.title("Dynamic Checkboxes Example")
root.geometry("720x250")

# Add checkboxes dynamically
add_checkboxes()

# Start the Tkinter event loop
root.mainloop()
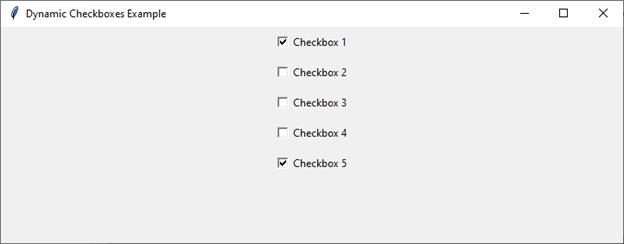
Let's break down the dynamic checkbox example. The add_checkboxes function is responsible for creating checkboxes in a loop. Each checkbox is associated with a unique variable (checkbox_var) to store its state. Additionally, a command is specified to invoke the on_checkbox_change function whenever the checkbox state changes.
The on_checkbox_change function takes two parameters: the value of the checkbox and its associated variable. This allows for the identification of which checkbox triggered the event and the ability to access its current state.
Output
Upon running the code, you will get an output window like the one shown below

Customizing Dynamic Checkbox Options
In many cases, developers may need checkboxes corresponding to specific options or values. The dynamic creation of checkboxes based on a list of options is a common requirement.
Example
import tkinter as tk

def on_checkbox_change(checkbox_value, variable):
   print(f"Checkbox {checkbox_value} is {'checked' if variable.get() else 'unchecked'}")

def add_checkboxes(options):
   for option in options:
      checkbox_var = tk.BooleanVar()
      checkbox_var.set(False)  # Set the initial state (unchecked)

      checkbox = tk.Checkbutton(
         root, text=option, variable=checkbox_var,
         command=lambda v=option: on_checkbox_change(v, checkbox_var))
      checkbox.pack(pady=5)

# Create the main window
root = tk.Tk()
root.title("Customizing Dynamic Checkboxes Example")
root.geometry("720x250")

# List of options for checkboxes
checkbox_options = ["Option 1", "Option 2", "Option 3", "Option 4", "Option 5"]

# Add checkboxes dynamically based on the list
add_checkboxes(checkbox_options)

# Start the Tkinter event loop
root.mainloop()
Output
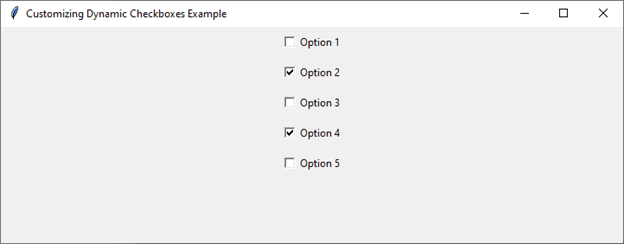
Here, the add_checkboxes function now takes a list of options as an argument. For each option, a checkbox is created, ensuring a dynamic interface that adapts to the specified options.

Use Cases, Benefits, and Further Customization
Creating checkboxes dynamically is useful in scenarios where the number of options is not known beforehand or when the options may change dynamically.
Another significant benefit of dynamic checkboxes is the reduction of code redundancy. Instead of hardcoding each checkbox, a loop automates the process, making the code more concise and maintainable.
Developers can extend this functionality by incorporating additional features such as
Data-Driven Checkboxes Integrate dynamic checkboxes with external data sources, such as databases or API responses, to populate options dynamically.
Styling and Layout Customize the appearance of checkboxes, adjust spacing, and incorporate styles to match the overall theme of the application.
Error Handling Implement robust error handling to gracefully manage scenarios where checkboxes cannot be created or updated.
Interactive Widgets Combine checkboxes with other Tkinter widgets to create interactive dashboards or configuration panels.
Conclusion
In this tutorial, we explored the creation of dynamic checkboxes in Tkinter, a fundamental aspect of building flexible and user-friendly GUIs.

