
Article Categories
- All Categories
-
 Data Structure
-
 Networking
-
 RDBMS
RDBMS
-
 Operating System
-
 Java
Java
-
 MS Excel
-
 iOS
iOS
-
 HTML
HTML
-
 CSS
CSS
-
 Android
-
 Python
-
 C Programming
-
 C++
C++
-
 C#
C#
-
 MongoDB
-
 MySQL
MySQL
-
 Javascript
-
 PHP
PHP
Displaying data on OLED Screen using Arduino
In this tutorial, we will interface Arduino with the SSD 1306 OLED Display.
Circuit Diagram
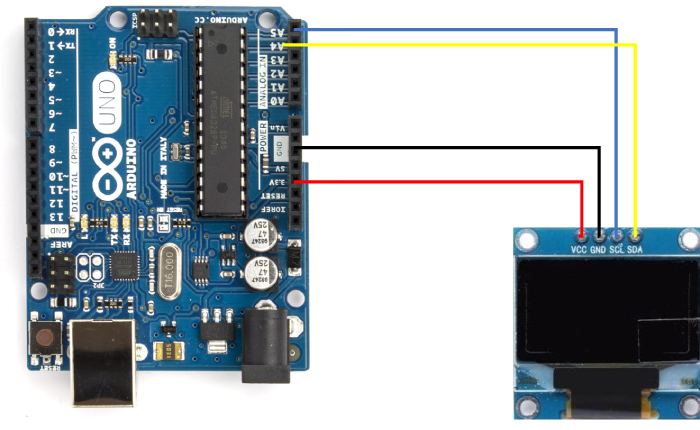
As you can see, we connect Vcc to 3.3V, GND to GND, SDA to A4 and SCL to A5. A4 and A5 also serve as SDA and SCL on Arduino Uno.
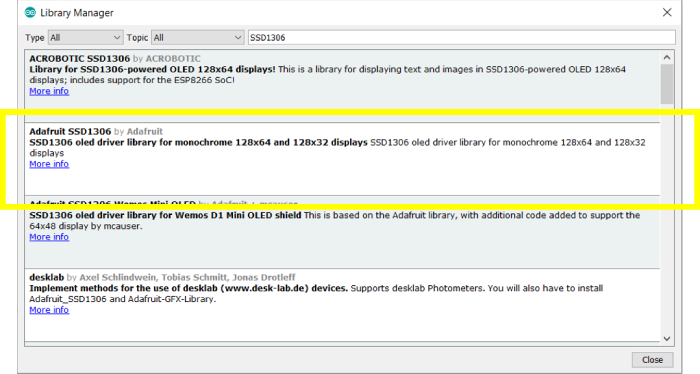
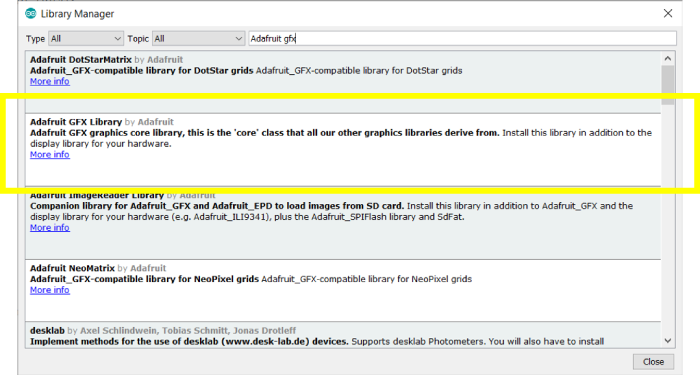
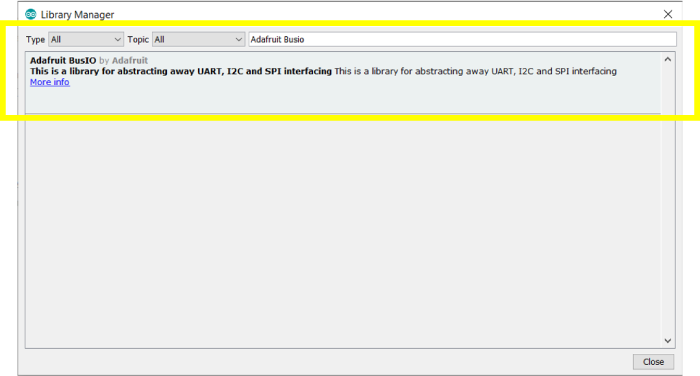
Required Libraries
The following libraries will be required for interfacing Arduino Uno with the OLED Display −
Adafruit SSD1306
Adafruit GFX
Adafruit BusIO (required by Adafruit GFX)
Go to Tools → Manage Libraries, search for these libraries and click Install.
Example
The code is given below −
#include <Wire.h>
#include <Adafruit_SSD1306.h>
#include <Adafruit_GFX.h>

#define WIDTH 128 // OLED width (pixels)
#define HEIGHT 64 // OLED height (pixels)

#define ADDRESS 0x3C

//Creation of SSD1306 display object
Adafruit_SSD1306 display(WIDTH, HEIGHT, &Wire, -1);

void setup() {
   Serial.begin(9600);

   if(!display.begin(SSD1306_SWITCHCAPVCC, ADDRESS)) {
      Serial.println("SSD1306 initialization failed");
      while(1){}
   }

   delay(5000);
   display.clearDisplay();

   display.setTextColor(WHITE);
   display.setTextSize(1);
   display.setCursor(0, 10);
   // Display static text
   display.println("Hello World!");
   display.display();
}

void loop() {

}
As you can see, we begin with the inclusion of the required libraries, followed by the definition of the display width, height and I2C address.
#include <Wire.h>
#include <Adafruit_SSD1306.h>
#include <Adafruit_GFX.h>

#define WIDTH 128 // OLED width (pixels)
#define HEIGHT 64 // OLED height (pixels)

#define ADDRESS 0x3C
Next, we define the display.
Adafruit_SSD1306 display(WIDTH, HEIGHT, &Wire, -1);
The -1 at the end indicates that this OLED display has no reset pin. If the OLED screen does have a reset pin, enter the pin number of the GPIO on the Arduino to which the reset pin is connected. &Wire indicates the I2C communication object (Wire).
Within Setup, we first initialize Serial, and then we try to initialize the display object using display.begin(). It takes in two parameters: SSD1306_SWITCHCAPVCC and the I2C address of the OLED display.
You may be wondering what does SSD1306_SWITCHCAPVCC signify. As per the comments in the source code of the Adafruit SSD1306 library, this first parameter determines VCC selection.
“Pass SSD1306_SWITCHCAPVCC to generate the display voltage (step up) from the 3.3V source, or SSD1306_EXTERNALVCC otherwise. Most situations with Adafruit SSD1306 breakouts will want SSD1306_SWITCHCAPVCC.”
If the initialization is successful, we proceed further, else we enter an infinite while loop.
If we do proceed further, we wait for a short time, then clear the display, then set the text color, text size and cursor position, and then write the text to be displayed. You are encouraged to play around with the text color, size and cursor position.
void setup() {
   Serial.begin(9600);

   if(!display.begin(SSD1306_SWITCHCAPVCC, ADDRESS)) {
      Serial.println("SSD1306 initialization failed");
      while(1){}
   }
   delay(5000);
   display.clearDisplay();

   display.setTextColor(WHITE);
   display.setTextSize(1);
   display.setCursor(0, 10);
   // Display static text
   display.println("Hello World!");
   display.display();
}
In the loop, nothing is done.
void loop() {

} 
914 Views
