
Article Categories
- All Categories
-
 Data Structure
-
 Networking
-
 RDBMS
RDBMS
-
 Operating System
-
 Java
Java
-
 MS Excel
-
 iOS
iOS
-
 HTML
HTML
-
 CSS
CSS
-
 Android
-
 Python
-
 C Programming
-
 C++
C++
-
 C#
C#
-
 MongoDB
-
 MySQL
MySQL
-
 Javascript
-
 PHP
PHP
-
 Economics & Finance
Create circular Progress Bar in iOS
It is very important to know how to create a circular progress bar for iOS developers, almost every application have this.
This is mainly used in showing the downloading status, loading status or any other progress related thing.
Creating Circular Progress bar may become very tedious for new programmers and they might struggle working with it.
There are multiple way one can create circular progress bar. In this post we will be seeing one of the simplest and easiest way to create circular progress bar.
So let’s get started
Step 1 − Open Xcode, Single View Application, name it CircularProgress.
So we will be creating an application with 3 buttons having percentage and one circular progress view, where on tapping the buttons the progress view will change based on percentage.
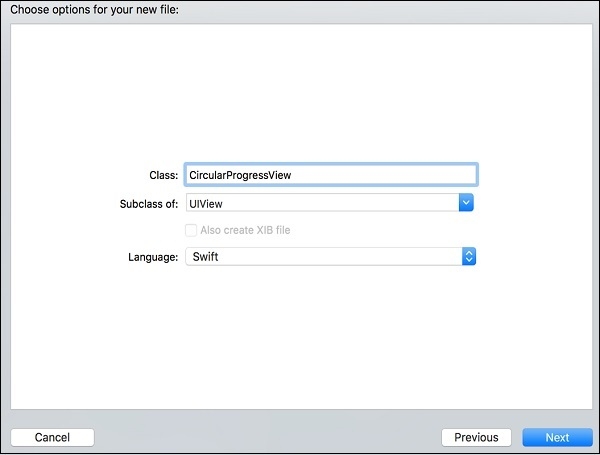
Step 2 − Create new class, File -→ add new file -→ Cocoa Touch class -→ CircularProgressView of UIView class.
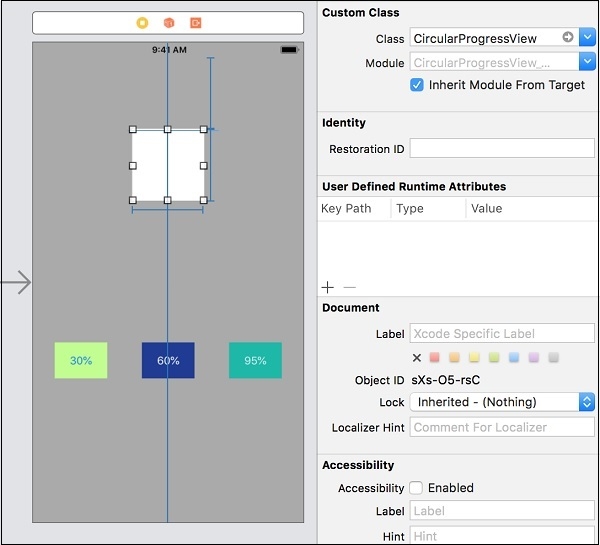
Step 3 − Create UI, Add UI view and add the class CircularProgressView of the same as shown below in the image, add three buttons and name them 30%, 60% and 95%.
Create @IBAction for all the three buttons in ViewController.swift and name them as shown below
@IBAction func btn95(_ sender: Any) {
}
@IBAction func btn30(_ sender: Any) {
}
@IBAction func btn60(_ sender: Any) {
}
Create @IBoutlet for UI View in ViewController.swift and name it as below
@IBOutlet weak var circularProgress: CircularProgressView!
Step 4 − In CircularProgressView.swift, create two object progress layer and track layer of type CAShapeLayer().
var progressLyr = CAShapeLayer()
var trackLyr = CAShapeLayer()
Step 5 Write did set methods to set progressLyr and trackLyr as below
var progressClr = UIColor.white {
   didSet {
      progressLyr.strokeColor = progressClr.cgColor
   }
}
var trackClr = UIColor.white {
   didSet {
      trackLyr.strokeColor = trackClr.cgColor
   }
}
Here we are setting the property progressLyr and trackLyr.
didSet is a property observer, Property observers observe and respond to changes in a property’s value. Property observers are called every time a property’s value is set, even if the new value is the same as the property’s current value
Step 5 − Add makeCircularPath function and add below code.
func makeCircularPath() {
   self.backgroundColor = UIColor.clear
   self.layer.cornerRadius = self.frame.size.width/2
   let circlePath = UIBezierPath(arcCenter: CGPoint(x: frame.size.width/2, y: frame.size.height/2), radius: (frame.size.width - 1.5)/2, startAngle: CGFloat(-0.5 * .pi), endAngle: CGFloat(1.5 * .pi), clockwise: true)
   trackLyr.path = circlePath.cgPath
   trackLyr.fillColor = UIColor.clear.cgColor
   trackLyr.strokeColor = trackClr.cgColor
   trackLyr.lineWidth = 5.0
   trackLyr.strokeEnd = 1.0
   layer.addSublayer(trackLyr)
   progressLyr.path = circlePath.cgPath
   progressLyr.fillColor = UIColor.clear.cgColor
   progressLyr.strokeColor = progressClr.cgColor
   progressLyr.lineWidth = 10.0
   progressLyr.strokeEnd = 0.0
   layer.addSublayer(progressLyr)
}
In this function we are creating a circular path, defining the parameters of it and it’s behaviour.
Step 6 − Add required init function, when we design the UI from storyboard we should be using required init, when you design the UI programmatically we will use override init, in our case we’re going to use require init.
required init?(coder aDecoder: NSCoder) {
   super.init(coder: aDecoder)
   makeCircularPath()
}
Step7 − Now we want to animate the progress so create new function setProgressWithAnimation and write the below code
func setProgressWithAnimation(duration: TimeInterval, value: Float) {
   let animation = CABasicAnimation(keyPath: "strokeEnd")
   animation.duration = duration
   animation.fromValue = 0
   animation.toValue = value
   animation.timingFunction = CAMediaTimingFunction(name: kCAMediaTimingFunctionLinear)
   progressLyr.strokeEnd = CGFloat(value)
   progressLyr.add(animation, forKey: "animateprogress")
}
We’re done, your final code for CircularProgressView.swift should look like this
import UIKit
class CircularProgressView: UIView {
   var progressLyr = CAShapeLayer()
   var trackLyr = CAShapeLayer()
   required init?(coder aDecoder: NSCoder) {
      super.init(coder: aDecoder)
      makeCircularPath()
   }
   var progressClr = UIColor.white {
      didSet {
         progressLyr.strokeColor = progressClr.cgColor
      }
   }
   var trackClr = UIColor.white {
      didSet {
         trackLyr.strokeColor = trackClr.cgColor
      }
   }
   func makeCircularPath() {
      self.backgroundColor = UIColor.clear
      self.layer.cornerRadius = self.frame.size.width/2
      let circlePath = UIBezierPath(arcCenter: CGPoint(x: frame.size.width/2, y: frame.size.height/2), radius: (frame.size.width - 1.5)/2, startAngle: CGFloat(-0.5 * .pi), endAngle: CGFloat(1.5 * .pi), clockwise: true)
      trackLyr.path = circlePath.cgPath
      trackLyr.fillColor = UIColor.clear.cgColor
      trackLyr.strokeColor = trackClr.cgColor
      trackLyr.lineWidth = 5.0
      trackLyr.strokeEnd = 1.0
      layer.addSublayer(trackLyr)
      progressLyr.path = circlePath.cgPath
      progressLyr.fillColor = UIColor.clear.cgColor
      progressLyr.strokeColor = progressClr.cgColor
      progressLyr.lineWidth = 10.0
      progressLyr.strokeEnd = 0.0
      layer.addSublayer(progressLyr)
   }
   func setProgressWithAnimation(duration: TimeInterval, value: Float) {
      let animation = CABasicAnimation(keyPath: "strokeEnd")
      animation.duration = duration
      animation.fromValue = 0
      animation.toValue = value
      animation.timingFunction = CAMediaTimingFunction(name: kCAMediaTimingFunctionLinear)
      progressLyr.strokeEnd = CGFloat(value)
      progressLyr.add(animation, forKey: "animateprogress")
   }
}
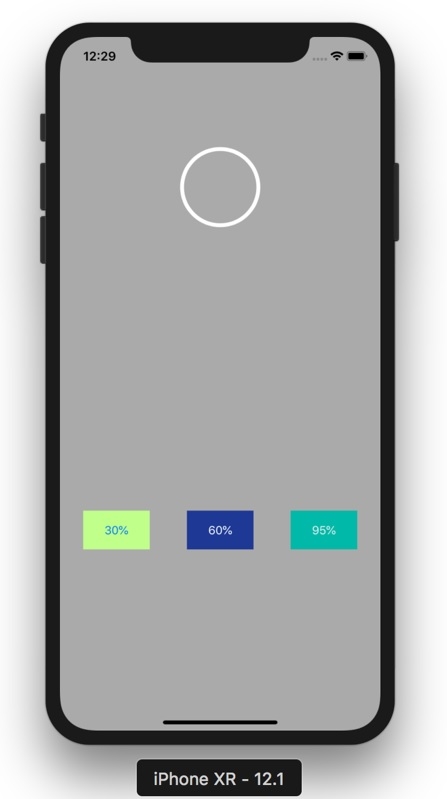
Step 8 − Run the above code just to check everything works fine, you should see your UI as below but non-functional as we have not added any code in ViewController.swift
Step 9 − Let’s add some code in ViewController.swift.
Write the below line in viewDidLoad(), this will specify the color of the progress bar
circularProgress.trackClr = UIColor.cyan
circularProgress.progressClr = UIColor.purple
Add below lines in your button functionality, with duration of 95%, 30% and 60%
@IBAction func btn95(_ sender: Any) {
   circularProgress.setProgressWithAnimation(duration: 1.0, value: 0.95)
}
@IBAction func btn30(_ sender: Any) {
   circularProgress.setProgressWithAnimation(duration: 1.0, value: 0.30)
}
@IBAction func btn60(_ sender: Any) {
   circularProgress.setProgressWithAnimation(duration: 1.0, value: 0.60)

}
Finally your ViewController.swift should have below code
import UIKit
class ViewController: UIViewController {
   @IBOutlet weak var circularProgress: CircularProgressView!
   override func viewDidLoad() {
      super.viewDidLoad()
      circularProgress.trackClr = UIColor.cyan
      circularProgress.progressClr = UIColor.purple
   }
   @IBAction func btn95(_ sender: Any) {
      circularProgress.setProgressWithAnimation(duration: 1.0, value: 0.95)
   }
   @IBAction func btn30(_ sender: Any) {
      circularProgress.setProgressWithAnimation(duration: 1.0, value: 0.30)
   }
   @IBAction func btn60(_ sender: Any) {
      circularProgress.setProgressWithAnimation(duration: 1.0, value: 0.60)
   }
}
In the button function we are calling setProgressWithAnimation with values and duration.
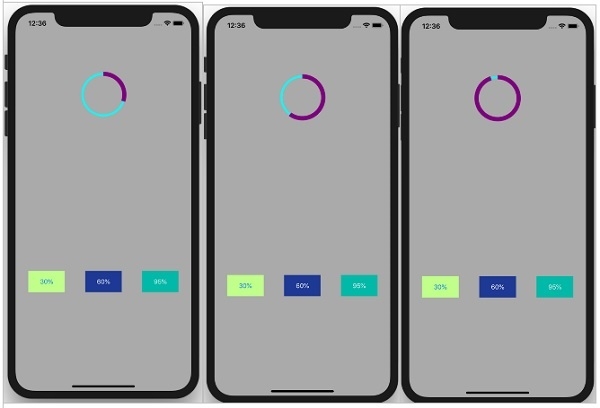
That’s it we’re done, run the application and tap on 30% or 60% or 95%. You’ll see the view animating.

3K+ Views
