 Data Structure
 Networking
 RDBMS
RDBMS Operating System
 Java
Java MS Excel
 iOS
iOS HTML
HTML CSS
CSS Android
 Python
 C Programming
 C++
C++ C#
C# MongoDB
 MySQL
MySQL Javascript
 PHP
PHP
- Selected Reading
- UPSC IAS Exams Notes
- Developer's Best Practices
- Questions and Answers
- Effective Resume Writing
- HR Interview Questions
- Computer Glossary
- Who is Who
Color Identification in Images using Python and OpenCV
Identifying colors in images is a task commonly performed in computer vision and image processing. It has a wide range of applications such as object detection, image segmentation, and image retrieval. In this article, we will see how to determine colors in an image using Python and OpenCV.
Open CV is a popular computer vision library written in C/C++ with bindings for Python, OpenCV provides easy ways of manipulating color spaces. Open CV is open source and gives various algorithms useful in image processing.
Before identifying colors in an image let us learn about some common image representation methods. In digital images, colors are typically represented using the RGB (Red, Green, Blue) color model, in this model each color is represented as combination of three basic colors Red, green and Blue on the basis of some value. The range of these values is from 0 to 255 where 255 is maximum contribution and 0 is minimum.
Color Identification Using OpenCV
A color histogram is a representation of the distribution of colors in an image using the number of pixels present in a particular color and presenting them in a histogram. By studying this histogram, we can know the dominant color of the image.
We can categorize the colors into different color categories and make color histograms to analyze colors through it
To create this histogram, we need to convert our image from RGB color space to another color space like HSV color space which stands for hue saturation and value color space.
After we have converted the image to the HSV color space, we will create a histogram of the Hue component of the given image.
The Hue component will represent the actual color information of the image, and the Saturation and Value components will represent the brightness and intensity of the color.
Color Identification Using OpenCV
Let us see steps how we can perform color identification in images using Python and OpenCV.
Step 1: Importing the Required Libraries
To convert images between the BGR and RGB color spaces, we need to import the required libraries. We will be using the following libraries ?
OpenCV ? To read and manipulate images.
Matplotlib ? To display images.
import cv2
import numpy as np
Step 2: Load the Image and Convert it to the HSV Color Space
Now we will load the image and convert it into the HSV color space.
img = cv2.imread('image.jpg')
hsv_img = cv2.cvtColor(img, cv2.COLOR_BGR2HSV)
Step 3: Define the Color Range
We need to define the lower and upper bounds of the color range we want to detect. We can use the inRange() function of OpenCV to extract the pixels within the color range.
lower_range = (0, 50, 50) # lower range of red color in HSV
upper_range = (10, 255, 255) # upper range of red color in HSV
mask = cv2.inRange(hsv_image, lower_range, upper_range)
Step 4: Apply a Mask to the Image
We can apply the mask we obtained in the previous step to the original image tohsv_img extract only the pixels within the color range.
color_image = cv2.bitwise_and(image, image, mask=mask)
Step 5: Display the Color Image
Finally, we can display the color image that contains only the pixels within the color range we specified.
# Display the color image
cv2.imshow('Color Image', color_image)
cv2.waitKey(0)
cv2.destroyAllWindows()
Example
import cv2
import numpy as np
img = cv2.imread('image_red.jpg')
cv2.imshow('Original Image', img)
cv2.waitKey(0)
hsv_img = cv2.cvtColor(img, cv2.COLOR_BGR2HSV)

# lower range of red color in HSV
lower_range = (0, 50, 50)

# upper range of red color in HSV
upper_range = (150, 255, 255)
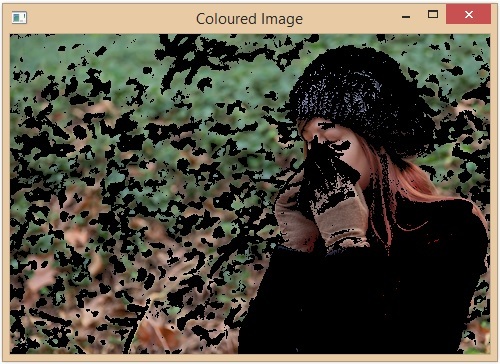
mask = cv2.inRange(hsv_img, lower_range, upper_range)
color_image = cv2.bitwise_and(img, img, mask=mask)

# Display the color of the image
cv2.imshow('Coloured Image', color_image)
cv2.waitKey(0)
cv2.destroyAllWindows()
Output
Original Image ?

Colored Image ?

Detecting Different Colors
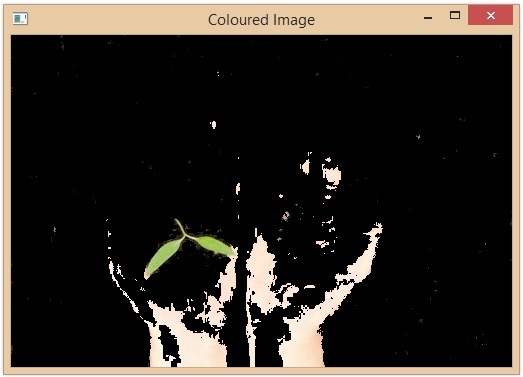
In the above code, we have identified the pixels within the red color range. We can modify the lower and upper ranges to detect different colors. For example, If you need to detect green color, we can set the lower and upper ranges as follows ?
import cv2
import numpy as np
img = cv2.imread('image1.jpg')
cv2.imshow('Original Image', img)
cv2.waitKey(0)
hsv_img = cv2.cvtColor(img, cv2.COLOR_BGR2HSV)
lower_range = (12, 25, 25) # lower range of green color in HSV
upper_range = (86, 255, 255) # upper range of green color in HSV
mask = cv2.inRange(hsv_img, lower_range, upper_range)
color_image = cv2.bitwise_and(img, img, mask=mask)
cv2.imshow('Coloured Image', color_image)
cv2.waitKey(0)
cv2.destroyAllWindows()
Output
Original Image ?

Colored Image ?

Conclusion
In this article we discussed about color identification. Color identification is commonly used in computer vision and image processing. We discussed how we can identify the color in images using python language and OpenCV library of python. We learned about different types of color models like RGB and HSV. We saw how we can create a color histogram and use that to identify the dominant colors in an image. We also saw how we can display those dominant colors.
