- CakePHP - Home
- CakePHP - Overview
- CakePHP - Installation
- CakePHP - Folder Structure
- CakePHP - Project Configuration
- CakePHP - Routing
- CakePHP - Controllers
- CakePHP - Views
- CakePHP - Extending Views
- CakePHP - View Elements
- CakePHP - View Events
- CakePHP - Working with Database
- CakePHP - View a Record
- CakePHP - Update a Record
- CakePHP - Delete a Record
- CakePHP - Services
- CakePHP - Errors & Exception Handling
- CakePHP - Logging
- CakePHP - Form Handling
- CakePHP - Internationalization
- CakePHP - Session Management
- CakePHP - Cookie Management
- CakePHP - Security
- CakePHP - Validation
- CakePHP - Creating Validators
- CakePHP - Pagination
- CakePHP - Date and Time
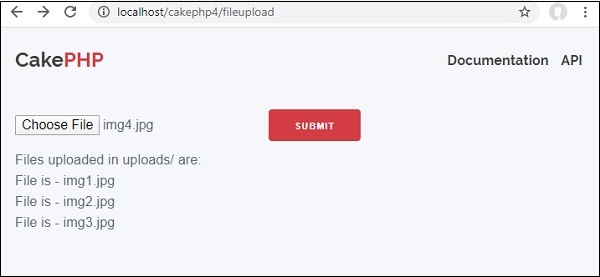
- CakePHP - File upload
- CakePHP Useful Resources
- CakePHP - Quick Guide
- CakePHP - Useful Resources
- CakePHP - Discussion
CakePHP - Quick Guide
CakePHP - Overview
CakePHP is an open source MVC framework. It makes developing, deploying and maintaining applications much easier. CakePHP has a number of libraries to reduce the overload of most common tasks.
Advantages of CakePHP
The advantages of using CakePHP are listed below −
Open Source
MVC Framework
Templating Engine
Caching Operations
Search Engine Friendly URLs
Easy CRUD (Create, Read, Update, Delete) Database Interactions.
Libraries and Helpers
Built-in Validation
Localisation
Email, Cookie, Security, Session, and Request Handling Components
View Helpers for AJAX, JavaScript, HTML Forms and More
CakePHP Request Cycle
The following illustration describes how a Request Lifecycle in CakePHP works −
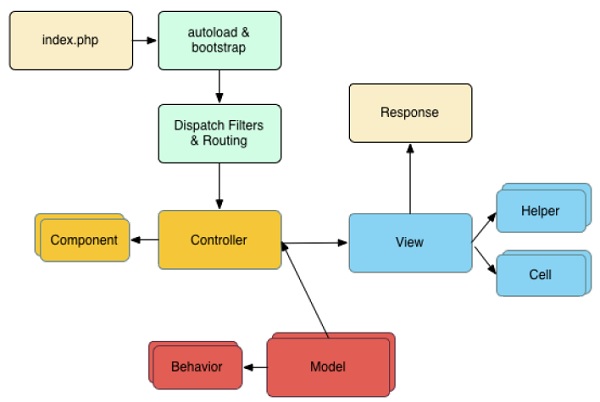
A typical CakePHP request cycle starts with a user requesting a page or resource in your application. At high level, each request goes through the following steps −
The webserver rewrite rules direct the request to webroot / index.php.
Your applications autoloader and bootstrap files are executed.
Any dispatch filters that are configured can handle the request, and optionally generate a response.
The dispatcher selects the appropriate controller and action based on routing rules.
The controllers action is called and the controller interacts with the required Models and Components.
The controller delegates response creation to the View to generate the output resulting from the model data.
The view uses Helpers and Cells to generate the response body and headers.
The response is sent back to the client.
CakePHP - Installation
In this chapter, we will show the installation of CakePHP 4.0.3. The minimum PHP version that we need to install is PHP 7.3.
You need to have PHP 7.3 and Composer to be installed before starting the installation of cakePHP.
For Windows users, install or update WAMP server with PHP version > 7.3.
Go to www.wampserver.com/en/download-wampserver-64bits/ and install it.
For Linux users, kindly refer Tutorials Point website which is available at www.tutorialspoint.com/php7/php7_installation_linux.htm for installation of PHP .
Installing Composer
Go to composer at https://getcomposer.org/download/ and click on download as per the operating system (OS) of your computer and install composer on your system. Add the location to PATH variable for windows users, so that you can use composer from any directory.
Once you are done installing composer, let us now start to install CakePHP.
Installing CakePHP
Go to the folder where wamp is located for windows users and in www/ folder, create a folder cakephp4/.
For Linux users, create the folder var/www/html/ and then create folder cakephp4/.
cakephp4/ is the folder where we are going to install CakePHP.
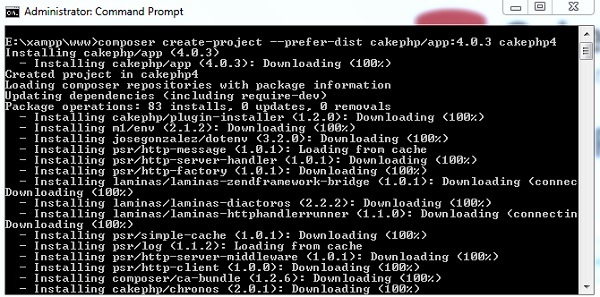
Use composer to execute the following command −
composer create-project --prefer-dist cakephp/app:4.0.3 cakephp4
This is what you should see, when the command executes −
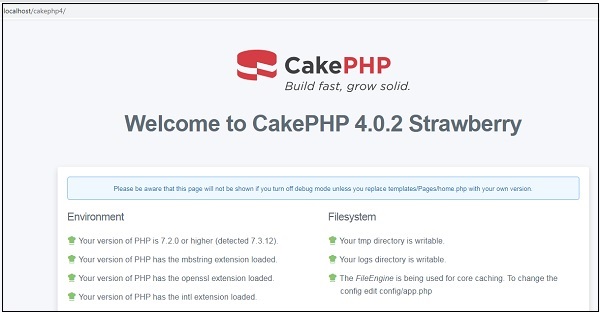
Once the installation is complete, use localhost to open your project in browser.
The Path for the same is http://localhost/cakephp.
CakePHP - Folder Structure
Here, we will learn about the Folder structure and the Naming Convention in CakePHP. Let us begin by understanding the Folder structure.
Folder Structure
Take a look at the following screenshot. It shows the folder structure of CakePHP.
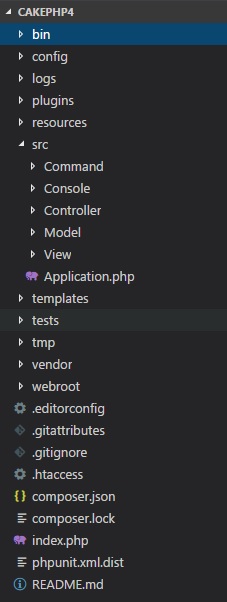
The following table describes the role of each folder in CakePHP −
| Sr.No | Folder Name & Description |
|---|---|
| 1 | bin The bin folder holds the Cake console executables. |
| 2 | config The config folder holds the (few) configuration files CakePHP uses. Database connection details, bootstrapping, core configuration files and more should be stored here. |
| 3 | logs The logs folder normally contains your log files, depending on your log configuration. |
| 4 | plugins The plugins folder is where the Plugins of your application uses are stored. |
| 5 | resources The files for internationalization in the respective locale folder will be stored here. E.g. locales/en_US. |
| 6 | src The src folder will be where you work your magic. It is where your applications files will be placed and you will do most of your application development. Lets look a little closer at the folders inside src.
|
| 7 | templates Template Presentational files are placed here: elements, error pages, layouts, and view template files. |
| 8 | tests The tests folder will be where you put the test cases for your application. |
| 9 | tmp The tmp folder is where CakePHP stores temporary data. The actual data it stores depends on how you have CakePHP configured, but this folder is usually used to store model descriptions and sometimes session information. |
| 10 | vendor The vendor folder is where CakePHP and other application dependencies will be installed. Make a personal commitment not to edit files in this folder. We cant help you, if youve modified the core. |
| 11 | webroot The webroot directory is the public document root of your application. It contains all the files you want to be publically reachable. |
Naming Convention
Naming convention is not something mandatory to be followed, but is a good coding practice and will be very helpful as your project goes big.
Controller Convention
The controller class name has to be plural, PascalCased and the name has to end with Controller. For example, for Students class the name of the controller can be StudentsController. Public methods on Controllers are often exposed as actions accessible through a web browser.
For example, the /users /view maps to the view() method of the UsersController out of the box. Protected or private methods cannot be accessed with routing.
File and Class Name Convention
Mostly, we have seen that our class name file name is almost the same. This is similar in cakephp.
For example, the class StudentsController will have the file named as StudentsController.php. The files have to be saved as the module name and in the respective folders in app folder.
Database Conventions
The tables used for CakePHP models, mostly have names plural with underscore.
For example, student_details, student_marks. The field name has an underscore, if it is made up of two words, for example, first_name, last_name.
Model Conventions
For model, the classes are named as per database table, the names are plural, PascalCased and suffixed with Table.
For example, StudentDetailsTable, StudentMarksTable
View Conventions
For view templates, the files are based on controller functions.
For example, if the class StudentDetailsController has function showAll(), the view template will be named as show_all.php and saved inside template/yrmodule/show_all.php.
CakePHP - Project Configuration
In this chapter, we will understand the Environment Variables, General Configuration, Database Configuration and Email Configuration in CakePHP.
Configuration CakePHP comes with one configuration file by default, and we can modify it according to our needs. There is one dedicated folder config for this purpose. CakePHP comes with different configuration options.
Let us start by understanding the Environment Variables in CakePHP.
Environment Variables
Environment variables make the working of your application on different environments easy. For example, on dev server, test server, staging server and production server environment. For all these environments, you can make use of env() function to read the configuration for the environment you need and build your application.
In your config folder, you will come across config/.env.example. This file has all the variables that will be changed based on your environment. To start with, you can create a file in config folder i.e. config/.env and define those variables and use them. In case you need any additional variables, it can go in that file.
You can read your environment variable using env() function as shown below −
Example
$debug = env('APP_DEBUG', false);
The first one is the name of the environment variable you want and second value is the default value. The default value is used, if there is no value found for the environment variable.
General Configuration
The following table describes the role of various variables and how they affect your CakePHP application.
| Sr.No | Variable Name & Description |
|---|---|
| 1 | debug Changes CakePHP debugging output. false = Production mode. No error messages, errors, or warnings shown. true = Errors and warnings shown. |
| 2 | App.namespace The namespace to find app classes under. |
| 3 | App.baseUrl Un-comment this definition, if you dont plan to use Apaches mod_rewrite with CakePHP. Dont forget to remove your .htaccess files too. |
| 4 | App.base The base directory the app resides in. If false, this will be auto detected. |
| 5 | App.encoding Define what encoding your application uses. This encoding is used to generate the charset in the layout, and encode entities. It should match the encoding values specified for your database. |
| 6 | App.webroot The webroot directory. |
| 7 | App.wwwRoot The file path to webroot. |
| 8 | App.fullBaseUrl The fully qualified domain name (including protocol) to your applications root. |
| 9 | App.imageBaseUrl Web path to the public images directory under webroot. |
| 10 | App.cssBaseUrl Web path to the public css directory under webroot. |
| 11 | App.jsBaseUrl Web path to the public js directory under webroot. |
| 12 | App.paths Configure paths for non-class based resources. Supports the plugins, templates, locales, subkeys, which allow the definition of paths for plugins, view templates and locale files respectively. |
| 13 | Security.salt A random string used in hashing. This value is also used as the HMAC salt when doing symmetric encryption. |
| 14 | Asset.timestamp Appends a timestamp, which is last modified time of the particular file at the end of asset files URLs (CSS, JavaScript, Image) when using proper helpers. The valid values are −
|
Databases Configuration
Database can be configured in config/app.php and config/app_local.php file. This file contains a default connection with provided parameters, which can be modified as per our choice.
The below snippet shows the default parameters and values, which should be modified as per the requirement.
Config/app_local.php
*/
   'Datasources' => [
      'default' => [
         'host' => 'localhost',
         'username' => 'my_app',
         'password' => 'secret',
         'database' => 'my_app',
         'url' => env('DATABASE_URL', null),
      ],
      /*
         * The test connection is used during the test suite.
      */
      'test' => [
         'host' => 'localhost',
         //'port' => 'non_standard_port_number',
         'username' => 'my_app',
         'password' => 'secret',
         'database' => 'test_myapp',
         //'schema' => 'myapp',
      ],
   ],
Let us understand each parameter in detail in config/app_local.php.
| Host | The database servers hostname (or IP address). |
|---|---|
| username | Database username |
| password | Database password. |
| database | Name of Database. |
| Port | The TCP port or Unix socket used to connect to the server. |
config/app.php
'Datasources' => [
   'default' => [
      'className' => Connection::class,
      'driver' => Mysql::class,
      'persistent' => false,
      'timezone' => 'UTC',
      //'encoding' => 'utf8mb4',
      'flags' => [],
      'cacheMetadata' => true,
      'log' => false,
      'quoteIdentifiers' => false,
      //'init' => ['SET GLOBAL innodb_stats_on_metadata = 0'],
   ],
]
Let us understand each parameter in detail in config/app.php.
| Sr.No | Key & Description |
|---|---|
| 1 | className The fully namespaced class name of the class that represents the connection to a database server. This class is responsible for loading the database driver, providing SQL transaction mechanisms and preparing SQL statements among other things. |
| 2 | driver The class name of the driver used to implement all specificities for a database engine. This can either be a short classname using plugin syntax, a fully namespaced name, or a constructed driver instance. Examples of short classnames are Mysql, Sqlite, Postgres, and Sqlserver. |
| 3 | persistent Whether or not to use a persistent connection to the database. |
| 4 | encoding Indicates the character set to use, when sending SQL statements to the server like utf8 etc. |
| 5 | timezone Server timezone to set. |
| 6 | init A list of queries that should be sent to the database server as and when the connection is created. |
| 7 | loglog Set to true to enable query logging. When enabled queries will be logged at a debug level with the queriesLog scope. |
| 8 | quoteIdentifiers Set to true, if you are using reserved words or special characters in your table or column names. Enabling this setting will result in queries built using the Query Builder having identifiers quoted when creating SQL. It decreases performance. |
| 9 | flags An associative array of PDO constants that should be passed to the underlying PDO instance. |
| 10 | cacheMetadata Either boolean true, or a string containing the cache configuration to store meta data in. Having metadata caching disable is not advised and can result in very poor performance. |
Email Configuration
Email can be configured in file config/app.php. It is not required to define email configuration in config/app.php. Email can be used without it. Just use the respective methods to set all configurations separately or load an array of configs. Configuration for Email defaults is created using config() and configTransport().
Email Configuration Transport
By defining transports separately from delivery profiles, you can easily re-use transport configuration across multiple profiles. You can specify multiple configurations for production, development and testing. Each transport needs a className. Valid options are as follows −
Mail − Send using PHP mail function
Smtp − Send using SMTP
Debug − Do not send the email, just return the result
You can add custom transports (or override existing transports) by adding the appropriate file to src/Mailer/Transport. Transports should be named YourTransport.php, where 'Your' is the name of the transport.
Following is the example of Email configuration transport.
'EmailTransport' => [
   'default' => [
      'className' => 'Mail',
      // The following keys are used in SMTP transports
      'host' => 'localhost',
      'port' => 25,
      'timeout' => 30,
      'username' => 'user',
      'password' => 'secret',
      'client' => null,
      'tls' => null,
      'url' => env('EMAIL_TRANSPORT_DEFAULT_URL', null),
   ],
],
Email Delivery Profiles
Delivery profiles allow you to predefine various properties about email messages from your application, and give the settings a name. This saves duplication across your application and makes maintenance and development easier. Each profile accepts a number of keys.
Following is an example of Email delivery profiles.
'Email' => [
   'default' => [

      'transport' => 'default',
      'from' => 'you@localhost',
   ],
],
CakePHP - Routing
In this chapter, we are going to learn the following topics related to routing −
- Introduction to Routing
- Connecting Routes
- Passing Arguments to Routes
- Generating urls
- Redirect urls
Introduction to Routing
In this section, we will see how you can implement routes, how you can pass arguments from URL to controllers action, how you can generate URLs, and how you can redirect to a specific URL. Normally, routes are implemented in file config/routes.php. Routing can be implemented in two ways −
- static method
- scoped route builder
Here, is an example presenting both the types.
// Using the scoped route builder.
Router::scope('/', function ($routes) {
   $routes->connect('/', ['controller' => 'Articles', 'action' => 'index']);
});
// Using the static method.
Router::connect('/', ['controller' => 'Articles', 'action' => 'index']);
Both the methods will execute the index method of ArticlesController. Out of the two methods, scoped route builder gives better performance.
Connecting Routes
Router::connect() method is used to connect routes. The following is the syntax of the method −
static Cake\Routing\Router::connect($route, $defaults =[], $options =[])
There are three arguments to the Router::connect() method −
The first argument is for the URL template you wish to match.
The second argument contains default values for your route elements.
The third argument contains options for the route, which generally contains regular expression rules.
Here, is the basic format of a route −
$routes->connect(
   'URL template',
   ['default' => 'defaultValue'],
   ['option' => 'matchingRegex']
);
Example
Make changes in the config/routes.php file as shown below.
config/routes.php
<?php
use Cake\Http\Middleware\CsrfProtectionMiddleware;
use Cake\Routing\Route\DashedRoute;
use Cake\Routing\RouteBuilder;
$routes->setRouteClass(DashedRoute::class);
$routes->scope('/', function (RouteBuilder $builder) {
   // Register scoped middleware for in scopes.
      $builder->registerMiddleware('csrf', new CsrfProtectionMiddleware([
      'httpOnly' => true,
   ]));
   $builder->applyMiddleware('csrf');
   $builder->connect('/', ['controller' => 'Tests', 'action' => 'show']);
   $builder->connect('/pages/*', ['controller' => 'Pages', 'action' => 'display']);
   $builder->fallbacks();
});
Create a TestsController.php file at src/Controller/TestsController.php. Copy the following code in the controller file.
src/Controller/TestsController.php
<?php
declare(strict_types=1);
namespace App\Controller;
use Cake\Core\Configure;
use Cake\Http\Exception\ForbiddenException;
use Cake\Http\Exception\NotFoundException;
use Cake\Http\Response;
use Cake\View\Exception\MissingTemplateException;
class TestsController extends AppController {
   public function show()
   {
   }
}
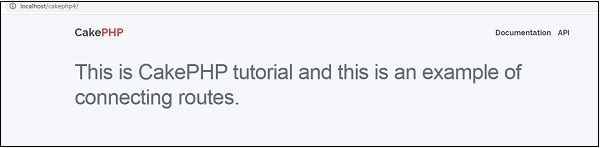
Create a folder Tests under src/Template and under that folder, create a View file called show.php. Copy the following code in that file.
src/Template/Tests/show.php
<h1>This is CakePHP tutorial and this is an example of connecting routes.</h1>
Execute the above example by visiting the following URL which is available at http://localhost/cakephp4/
Output
The above URL will yield the following output.
Passed Arguments
Passed arguments are the arguments which are passed in the URL. These arguments can be passed to controllers action. These passed arguments are given to your controller in three ways.
As arguments to the action method
Following example shows, how we can pass arguments to the action of the controller. Visit the following URL at http://localhost/cakephp4/tests/value1/value2
This will match the following route line.
$builder->connect('tests/:arg1/:arg2', ['controller' => 'Tests', 'action' => 'show'],['pass' => ['arg1', 'arg2']]);
Here, the value1 from URL will be assigned to arg1 and value2 will be assigned to arg2.
As numericallyindexed array
Once the argument is passed to the controllers action, you can get the argument with the following statement.
$args = $this->request->params[pass]
The arguments passed to controllers action will be stored in $args variable.
Using routing array
The argument can also be passed to action by the following statement −
$routes->connect('/', ['controller' => 'Tests', 'action' => 'show',5,6]);
The above statement will pass two arguments 5, and 6 to TestControllers show() method.
Example
Make Changes in the config/routes.php file as shown in the following program.
config/routes.php
<?php
use Cake\Http\Middleware\CsrfProtectionMiddleware;
use Cake\Routing\Route\DashedRoute;
use Cake\Routing\RouteBuilder;
$routes->setRouteClass(DashedRoute::class);
$routes->scope('/', function (RouteBuilder $builder) {
// Register scoped middleware for in scopes.
$builder->registerMiddleware('csrf', new CsrfProtectionMiddleware([
      'httpOnly' => true,
   ]));
   $builder->applyMiddleware('csrf');
   $builder->connect('tests/:arg1/:arg2', ['controller' => 'Tests', 'action' => 'show'],['pass' => ['arg1', 'arg2']]);
   $builder->connect('/pages/*', ['controller' => 'Pages', 'action' => 'display']);
   $builder->fallbacks();
});
Create a TestsController.php file at src/Controller/TestsController.php. Copy the following code in the controller file.
src/Controller/TestsController.php
<?php
declare(strict_types=1);
namespace App\Controller;
use Cake\Core\Configure;
use Cake\Http\Exception\ForbiddenException;
use Cake\Http\Exception\NotFoundException;
use Cake\Http\Response;
use Cake\View\Exception\MissingTemplateException;
class TestsController extends AppController {
public function show($arg1, $arg2) {
      $this->set('argument1',$arg1);
      $this->set('argument2',$arg2);
   }
}
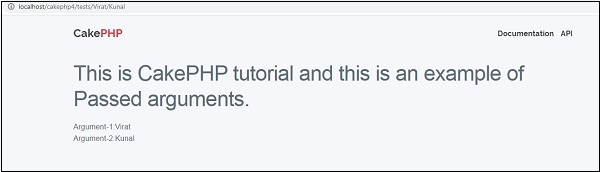
Create a folder Tests at src/Template and under that folder create a View file called show.php. Copy the following code in that file.
src/Template/Tests/show.php.
<h1>This is CakePHP tutorial and this is an example of Passed arguments.</h1>
<?php
   echo "Argument-1:".$argument1."<br/>";
   echo "Argument-2:".$argument2."<br/>";
?>
Execute the above example by visiting the following URL http://localhost/cakephp4/tests/Virat/Kunal
Output
Upon execution, the above URL will produce the following output.
Generating URLs
This is a cool feature of CakePHP. Using the generated URLs, we can easily change the structure of URL in the application without modifying the whole code.
url( string|array|null $url null , boolean $full false )
The above function will take two arguments −
The first argument is an array specifying any of the following - 'controller', 'action', 'plugin'. Additionally, you can provide routed elements or query string parameters. If string, it can be given the name of any valid url string.
If true, the full base URL will be prepended to the result. Default is false.
Example
Make Changes in the config/routes.php file as shown in the following program.
config/routes.php
<?php
use Cake\Http\Middleware\CsrfProtectionMiddleware;
use Cake\Routing\Route\DashedRoute;
use Cake\Routing\RouteBuilder;
$routes->setRouteClass(DashedRoute::class);
$routes->scope('/', function (RouteBuilder $builder) {
   // Register scoped middleware for in scopes.
   $builder->registerMiddleware('csrf', new CsrfProtectionMiddleware([
      'httpOnly' => true,
   ]));
   $builder->applyMiddleware('csrf');
   $builder->connect('/generate',['controller'=>'Generates','action'=>'show']);
   $builder->fallbacks();
});
Create a GeneratesController.php file at src/Controller/GeneratesController.php. Copy the following code in the controller file.
src/Controller/GeneratesController.php
<?php
declare(strict_types=1);
namespace App\Controller;
21
use Cake\Core\Configure;
use Cake\Http\Exception\ForbiddenException;
use Cake\Http\Exception\NotFoundException;
use Cake\Http\Response;
use Cake\View\Exception\MissingTemplateException;
class GeneratesController extends AppController {
   public function show()
   {
   }
}
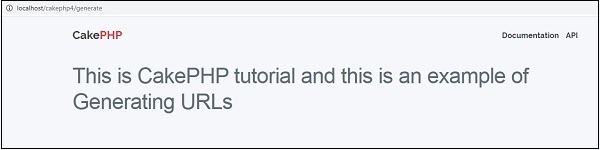
Create a folder Generates at src/Template and under that folder, create a View file called show.php. Copy the following code in that file.
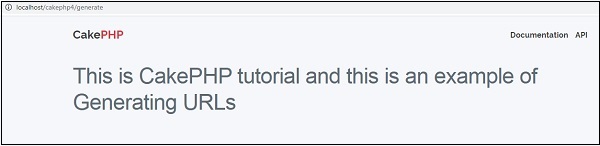
src/Template/Generates/show.php
<h1>This is CakePHP tutorial and this is an example of Generating URLs<h1>
Execute the above example by visiting the following URL −
http://localhost/cakephp4/generate
Output
The above URL will produce the following output −
Redirect Routing
Redirect routing is useful, when we want to inform client applications that, this URL has been moved. The URL can be redirected using the following function −
static Cake\Routing\Router::redirect($route, $url, $options =[])
There are three arguments to the above function as follows −
A string describing the template of the route.
A URL to redirect to.
An array matching the named elements in the route to regular expressions which that element should match.
Example
Make Changes in the config/routes.php file as shown below. Here, we have used controllers that were created previously.
config/routes.php
<?php
use Cake\Http\Middleware\CsrfProtectionMiddleware;
use Cake\Routing\Route\DashedRoute;
use Cake\Routing\RouteBuilder;
$routes->setRouteClass(DashedRoute::class);
$routes->scope('/', function (RouteBuilder $builder) {
   // Register scoped middleware for in scopes.
   $builder->registerMiddleware('csrf', new CsrfProtectionMiddleware([
      'httpOnly' => true,
   ]));
   $builder->applyMiddleware('csrf');
   $builder->connect('/generate',['controller'=>'Generates','action'=>'show']);
   $builder->redirect('/redirect','https://tutorialspoint.com/');
   $builder->fallbacks();
});
Execute the above example by visiting the following URLs.
URL 1 − http://localhost/cakephp4/generate
Output for URL 1
URL 2 − http://localhost/cakephp4/redirect
Output for URL 2
You will be redirected to https://tutorialspoint.com
CakePHP - Controllers
The controller as the name indicates controls the application. It acts like a bridge between models and views. Controllers handle request data, makes sure that correct models are called and right response or view is rendered.
Methods in the controllers class are called actions. Each controller follows naming conventions. The Controller class names are in plural form, Camel Cased, and end in Controller PostsController.
AppController
The AppConttroller class is the parent class of all applications controllers. This class extends the Controller class of CakePHP. AppController is defined at src/Controller/AppController.php. The file contains the following code.
<?php
declare(strict_types=1);
namespace App\Controller;
use Cake\Controller\Controller;
class AppController extends Controller {
   public function initialize(): void {
      parent::initialize();
      $this->loadComponent('RequestHandler');
      $this->loadComponent('Flash');
   }
}
AppController can be used to load components that will be used in every controller of your application. The attributes and methods created in AppController will be available in all controllers that extend it. The initialize() method will be invoked at the end of controllers constructor to load components.
Controller Actions
The methods in the controller class are called Actions. These actions are responsible for sending appropriate response for browser/user making the request. View is rendered by the name of action, i.e., the name of method in controller.
Example
class RecipesController extends AppController {
   public function view($id) {
      // Action logic goes here.
   }
   public function share($customerId, $recipeId) {
      // Action logic goes here.
   }
   public function search($query) {
      // Action logic goes here.
   }
}
As you can see in the above example, the RecipesController has 3 actions − View, Share, and Search.
Redirecting
For redirecting a user to another action of the same controller, we can use the setAction() method. The following is the syntax for the setAction() method.
Cake\Controller\Controller::setAction($action, $args...)
The following code will redirect the user to index action of the same controller.
$this->setAction('index');
The following example shows the usage of the above method.
Example
Make changes in the config/routes.php file as shown in the following program.
config/routes.php
<?php
use Cake\Http\Middleware\CsrfProtectionMiddleware;
use Cake\Routing\Route\DashedRoute;
use Cake\Routing\RouteBuilder;
$routes->setRouteClass(DashedRoute::class);
$routes->scope('/', function (RouteBuilder $builder) {
   // Register scoped middleware for in scopes.
   $builder->registerMiddleware('csrf', new CsrfProtectionMiddleware([
      'httpOnly' => true,
   ]));
   $builder->applyMiddleware('csrf');
   $builder->connect('/redirect-controller',['controller'=>'Redirects','action'=>'action1']);
   $builder->connect('/redirect-controller2',['controller'=>'Redirects','action'=>'action2']);
   $builder->fallbacks();
});
Create a RedirectsController.php file at src/Controller/RedirectsController.php. Copy the following code in the controller file.
src/Controller/RedirectsController.php
<?php
declare(strict_types=1);
namespace App\Controller;
use Cake\Core\Configure;
use Cake\Http\Exception\ForbiddenException;
use Cake\Http\Exception\NotFoundException;
use Cake\Http\Response;
use Cake\View\Exception\MissingTemplateException;
class RedirectsController extends AppController {
   public function action1() {
   }
   public function action2(){
      echo "redirecting from action2";
      $this->setAction('action1');
   }
}
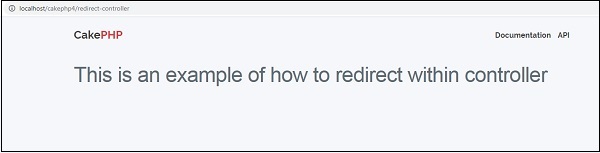
Create a directory Redirects at src/Template and under that directory create a View file called action1.php. Copy the following code in that file.
src/Template/Redirects/action1.php
<h1>This is an example of how to redirect within controller.</h1>
Execute the above example by visiting the following URL.
http://localhost/cakephp4/redirect-controller
Output
Upon execution, you will receive the following output.
Now, visit the following URL: http://localhost/cakephp4/redirect-controller2
The above URL will give you the following output.

Loading Models
In CakePHP, a model can be loaded using the loadModel() method. The following is the syntax for the loadModel() method −
Cake\Controller\Controller::loadModel(string $modelClass, string $type)
There are two arguments to the above function as follows −
The first argument is the name of model class.
The second argument is the type of repository to load.
Example
If you want to load Articles model in a controller, then it can be loaded by writing the following line in controllers action.
$this->loadModel('Articles');
CakePHP - Views
The letter V in the MVC is for Views. Views are responsible for sending output to user based on request. View Classes is a powerful way to speed up the development process.
View Templates
The View Templates file of CakePHP gets data from controller and then render the output so that it can be displayed properly to the user. We can use variables, various control structures in template.
Template files are stored in src/Template/, in a directory named after the controller that uses the files, and named after the action it corresponds to. For example, the Viewfile for the Products controllers view() action, would normally be found in src/Template/Products/view.php.
In short, the name of the controller (ProductsController) is same as the name of the folder (Products) but without the word Controller and name of action/method (view()) of the controller (ProductsController) is same as the name of the View file(view.php).
View Variables
View variables are variables which get the value from controller. We can use as many variables in view templates as we want. We can use the set() method to pass values to variables in views. These set variables will be available in both the view and the layout your action renders. The following is the syntax of the set() method.
Cake\View\View::set(string $var, mixed $value)
This method takes two arguments − the name of the variable and its value.
Example
Make Changes in the config/routes.php file as shown in the following program.
config/routes.php
<?php
use Cake\Http\Middleware\CsrfProtectionMiddleware;
use Cake\Routing\Route\DashedRoute;
use Cake\Routing\RouteBuilder;
$routes->setRouteClass(DashedRoute::class);
$routes->scope('/', function (RouteBuilder $builder) {
   // Register scoped middleware for in scopes.
   $builder->registerMiddleware('csrf', new CsrfProtectionMiddleware([
      'httpOnly' => true,
   ]));
   $builder->applyMiddleware('csrf');
   $builder->connect('template',['controller'=>'Products','action'=>'view']);
   $builder->fallbacks();
});
Create a ProductsController.php file at src/Controller/ProductsController.php. Copy the following code in the controller file.
src/Controller/ProductsController.php
<?php
declare(strict_types=1);
namespace App\Controller;
use Cake\Core\Configure;
use Cake\Http\Exception\ForbiddenException;
use Cake\Http\Exception\NotFoundException;
use Cake\Http\Response;
use Cake\View\Exception\MissingTemplateException;
class ProductsController extends AppController {
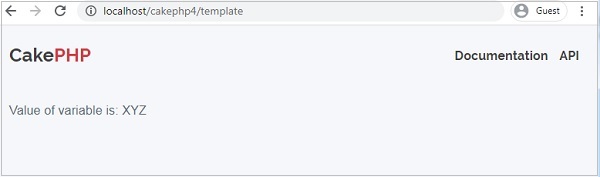
public function view(){
$this->set('Product_Name','XYZ');
}
}
Create a directory Products at src/Template and under that folder create a View file called view.php. Copy the following code in that file.
Value of variable is: <?php echo $Product_Name; ? >
Execute the above example by visiting the following URL.
http://localhost/cakephp4/template
Output
The above URL will produce the following output.
CakePHP - Extending Views
Many times, while making web pages, we want to repeat certain part of pages in other pages. CakePHP has such facility by which one can extend view in another view and for this, we need not repeat the code again.
The extend() method is used to extend views in View file. This method takes one argument, i.e., the name of the view file with path. Dont use extension .ctp while providing the name of the View file.
Example
Make changes in the config/routes.php file as shown in the following program.
config/routes.php
<?php
use Cake\Http\Middleware\CsrfProtectionMiddleware;
use Cake\Routing\Route\DashedRoute;
use Cake\Routing\RouteBuilder;
$routes->setRouteClass(DashedRoute::class);
$routes->scope('/', function (RouteBuilder $builder) {
   $builder->registerMiddleware('csrf', new CsrfProtectionMiddleware([
      'httpOnly' => true,
   ]));
   $builder->applyMiddleware('csrf');
   $builder->connect('extend',['controller'=>'Extends','action'=>'index']);
   $builder->fallbacks();
});
Create an ExtendsController.php file at src/Controller/ExtendsController.php. Copy the following code in the controller file.
src/Controller/ExtendsController.php
<?php
   namespace App\Controller;
   use App\Controller\AppController;
   class ExtendsController extends AppController{
      public function index(){
      }
   }
?>
Create a directory Extends at src/Template and under that folder create a View file called header.php. Copy the following code in that file.
src/Template/Extends/header.php
<div align="center">
   <h1>Common Header</h1>
</div>
<?= $this->fetch('content') ?>
Create another View under Extends directory called index.php. Copy the following code in that file. Here, we are extending the above view header.php.
src/Template/Extends/index.php
<?php $this->extend('header'); ?>
This is an example of extending view.
Execute the above example by visiting the following URL http://localhost/cakephp4/extend
Output
Upon execution, you will receive the following output.

CakePHP - View Elements
Certain parts of the web pages are repeated on multiple web pages, but at different locations. CakePHP can help us reuse these repeated parts. These reusable parts are called Elements - help box, extra menu, etc. An element is basically a mini-view. We can also pass variables in elements.
Cake\View\View::element(string $elementPath, array $data, array $options =[]
There are three arguments to the above function as follows −
The first argument is the name of the template file in the /src/Template/element/ folder.
The second argument is the array of data to be made available to the rendered view.
The third argument is for the array of options. e.g. cache.
Out of the 3 arguments, the first one is compulsory, while the rest are optional.
Example
Create an element file at src/Template/element directory called helloworld.php. Copy the following code in that file.
src/Template/element/helloworld.php
<p>Hello World</p>
Create a folder Elems at src/Template and under that directory create a View file called index.php. Copy the following code in that file.
src/Template/Elems/index.php
Element Example: <?php echo $this->element('helloworld'); ?>
Make Changes in the config/routes.php file as shown in the following program.
config/routes.php
<?php
use Cake\Http\Middleware\CsrfProtectionMiddleware;
use Cake\Routing\Route\DashedRoute;
use Cake\Routing\RouteBuilder;
$routes->setRouteClass(DashedRoute::class);
$routes->scope('/', function (RouteBuilder $builder) {
   $builder->registerMiddleware('csrf', new CsrfProtectionMiddleware([
      'httpOnly' => true,
   ]));
   $builder->applyMiddleware('csrf');
   $builder->connect('/element-example',['controller'=>'Elems','action'=>'index']);
   $builder->fallbacks();
});
Create an ElemsController.php file at src/Controller/ElemsController.php. Copy the following code in the controller file.
src/Controller/ElemsController.php
<?php
   namespace App\Controller;
   use App\Controller\AppController;
   class ElemsController extends AppController{
      public function index(){
      }
   }
?>
Execute the above example by visiting the following URL http://localhost/cakephp4/element-example
Output
Upon execution, the above URL will give you the following output.

CakePHP - View Events
There are several callbacks/events that we can use with View Events. These events are helpful to perform several tasks before something happens or after something happens. The following is a list of callbacks that can be used with CakePHP −
| Sr.No | Event Function & Description |
|---|---|
| 1 | Helper::beforeRender(Event $event,$viewFile) The beforeRender method is called after the controllers beforeRender method but before the controller renders view and layout. This receives the file being rendered as an argument. |
| 2 | Helper::beforeRenderFile(Event $event, $viewFile) This method is called before each view file is rendered. This includes elements, views, parent views and layouts. |
| 3 | Helper::afterRenderFile(Event $event, $viewFile, $content) This method is called after each View file is rendered. This includes elements, views, parent views and layouts. A callback can modify and return $content to change how the rendered content will be displayed in the browser. |
| 4 | Helper::afterRender(Event $event, $viewFile) This method is called after the view has been rendered, but before the layout rendering has started. |
| 5 | Helper::beforeLayout(Event $event, $layoutFile) This method is called before the layout rendering starts. This receives the layout filename as an argument. |
| 6 | Helper::afterLayout(Event $event, $layoutFile) This method is called after the layout rendering is complete. This receives the layout filename as an argument. |
CakePHP - Working with Database
Working with database in CakePHP is very easy. We will understand the CRUD (Create, Read, Update, Delete) operations in this chapter.
Further, we also need to configure our database in config/app_local.php file.
'Datasources' => [
   'default' => [
      'host' => 'localhost',
      'username' => 'my_app',
      'password' => 'secret',
      'database' => 'my_app',
      'url' => env('DATABASE_URL', null),
   ],
   /*
      * The test connection is used during the test suite.
   */
   'test' => [
      'host' => 'localhost',
      //'port' => 'non_standard_port_number',
      'username' => 'my_app',
      'password' => 'secret',
      'database' => 'test_myapp',
      //'schema' => 'myapp',
   ],
],
The default connection has following details −
'host' => 'localhost',
   'username' => 'my_app',
   'password' => 'secret',
   'database' => 'my_app',
You can change the details, i.e. host, username, password and database as per your choice.
Once done, make sure it is updated in config/app_local.php in Datasources object.
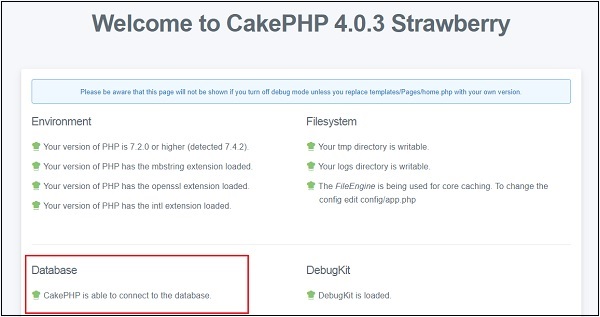
Now, we will continue with above details, go to your phpmyadmin or mysql database and create user my_app as shown below −
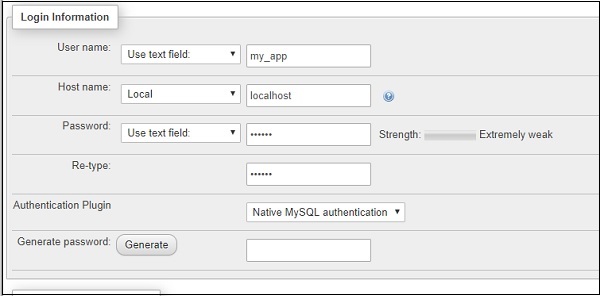
Give the necessary privileges and save it. Now, we have the database details as per the configuration mentioned in app_local.php. When you check CakePHP home page, this is what you should get −
Now, we will create the following users table in the database.
CREATE TABLE `users` (
   `id` int(11) NOT NULL AUTO_INCREMENT,
   `username` varchar(50) NOT NULL,
   `password` varchar(255) NOT NULL, PRIMARY KEY (`id`)
) ENGINE=InnoDB AUTO_INCREMENT=7 DEFAULT CHARSET=latin1
Insert a Record
To insert a record in database, we first need to get hold of a table using TableRegistry class. We can fetch the instance out of registry using get() method. The get() method will take the name of the database table as an argument.
This new instance is used to create new entity. Set necessary values with the instance of new entity. We now have to call the save() method with TableRegistry classs instance which will insert new record in database.
Example
Make changes in the config/routes.php file as shown in the following program.
config/routes.php
<?php
use Cake\Http\Middleware\CsrfProtectionMiddleware;
use Cake\Routing\Route\DashedRoute;
use Cake\Routing\RouteBuilder;
$routes->setRouteClass(DashedRoute::class);
$routes->scope('/', function (RouteBuilder $builder) {
   $builder->registerMiddleware('csrf', new CsrfProtectionMiddleware([
      'httpOnly' => true,
   ]));
   $builder->applyMiddleware('csrf');
   //$builder->connect('/pages',['controller'=>'Pages','action'=>'display', 'home']);
   $builder->connect('/users/add', ['controller' => 'Users', 'action' => 'add']);
   $builder->fallbacks();
});
Create a UsersController.php file at src/Controller/UsersController.php. Copy the following code in the controller file.
src/controller/UsersController.php
<?php
namespace App\Controller;
use App\Controller\AppController;
use Cake\ORM\TableRegistry;
use Cake\Datasource\ConnectionManager;
use Cake\Auth\DefaultPasswordHasher;
class UsersController extends AppController{
   public function add(){
      if($this->request->is('post')){
         $username = $this->request->getData('username');
         $hashPswdObj = new DefaultPasswordHasher;
         $password = $hashPswdObj->hash($this->request->getData('password'));
         $users_table = TableRegistry::get('users');
         $users = $users_table->newEntity($this->request->getData());
         $users->username = $username;
         $users->password = $password;
         $this->set('users', $users);
         if($users_table->save($users))
         echo "User is added.";
      }
   }
}
?>
Create a directory Users at src/Template and under that directory create a View file called add.php. Copy the following code in that file.
src/Template/Users/add.php
<?php
   echo $this->Form->create(NULL,array('url'=>'/users/add'));
   echo $this->Form->control('username');
   echo $this->Form->control('password');
   echo $this->Form->button('Submit');
   echo $this->Form->end();
?>
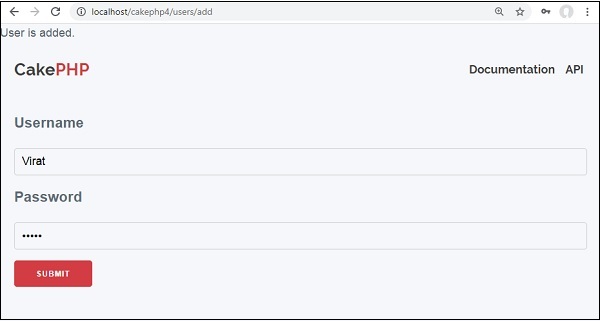
Execute the above example by visiting the following URL. http://localhost/cakephp4/users/add
Output
Upon execution, you will receive the following output.
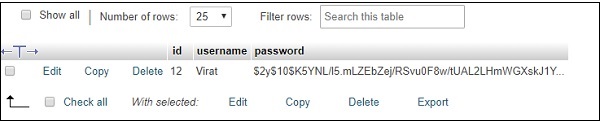
The data will be saved in the users table as shown below −
CakePHP - View a Record
To view records of database, we first need to get hold of a table using the TableRegistry class. We can fetch the instance out of registry using get() method. The get() method will take the name of the database table as argument.
Now, this new instance is used to find records from database using find() method. This method will return all records from the requested table.
Example
Make changes in the config/routes.php file as shown in the following code.
config/routes.php
<?php
use Cake\Http\Middleware\CsrfProtectionMiddleware;
use Cake\Routing\Route\DashedRoute;
use Cake\Routing\RouteBuilder;
$routes->setRouteClass(DashedRoute::class);
$routes->scope('/', function (RouteBuilder $builder) {
   $builder->registerMiddleware('csrf', new CsrfProtectionMiddleware([
      'httpOnly' => true,
   ]));
   $builder->applyMiddleware('csrf');
   //$builder->connect('/pages',['controller'=>'Pages','action'=>'display', 'home']);
   $builder->connect('/users', ['controller' => 'Users', 'action' => 'index']);
   $builder->fallbacks();
});
Create a UsersController.php file at src/Controller/UsersController.php. Copy the following code in the controller file.
src/controller/UsersController.php
<?php
   namespace App\Controller;
   use App\Controller\AppController;
   use Cake\ORM\TableRegistry;
   use Cake\Datasource\ConnectionManager;
   class UsersController extends AppController{
      public function index(){
         $users = TableRegistry::get('users');
         $query = $users->find();
         $this->set('results',$query);
      }
   }
?>
Create a directory Users at src/Template, ignore if already created, and under that directory create a View file called index.php. Copy the following code in that file.
src/Template/Users/index.ctp
<a href="add">Add User</a>
<table>
   <tr>
      <td>ID</td>
      <td>Username</td>
      <td>Password</td>
      <td>Edit</td>
      <td>Delete</td>
   </tr>
   <?php
      foreach ($results as $row):
      echo "<tr><td>".$row->id."</td>";
      echo "<td<".$row-<username."</td>";
      echo "<td>".$row->password."</td>";
      echo "<td><a href='".$this-<Url->build(["controller" => "Users","action" => "edit",$row->id])."'>Edit</a></td>";
      echo "<td><a href='".$this->Url->build(["controller" => "Users","action" => "delete",$row->id])."'>Delete</a></td></tr>";
      endforeach;
   ?>
</table>
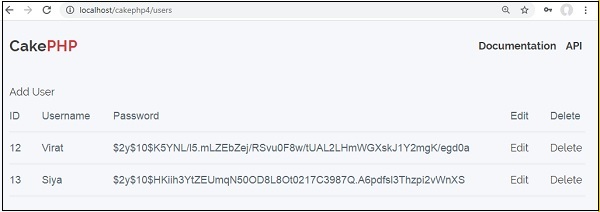
Execute the above example by visiting the following URL http://localhost/cakephp4/users
Output
Upon execution, the above URL will give you the following output.
CakePHP - Update a Record
To update a record in database, we first need to get hold of a table using TableRegistry class. We can fetch the instance out of registry using the get() method. The get() method will take the name of the database table as an argument. Now, this new instance is used to get particular record that we want to update.
Call the get() method with this new instance, and pass the primary key to find a record, which will be saved in another instance. Use this instance, to set new values that you want to update and then, finally call the save() method with the TableRegistry classs instance to update record.
Example
Make changes in the config/routes.php file as shown in the following code.
config/routes.php
<?php
use Cake\Http\Middleware\CsrfProtectionMiddleware;
use Cake\Routing\Route\DashedRoute;
use Cake\Routing\RouteBuilder;
$routes->setRouteClass(DashedRoute::class);
$routes->scope('/', function (RouteBuilder $builder) {
   $builder->registerMiddleware('csrf', new CsrfProtectionMiddleware([
      'httpOnly' => true,
   ]));
   $builder->applyMiddleware('csrf');
   //$builder->connect('/pages',['controller'=>'Pages','action'=>'display', 'home']);
   $builder->connect('/users/edit', ['controller' => 'Users', 'action' => 'edit']);
   $builder->fallbacks();
});
Create a UsersController.php file at src/Controller/UsersController.php. Copy the following code in the controller file.
src/controller/UsersController.php
<?php
   namespace App\Controller;
   use App\Controller\AppController;
   use Cake\ORM\TableRegistry;
   use Cake\Datasource\ConnectionManager;
   class UsersController extends AppController{
      public function index(){
         $users = TableRegistry::get('users');
         $query = $users->find();
         $this->set('results',$query);
      }
      public function edit($id){
         if($this->request->is('post')){
            $username = $this->request->getData('username');
            $password = $this->request->getData('password');
            $users_table = TableRegistry::get('users');
            $users = $users_table->get($id);
            $users->username = $username;
            $users->password = $password;
            if($users_table->save($users))
            echo "User is udpated";
            $this->setAction('index');
         } else {
            $users_table = TableRegistry::get('users')->find();
            $users = $users_table->where(['id'=>$id])->first();
            $this->set('username',$users->username);
            $this->set('password',$users->password);
            $this->set('id',$id);
         }
      }
   }
?>
Create a directory Users at src/Template, ignore if already created, and under that directory create a view called index.php. Copy the following code in that file.
src/Template/Users/index.php
<a href="add">Add User</a>
<table>
   <tr>
   <td>ID</td>
   <td>Username</td>
   <td>Password</td>
   <td>Edit</td>
   <td>Delete</td>
   </tr>
   <?php
      foreach ($results as $row):
      echo "<tr><td>".$row->id."</td>";
      echo "<td>".$row->username."</td>";
      echo "<td>".$row->password."</td>";
      echo "<td><a href='".$this->Url->build(["controller" => "Users","action" => "edit",$row->id])."'>Edit</a></td>";
      echo "<td><a href='".$this->Url->build(["controller" => "Users","action" => "delete",$row->id])."'>Delete</a></td></tr>";
      endforeach;
   ?>
</table>
Create another View file under the Users directory called edit.php and copy the following code in it.
src/Template/Users/edit.php
<?php
   echo $this->Form->create(NULL,array('url'=>'/users/edit/'.$id));
   echo $this->Form->control('username',['value'=>$username]);
   echo $this->Form->control('password',['value'=>$password]);
   echo $this->Form->button('Submit');
   echo $this->Form->end();
?>
Execute the above example by visiting the following URL and click on Edit link to edit record.
http://localhost/cakephp4/users
Output
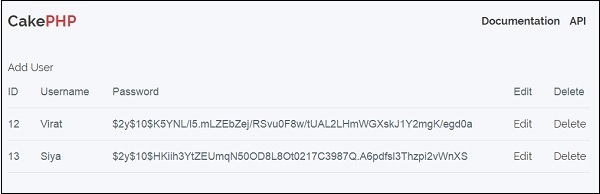
After visiting the above URL, it will display the records in users table as shown below −
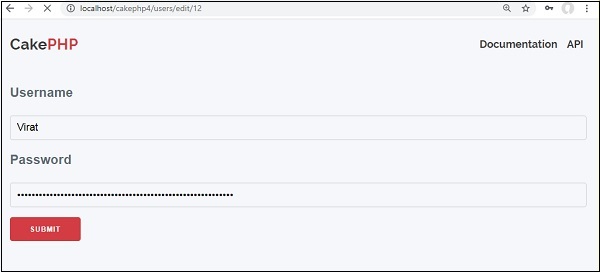
Click on Edit button and it will display you following screen −
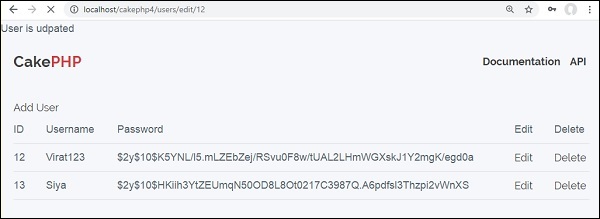
Now, we will update the name Virat to Virat123 and submit the details. The next screen displayed will be as follows −
CakePHP - Delete a Record
To delete a record in database, we first need to get hold of a table using the TableRegistry class. We can fetch the instance out of registry using the get() method. The get() method will take the name of the database table as an argument. Now, this new instance is used to get particular record that we want to delete.
Call the get() method with this new instance and pass the primary key to find a record which will be saved in another instance. Use the TableRegistry classs instance to call the delete method to delete record from database.
Example
Make changes in the config/routes.php file as shown in the following code.
config/routes.php
<?php
use Cake\Http\Middleware\CsrfProtectionMiddleware;
use Cake\Routing\Route\DashedRoute;
use Cake\Routing\RouteBuilder;
$routes->setRouteClass(DashedRoute::class);
$routes->scope('/', function (RouteBuilder $builder) {
   $builder->registerMiddleware('csrf', new CsrfProtectionMiddleware([
      'httpOnly' => true,
   ]));
   $builder->applyMiddleware('csrf');
   //$builder->connect('/pages',['controller'=>'Pages','action'=>'display', 'home']);
   $builder->connect('/users/delete', ['controller' => 'Users', 'action' => 'delete']);
   $builder->fallbacks();
});
Create a UsersController.php file at src/Controller/UsersController.php. Copy the following code in the controller file.
src/controller/UsersController.php
<?php
namespace App\Controller;
use App\Controller\AppController;
use Cake\ORM\TableRegistry;
use Cake\Datasource\ConnectionManager;
class UsersController extends AppController{
public function index(){
$users = TableRegistry::get('users');
$query = $users->find();
$this->set('results',$query);
}
public function delete($id){
$users_table = TableRegistry::get('users');
$users = $users_table->get($id);
$users_table->delete($users);
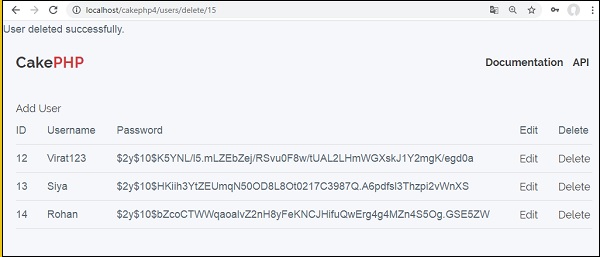
echo "User deleted successfully.";
$this->setAction('index');
}
}
?>
Just create an empty View file under Users directory called delete.ctp.
src/Template/Users/delete.ctp
Create a directory Users at src/Template, ignore if already created, and under that directory create a Viewfile called index.ctp. Copy the following code in that file.
src/Template/Users/index.ctp
<a href="add">Add User</a>
<table>
   <tr>
   <td>ID</td>
   <td>Username</td>
   <td>Password</td>
   <td>Edit</td>
   <td>Delete</td>
   </tr>
   <?php
      foreach ($results as $row):
      echo "<tr><td>".$row->id."</td>";
      echo "<td>".$row->username."</td>";
      echo "<td>".$row->password."</td>";
      echo "<td><a href='".$this->Url->build(["controller" => "Users","action" => "edit",$row->id])."'>Edit</a></td>";
      echo "<td><a href='".$this->Url->build(["controller" => "Users","action" => "delete",$row->id])."'>Delete</a></td></tr>";
      endforeach;
   ?>
</table>
Execute the above example by visiting the following URL and click on Delete link to delete record.
http://localhost:85/CakePHP/users
Output
After visiting the above URL and clicking on the Delete link, you will receive the following output where you can delete record.
Click on Delete link to delete the record.
CakePHP - Services
This chapter deals with the information about the authentication process available in CakePHP.
Authentication
Authentication is the process of identifying the correct user. CakePHP supports three types of authentication.
FormAuthenticate − It allows you to authenticate users based on form POST data. Usually, this is a login form that users enter information into. This is default authentication method.
BasicAuthenticate − It allows you to authenticate users using Basic HTTP authentication
DigestAuthenticate − It allows you to authenticate users using Digest HTTP authentication.
Example for FormAuthentication
Make changes in the config/routes.php file as shown in the following code.
config/routes.php
<?php
use Cake\Core\Plugin;
use Cake\Routing\RouteBuilder;
use Cake\Routing\Router;
Router::defaultRouteClass('DashedRoute');
Router::scope('/', function (RouteBuilder $routes) {
   $routes->connect('/auth',['controller'=>'Authexs','action'=>'index']);
   $routes->connect('/login',['controller'=>'Authexs','action'=>'login']);
   $routes->connect('/logout',['controller'=>'Authexs','action'=>'logout']);
   $routes->fallbacks('DashedRoute');
});
Plugin::routes();
Change the code of AppController.php file as shown in the following program.
src/Controller/AppController.php
<?php
namespace App\Controller;
use Cake\Controller\Controller;
use Cake\Event\Event;
use Cake\Controller\Component\AuthComponent;
class AppController extends Controller {
   public function initialize() {
      parent::initialize();
      $this->loadComponent('RequestHandler');
      $this->loadComponent('Flash');
         $this->loadComponent('Auth', [
            'authenticate' => [
               'Form' => [
                  'fields' => [
               'username' => 'username',
               'password' => 'password'
            ]
         ]
      ],
      'loginAction' => [
         'controller' => 'Authexs',
         'action' => 'login'
      ],
      'loginRedirect' => [
         'controller' => 'Authexs',
         'action' => 'index'
      ],
      'logoutRedirect' => [
         'controller' => 'Authexs',
         'action' => 'login'
      ]
   ]);
}
public function beforeFilter(Event $event) {
      $this->Auth->allow(['index','view']);
      $this->set('loggedIn', $this->Auth->user());
   }
}
Create AuthexsController.php file at src/Controller/AuthexsController.php. Copy the following code in the controller file.
src/Controller/AuthexsController.php
<?php
namespace App\Controller;
use App\Controller\AppController;
use Cake\ORM\TableRegistry;
use Cake\Datasource\ConnectionManager;
use Cake\Event\Event;
use Cake\Auth\DefaultPasswordHasher;
class AuthexsController extends AppController {
   var $components = array('Auth');
   public function index(){
   }
   public function login(){
      if($this->request->is('post')) {
         $user = $this->Auth->identify();
         if($user){
            $this->Auth->setUser($user);
            return $this->redirect($this->Auth->redirectUrl());
         } else
         $this->Flash->error('Your username or password is incorrect.');
      }
   }
   public function logout(){
      return $this->redirect($this->Auth->logout());
   }
}
?>
Create a directory Authexs at src/Template and under that directory create a View file called login.php. Copy the following code in that file.
src/Template/Authexs/login.php
<?php
   echo $this->Form->create();
   echo $this->Form->control('username');
   echo $this->Form->control('password');
   echo $this->Form->button('Submit');
   echo $this->Form->end();
?>
Create another View file called logout.php. Copy the following code in that file.
src/Template/Authexs/logout.php
You are successfully logged out.
Create another View file called index.php. Copy the following code in that file.
src/Template/Authexs/index.php
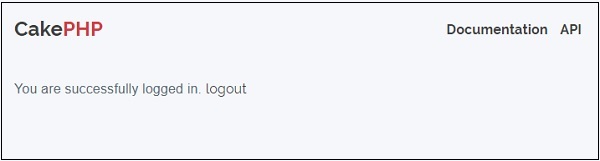
You are successfully logged in.
<?php
   echo $this->Html->link('logout',[
      "controller" => "Authexs","action" => "logout"
   ]);
?>
Execute the above example by visiting the following URL.
http://localhost/cakephp4/auth
Output
As the authentication has been implemented, and once you try to visit the above URL, you will be redirected to the login page as shown below.

After providing the correct credentials, you will be logged in and redirected to the screen as shown below.
After clicking on the logout link, you will be redirected to the login screen again.
CakePHP - Errors & Exception Handling
Failure of system needs to be handled effectively for smooth running of the system. CakePHP comes with default error trapping, that prints and logs error as they occur. This same error handler is used to catch Exceptions.
Error handler displays errors, when debug is true and logs error, when debug is false. CakePHP has number of exception classes and the built in exception handling will capture any uncaught exception and render a useful page.
Errors and Exception Configuration
Errors and Exception can be configured in file config\app.php. Error handling accepts a few options that allow you to tailor error handling for your application −
| Option | Data Type | Description |
|---|---|---|
| errorLevel | int | The level of errors you are interested in capturing. Use the built-in php error constants, and bitmasks to select the level of error you are interested in. |
| trace | bool | Include stack traces for errors in log files. Stack traces will be included in the log after each error. This is helpful for finding where/when errors are being raised. |
| exceptionRenderer | string | The class responsible for rendering uncaught exceptions. If you choose a custom class, you should place the file for that class in src/Error. This class needs to implement a render() method. |
| log | bool | When true, exceptions + their stack traces will be logged to Cake\Log\Log. |
| skipLog | array | An array of exception class names that should not be logged. This is useful to remove NotFoundExceptions or other common, but uninteresting logs messages. |
| extraFatalErrorMemory | int | Set to the number of megabytes to increase the memory limit by, when a fatal error is encountered. This allows breathing room to complete logging or error handling. |
Example
Make changes in the config/routes.php file as shown in the following code.
config/routes.php
<?php
use Cake\Http\Middleware\CsrfProtectionMiddleware;
use Cake\Routing\Route\DashedRoute;
use Cake\Routing\RouteBuilder;
$routes->setRouteClass(DashedRoute::class);
$routes->scope('/', function (RouteBuilder $builder) {
   $builder->registerMiddleware('csrf', new CsrfProtectionMiddleware([
      'httpOnly' => true,
   ]));
   $builder->applyMiddleware('csrf');
   //$builder->connect('/pages',['controller'=>'Pages','action'=>'display', 'home']);
   $builder->connect('/exception/:arg1/:arg2',
      ['controller'=>'Exps','action'=>'index'],
      ['pass' => ['arg1', 'arg2']]);
   $builder->fallbacks();
});
Create ExpsController.php file at src/Controller/ExpsController.php. Copy the following code in the controller file.
src/Controller/ExpsController.php
<?php
namespace App\Controller;
use App\Controller\AppController;
use Cake\Core\Exception\Exception;
class ExpsController extends AppController {
public function index($arg1,$arg2) {
try{
$this->set('argument1',$arg1);
$this->set('argument2',$arg2);
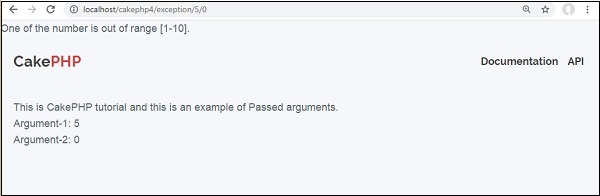
if(($arg1 > 1 || $arg1 > 10) || ($arg2 < 1 || $arg2 > 10))
throw new Exception("One of the number is out of range [1-10].");
} catch(\Exception $ex){
echo $ex->getMessage();
}
}
}
?>
Create a directory Exps at src/Template and under that directory create a View file called index.php. Copy the following code in that file.
src/Template/Exps/index.php
This is CakePHP tutorial and this is an example of Passed arguments.

Argument-1: <?=$argument1?><br/>
Argument-2: <?=$argument2?><br/>
Execute the above example by visiting the following URL.
http://localhost/cakephp4/exception/5/0
Output
Upon execution, you will receive the following output.
CakePHP - Logging
Logging in CakePHP is a very easy task. You just have to use one function. You can log errors, exceptions, user activities, action taken by users, for any background process like cronjob. Logging data in CakePHP is easy. The log() function is provided by the LogTrait, which is the common ancestor for almost all CakePHP classes.
Logging Configuration
We can configure the log in file config/app.php. There is a log section in the file, where you can configure logging options as shown in the following screenshot.
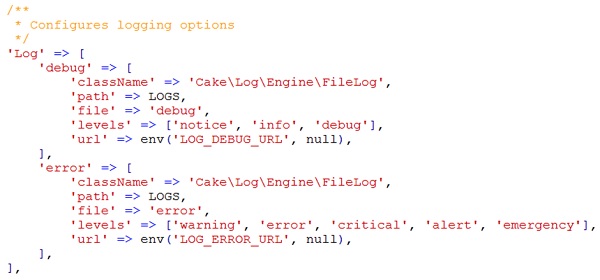
By default, you will see two log levels − error and debug already configured for you. Each will handle different level of messages.
CakePHP supports various logging levels as shown below −
Emergency − System is unusable
Alert − Action must be taken immediately
Critical − Critical conditions
Error − Error conditions
Warning − Warning conditions
Notice − Normal but significant condition
Info − Informational messages
Debug − Debug-level messages
Writing to Log file
There are two ways by which, we can write in a Log file.
The first is to use the static write() method. The following is the syntax of the static write() method.
| Syntax | write( integer|string $level, mixed $message, string|array $context [] ) |
|---|---|
| Parameters |
The severity level of the message being written. The value must be an integer or string matching a known level. Message content to log. Additional data to be used for logging the message. The special scope key can be passed to be used for further filtering of the log engines to be used. If a string or a numerically index array is passed, it will be treated as the scope key. See Cake\Log\Log::config() for more information on logging scopes. |
| Returns | boolean |
| Description | Writes the given message and type to all of the configured log adapters. Configured adapters are passed both the $level and $message variables. $level is one of the following strings/values. |
The second is to use the log() shortcut function available on any using the LogTrait Calling log() will internally call Log::write() −
Example
Make changes in the config/routes.php file as shown in the following program.
config/routes.php
<?php
use Cake\Http\Middleware\CsrfProtectionMiddleware;
use Cake\Routing\Route\DashedRoute;
use Cake\Routing\RouteBuilder;
$routes->setRouteClass(DashedRoute::class);
$routes->scope('/', function (RouteBuilder $builder) {
   $builder->registerMiddleware('csrf', new CsrfProtectionMiddleware([
      'httpOnly' => true,
   ]));
   $builder->applyMiddleware('csrf');
   //$builder->connect('/pages',
      ['controller'=>'Pages','action'=>'display', 'home']);
   $builder->connect('logex',['controller'=>'Logexs','action'=>'index']);
   $builder->fallbacks();
});
Create a LogexsController.php file at src/Controller/LogexsController.php. Copy the following code in the controller file.
src/Controller/LogexsController.php
<?php
   namespace App\Controller;
   use App\Controller\AppController;
   use Cake\Log\Log;
   class LogexsController extends AppController{
      public function index(){
         /*The first way to write to log file.*/
         Log::write('debug',"Something didn't work.");
         /*The second way to write to log file.*/
         $this->log("Something didn't work.",'debug');
      }
   }
?>
Create a directory Logexs at src/Template and under that directory create a View file called index.php. Copy the following code in that file.
src/Template/Logexs/index.php
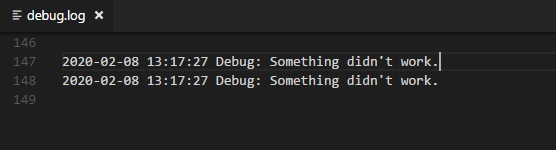
Something is written in log file. Check log file logs\debug.log
Execute the above example by visiting the following URL.
http://localhost/cakephp4/logex
Output
Upon execution, you will receive the following output.

The logs will be added to log/debug.log file −
CakePHP - Form Handling
CakePHP provides various in built tags to handle HTML forms easily and securely. Like many other PHP frameworks, major elements of HTML are also generated using CakePHP. Following are the various functions used to generate HTML elements.
The following functions are used to generate select options −
| Syntax | _selectOptions( array $elementsarray(), array $parentsarray(), boolean $showParentsnull, array $attributesarray() ) |
|---|---|
| Parameters |
|
| Returns | array |
| Description | Returns an array of formatted OPTION/OPTGROUP elements |
The following functions are used to generate HTML select element.
| Syntax | select( string $fieldName, array $options array(), array $attributes array() ) |
|---|---|
| Parameters | Name attribute of the SELECT Array of the OPTION elements (as 'value'=>'Text' pairs) to be used in the SELECT element. |
| Returns | Formatted SELECT element. |
| Description | Returns a formatted SELECT element. |
The following functions are used to generate button on HTML page.
| Syntax | Button(string $title, array $optionsarray() ) |
|---|---|
| Parameters |
|
| Returns | HTML button tag. |
| Description | Creates a <button> tag. The type attribute defaults to type="submit". You can change it to a different value by using $options['type']. |
The following functions are used to generate checkbox on HTML page.
| Syntax | Checkbox(string $fieldName, array $optionsarray() ) |
|---|---|
| Parameters |
|
| Returns | An HTML text input element. |
| Description | Creates a checkbox input widget. |
The following functions are used to create form on HTML page.
| Syntax | create( mixed $modelnull , array $optionsarray() ) |
|---|---|
| Parameters |
|
| Returns | A formatted opening FORM tag. |
| Description | Returns an HTML FORM element. |
The following functions are used to provide file uploading functionality on HTML page.
| Syntax | file(string $fieldName, array $optionsarray() ) |
|---|---|
| Parameters |
|
| Returns | A generated file input. |
| Description | Creates file input widget. |
The following functions are used to create hidden element on HTML page.
| Syntax | hidden( string $fieldName , array $optionsarray() ) |
|---|---|
| Parameters |
|
| Returns | A generated hidden input |
| Description | Creates a hidden input field |
The following functions are used to generate input element on HTML page.
| Syntax | Input(string $fieldName , array $options array() ) |
|---|---|
| Parameters |
|
| Returns | Completed form widget |
| Description | Generates a form input element complete with label and wrapper div |
The following functions are used to generate radio button on HTML page.
| Syntax | Radio(string $fieldName , array $optionsarray() , array $attributesarray() ) |
|---|---|
| Parameters |
|
| Returns | Completed radio widget set |
| Description | Creates a set of radio widgets. Will create a legend and fieldset by default. Use $options to control this. |
The following functions are used to generate submit button on HTML page.
| Syntax | Submit(string $caption null, array $options array() ) |
|---|---|
| Parameters |
|
| Returns | An HTML submit button |
| Description | Creates a submit button element. This method will generate <input /> elements that can be used to submit, and reset forms by using $options. Image submits can be created by supplying an image path for $caption. |
The following functions are used to generate textarea element on HTML page.
| Syntax | Textarea(string $fieldName , array $options array() ) |
|---|---|
| Parameters |
|
| Returns | A generated HTML text input element |
| Description | Creates a textarea widget |
Example
Make changes in the config/routes.php file as shown in the following code.
config/routes.php
<?php
use Cake\Http\Middleware\CsrfProtectionMiddleware;
use Cake\Routing\Route\DashedRoute;
use Cake\Routing\RouteBuilder;
$routes->setRouteClass(DashedRoute::class);
$routes->scope('/', function (RouteBuilder $builder) {
   $builder->registerMiddleware('csrf', new CsrfProtectionMiddleware([
      'httpOnly' => true,
   ]));
   $builder->applyMiddleware('csrf');
   //$builder->connect('/pages',['controller'=>'Pages','action'=>'display', 'home']);
   $builder->connect('register',['controller'=>'Registrations','action'=>'index']);
   $builder->fallbacks();
});
Create a RegistrationsController.php file at
src/Controller/RegistrationsController.php. Copy the following code in the controller file.
src/Controller/RegistrationsController.php
<?php
   namespace App\Controller;
   use App\Controller\AppController;
   class RegistrationsController extends AppController{
      public function index(){
         $country = array('India','United State of America','United Kingdom');
         $this->set('country',$country);
         $gender = array('Male','Female');
         $this->set('gender',$gender);
      }
   }
?>
Create a directory Registrations at src/Template and under that directory, create a View file called index.php. Copy the following code in that file.
src/Template/Registrations/index.php
<?php
echo $this->Form->create(NULL,array('url'=>'/register'));
echo '<label for="country">Country</label>';
echo $this->Form->select('country',$country);
echo '<label for="gender">Gender</label>';
echo $this->Form->radio('gender ',$gender);
echo '<label for="address">Address</label>';
echo $this->Form->textarea('address');
echo $this->Form->file('profilepic');
echo '<div>'.$this->Form->checkbox('terms').
'<label for="country">Terms ∓ Conditions</label></div>';
echo $this->Form->button('Submit');
echo $this->Form->end();
?>
Execute the above example by visiting the following URL −
http://localhost/cakephp4/register
Output
Upon execution, you will receive the following output.

CakePHP - Internationalization
Like many other frameworks, CakePHP also supports Internationalization. We need to follow these steps to go from single language to multiple language.
Step 1
Create a separate locales directory resources\locales.
Step 2
Create subdirectory for each language, under the directory src\Locale. The name of the subdirectory can be two letter ISO code of the language or full locale name like en_US, fr_FR etc.
Step 3
Create separate default.po file under each language subdirectory. This file contains entry in the form of msgid and msgstr, as shown in the following program.
msgid "msg"
msgstr "CakePHP Internationalization example."
Here, the msgid is the key which will be used in the View template file and msgstr is the value which stores the translation.
Step 4
In the View template file, we can use the above msgid, as shown below which will be translated based on the set value of locale.
<?php echo __('msg'); ?>
The default locale can be set in the config/app.php file by the following line.
'defaultLocale' => env('APP_DEFAULT_LOCALE', 'en_US')
To change the local at runtime, we can use the following lines.
use Cake\I18n\I18n;
I18n::locale('de_DE');
Example
Make changes in the config/routes.php file as shown in the following program.
config/routes.php
<?php
use Cake\Http\Middleware\CsrfProtectionMiddleware;
use Cake\Routing\Route\DashedRoute;
use Cake\Routing\RouteBuilder;
$routes->setRouteClass(DashedRoute::class);
$routes->scope('/', function (RouteBuilder $builder) {
   $builder->registerMiddleware('csrf', new CsrfProtectionMiddleware([
      'httpOnly' => true,
   ]));
   $builder->applyMiddleware('csrf');
   //$builder->connect('/pages',
      ['controller'=>'Pages','action'=>'display', 'home']);
   $builder->connect('locale',
      ['controller'=>'Localizations','action'=>'index']);
   $builder->fallbacks();
});
Create a LocalizationsController.php file at src/Controller/LocalizationsController.php. Copy the following code in the controller file.
src/Controller/LocalizationsController.php
<?php
   namespace App\Controller;
   use App\Controller\AppController;
   use Cake\I18n\I18n;
   class LocalizationsController extends AppController {
      public function index() {
         if($this->request->is('post')) {
            $locale = $this->request->getData('locale');
            I18n::setLocale($locale);
         }
      }
   }
?>
Create a locales directory at resources\locales. Create 3 directories called en_US, fr_FR, de_DE under the locales directory. Create a file under each directory called default.po. Copy the following code in the respective file.
resources/locales/en_US/default.po
msgid "msg"
msgstr "CakePHP Internationalization example."
resources/locales/fr_FR/default.po
msgid "msg"
msgstr "Exemple CakePHP internationalisation."
resources/locales/de_DE/default.po
msgid "msg"
msgstr "CakePHP Internationalisierung Beispiel."
Create a directory Localizations at src/Template and under that directory, create a View file called index.php. Copy the following code in that file.
src/Template/Localizations/index.php
<?php
   echo $this->Form->create(NULL,array('url'=>'/locale'));
   echo $this->Form->radio("locale",
      [
         ['value'=>'en_US','text'=>'English'],
         ['value'=>'de_DE','text'=>'German'],
         ['value'=>'fr_FR','text'=>'French'],
      ]
   );
   echo $this->Form->button('Change Language');
   echo $this->Form->end();
?>
<?php echo __('msg'); ?>
Execute the above example by visiting the following URL. http://localhost/cakephp4/locale
Output
Upon execution, you will receive the following output.
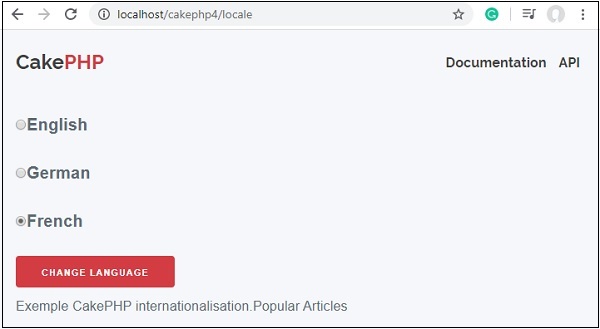
CakePHP provides Email class to manage email related functionalities. To use email functionality in any controller, we first need to load the Email class by writing the following line.
use Cake\Mailer\Email;
The Email class provides various useful methods which are described below.
| Syntax | From(string|array|null $email null, string|null $name null ) |
|---|---|
| Parameters |
|
| Returns | array|$this |
| Description | It specifies from which email address; the email will be sent |
| Syntax | To(string|array|null $emailnull, string|null $namenull) |
|---|---|
| Parameters |
|
| Returns | array|$this |
| Description | It specifies to whom the email will be sent |
| Syntax | Send(string|array|null $contentnull) |
|---|---|
| Parameters |
|
| Returns | array |
| Description | Send an email using the specified content, template and layout |
| Syntax | Subject(string|null $subjectnull) |
|---|---|
| Parameters |
|
| Returns | array|$this |
| Description | Get/Set Subject |
| Syntax | Attachments(string|array|null $attachmentsnull) |
|---|---|
| Parameters |
|
| Returns | array|$this |
| Description | Add attachments to the email message |
| Syntax | Bcc(string|array|null $emailnull, string|null $namenull) |
|---|---|
| Parameters |
|
| Returns | array|$this |
| Description | Bcc |
| Syntax | cc( string|array|null $emailnull , string|null $namenull ) |
|---|---|
| Parameters |
|
| Returns | array|$this |
| Description | Cc |
Example
Make changes in the config/routes.php file as shown in the following program.
config/routes.php
<?php
use Cake\Http\Middleware\CsrfProtectionMiddleware;
use Cake\Routing\Route\DashedRoute;
use Cake\Routing\RouteBuilder;
$routes->setRouteClass(DashedRoute::class);
$routes->scope('/', function (RouteBuilder $builder) {
   $builder->registerMiddleware('csrf', new CsrfProtectionMiddleware([
      'httpOnly' => true,
   ]));
   $builder->applyMiddleware('csrf');
   //$builder->connect('/pages',['controller'=>'Pages','action'=>'display', 'home']);
   $builder->connect('/email',['controller'=>'Emails','action'=>'index']);
   $builder->fallbacks();
});
Create an EmailsController.php file at src/Controller/EmailsController.php. Copy the following code in the controller file.
src/Controller/EmailsController.php
<?php
   namespace App\Controller;
   use App\Controller\AppController;
   use Cake\Mailer\Email;
   class EmailsController extends AppController{
      public function index(){
         $email = new Email('default');
         $email->to('abc@gmail.com')
            ->subject('About')
            ->send('My message');
      }
   }
?>
Create a directory Emails at src/Template and under that directory, create a View file called index.php. Copy the following code in that file.
src/Template/Emails/index.php
Email Sent.
Before we send any email, we need to configure it. In the below screenshot, you can see that there are two transports, default and Gmail. We have used Gmail transport.
You need to replace the GMAIL USERNAME with your Gmail username and APP PASSWORD with your applications password. You need to turn on 2-step verification in Gmail and create a new APP password to send email.
config/app.php
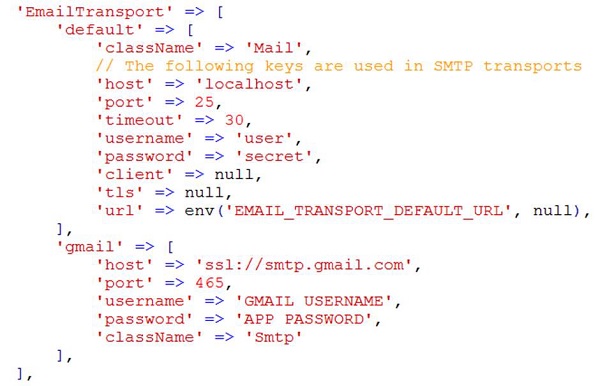
Execute the above example by visiting the following URL − http://localhost/cakephp/email
Output
Upon execution, you will receive the following output.
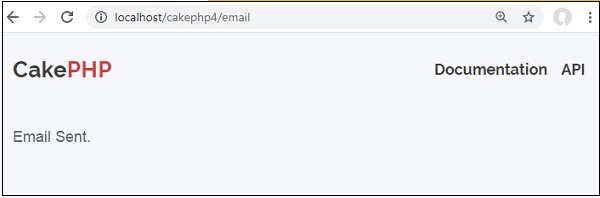
CakePHP - Session Management
Session allows us to manage unique users across requests, and stores data for specific users. Session data can be accessible anywhere, anyplace, where you have access to request object, i.e., sessions are accessible from controllers, views, helpers, cells, and components.
Accessing Session Object
Session object can be created by executing the following code.
$session = $this->request->session();
Writing Session Data
To write something in session, we can use the write() session method.
Session::write($key, $value)
The above method will take two arguments, the value and the key under, which the value will be stored.
Example
$session->write('name', 'Virat Gandhi');
Reading Session Data
To retrieve stored data from session, we can use the read() session method.
Session::read($key)
The above function will take only one argument, that is the key of the value, which was used at the time of writing session data. Once the correct key was provided, then the function will return its value.
Example
$session->read('name');
When you want to check whether, particular data exists in the session or not, then you can use the check() session method.
Session::check($key)
The above function will take only key as the argument.
Example
if ($session->check('name')) {
   // name exists and is not null.
}
Delete Session Data
To delete data from session, we can use the delete() session method to delete the data.
Session::delete($key)
The above function will take only key of the value to be deleted from session.
Example
$session->delete('name');
When you want to read and then delete data from session then, we can use the consume() session method.
static Session::consume($key)
The above function will take only key as argument.
Example
$session->consume('name');
Destroying a Session
We need to destroy a user session, when the user logs out from the site and to destroy the session the destroy() method is used.
Session::destroy()
Example
$session->destroy();
Destroying session will remove all session data from server, but will not remove session cookie.
Renew a Session
In a situation, where you want to renew user session then, we can use the renew() session method.
Session::renew()
Example
$session->renew();
Complete Session
Make changes in the config/routes.php file as shown in the following program.
config/routes.php
<?php
use Cake\Http\Middleware\CsrfProtectionMiddleware;
use Cake\Routing\Route\DashedRoute;
use Cake\Routing\RouteBuilder;
$routes->setRouteClass(DashedRoute::class);
$routes->scope('/', function (RouteBuilder $builder) {
   $builder->registerMiddleware('csrf', new CsrfProtectionMiddleware([
      'httpOnly' => true,
   ]));
   $builder->applyMiddleware('csrf');
   //$builder->connect('/pages',['controller'=>'Pages','action'=>'display', 'home']);
   $builder->connect('/session-object',['controller'=>'Sessions','action'=>'index']);
   $builder->connect('/session-read',['controller'=>'Sessions','action'=>'retrieve_session_data']);
   $builder->connect('/session-write',['controller'=>'Sessions','action'=> 'write_session_data']);
   $builder->connect('/session-check',['controller'=>'Sessions','action'=>'check_session_data']);
   $builder->connect('/session-delete',['controller'=>'Sessions','action'=>'delete_session_data']);
   $builder->connect('/session-destroy',['controller'=>'Sessions','action'=>'destroy_session_data']);
   $builder->fallbacks();
});
Create a SessionsController.php file at src/Controller/SessionsController.php. Copy the following code in the controller file
src/Controller/SessionsController.php
<?php
namespace App\Controller;
use App\Controller\AppController;
   class SessionsController extends AppController {
   public function retrieveSessionData() {
      //create session object
      $session = $this->request->getSession();
      //read data from session
      $name = $session->read('name');
      $this->set('name',$name);
   }
   public function writeSessionData(){
      //create session object
      $session = $this->request->getSession();
      //write data in session
      $session->write('name','Virat Gandhi');
   }
   public function checkSessionData(){
      //create session object
      $session = $this->request->getSession();
      //check session data
      $name = $session->check('name');
      $address = $session->check('address');
      $this->set('name',$name);
      $this->set('address',$address);
   }
   public function deleteSessionData(){
      //create session object
      $session = $this->request->getSession();
      //delete session data
      $session->delete('name');
   }
   public function destroySessionData(){
      //create session object
      $session = $this->request->getSession();
      //destroy session
      $session->destroy();
   }
}
?>
Create a directory Sessions at src/Template and under that directory create a View file called write_session_data.php. Copy the following code in that file.
src/Template/Sessions/write_session_data.php
The data has been written in session.
Create another View file called retrieve_session_data.php under the same Sessions directory and copy the following code in that file.
src/Template/Sessions/retrieve_session_data.php
Here is the data from session.
Name: <?=$name;?>
Create another View file called check_session_data.ctp under the same Sessions directory and copy the following code in that file.
src/Template/Sessions/check_session_data.ctp
<?php if($name): ?>
name exists in the session.
<?php else: ?>
name doesn't exist in the database
<?php endif;?>
<?php if($address): ?>
address exists in the session.
<?php else: ?>
address doesn't exist in the database
<?php endif;?>
Create another View file called delete_session_data.ctp, under the same Sessions directory and copy the following code in that file.
src/Template/Sessions/delete_session_data.ctp
Data deleted from session.
Create another View file called destroy_session_data.ctp, under the same Sessions directory and copy the following code in that file.
src/Template/Sessions/destroy_session_data.ctp
Session Destroyed.
Output
Execute the above example by visiting the following URL. This URL will help you write data in session.
http://localhost/cakephp4/session-write
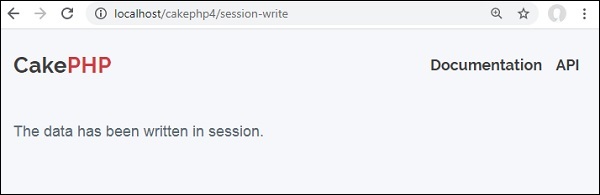
Visit the following URL to read session data − http://localhost/cakephp4/session-read
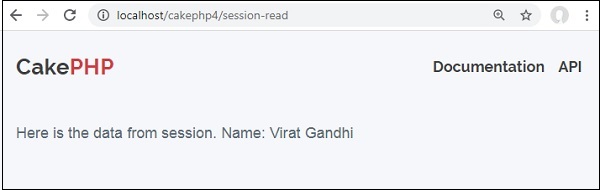
Visit the following URL to check session data − http://localhost/cakephp4/session-check
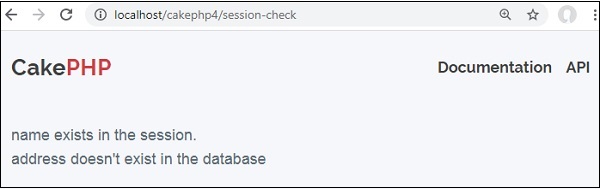
Visit the following URL to delete session data − http://localhost/cakephp4/session-delete Visit the
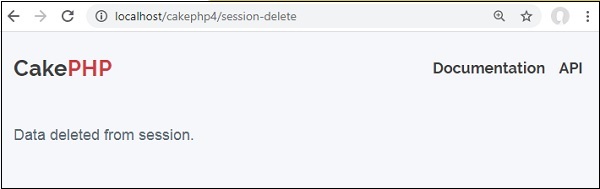
Visit the following URL to destroy session data − http://localhost/cakephp4/session-destroy
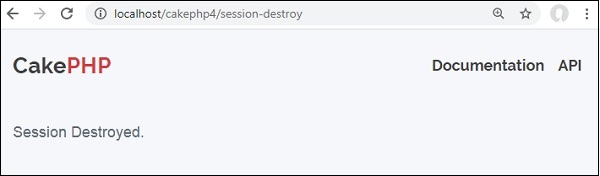
CakePHP - Cookie Management
Handling Cookie with CakePHP is easy and secure. There is a CookieComponent class which is used for managing Cookie. The class provides several methods for working with Cookies.
To work with cookies, add this 2 classes to your controller −
use Cake\Http\Cookie\Cookie;
use Cake\Http\Cookie\CookieCollection;
The cookie object has to be created first to register a cookie.
$cookie = new Cookie(name,value,expiration time,path,domain);
The name and value are mandatory and others are optional param.
Write Cookie
Following is the syntax to write a cookie.
$cookie = new Cookie(name,value,expiration time,path,domain);
The cookie created has to be added to cookieCollection as shown below −
$cookie = new Cookie('name','XYZ');
$cookies = new CookieCollection([$cookie]);
If the cookie collection object is already created, the rest of the cookies can be added as shown below −
$cookies = $cookies->add($cookie);
Read Cookie
To read cookie make use of get() method from cookiecollection.
Syntax
The syntax for read cookie is as follows −
Cake\Http\Cookie\CookieCollection::get($name)
This will return you cookiecollection Interface, to get the value of the cookie, you will have to call the method getValue().
Cake\Http\Cookie\CookieCollection Interface::getValue()
Check Cookie
The has() method from cookieCollection will tell you, if the cookie is present or not.
Cake\Http\Cookie\CookieCollection::has($name)
Example
echo $isPresent = $this->cookies->has('name');
Delete Cookie
The remove() method is used to delete cookie. Following is the syntax of the remove() method.
Cake\Http\Cookie\CookieCollection::remove($name)
The remove() method will take one argument, the name of cookie variable ($name) to delete.
Example 1
$test = $this->cookies->remove('name');
Example 2
Make changes in the config/routes.php file as shown in the following program.
config/routes.php
<?php
use Cake\Http\Middleware\CsrfProtectionMiddleware;
use Cake\Routing\Route\DashedRoute;
use Cake\Routing\RouteBuilder;
$routes->setRouteClass(DashedRoute::class);
$routes->scope('/', function (RouteBuilder $builder) {
   $builder->registerMiddleware('csrf', new CsrfProtectionMiddleware([
      'httpOnly' => true,
   ]));
   $builder->applyMiddleware('csrf');
   //$builder->connect('/pages',['controller'=>'Pages','action'=>'display', 'home']);
   $builder->connect('cookie/testcookies',['controller'=>'Cookies','action'=>'testCookies']);
   $builder->fallbacks();
});
Create a CookiesController.php file at src/Controller/CookiesController.php. Copy the following code in the controller file.
src/Controller/Cookies/CookiesController.php
<?php
   namespace App\Controller;
   use App\Controller\AppController;
   use Cake\Http\Cookie\Cookie;
   use Cake\Http\Cookie\CookieCollection;
   class CookiesController extends AppController{
      public $cookies;
      public function testCookies() {
         $cookie = new Cookie('name','XYZ');
         $this->cookies = new CookieCollection([$cookie]);
         $cookie_val = $this->cookies->get('name');
         $this->set('cookie_val',$cookie_val->getValue());
         $isPresent = $this->cookies->has('name');
         $this->set('isPresent',$isPresent);
         $this->set('count', $this->cookies->count());
         $test = $this->cookies->remove('name');
         $this->set('count_afterdelete', $test->count());
      }
   }
?>
Create a directory Cookies at src/Template and under that directory create a View file called test_cookies.php. Copy the following code in that file.
src/Template/Cookie/test_cookies.php
The value of the cookie is: <?php echo $cookie_val; ?>

<br/>
<?php
   if($isPresent):
?>
The cookie is present.
<?php
   else:
?>
The cookie isn't present.
<?php
   endif;
?>
<br/>
<?php
   echo "The count of cookie before delete is :" .$count;
?>
<br/>
<?php
   echo "The count of cookie after delete is :" .$count_afterdelete;
?>
Output
Execute the above example by visiting the following URL − http://localhost/cakephp4/cookie/testcookies
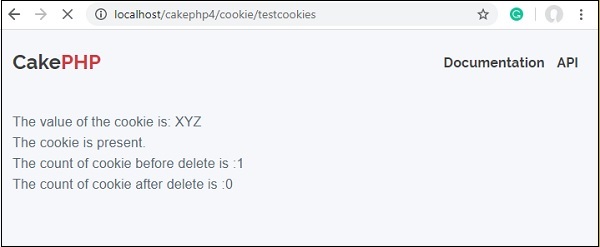
CakePHP - Security
Security is another important feature while building web applications. It assures the users of the website that, their data is secured. CakePHP provides some tools to secure your application.
Encryption and Decryption
Security library in CakePHP provides methods, by which we can encrypt and decrypt data. Following are the two methods, which are used for the same purpose.
static Cake\Utility\Security::encrypt($text, $key, $hmacSalt = null)
static Cake\Utility\Security::decrypt($cipher, $key, $hmacSalt = null)
The encrypt method will take text and key as the argument to encrypt data and the return value will be the encrypted value with HMAC checksum.
To hash a data, hash() method is used. Following is the syntax of the hash() method.
static Cake\Utility\Security::hash($string, $type = NULL, $salt = false)
CSRF
CSRF stands for Cross Site Request Forgery. By enabling the CSRF Component, you get protection against attacks. CSRF is a common vulnerability in web applications.
It allows an attacker to capture and replay a previous request, and sometimes submit data requests using image tags or resources on other domains. The CSRF can be enabled by simply adding the CsrfComponent to your components array as shown below −
public function initialize(): void {
   parent::initialize();
   $this->loadComponent('Csrf');
}
The CsrfComponent integrates seamlessly with FormHelper. Each time you create a form with FormHelper, it will insert a hidden field containing the CSRF token.
While this is not recommended, you may want to disable the CsrfComponent on certain requests. You can do so by using the controllers event dispatcher, during the beforeFilter() method.
public function beforeFilter(Event $event) {
   $this->eventManager()->off($this->Csrf);
}
Security Component
Security Component applies tighter security to your application. It provides methods for various tasks like −
Restricting which HTTP methods your application accepts − You should always verify the HTTP method, being used before executing side-effects. You should check the HTTP method or use Cake\Network\Request::allowMethod() to ensure the correct HTTP method is used.
Form tampering protection − By default, the SecurityComponent prevents users from tampering with forms in specific ways. The SecurityComponent will prevent the following things −
Unknown fields cannot be added to the form.
Fields cannot be removed from the form.
Values in hidden inputs cannot be modified.
Requiring that SSL be used − All actions to require a SSL- secured
Limiting cross controller communication − We can restrict which controller can send request to this controller. We can also restrict which actions can send request to this controllers action.
Example
Make changes in the config/routes.php file as shown in the following program.
config/routes.php
<?php
use Cake\Http\Middleware\CsrfProtectionMiddleware;
use Cake\Routing\Route\DashedRoute;
use Cake\Routing\RouteBuilder;
$routes->setRouteClass(DashedRoute::class);
$routes->scope('/', function (RouteBuilder $builder) {
   $builder->registerMiddleware('csrf', new CsrfProtectionMiddleware([
      'httpOnly' => true,
   ]));
   $builder->applyMiddleware('csrf');
   //$builder->connect('/pages',
      ['controller'=>'Pages','action'=>'display', 'home']);
   $builder->connect('login',['controller'=>'Logins','action'=>'index']);
   $builder->fallbacks();
});
Create a LoginsController.php file at src/Controller/LoginsController.php. Copy the following code in the controller file.
src/Controller/LoginsController.php
<?php
   namespace App\Controller;
   use App\Controller\AppController;
   class LoginsController extends AppController {
      public function initialize() : void {
         parent::initialize();
         $this->loadComponent('Security');
      }
         public function index(){
      }
   }
?>
Create a directory Logins at src/Template and under that directory create a View file called index.php. Copy the following code in that file.
src/Template/Logins/index.php
<?php
   echo $this->Form->create(NULL,array('url'=>'/login'));
   echo $this->Form->control('username');
   echo $this->Form->control('password');
   echo $this->Form->button('Submit');
   echo $this->Form->end();
?>
Execute the above example by visiting the following URL − http://localhost/cakephp4/login
Output
Upon execution, you will receive the following output.
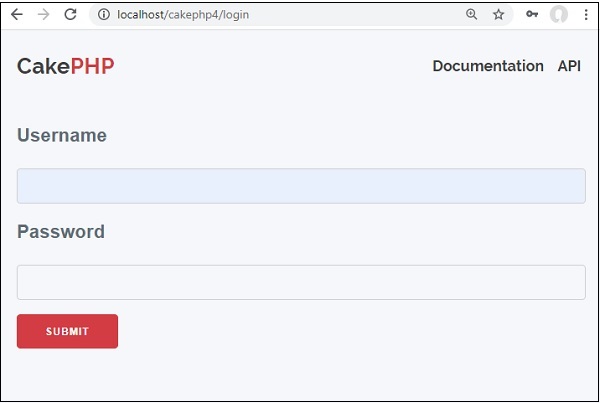
CakePHP - Validation
Often while making websites, we need to validate certain things before processing data further. CakePHP provides validation package, to build validators that can validate data with ease.
Validation Methods
CakePHP provides various validation methods in the Validation Class. Some of the most popular of them are listed below.
| Syntax | Add(string $field, array|string $name, array|Cake\Validation\ValidationRule $rule [] ) |
|---|---|
| Parameters |
|
| Returns | $this |
| Description | Adds a new rule to a field's rule set. If second argument is an array, then rules list for the field will be replaced with second argument and third argument will be ignored. |
| Syntax | allowEmpty(string $field, boolean|string|callable $whentrue, string|null $messagenull) |
|---|---|
| Parameters |
|
| Returns | $this |
| Description | Allows a field to be empty. |
| Syntax | alphanumeric (string $field, string|null $messagenull, string|callable|null $whennull) |
| Parameters |
|
| Returns | $this |
| Description | Add an alphanumeric rule to a field. |
| Syntax | creditCard(string $field , string $type'all', string|null $messagenull, string|callable|null $whennull) |
|---|---|
| Parameters |
|
| Returns | $this |
| Description | Add a credit card rule to a field. |
| Syntax | Email(string $field , boolean $checkMXfalse, string|null $messagenull, string|callable|null, $whennull) |
|---|---|
| Parameters |
|
| Returns | $this |
| Description | Add an email validation rule to a field. |
| Syntax | maxLength(string $field, integer $max, string|null $messagenull, string|callable|null $whennull) |
|---|---|
| Parameters |
|
| Returns | $this |
| Description | Add a string length validation rule to a field. |
| Syntax | minLength(string $field, integer $min, string|null $messagenull, string|callable|null $whennull) |
|---|---|
| Parameters |
|
| Returns | $this |
| Description | Add a string length validation rule to a field. |
| Syntax | notBlank(string $field, string|null $messagenull, string|callable|null $whennull) |
|---|---|
| Parameters |
|
| Returns | $this |
| Description | Add a notBlank rule to a field. |
CakePHP - Creating Validators
Validator can be created by adding the following two lines in the controller.
use Cake\Validation\Validator;
$validator = new Validator();
Validating Data
Once, we have created validator, we can use the validator object to validate data. The following code explains, how we can validate data for login webpage.
$validator->notEmpty('username', 'We need username.')->add(
   'username', 'validFormat', ['rule' => 'email','message' => 'E-mail must be valid']);

$validator->notEmpty('password', 'We need password.');
$errors = $validator->errors($this->request->data());
Using the $validator object, we have first called the notEmpty() method, which will ensure that the username must not be empty. After that, we have chained the add() method to add one more validation for proper email format.
After that we have added validation for password field with notEmpty() method, which will confirm that password field must not be empty.
Example
Make Changes in the config/routes.php file as shown in the following program.
config/routes.php
<?php
use Cake\Http\Middleware\CsrfProtectionMiddleware;
use Cake\Routing\Route\DashedRoute;
use Cake\Routing\RouteBuilder;
$routes->setRouteClass(DashedRoute::class);
$routes->scope('/', function (RouteBuilder $builder) {
   $builder->registerMiddleware('csrf', new CsrfProtectionMiddleware([
      'httpOnly' => true,
   ]));
   $builder->applyMiddleware('csrf');
   //$builder->connect('/pages',['controller'=>'Pages','action'=>'display', 'home']);
   $builder->connect('validation',['controller'=>'Valids','action'=>'index']);
   $builder->fallbacks();
});
Create a ValidsController.php file at src/Controller/ValidsController.php. Copy the following code in the controller file.
src/Controller/ValidsController.php
<?php
   namespace App\Controller;
   use App\Controller\AppController;
   use Cake\Validation\Validator;
   class ValidsController extends AppController{
      public function index(){
         $validator = new Validator();
         $validator->notEmpty('username', 'We need username.')->add(
            'username', 'validFormat', ['rule' => 'email','message' => 'E-mail must be valid']);
         $validator->notEmpty('password', 'We need password.');
         $errors = $validator->errors($this->request->getData());
         $this->set('errors',$errors);
      }
   }
?>
Create a directory Valids at src/Template and under that directory create a View file called index.php. Copy the following code in that file.
src/Template/Valids/index.php
<?php
   if($errors) {
      foreach($errors as $error)
      foreach($error as $msg)
      echo '<font color="red">'.$msg.'</font><br>';
   } else {
      echo "No errors.";
   }
   echo $this->Form->create(NULL,array('url'=>'/validation'));
   echo $this->Form->control('username');
   echo $this->Form->control('password');
   echo $this->Form->button('Submit');
   echo $this->Form->end();
?>
Execute the above example by visiting the following URL −
http://localhost/cakephp4/validation
Output
Click on the submit button without entering anything. You will receive the following output.

Http - Client
The http client can be used to make requests like GET, POST, PUT etc.
To work with http client, add the following −
use Cake\Http\Client;
Let us work on example to understand working of HTTP client.
HTTP GET Method
To get the data from give http url, you can do as follows −
$response = $http->get('https://jsonplaceholder.typicode.com/users');
In case, you need to pass some query params, they can be passed as follows −
$response = $http->get('https://jsonplaceholder.typicode.com/users', ["id", 1]);
To get the response, you can do as follows −
For normal text data −
$response->getBody();
For Json −
$response->getJson();
For Xml −
$response->getXml()
Example
Make Changes in the config/routes.php file as shown in the following program.
config/routes.php
<?php
use Cake\Http\Middleware\CsrfProtectionMiddleware;
use Cake\Routing\Route\DashedRoute;
use Cake\Routing\RouteBuilder;
$routes->setRouteClass(DashedRoute::class);
$routes->scope('/', function (RouteBuilder $builder) {
   $builder->registerMiddleware('csrf', new CsrfProtectionMiddleware([
      'httpOnly' => true,
   ]));
   $builder->applyMiddleware('csrf');
   //$builder->connect('/pages',['controller'=>'Pages','action'=>'display', 'home']);
   $builder->connect('getData',['controller'=>'Requests','action'=>'index']);
   $builder->fallbacks();
});
Create a RequestsController.php file at src/Controller/RequestsController.php. Copy the following code in the controller file.
src/Controller/RequestsController.php
<?php
   namespace App\Controller;
   use App\Controller\AppController;
   use Cake\Http\Client;
   class RequestsController extends AppController{
      public function index(){
         $http = new Client();
         $response = $http->get('https://jsonplaceholder.typicode.com/users');
         $stream = $response->getJson();
         $this->set('response',$stream);
      }
   }
?>
Create a directory Requests at src/Template and under that directory create a View file called index.php. Copy the following code in that file.
src/Template/Requests/index.php
<h3>All Users from url : https://jsonplaceholder.typicode.com/users</h3>
<?php
   if($response) {
      foreach($response as $res => $val) {
         echo '<font color="gray">Name: '.$val["name"].' Email -'.$val["email"].'</font><br>';
      }
   }
?>
Execute the above example by visiting the following URL −
http://localhost/cakephp4/getData
Output
Click on the submit button without entering anything. You will receive the following output.
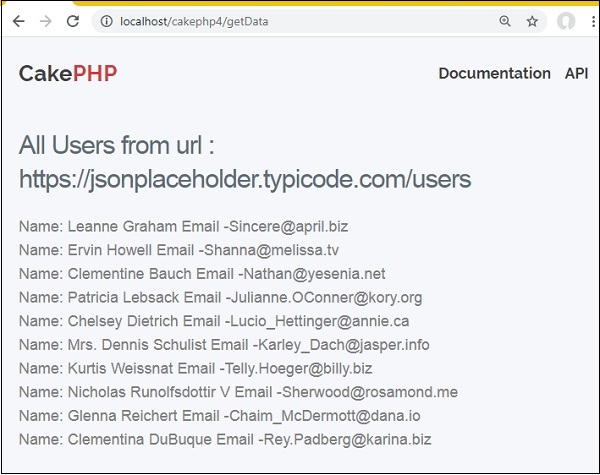
HTTP POST Method
To work with post, you need to call $http client as follows −
$response = $http->post('yoururl', data);
Let us see one example on the same.
Example
Make Changes in the config/routes.php file as shown in the following program.
config/routes.php
<?php
use Cake\Http\Middleware\CsrfProtectionMiddleware;
use Cake\Routing\Route\DashedRoute;
use Cake\Routing\RouteBuilder;
$routes->setRouteClass(DashedRoute::class);
$routes->scope('/', function (RouteBuilder $builder) {
   $builder->registerMiddleware('csrf', new CsrfProtectionMiddleware([
      'httpOnly' => true,
   ]));
   $builder->applyMiddleware('csrf');
   //$builder->connect('/pages',['controller'=>'Pages','action'=>'display', 'home']);
   $builder->connect('postData',['controller'=>'Requests','action'=>'index']);
   $builder->fallbacks();
});
Create a RequestsController.php file at src/Controller/RequestsController.php. Copy the following code in the controller file. Ignore if already created.
src/Controller/RequestsController.php
<?php
   namespace App\Controller;
   use App\Controller\AppController;
   use Cake\Http\Client;
   class RequestsController extends AppController{
      public function index(){
         $http = new Client();
         $response = $http->post('https://postman-echo.com/post', [
            'name'=> 'ABC',
            'email' => 'xyz@gmail.com'
         ]);
      }
   }
?>
Create a directory Requests at src/Template and under that directory create a View file called index.php. Copy the following code in that file.
src/Template/Requests/index.php
<h3>Testing Post Method</h3>
Execute the above example by visiting the following URL −
http://localhost/cakephp4/postData
Output
Given below is the output of the code −
Similarly, you can try for PUT method.
$http = new Client();
$response = $http->put('https://postman-echo.com/post', [
   'name'=> 'ABC',
   'email' => 'xyz@gmail.com'
]);
CakePHP - Pagination
If we want to show a set of data that is huge, we can use pagination and this feature is available with cake php 4 which is very easy to use.
We have a table titled articles with following data −
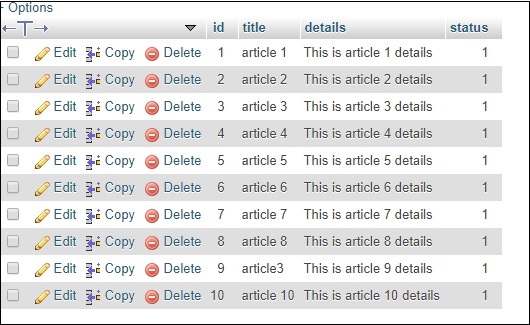
Let us use pagination to display the data in the form of pages, instead of showing them all together.
Example
Make Changes in the config/routes.php file as shown in the following program.
config/routes.php
<?php
use Cake\Http\Middleware\CsrfProtectionMiddleware;
use Cake\Routing\Route\DashedRoute;
use Cake\Routing\RouteBuilder;
$routes->setRouteClass(DashedRoute::class);
$routes->scope('/', function (RouteBuilder $builder) {
   $builder->registerMiddleware('csrf', new CsrfProtectionMiddleware([
      'httpOnly' => true,
   ]));
   $builder->applyMiddleware('csrf');
   //$builder->connect('/pages',['controller'=>'Pages','action'=>'display', 'home']);
   $builder->connect('posts',['controller'=>'Posts','action'=>'index']);
   $builder->fallbacks();
});
Create a PostsController.php file at src/Controller/PostsController.php. Copy the following code in the controller file. Ignore, if already created.
src/Controller/PostsController.php
<?php
   namespace App\Controller;
   use App\Controller\AppController;
   class PostsController extends AppController {
      public function index(){
         $this->loadModel('articles');
         $articles = $this->articles->find('all')->order(['articles.id ASC']);
         $this->set('articles', $this->paginate($articles, ['limit'=> '3']));
      }
   }
?>
The data from articles table is fetched using −
$this->loadModel('articles');
$articles = $this->articles->find('all')->order(['articles.id ASC']);
To apply pagination and we would show the data with 3 per records and the same is done as follows −
$this->set('articles', $this->paginate($articles, ['limit'=> '3']));
This is enough to activate pagination on the articles tables.
Create a directory Posts at src/Template and under that directory create a Viewfile called index.php. Copy the following code in that file.
src/Template/Posts/index.php
<div>
<?php foreach ($articles as $key=>$article) {?>
<a href="#">
   <div>
   <p><?= $article->title ?> </p>
   <p><?= $article->details ?></p>
   </div>
</a>
<br/>
<?php
}
?>
<ul class="pagination">
<?= $this->Paginator->prev("<<") ?>
<?= $this->Paginator->numbers() ?>
<?= $this->Paginator->next(">>") ?>
</ul>
</div>
The pagination for the list of pages is done as follows −
<ul class="pagination">
<?= $this->Paginator->prev("<<") ?>
<?= $this->Paginator->numbers() ?>
<?= $this->Paginator->next(">>") ?>
</ul>
Execute the above example by visiting the following URL −
http://localhost/cakephp4/posts
Output
When you run the code, you will see the following output −
Click on the numbers below, to switch to next page, or use the next or previous button.
For example
You will see that page=2 is appended to the page url in the browser.
CakePHP - Date and Time
To work with date and time in cakephp4, we are going to make use of the available FrozenTime class.
To work with date and time, include the class in your controller
use Cake\I18n\FrozenTime;
Let us work, on an example and display date and time, using FrozenTime class.
Example
Make Changes in the config/routes.php file as shown in the following program.
config/routes.php
<?php
use Cake\Http\Middleware\CsrfProtectionMiddleware;
use Cake\Routing\Route\DashedRoute;
use Cake\Routing\RouteBuilder;
$routes->setRouteClass(DashedRoute::class);
$routes->scope('/', function (RouteBuilder $builder) {
   $builder->registerMiddleware('csrf', new CsrfProtectionMiddleware([
      'httpOnly' => true,
   ]));
   $builder->applyMiddleware('csrf');
   //$builder->connect('/pages',['controller'=>'Pages','action'=>'display', 'home']);
   $builder->connect('datetime',['controller'=>'Dates','action'=>'index']);
   $builder->fallbacks();
});
Create a DatesController.php file at src/Controller/DatesController.php. Copy the following code in the controller file. Ignore if already created.
src/Controller/DatesController.php
<?php
   namespace App\Controller;
   use App\Controller\AppController;
   use Cake\I18n\FrozenTime;
   class DatesController extends AppController{
      public function index(){
         $time = FrozenTime::now();
         $now = FrozenTime::parse('now');
         $_now = $now->i18nFormat('yyyy-MM-dd HH:mm:ss');
         $this->set('timenow', $_now);
         $now = FrozenTime::parse('now');
         $nice = $now->nice();
         $this->set('nicetime', $nice);
         $hebrewdate = $now->i18nFormat(\IntlDateFormatter::FULL, null, 'en-IR@calendar=hebrew');
         $this->set("hebrewdate",$hebrewdate);
         $japanesedate = $now->i18nFormat(\IntlDateFormatter::FULL, null, 'en-IR@calendar=japanese');
         $this->set("japanesedate",$japanesedate);
         $time = FrozenTime::now();
         $this->set("current_year",$time->year);
         $this->set("current_month",$time->month);
         $this->set("current_day",$time->day);
      }
   }
?>
Create a directory Dates at src/Template and under that directory create a View file called index.php. Copy the following code in that file.
src/Template/Dates/index.php
<?php
   echo "The Current date and time is = ".$timenow;
   echo "<br/>";
   echo "Using nice format available = ".$nicetime;
   echo "<br/>";
   echo "Date and Time as per Hebrew Calender =" .$hebrewdate;
   echo "<br/>";
   echo "Date and Time as per Japanese Calender =" .$japanesedate;
   echo "<br/>";
   echo "Current Year = ".$current_year;
   echo "<br/>";
   echo "Current Month = ".$current_month;
   echo "<br/>";
   echo "Current Day = ".$current_day;
?>
Execute the above example by visiting the following URL −
http://localhost/cakephp4/datetime
Output
When you run the code, you will see the following output −
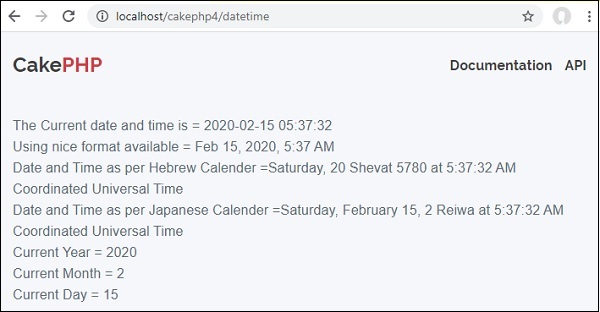
CakePHP - File upload
To work on file upload we are going to use the form helper. Here, is an example for file upload.
Example
Make Changes in the config/routes.php file, as shown in the following program.
config/routes.php
<?php
use Cake\Http\Middleware\CsrfProtectionMiddleware;
use Cake\Routing\Route\DashedRoute;
use Cake\Routing\RouteBuilder;
$routes->setRouteClass(DashedRoute::class);
$routes->scope('/', function (RouteBuilder $builder) {
   $builder->registerMiddleware('csrf', new CsrfProtectionMiddleware([
      'httpOnly' => true,
   ]));
   $builder->applyMiddleware('csrf');
   //$builder->connect('/pages',['controller'=>'Pages','action'=>'display', 'home']);
   $builder->connect('fileupload',['controller'=>'Files','action'=>'index']);
   $builder->fallbacks();
});
Create a FilesController.php file at src/Controller/FilesController.php. Copy the following code in the controller file. Ignore, if already created.
Create uploads/ directory in src/. The files uploaded will be saved in uploads/ folder.
src/Controller/FilesController.php
<?php
   namespace App\Controller;
   use App\Controller\AppController;
   use Cake\View\Helper\FormHelper;
   class FilesController extends AppController {
      public function index(){
         if ($this->request->is('post')) {
            $fileobject = $this->request->getData('submittedfile');
            $uploadPath = '../uploads/';
            $destination = $uploadPath.$fileobject->getClientFilename();
            // Existing files with the same name will be replaced.
            $fileobject->moveTo($destination);
         }
      }
   }
?>
Create a directory Files at src/Template and under that directory create a View file called index.php. Copy the following code in that file.
src/Template/Files/index.php
<?php
echo $this->Form->create(NULL, ['type' => 'file']);
echo $this->l;Form->file('submittedfile');
echo $this->Form->button('Submit');
echo $this->Form->end();
$uploadPath ='../uploads/';
$files = scandir($uploadPath, 0);
echo "Files uploaded in uploads/ are:<br/>";
for($i = 2; $i < count($files); $i++)
echo "File is - ".$files[$i]."<br>";
?>
The files saved in uploads/ folder is listed for the user. Execute the above example by visiting the following URL −
http://localhost/cakephp4/fileupload −
Output
When you execute the above code, you should see the following output −