
 Data Structure
 Networking
 RDBMS
RDBMS Operating System
 Java
Java MS Excel
 iOS
iOS HTML
HTML CSS
CSS Android
 Python
 C Programming
 C++
C++ C#
C# MongoDB
 MySQL
MySQL Javascript
 PHP
PHP
- Selected Reading
- UPSC IAS Exams Notes
- Developer's Best Practices
- Questions and Answers
- Effective Resume Writing
- HR Interview Questions
- Computer Glossary
- Who is Who
BMP 180 Pressure Sensor
BMP180 sensor is a sensor that can be attached to a microcontroller on a breadboard and can measure the pressure, temperature, and altitude of a place. It can be connected to controllers such as ESP32 or Arduino and can be used by programs to read the values. In this article, using three different examples, the use of the BMP180 Sensor is demonstrated using ESP32. The circuit is made using an ESP32 microcontroller and BMP180 sensor and the programs to measure the temperature or pressure or altitude are written using Arduino software.
Example 1 ? Measuring the temperature of a place using a BMP180 sensor
Example 2 ? Measuring the pressure at a place using a BMP180 sensor
Example 3 ? Measuring the altitude of a place using a BMP180 sensor
Making the Circuit on the breadboard using ESP32
Make the circuit as given here ?
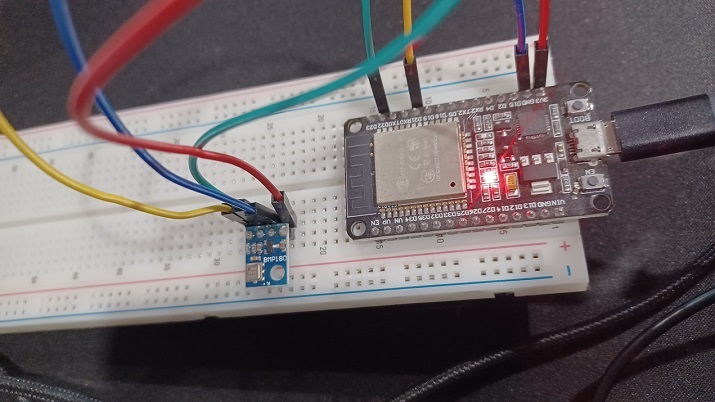
Fig 1: Circuit showing BMP180 sensor connections to ESP32, on the breadboard
The detailed view of the BMP180 Sensor
The BMP180 Sensor picture is given below ?
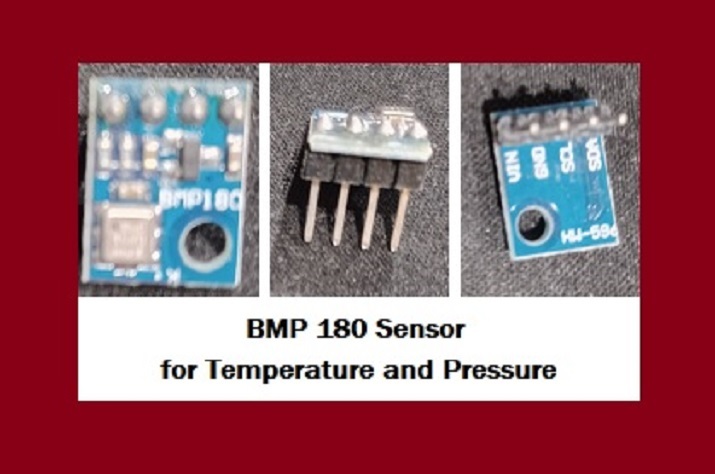
Fig 2: Showing BMP 180 Sensor and its pins.
Example 1: Measuring the temperature of a place using a BMP180 sensor
Here, the BMP180 Sensor is used to measure the temperature. The C language program here uses Wire.h for I2C communications between the Master ESP32 and Slave BMP180. For Using the BMP180 sensor, Adafruit_BMP085.h is used. The result can be seen using the Serial Monitor.
Circuit Design Steps and Coding
Step 1 ? First the microcontroller ESP32 is placed on the breadboard.
Step 2 ? Next the BMP180 sensor is inserted into the breadboard.
Step 3 ? The BMP180 sensor's Vin is to be connected to the 3V3 / Vin pin of ESP32. Connect the BMP180 sensor's GND to the GND pin of ESP32. Connect the SCL pin of the BMP180 sensor to the D22 pin of ESP32 and the SDA pin to D21.
Step 4 ? Write the C program using Arduino for measuring the temperature.
Step 5 ? Attach the ESP32 to the computer using a USB data cable.
Step 6 ? Compile and transfer the code into ESP32 and check the result on the serial monitor.
The Code
// Read the temperature of the place using BMP180 sensor
//required libraries
#include <Wire.h>
#include <Adafruit_BMP085.h>
//bmp object
Adafruit_BMP085 bmp;
void setup() {
   //specified baud rate
   Serial.begin(9600);
   //if bmp is not detected
   if (!bmp.begin()) {
      Serial.println("Could not found BMP180");
      while (1) {}
   }
}
void loop() {
   // Check these readings using the Serial Monitor
   //print the Temperature of the place
   Serial.print("Temperature Now = ");
   Serial.print(bmp.readTemperature());
   Serial.println(" *C");
   Serial.println();
   delay(500);
}
Viewing The Result - Example 1
The result can be seen in Serial Monitor as soon the code is compiled and transferred/uploaded to the ESP32.
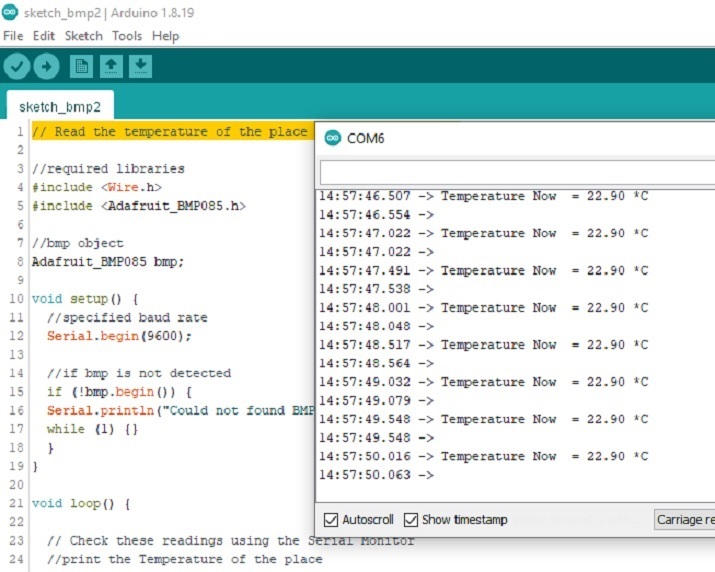
Fig: Showing the result of temperature readings using Serial Monitor
Example 2: Measuring the pressure at a place using a BMP180 sensor
Here, the BMP180 Sensor is used to measure the pressure. The C language program here, uses Wire.h for I2C communications between the Master ESP32 and Slave BMP180. For Using BMP180 sensor, Adafruit_BMP085.h is used. The result can be seen using the Serial Monitor.
Circuit Design Steps and Coding
Step 1 ? First the microcontroller ESP32 is placed on the breadboard.
Step 2 ? Next the BMP180 sensor is inserted into the breadboard.
Step 3 ? The BMP180 sensor's Vin is to be connected to the 3V3 / Vin pin of ESP32. Connect the BMP180 sensor's GND to the GND pin of ESP32. Connect the SCL pin of the BMP180 sensor to the D22 pin of ESP32 and the SDA pin to D21.
Step 4 ? Write the C program using Arduino for measuring the atmospheric pressure.
Step 5 ? Attach the ESP32 to the computer using a USB data cable.
Step 6 ? Compile and transfer the code into ESP32 and check the result on the serial monitor.
The Code
// Read the pressure at the place using BMP180 sensor
//required libraries
#include <Wire.h>
#include <Adafruit_BMP085.h>
//bmp object
Adafruit_BMP085 bmp;
void setup() {
   //specified baud rate
   Serial.begin(9600);
   //if bmp is not detected
   if (!bmp.begin()) {
      Serial.println("Could not found BMP180!!");
      while (1) {}
   }
}
void loop() {
   // Check these readings using the Serial Monitor
   //print the Pressure at the place
   Serial.print("Pressure Here = ");
   Serial.print(bmp.readPressure());
   Serial.println(" Pa");
   Serial.println();
   delay(500);
}
Viewing The Result - Example 2:
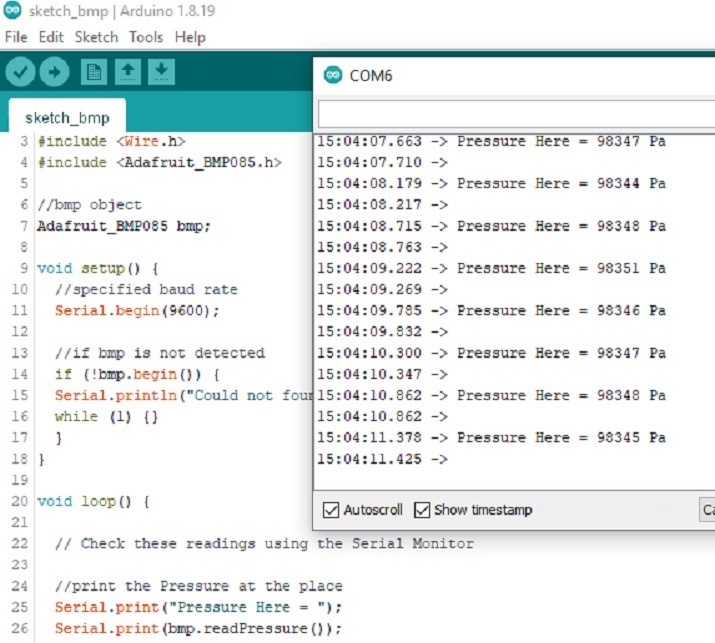
Fig 3: Showing the result for pressure readings using Serial Monitor.
Example 3: Measuring the altitude of a place using a BMP180 sensor
Here, the BMP180 Sensor is used to measure the altitude. The C language program here uses Wire.h for I2C communications between the Master ESP32 and Slave BMP180. For Using the BMP180 sensor, Adafruit_BMP085.h is used. The result can be seen using the Serial Monitor.
The Code
// Read the altitude of the place using a BMP180 sensor
//required libraries
#include <Wire.h>
#include <Adafruit_BMP085.h>
//bmp object
Adafruit_BMP085 bmp;
void setup() {
   //specified baud rate
   Serial.begin(9600);
   //if bmp is not detected
   if (!bmp.begin()) {
      Serial.println("Could not found BMP180");
      while (1) {}
   }
}
void loop() {
   // Find the altitude
   Serial.print("Altitude = ");
   Serial.print(bmp.readAltitude());
   Serial.println(" meters");
   // Check these readings using the Serial Monitor
   Serial.println();
   delay(500);
}
Viewing The Result - Example 2:
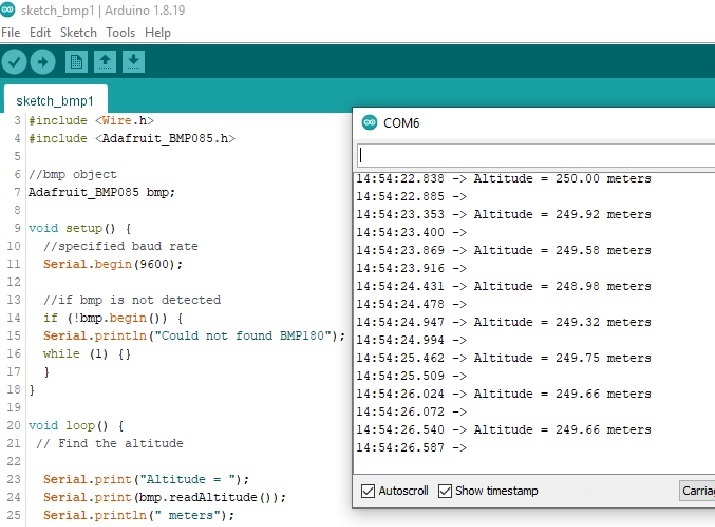
Fig 3: Showing the result for altitude readings using Serial Monitor.
In this article, using three different examples, the ways to use a BMP180 sensor with ESP32 are given. In the first example, the BMP180 Sensor is used to measure the temperature. In the second example, the BMP180 Sensor is used to measure the pressure and in the third example, the BMP180 Sensor is used to measure the altitude of a place.

620 Views
