- Apex - Home
- Apex - Overview
- Apex - Environment
- Apex - Example
- Apex - Data Types
- Apex - Variables
- Apex - Strings
- Apex - Arrays
- Apex - Constants
- Apex - Decision Making
- Apex - Loops
- Apex - Collections
- Apex - Classes
- Apex - Methods
- Apex - Objects
- Apex - Interfaces
- Apex - DML
- Apex - Database Methods
- Apex - SOSL
- Apex - SOQL
- Apex - Security
- Apex - Invoking
- Apex - Triggers
- Apex - Trigger Design Patterns
- Apex - Governer Limits
- Apex - Batch Processing
- Apex - Debugging
- Apex - Testing
- Apex - Deployment
Apex - Quick Guide
Apex - Overview
What is Apex?
Apex is a proprietary language developed by the Salesforce.com. As per the official definition, Apex is a strongly typed, object-oriented programming language that allows developers to execute the flow and transaction control statements on the Force.com platform server in conjunction with calls to the Force.com API.
It has a Java-like syntax and acts like database stored procedures. It enables the developers to add business logic to most system events, including button clicks, related record updates, and Visualforce pages.Apex code can be initiated by Web service requests and from triggers on objects. Apex is included in Performance Edition, Unlimited Edition, Enterprise Edition, and Developer Edition.
Features of Apex as a Language
Let us now discuss the features of Apex as a Language −
Integrated
Apex has built in support for DML operations like INSERT, UPDATE, DELETE and also DML Exception handling. It has support for inline SOQL and SOSL query handling which returns the set of sObject records. We will study the sObject, SOQL, SOSL in detail in future chapters.
Java like syntax and easy to use
Apex is easy to use as it uses the syntax like Java. For example, variable declaration, loop syntax and conditional statements.
Strongly Integrated With Data
Apex is data focused and designed to execute multiple queries and DML statements together. It issues multiple transaction statements on Database.
Strongly Typed
Apex is a strongly typed language. It uses direct reference to schema objects like sObject and any invalid reference quickly fails if it is deleted or if is of wrong data type.
Multitenant Environment
Apex runs in a multitenant environment. Consequently, the Apex runtime engine is designed to guard closely against runaway code, preventing it from monopolizing shared resources. Any code that violates limits fails with easy-to-understand error messages.
Upgrades Automatically
Apex is upgraded as part of Salesforce releases. We don't have to upgrade it manually.
Easy Testing
Apex provides built-in support for unit test creation and execution, including test results that indicate how much code is covered, and which parts of your code can be more efficient.
When Should Developer Choose Apex?
Apex should be used when we are not able to implement the complex business functionality using the pre-built and existing out of the box functionalities. Below are the cases where we need to use apex over Salesforce configuration.
Apex Applications
We can use Apex when we want to −
Create Web services with integrating other systems.
Create email services for email blast or email setup.
Perform complex validation over multiple objects at the same time and also custom validation implementation.
Create complex business processes that are not supported by existing workflow functionality or flows.
Create custom transactional logic (logic that occurs over the entire transaction, not just with a single record or object) like using the Database methods for updating the records.
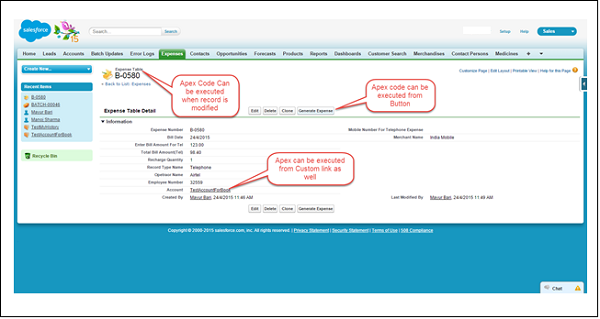
Perform some logic when a record is modified or modify the related object's record when there is some event which has caused the trigger to fire.
Working Structure of Apex
As shown in the diagram below (Reference: Salesforce Developer Documentation), Apex runs entirely on demand Force.com Platform
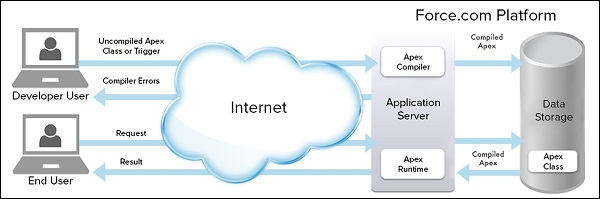
Flow of Actions
There are two sequence of actions when the developer saves the code and when an end user performs some action which invokes the Apex code as shown below −
Developer Action
When a developer writes and saves Apex code to the platform, the platform application server first compiles the code into a set of instructions that can be understood by the Apex runtime interpreter, and then saves those instructions as metadata.
End User Action
When an end-user triggers the execution of Apex, by clicking a button or accessing a Visualforce page, the platform application server retrieves the compiled instructions from the metadata and sends them through the runtime interpreter before returning the result. The end-user observes no differences in execution time as compared to the standard application platform request.
Since Apex is the proprietary language of Salesforce.com, it does not support some features which a general programming language does. Following are a few features which Apex does not support −
It cannot show the elements in User Interface.
You cannot change the standard SFDC provided functionality and also it is not possible to prevent the standard functionality execution.
Creating multiple threads is also not possible as we can do it in other languages.
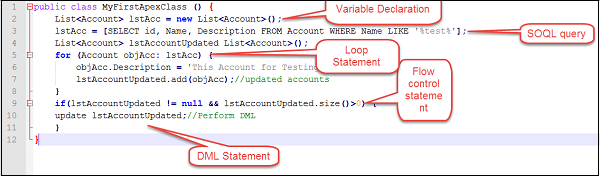
Understanding the Apex Syntax
Apex code typically contains many things that we might be familiar with from other programming languages.
Variable Declaration
As strongly typed language, you must declare every variable with data type in Apex. As seen in the code below (screenshot below), lstAcc is declared with data type as List of Accounts.
SOQL Query
This will be used to fetch the data from Salesforce database. The query shown in screenshot below is fetching data from Account object.
Loop Statement
This loop statement is used for iterating over a list or iterating over a piece of code for a specified number of times. In the code shown in the screenshot below, iteration will be same as the number of records we have.
Flow Control Statement
The If statement is used for flow control in this code. Based on certain condition, it is decided whether to go for execution or to stop the execution of the particular piece of code. For example, in the code shown below, it is checking whether the list is empty or it contains records.
DML Statement
Performs the records insert, update, upsert, delete operation on the records in database. For example, the code given below helps in updating Accounts with new field value.
Following is an example of how an Apex code snippet will look like. We are going to study all these Apex programming concepts further in this tutorial.
Apex - Environment
In this chapter, we will understand the environment for our Salesforce Apex development. It is assumed that you already have a Salesforce edition set up for doing Apex development.
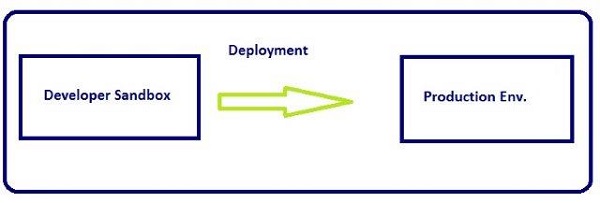
You can develop the Apex code in either Sandbox or Developer edition of Salesforce. A Sandbox organization is a copy of your organization in which you can write code and test it without taking the risk of data modification or disturbing the normal functionality. As per the standard industrial practice, you have to develop the code in Sandbox and then deploy it to the Production environment.
For this tutorial, we will be using the Developer edition of Salesforce. In the Developer edition, you will not have the option of creating a Sandbox organization. The Sandbox features are available in other editions of Salesforce.
Apex Code Development Tools
In all the editions, we can use any of the following three tools to develop the code −
- Force.com Developer Console
- Force.com IDE
- Code Editor in the Salesforce User Interface
Note − We will be utilizing the Developer Console throughout our tutorial for code execution as it is simple and user friendly for learning.
Force.com Developer Console
The Developer Console is an integrated development environment with a collection of tools you can use to create, debug, and test applications in your Salesforce organization.
Follow these steps to open the Developer Console −
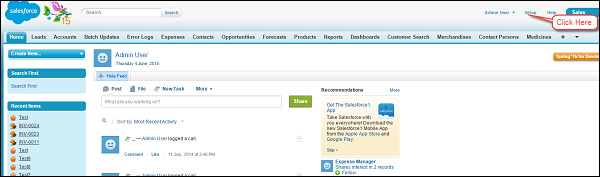
Step 1 − Go to Name → Developer Console

Step 2 − Click on "Developer Console" and a window will appear as in the following screenshot.

Following are a few operations that can be performed using the Developer Console.
Writing and compiling code − You can write the code using the source code editor. When you save a trigger or class, the code is automatically compiled. Any compilation errors will be reported.
Debugging − You can write the code using the source code editor. When you save a trigger or class, the code is automatically compiled. Any compilation errors will be reported.
Testing − You can view debug logs and set checkpoints that aid in debugging.
Checking performance − You can execute tests of specific test classes or all classes in your organization, and you can view test results. Also, you can inspect code coverage.
SOQL queries − You can inspect debug logs to locate performance bottlenecks.
Color coding and autocomplete − The source code editor uses a color scheme for easier readability of code elements and provides auto completion for class and method names.
Executing Code in Developer Console
All the code snippets mentioned in this tutorial need to be executed in the developer console. Follow these steps to execute steps in Developer Console.
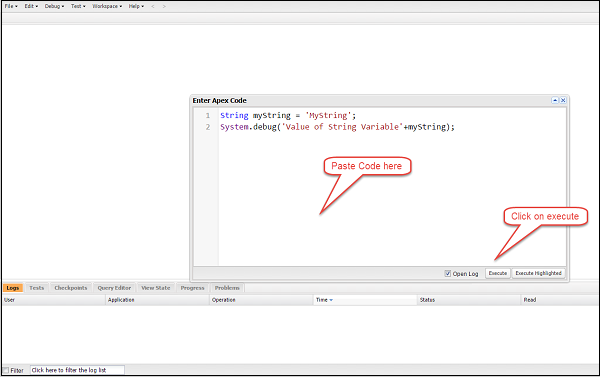
Step 1 − Login to the Salesforce.com using login.salesforce.com. Copy the code snippets mentioned in the tutorial. For now, we will use the following sample code.
String myString = 'MyString';
System.debug('Value of String Variable'+myString);

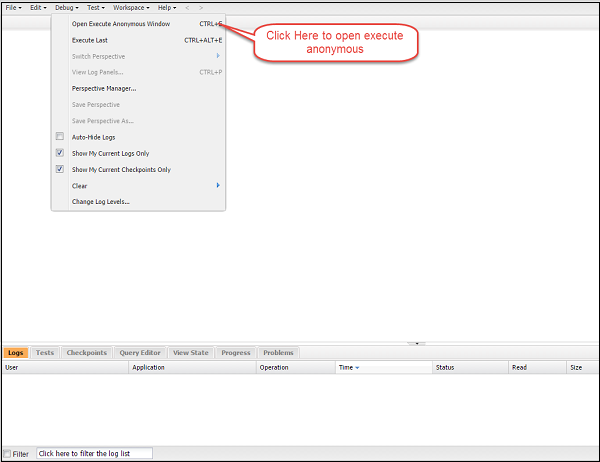
Step 2 − To open the Developer Console, click on Name → Developer Console and then click on Execute Anonymous as shown below.

Step 3 − In this step, a window will appear and you can paste the code there.
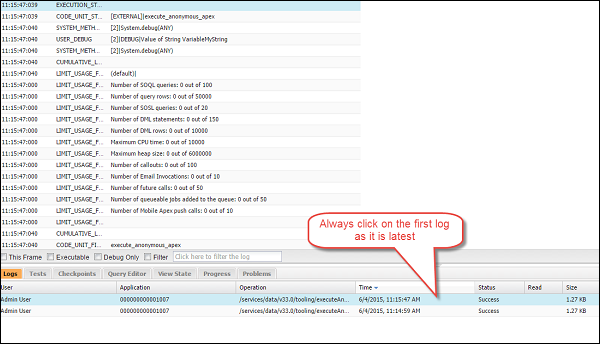
Step 4 − When we click on Execute, the debug logs will open. Once the log appears in window as shown below, then click on the log record.
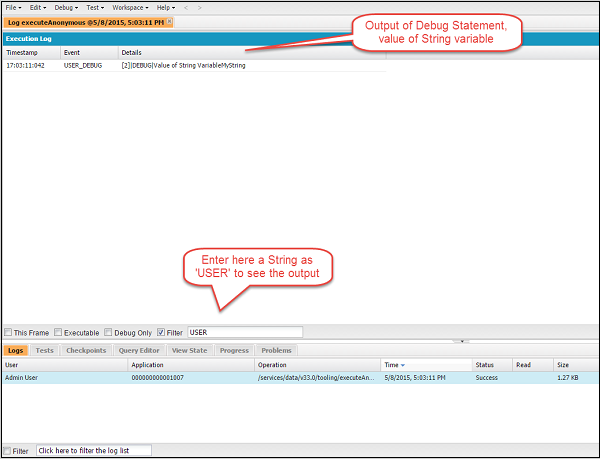
Then type 'USER' in the window as shown below and the output statement will appear in the debug window. This 'USER' statement is used for filtering the output.
So basically, you will be following all the above mentioned steps to execute any code snippet in this tutorial.
Apex - Example
Enterprise Application Development Example
For our tutorial, we will be implementing the CRM application for a Chemical Equipment and Processing Company. This company deals with suppliers and provides services. We will work out small code snippets related to this example throughout our tutorial to understand every concept in detail.
For executing the code in this tutorial, you will need to have two objects created: Customer and Invoice objects. If you already know how to create these objects in Salesforce, you can skip the steps given below. Else, you can follow the step by step guide below.
Creating Customer Object
We will be setting up the Customer object first.
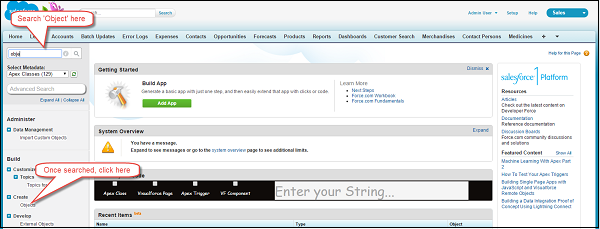
Step 1 − Go to Setup and then search for 'Object' as shown below. Then click on the Objects link as shown below.

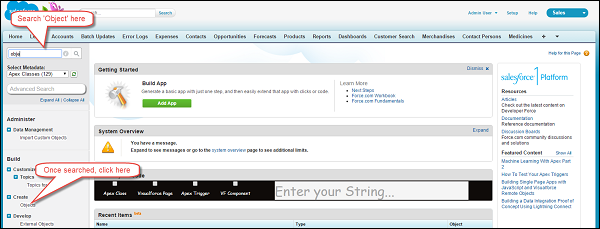
Step 2 − Once the object page is opened, then click on the 'Create New Object' button as shown below.
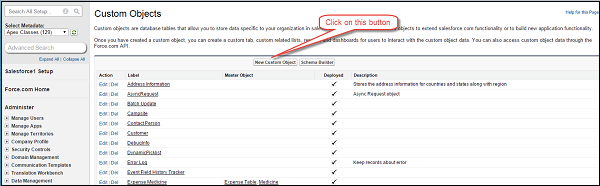
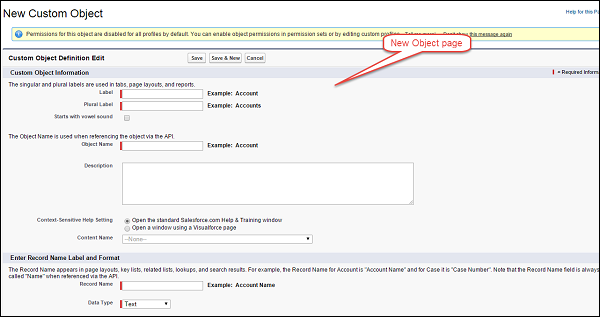
Step 3 − After clicking on button, the new object creation page will appear and then enter all the object details as entered below. Object name should be Customer. You just have to enter the information in the field as shown in the screenshot below and keep other default things as it is.
Enter the information and then click on the 'Save' button −
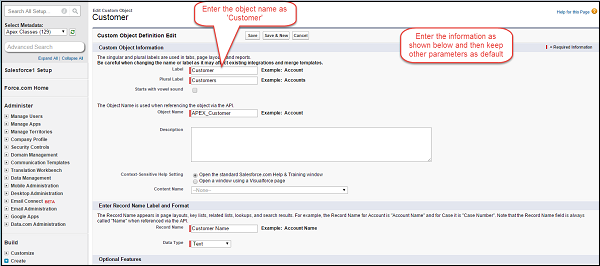
By following the above steps, we have successfully created the Customer object.
Creating the Custom Fields for Customer object
Now that we have our Customer object set up, we will create a field 'Active' and then you can create the other fields by following similar steps. The Name and API name of the field will be given in the screenshot.
Step 1 − We will be creating a field named as 'Active' of data type as Checkbox. Go to Setup and click on it.

Step 2 − Search for 'Object' as shown below and click on it.
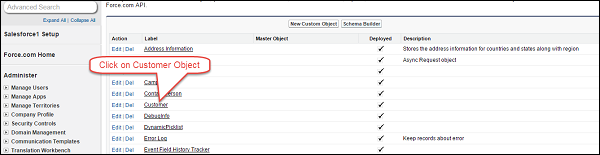
Step 3 − Click on object 'Customer'.
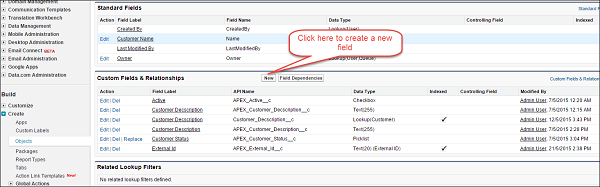
Step 4 − Once you have clicked on the Customer object link and the object detail page appears, click on the New button.
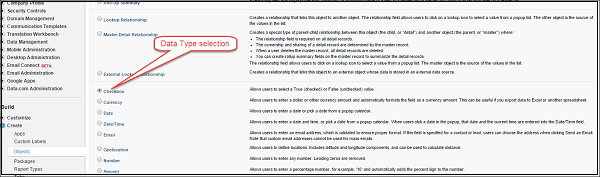
Step 5 − Now, select the data type as Checkbox and click Next.
Step 6 − Enter the field name and label as shown below.
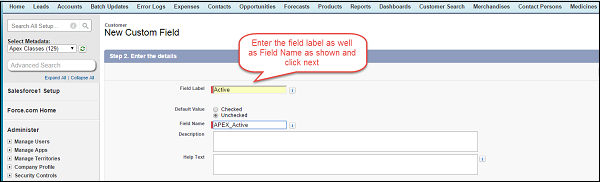
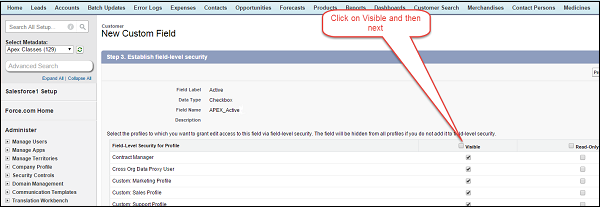
Step 7 − Click on Visible and then click Next.
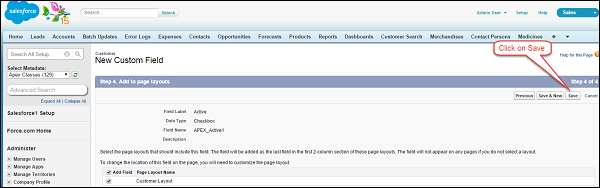
Step 8 − Now click on 'Save'.
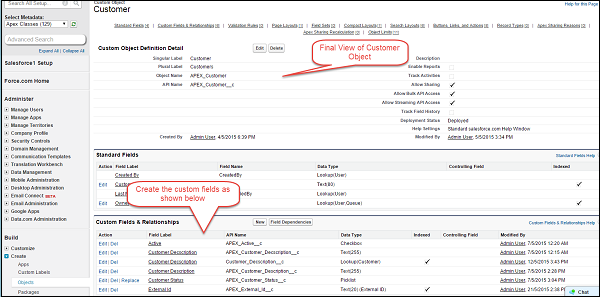
By following the above steps, our custom field 'Active' is created. You have to follow all the above custom field creation steps for the remaining fields. This is the final view of customer object once all the fields are created −
Creating Invoice Object
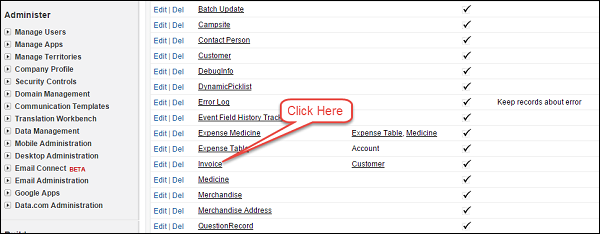
Step 1 − Go to Setup and search for 'Object' and then click on the Objects link as shown below.

Step 2 − Once the object page is opened, then click on the 'Create New Object' button as shown below.
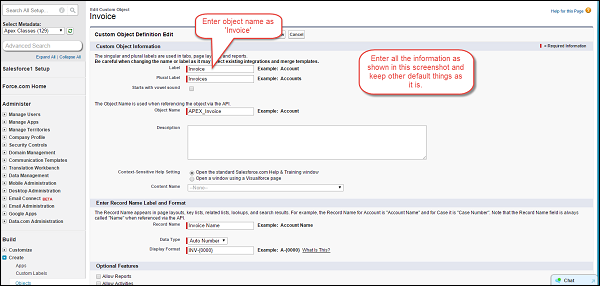
Step 3 − After clicking on the button, the new object creation page will appear as shown in the screenshot below. You need to enter the details here. The object name should be Invoice. This is similar to how we created the Customer object earlier in this tutorial.
Step 4 − Enter the information as shown below and then click on the 'Save' button.
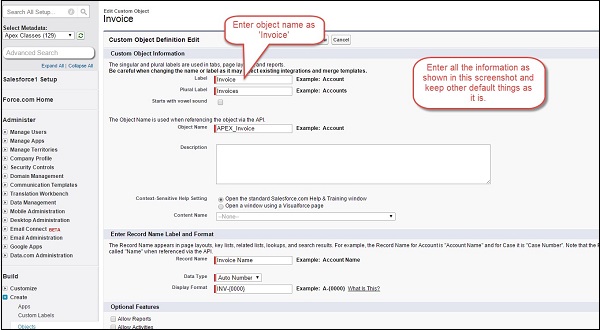
By following these steps, your Invoice object will be created.
Creating the Custom Fields for Invoice object
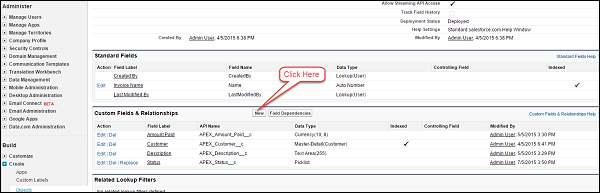
We will be creating the field Description on Invoice object as shown below −
Step 1 − Go to Setup and click on it.
Step 2 − Search for 'Object' as shown below and click on it.
Step 3 − Click on object 'Invoice'.
And then click on 'New'.
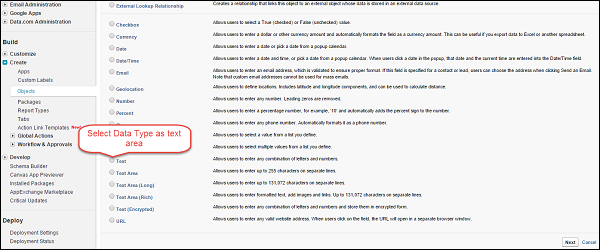
Step 4 − Select the data type as Text Area and then click on Next button.
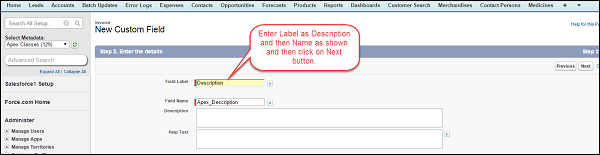
Step 5 − Enter the information as given below.
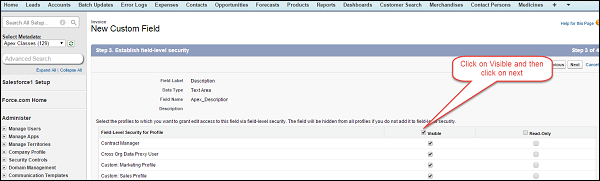
Step 6 − Click on Visible and then Next.
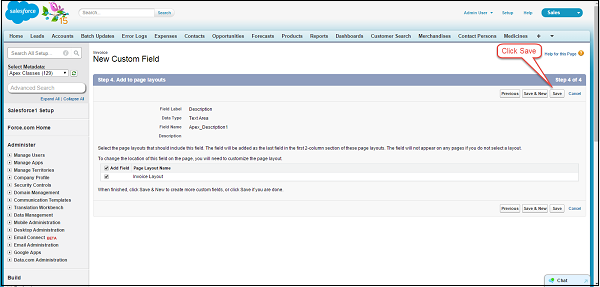
Step 7 − Click on Save.
Similarly, you can create the other fields on the Invoice object.
By this, we have created the objects that are needed for this tutorial. We will be learning various examples in the subsequent chapters based on these objects.
Apex - Data Types
Understanding the Data Types
The Apex language is strongly typed so every variable in Apex will be declared with the specific data type. All apex variables are initialized to null initially. It is always recommended for a developer to make sure that proper values are assigned to the variables. Otherwise such variables when used, will throw null pointer exceptions or any unhandled exceptions.
Apex supports the following data types −
Primitive (Integer, Double, Long, Date, Datetime, String, ID, or Boolean)
Collections (Lists, Sets and Maps) (To be covered in Chapter 6)
sObject
Enums
Classes, Objects and Interfaces (To be covered in Chapter 11, 12 and 13)
In this chapter, we will look at all the Primitive Data Types, sObjects and Enums. We will be looking at Collections, Classes, Objects and Interfaces in upcoming chapters since they are key topics to be learnt individually.
Primitive Data Types
In this section, we will discuss the Primitive Data Types supported by Apex.
Integer
A 32-bit number that does not include any decimal point. The value range for this starts from -2,147,483,648 and the maximum value is up to 2,147,483,647.
Example
We want to declare a variable which will store the quantity of barrels which need to be shipped to the buyer of the chemical processing plant.
Integer barrelNumbers = 1000;
system.debug(' value of barrelNumbers variable: '+barrelNumbers);
The System.debug() function prints the value of variable so that we can use this to debug or to get to know what value the variable holds currently.
Paste the above code to the Developer console and click on Execute. Once the logs are generated, then it will show the value of variable "barrelNumbers" as 1000.
Boolean
This variable can either be true, false or null. Many times, this type of variable can be used as flag in programming to identify if the particular condition is set or not set.
Example
If the Boolean shipmentDispatched is to be set as true, then it can be declared as −
Boolean shipmentDispatched;
shipmentDispatched = true;
System.debug('Value of shipmentDispatched '+shipmentDispatched);
Date
This variable type indicates a date. This can only store the date and not the time. For saving the date along with time, we will need to store it in variable of DateTime.
Example
Consider the following example to understand how the Date variable works.
//ShipmentDate can be stored when shipment is dispatched.
Date ShipmentDate = date.today();
System.debug('ShipmentDate '+ShipmentDate);
Long
This is a 64-bit number without a decimal point. This is used when we need a range of values wider than those provided by Integer.
Example
If the company revenue is to be stored, then we will use the data type as Long.
Long companyRevenue = 21474838973344648L;
system.debug('companyRevenue'+companyRevenue);
Object
We can refer this as any data type which is supported in Apex. For example, Class variable can be object of that class, and the sObject generic type is also an object and similarly specific object type like Account is also an Object.
Example
Consider the following example to understand how the object variable works.
Account objAccount = new Account (Name = 'Test Chemical');
system.debug('Account value'+objAccount);
Note − You can create an object of predefined class as well, as given below −
//Class Name: MyApexClass
MyApexClass classObj = new MyApexClass();
This is the class object which will be used as class variable.
String
String is any set of characters within single quotes. It does not have any limit for the number of characters. Here, the heap size will be used to determine the number of characters. This puts a curb on the monopoly of resources by the Apex program and also ensures that it does not get too large.
Example
String companyName = 'Abc International';
System.debug('Value companyName variable'+companyName);
Time
This variable is used to store the particular time. This variable should always be declared with the system static method.
Blob
The Blob is a collection of Binary data which is stored as object. This will be used when we want to store the attachment in salesforce into a variable. This data type converts the attachments into a single object. If the blob is to be converted into a string, then we can make use of the toString and the valueOf methods for the same.
sObject
This is a special data type in Salesforce. It is similar to a table in SQL and contains fields which are similar to columns in SQL. There are two types of sObjects Standard and Custom.
For example, Account is a standard sObject and any other user-defined object (like Customer object that we created) is a Custom sObject.
Example
//Declaring an sObject variable of type Account
Account objAccount = new Account();

//Assignment of values to fields of sObjects
objAccount.Name = 'ABC Customer';
objAccount.Description = 'Test Account';
System.debug('objAccount variable value'+objAccount);

//Declaring an sObject for custom object APEX_Invoice_c
APEX_Customer_c objCustomer = new APEX_Customer_c();

//Assigning value to fields
objCustomer.APEX_Customer_Decscription_c = 'Test Customer';
System.debug('value objCustomer'+objCustomer);
Enum
Enum is an abstract data type that stores one value of a finite set of specified identifiers. You can use the keyword Enum to define an Enum. Enum can be used as any other data type in Salesforce.
Example
You can declare the possible names of Chemical Compound by executing the following code −
//Declaring enum for Chemical Compounds
public enum Compounds {HCL, H2SO4, NACL, HG}
Compounds objC = Compounds.HCL;
System.debug('objC value: '+objC);
Apex - Variables
Java and Apex are similar in a lot of ways. Variable declaration in Java and Apex is also quite the same. We will discuss a few examples to understand how to declare local variables.
String productName = 'HCL';
Integer i = 0;
Set<string> setOfProducts = new Set<string>();
Map<id, string> mapOfProductIdToName = new Map<id, string>();
Note that all the variables are assigned with the value null.
Declaring Variables
You can declare the variables in Apex like String and Integer as follows −
String strName = 'My String';  //String variable declaration
Integer myInteger = 1;         //Integer variable declaration
Boolean mtBoolean = true;      //Boolean variable declaration
Apex variables are Case-Insensitive
This means that the code given below will throw an error since the variable 'm' has been declared two times and both will be treated as the same.
Integer m = 100;
for (Integer i = 0; i<10; i++) {
   integer m = 1; //This statement will throw an error as m is being declared
   again
   System.debug('This code will throw error');
}
Scope of Variables
An Apex variable is valid from the point where it is declared in code. So it is not allowed to redefine the same variable again and in code block. Also, if you declare any variable in a method, then that variable scope will be limited to that particular method only. However, class variables can be accessed throughout the class.
Example
//Declare variable Products
List<string> Products = new List<strings>();
Products.add('HCL');

//You cannot declare this variable in this code clock or sub code block again
//If you do so then it will throw the error as the previous variable in scope
//Below statement will throw error if declared in same code block
List<string> Products = new List<strings>();
Apex - Strings
String in Apex, as in any other programming language, is any set of characters with no character limit.
Example
String companyName = 'Abc International';
System.debug('Value companyName variable'+companyName);
String Methods
String class in Salesforce has many methods. We will take a look at some of the most important and frequently used string methods in this chapter.
contains
This method will return true if the given string contains the substring mentioned.
Syntax
public Boolean contains(String substring)
Example
String myProductName1 = 'HCL';
String myProductName2 = 'NAHCL';
Boolean result = myProductName2.contains(myProductName1);
System.debug('O/p will be true as it contains the String and Output is:'+result);
equals
This method will return true if the given string and the string passed in the method have the same binary sequence of characters and they are not null. You can compare the SFDC record id as well using this method. This method is case-sensitive.
Syntax
public Boolean equals(Object string)
Example
String myString1 = 'MyString';
String myString2 = 'MyString';
Boolean result = myString2.equals(myString1);
System.debug('Value of Result will be true as they are same and Result is:'+result);
equalsIgnoreCase
This method will return true if stringtoCompare has the same sequence of characters as the given string. However, this method is not case-sensitive.
Syntax
public Boolean equalsIgnoreCase(String stringtoCompare)
Example
The following code will return true as string characters and sequence are same, ignoring the case sensitivity.
String myString1 = 'MySTRING';
String myString2 = 'MyString';
Boolean result = myString2.equalsIgnoreCase(myString1);
System.debug('Value of Result will be true as they are same and Result is:'+result);
remove
This method removes the string provided in stringToRemove from the given string. This is useful when you want to remove some specific characters from string and are not aware of the exact index of the characters to remove. This method is case sensitive and will not work if the same character sequence occurs but case is different.
Syntax
public String remove(String stringToRemove)
Example
String myString1 = 'This Is MyString Example';
String stringToRemove = 'MyString';
String result = myString1.remove(stringToRemove);
System.debug('Value of Result will be 'This Is Example' as we have removed the MyString
   and Result is :'+result);
removeEndIgnoreCase
This method removes the string provided in stringToRemove from the given string but only if it occurs at the end. This method is not case-sensitive.
Syntax
public String removeEndIgnoreCase(String stringToRemove)
Example
String myString1 = 'This Is MyString EXAMPLE';
String stringToRemove = 'Example';
String result = myString1.removeEndIgnoreCase(stringToRemove);
System.debug('Value of Result will be 'This Is MyString' as we have removed the 'Example'
   and Result is :'+result);
startsWith
This method will return true if the given string starts with the prefix provided in the method.
Syntax
public Boolean startsWith(String prefix)
Example
String myString1 = 'This Is MyString EXAMPLE';
String prefix = 'This';
Boolean result = myString1.startsWith(prefix);
System.debug(' This will return true as our String starts with string 'This' and the
   Result is :'+result);
Apex - Arrays
Arrays in Apex are basically the same as Lists in Apex. There is no logical distinction between the Arrays and Lists as their internal data structure and methods are also same but the array syntax is little traditional like Java.
Below is the representation of an Array of Products −
Index 0 − HCL
Index 1 − H2SO4
Index 2 − NACL
Index 3 − H2O
Index 4 − N2
Index 5 − U296
Syntax
<String> [] arrayOfProducts = new List<String>();
Example
Suppose, we have to store the name of our Products we can use the Array where in, we will store the Product Names as shown below. You can access the particular Product by specifying the index.
//Defining array
String [] arrayOfProducts = new List<String>();

//Adding elements in Array
arrayOfProducts.add('HCL');
arrayOfProducts.add('H2SO4');
arrayOfProducts.add('NACL');
arrayOfProducts.add('H2O');
arrayOfProducts.add('N2');
arrayOfProducts.add('U296');

for (Integer i = 0; i<arrayOfProducts.size(); i++) {
   //This loop will print all the elements in array
   system.debug('Values In Array: '+arrayOfProducts[i]);
}
Accessing array element by using index
You can access any element in array by using the index as shown below −
//Accessing the element in array
//We would access the element at Index 3
System.debug('Value at Index 3 is :'+arrayOfProducts[3]);
Apex - Constants
As in any other programming language, Constants are the variables which do not change their value once declared or assigned a value.
In Apex, Constants are used when we want to define variables which should have constant value throughout the program execution. Apex constants are declared with the keyword 'final'.
Example
Consider a CustomerOperationClass class and a constant variable regularCustomerDiscount inside it −
public class CustomerOperationClass {
   static final Double regularCustomerDiscount = 0.1;
   static Double finalPrice = 0;

   public static Double provideDiscount (Integer price) {
      //calculate the discount
      finalPrice = price - price * regularCustomerDiscount;
      return finalPrice;
   }
}
To see the Output of the above class, you have to execute the following code in the Developer Console Anonymous Window −
Double finalPrice = CustomerOperationClass.provideDiscount(100);
System.debug('finalPrice '+finalPrice);
Apex - Decision Making
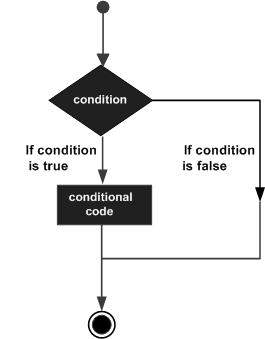
Decision-making structures require that the programmer specify one or more conditions to be evaluated or tested by the program, along with a statement or statements to be executed if the condition is determined to be true, and optionally, other statements to be executed if the condition is determined to be false.
In this chapter, we will be studying the basic and advanced structure of decision-making and conditional statements in Apex. Decision-making is necessary to control the flow of execution when certain condition is met or not. Following is the general form of a typical decision-making structure found in most of the programming languages
| Sr.No. | Statement & Description |
|---|---|
| 1 | if statement
An if statement consists of a Boolean expression followed by one or more statements. |
| 2 | if...else statement
An if statement can be followed by an optional else statement, which executes when the Boolean expression is false. |
| 3 | if...elseif...else statement
An if statement can be followed by an optional else if...else statement, which is very useful to test various conditions using single if...else if statement. |
| 4 | nested if statement
You can use one if or else if statement inside another if or else if statement(s). |
Apex - Loops
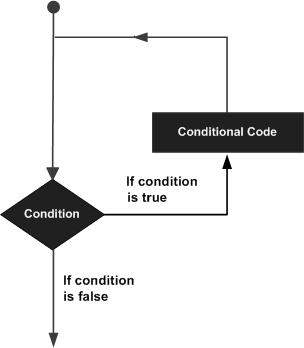
Loops are used when a particular piece of code should be repeated with the desired number of iteration. Apex supports the standard traditional for loop as well as other advanced types of Loops. In this chapter, we will discuss in detail about the Loops in Apex.
A loop statement allows us to execute a statement or group of statements multiple times and following is the general from of a loop statement in most of the programming languages −
The following tables lists down the different Loops that handle looping requirements in Apex Programming language. Click the following links to check their detail.
| Sr.No. | Loop Type & Description |
|---|---|
| 1 | for loop
This loop performs a set of statements for each item in a set of records. |
| 2 | SOQL for loop
Execute a sequence of statements directly over the returned set o SOQL query. |
| 3 | Java-like for loop
Execute a sequence of statements in traditional Java-like syntax. |
| 4 | while loop
Repeats a statement or group of statements while a given condition is true. It tests the condition before executing the loop body. |
| 5 | do...while loop
Like a while statement, except that it tests the condition at the end of the loop body. |
Apex - Collections
Collections is a type of variable that can store multiple number of records. For example, List can store multiple number of Account object's records. Let us now have a detailed overview of all collection types.
Lists
List can contain any number of records of primitive, collections, sObjects, user defined and built in Apex type. This is one of the most important type of collection and also, it has some system methods which have been tailored specifically to use with List. List index always starts with 0. This is synonymous to the array in Java. A list should be declared with the keyword 'List'.
Example
Below is the list which contains the List of a primitive data type (string), that is the list of cities.
List<string> ListOfCities = new List<string>();
System.debug('Value Of ListOfCities'+ListOfCities);
Declaring the initial values of list is optional. However, we will declare the initial values here. Following is an example which shows the same.
List<string> ListOfStates = new List<string> {'NY', 'LA', 'LV'};
System.debug('Value ListOfStates'+ListOfStates);
List of Accounts (sObject)
List<account> AccountToDelete = new List<account> (); //This will be null
System.debug('Value AccountToDelete'+AccountToDelete);
We can declare the nested List as well. It can go up to five levels. This is called the Multidimensional list.
This is the list of set of integers.
List<List<Set<Integer>>> myNestedList = new List<List<Set<Integer>>>();
System.debug('value myNestedList'+myNestedList);
List can contain any number of records, but there is a limitation on heap size to prevent the performance issue and monopolizing the resources.
Methods for Lists
There are methods available for Lists which we can be utilized while programming to achieve some functionalities like calculating the size of List, adding an element, etc.
Following are some most frequently used methods −
- size()
- add()
- get()
- clear()
- set()
The following example demonstrates the use of all these methods
// Initialize the List
List<string> ListOfStatesMethod = new List<string>();

// This statement would give null as output in Debug logs
System.debug('Value of List'+ ListOfStatesMethod);

// Add element to the list using add method
ListOfStatesMethod.add('New York');
ListOfStatesMethod.add('Ohio');

// This statement would give New York and Ohio as output in Debug logs
System.debug('Value of List with new States'+ ListOfStatesMethod);

// Get the element at the index 0
String StateAtFirstPosition = ListOfStatesMethod.get(0);

// This statement would give New York as output in Debug log
System.debug('Value of List at First Position'+ StateAtFirstPosition);

// set the element at 1 position
ListOfStatesMethod.set(0, 'LA');

// This statement would give output in Debug log
System.debug('Value of List with element set at First Position' + ListOfStatesMethod[0]);

// Remove all the elements in List
ListOfStatesMethod.clear();

// This statement would give output in Debug log
System.debug('Value of List'+ ListOfStatesMethod);
You can use the array notation as well to declare the List, as given below, but this is not general practice in Apex programming −
String [] ListOfStates = new List<string>();
Sets
A Set is a collection type which contains multiple number of unordered unique records. A Set cannot have duplicate records. Like Lists, Sets can be nested.
Example
We will be defining the set of products which company is selling.
Set<string> ProductSet = new Set<string>{'Phenol', 'Benzene', 'H2SO4'};
System.debug('Value of ProductSet'+ProductSet);
Methods for Sets
Set does support methods which we can utilize while programming as shown below (we are extending the above example) −
// Adds an element to the set
// Define set if not defined previously
Set<string> ProductSet = new Set<string>{'Phenol', 'Benzene', 'H2SO4'};
ProductSet.add('HCL');
System.debug('Set with New Value '+ProductSet);

// Removes an element from set
ProductSet.remove('HCL');
System.debug('Set with removed value '+ProductSet);

// Check whether set contains the particular element or not and returns true or false
ProductSet.contains('HCL');
System.debug('Value of Set with all values '+ProductSet);
Maps
It is a key value pair which contains the unique key for each value. Both key and value can be of any data type.
Example
The following example represents the map of the Product Name with the Product code.
// Initialize the Map
Map<string, string> ProductCodeToProductName = new Map<string, string>
{'1000'=>'HCL', '1001'=>'H2SO4'};

// This statement would give as output as key value pair in Debug log
System.debug('value of ProductCodeToProductName'+ProductCodeToProductName);
Methods for Maps
Following are a few examples which demonstrate the methods that can be used with Map −
// Define a new map
Map<string, string> ProductCodeToProductName = new Map<string, string>();

// Insert a new key-value pair in the map where '1002' is key and 'Acetone' is value
ProductCodeToProductName.put('1002', 'Acetone');

// Insert a new key-value pair in the map where '1003' is key and 'Ketone' is value
ProductCodeToProductName.put('1003', 'Ketone');

// Assert that the map contains a specified key and respective value
System.assert(ProductCodeToProductName.containsKey('1002'));
System.debug('If output is true then Map contains the key and output is:'
   + ProductCodeToProductName.containsKey('1002'));

// Retrieves a value, given a particular key
String value = ProductCodeToProductName.get('1002');
System.debug('Value at the Specified key using get function: '+value);

// Return a set that contains all of the keys in the map
Set SetOfKeys = ProductCodeToProductName.keySet();
System.debug('Value of Set with Keys '+SetOfKeys);
Map values may be unordered and hence we should not rely on the order in which the values are stored and try to access the map always using keys. Map value can be null. Map keys when declared String are case-sensitive; for example, ABC and abc will be considered as different keys and treated as unique.
Apex - Classes
What is a Class?
A class is a template or blueprint from which objects are created. An object is an instance of a class. This is the standard definition of Class. Apex Classes are similar to Java Classes.
For example, InvoiceProcessor class describes the class which has all the methods and actions that can be performed on the Invoice. If you create an instance of this class, then it will represent the single invoice which is currently in context.
Creating Classes
You can create class in Apex from the Developer Console, Force.com Eclipse IDE and from Apex Class detail page as well.
From Developer Console
Follow these steps to create an Apex class from the Developer Console −
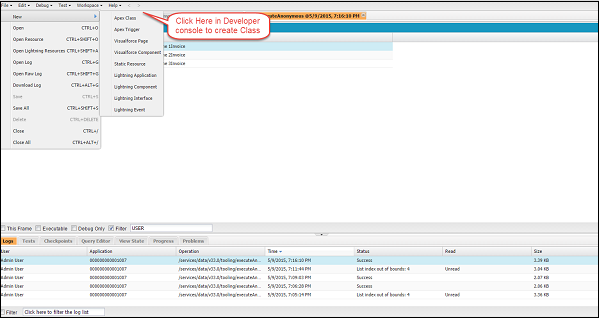
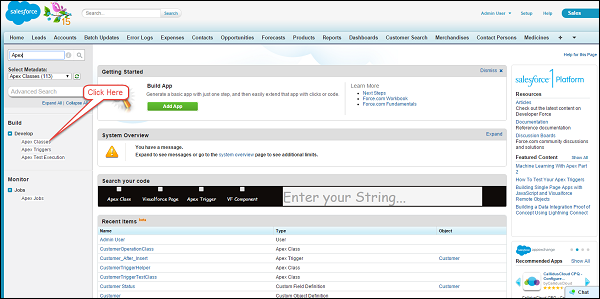
Step 1 − Go to Name and click on the Developer Console.
Step 2 − Click on File ⇒ New and then click on the Apex class.
From Force.com IDE
Follow these steps to create a class from Force.com IDE −
Step 1 − Open Force.com Eclipse IDE
Step 2 − Create a New Project by clicking on File ⇒ New ⇒ Apex Class.
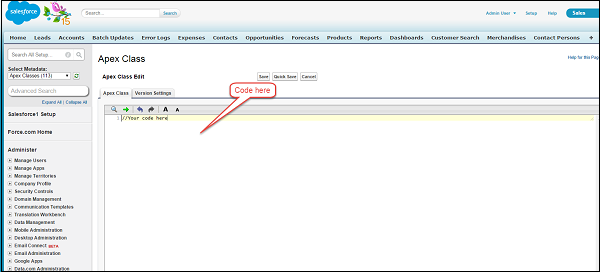
Step 3 − Provide the Name for the Class and click on OK.
Once this is done, the new class will be created.
From Apex Class Detail Page
Follow these steps to create a class from Apex Class Detail Page −
Step 1 − Click on Name ⇒ Setup.
Step 2 − Search for 'Apex Class' and click on the link. It will open the Apex Class details page.
Step 3 − Click on 'New' and then provide the Name for class and then click Save.
Apex Class Structure
Below is the sample structure for Apex class definition.
Syntax
private | public | global
[virtual | abstract | with sharing | without sharing]
class ClassName [implements InterfaceNameList] [extends ClassName] {
   // Classs Body
}
This definition uses a combination of access modifiers, sharing modes, class name and class body. We will look at all these options further.
Example
Following is a sample structure for Apex class definition −
public class MySampleApexClass {       //Class definition and body
   public static Integer myValue = 0;  //Class Member variable
   public static String myString = ''; //Class Member variable

   public static Integer getCalculatedValue () {
   // Method definition and body
   // do some calculation
      myValue = myValue+10;
      return myValue;
   }
}
Access Modifiers
Private
If you declare the access modifier as 'Private', then this class will be known only locally and you cannot access this class outside of that particular piece. By default, classes have this modifier.
Public
If you declare the class as 'Public' then this implies that this class is accessible to your organization and your defined namespace. Normally, most of the Apex classes are defined with this keyword.
Global
If you declare the class as 'global' then this will be accessible by all apex codes irrespective of your organization. If you have method defined with web service keyword, then you must declare the containing class with global keyword.
Sharing Modes
Let us now discuss the different modes of sharing.
With Sharing
This is a special feature of Apex Classes in Salesforce. When a class is specified with 'With Sharing' keyword then it has following implications: When the class will get executed, it will respect the User's access settings and profile permission. Suppose, User's action has triggered the record update for 30 records, but user has access to only 20 records and 10 records are not accessible. Then, if the class is performing the action to update the records, only 20 records will be updated to which the user has access and rest of 10 records will not be updated. This is also called as the User mode.
Without Sharing
Even if the User does not have access to 10 records out of 30, all the 30 records will be updated as the Class is running in the System mode, i.e., it has been defined with Without Sharing keyword. This is called the System Mode.
Virtual
If you use the 'virtual' keyword, then it indicates that this class can be extended and overrides are allowed. If the methods need to be overridden, then the classes should be declared with the virtual keyword.
Abstract
If you declare the class as 'abstract', then it will only contain the signature of method and not the actual implementation.
Class Variables
Syntax
[public | private | protected | global] [final] [static] data_type
variable_name [= value]
In the above syntax −
- Variable data type and variable name are mandatory
- Access modifiers and value are optional.
Example
public static final Integer myvalue;
Apex - Methods
Class Methods
There are two modifiers for Class Methods in Apex Public or Protected. Return type is mandatory for method and if method is not returning anything then you must mention void as the return type. Additionally, Body is also required for method.
Syntax
[public | private | protected | global]
[override]
[static]

return_data_type method_name (input parameters) {
   // Method body goes here
}
Explanation of Syntax
Those parameters mentioned in the square brackets are optional. However, the following components are essential −
- return_data_type
- method_name
Access Modifiers for Class Methods
Using access modifiers, you can specify access level for the class methods. For Example, Public method will be accessible from anywhere in the class and outside of the Class. Private method will be accessible only within the class. Global will be accessible by all the Apex classes and can be exposed as web service method accessible by other apex classes.
Example
//Method definition and body
public static Integer getCalculatedValue () {

   //do some calculation
   myValue = myValue+10;
   return myValue;
}
This method has return type as Integer and takes no parameter.
A Method can have parameters as shown in the following example −
// Method definition and body, this method takes parameter price which will then be used
// in method.

public static Integer getCalculatedValueViaPrice (Decimal price) {
   // do some calculation
   myValue = myValue+price;
   return myValue;
}
Class Constructors
A constructor is a code that is invoked when an object is created from the class blueprint. It has the same name as the class name.
We do not need to define the constructor for every class, as by default a no-argument constructor gets called. Constructors are useful for initialization of variables or when a process is to be done at the time of class initialization. For example, you will like to assign values to certain Integer variables as 0 when the class gets called.
Example
// Class definition and body
public class MySampleApexClass2 {
   public static Double myValue;   // Class Member variable
   public static String myString;  // Class Member variable

   public MySampleApexClass2 () {
      myValue = 100; //initialized variable when class is called
   }

   public static Double getCalculatedValue () { // Method definition and body
      // do some calculation
      myValue = myValue+10;
      return myValue;
   }

   public static Double getCalculatedValueViaPrice (Decimal price) {
      // Method definition and body
      // do some calculation
      myValue = myValue+price; // Final Price would be 100+100=200.00
      return myValue;
   }
}
You can call the method of class via constructor as well. This may be useful when programming Apex for visual force controller. When class object is created, then constructor is called as shown below −
// Class and constructor has been instantiated
MySampleApexClass2 objClass = new MySampleApexClass2();
Double FinalPrice = MySampleApexClass2.getCalculatedValueViaPrice(100);
System.debug('FinalPrice: '+FinalPrice);
Overloading Constructors
Constructors can be overloaded, i.e., a class can have more than one constructor defined with different parameters.
Example
public class MySampleApexClass3 {  // Class definition and body
   public static Double myValue;   // Class Member variable
   public static String myString;  // Class Member variable

   public MySampleApexClass3 () {
      myValue = 100; // initialized variable when class is called
      System.debug('myValue variable with no Overaloading'+myValue);
   }

   public MySampleApexClass3 (Integer newPrice) { // Overloaded constructor
      myValue = newPrice; // initialized variable when class is called
      System.debug('myValue variable with Overaloading'+myValue);
   }

      public static Double getCalculatedValue () { // Method definition and body
      // do some calculation
      myValue = myValue+10;
      return myValue;
   }

   public static Double getCalculatedValueViaPrice (Decimal price) {
      // Method definition and body
      // do some calculation
      myValue = myValue+price;
      return myValue;
   }
}
You can execute this class as we have executed it in previous example.
// Developer Console Code
MySampleApexClass3 objClass = new MySampleApexClass3();
Double FinalPrice = MySampleApexClass3.getCalculatedValueViaPrice(100);
System.debug('FinalPrice: '+FinalPrice);
Apex - Objects
An instance of class is called Object. In terms of Salesforce, object can be of class or you can create an object of sObject as well.
Object Creation from Class
You can create an object of class as you might have done in Java or other object-oriented programming language.
Following is an example Class called MyClass −
// Sample Class Example
public class MyClass {
   Integer myInteger = 10;

   public void myMethod (Integer multiplier) {
      Integer multiplicationResult;
      multiplicationResult = multiplier*myInteger;
      System.debug('Multiplication is '+multiplicationResult);
   }
}
This is an instance class, i.e., to call or access the variables or methods of this class, you must create an instance of this class and then you can perform all the operations.
// Object Creation
// Creating an object of class
MyClass objClass = new MyClass();

// Calling Class method using Class instance
objClass.myMethod(100);
sObject creation
sObjects are the objects of Salesforce in which you store the data. For example, Account, Contact, etc., are custom objects. You can create object instances of these sObjects.
Following is an example of sObject initialization and shows how you can access the field of that particular object using dot notation and assign the values to fields.
// Execute the below code in Developer console by simply pasting it
// Standard Object Initialization for Account sObject
Account objAccount = new Account(); // Object initialization
objAccount.Name = 'Testr Account'; // Assigning the value to field Name of Account
objAccount.Description = 'Test Account';
insert objAccount; // Creating record using DML
System.debug('Records Has been created '+objAccount);

// Custom sObject initialization and assignment of values to field
APEX_Customer_c objCustomer = new APEX_Customer_c ();
objCustomer.Name = 'ABC Customer';
objCustomer.APEX_Customer_Decscription_c = 'Test Description';
insert objCustomer;
System.debug('Records Has been created '+objCustomer);
Static Initialization
Static methods and variables are initialized only once when a class is loaded. Static variables are not transmitted as part of the view state for a Visualforce page.
Following is an example of Static method as well as Static variable.
// Sample Class Example with Static Method
public class MyStaticClass {
   Static Integer myInteger = 10;

   public static void myMethod (Integer multiplier) {
      Integer multiplicationResult;
      multiplicationResult = multiplier * myInteger;
      System.debug('Multiplication is '+multiplicationResult);
   }
}

// Calling the Class Method using Class Name and not using the instance object
MyStaticClass.myMethod(100);
Static Variable Use
Static variables will be instantiated only once when class is loaded and this phenomenon can be used to avoid the trigger recursion. Static variable value will be same within the same execution context and any class, trigger or code which is executing can refer to it and prevent the recursion.
Apex - Interfaces
An interface is like an Apex class in which none of the methods have been implemented. It only contains the method signatures, but the body of each method is empty. To use an interface, another class must implement it by providing a body for all of the methods contained in the interface.
Interfaces are used mainly for providing the abstraction layer for your code. They separate the implementation from declaration of the method.
Let's take an example of our Chemical Company. Suppose that we need to provide the discount to Premium and Ordinary customers and discounts for both will be different.
We will create an Interface called the DiscountProcessor.
// Interface
public interface DiscountProcessor {
   Double percentageDiscountTobeApplied(); // method signature only
}

// Premium Customer Class
public class PremiumCustomer implements DiscountProcessor {

   //Method Call
   public Double percentageDiscountTobeApplied () {

      // For Premium customer, discount should be 30%
      return 0.30;
   }
}

// Normal Customer Class
public class NormalCustomer implements DiscountProcessor {

   // Method Call
   public Double percentageDiscountTobeApplied () {

      // For Premium customer, discount should be 10%
      return 0.10;
   }
}
When you implement the Interface then it is mandatory to implement the method of that Interface. If you do not implement the Interface methods, it will throw an error. You should use Interfaces when you want to make the method implementation mandatory for the developer.
Standard Salesforce Interface for Batch Apex
SFDC do have standard interfaces like Database.Batchable, Schedulable, etc. For example, if you implement the Database.Batchable Interface, then you must implement the three methods defined in the Interface Start, Execute and Finish.
Below is an example for Standard Salesforce provided Database.Batchable Interface which sends out emails to users with the Batch Status. This interface has 3 methods, Start, Execute and Finish. Using this interface, we can implement the Batchable functionality and it also provides the BatchableContext variable which we can use to get more information about the Batch which is executing and to perform other functionalities.
global class CustomerProessingBatch implements Database.Batchable<sobject7>,
Schedulable {
   // Add here your email address
   global String [] email = new String[] {'test@test.com'};

   // Start Method
   global Database.Querylocator start (Database.BatchableContext BC) {

      // This is the Query which will determine the scope of Records and fetching the same
      return Database.getQueryLocator('Select id, Name, APEX_Customer_Status__c,
         APEX_Customer_Decscription__c From APEX_Customer__c WHERE createdDate = today
         && APEX_Active__c = true');
   }

   // Execute method
   global void execute (Database.BatchableContext BC, List<sobject> scope) {
      List<apex_customer__c> customerList = new List<apex_customer__c>();
      List<apex_customer__c> updtaedCustomerList = new List<apex_customer__c>();

      for (sObject objScope: scope) {
         // type casting from generic sOject to APEX_Customer__c
         APEX_Customer__c newObjScope = (APEX_Customer__c)objScope ;
         newObjScope.APEX_Customer_Decscription__c = 'Updated Via Batch Job';
         newObjScope.APEX_Customer_Status__c = 'Processed';

         // Add records to the List
         updtaedCustomerList.add(newObjScope);
      }

      // Check if List is empty or not
      if (updtaedCustomerList != null && updtaedCustomerList.size()>0) {

         // Update the Records
         Database.update(updtaedCustomerList); System.debug('List Size
            '+updtaedCustomerList.size());
      }
   }

   // Finish Method
   global void finish(Database.BatchableContext BC) {
      Messaging.SingleEmailMessage mail = new Messaging.SingleEmailMessage();

      // get the job Id
      AsyncApexJob a = [Select a.TotalJobItems, a.Status, a.NumberOfErrors,
      a.JobType, a.JobItemsProcessed, a.ExtendedStatus, a.CreatedById,
      a.CompletedDate From AsyncApexJob a WHERE id = :BC.getJobId()];
      System.debug('$$$ Jobid is'+BC.getJobId());

      // below code will send an email to User about the status
      mail.setToAddresses(email);

      // Add here your email address
      mail.setReplyTo('test@test.com');
      mail.setSenderDisplayName('Apex Batch Processing Module');
      mail.setSubject('Batch Processing '+a.Status);
      mail.setPlainTextBody('The Batch Apex job processed
         '+a.TotalJobItems+'batches with '+a.NumberOfErrors+'failures'+'Job Item
         processed are'+a.JobItemsProcessed);
      Messaging.sendEmail(new Messaging.Singleemailmessage [] {mail});
   }

   // Scheduler Method to scedule the class
   global void execute(SchedulableContext sc) {
      CustomerProessingBatch conInstance = new CustomerProessingBatch();
      database.executebatch(conInstance,100);
   }
}
To execute this class, you have to run the below code in the Developer Console.
CustomerProessingBatch objBatch = new CustomerProessingBatch ();
Database.executeBatch(objBatch);
Apex - DML
In this chapter, we will discuss how to perform the different Database Modification Functionalities in Salesforce. There are two says with which we can perform the functionalities.
DML Statements
DML are the actions which are performed in order to perform insert, update, delete, upsert, restoring records, merging records, or converting leads operation.
DML is one of the most important part in Apex as almost every business case involves the changes and modifications to database.
Database Methods
All operations which you can perform using DML statements can be performed using Database methods as well. Database methods are the system methods which you can use to perform DML operations. Database methods provide more flexibility as compared to DML Statements.
In this chapter, we will be looking at the first approach using DML Statements. We will look at the Database Methods in a subsequent chapter.
DML Statements
Let us now consider the instance of the Chemical supplier company again. Our Invoice records have fields as Status, Amount Paid, Amount Remaining, Next Pay Date and Invoice Number. Invoices which have been created today and have their status as 'Pending', should be updated to 'Paid'.
Insert Operation
Insert operation is used to create new records in Database. You can create records of any Standard or Custom object using the Insert DML statement.
Example
We can create new records in APEX_Invoice__c object as new invoices are being generated for new customer orders every day. We will create a Customer record first and then we can create an Invoice record for that new Customer record.
// fetch the invoices created today, Note, you must have at least one invoice
// created today

List<apex_invoice__c> invoiceList = [SELECT id, Name, APEX_Status__c,
   createdDate FROM APEX_Invoice__c WHERE createdDate = today];

// create List to hold the updated invoice records
List<apex_invoice__c> updatedInvoiceList = new List<apex_invoice__c>();
APEX_Customer__c objCust = new APEX_Customer__C();
objCust.Name = 'Test ABC';

//DML for Inserting the new Customer Records
insert objCust;
for (APEX_Invoice__c objInvoice: invoiceList) {
   if (objInvoice.APEX_Status__c == 'Pending') {
      objInvoice.APEX_Status__c = 'Paid';
      updatedInvoiceList.add(objInvoice);
   }
}

// DML Statement to update the invoice status
update updatedInvoiceList;

// Prints the value of updated invoices
System.debug('List has been updated and updated values are' + updatedInvoiceList);

// Inserting the New Records using insert DML statement
APEX_Invoice__c objNewInvoice = new APEX_Invoice__c();
objNewInvoice.APEX_Status__c = 'Pending';
objNewInvoice.APEX_Amount_Paid__c = 1000;
objNewInvoice.APEX_Customer__c = objCust.id;

// DML which is creating the new Invoice record which will be linked with newly
// created Customer record
insert objNewInvoice;
System.debug('New Invoice Id is '+objNewInvoice.id+' and the Invoice Number is'
   + objNewInvoice.Name);
Update Operation
Update operation is to perform updates on existing records. In this example, we will be updating the Status field of an existing Invoice record to 'Paid'.
Example
// Update Statement Example for updating the invoice status. You have to create
and Invoice records before executing this code. This program is updating the
record which is at index 0th position of the List.

// First, fetch the invoice created today
List<apex_invoice__c> invoiceList = [SELECT id, Name, APEX_Status__c,
createdDate FROM APEX_Invoice__c];
List<apex_invoice__c> updatedInvoiceList = new List<apex_invoice__c>();

// Update the first record in the List
invoiceList[0].APEX_Status__c = 'Pending';
updatedInvoiceList.add(invoiceList[0]);

// DML Statement to update the invoice status
update updatedInvoiceList;

// Prints the value of updated invoices
System.debug('List has been updated and updated values of records are'
   + updatedInvoiceList[0]);
Upsert Operation
Upsert Operation is used to perform an update operation and if the records to be updated are not present in database, then create new records as well.
Example
Suppose, the customer records in Customer object need to be updated. We will update the existing Customer record if it is already present, else create a new one. This will be based on the value of field APEX_External_Id__c. This field will be our field to identify if the records are already present or not.
Note − Before executing this code, please create a record in Customer object with the external Id field value as '12341' and then execute the code given below −
// Example for upserting the Customer records
List<apex_customer__c> CustomerList = new List<apex_customer__c>();
for (Integer i = 0; i < 10; i++) {
   apex_customer__c objcust=new apex_customer__c(name = 'Test' +i,
   apex_external_id__c='1234' +i);
   customerlist.add(objcust);
} //Upserting the Customer Records

upsert CustomerList;

System.debug('Code iterated for 10 times and created 9 records as one record with
   External Id 12341 is already present');

for (APEX_Customer_c objCustomer: CustomerList) {
   if (objCustomer.APEX_External_Id_c == '12341') {
      system.debug('The Record which is already present is '+objCustomer);
   }
}
Delete Operation
You can perform the delete operation using the Delete DML.
Example
In this case, we will delete the invoices which have been created for the testing purpose, that is the ones which contain the name as 'Test'.
You can execute this snippet from the Developer console as well without creating the class.
// fetch the invoice created today
List<apex_invoice__c> invoiceList = [SELECT id, Name, APEX_Status__c,
createdDate FROM APEX_Invoice__c WHERE createdDate = today];
List<apex_invoice__c> updatedInvoiceList = new List<apex_invoice__c>();
APEX_Customer__c objCust = new APEX_Customer__C();
objCust.Name = 'Test';

// Inserting the Customer Records
insert objCust;
for (APEX_Invoice__c objInvoice: invoiceList) {
   if (objInvoice.APEX_Status__c == 'Pending') {
      objInvoice.APEX_Status__c = 'Paid';
      updatedInvoiceList.add(objInvoice);
   }
}

// DML Statement to update the invoice status
update updatedInvoiceList;

// Prints the value of updated invoices
System.debug('List has been updated and updated values are' + updatedInvoiceList);

// Inserting the New Records using insert DML statement
APEX_Invoice__c objNewInvoice = new APEX_Invoice__c();
objNewInvoice.APEX_Status__c = 'Pending';
objNewInvoice.APEX_Amount_Paid__c = 1000;
objNewInvoice.APEX_Customer__c = objCust.id;

// DML which is creating the new record
insert objNewInvoice;
System.debug('New Invoice Id is' + objNewInvoice.id);

// Deleting the Test invoices from Database
// fetch the invoices which are created for Testing, Select name which Customer Name
// is Test.
List<apex_invoice__c> invoiceListToDelete = [SELECT id FROM APEX_Invoice__c
   WHERE APEX_Customer__r.Name = 'Test'];

// DML Statement to delete the Invoices
delete invoiceListToDelete;
System.debug('Success, '+invoiceListToDelete.size()+' Records has been deleted');
Undelete Operation
You can undelete the record which has been deleted and is present in Recycle bin. All the relationships which the deleted record has, will also be restored.
Example
Suppose, the Records deleted in the previous example need to be restored. This can be achieved using the following example. The code in the previous example has been modified for this example.
// fetch the invoice created today
List<apex_invoice__c> invoiceList = [SELECT id, Name, APEX_Status__c,
createdDate FROM APEX_Invoice__c WHERE createdDate = today];
List<apex_invoice__c> updatedInvoiceList = new List<apex_invoice__c>();
APEX_Customer__c objCust = new APEX_Customer__C();
objCust.Name = 'Test';

// Inserting the Customer Records
insert objCust;
for (APEX_Invoice__c objInvoice: invoiceList) {
   if (objInvoice.APEX_Status__c == 'Pending') {
      objInvoice.APEX_Status__c = 'Paid';
      updatedInvoiceList.add(objInvoice);
   }
}

// DML Statement to update the invoice status
update updatedInvoiceList;

// Prints the value of updated invoices
System.debug('List has been updated and updated values are' + updatedInvoiceList);

// Inserting the New Records using insert DML statement
APEX_Invoice__c objNewInvoice = new APEX_Invoice__c();
objNewInvoice.APEX_Status__c = 'Pending';
objNewInvoice.APEX_Amount_Paid__c = 1000;
objNewInvoice.APEX_Customer__c = objCust.id;

// DML which is creating the new record
insert objNewInvoice;
System.debug('New Invoice Id is '+objNewInvoice.id);

// Deleting the Test invoices from Database
// fetch the invoices which are created for Testing, Select name which Customer Name
// is Test.
List<apex_invoice__c> invoiceListToDelete = [SELECT id FROM APEX_Invoice__c
   WHERE APEX_Customer__r.Name = 'Test'];

// DML Statement to delete the Invoices
delete invoiceListToDelete;
system.debug('Deleted Record Count is ' + invoiceListToDelete.size());
System.debug('Success, '+invoiceListToDelete.size() + 'Records has been deleted');

// Restore the deleted records using undelete statement
undelete invoiceListToDelete;
System.debug('Undeleted Record count is '+invoiceListToDelete.size()+'. This should
   be same as Deleted Record count');
Apex - Database Methods
Database class methods is another way of working with DML statements which are more flexible than DML Statements like insert, update, etc.
Differences between Database Methods and DML Statements
| DML Statements | Database Methods |
|---|---|
| Partial Update is not allowed. For example, if you have 20 records in list, then either all the records will be updated or none. | Partial update is allowed. You can specify the Parameter in Database method as true or false, true to allow the partial update and false for not allowing the same. |
| You cannot get the list of success and failed records. | You can get the list of success and failed records as we have seen in the example. |
| Example − insert listName | Example − Database.insert(listName, False), where false indicate that partial update is not allowed. |
Insert Operation
Inserting new records via database methods is also quite simple and flexible. Let us consider the previous scenario wherein, we have inserted new records using the DML statements. We will be inserting the same using Database methods.
Example
// Insert Operation Using Database methods
// Insert Customer Records First using simple DML Statement. This Customer Record will be
// used when we will create Invoice Records
APEX_Customer__c objCust = new APEX_Customer__C();
objCust.Name = 'Test';
insert objCust; // Inserting the Customer Records

// Insert Operation Using Database methods
APEX_Invoice__c objNewInvoice = new APEX_Invoice__c();
List<apex_invoice__c> InvoiceListToInsert = new List<apex_invoice__c>();
objNewInvoice.APEX_Status__c = 'Pending';
objNewInvoice.APEX_Customer__c = objCust.id;
objNewInvoice.APEX_Amount_Paid__c = 1000;
InvoiceListToInsert.add(objNewInvoice);
Database.SaveResult[] srList = Database.insert(InvoiceListToInsert, false);

// Database method to insert the records in List
// Iterate through each returned result by the method

for (Database.SaveResult sr : srList) {
   if (sr.isSuccess()) {
      // This condition will be executed for successful records and will fetch the ids
      // of successful records
      System.debug('Successfully inserted Invoice. Invoice ID: ' + sr.getId());
      // Get the invoice id of inserted Account
   } else {
      // This condition will be executed for failed records
      for(Database.Error objErr : sr.getErrors()) {
         System.debug('The following error has occurred.');

         // Printing error message in Debug log
         System.debug(objErr.getStatusCode() + ': ' + objErr.getMessage());
         System.debug('Invoice oject field which are affected by the error:'
            + objErr.getFields());
      }
   }
}
Update Operation
Let us now consider our business case example using the database methods. Suppose we need to update the status field of Invoice object but at the same time, we also require information like status of records, failed record ids, success count, etc. This is not possible by using DML Statements, hence we must use Database methods to get the status of our operation.
Example
We will be updating the Invoice's 'Status' field if it is in status 'Pending' and date of creation is today.
The code given below will help in updating the Invoice records using the Database.update method. Also, create an Invoice record before executing this code.
// Code to update the records using the Database methods
List<apex_invoice__c> invoiceList = [SELECT id, Name, APEX_Status__c,
   createdDate FROM APEX_Invoice__c WHERE createdDate = today];

// fetch the invoice created today
List<apex_invoice__c> updatedInvoiceList = new List<apex_invoice__c>();
for (APEX_Invoice__c objInvoice: invoiceList) {
   if (objInvoice.APEX_Status__c == 'Pending') {
      objInvoice.APEX_Status__c = 'Paid';
      updatedInvoiceList.add(objInvoice);    //Adding records to the list
   }
}

Database.SaveResult[] srList = Database.update(updatedInvoiceList, false);
// Database method to update the records in List

// Iterate through each returned result by the method
for (Database.SaveResult sr : srList) {
   if (sr.isSuccess()) {
      // This condition will be executed for successful records and will fetch
      // the ids of successful records
      System.debug('Successfully updated Invoice. Invoice ID is : ' + sr.getId());
   } else {
      // This condition will be executed for failed records
      for(Database.Error objErr : sr.getErrors()) {
         System.debug('The following error has occurred.');

         // Printing error message in Debug log
         System.debug(objErr.getStatusCode() + ': ' + objErr.getMessage());
         System.debug('Invoice oject field which are affected by the error:'
            + objErr.getFields());
      }
   }
}
We will be looking at only the Insert and Update operations in this tutorial. The other operations are quite similar to these operations and what we did in the last chapter.
Apex - SOSL
Every business or application has search functionality as one of the basic requirements. For this, Salesforce.com provides two major approaches using SOSL and SOQL. Let us discuss the SOSL approach in detail in this chapter.
SOSL
Searching the text string across the object and across the field will be done by using SOSL. This is Salesforce Object Search Language. It has the capability of searching a particular string across multiple objects.
SOSL statements evaluate to a list of sObjects, wherein, each list contains the search results for a particular sObject type. The result lists are always returned in the same order as they were specified in the SOSL query.
SOSL Query Example
Consider a business case wherein, we need to develop a program which can search a specified string. Suppose, we need to search for string 'ABC' in the Customer Name field of Invoice object. The code goes as follows −
First, you have to create a single record in Invoice object with Customer name as 'ABC' so that we can get valid result when searched.
// Program To Search the given string in all Object
// List to hold the returned results of sObject generic type
List<list<SObject>> invoiceSearchList = new List<List<SObject>>();

// SOSL query which will search for 'ABC' string in Customer Name field of Invoice Object
invoiceSearchList = [FIND 'ABC*' IN ALL FIELDS RETURNING APEX_Invoice_c
   (Id,APEX_Customer_r.Name)];

// Returned result will be printed
System.debug('Search Result '+invoiceSearchList);

// Now suppose, you would like to search string 'ABC' in two objects,
// that is Invoice and Account. Then for this query goes like this:

// Program To Search the given string in Invoice and Account object,
// you could specify more objects if you want, create an Account with Name as ABC.

// List to hold the returned results of sObject generic type
List<List<SObject>> invoiceAndSearchList = new List<List<SObject>>();

// SOSL query which will search for 'ABC' string in Invoice and in Account object's fields
invoiceAndSearchList = [FIND 'ABC*' IN ALL FIELDS RETURNING APEX_Invoice__c
   (Id,APEX_Customer__r.Name), Account];

// Returned result will be printed
System.debug('Search Result '+invoiceAndSearchList);

// This list will hold the returned results for Invoice Object
APEX_Invoice__c [] searchedInvoice = ((List<APEX_Invoice_c>)invoiceAndSearchList[0]);

// This list will hold the returned results for Account Object
Account [] searchedAccount = ((List<Account>)invoiceAndSearchList[1]);
System.debug('Value of searchedInvoice'+searchedInvoice+'Value of searchedAccount'
   + searchedAccount);
SOQL
This is almost the same as SOQL. You can use this to fetch the object records from one object only at a time. You can write nested queries and also fetch the records from parent or child object on which you are querying now.
We will explore SOQL in the next chapter.
Apex - SOQL
This is Salesforce Object Query Language designed to work with SFDC Database. It can search a record on a given criterion only in single sObject.
Like SOSL, it cannot search across multiple objects but it does support nested queries.
SOQL Example
Consider our ongoing example of Chemical Company. Suppose, we need a list of records which are created today and whose customer name is not 'test'. In this case, we will have to use the SOQL query as given below −
// fetching the Records via SOQL
List<apex_invoice__c> InvoiceList = new List<apex_invoice__c>();
InvoiceList = [SELECT Id, Name, APEX_Customer__r.Name, APEX_Status__c FROM
   APEX_Invoice__c WHERE createdDate = today AND APEX_Customer__r.Name != 'Test'];
// SOQL query for given criteria

// Printing the fetched records
System.debug('We have total '+InvoiceList.size()+' Records in List');

for (APEX_Invoice__c objInvoice: InvoiceList) {
   System.debug('Record Value is '+objInvoice);
   // Printing the Record fetched
}
You can run the SOQL query via the Query Editor in the Developer console as shown below.
Run the query given below in the Developer Console. Search for the Invoice records created today.
SELECT Id, Name, APEX_Customer__r.Name, APEX_Status__c FROM APEX_Invoice__c
   WHERE createdDate = today
You must select the fields for which you need the values, otherwise, it can throw run time errors.
Traversing Relationship Fields
This is one of the most important parts in SFDC as many times we need to traverse through the parent child object relationship
Also, there may be cases when you need to insert two associated objects records in Database. For example, Invoice object has relationship with the Customer object and hence one Customer can have many invoices.
Suppose, you are creating the invoice and then you need to relate this invoice to Customer. You can use the following code for this functionality −
// Now create the invoice record and relate it with the Customer object
// Before executing this, please create a Customer Records with Name 'Customer
// Creation Test'
APEX_Invoice__c objInvoice = new APEX_Invoice__c();

// Relating Invoice to customer via id field of Customer object
objInvoice.APEX_Customer__c = [SELECT id FROM APEX_Customer__c WHERE Name =
   'Customer Creation Test' LIMIT 1].id;
objInvoice.APEX_Status__c = 'Pending';
insert objInvoice;  //Creating Invoice
System.debug('Newly Created Invoice'+objInvoice);  //Newly created invoice
Execute this code snippet in the Developer Console. Once executed, copy the Id of invoice from the Developer console and then open the same in SFDC as shown below. You can see that the Parent record has already been assigned to Invoice record as shown below.

Fetching Child Records
Let us now consider an example wherein, all the invoices related to particular customer record need to be in one place. For this, you must know the child relationship name. To see the child relationship name, go to the field detail page on the child object and check the "Child Relationship" value. In our example, it is invoices appended by __r at the end.
Example
In this example, we will need to set up data, create a customer with name as 'ABC Customer' record and then add 3 invoices to that customer.
Now, we will fetch the invoices the Customer 'ABC Customer' has. Following is the query for the same −
// Fetching Child Records using SOQL
List<apex_customer__c> ListCustomers = [SELECT Name, Id,
   (SELECT id, Name FROM Invoices__r) FROM APEX_Customer__c WHERE Name = 'ABC Customer'];

// Query for fetching the Child records along with Parent
System.debug('ListCustomers '+ListCustomers); // Parent Record

List<apex_invoice__c> ListOfInvoices = ListCustomers[0].Invoices__r;
// By this notation, you could fetch the child records and save it in List
System.debug('ListOfInvoices values of Child '+ListOfInvoices);
// Child records
You can see the Record values in the Debug logs.
Fetching Parent Record
Suppose, you need to fetch the Customer Name of Invoice the creation date of which is today, then you can use the query given below for the same −
Example
Fetch the Parent record's value along with the child object.
// Fetching Parent Record Field value using SOQL
List<apex_invoice__c> ListOfInvoicesWithCustomerName = new List<apex_invoice__c>();
ListOfInvoicesWithCustomerName = [SELECT Name, id, APEX_Customer__r.Name
   FROM APEX_Invoice__c LIMIT 10];

// Fetching the Parent record's values
for (APEX_Invoice__c objInv: ListOfInvoicesWithCustomerName) {
   System.debug('Invoice Customer Name is '+objInv.APEX_Customer__r.Name);
   // Will print the values, all the Customer Records will be printed
}
Here we have used the notation APEX_Customer__r.Name, where APEX_Customer__r is parent relationship name, here you have to append the __r at the end of the Parent field and then you can fetch the parent field value.
Aggregate Functions
SOQL does have aggregate function as we have in SQL. Aggregate functions allow us to roll up and summarize the data. Let us now understand the function in detail.
Suppose, you wanted to know that what is the average revenue we are getting from Customer 'ABC Customer', then you can use this function to take up the average.
Example
// Getting Average of all the invoices for a Perticular Customer
AggregateResult[] groupedResults = [SELECT
   AVG(APEX_Amount_Paid__c)averageAmount FROM APEX_Invoice__c WHERE
   APEX_Customer__r.Name = 'ABC Customer'];
Object avgPaidAmount = groupedResults[0].get('averageAmount');
System.debug('Total Average Amount Received From Customer ABC is '+avgPaidAmount);
Check the output in Debug logs. Note that any query that includes an aggregate function returns its results in an array of AggregateResult objects. AggregateResult is a readonly sObject and is only used for query results. It is useful when we need to generate the Report on Large data.
There are other aggregate functions as well which you can be used to perform data summary.
MIN() − This can be used to find the minimum value
MAX() − This can be used to find the maximum value.
Binding Apex Variables
You can use the Apex variable in SOQL query to fetch the desired results. Apex variables can be referenced by the Colon (:) notation.
Example
// Apex Variable Reference
String CustomerName = 'ABC Customer';
List<apex_customer__c> ListCustomer = [SELECT Id, Name FROM APEX_Customer__c
   WHERE Name = :CustomerName];

// Query Using Apex variable
System.debug('ListCustomer Name'+ListCustomer); // Customer Name
Apex - Security
Apex security refers to the process of applying security settings and enforcing the sharing rules on running code. Apex classes have security setting that can be controlled via two keywords.
Data Security and Sharing Rules
Apex generally runs in system context, that is, the current user's permissions. Field-level security, and sharing rules are not taken into account during code execution. Only the anonymous block code executes with the permission of the user who is executing the code.
Our Apex code should not expose the sensitive data to User which is hidden via security and sharing settings. Hence, Apex security and enforcing the sharing rule is most important.
With Sharing Keyword
If you use this keyword, then the Apex code will enforce the Sharing settings of current user to Apex code. This does not enforce the Profile permission, only the data level sharing settings.
Let us consider an example wherein, our User has access to 5 records, but the total number of records is 10. So when the Apex class will be declared with the "With Sharing" Keyword, it will return only 5 records on which the user has access to.
Example
First, make sure that you have created at least 10 records in the Customer object with 'Name' of 5 records as 'ABC Customer' and rest 5 records as 'XYZ Customer'. Then, create a sharing rule which will share the 'ABC Customer' with all Users. We also need to make sure that we have set the OWD of Customer object as Private.
Paste the code given below to Anonymous block in the Developer Console.
// Class With Sharing
public with sharing class MyClassWithSharing {
   // Query To fetch 10 records
   List<apex_customer__c> CustomerList = [SELECT id, Name FROM APEX_Customer__c LIMIT 10];

   public Integer executeQuery () {
      System.debug('List will have only 5 records and the actual records are'
         + CustomerList.size()+' as user has access to'+CustomerList);
      Integer ListSize = CustomerList.size();
      return ListSize;
   }
}

// Save the above class and then execute as below
// Execute class using the object of class
MyClassWithSharing obj = new MyClassWithSharing();
Integer ListSize = obj.executeQuery();
Without Sharing Keyword
As the name suggests, class declared with this keyword executes in System mode, i.e., irrespective of the User's access to the record, query will fetch all the records.
// Class Without Sharing
public without sharing class MyClassWithoutSharing {
   List<apex_customer__c> CustomerList = [SELECT id, Name FROM APEX_Customer__c LIMIT 10];

   // Query To fetch 10 records, this will return all the records
   public Integer executeQuery () {
      System.debug('List will have only 5 records and the actula records are'
         + CustomerList.size()+' as user has access to'+CustomerList);
      Integer ListSize = CustomerList.size();
      return ListSize;
   }
}
// Output will be 10 records.
Setting Security for Apex Class
You can enable or disable an Apex class for particular profile. The steps for the same are given below. You can determine which profile should have access to which class.
Setting Apex class security from the class list page
Step 1 − From Setup, click Develop → Apex Classes.
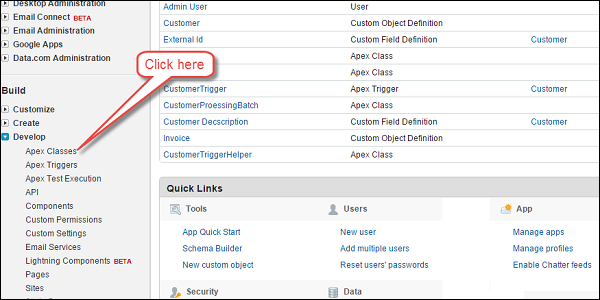
Step 2 − Click the name of the class that you want to restrict. We have clicked on CustomerOperationClass.
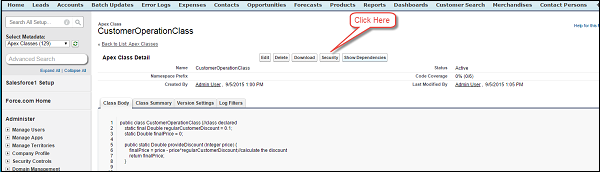
Step 3 − Click on Security.
Step 4 − Select the profiles that you want to enable from the Available Profiles list and click Add, or select the profiles that you want to disable from the Enabled Profiles list and click on Remove.
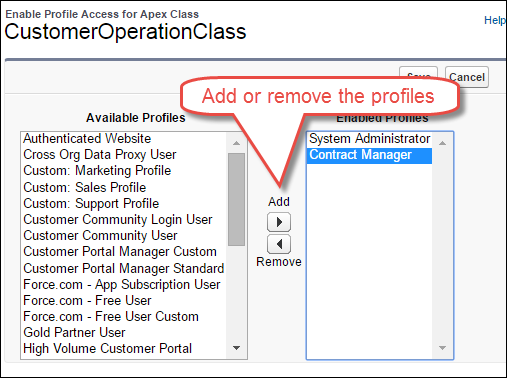
Step 5 − Click on Save.
Setting Apex Security from Permission Set
Step 1 − From Setup, click Manage Users → Permission Sets.
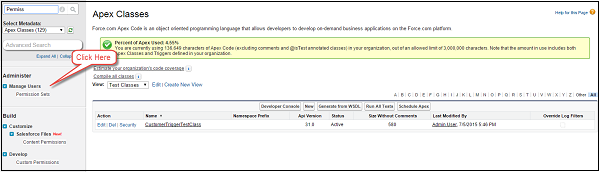
Step 2 − Select a permission set.
Step 3 − Click on Apex Class Access.
Step 4 − Click on Edit.
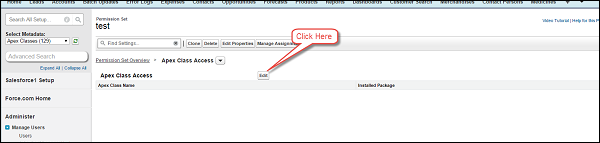
Step 5 − Select the Apex classes that you want to enable from the Available Apex Classes list and click Add, or select the Apex classes that you want to disable from the Enabled Apex Classes list and click remove.
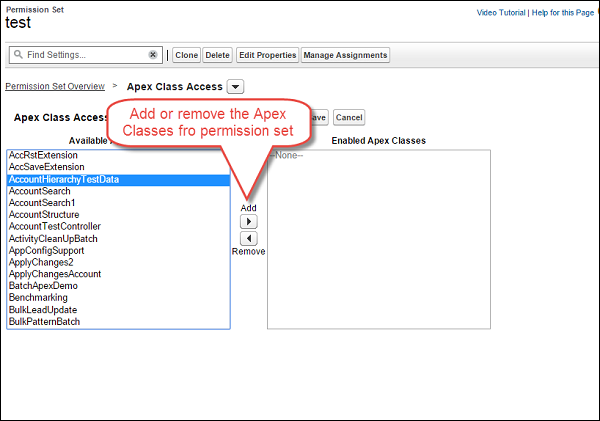
Step 6 − Click the Save button.
Apex - Invoking
Apex invoking refers to the process of executing the Apex class. Apex class can only be executed when it is invoked via one of the ways listed below −
Triggers and Anonymous block
A trigger invoked for specified events
Asynchronous Apex
Scheduling an Apex class to run at specified intervals, or running a batch job
Web Services class
Apex Email Service class
Apex Web Services, which allow exposing your methods via SOAP and REST Web services
Visualforce Controllers
Apex Email Service to process inbound email
Invoking Apex Using JavaScript
The Ajax toolkit to invoke Web service methods implemented in Apex
We will now understand a few common ways to invoke Apex.
From Execute Anonymous Block
You can invoke the Apex class via execute anonymous in the Developer Console as shown below −
Step 1 − Open the Developer Console.
Step 2 − Click on Debug.
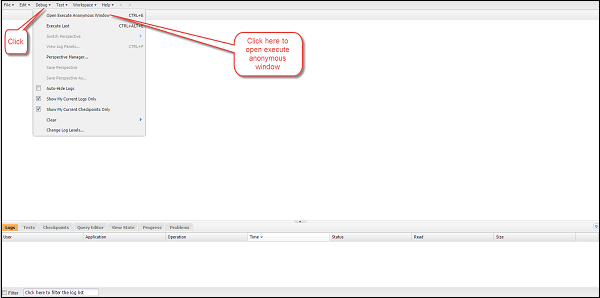
Step 3 − Execute anonymous window will open as shown below. Now, click on the Execute button −
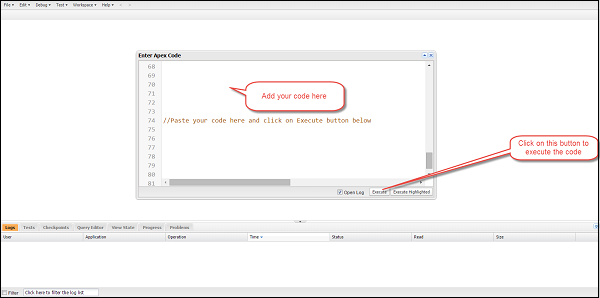
Step 4 − Open the Debug Log when it will appear in the Logs pane.
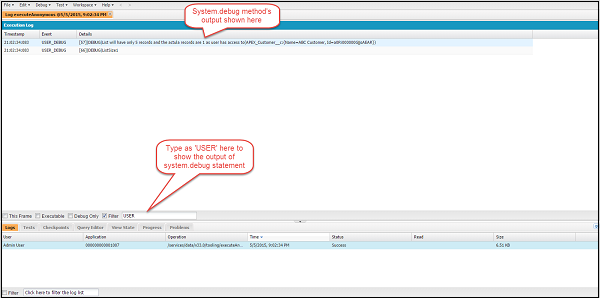
From Trigger
You can call an Apex class from Trigger as well. Triggers are called when a specified event occurs and triggers can call the Apex class when executing.
Following is the sample code that shows how a class gets executed when a Trigger is called.
Example
// Class which will gets called from trigger
public without sharing class MyClassWithSharingTrigger {

   public static Integer executeQuery (List<apex_customer__c> CustomerList) {
      // perform some logic and operations here
      Integer ListSize = CustomerList.size();
      return ListSize;
   }
}

// Trigger Code
trigger Customer_After_Insert_Example on APEX_Customer__c (after insert) {
   System.debug('Trigger is Called and it will call Apex Class');
   MyClassWithSharingTrigger.executeQuery(Trigger.new);  // Calling Apex class and
                                                         // method of an Apex class
}

// This example is for reference, no need to execute and will have detail look on
// triggers later chapters.
From Visualforce Page Controller Code
Apex class can be called from the Visualforce page as well. We can specify the controller or the controller extension and the specified Apex class gets called.
Example
VF Page Code
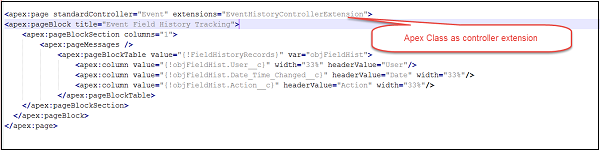
Apex Class Code (Controller Extension)
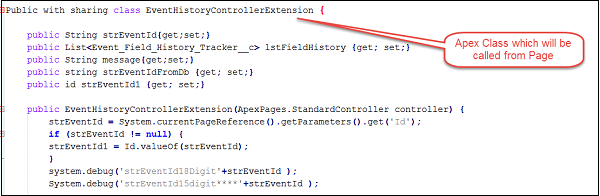
Apex - Triggers
Apex triggers are like stored procedures which execute when a particular event occurs. A trigger executes before and after an event occurs on record.
Syntax
trigger triggerName on ObjectName (trigger_events) { Trigger_code_block }
Executing the Trigger
Following are the events on which we can fir the trigger −
- insert
- update
- delete
- merge
- upsert
- undelete
Trigger Example 1
Suppose we received a business requirement that we need to create an Invoice Record when Customer's 'Customer Status' field changes to Active from Inactive. For this, we will create a trigger on APEX_Customer__c object by following these steps −
Step 1 − Go to sObject
Step 2 − Click on Customer
Step 3 − Click on 'New' button in the Trigger related list and add the trigger code as give below.
// Trigger Code
trigger Customer_After_Insert on APEX_Customer__c (after update) {
   List InvoiceList = new List();

   for (APEX_Customer__c objCustomer: Trigger.new) {

      if (objCustomer.APEX_Customer_Status__c == 'Active') {
         APEX_Invoice__c objInvoice = new APEX_Invoice__c();
         objInvoice.APEX_Status__c = 'Pending';
         InvoiceList.add(objInvoice);
      }
   }

   // DML to insert the Invoice List in SFDC
   insert InvoiceList;
}
Explanation
Trigger.new − This is the context variable which stores the records currently in the trigger context, either being inserted or updated. In this case, this variable has Customer object's records which have been updated.
There are other context variables which are available in the context trigger.old, trigger.newMap, trigger.OldMap.
Trigger Example 2
The above trigger will execute when there is an update operation on the Customer records. Suppose, the invoice record needs to be inserted only when the Customer Status changes from Inactive to Active and not every time; for this, we can use another context variable trigger.oldMap which will store the key as record id and the value as old record values.
// Modified Trigger Code
trigger Customer_After_Insert on APEX_Customer__c (after update) {
   List<apex_invoice__c> InvoiceList = new List<apex_invoice__c>();

   for (APEX_Customer__c objCustomer: Trigger.new) {

      // condition to check the old value and new value
      if (objCustomer.APEX_Customer_Status__c == 'Active' &&

      trigger.oldMap.get(objCustomer.id).APEX_Customer_Status__c == 'Inactive') {
         APEX_Invoice__c objInvoice = new APEX_Invoice__c();
         objInvoice.APEX_Status__c = 'Pending';
         InvoiceList.add(objInvoice);
      }
   }

   // DML to insert the Invoice List in SFDC
   insert InvoiceList;
}
Explanation
We have used the Trigger.oldMap variable which as explained earlier, is a context variable which stores the Id and old value of records which are being updated.
Apex - Trigger Design Patterns
Design patterns are used to make our code more efficient and to avoid hitting the governor limits. Often developers can write inefficient code that can cause repeated instantiation of objects. This can result in inefficient, poorly performing code, and potentially the breaching of governor limits. This most commonly occurs in triggers, as they can operate against a set of records.
We will see some important design pattern strategies in this chapter.
Bulk Triggers Design Patterns
In real business case, it will be possible that you may need to process thousands of records in one go. If your trigger is not designed to handle such situations, then it may fail while processing the records. There are some best practices which you need to follow while implementing the triggers. All triggers are bulk triggers by default, and can process multiple records at a time. You should always plan to process more than one record at a time.
Consider a business case, wherein, you need to process large number of records and you have written the trigger as given below. This is the same example which we had taken for inserting the invoice record when the Customer Status changes from Inactive to Active.
// Bad Trigger Example
trigger Customer_After_Insert on APEX_Customer__c (after update) {

   for (APEX_Customer__c objCustomer: Trigger.new) {

      if (objCustomer.APEX_Customer_Status__c == 'Active' &&
         trigger.oldMap.get(objCustomer.id).APEX_Customer_Status__c == 'Inactive') {

         // condition to check the old value and new value
         APEX_Invoice__c objInvoice = new APEX_Invoice__c();
         objInvoice.APEX_Status__c = 'Pending';
         insert objInvoice;   //DML to insert the Invoice List in SFDC
      }
   }
}
You can now see that the DML Statement has been written in for the loop block which will work when processing only few records but when you are processing some hundreds of records, it will reach the DML Statement limit per transaction which is the governor limit. We will have a detailed look on Governor Limits in a subsequent chapter.
To avoid this, we have to make the trigger efficient for processing multiple records at a time.
The following example will help you understand the same −
// Modified Trigger Code-Bulk Trigger
trigger Customer_After_Insert on APEX_Customer__c (after update) {
   List<apex_invoice__c> InvoiceList = new List<apex_invoice__c>();

   for (APEX_Customer__c objCustomer: Trigger.new) {

      if (objCustomer.APEX_Customer_Status__c == 'Active' &&
         trigger.oldMap.get(objCustomer.id).APEX_Customer_Status__c == 'Inactive') {

         //condition to check the old value and new value
         APEX_Invoice__c objInvoice = new APEX_Invoice__c();
         objInvoice.APEX_Status__c = 'Pending';
         InvoiceList.add(objInvoice);//Adding records to List
      }
   }

   insert InvoiceList;
   // DML to insert the Invoice List in SFDC, this list contains the all records
   // which need to be modified and will fire only one DML
}
This trigger will only fire 1 DML statement as it will be operating over a List and the List has all the records which need to be modified.
By this way, you can avoid the DML statement governor limits.
Trigger Helper Class
Writing the whole code in trigger is also not a good practice. Hence you should call the Apex class and delegate the processing from Trigger to Apex class as shown below. Trigger Helper class is the class which does all the processing for trigger.
Let us consider our invoice record creation example again.
// Below is the Trigger without Helper class
trigger Customer_After_Insert on APEX_Customer__c (after update) {
   List<apex_invoice__c> InvoiceList = new List<apex_invoice__c>();

   for (APEX_Customer__c objCustomer: Trigger.new) {

      if (objCustomer.APEX_Customer_Status__c == 'Active' &&
         trigger.oldMap.get(objCustomer.id).APEX_Customer_Status__c == 'Inactive') {

         // condition to check the old value and new value
         APEX_Invoice__c objInvoice = new APEX_Invoice__c();
         objInvoice.APEX_Status__c = 'Pending';
         InvoiceList.add(objInvoice);
      }
   }

   insert InvoiceList; // DML to insert the Invoice List in SFDC
}

// Below is the trigger with helper class
// Trigger with Helper Class
trigger Customer_After_Insert on APEX_Customer__c (after update) {
   CustomerTriggerHelper.createInvoiceRecords(Trigger.new, trigger.oldMap);
   // Trigger calls the helper class and does not have any code in Trigger
}
Helper Class
public class CustomerTriggerHelper {
   public static void createInvoiceRecords (List<apex_customer__c>

   customerList, Map<id, apex_customer__c> oldMapCustomer) {
      List<apex_invoice__c> InvoiceList = new Listvapex_invoice__c>();

      for (APEX_Customer__c objCustomer: customerList) {

         if (objCustomer.APEX_Customer_Status__c == 'Active' &&
            oldMapCustomer.get(objCustomer.id).APEX_Customer_Status__c == 'Inactive') {

            // condition to check the old value and new value
            APEX_Invoice__c objInvoice = new APEX_Invoice__c();

            // objInvoice.APEX_Status__c = 'Pending';
            InvoiceList.add(objInvoice);
         }
      }

      insert InvoiceList;  // DML to insert the Invoice List in SFDC
   }
}
In this, all the processing has been delegated to the helper class and when we need a new functionality we can simply add the code to the helper class without modifying the trigger.
Single Trigger on Each sObject
Always create a single trigger on each object. Multiple triggers on the same object can cause the conflict and errors if it reaches the governor limits.
You can use the context variable to call the different methods from helper class as per the requirement. Consider our previous example. Suppose that our createInvoice method should be called only when the record is updated and on multiple events. Then we can control the execution as below −
// Trigger with Context variable for controlling the calling flow
trigger Customer_After_Insert on APEX_Customer__c (after update, after insert) {

   if (trigger.isAfter && trigger.isUpdate) {
      // This condition will check for trigger events using isAfter and isUpdate
      // context variable
      CustomerTriggerHelper.createInvoiceRecords(Trigger.new);

      // Trigger calls the helper class and does not have any code in Trigger
      // and this will be called only when trigger ids after update
   }
}

// Helper Class
public class CustomerTriggerHelper {

   //Method To Create Invoice Records
   public static void createInvoiceRecords (List<apex_customer__c> customerList) {

      for (APEX_Customer__c objCustomer: customerList) {

         if (objCustomer.APEX_Customer_Status__c == 'Active' &&
            trigger.oldMap.get(objCustomer.id).APEX_Customer_Status__c == 'Inactive') {

            // condition to check the old value and new value
            APEX_Invoice__c objInvoice = new APEX_Invoice__c();
            objInvoice.APEX_Status__c = 'Pending';
            InvoiceList.add(objInvoice);
         }
      }

      insert InvoiceList; // DML to insert the Invoice List in SFDC
   }
}
Apex - Governer Limits
Governor execution limits ensure the efficient use of resources on the Force.com multitenant platform. It is the limit specified by the Salesforce.com on code execution for efficient processing.
What are Governor Limits?
As we know, Apex runs in multi-tenant environment, i.e., a single resource is shared by all the customers and organizations. So, it is necessary to make sure that no one monopolizes the resources and hence Salesforce.com has created the set of limits which governs and limits the code execution. Whenever any of the governor limits are crossed, it will throw error and will halt the execution of program.
From a Developer's perspective, it is important to ensure that our code should be scalable and should not hit the limits.
All these limits are applied on per transaction basis. A single trigger execution is one transaction.
As we have seen, the trigger design pattern helps avoid the limit error. We will now see other important limits.
Avoiding SOQL Query Limit
You can issue only 100 queries per transaction, that is, when your code will issue more than 100 SOQL queries then it will throw error.
Example
This example shows how SOQL query limit can be reached −
The following trigger iterates over a list of customers and updates the child record's (Invoice) description with string 'Ok to Pay'.
// Helper class:Below code needs o be checked.
public class CustomerTriggerHelper {

  public static void isAfterUpdateCall(Trigger.new) {
      createInvoiceRecords(trigger.new);//Method call
      updateCustomerDescription(trigger.new);
   }

   // Method To Create Invoice Records
   public static void createInvoiceRecords (List<apex_customer__c> customerList) {
      for (APEX_Customer__c objCustomer: customerList) {

         if (objCustomer.APEX_Customer_Status__c == 'Active' &&
            trigger.oldMap.get(objCustomer.id).APEX_Customer_Status__c == 'Inactive') {

            // condition to check the old value and new value
            APEX_Invoice__c objInvoice = new APEX_Invoice__c();
            objInvoice.APEX_Status__c = 'Pending';
            InvoiceList.add(objInvoice);
         }
      }
      insert InvoiceList; // DML to insert the Invoice List in SFDC
   }

   // Method to update the invoice records
   public static updateCustomerDescription (List<apex_customer__c> customerList) {
      for (APEX_Customer__c objCust: customerList) {
         List<apex_customer__c> invList = [SELECT Id, Name,
            APEX_Description__c FROM APEX_Invoice__c WHERE APEX_Customer__c = :objCust.id];

         // This query will fire for the number of records customer list has and will
         // hit the governor limit when records are more than 100
         for (APEX_Invoice__c objInv: invList) {
            objInv.APEX_Description__c = 'OK To Pay';
            update objInv;
            // Update invoice, this will also hit the governor limit for DML if large
            // number(150) of records are there
         }
      }
   }
}
When the 'updateCustomerDescription' method is called and the number of customer records are more than 100, then it will hit the SOQL limit. To avoid this, never write the SOQL query in the For Loop. In this case, the SOQL query has been written in the For loop.
Following is an example which will show how to avoid the DML as well as the SOQL limit. We have used the nested relationship query to fetch the invoice records and used the context variable trigger.newMap to get the map of id and Customer records.
// SOQL-Good Way to Write Query and avoid limit exception
// Helper Class
public class CustomerTriggerHelper {
   public static void isAfterUpdateCall(Trigger.new) {
      createInvoiceRecords(trigger.new);  //Method call
      updateCustomerDescription(trigger.new, trigger.newMap);
   }

   // Method To Create Invoice Records
   public static void createInvoiceRecords (List<apex_customer__c> customerList) {
      for (APEX_Customer__c objCustomer: customerList) {

         if (objCustomer.APEX_Customer_Status__c == 'Active' &&
            trigger.oldMap.get(objCustomer.id).APEX_Customer_Status__c == 'Inactive') {

            // condition to check the old value and new value
            APEX_Invoice__c objInvoice = new APEX_Invoice__c();
            objInvoice.APEX_Status__c = 'Pending';
            InvoiceList.add(objInvoice);
         }
      }
      insert InvoiceList; // DML to insert the Invoice List in SFDC
   }

   // Method to update the invoice records
   public static updateCustomerDescription (List<apex_customer__c>
      customerList, Map<id, apex_customer__c> newMapVariable) {
      List<apex_customer__c> customerListWithInvoice = [SELECT id,
         Name,(SELECT Id, Name, APEX_Description__c FROM APEX_Invoice__r) FROM
         APEX_Customer__c WHERE Id IN :newMapVariable.keySet()];

      // Query will be for only one time and fetches all the records
      List<apex_invoice__c> invoiceToUpdate = new
      List<apex_invoice__c>();

      for (APEX_Customer__c objCust: customerList) {
         for (APEX_Invoice__c objInv: invList) {
            objInv.APEX_Description__c = 'OK To Pay';
            invoiceToUpdate.add(objInv);
            // Add the modified records to List
         }
      }
      update invoiceToUpdate;
   }
}
DML Bulk Calls
This example shows the Bulk trigger along with the trigger helper class pattern. You must save the helper class first and then save the trigger.
Note − Paste the below code in 'CustomerTriggerHelper' class which we have created earlier.
// Helper Class
public class CustomerTriggerHelper {
   public static void isAfterUpdateCall(List<apex_customer__c> customerList,
      Map<id, apex_customer__c> mapIdToCustomers, Map<id, apex_customer__c>
      mapOldItToCustomers) {
      createInvoiceRecords(customerList, mapOldItToCustomers);   //Method call
      updateCustomerDescription(customerList,mapIdToCustomers,
      mapOldItToCustomers);
   }

   // Method To Create Invoice Records
   public static void createInvoiceRecords (List<apex_customer__c>
      customerList, Map<id, apex_customer__c> mapOldItToCustomers) {
      List<apex_invoice__c> InvoiceList = new List<apex_invoice__c>();
      List<apex_customer__c> customerToInvoice = [SELECT id, Name FROM
         APEX_Customer__c LIMIT 1];

      for (APEX_Customer__c objCustomer: customerList) {
         if (objCustomer.APEX_Customer_Status__c == 'Active' &&
            mapOldItToCustomers.get(objCustomer.id).APEX_Customer_Status__c == 'Inactive') {
            //condition to check the old value and new value
            APEX_Invoice__c objInvoice = new APEX_Invoice__c();
            objInvoice.APEX_Status__c = 'Pending';
            objInvoice.APEX_Customer__c = objCustomer.id;
            InvoiceList.add(objInvoice);
         }
      }
      system.debug('InvoiceList&&&'+InvoiceList);
      insert InvoiceList;
      // DML to insert the Invoice List in SFDC. This also follows the Bulk pattern
   }

   // Method to update the invoice records
   public static void updateCustomerDescription (List<apex_customer__c>
      customerList, Map<id, apex_customer__c> newMapVariable, Map<id,
      apex_customer__c> oldCustomerMap) {
      List<apex_customer__c> customerListWithInvoice = [SELECT id,
      Name,(SELECT Id, Name, APEX_Description__c FROM Invoices__r) FROM
         APEX_Customer__c WHERE Id IN :newMapVariable.keySet()];

      // Query will be for only one time and fetches all the records
      List<apex_invoice__c> invoiceToUpdate = new List<apex_invoice__c>();
      List<apex_invoice__c> invoiceFetched = new List<apex_invoice__c>();
      invoiceFetched = customerListWithInvoice[0].Invoices__r;
      system.debug('invoiceFetched'+invoiceFetched);
      system.debug('customerListWithInvoice****'+customerListWithInvoice);

      for (APEX_Customer__c objCust: customerList) {
         system.debug('objCust.Invoices__r'+objCust.Invoices__r);
         if (objCust.APEX_Active__c == true &&
            oldCustomerMap.get(objCust.id).APEX_Active__c == false) {
            for (APEX_Invoice__c objInv: invoiceFetched) {
               system.debug('I am in For Loop'+objInv);
               objInv.APEX_Description__c = 'OK To Pay';
               invoiceToUpdate.add(objInv);
               // Add the modified records to List
            }
         }
      }
     system.debug('Value of List ***'+invoiceToUpdate);
     update invoiceToUpdate;
      // This statement is Bulk DML which performs the DML on List and avoids
      // the DML Governor limit
   }
}

// Trigger Code for this class: Paste this code in 'Customer_After_Insert'
// trigger on Customer Object
trigger Customer_After_Insert on APEX_Customer__c (after update) {
   CustomerTriggerHelper.isAfterUpdateCall(Trigger.new, trigger.newMap,
      trigger.oldMap);
   // Trigger calls the helper class and does not have any code in Trigger
}
Other Salesforce Governor Limits
Following table lists down the important governor limits.
| Description | Limit |
|---|---|
| Total heap size | 6 MB/12 MB |
| Total number of DML statements issued | 150 |
| Total number of records retrieved by a single SOSL query | 2000 |
| Total number of SOSL queries issued | 20 |
| Total number of records retrieved by Database.getQueryLocator | 10000 |
| Total number of records retrieved by SOQL queries | 50000 |
Apex - Batch Processing
In this chapter, we will understand Batch Processing in Apex. Consider a scenario wherein, we will process large number of records on daily basis, probably the cleaning of data or maybe deleting some unused data.
What is Batch Apex?
Batch Apex is asynchronous execution of Apex code, specially designed for processing the large number of records and has greater flexibility in governor limits than the synchronous code.
When to use Batch Apex?
When you want to process large number of records on daily basis or even on specific time of interval then you can go for Batch Apex.
Also, when you want an operation to be asynchronous then you can implement the Batch Apex. Batch Apex is exposed as an interface that must be implemented by the developer. Batch jobs can be programmatically invoked at runtime using Apex. Batch Apex operates over small batches of records, covering your entire record set and breaking the processing down to manageable chunks of data.
Using Batch Apex
When we are using the Batch Apex, we must implement the Salesforce-provided interface Database.Batchable, and then invoke the class programmatically.
You can monitor the class by following these steps −
To monitor or stop the execution of the batch Apex Batch job, go to Setup → Monitoring → Apex Jobs or Jobs → Apex Jobs.
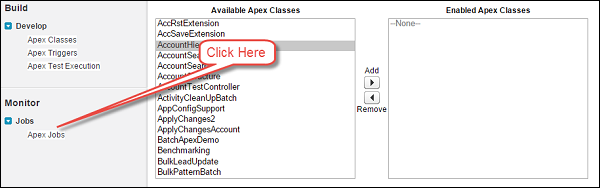
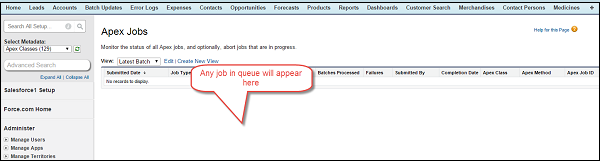
Database.Batchable interface has the following three methods that need to be implemented −
- Start
- Execute
- Finish
Let us now understand each method in detail.
Start
The Start method is one of the three methods of the Database.Batchable interface.
Syntax
global void execute(Database.BatchableContext BC, list<sobject<) {}
This method will be called at the starting of the Batch Job and collects the data on which the Batch job will be operating.
Consider the following points to understand the method −
Use the Database.QueryLocator object when you are using a simple query to generate the scope of objects used in the batch job. In this case, the SOQL data row limit will be bypassed.
Use the iterable object when you have complex criteria to process the records. Database.QueryLocator determines the scope of records which should be processed.
Execute
Let us now understand the Execute method of the Database.Batchable interface.
Syntax
global void execute(Database.BatchableContext BC, list<sobject<) {}
where, list<sObject< is returned by the Database.QueryLocator method.
This method gets called after the Start method and does all the processing required for Batch Job.
Finish
We will now discuss the Finish method of the Database.Batchable interface.
Syntax
global void finish(Database.BatchableContext BC) {}
This method gets called at the end and you can do some finishing activities like sending an email with information about the batch job records processed and status.
Batch Apex Example
Let us consider an example of our existing Chemical Company and assume that we have requirement to update the Customer Status and Customer Description field of Customer Records which have been marked as Active and which have created Date as today. This should be done on daily basis and an email should be sent to a User about the status of the Batch Processing. Update the Customer Status as 'Processed' and Customer Description as 'Updated Via Batch Job'.
// Batch Job for Processing the Records
global class CustomerProessingBatch implements Database.Batchable<sobject> {
   global String [] email = new String[] {'test@test.com'};
   // Add here your email address here

   // Start Method
   global Database.Querylocator start (Database.BatchableContext BC) {
      return Database.getQueryLocator('Select id, Name, APEX_Customer_Status__c,
      APEX_Customer_Decscription__c From APEX_Customer__c WHERE createdDate = today
      AND APEX_Active__c = true');
      // Query which will be determine the scope of Records fetching the same
   }

   // Execute method
   global void execute (Database.BatchableContext BC, List<sobject> scope) {
      List<apex_customer__c> customerList = new List<apex_customer__c>();
      List<apex_customer__c> updtaedCustomerList = new List<apex_customer__c>();

      // List to hold updated customer
      for (sObject objScope: scope) {
         APEX_Customer__c newObjScope = (APEX_Customer__c)objScope ;

         // type casting from generic sOject to APEX_Customer__c
         newObjScope.APEX_Customer_Decscription__c = 'Updated Via Batch Job';
         newObjScope.APEX_Customer_Status__c = 'Processed';
         updtaedCustomerList.add(newObjScope); // Add records to the List
         System.debug('Value of UpdatedCustomerList '+updtaedCustomerList);
      }

      if (updtaedCustomerList != null && updtaedCustomerList.size()>0) {
         // Check if List is empty or not
         Database.update(updtaedCustomerList); System.debug('List Size '
          + updtaedCustomerList.size());
         // Update the Records
      }
   }

   // Finish Method
   global void finish(Database.BatchableContext BC) {
      Messaging.SingleEmailMessage mail = new Messaging.SingleEmailMessage();

      // Below code will fetch the job Id
      AsyncApexJob a = [Select a.TotalJobItems, a.Status, a.NumberOfErrors,
      a.JobType, a.JobItemsProcessed, a.ExtendedStatus, a.CreatedById,
      a.CompletedDate From AsyncApexJob a WHERE id = :BC.getJobId()];

      // get the job Id
      System.debug('$$$ Jobid is'+BC.getJobId());

      // below code will send an email to User about the status
      mail.setToAddresses(email);
      mail.setReplyTo('test@test.com'); // Add here your email address
      mail.setSenderDisplayName('Apex Batch Processing Module');
      mail.setSubject('Batch Processing '+a.Status);
      mail.setPlainTextBody('The Batch Apex job processed'
         + a.TotalJobItems+'batches with '+a.NumberOfErrors+'failures'+'Job Item
      processed are'+a.JobItemsProcessed);
      Messaging.sendEmail(new Messaging.Singleemailmessage [] {mail});
   }
}
To execute this code, first save it and then paste the following code in Execute anonymous. This will create the object of class and Database.execute method will execute the Batch job. Once the job is completed then an email will be sent to the specified email address. Make sure that you have a customer record which has Active as checked.
// Paste in Developer Console
CustomerProessingBatch objClass = new CustomerProessingBatch();
Database.executeBatch (objClass);
Once this class is executed, then check the email address you have provided where you will receive the email with information. Also, you can check the status of the batch job via the Monitoring page and steps as provided above.
If you check the debug logs, then you can find the List size which indicates how many records have been processed.
Limitations
We can only have 5 batch job processing at a time. This is one of the limitations of Batch Apex.
Scheduling the Apex Batch Job using Apex Detail Page
You can schedule the Apex class via Apex detail page as given below −
Step 1 − Go to Setup ⇒ Apex Classes, Click on Apex Classes.
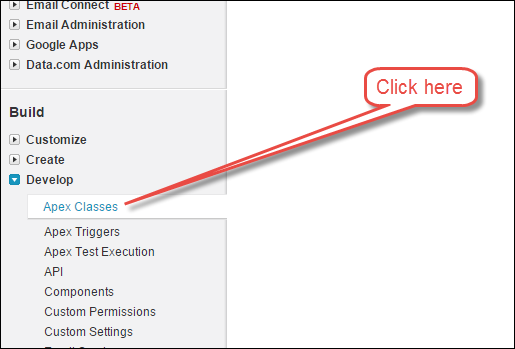
Step 2 − Click on the Schedule Apex button.

Step 3 − Provide details.
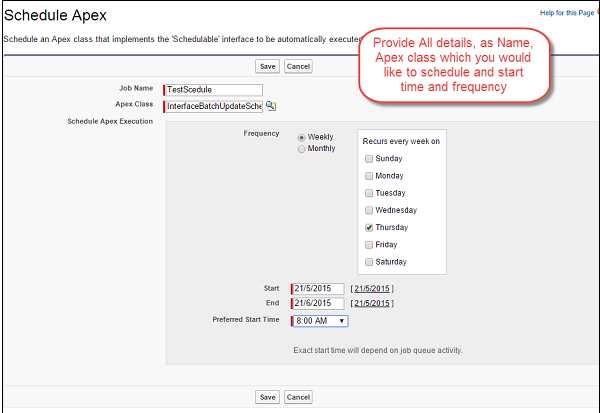
Scheduling the Apex Batch Job using Schedulable Interface
You can schedule the Apex Batch Job using Schedulable Interface as given below −
// Batch Job for Processing the Records
global class CustomerProessingBatch implements Database.Batchable<sobject> {
   global String [] email = new String[] {'test@test.com'};
   // Add here your email address here

   // Start Method
   global Database.Querylocator start (Database.BatchableContext BC) {
      return Database.getQueryLocator('Select id, Name, APEX_Customer_Status__c,
      APEX_Customer_Decscription__c From APEX_Customer__c WHERE createdDate = today
      AND APEX_Active__c = true');
      // Query which will be determine the scope of Records fetching the same
   }

   // Execute method
   global void execute (Database.BatchableContext BC, List<sobject> scope) {
      List<apex_customer__c> customerList = new List<apex_customer__c>();
      List<apex_customer__c> updtaedCustomerList = new
      List<apex_customer__c>();//List to hold updated customer

      for (sObject objScope: scope) {
         APEX_Customer__c newObjScope = (APEX_Customer__c)objScope ;//type
         casting from generic sOject to APEX_Customer__c
         newObjScope.APEX_Customer_Decscription__c = 'Updated Via Batch Job';
         newObjScope.APEX_Customer_Status__c = 'Processed';
         updtaedCustomerList.add(newObjScope);//Add records to the List
         System.debug('Value of UpdatedCustomerList '+updtaedCustomerList);
      }

      if (updtaedCustomerList != null && updtaedCustomerList.size()>0) {
         // Check if List is empty or not
         Database.update(updtaedCustomerList); System.debug('List Size'
            + updtaedCustomerList.size());
         // Update the Records
      }
   }

   // Finish Method
   global void finish(Database.BatchableContext BC) {
      Messaging.SingleEmailMessage mail = new Messaging.SingleEmailMessage();

      // Below code will fetch the job Id
      AsyncApexJob a = [Select a.TotalJobItems, a.Status, a.NumberOfErrors,
      a.JobType, a.JobItemsProcessed, a.ExtendedStatus, a.CreatedById,
      a.CompletedDate From AsyncApexJob a WHERE id = :BC.getJobId()];//get the job Id
      System.debug('$$$ Jobid is'+BC.getJobId());

      // below code will send an email to User about the status
      mail.setToAddresses(email);
      mail.setReplyTo('test@test.com');//Add here your email address
      mail.setSenderDisplayName('Apex Batch Processing Module');
      mail.setSubject('Batch Processing '+a.Status);
      mail.setPlainTextBody('The Batch Apex job processed'
         + a.TotalJobItems+'batches with '+a.NumberOfErrors+'failures'+'Job Item
      processed are'+a.JobItemsProcessed);
      Messaging.sendEmail(new Messaging.Singleemailmessage [] {mail});
   }

   // Scheduler Method to scedule the class
   global void execute(SchedulableContext sc) {
      CustomerProessingBatch conInstance = new CustomerProessingBatch();
      database.executebatch(conInstance,100);
   }
}

// Paste in Developer Console
CustomerProessingBatch objClass = new CustomerProcessingBatch();
Database.executeBatch (objClass);
Apex - Debugging
Debugging is an important part in any programming development. In Apex, we have certain tools that can be used for debugging. One of them is the system.debug() method which prints the value and output of variable in the debug logs.
We can use the following two tools for debugging −
- Developer Console
- Debug Logs
Debugging via Developer Console
You can use the Developer console and execute anonymous functionality for debugging the Apex as below −
Example
Consider our existing example of fetching the customer records which have been created today. We just want to know if the query is returning the results or not and if yes, then we will check the value of List.
Paste the code given below in execute anonymous window and follow the steps which we have done for opening execute anonymous window.
Step 1 − Open the Developer console
Step 2 − Open the Execute anonymous from 'Debug' as shown below.
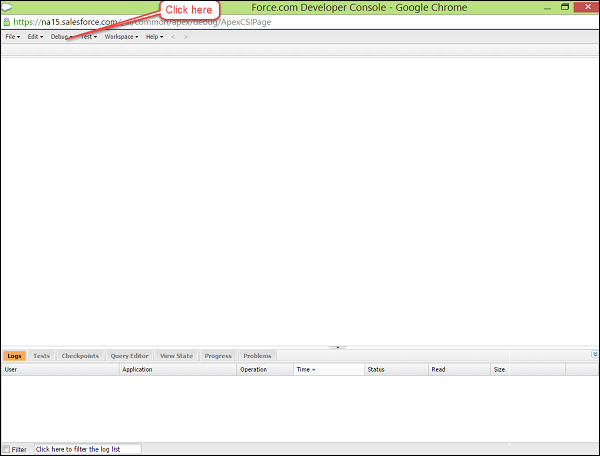
Step 3 − Open the Execute Anonymous window and paste the following code and click on execute.

// Debugging The Apex
List<apex_customer__c> customerList = new List<apex_customer__c>();
customerList = [SELECT Id, Name FROM APEX_Customer__c WHERE CreatedDate =
today];
// Our Query
System.debug('Records on List are '+customerList+' And Records are '+customerList);
// Debug statement to check the value of List and Size
Step 4 − Open the Logs as shown below.
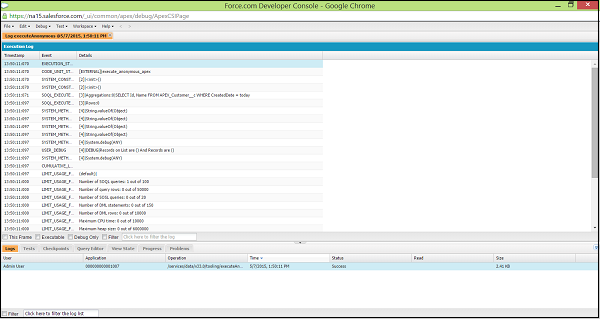
Step 5 − Enter 'USER' in filter condition as shown below.
Step 6 − Open the USER DEBUG Statement as shown below.
Debugging via Debug Logs
You can debug the same class via debug logs as well. Suppose, you have a trigger in Customer object and it needs to be debugged for some variable values, then you can do this via the debug logs as shown below −
This is the Trigger Code which updates the Description field if the modified customer is active and you want to check the values of variables and records currently in scope −
trigger CustomerTrigger on APEX_Customer__c (before update) {
   List<apex_customer__c> customerList = new List<apex_customer__c>();
   for (APEX_Customer__c objCust: Trigger.new) {
      System.debug('objCust current value is'+objCust);

      if (objCust.APEX_Active__c == true) {
         objCust.APEX_Customer_Description__c = 'updated';
         System.debug('The record which has satisfied the condition '+objCust);
      }
   }
}
Follow the steps given below to generate the Debug logs.
Step 1 − Set the Debug logs for your user. Go to Setup and type 'Debug Log' in search setup window and then click on Link.
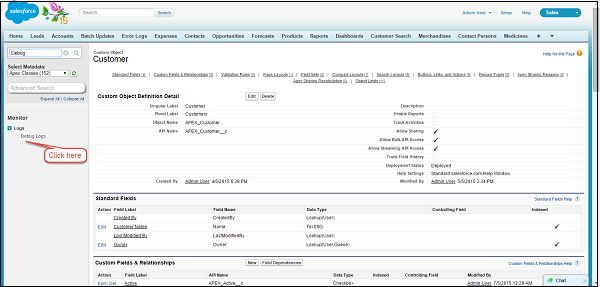
Step 2 − Set the debug logs as following.

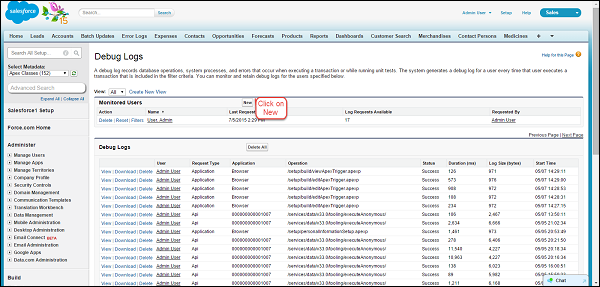
Step 3 − Enter the name of User which requires setup. Enter your name here.
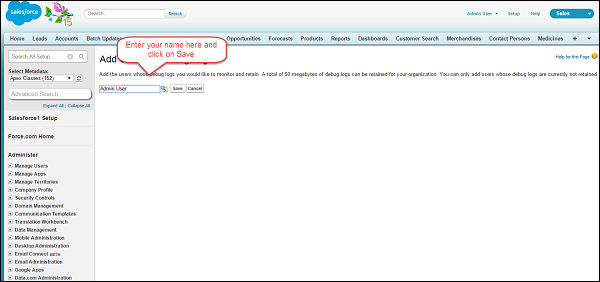
Step 4 − Modify the customer records as event should occur to generate the debug log.
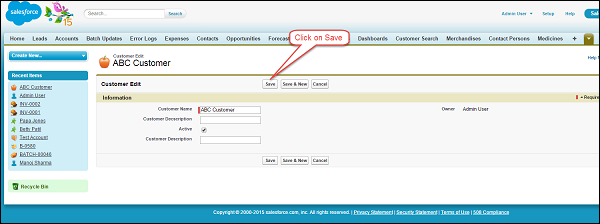
Step 5 − Now go to the debug logs section again. Open the debug logs and click on Reset.

Step 6 − Click on the view link of the first debug log.
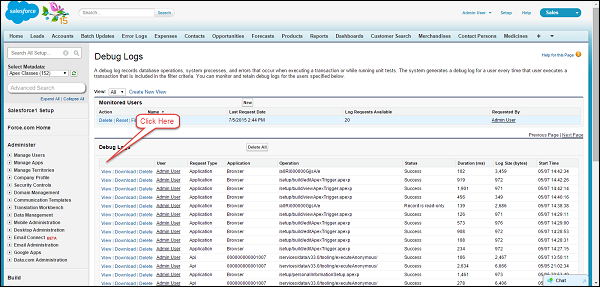
Step 7 − Search for the string 'USER' by using the browser search as shown below.
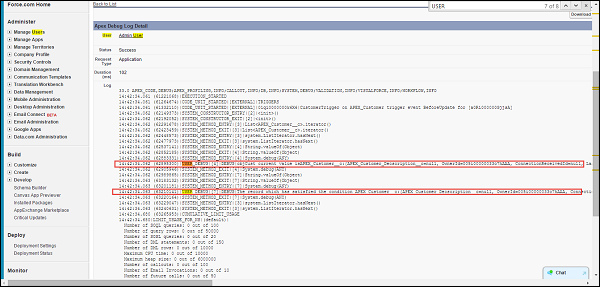
The debug statement will show the value of the field at which we have set the point.
Apex - Testing
Testing is the integrated part of Apex or any other application development. In Apex, we have separate test classes to develop for all the unit testing.
Test Classes
In SFDC, the code must have 75% code coverage in order to be deployed to Production. This code coverage is performed by the test classes. Test classes are the code snippets which test the functionality of other Apex class.
Let us write a test class for one of our codes which we have written previously. We will write test class to cover our Trigger and Helper class code. Below is the trigger and helper class which needs to be covered.
// Trigger with Helper Class
trigger Customer_After_Insert on APEX_Customer__c (after update) {
   CustomerTriggerHelper.createInvoiceRecords(Trigger.new, trigger.oldMap);
      //Trigger calls the helper class and does not have any code in Trigger
}

// Helper Class:
public class CustomerTriggerHelper {
   public static void createInvoiceRecords (List<apex_customer__c>

      customerList, Map<id, apex_customer__c> oldMapCustomer) {
      List<apex_invoice__c> InvoiceList = new List<apex_invoice__c>();

      for (APEX_Customer__c objCustomer: customerList) {
         if (objCustomer.APEX_Customer_Status__c == 'Active' &&
            oldMapCustomer.get(objCustomer.id).APEX_Customer_Status__c == 'Inactive') {

            // condition to check the old value and new value
            APEX_Invoice__c objInvoice = new APEX_Invoice__c();
            objInvoice.APEX_Status__c = 'Pending';
            objInvoice.APEX_Customer__c = objCustomer.id;
            InvoiceList.add(objInvoice);
         }
      }
      insert InvoiceList;  // DML to insert the Invoice List in SFDC
   }
}
Creating Test Class
In this section, we will understand how to create a Test Class.
Data Creation
We need to create data for test class in our test class itself. Test class by default does not have access to organization data but if you set @isTest(seeAllData = true), then it will have the access to organization's data as well.
@isTest annotation
By using this annotation, you declared that this is a test class and it will not be counted against the organization's total code limit.
testMethod keyword
Unit test methods are the methods which do not take arguments, commit no data to the database, send no emails, and are declared with the testMethod keyword or the isTest annotation in the method definition. Also, test methods must be defined in test classes, that is, classes annotated with isTest.
We have used the 'myUnitTest' test method in our examples.
Test.startTest() and Test.stopTest()
These are the standard test methods which are available for test classes. These methods contain the event or action for which we will be simulating our test. Like in this example, we will test our trigger and helper class to simulate the fire trigger by updating the records as we have done to start and stop block. This also provides separate governor limit to the code which is in start and stop block.
System.assert()
This method checks the desired output with the actual. In this case, we are expecting an Invoice record to be inserted so we added assert to check the same.
Example
/**
* This class contains unit tests for validating the behavior of Apex classes
* and triggers.
*
* Unit tests are class methods that verify whether a particular piece
* of code is working properly. Unit test methods take no arguments,
* commit no data to the database, and are flagged with the testMethod
* keyword in the method definition.
*
* All test methods in an organization are executed whenever Apex code is deployed
* to a production organization to confirm correctness, ensure code
* coverage, and prevent regressions. All Apex classes are
* required to have at least 75% code coverage in order to be deployed
* to a production organization. In addition, all triggers must have some code coverage.
*
* The @isTest class annotation indicates this class only contains test
* methods. Classes defined with the @isTest annotation do not count against
* the organization size limit for all Apex scripts.
*
* See the Apex Language Reference for more information about Testing and Code Coverage.
*/

@isTest
private class CustomerTriggerTestClass {
   static testMethod void myUnitTest() {
      //Create Data for Customer Objet
      APEX_Customer__c objCust = new APEX_Customer__c();
      objCust.Name = 'Test Customer';
      objCust.APEX_Customer_Status__c = 'Inactive';
      insert objCust;

      // Now, our trigger will fire on After update event so update the Records
      Test.startTest();    // Starts the scope of test
      objCust.APEX_Customer_Status__c = 'Active';
      update objCust;
      Test.stopTest();     // Ends the scope of test

      // Now check if it is giving desired results using system.assert
      // Statement.New invoice should be created
      List<apex_invoice__c> invList = [SELECT Id, APEX_Customer__c FROM
         APEX_Invoice__c WHERE APEX_Customer__c = :objCust.id];
      system.assertEquals(1,invList.size());
      // Check if one record is created in Invoivce sObject
   }
}
Running the Test Class
Follow the steps given below to run the test class −
Step 1 − Go to Apex classes ⇒ click on the class name 'CustomerTriggerTestClass'.
Step 2 − Click on Run Test button as shown.
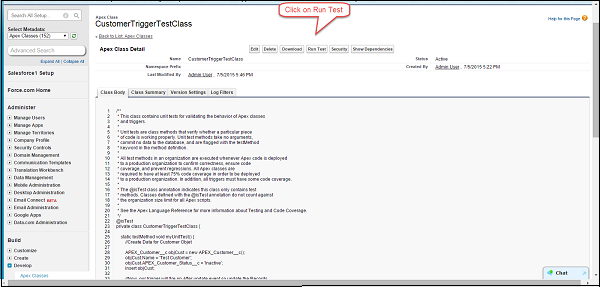
Step 3 − Check status
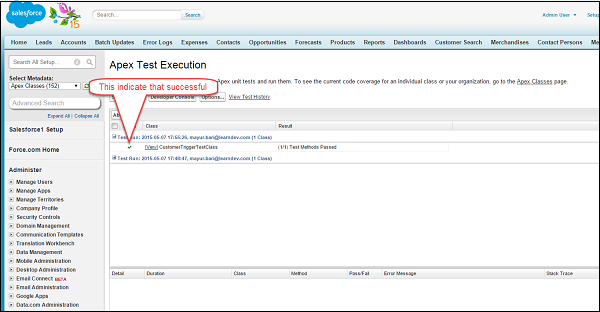
Step 4 − Now check the class and trigger for which we have written the test
Class
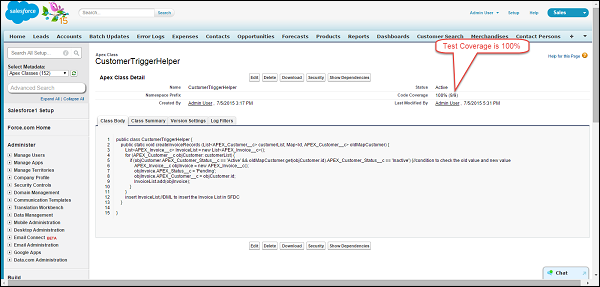
Trigger
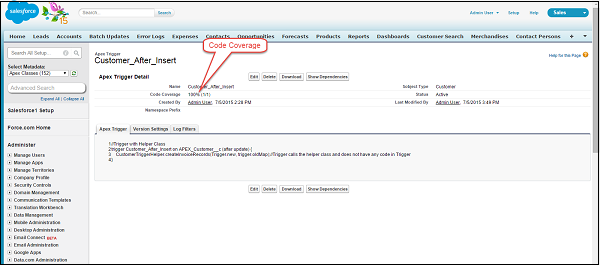
Our testing is successful and completed.
Apex - Deployment
What is Deployment in SFDC?
Till now we have developed code in Developer Edition, but in real life scenario, you have to do this development in Sandbox and then you might need to deploy this to another sandbox or production environment and this is called the deployment. In short, this is the movement of metadata from one organization to another. The reason behind this is that you cannot develop Apex in your Salesforce production organization. Live users accessing the system while you are developing can destabilize your data or corrupt your application.
Tools available for deployment −
- Force.com IDE
- Change Sets
- SOAP API
- Force.com Migration Tool
As we are using the Developer Edition for our development and learning purpose, we cannot use the Change Set or other tools which need the SFDC enterprise or other paid edition. Hence, we will be elaborating the Force.com IDE deployment method in this tutorial.
Force.com Eclipse IDE
Step 1 − Open Eclipse and open the class trigger that needs to be deployed.
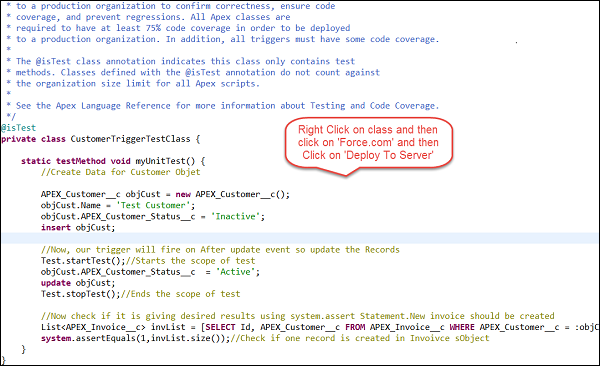
Step 2 − Once you click on 'Deploy to server', then enter the username and password of the organization wherein, the Component needs to be deployed.
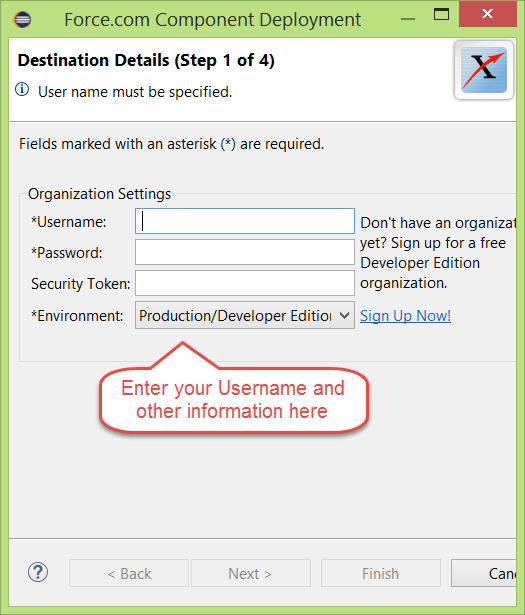
By performing the above mentioned steps, your Apex components will be deployed to the target organization.
Deployment using Change Set
You can deploy Validation rules, workflow rules, Apex classes and Trigger from one organization to other by connecting them via the deployment settings. In this case, organizations must be connected.
To open the deployment setup, follow the steps given below. Remember that this feature is not available in the Developer Edition −
Step 1 − Go to Setup and search for 'Deploy'.
Step 2 − Click on 'Outbound Change Set' in order to create change set to deploy.
Step 3 − Add components to change set using the 'Add' button and then Save and click on Upload.
Step 4 − Go to the Target organization and click on the inbound change set and finally click on deploy.
SOAP API Calls to Deploy
We will just have a small overview of this method as this is not a commonly-used method.
You can use the method calls given below to deploy your metadata.
- compileAndTest()
- compileClasses()
- compileTriggers()
Force.com Migration Tool
This tool is used for the scripted deployment. You have to download the Force.com Migration tool and then you can perform the file based deployment. You can download the Force.com migration tool and then do the scripted deployment.
