- Apache Kafka - Home
- Apache Kafka - Introduction
- Apache Kafka - Fundamentals
- Apache Kafka - Cluster Architecture
- Apache Kafka - Work Flow
- Apache Kafka - Installation Steps
- Apache Kafka - Basic Operations
- Simple Producer Example
- Consumer Group Example
- Integration With Storm
- Integration With Spark
- Real Time Application(Twitter)
- Apache Kafka - Tools
- Apache Kafka - Applications
Apache Kafka - Quick Guide
Apache Kafka - Introduction
In Big Data, an enormous volume of data is used. Regarding data, we have two main challenges.The first challenge is how to collect large volume of data and the second challenge is to analyze the collected data. To overcome those challenges, you must need a messaging system.
Kafka is designed for distributed high throughput systems. Kafka tends to work very well as a replacement for a more traditional message broker. In comparison to other messaging systems, Kafka has better throughput, built-in partitioning, replication and inherent fault-tolerance, which makes it a good fit for large-scale message processing applications.
What is a Messaging System?
A Messaging System is responsible for transferring data from one application to another, so the applications can focus on data, but not worry about how to share it. Distributed messaging is based on the concept of reliable message queuing. Messages are queued asynchronously between client applications and messaging system. Two types of messaging patterns are available − one is point to point and the other is publish-subscribe (pub-sub) messaging system. Most of the messaging patterns follow pub-sub.
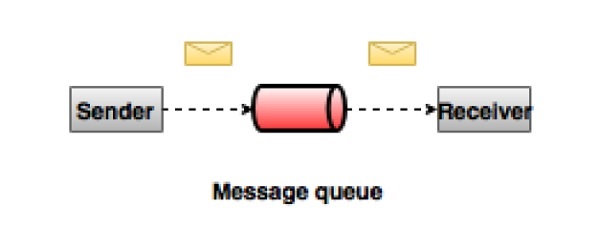
Point to Point Messaging System
In a point-to-point system, messages are persisted in a queue. One or more consumers can consume the messages in the queue, but a particular message can be consumed by a maximum of one consumer only. Once a consumer reads a message in the queue, it disappears from that queue. The typical example of this system is an Order Processing System, where each order will be processed by one Order Processor, but Multiple Order Processors can work as well at the same time. The following diagram depicts the structure.
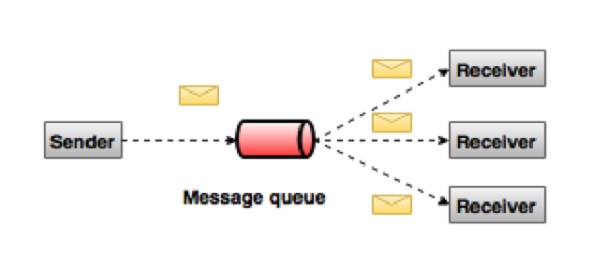
Publish-Subscribe Messaging System
In the publish-subscribe system, messages are persisted in a topic. Unlike point-to-point system, consumers can subscribe to one or more topic and consume all the messages in that topic. In the Publish-Subscribe system, message producers are called publishers and message consumers are called subscribers. A real-life example is Dish TV, which publishes different channels like sports, movies, music, etc., and anyone can subscribe to their own set of channels and get them whenever their subscribed channels are available.
What is Kafka?
Apache Kafka is a distributed publish-subscribe messaging system and a robust queue that can handle a high volume of data and enables you to pass messages from one end-point to another. Kafka is suitable for both offline and online message consumption. Kafka messages are persisted on the disk and replicated within the cluster to prevent data loss. Kafka is built on top of the ZooKeeper synchronization service. It integrates very well with Apache Storm and Spark for real-time streaming data analysis.
Benefits
Following are a few benefits of Kafka −
Reliability − Kafka is distributed, partitioned, replicated and fault tolerance.
Scalability − Kafka messaging system scales easily without down time..
Durability − Kafka uses
Distributed commit log
which means messages persists on disk as fast as possible, hence it is durable..Performance − Kafka has high throughput for both publishing and subscribing messages. It maintains stable performance even many TB of messages are stored.
Kafka is very fast and guarantees zero downtime and zero data loss.
Use Cases
Kafka can be used in many Use Cases. Some of them are listed below −
Metrics − Kafka is often used for operational monitoring data. This involves aggregating statistics from distributed applications to produce centralized feeds of operational data.
Log Aggregation Solution − Kafka can be used across an organization to collect logs from multiple services and make them available in a standard format to multiple con-sumers.
Stream Processing − Popular frameworks such as Storm and Spark Streaming read data from a topic, processes it, and write processed data to a new topic where it becomes available for users and applications. Kafkas strong durability is also very useful in the context of stream processing.
Need for Kafka
Kafka is a unified platform for handling all the real-time data feeds. Kafka supports low latency message delivery and gives guarantee for fault tolerance in the presence of machine failures. It has the ability to handle a large number of diverse consumers. Kafka is very fast, performs 2 million writes/sec. Kafka persists all data to the disk, which essentially means that all the writes go to the page cache of the OS (RAM). This makes it very efficient to transfer data from page cache to a network socket.
Apache Kafka - Fundamentals
Before moving deep into the Kafka, you must aware of the main terminologies such as topics, brokers, producers and consumers. The following diagram illustrates the main terminologies and the table describes the diagram components in detail.
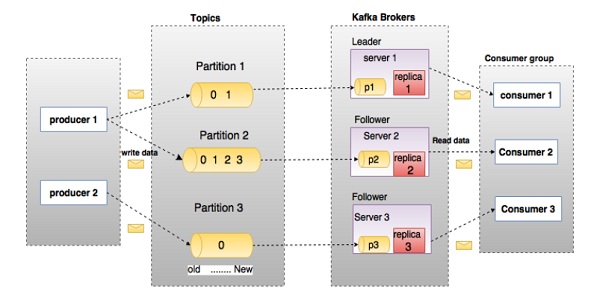
In the above diagram, a topic is configured into three partitions. Partition 1 has two offset factors 0 and 1. Partition 2 has four offset factors 0, 1, 2, and 3. Partition 3 has one offset factor 0. The id of the replica is same as the id of the server that hosts it.
Assume, if the replication factor of the topic is set to 3, then Kafka will create 3 identical replicas of each partition and place them in the cluster to make available for all its operations. To balance a load in cluster, each broker stores one or more of those partitions. Multiple producers and consumers can publish and retrieve messages at the same time.
| S.No | Components and Description |
|---|---|
| 1 | Topics A stream of messages belonging to a particular category is called a topic. Data is stored in topics. Topics are split into partitions. For each topic, Kafka keeps a mini-mum of one partition. Each such partition contains messages in an immutable ordered sequence. A partition is implemented as a set of segment files of equal sizes. |
| 2 | Partition Topics may have many partitions, so it can handle an arbitrary amount of data. |
| 3 |
Partition offset Each partitioned message has a unique sequence id called as |
| 4 |
Replicas of partition Replicas are nothing but |
| 5 |
Brokers
|
| 6 |
Kafka Cluster Kafkas having more than one broker are called as Kafka cluster. A Kafka cluster can be expanded without downtime. These clusters are used to manage the persistence and replication of message data. |
| 7 |
Producers Producers are the publisher of messages to one or more Kafka topics. Producers send data to Kafka brokers. Every time a producer pub-lishes a message to a broker, the broker simply appends the message to the last segment file. Actually, the message will be appended to a partition. Producer can also send messages to a partition of their choice. |
| 8 |
Consumers Consumers read data from brokers. Consumers subscribes to one or more topics and consume published messages by pulling data from the brokers. |
| 9 |
Leader
|
| 10 |
Follower Node which follows leader instructions are called as follower. If the leader fails, one of the follower will automatically become the new leader. A follower acts as normal consumer, pulls messages and up-dates its own data store. |
Apache Kafka - Cluster Architecture
Take a look at the following illustration. It shows the cluster diagram of Kafka.
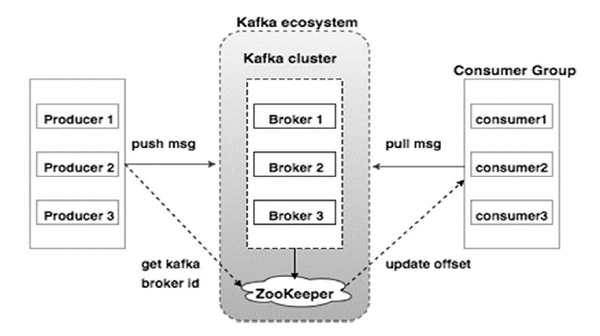
The following table describes each of the components shown in the above diagram.
| S.No | Components and Description |
|---|---|
| 1 |
Broker Kafka cluster typically consists of multiple brokers to maintain load balance. Kafka brokers are stateless, so they use ZooKeeper for maintaining their cluster state. One Kafka broker instance can handle hundreds of thousands of reads and writes per second and each bro-ker can handle TB of messages without performance impact. Kafka broker leader election can be done by ZooKeeper. |
| 2 |
ZooKeeper ZooKeeper is used for managing and coordinating Kafka broker. ZooKeeper service is mainly used to notify producer and consumer about the presence of any new broker in the Kafka system or failure of the broker in the Kafka system. As per the notification received by the Zookeeper regarding presence or failure of the broker then pro-ducer and consumer takes decision and starts coordinating their task with some other broker. |
| 3 |
Producers Producers push data to brokers. When the new broker is started, all the producers search it and automatically sends a message to that new broker. Kafka producer doesnt wait for acknowledgements from the broker and sends messages as fast as the broker can handle. |
| 4 |
Consumers Since Kafka brokers are stateless, which means that the consumer has to maintain how many messages have been consumed by using partition offset. If the consumer acknowledges a particular message offset, it implies that the consumer has consumed all prior messages. The consumer issues an asynchronous pull request to the broker to have a buffer of bytes ready to consume. The consumers can rewind or skip to any point in a partition simply by supplying an offset value. Consumer offset value is notified by ZooKeeper. |
Apache Kafka - WorkFlow
As of now, we discussed the core concepts of Kafka. Let us now throw some light on the workflow of Kafka.
Kafka is simply a collection of topics split into one or more partitions. A Kafka partition is a linearly ordered sequence of messages, where each message is identified by their index (called as offset). All the data in a Kafka cluster is the disjointed union of partitions. Incoming messages are written at the end of a partition and messages are sequentially read by consumers. Durability is provided by replicating messages to different brokers.
Kafka provides both pub-sub and queue based messaging system in a fast, reliable, persisted, fault-tolerance and zero downtime manner. In both cases, producers simply send the message to a topic and consumer can choose any one type of messaging system depending on their need. Let us follow the steps in the next section to understand how the consumer can choose the messaging system of their choice.
Workflow of Pub-Sub Messaging
Following is the step wise workflow of the Pub-Sub Messaging −
Producers send message to a topic at regular intervals.
Kafka broker stores all messages in the partitions configured for that particular topic. It ensures the messages are equally shared between partitions. If the producer sends two messages and there are two partitions, Kafka will store one message in the first partition and the second message in the second partition.
Consumer subscribes to a specific topic.
Once the consumer subscribes to a topic, Kafka will provide the current offset of the topic to the consumer and also saves the offset in the Zookeeper ensemble.
Consumer will request the Kafka in a regular interval (like 100 Ms) for new messages.
Once Kafka receives the messages from producers, it forwards these messages to the consumers.
Consumer will receive the message and process it.
Once the messages are processed, consumer will send an acknowledgement to the Kafka broker.
Once Kafka receives an acknowledgement, it changes the offset to the new value and updates it in the Zookeeper. Since offsets are maintained in the Zookeeper, the consumer can read next message correctly even during server outrages.
This above flow will repeat until the consumer stops the request.
Consumer has the option to rewind/skip to the desired offset of a topic at any time and read all the subsequent messages.
Workflow of Queue Messaging / Consumer Group
In a queue messaging system instead of a single consumer, a group of consumers having the same Group ID
will subscribe to a topic. In simple terms, consumers subscribing to a topic with same Group ID
are considered as a single group and the messages are shared among them. Let us check the actual workflow of this system.
Producers send message to a topic in a regular interval.
Kafka stores all messages in the partitions configured for that particular topic similar to the earlier scenario.
A single consumer subscribes to a specific topic, assume
Topic-01
withGroup ID
asGroup-1
.Kafka interacts with the consumer in the same way as Pub-Sub Messaging until new consumer subscribes the same topic,
Topic-01
with the sameGroup ID
asGroup-1
.Once the new consumer arrives, Kafka switches its operation to share mode and shares the data between the two consumers. This sharing will go on until the number of con-sumers reach the number of partition configured for that particular topic.
Once the number of consumer exceeds the number of partitions, the new consumer will not receive any further message until any one of the existing consumer unsubscribes. This scenario arises because each consumer in Kafka will be assigned a minimum of one partition and once all the partitions are assigned to the existing consumers, the new consumers will have to wait.
This feature is also called as
Consumer Group
. In the same way, Kafka will provide the best of both the systems in a very simple and efficient manner.
Role of ZooKeeper
A critical dependency of Apache Kafka is Apache Zookeeper, which is a distributed configuration and synchronization service. Zookeeper serves as the coordination interface between the Kafka brokers and consumers. The Kafka servers share information via a Zookeeper cluster. Kafka stores basic metadata in Zookeeper such as information about topics, brokers, consumer offsets (queue readers) and so on.
Since all the critical information is stored in the Zookeeper and it normally replicates this data across its ensemble, failure of Kafka broker / Zookeeper does not affect the state of the Kafka cluster. Kafka will restore the state, once the Zookeeper restarts. This gives zero downtime for Kafka. The leader election between the Kafka broker is also done by using Zookeeper in the event of leader failure.
To learn more on Zookeeper, please refer zookeeper
Let us continue further on how to install Java, ZooKeeper, and Kafka on your machine in the next chapter.
Apache Kafka - Installation Steps
Following are the steps for installing Java on your machine.
Step 1 - Verifying Java Installation
Hopefully you have already installed java on your machine right now, so you just verify it using the following command.
$ java -version
If java is successfully installed on your machine, you could see the version of the installed Java.
Step 1.1 - Download JDK
If Java is not downloaded, please download the latest version of JDK by visiting the following link and download latest version.
http://www.oracle.com/technetwork/java/javase/downloads/index.htmlNow the latest version is JDK 8u 60 and the file is jdk-8u60-linux-x64.tar.gz. Please download the file on your machine.
Step 1.2 - Extract Files
Generally, files being downloaded are stored in the downloads folder, verify it and extract the tar setup using the following commands.
$ cd /go/to/download/path
$ tar -zxf jdk-8u60-linux-x64.gz
Step 1.3 - Move to Opt Directory
To make java available to all users, move the extracted java content to usr/local/java
/ folder.
$ su
password: (type password of root user)
$ mkdir /opt/jdk
$ mv jdk-1.8.0_60 /opt/jdk/
Step 1.4 - Set path
To set path and JAVA_HOME variables, add the following commands to ~/.bashrc file.
export JAVA_HOME =/usr/jdk/jdk-1.8.0_60
export PATH=$PATH:$JAVA_HOME/bin
Now apply all the changes into current running system.
$ source ~/.bashrc
Step 1.5 - Java Alternatives
Use the following command to change Java Alternatives.
update-alternatives --install /usr/bin/java java /opt/jdk/jdk1.8.0_60/bin/java 100
Step 1.6 − Now verify java using verification command (java -version) explained in Step 1.
Step 2 - ZooKeeper Framework Installation
Step 2.1 - Download ZooKeeper
To install ZooKeeper framework on your machine, visit the following link and download the latest version of ZooKeeper.
http://zookeeper.apache.org/releases.htmlAs of now, latest version of ZooKeeper is 3.4.6 (ZooKeeper-3.4.6.tar.gz).
Step 2.2 - Extract tar file
Extract tar file using the following command
$ cd opt/
$ tar -zxf zookeeper-3.4.6.tar.gz
$ cd zookeeper-3.4.6
$ mkdir data
Step 2.3 - Create Configuration File
Open Configuration File named conf/zoo.cfg
using the command vi conf/zoo.cfg and all the following parameters to set as starting point.
$ vi conf/zoo.cfg
tickTime=2000
dataDir=/path/to/zookeeper/data
clientPort=2181
initLimit=5
syncLimit=2
Once the configuration file has been saved successfully and return to terminal again, you can start the zookeeper server.
Step 2.4 - Start ZooKeeper Server
$ bin/zkServer.sh start
After executing this command, you will get a response as shown below −
$ JMX enabled by default
$ Using config: /Users/../zookeeper-3.4.6/bin/../conf/zoo.cfg
$ Starting zookeeper ... STARTED
Step 2.5 - Start CLI
$ bin/zkCli.sh
After typing the above command, you will be connected to the zookeeper server and will get the below response.
Connecting to localhost:2181
................
................
................
Welcome to ZooKeeper!
................
................
WATCHER::
WatchedEvent state:SyncConnected type: None path:null
[zk: localhost:2181(CONNECTED) 0]
Step 2.6 - Stop Zookeeper Server
After connecting the server and performing all the operations, you can stop the zookeeper server with the following command −
$ bin/zkServer.sh stop
Now you have successfully installed Java and ZooKeeper on your machine. Let us see the steps to install Apache Kafka.
Step 3 - Apache Kafka Installation
Let us continue with the following steps to install Kafka on your machine.
Step 3.1 - Download Kafka
To install Kafka on your machine, click on the below link −
https://www.apache.org/dyn/closer.cgi?path=/kafka/0.9.0.0/kafka_2.11-0.9.0.0.tgzNow the latest version i.e., kafka_2.11_0.9.0.0.tgz will be downloaded onto your machine.
Step 3.2 - Extract the tar file
Extract the tar file using the following command −
$ cd opt/
$ tar -zxf kafka_2.11.0.9.0.0 tar.gz
$ cd kafka_2.11.0.9.0.0
Now you have downloaded the latest version of Kafka on your machine.
Step 3.3 - Start Server
You can start the server by giving the following command −
$ bin/kafka-server-start.sh config/server.properties
After the server starts, you would see the below response on your screen −
$ bin/kafka-server-start.sh config/server.properties
[2016-01-02 15:37:30,410] INFO KafkaConfig values:
request.timeout.ms = 30000
log.roll.hours = 168
inter.broker.protocol.version = 0.9.0.X
log.preallocate = false
security.inter.broker.protocol = PLAINTEXT
.
.
Step 4 - Stop the Server
After performing all the operations, you can stop the server using the following command −
$ bin/kafka-server-stop.sh config/server.properties
Now that we have already discussed the Kafka installation, we can learn how to perform basic operations on Kafka in the next chapter.
Apache Kafka - Basic Operations
First let us start implementing single node-single broker
configuration and we will then migrate our setup to single node-multiple brokers configuration.
Hopefully you would have installed Java, ZooKeeper and Kafka on your machine by now. Before moving to the Kafka Cluster Setup, first you would need to start your ZooKeeper because Kafka Cluster uses ZooKeeper.
Start ZooKeeper
Open a new terminal and type the following command −
bin/zookeeper-server-start.sh config/zookeeper.properties
To start Kafka Broker, type the following command −
bin/kafka-server-start.sh config/server.properties
After starting Kafka Broker, type the command jps
on ZooKeeper terminal and you would see the following response −
821 QuorumPeerMain
928 Kafka
931 Jps
Now you could see two daemons running on the terminal where QuorumPeerMain is ZooKeeper daemon and another one is Kafka daemon.
Single Node-Single Broker Configuration
In this configuration you have a single ZooKeeper and broker id instance. Following are the steps to configure it −
Creating a Kafka Topic − Kafka provides a command line utility named kafka-topics.sh
to create topics on the server. Open new terminal and type the below example.
Syntax
bin/kafka-topics.sh --create --zookeeper localhost:2181 --replication-factor 1
--partitions 1 --topic topic-name
Example
bin/kafka-topics.sh --create --zookeeper localhost:2181 --replication-factor 1
--partitions 1 --topic Hello-Kafka
We just created a topic named Hello-Kafka
with a single partition and one replica factor. The above created output will be similar to the following output −
Output − Created topic Hello-Kafka
Once the topic has been created, you can get the notification in Kafka broker terminal window and the log for the created topic specified in /tmp/kafka-logs/ in the config/server.properties file.
List of Topics
To get a list of topics in Kafka server, you can use the following command −
Syntax
bin/kafka-topics.sh --list --zookeeper localhost:2181
Output
Hello-Kafka
Since we have created a topic, it will list out Hello-Kafka
only. Suppose, if you create more than one topics, you will get the topic names in the output.
Start Producer to Send Messages
Syntax
bin/kafka-console-producer.sh --broker-list localhost:9092 --topic topic-name
From the above syntax, two main parameters are required for the producer command line client −
Broker-list − The list of brokers that we want to send the messages to. In this case we only have one broker. The Config/server.properties file contains broker port id, since we know our broker is listening on port 9092, so you can specify it directly.
Topic name − Here is an example for the topic name.
Example
bin/kafka-console-producer.sh --broker-list localhost:9092 --topic Hello-Kafka
The producer will wait on input from stdin and publishes to the Kafka cluster. By default, every new line is published as a new message then the default producer properties are specified in config/producer.properties
file. Now you can type a few lines of messages in the terminal as shown below.
Output
$ bin/kafka-console-producer.sh --broker-list localhost:9092
--topic Hello-Kafka[2016-01-16 13:50:45,931]
WARN property topic is not valid (kafka.utils.Verifia-bleProperties)
Hello
My first message
My second message
Start Consumer to Receive Messages
Similar to producer, the default consumer properties are specified in config/consumer.proper-ties
file. Open a new terminal and type the below syntax for consuming messages.
Syntax
bin/kafka-console-consumer.sh --zookeeper localhost:2181 topic topic-name
--from-beginning
Example
bin/kafka-console-consumer.sh --zookeeper localhost:2181 topic Hello-Kafka
--from-beginning
Output
Hello
My first message
My second message
Finally, you are able to enter messages from the producers terminal and see them appearing in the consumers terminal. As of now, you have a very good understanding on the single node cluster with a single broker. Let us now move on to the multiple brokers configuration.
Single Node-Multiple Brokers Configuration
Before moving on to the multiple brokers cluster setup, first start your ZooKeeper server.
Create Multiple Kafka Brokers − We have one Kafka broker instance already in con-fig/server.properties. Now we need multiple broker instances, so copy the existing server.prop-erties file into two new config files and rename it as server-one.properties and server-two.prop-erties. Then edit both new files and assign the following changes −
config/server-one.properties
# The id of the broker. This must be set to a unique integer for each broker.
broker.id=1
# The port the socket server listens on
port=9093
# A comma seperated list of directories under which to store log files
log.dirs=/tmp/kafka-logs-1
config/server-two.properties
# The id of the broker. This must be set to a unique integer for each broker.
broker.id=2
# The port the socket server listens on
port=9094
# A comma seperated list of directories under which to store log files
log.dirs=/tmp/kafka-logs-2
Start Multiple Brokers− After all the changes have been made on three servers then open three new terminals to start each broker one by one.
Broker1
bin/kafka-server-start.sh config/server.properties
Broker2
bin/kafka-server-start.sh config/server-one.properties
Broker3
bin/kafka-server-start.sh config/server-two.properties
Now we have three different brokers running on the machine. Try it by yourself to check all the daemons by typing jps on the ZooKeeper terminal, then you would see the response.
Creating a Topic
Let us assign the replication factor value as three for this topic because we have three different brokers running. If you have two brokers, then the assigned replica value will be two.
Syntax
bin/kafka-topics.sh --create --zookeeper localhost:2181 --replication-factor 3
-partitions 1 --topic topic-name
Example
bin/kafka-topics.sh --create --zookeeper localhost:2181 --replication-factor 3
-partitions 1 --topic Multibrokerapplication
Output
created topic Multibrokerapplication
The Describe
command is used to check which broker is listening on the current created topic as shown below −
bin/kafka-topics.sh --describe --zookeeper localhost:2181
--topic Multibrokerappli-cation
Output
bin/kafka-topics.sh --describe --zookeeper localhost:2181
--topic Multibrokerappli-cation

Topic:Multibrokerapplication    PartitionCount:1
ReplicationFactor:3 Configs:

Topic:Multibrokerapplication Partition:0 Leader:0
Replicas:0,2,1 Isr:0,2,1
From the above output, we can conclude that first line gives a summary of all the partitions, showing topic name, partition count and the replication factor that we have chosen already. In the second line, each node will be the leader for a randomly selected portion of the partitions.
In our case, we see that our first broker (with broker.id 0) is the leader. Then Replicas:0,2,1 means that all the brokers replicate the topic finally Isr
is the set of in-sync
replicas. Well, this is the subset of replicas that are currently alive and caught up by the leader.
Start Producer to Send Messages
This procedure remains the same as in the single broker setup.
Example
bin/kafka-console-producer.sh --broker-list localhost:9092
--topic Multibrokerapplication
Output
bin/kafka-console-producer.sh --broker-list localhost:9092 --topic Multibrokerapplication
[2016-01-20 19:27:21,045] WARN Property topic is not valid (kafka.utils.Verifia-bleProperties)
This is single node-multi broker demo
This is the second message
Start Consumer to Receive Messages
This procedure remains the same as shown in the single broker setup.
Example
bin/kafka-console-consumer.sh --zookeeper localhost:2181
topic Multibrokerapplica-tion --from-beginning
Output
bin/kafka-console-consumer.sh --zookeeper localhost:2181
topic Multibrokerapplica-tion from-beginning
This is single node-multi broker demo
This is the second message
Basic Topic Operations
In this chapter we will discuss the various basic topic operations.
Modifying a Topic
As you have already understood how to create a topic in Kafka Cluster. Now let us modify a created topic using the following command
Syntax
bin/kafka-topics.sh zookeeper localhost:2181 --alter --topic topic_name
--parti-tions count
Example
We have already created a topic Hello-Kafka with single partition count and one replica factor.
Now using alter command we have changed the partition count.
bin/kafka-topics.sh --zookeeper localhost:2181
--alter --topic Hello-kafka --parti-tions 2
Output
WARNING: If partitions are increased for a topic that has a key,
the partition logic or ordering of the messages will be affected
Adding partitions succeeded!
Deleting a Topic
To delete a topic, you can use the following syntax.
Syntax
bin/kafka-topics.sh --zookeeper localhost:2181 --delete --topic topic_name
Example
bin/kafka-topics.sh --zookeeper localhost:2181 --delete --topic Hello-kafka
Output
> Topic Hello-kafka marked for deletion
Note −This will have no impact if delete.topic.enable is not set to true
Apache Kafka - Simple Producer Example
Let us create an application for publishing and consuming messages using a Java client. Kafka producer client consists of the following APIs.
KafkaProducer API
Let us understand the most important set of Kafka producer API in this section. The central part of the KafkaProducer API is KafkaProducer
class. The KafkaProducer class provides an option to connect a Kafka broker in its constructor with the following methods.
KafkaProducer class provides send method to send messages asynchronously to a topic. The signature of send() is as follows
producer.send(new ProducerRecord<byte[],byte[]>(topic,
partition, key1, value1) , callback);
ProducerRecord − The producer manages a buffer of records waiting to be sent.
Callback − A user-supplied callback to execute when the record has been acknowl-edged by the server (null indicates no callback).
KafkaProducer class provides a flush method to ensure all previously sent messages have been actually completed. Syntax of the flush method is as follows −
public void flush()
KafkaProducer class provides partitionFor method, which helps in getting the partition metadata for a given topic. This can be used for custom partitioning. The signature of this method is as follows −
public Map metrics()
It returns the map of internal metrics maintained by the producer.
public void close() − KafkaProducer class provides close method blocks until all previously sent requests are completed.
Producer API
The central part of the Producer API is Producer
class. Producer class provides an option to connect Kafka broker in its constructor by the following methods.
The Producer Class
The producer class provides send method to send messages to either single or multiple topics using the following signatures.
public void send(KeyedMessaget<k,v> message)
- sends the data to a single topic,par-titioned by key using either sync or async producer.
public void send(List<KeyedMessage<k,v>>messages)
- sends data to multiple topics.
Properties prop = new Properties();
prop.put(producer.type,async)
ProducerConfig config = new ProducerConfig(prop);
There are two types of producers Sync and Async.
The same API configuration applies to Sync
producer as well. The difference between them is a sync producer sends messages directly, but sends messages in background. Async producer is preferred when you want a higher throughput. In the previous releases like 0.8, an async producer does not have a callback for send() to register error handlers. This is available only in the current release of 0.9.
public void close()
Producer class provides close method to close the producer pool connections to all Kafka bro-kers.
Configuration Settings
The Producer APIs main configuration settings are listed in the following table for better under-standing −
| S.No | Configuration Settings and Description |
|---|---|
| 1 |
client.id identifies producer application |
| 2 |
producer.type either sync or async |
| 3 |
acks The acks config controls the criteria under producer requests are con-sidered complete. |
| 4 |
retries If producer request fails, then automatically retry with specific value. |
| 5 |
bootstrap.servers bootstrapping list of brokers. |
| 6 |
linger.ms if you want to reduce the number of requests you can set linger.ms to something greater than some value. |
| 7 |
key.serializer Key for the serializer interface. |
| 8 |
value.serializer value for the serializer interface. |
| 9 |
batch.size Buffer size. |
| 10 |
buffer.memory controls the total amount of memory available to the producer for buff-ering. |
ProducerRecord API
ProducerRecord is a key/value pair that is sent to Kafka cluster.ProducerRecord class constructor for creating a record with partition, key and value pairs using the following signature.
public ProducerRecord (string topic, int partition, k key, v value)
Topic − user defined topic name that will appended to record.
Partition − partition count
Key − The key that will be included in the record.
- Value − Record contents
public ProducerRecord (string topic, k key, v value)
ProducerRecord class constructor is used to create a record with key, value pairs and without partition.
Topic − Create a topic to assign record.
Key − key for the record.
Value − record contents.
public ProducerRecord (string topic, v value)
ProducerRecord class creates a record without partition and key.
Topic − create a topic.
Value − record contents.
The ProducerRecord class methods are listed in the following table −
| S.No | Class Methods and Description |
|---|---|
| 1 |
public string topic() Topic will append to the record. |
| 2 |
public K key() Key that will be included in the record. If no such key, null will be re-turned here. |
| 3 |
public V value() Record contents. |
| 4 |
partition() Partition count for the record |
SimpleProducer application
Before creating the application, first start ZooKeeper and Kafka broker then create your own topic in Kafka broker using create topic command. After that create a java class named Sim-pleProducer.java
and type in the following coding.
//import util.properties packages
import java.util.Properties;

//import simple producer packages
import org.apache.kafka.clients.producer.Producer;

//import KafkaProducer packages
import org.apache.kafka.clients.producer.KafkaProducer;

//import ProducerRecord packages
import org.apache.kafka.clients.producer.ProducerRecord;

//Create java class named SimpleProducer
public class SimpleProducer {

   public static void main(String[] args) throws Exception{

      // Check arguments length value
      if(args.length == 0){
         System.out.println("Enter topic name");
         return;
      }

      //Assign topicName to string variable
      String topicName = args[0].toString();

      // create instance for properties to access producer configs
      Properties props = new Properties();

      //Assign localhost id
      props.put("bootstrap.servers", localhost:9092");

      //Set acknowledgements for producer requests.
      props.put("acks", all");

      //If the request fails, the producer can automatically retry,
      props.put("retries", 0);

      //Specify buffer size in config
      props.put("batch.size", 16384);

      //Reduce the no of requests less than 0
      props.put("linger.ms", 1);

      //The buffer.memory controls the total amount of memory available to the producer for buffering.
      props.put("buffer.memory", 33554432);

      props.put("key.serializer",
         "org.apache.kafka.common.serialization.StringSerializer");

      props.put("value.serializer",
         "org.apache.kafka.common.serialization.StringSerializer");

      Producer<String, String> producer = new KafkaProducer
         <String, String>(props);

      for(int i = 0; i < 10; i++)
         producer.send(new ProducerRecord<String, String>(topicName,
            Integer.toString(i), Integer.toString(i)));
               System.out.println(Message sent successfully);
               producer.close();
   }
}
Compilation − The application can be compiled using the following command.
javac -cp /path/to/kafka/kafka_2.11-0.9.0.0/lib/* *.java
Execution − The application can be executed using the following command.
java -cp /path/to/kafka/kafka_2.11-0.9.0.0/lib/*:. SimpleProducer <topic-name>
Output
Message sent successfully
To check the above output open new terminal and type Consumer CLI command to receive messages.
>> bin/kafka-console-consumer.sh --zookeeper localhost:2181 topic <topic-name> from-beginning
1
2
3
4
5
6
7
8
9
10
Simple Consumer Example
As of now we have created a producer to send messages to Kafka cluster. Now let us create a consumer to consume messages form the Kafka cluster. KafkaConsumer API is used to consume messages from the Kafka cluster. KafkaConsumer class constructor is defined below.
public KafkaConsumer(java.util.Map<java.lang.String,java.lang.Object> configs)
configs − Return a map of consumer configs.
KafkaConsumer class has the following significant methods that are listed in the table below.
| S.No | Method and Description |
|---|---|
| 1 |
public java.util.Set<TopicPar-tition> assignment() Get the set of partitions currently assigned by the con-sumer. |
| 2 |
public string subscription() Subscribe to the given list of topics to get dynamically as-signed partitions. |
| 3 |
public void sub-scribe(java.util.List<java.lang.String> topics, ConsumerRe-balanceListener listener) Subscribe to the given list of topics to get dynamically as-signed partitions. |
| 4 |
public void unsubscribe() Unsubscribe the topics from the given list of partitions. |
| 5 |
public void sub-scribe(java.util.List<java.lang.String> topics) Subscribe to the given list of topics to get dynamically as-signed partitions. If the given list of topics is empty, it is treated the same as unsubscribe(). |
| 6 |
public void sub-scribe(java.util.regex.Pattern pattern, ConsumerRebalanceLis-tener listener) The argument pattern refers to the subscribing pattern in the format of regular expression and the listener argument gets notifications from the subscribing pattern. |
| 7 |
public void as-sign(java.util.List<TopicParti-tion> partitions) Manually assign a list of partitions to the customer. |
| 8 |
poll() Fetch data for the topics or partitions specified using one of the subscribe/assign APIs. This will return error, if the topics are not subscribed before the polling for data. |
| 9 |
public void commitSync() Commit offsets returned on the last poll() for all the sub-scribed list of topics and partitions. The same operation is applied to commitAsyn(). |
| 10 |
public void seek(TopicPartition partition, long offset) Fetch the current offset value that consumer will use on the next poll() method. |
| 11 |
public void resume() Resume the paused partitions. |
| 12 |
public void wakeup() Wakeup the consumer. |
ConsumerRecord API
The ConsumerRecord API is used to receive records from the Kafka cluster. This API consists of a topic name, partition number, from which the record is being received and an offset that points to the record in a Kafka partition. ConsumerRecord class is used to create a consumer record with specific topic name, partition count and <key, value> pairs. It has the following signature.
public ConsumerRecord(string topic,int partition, long offset,K key, V value)
Topic − The topic name for consumer record received from the Kafka cluster.
Partition − Partition for the topic.
Key − The key of the record, if no key exists null will be returned.
Value − Record contents.
ConsumerRecords API
ConsumerRecords API acts as a container for ConsumerRecord. This API is used to keep the list of ConsumerRecord per partition for a particular topic. Its Constructor is defined below.
public ConsumerRecords(java.util.Map<TopicPartition,java.util.List
<Consumer-Record>K,V>>> records)
TopicPartition − Return a map of partition for a particular topic.
Records − Return list of ConsumerRecord.
ConsumerRecords class has the following methods defined.
| S.No | Methods and Description |
|---|---|
| 1 |
public int count() The number of records for all the topics. |
| 2 |
public Set partitions() The set of partitions with data in this record set (if no data was returned then the set is empty). |
| 3 |
public Iterator iterator() Iterator enables you to cycle through a collection, obtaining or re-moving elements. |
| 4 |
public List records() Get list of records for the given partition. |
Configuration Settings
The configuration settings for the Consumer client API main configuration settings are listed below −
| S.No | Settings and Description |
|---|---|
| 1 |
bootstrap.servers Bootstrapping list of brokers. |
| 2 |
group.id Assigns an individual consumer to a group. |
| 3 |
enable.auto.commit Enable auto commit for offsets if the value is true, otherwise not committed. |
| 4 |
auto.commit.interval.ms Return how often updated consumed offsets are written to ZooKeeper. |
| 5 |
session.timeout.ms Indicates how many milliseconds Kafka will wait for the ZooKeeper to respond to a request (read or write) before giving up and continuing to consume messages. |
SimpleConsumer Application
The producer application steps remain the same here. First, start your ZooKeeper and Kafka broker. Then create a SimpleConsumer
application with the java class named SimpleCon-sumer.java
and type the following code.
import java.util.Properties;
import java.util.Arrays;
import org.apache.kafka.clients.consumer.KafkaConsumer;
import org.apache.kafka.clients.consumer.ConsumerRecords;
import org.apache.kafka.clients.consumer.ConsumerRecord;
public class SimpleConsumer {
public static void main(String[] args) throws Exception {
if(args.length == 0){
System.out.println("Enter topic name");
return;
}
//Kafka consumer configuration settings
String topicName = args[0].toString();
Properties props = new Properties();
props.put("bootstrap.servers", "localhost:9092");
props.put("group.id", "test");
props.put("enable.auto.commit", "true");
props.put("auto.commit.interval.ms", "1000");
props.put("session.timeout.ms", "30000");
props.put("key.deserializer",
"org.apache.kafka.common.serialization.StringDeserializer");
props.put("value.deserializer",
"org.apache.kafka.common.serialization.StringDeserializer");
KafkaConsumer<String, String> consumer = new KafkaConsumer
<String, String>(props);
//Kafka Consumer subscribes list of topics here.
consumer.subscribe(Arrays.asList(topicName))
//print the topic name
System.out.println("Subscribed to topic " + topicName);
int i = 0;
while (true) {
ConsumerRecords<String, String> records = con-sumer.poll(100);
for (ConsumerRecord<String, String> record : records)
// print the offset,key and value for the consumer records.
System.out.printf("offset = %d, key = %s, value = %s\n",
record.offset(), record.key(), record.value());
}
}
}
Compilation − The application can be compiled using the following command.
javac -cp /path/to/kafka/kafka_2.11-0.9.0.0/lib/* *.java
Execution − The application can be executed using the following command
java -cp /path/to/kafka/kafka_2.11-0.9.0.0/lib/*:. SimpleConsumer <topic-name>
Input − Open the producer CLI and send some messages to the topic. You can put the smple input as Hello Consumer.
Output − Following will be the output.
Subscribed to topic Hello-Kafka
offset = 3, key = null, value = Hello Consumer
Apache Kafka - Consumer Group Example
Consumer group is a multi-threaded or multi-machine consumption from Kafka topics.
Consumer Group
Consumers can join a group by using the same
group.id.
The maximum parallelism of a group is that the number of consumers in the group ← no of partitions.
Kafka assigns the partitions of a topic to the consumer in a group, so that each partition is consumed by exactly one consumer in the group.
Kafka guarantees that a message is only ever read by a single consumer in the group.
Consumers can see the message in the order they were stored in the log.
Re-balancing of a Consumer
Adding more processes/threads will cause Kafka to re-balance. If any consumer or broker fails to send heartbeat to ZooKeeper, then it can be re-configured via the Kafka cluster. During this re-balance, Kafka will assign available partitions to the available threads, possibly moving a partition to another process.
import java.util.Properties;
import java.util.Arrays;
import org.apache.kafka.clients.consumer.KafkaConsumer;
import org.apache.kafka.clients.consumer.ConsumerRecords;
import org.apache.kafka.clients.consumer.ConsumerRecord;
public class ConsumerGroup {
public static void main(String[] args) throws Exception {
if(args.length < 2){
System.out.println("Usage: consumer <topic> <groupname>");
return;
}
String topic = args[0].toString();
String group = args[1].toString();
Properties props = new Properties();
props.put("bootstrap.servers", "localhost:9092");
props.put("group.id", group);
props.put("enable.auto.commit", "true");
props.put("auto.commit.interval.ms", "1000");
props.put("session.timeout.ms", "30000");
props.put("key.deserializer",
"org.apache.kafka.common.serialization.ByteArraySerializer");
props.put("value.deserializer",
"org.apache.kafka.common.serialization.StringDeserializer");
KafkaConsumer<String, String> consumer = new KafkaConsumer<String, String>(props);
consumer.subscribe(Arrays.asList(topic));
System.out.println("Subscribed to topic " + topic);
int i = 0;
while (true) {
ConsumerRecords<String, String> records = consumer.poll(100);
for (ConsumerRecord<String, String> record : records)
System.out.printf("offset = %d, key = %s, value = %s\n",
record.offset(), record.key(), record.value());
}
}
}
Compilation
javac -cp /path/to/kafka/kafka_2.11-0.9.0.0/libs/*" ConsumerGroup.java
Execution
>>java -cp /path/to/kafka/kafka_2.11-0.9.0.0/libs/*":.
ConsumerGroup <topic-name> my-group
>>java -cp "/home/bala/Workspace/kafka/kafka_2.11-0.9.0.0/libs/*":.
ConsumerGroup <topic-name> my-group
Here we have created a sample group name as my-group
with two consumers. Similarly, you can create your group and number of consumers in the group.
Input
Open producer CLI and send some messages like −
Test consumer group 01
Test consumer group 02
Output of the First Process
Subscribed to topic Hello-kafka
offset = 3, key = null, value = Test consumer group 01
Output of the Second Process
Subscribed to topic Hello-kafka
offset = 3, key = null, value = Test consumer group 02
Now hopefully you would have understood SimpleConsumer and ConsumeGroup by using the Java client demo. Now you have an idea about how to send and receive messages using a Java client. Let us continue Kafka integration with big data technologies in the next chapter.
Apache Kafka - Integration With Storm
In this chapter, we will learn how to integrate Kafka with Apache Storm.
About Storm
Storm was originally created by Nathan Marz and team at BackType. In a short time, Apache Storm became a standard for distributed real-time processing system that allows you to process a huge volume of data. Storm is very fast and a benchmark clocked it at over a million tuples processed per second per node. Apache Storm runs continuously, consuming data from the configured sources (Spouts) and passes the data down the processing pipeline (Bolts). Com-bined, Spouts and Bolts make a Topology.
Integration with Storm
Kafka and Storm naturally complement each other, and their powerful cooperation enables real-time streaming analytics for fast-moving big data. Kafka and Storm integration is to make easier for developers to ingest and publish data streams from Storm topologies.
Conceptual flow
A spout is a source of streams. For example, a spout may read tuples off a Kafka Topic and emit them as a stream. A bolt consumes input streams, process and possibly emits new streams. Bolts can do anything from running functions, filtering tuples, do streaming aggregations, streaming joins, talk to databases, and more. Each node in a Storm topology executes in parallel. A topology runs indefinitely until you terminate it. Storm will automatically reassign any failed tasks. Additionally, Storm guarantees that there will be no data loss, even if the machines go down and messages are dropped.
Let us go through the Kafka-Storm integration APIs in detail. There are three main classes to integrate Kafka with Storm. They are as follows −
BrokerHosts - ZkHosts & StaticHosts
BrokerHosts is an interface and ZkHosts and StaticHosts are its two main implementations. ZkHosts is used to track the Kafka brokers dynamically by maintaining the details in ZooKeeper, while StaticHosts is used to manually / statically set the Kafka brokers and its details. ZkHosts is the simple and fast way to access the Kafka broker.
The signature of ZkHosts is as follows −
public ZkHosts(String brokerZkStr, String brokerZkPath)
public ZkHosts(String brokerZkStr)
Where brokerZkStr is ZooKeeper host and brokerZkPath is the ZooKeeper path to maintain the Kafka broker details.
KafkaConfig API
This API is used to define configuration settings for the Kafka cluster. The signature of Kafka Con-fig is defined as follows
public KafkaConfig(BrokerHosts hosts, string topic)
Hosts − The BrokerHosts can be ZkHosts / StaticHosts.
Topic − topic name.
SpoutConfig API
Spoutconfig is an extension of KafkaConfig that supports additional ZooKeeper information.
public SpoutConfig(BrokerHosts hosts, string topic, string zkRoot, string id)
Hosts − The BrokerHosts can be any implementation of BrokerHosts interface
Topic − topic name.
zkRoot − ZooKeeper root path.
id − The spout stores the state of the offsets its consumed in Zookeeper. The id should uniquely identify your spout.
SchemeAsMultiScheme
SchemeAsMultiScheme is an interface that dictates how the ByteBuffer consumed from Kafka gets transformed into a storm tuple. It is derived from MultiScheme and accept implementation of Scheme class. There are lot of implementation of Scheme class and one such implementation is StringScheme, which parses the byte as a simple string. It also controls the naming of your output field. The signature is defined as follows.
public SchemeAsMultiScheme(Scheme scheme)
Scheme − byte buffer consumed from kafka.
KafkaSpout API
KafkaSpout is our spout implementation, which will integrate with Storm. It fetches the mes-sages from kafka topic and emits it into Storm ecosystem as tuples. KafkaSpout get its config-uration details from SpoutConfig.
Below is a sample code to create a simple Kafka spout.
// ZooKeeper connection string
BrokerHosts hosts = new ZkHosts(zkConnString);

//Creating SpoutConfig Object
SpoutConfig spoutConfig = new SpoutConfig(hosts,
   topicName, "/" + topicName UUID.randomUUID().toString());

//convert the ByteBuffer to String.
spoutConfig.scheme = new SchemeAsMultiScheme(new StringScheme());

//Assign SpoutConfig to KafkaSpout.
KafkaSpout kafkaSpout = new KafkaSpout(spoutConfig);
Bolt Creation
Bolt is a component that takes tuples as input, processes the tuple, and produces new tuples as output. Bolts will implement IRichBolt interface. In this program, two bolt classes WordSplitter-Bolt and WordCounterBolt are used to perform the operations.
IRichBolt interface has the following methods −
Prepare − Provides the bolt with an environment to execute. The executors will run this method to initialize the spout.
Execute − Process a single tuple of input.
Cleanup − Called when a bolt is going to shut down.
declareOutputFields − Declares the output schema of the tuple.
Let us create SplitBolt.java, which implements the logic to split a sentence into words and CountBolt.java, which implements logic to separate unique words and count its occurrence.
SplitBolt.java
import java.util.Map;

import backtype.storm.tuple.Tuple;
import backtype.storm.tuple.Fields;
import backtype.storm.tuple.Values;

import backtype.storm.task.OutputCollector;
import backtype.storm.topology.OutputFieldsDeclarer;
import backtype.storm.topology.IRichBolt;
import backtype.storm.task.TopologyContext;

public class SplitBolt implements IRichBolt {
   private OutputCollector collector;

   @Override
   public void prepare(Map stormConf, TopologyContext context,
      OutputCollector collector) {
      this.collector = collector;
   }

   @Override
   public void execute(Tuple input) {
      String sentence = input.getString(0);
      String[] words = sentence.split(" ");

      for(String word: words) {
         word = word.trim();

         if(!word.isEmpty()) {
            word = word.toLowerCase();
            collector.emit(new Values(word));
         }

      }

      collector.ack(input);
   }

   @Override
   public void declareOutputFields(OutputFieldsDeclarer declarer) {
      declarer.declare(new Fields("word"));
   }

   @Override
   public void cleanup() {}

   @Override
   public Map<String, Object> getComponentConfiguration() {
      return null;
   }

}
CountBolt.java
import java.util.Map;
import java.util.HashMap;
import backtype.storm.tuple.Tuple;
import backtype.storm.task.OutputCollector;
import backtype.storm.topology.OutputFieldsDeclarer;
import backtype.storm.topology.IRichBolt;
import backtype.storm.task.TopologyContext;
public class CountBolt implements IRichBolt{
Map<String, Integer> counters;
private OutputCollector collector;
@Override
public void prepare(Map stormConf, TopologyContext context,
OutputCollector collector) {
this.counters = new HashMap<String, Integer>();
this.collector = collector;
}
@Override
public void execute(Tuple input) {
String str = input.getString(0);
if(!counters.containsKey(str)){
counters.put(str, 1);
}else {
Integer c = counters.get(str) +1;
counters.put(str, c);
}
collector.ack(input);
}
@Override
public void cleanup() {
for(Map.Entry<String, Integer> entry:counters.entrySet()){
System.out.println(entry.getKey()+" : " + entry.getValue());
}
}
@Override
public void declareOutputFields(OutputFieldsDeclarer declarer) {
}
@Override
public Map<String, Object> getComponentConfiguration() {
return null;
}
}
Submitting to Topology
The Storm topology is basically a Thrift structure. TopologyBuilder class provides simple and easy methods to create complex topologies. The TopologyBuilder class has methods to set spout (setSpout) and to set bolt (setBolt). Finally, TopologyBuilder has createTopology to create to-pology. shuffleGrouping and fieldsGrouping methods help to set stream grouping for spout and bolts.
Local Cluster − For development purposes, we can create a local cluster using LocalCluster
object and then submit the topology using submitTopology
method of LocalCluster
class.
KafkaStormSample.java
import backtype.storm.Config;
import backtype.storm.LocalCluster;
import backtype.storm.topology.TopologyBuilder;

import java.util.ArrayList;
import java.util.List;
import java.util.UUID;

import backtype.storm.spout.SchemeAsMultiScheme;
import storm.kafka.trident.GlobalPartitionInformation;
import storm.kafka.ZkHosts;
import storm.kafka.Broker;
import storm.kafka.StaticHosts;
import storm.kafka.BrokerHosts;
import storm.kafka.SpoutConfig;
import storm.kafka.KafkaConfig;
import storm.kafka.KafkaSpout;
import storm.kafka.StringScheme;

public class KafkaStormSample {
   public static void main(String[] args) throws Exception{
      Config config = new Config();
      config.setDebug(true);
      config.put(Config.TOPOLOGY_MAX_SPOUT_PENDING, 1);
      String zkConnString = "localhost:2181";
      String topic = "my-first-topic";
      BrokerHosts hosts = new ZkHosts(zkConnString);

      SpoutConfig kafkaSpoutConfig = new SpoutConfig (hosts, topic, "/" + topic,
         UUID.randomUUID().toString());
      kafkaSpoutConfig.bufferSizeBytes = 1024 * 1024 * 4;
      kafkaSpoutConfig.fetchSizeBytes = 1024 * 1024 * 4;
      kafkaSpoutConfig.forceFromStart = true;
      kafkaSpoutConfig.scheme = new SchemeAsMultiScheme(new StringScheme());

      TopologyBuilder builder = new TopologyBuilder();
      builder.setSpout("kafka-spout", new KafkaSpout(kafkaSpoutCon-fig));
      builder.setBolt("word-spitter", new SplitBolt()).shuffleGroup-ing("kafka-spout");
      builder.setBolt("word-counter", new CountBolt()).shuffleGroup-ing("word-spitter");

      LocalCluster cluster = new LocalCluster();
      cluster.submitTopology("KafkaStormSample", config, builder.create-Topology());

      Thread.sleep(10000);

      cluster.shutdown();
   }
}
Before moving compilation, Kakfa-Storm integration needs curator ZooKeeper client java library. Curator version 2.9.1 support Apache Storm version 0.9.5 (which we use in this tutorial). Down-load the below specified jar files and place it in java class path.
- curator-client-2.9.1.jar
- curator-framework-2.9.1.jar
After including dependency files, compile the program using the following command,
javac -cp "/path/to/Kafka/apache-storm-0.9.5/lib/*" *.java
Execution
Start Kafka Producer CLI (explained in previous chapter), create a new topic called my-first-topic
and provide some sample messages as shown below −
hello
kafka
storm
spark
test message
another test message
Now execute the application using the following command −
java -cp /path/to/Kafka/apache-storm-0.9.5/lib/*:. KafkaStormSample
The sample output of this application is specified below −
storm : 1
test : 2
spark : 1
another : 1
kafka : 1
hello : 1
message : 2
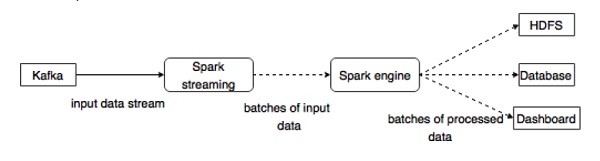
Apache Kafka - Integration With Spark
In this chapter, we will be discussing about how to integrate Apache Kafka with Spark Streaming API.
About Spark
Spark Streaming API enables scalable, high-throughput, fault-tolerant stream processing of live data streams. Data can be ingested from many sources like Kafka, Flume, Twitter, etc., and can be processed using complex algorithms such as high-level functions like map, reduce, join and window. Finally, processed data can be pushed out to filesystems, databases, and live dash-boards. Resilient Distributed Datasets (RDD) is a fundamental data structure of Spark. It is an immutable distributed collection of objects. Each dataset in RDD is divided into logical partitions, which may be computed on different nodes of the cluster.
Integration with Spark
Kafka is a potential messaging and integration platform for Spark streaming. Kafka act as the central hub for real-time streams of data and are processed using complex algorithms in Spark Streaming. Once the data is processed, Spark Streaming could be publishing results into yet another Kafka topic or store in HDFS, databases or dashboards. The following diagram depicts the conceptual flow.
Now, let us go through Kafka-Spark APIs in detail.
SparkConf API
It represents configuration for a Spark application. Used to set various Spark parameters as key-value pairs.
SparkConf
class has the following methods −
set(string key, string value) − set configuration variable.
remove(string key) − remove key from the configuration.
setAppName(string name) − set application name for your application.
get(string key) − get key
StreamingContext API
This is the main entry point for Spark functionality. A SparkContext represents the connection to a Spark cluster, and can be used to create RDDs, accumulators and broadcast variables on the cluster. The signature is defined as shown below.
public StreamingContext(String master, String appName, Duration batchDuration,
   String sparkHome, scala.collection.Seq<String> jars,
   scala.collection.Map<String,String> environment)
master − cluster URL to connect to (e.g. mesos://host:port, spark://host:port, local[4]).
appName − a name for your job, to display on the cluster web UI
batchDuration − the time interval at which streaming data will be divided into batches
public StreamingContext(SparkConf conf, Duration batchDuration)
Create a StreamingContext by providing the configuration necessary for a new SparkContext.
conf − Spark parameters
batchDuration − the time interval at which streaming data will be divided into batches
KafkaUtils API
KafkaUtils API is used to connect the Kafka cluster to Spark streaming. This API has the signifi-cant method createStream
signature defined as below.
public static ReceiverInputDStream<scala.Tuple2<String,String>> createStream(
   StreamingContext ssc, String zkQuorum, String groupId,
   scala.collection.immutable.Map<String,Object> topics, StorageLevel storageLevel)
The above shown method is used to Create an input stream that pulls messages from Kafka Brokers.
ssc − StreamingContext object.
zkQuorum − Zookeeper quorum.
groupId − The group id for this consumer.
topics − return a map of topics to consume.
storageLevel − Storage level to use for storing the received objects.
KafkaUtils API has another method createDirectStream, which is used to create an input stream that directly pulls messages from Kafka Brokers without using any receiver. This stream can guarantee that each message from Kafka is included in transformations exactly once.
The sample application is done in Scala. To compile the application, please download and install sbt
, scala build tool (similar to maven). The main application code is presented below.
import java.util.HashMap
import org.apache.kafka.clients.producer.{KafkaProducer, ProducerConfig, Produc-erRecord}
import org.apache.spark.SparkConf
import org.apache.spark.streaming._
import org.apache.spark.streaming.kafka._
object KafkaWordCount {
def main(args: Array[String]) {
if (args.length < 4) {
System.err.println("Usage: KafkaWordCount <zkQuorum><group> <topics> <numThreads>")
System.exit(1)
}
val Array(zkQuorum, group, topics, numThreads) = args
val sparkConf = new SparkConf().setAppName("KafkaWordCount")
val ssc = new StreamingContext(sparkConf, Seconds(2))
ssc.checkpoint("checkpoint")
val topicMap = topics.split(",").map((_, numThreads.toInt)).toMap
val lines = KafkaUtils.createStream(ssc, zkQuorum, group, topicMap).map(_._2)
val words = lines.flatMap(_.split(" "))
val wordCounts = words.map(x => (x, 1L))
.reduceByKeyAndWindow(_ + _, _ - _, Minutes(10), Seconds(2), 2)
wordCounts.print()
ssc.start()
ssc.awaitTermination()
}
}
Build Script
The spark-kafka integration depends on the spark, spark streaming and spark Kafka integration jar. Create a new file build.sbt
and specify the application details and its dependency. The sbt
will download the necessary jar while compiling and packing the application.
name := "Spark Kafka Project"
version := "1.0"
scalaVersion := "2.10.5"

libraryDependencies += "org.apache.spark" %% "spark-core" % "1.6.0"
libraryDependencies += "org.apache.spark" %% "spark-streaming" % "1.6.0"
libraryDependencies += "org.apache.spark" %% "spark-streaming-kafka" % "1.6.0"
Compilation / Packaging
Run the following command to compile and package the jar file of the application. We need to submit the jar file into the spark console to run the application.
sbt package
Submiting to Spark
Start Kafka Producer CLI (explained in the previous chapter), create a new topic called my-first-topic
and provide some sample messages as shown below.
Another spark test message
Run the following command to submit the application to spark console.
/usr/local/spark/bin/spark-submit --packages org.apache.spark:spark-streaming
-kafka_2.10:1.6.0 --class "KafkaWordCount" --master local[4] target/scala-2.10/spark
-kafka-project_2.10-1.0.jar localhost:2181 <group name> <topic name> <number of threads>
The sample output of this application is shown below.
spark console messages ..
(Test,1)
(spark,1)
(another,1)
(message,1)
spark console message ..
Real Time Application(Twitter)
Let us analyze a real time application to get the latest twitter feeds and its hashtags. Earlier, we have seen integration of Storm and Spark with Kafka. In both the scenarios, we created a Kafka Producer (using cli) to send message to the Kafka ecosystem. Then, the storm and spark inte-gration reads the messages by using the Kafka consumer and injects it into storm and spark ecosystem respectively. So, practically we need to create a Kafka Producer, which should −
- Read the twitter feeds using Twitter Streaming API,
- Process the feeds,
- Extract the HashTags and
- Send it to Kafka.
Once the HashTags
are received by Kafka, the Storm / Spark integration receive the infor-mation and send it to Storm / Spark ecosystem.
Twitter Streaming API
The Twitter Streaming API can be accessed in any programming language. The twitter4j is an open source, unofficial Java library, which provides a Java based module to easily access the Twitter Streaming API. The twitter4j provides a listener based framework to access the tweets. To access the Twitter Streaming API, we need to sign in for Twitter developer account and should get the following OAuth authentication details.
- Customerkey
- CustomerSecret
- AccessToken
- AccessTookenSecret
Once the developer account is created, download the twitter4j jar files and place it in the java class path.
The Complete Twitter Kafka producer coding (KafkaTwitterProducer.java) is listed below −
import java.util.Arrays;
import java.util.Properties;
import java.util.concurrent.LinkedBlockingQueue;
import twitter4j.*;
import twitter4j.conf.*;
import org.apache.kafka.clients.producer.Producer;
import org.apache.kafka.clients.producer.KafkaProducer;
import org.apache.kafka.clients.producer.ProducerRecord;
public class KafkaTwitterProducer {
public static void main(String[] args) throws Exception {
LinkedBlockingQueue<Status> queue = new LinkedBlockingQueue<Sta-tus>(1000);
if(args.length < 5){
System.out.println(
"Usage: KafkaTwitterProducer <twitter-consumer-key>
<twitter-consumer-secret> <twitter-access-token>
<twitter-access-token-secret>
<topic-name> <twitter-search-keywords>");
return;
}
String consumerKey = args[0].toString();
String consumerSecret = args[1].toString();
String accessToken = args[2].toString();
String accessTokenSecret = args[3].toString();
String topicName = args[4].toString();
String[] arguments = args.clone();
String[] keyWords = Arrays.copyOfRange(arguments, 5, arguments.length);
ConfigurationBuilder cb = new ConfigurationBuilder();
cb.setDebugEnabled(true)
.setOAuthConsumerKey(consumerKey)
.setOAuthConsumerSecret(consumerSecret)
.setOAuthAccessToken(accessToken)
.setOAuthAccessTokenSecret(accessTokenSecret);
TwitterStream twitterStream = new TwitterStreamFactory(cb.build()).get-Instance();
StatusListener listener = new StatusListener() {
@Override
public void onStatus(Status status) {
queue.offer(status);
// System.out.println("@" + status.getUser().getScreenName()
+ " - " + status.getText());
// System.out.println("@" + status.getUser().getScreen-Name());
/*for(URLEntity urle : status.getURLEntities()) {
System.out.println(urle.getDisplayURL());
}*/
/*for(HashtagEntity hashtage : status.getHashtagEntities()) {
System.out.println(hashtage.getText());
}*/
}
@Override
public void onDeletionNotice(StatusDeletionNotice statusDeletion-Notice) {
// System.out.println("Got a status deletion notice id:"
+ statusDeletionNotice.getStatusId());
}
@Override
public void onTrackLimitationNotice(int numberOfLimitedStatuses) {
// System.out.println("Got track limitation notice:" +
num-berOfLimitedStatuses);
}
@Override
public void onScrubGeo(long userId, long upToStatusId) {
// System.out.println("Got scrub_geo event userId:" + userId +
"upToStatusId:" + upToStatusId);
}
@Override
public void onStallWarning(StallWarning warning) {
// System.out.println("Got stall warning:" + warning);
}
@Override
public void onException(Exception ex) {
ex.printStackTrace();
}
};
twitterStream.addListener(listener);
FilterQuery query = new FilterQuery().track(keyWords);
twitterStream.filter(query);
Thread.sleep(5000);
//Add Kafka producer config settings
Properties props = new Properties();
props.put("bootstrap.servers", "localhost:9092");
props.put("acks", "all");
props.put("retries", 0);
props.put("batch.size", 16384);
props.put("linger.ms", 1);
props.put("buffer.memory", 33554432);
props.put("key.serializer",
"org.apache.kafka.common.serialization.StringSerializer");
props.put("value.serializer",
"org.apache.kafka.common.serialization.StringSerializer");
Producer<String, String> producer = new KafkaProducer<String, String>(props);
int i = 0;
int j = 0;
while(i < 10) {
Status ret = queue.poll();
if (ret == null) {
Thread.sleep(100);
i++;
}else {
for(HashtagEntity hashtage : ret.getHashtagEntities()) {
System.out.println("Hashtag: " + hashtage.getText());
producer.send(new ProducerRecord<String, String>(
top-icName, Integer.toString(j++), hashtage.getText()));
}
}
}
producer.close();
Thread.sleep(5000);
twitterStream.shutdown();
}
}
Compilation
Compile the application using the following command −
javac -cp /path/to/kafka/libs/*:/path/to/twitter4j/lib/*:. KafkaTwitterProducer.java
Execution
Open two consoles. Run the above compiled application as shown below in one console.
java -cp /path/to/kafka/libs/*:/path/to/twitter4j/lib/*:
. KafkaTwitterProducer <twitter-consumer-key>
<twitter-consumer-secret>
<twitter-access-token>
<twitter-ac-cess-token-secret>
my-first-topic food
Run any one of the Spark / Storm application explained in the previous chapter in another win-dow. The main point to note is that the topic used should be same in both cases. Here, we have used my-first-topic as the topic name.
Output
The output of this application will depend on the keywords and the current feed of the twitter. A sample output is specified below (storm integration).
. . .
food : 1
foodie : 2
burger : 1
. . .
Apache Kafka - Tools
Kafka Tool packaged under org.apache.kafka.tools.*. Tools are categorized into system tools and replication tools.
System Tools
System tools can be run from the command line using the run class script. The syntax is as follows −
bin/kafka-run-class.sh package.class - - options
Some of the system tools are mentioned below −
Kafka Migration Tool − This tool is used to migrate a broker from one version to an-other.
Mirror Maker − This tool is used to provide mirroring of one Kafka cluster to another.
Consumer Offset Checker − This tool displays Consumer Group, Topic, Partitions, Off-set, logSize, Owner for the specified set of Topics and Consumer Group.
Replication Tool
Kafka replication is a high level design tool. The purpose of adding replication tool is for stronger durability and higher availability. Some of the replication tools are mentioned below −
Create Topic Tool − This creates a topic with a default number of partitions, replication factor and uses Kafka's default scheme to do replica assignment.
List Topic Tool − This tool lists the information for a given list of topics. If no topics are provided in the command line, the tool queries Zookeeper to get all the topics and lists the information for them. The fields that the tool displays are topic name, partition, leader, replicas, isr.
Add Partition Tool − Creation of a topic, the number of partitions for topic has to be specified. Later on, more partitions may be needed for the topic, when the volume of the topic will increase. This tool helps to add more partitions for a specific topic and also allows manual replica assignment of the added partitions.
Apache Kafka - Applications
Kafka supports many of today's best industrial applications. We will provide a very brief overview of some of the most notable applications of Kafka in this chapter.
Twitter is an online social networking service that provides a platform to send and receive user tweets. Registered users can read and post tweets, but unregistered users can only read tweets. Twitter uses Storm-Kafka as a part of their stream processing infrastructure.
Apache Kafka is used at LinkedIn for activity stream data and operational metrics. Kafka mes-saging system helps LinkedIn with various products like LinkedIn Newsfeed, LinkedIn Today for online message consumption and in addition to offline analytics systems like Hadoop. Kafkas strong durability is also one of the key factors in connection with LinkedIn.
Netflix
Netflix is an American multinational provider of on-demand Internet streaming media. Netflix uses Kafka for real-time monitoring and event processing.
Mozilla
Mozilla is a free-software community, created in 1998 by members of Netscape. Kafka will soon be replacing a part of Mozilla current production system to collect performance and usage data from the end-users browser for projects like Telemetry, Test Pilot, etc.
Oracle
Oracle provides native connectivity to Kafka from its Enterprise Service Bus product called OSB (Oracle Service Bus) which allows developers to leverage OSB built-in mediation capabilities to implement staged data pipelines.
