- Angular 8 - Home
- Angular 8 - Introduction
- Angular 8 - Installation
- Creating First Application
- Angular 8 - Architecture
- Angular Components and Templates
- Angular 8 - Data Binding
- Angular 8 - Directives
- Angular 8 - Pipes
- Angular 8 - Reactive Programming
- Services and Dependency Injection
- Angular 8 - Http Client Programming
- Angular 8 - Angular Material
- Routing and Navigation
- Angular 8 - Animations
- Angular 8 - Forms
- Angular 8 - Form Validation
- Authentication and Authorization
- Angular 8 - Web Workers
- Service Workers and PWA
- Angular 8 - Server Side Rendering
- Angular 8 - Internationalization (i18n)
- Angular 8 - Accessibility
- Angular 8 - CLI Commands
- Angular 8 - Testing
- Angular 8 - Ivy Compiler
- Angular 8 - Building with Bazel
- Angular 8 - Backward Compatibility
- Angular 8 - Working Example
- Angular 9 - What’s New?
- Angular 8 Useful Resources
- Angular 8 - Quick Guide
- Angular 8 - Useful Resources
- Angular 8 - Discussion
Angular 8 - Data Binding
Data binding deals with how to bind your data from component to HTML DOM elements (Templates). We can easily interact with application without worrying about how to insert your data. We can make connections in two different ways one way and two-way binding.
Before moving to this topic, lets create a component in Angular 8.
Open command prompt and create new Angular application using below command −
cd /go/to/workspace
ng new databind-app
cd databind-app
Create a test component using Angular CLI as mentioned below −
ng generate component test
The above create a new component and the output is as follows −
CREATE src/app/test/test.component.scss (0 bytes) CREATE src/app/test/test.component.html (19 bytes) CREATE src/app/test/test.component.spec.ts (614 bytes)
CREATE src/app/test/test.component.ts (262 bytes) UPDATE src/app/app.module.ts (545 bytes)
Run the application using below command −
ng serve
One-way data binding
One-way data binding is a one-way interaction between component and its template. If you perform any changes in your component, then it will reflect the HTML elements. It supports the following types −
String interpolation
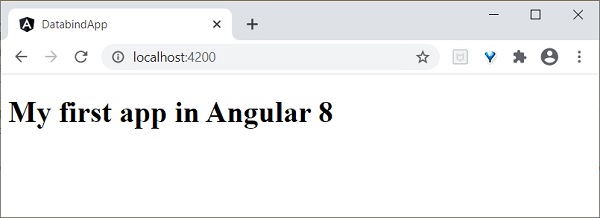
In general, String interpolation is the process of formatting or manipulating strings. In Angular, Interpolation is used to display data from component to view (DOM). It is denoted by the expression of {{ }} and also known as mustache syntax.
Lets create a simple string property in component and bind the data to view.
Add the below code in test.component.ts file as follows −
export class TestComponent implements OnInit {
   appName = "My first app in Angular 8";
}
Move to test.component.html file and add the below code −
<h1>{{appName}}</h1>
Add the test component in your app.component.html file by replacing the existing content as follows −
<app-test></app-test>
Finally, start your application (if not done already) using the below command −
ng serve
You could see the following output on your screen −
Event binding
Events are actions like mouse click, double click, hover or any keyboard and mouse actions. If a user interacts with an application and performs some actions, then event will be raised. It is denoted by either parenthesis () or on-. We have different ways to bind an event to DOM element. Lets understand one by one in brief.
Component to view binding
Lets understand how simple button click even handling works.
Add the following code in test.component.tsfile as follows −
export class TestComponent {
   showData($event: any){
      console.log("button is clicked!"); if($event) {
         console.log($event.target);
         console.log($event.target.value);
      }
   }
}
$event\ast\:refersthefiredevent\cdot\:Inthisscenario\:,\ast\:click \ast\:istheevent\cdot\ast$event has all the information about event and the target element. Here, the target is button. $event.target property will have the target information.
We have two approaches to call the component method to view (test.component.html). First one is defined below −
<h2>Event Binding</h2>
<button (click)="showData($event)">Click here</button>
Alternatively, you can use prefix - on using canonical form as shown below −
<button on-click = "showData()">Click here</button>
Here, we have not used $event as it is optional.
Finally, start your application (if not done already) using the below command −
ng serve
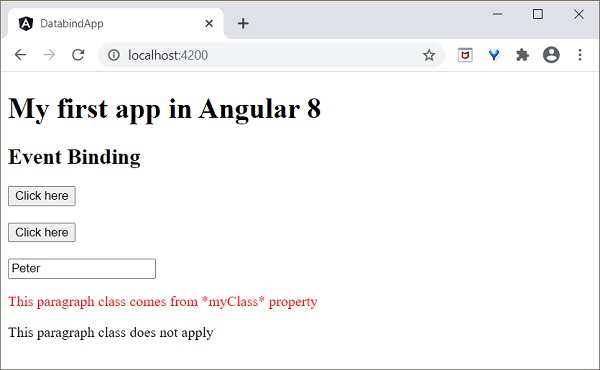
Now, run your application and you could see the below response −
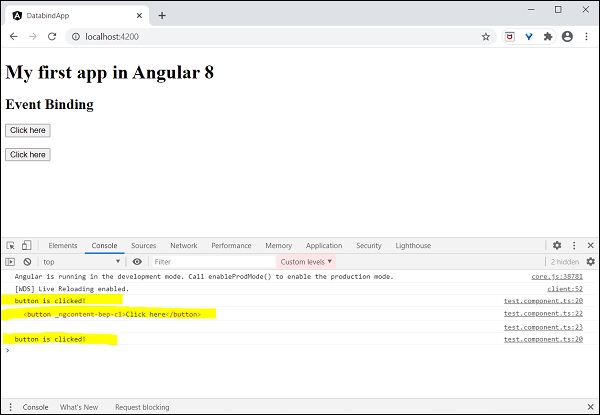
Here, when the user clicks on the button, event binding understands to button click action and call component showData() method so we can conclude it is one-way binding.
Property binding
Property binding is used to bind the data from property of a component to DOM elements. It is denoted by [].
Lets understand with a simple example.
Add the below code in test.component.ts file.
export class TestComponent {
   userName:string = "Peter";
}
Add the below changes in view test.component.html,
<input type="text" [value]="userName">
Here,
userName property is bind to an attribute of a DOM element <input> tag.
Finally, start your application (if not done already) using the below command −
ng serve

Attribute binding
Attribute binding is used to bind the data from component to HTML attributes. The syntax is as follows −
<HTMLTag [attr.ATTR]="Component data">
For example,
<td [attr.colspan]="columnSpan"> ... </td>
Lets understand with a simple example.
Add the below code in test.component.ts file.
export class TestComponent {
   userName:string = "Peter";
}
Add the below changes in view test.component.html,
<input type="text" [value]="userName">
Here,
userName property is bind to an attribute of a DOM element <input> tag.
Finally, start your application (if not done already) using the below command −
ng serve
Class binding
Class binding is used to bind the data from component to HTML class property. The syntax is as follows −
<HTMLTag [class]="component variable holding class name">
Class Binding provides additional functionality. If the component data is boolean, then the class will bind only when it is true. Multiple class can be provided by string (foo bar) as well as Array of string. Many more options are available.
For example,
<p [class]="myClasses">
Lets understand with a simple example.
Add the below code in test.component.ts file,
export class TestComponent {
   myCSSClass = "red";
   applyCSSClass = false;
}
Add the below changes in view test.component.html.
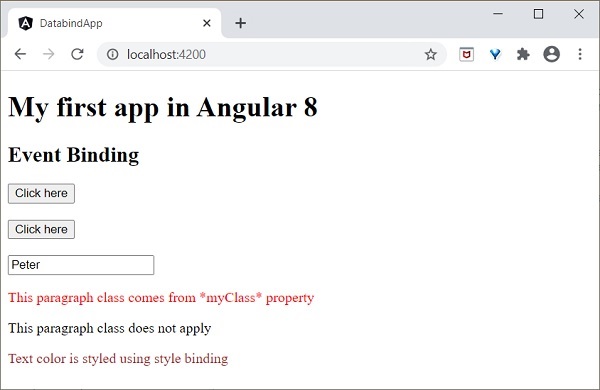
<p [class]="myCSSClass">This paragraph class comes from *myClass* property </p>
<p [class.blue]="applyCSSClass">This paragraph class does not apply</p>
Add the below content in test.component.css.
.red {
   color: red;
}
.blue {
   color: blue;
}
Finally, start your application (if not done already) using the below command −
ng serve
The final output will be as shown below −
Style binding
Style binding is used to bind the data from component into HTML style property. The syntax is as follows −
<HTMLTag [style.STYLE]="component data">
For example,
<p [style.color]="myParaColor"> ... </p>
Lets understand with a simple example.
Add the below code in test.component.ts file.
myColor = 'brown';
Add the below changes in view test.component.html.
<p [style.color]="myColor">Text color is styled using style binding</p>
Finally, start your application (if not done already) using the below command −
ng serve
The final output will be as shown below −
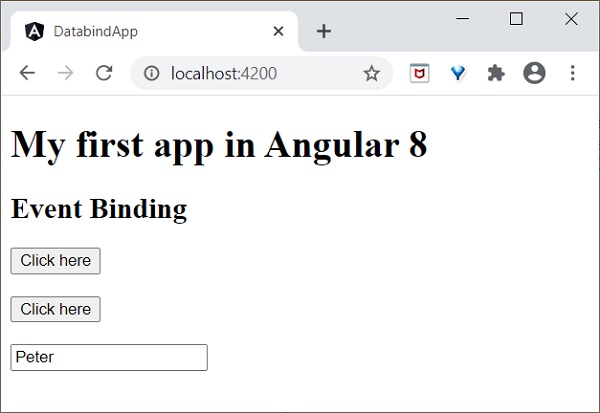
Two-way data binding
Two-way data binding is a two-way interaction, data flows in both ways (from component to views and views to component). Simple example is ngModel. If you do any changes in your property (or model) then, it reflects in your view and vice versa. It is the combination of property and event binding.
NgModel
NgModel is a standalone directive. ngModel directive binds form control to property and property to form control. The syntax of ngModel is as follows −
<HTML [(ngModel)]="model.name" />
For example,
<input type="text" [(ngModel)]="model.name" />
Lets try to use ngModel in our test application.
Configure FormsModule in AppModule (src/app/app.module.ts)
import { FormsModule } from '@angular/forms'; @NgModule({
   imports: [
      BrowserModule,
      FormsModule
   ]
})
export class AppModule { }
FormModule do the necessary setup to enable two-way data binding.
Update TestComponent view (test.component.html) as mentioned below −
<input type="text" [(ngModel)]="userName" />
<p>Two way binding! Hello {{ userName }}!</p>
Here,
Property is bind to form control ngModeldirective and if you enter any text in the textbox, it will bind to the property. After running your application, you could see the below changes −
Finally, start your application (if not done already) using the below command −
ng serve
Now, run your application and you could see the below response −
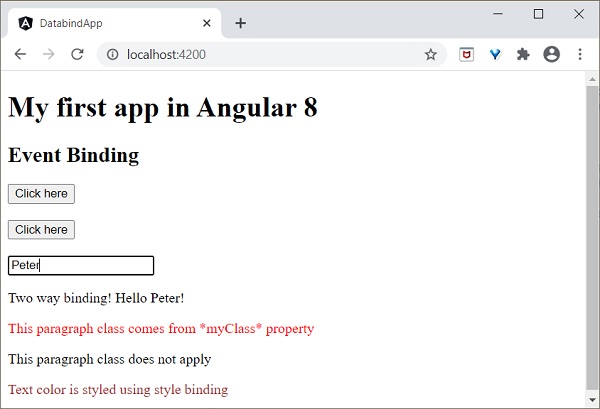
Now, try to change the input value to Jack. As you type, the text below the input gets changed and the final output will be as shown below −

We will learn more about form controls in the upcoming chapters.
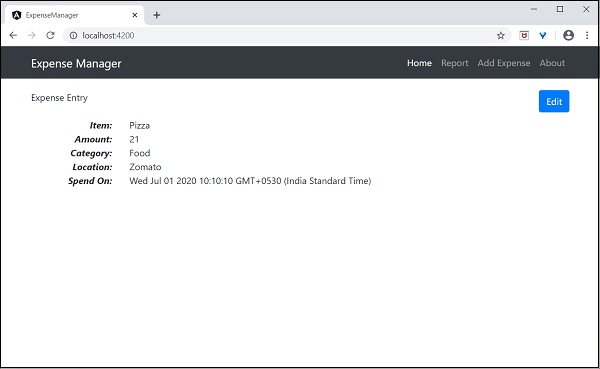
Working example
Let us implement all the concept learned in this chapter in our ExpenseManager application.
Open command prompt and go to project root folder.
cd /go/to/expense-manager
Create ExpenseEntry interface (src/app/expense-entry.ts) and add id, amount, category, Location, spendOn and createdOn.
export interface ExpenseEntry {
   id: number;
   item: string;
   amount: number;
   category: string;
   location: string;
   spendOn: Date;
   createdOn: Date;
}
Import ExpenseEntry into ExpenseEntryComponent.
import { ExpenseEntry } from '../expense-entry';
Create a ExpenseEntry object, expenseEntry as shown below −
export class ExpenseEntryComponent implements OnInit {
   title: string;
   expenseEntry: ExpenseEntry;
   constructor() { }
   ngOnInit() {
      this.title = "Expense Entry";
      this.expenseEntry = {
         id: 1,
         item: "Pizza",
         amount: 21,
         category: "Food",
         location: "Zomato",
         spendOn: new Date(2020, 6, 1, 10, 10, 10), createdOn: new Date(2020, 6, 1, 10, 10, 10),
      };
   }
}
Update the component template using expenseEntry object, src/app/expense-entry/expense-entry.component.html as specified below −
<!-- Page Content -->
<div class="container">
   <div class="row">
      <div class="col-lg-12 text-center" style="padding-top: 20px;">
         <div class="container" style="padding-left: 0px; padding-right: 0px;">
            <div class="row">
               <div class="col-sm" style="text-align: left;">
                  {{ title }}
               </div>
               <div class="col-sm" style="text-align: right;">
                  <button type="button" class="btn btn-primary">Edit</button>
               </div>
            </div>
         </div>
         <div class="container box" style="margin-top: 10px;">
            <div class="row">
               <div class="col-2" style="text-align: right;">
                  <strong><em>Item:</em></strong>
               </div>
               <div class="col" style="text-align: left;">
                  {{ expenseEntry.item }}
               </div>
            </div>
            <div class="row">
               <div class="col-2" style="text-align: right;">
                  <strong><em>Amount:</em></strong>
               </div>
               <div class="col" style="text-align: left;">
                  {{ expenseEntry.amount }}
               </div>
            </div>
            <div class="row">
               <div class="col-2" style="text-align: right;">
                  <strong><em>Category:</em></strong>
               </div>
               <div class="col" style="text-align: left;">
                  {{ expenseEntry.category }}
               </div>
            </div>
            <div class="row">
               <div class="col-2" style="text-align: right;">
                  <strong><em>Location:</em></strong>
               </div>
               <div class="col" style="text-align: left;">
                  {{ expenseEntry.location }}
               </div>
            </div>
            <div class="row">
               <div class="col-2" style="text-align: right;">
                  <strong><em>Spend On:</em></strong>
               </div>
               <div class="col" style="text-align: left;">
                  {{ expenseEntry.spendOn }}
               </div>
            </div>
         </div>
      </div>
   </div>
</div>