- Angular Tutorial
- Angular - Home
- Angular - Overview
- Angular - Features
- Angular - Advantages & Disadvantages
- Angular Basics
- Angular - Environment setup
- Angular - First Application
- Angular - MVC Architecture
- Angular Components
- Angular - Components
- Angular - Component Lifecycle
- Angular - View Encapsulation
- Angular - Emulated Encapsulation
- Angular - ShadowDom Encapsulation
- Angular - Component Interaction
- Angular - Using @Input Decorator
- Angular - Using @Output Decorator
- Angular - Using Local Variable
- Angular - Using @ViewChild Decorator
- Angular - Using Services
- Angular - Component Styles
- Angular - Nested Components
- Angular - Content projection
- Angular - Single-slot Content Projection
- Angular - Multi-slot Content Projection
- Angular - Conditional Content Projection
- Angular - Dynamic components
- Angular - Using NgComponentOutlet
- Angular - Using ViewContainerRef
- Angular - Elements
- Angular Templates
- Angular - Templates
- Angular - Template statements
- Angular - Template Variables
- Angular - SVG as Templates
- Angular Binding
- Angular - Data Binding
- Angular - Interpolation
- Angular - Event Binding
- Angular - Property Binding
- Angular - Attribute Binding
- Angular - Class Binding
- Angular - Style Binding
- Angular - Two-way Binding
- Angular Directives
- Angular - Directives
- Angular - Attribute Directives
- Angular - Structural Directives
- Angular - Custom Directives
- Angular Pipes
- Angular - Pipes
- Angular - Built-in Pipes
- Angular - Custom Pipes
- Angular Forms
- Angular - Forms
- Angular - Template Driven Forms
- Angular - Reactive Forms
- Angular - Form Validation
- Angular - Dynamic Forms
- Angular Dependency Injection
- Angular - Dependency Injection
- Angular - Injectable Service
- Angular Routing
- Angular - Routing
- Angular - Dynamic Routes
- Angular - Wildcard Routes
- Angular - Nested Routes
- Angular - Navigation
- Angular - Routing in SPA
- Angular - Custom Route Matches
- Angular - Router Reference
- Angular HTTP Client programming
- Angular - Services
- Angular - HTTP Client
- Angular - Express based REST API
- Angular - Request
- Angular - Request Response Workflow
- Angular - Response
- Angular - Express based Upload API
- Angular - GET
- Angular - POST
- Angular - PUT
- Angular - DELETE
- Angular - JSONP
- Angular - CRUD Operations Using HTTP
- Angular Modules
- Angular - Introduction to Modules
- Angular - Root Module
- Angular - Feature Module
- Angular - Sharing Module
- Angular - Routing Module
- Angular - NgModules
- Angular Animation
- Angular - Animations
- Angular Service Workers & PWA
- Angular - Service Workers & PWA
- Angular Testing
- Angular - Testing Overview
- Angular Design Patterns
- Angular - Design Patterns
- Angular - Lazy Loading
- Angular - Singleton Pattern
- Angular - Observer Pattern
- Angular Libraries
- Angular - Libraries
- Angular - Angular Material
- Angular - PrimeNG
- Angular - RxJS
- Angular Advanced
- Angular - Signals
- Angular - Authentication & Authorization
- Angular - Internationalization
- Angular - Standalone Component
- Angular - Accessibility
- Angular - Web Workers
- Angular - Server Side Rendering
- Angular - Ivy Compiler
- Angular - Building with Bazel
- Angular - Backward Compatibility
- Angular - Reactive Programming
- Angular Tools
- Angular - CLI
- Angular Material UI Elements
- Angular - Paginator
- Angular - Datepicker
- Angular - Select Drop-down
- Angular Miscellaneous
- Angular - Third Party Controls
- Angular - Configuration
- Angular - Displaying Data
- Angular - Decorators & Metadata
- Angular - Basic Example
- Angular - Error Handling
- Angular - Testing & Building a Project
- Angular - Lifecycle Hooks
- Angular - User Input
- Angular - What's New?
- Angular Useful Resources
- Angular - Quick Guide
- Angular - Useful Resources
- Angular - Discussion
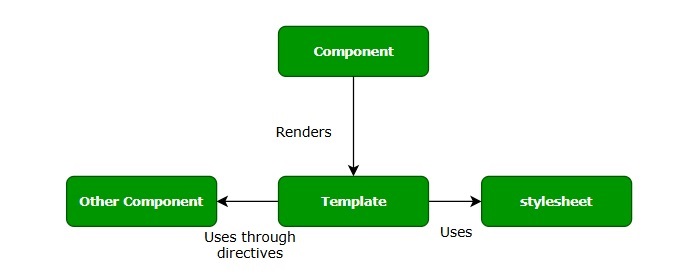
Angular - Components
Components are the building blocks of an Angular application. The primary use of Angular Component is to generate a section of web page called View. By combining different views, a single application is created. Every component will have an associated template and it will be called in order to generate views.
Let us learn the basic concept of components in this tutorial.
Structure of Angular Component
Each component of an Angular application has a few important parts which are as follows −
@component Decorator: All the application related configurations are written inside this decorator.
HTML Template: View of the Angular application.
Styles: It controls the styles of a view.
TypeScript Class: Code related to behavior of the Angular application goes into this class.
By default, all these parts are created by Angular CLI, you can update, add or even delete them if any of them is not required.
How to Create Components in Angular?
In Angular, a new Component is created using the ng generate component command as specified below −
ng generate component name-of-component
Example
Let's see an example where we create a new component in our ExpenseManager application. This component will contain our first expense entry. First, open the command prompt and navigate to ExpenseManager application.
cd expense-manager
Now, use the command given below to create a expense-entry component −
ng generate component expense-entry
Following files and folders will be created by Angular CLI on the above command −
CREATE src/app/expanse-entry/expanse-entry.spec.ts (597 bytes)
CREATE src/app/expanse-entry/expanse-entry.ts (224 bytes)
CREATE src/app/expanse-entry/expanse-entry.css (0 bytes)
CREATE src/app/expanse-entry/expanse-entry.html (29 bytes)
Here,
- ExpanseEntry is created under src/app/expense-entry folder.
- Component class, Template and stylesheet are created.
Next, we add a title property to ExpenseEntry, i.e., (src/app/expense-entry/expense-entry.ts) component.
expense-entry.ts
import { Component, OnInit } from '@angular/core';

@Component({
   selector: 'app-expense-entry',
   imports: [],
   templateUrl: './expense-entry.html',
   styleUrl: './expense-entry.css',
})
export class ExpenseEntry implements OnInit {
   title: any;
   constructor() {}
   ngOnInit(): void {
      this.title = "Expense Entry"
   }
}
Update template, src/app/expense-entry/expense-entry.html with below content.
expense-entry.html
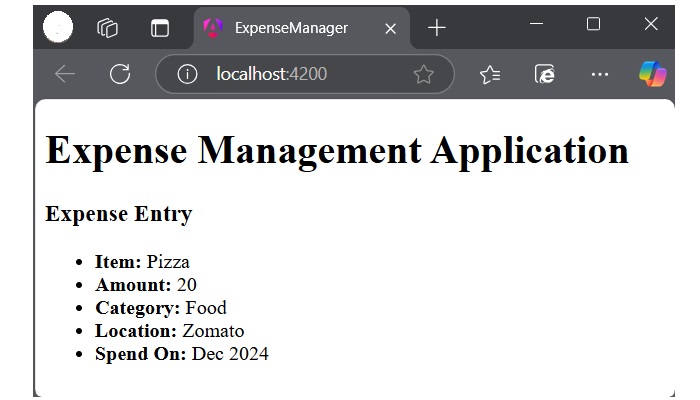
<h3>{{title}}</h3>
<ul>
   <li><b>Item:</b> Pizza</li>
   <li><b>Amount:</b> 20</li>
   <li><b>Category:</b> Food</li>
   <li><b>Location:</b> Zomato</li>
   <li><b>Spend On:</b> Dec 2024</li>
</ul>
Open src/app/app.html and include the newly created component.
app.html
<h1>Expense Management Application</h1>
<app-expense-entry></app-expense-entry>
<router-outlet />
Here,
app-expense-entry is the selector value and it can be used as a regular HTML Tag.
At the end, import ExpenseEntry to the app.ts file as shown below −
app.ts
import { Component, signal } from '@angular/core';
import { RouterOutlet } from '@angular/router';
import { ExpenseEntry } from './expense-entry/expense-entry';

@Component({
   selector: 'app-root',
   imports: [RouterOutlet, ExpenseEntry],
   templateUrl: './app.html',
   styleUrl: './app.css'
})
export class App {
   protected readonly title = signal('expense-manager');
}
Finally, the output of the application is −
Component Lifecycle Hook
Angular component goes through a series of stages/events during its existence. The different stages of the Angular Components Lifecycle are creation, change detection, rendering and destruction.
Each phase of the angular component is associated with a lifecycle hook interface which can be implemented to perform arbitrary action in that particular phase. The lifecycle hooks refer to the methods of lifecycle hook interfaces.
Component Interaction
Component interaction is one of the important and necessary features in the context of component based architecture. Angular provides multiple options to pass and receive data between components.
You can share data from parent component to child component as well as, child to parent component. Also, it is possible to share data between any other component within the Angular application.
In Angular, parent and child components interacts through the following ways −
- @Input decorator
- @Output decorator
- local variable
- @Viewchild decorator
- Services
Component Styling
Component styling is the process of designing and formatting the visual presentation of views or components. You can use the following ways for styling:
- Using "styles"
- Using "styleUrls"
- Styling through template
- Using global styles
- Using CSS preprocessor
- Customized styles
- Using custom selectors
Nested Components
Nested components are normal Angular Components with parent-child relations. The parent can access and share data with the child, either partially or fully. The component nested inside another component is called child component. The component containing the child component is called the parent component.
Dynamic Components
Angular allows the component to be dynamically created and loaded at run time at a specific location in the host (another) component.
You can create dynamic components in Angular using the following ways −
- Using NgComponentOutlet
- Using ViewContainerRef
Multiple Choice Questions (MCQ) on Angular Components
You have reached the end of this chapter. Now, it's time to check your understanding of the angular component concept. Please try to give correct answers to the questions given below −
Q. 1 - What is the primary purpose of an Angular Component?
A - To define the routing configuration
B - To generate and manage views
Answer : B
Explanation
An Angular Component is responsible for generating views and managing the behavior associated with them.
Q. 2 - Which Angular decorator is used to define a component?
Answer : A
Explanation
The @Component decorator is used to define an Angular component, which contains metadata such as the selector, template, and style URLs.
Q. 3 - Command to generate a new component in Angular:
Answer : B
Explanation
The ng generate component component-name command is used to create a new component in an Angular application using Angular CLI.
