- Vaadin Tutorial
- Vaadin - Home
- Vaadin – Overview
- Vaadin – Environment Setup
- Vaadin – Creating First Application
- Vaadin – Architecture
- User Interface Components
- Vaadin – Core Elements
- Vaadin – Layout Component
- Vaadin – Themes
- Vaadin Useful Resources
- Vaadin - Quick Guide
- Vaadin - Useful Resources
- Vaadin - Discussion
Vaadin - Quick Guide
Vaadin - Overview
This chapter will provide an overview of Vaadin. You will also be able to list out the merits and demerits of working with Vaadin, once you are done with this chapter.
What is Vaadin?
Vaadin is an open source web development framework. It comes with an inbuilt support for Java scripts and AJAX. You can also include external features into it using Google Web toolkit. Vaadin is a time-saver for the developers as it renders a rich content in the browser without the help of any markup files. All mark ups and supporting files will be generated at runtime with the help of Vaadin framework. Vaadin uses Java as a programming language and it supports both server side and client side development.
Advantages and Disadvantages
This section explains about advantages and disadvantages of using Vaadin in your web application.
Advantages
Vaadin offers the following advantages to its developers −
Server side programming
Vaadin is built using Java. Besides, there is no need for the developer to use markup languages to develop the web page. Vaadin also provides all kind of support using Google Web toolkit.
Offers multiple options
Vaadin provides many components, layouts, and different listeners compared to any conventional web technologies; hence it is much preferable to use Vaadin.
Entirely object oriented
Since Vaadin is Java based, it is fully Object oriented. A Java developer can easily develop a website, simply by having idea of Vaadin classes and its uses.
Easy to learn and integrate
Vaadin provides plug-in supports and it is very easy to learn and integrate with other web frameworks.
Disadvantages
Vaadin offers the following disadvantages to its developers −
Difficult to find skilled personnel
Vaadin is a recent technology, hence properly skilled personnel are always on demand and they can be costly. Hence, finding resources that can solve complex problem with Vaadin may be difficult.
Size of Java Script file
Depending on the context, the size of dynamic java script files may increase, thus demanding a bigger server to maintain its accessibility over the internet.
No fancy User Interface
Vaadin focused on business. You cannot create any fancy website using Vaadin.
Scalability
Some experts feel that Vaadin cannot compete with the other thin client based technologies such as Angular.js. Hence Vaadin is less scalable than other available technologies.
Vaadin - Environment setup
In this chapter we will learn how to set up the local environment to develop a Vaadin application.
Steps in Vaadin Installation
You will have to follow the steps given below to install and use Vaadin in application.
Step 1 - Java 8 installation
Vaadin uses JVM. Hence it is necessary to use JDK 8 for your local development environment. Please refer to official website of Oracle to download and install JDK 8 or above version. You might have to set environment variable for JAVA such that it can work properly. To verify your installation in Windows operating system, hit java –version in the command prompt and as an output it will show you the java version installed in your system.
Step 2 - IDE installation
You can use any IDE available online. The following table gives you the download link of different IDEs.
| IDE Name | Installation Link |
|---|---|
| Netbean | https://netbeans.org/downloads/ |
| Eclipse | https://www.eclipse.org/downloads/ |
| Intellij | https://www.jetbrains.com/idea/download/#section=windows |
Whichever IDE you use, make sure that you use the latest version. Please note that we are using Eclipse IDE in this tutorial.
Step 3 - Server Requirements
In this tutorial, we will be using Tomcat as the application server. In this chapter we will configure our Tomcat server in our system. If you are installing the latest version of Netbean, then you can directly install Apache Tomcat along with Netbean IDE. Else, please download the latest version of TOMCAT from its official website. Save the extracted Tomcat files in your C drive or program files as we will be using these files in the next steps.
Step 4 - Client Requirements
RichFaces is an UI component. The internet browser will be act as a client for our application. You can use any modern internet browser such as IE, Safari, Chrome etc
Step 5 - Configuring Eclipse
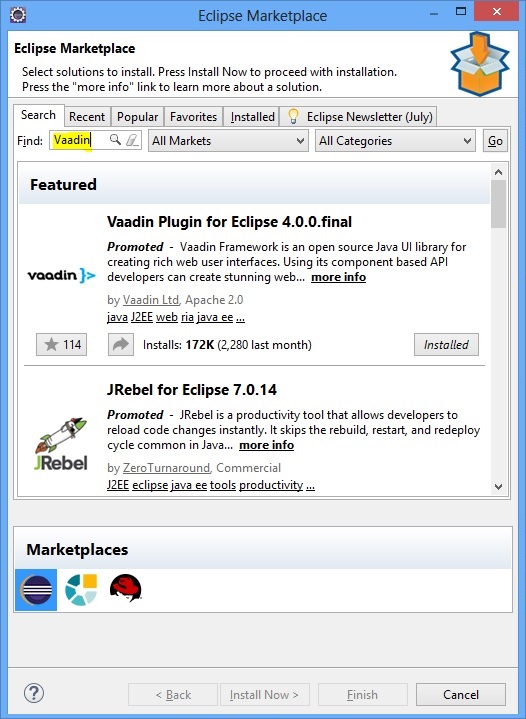
Go to Eclipse Market Place and type Vaadin in the search bar. You will find the screen as shown below. Click the Install button and install it.
This step might take some time as Eclipse needs to download all related files and install the same and configure it with the recent IDE. After successful installation, Eclipse will prompt you for a quick restart as the new change will reflect only after you restart the same. Once you restart, your local system is ready for using Vaadin application.
Vaadin - Creating First Application
In the previous chapter, you have seen the installation of Vaadin on your local system. In this chapter let us start by creating our first application using Vaadin. Recall that we are using Eclipse IDE in this tutorial.
To start creating your first application in Vaadin, open Eclipse IDE in your local system and follow the steps given below −
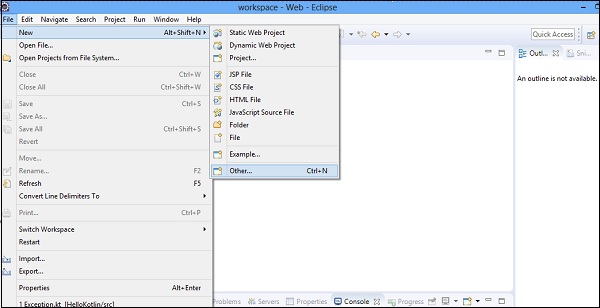
Step 1 − On the File menu, Click New and then click Other. Refer to the following screenshot for better understanding.
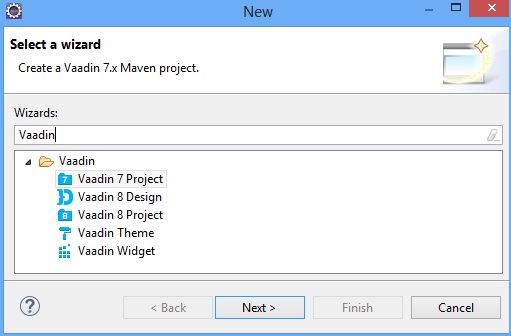
Step 2 − Now, type Vaadin in the search box and you can see options as shown in the following screenshot. Now, select Vaadin 8 from the options and click Next.
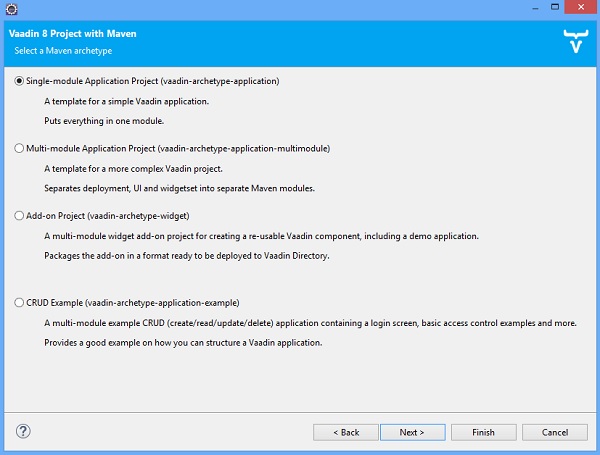
Step 3 − You can see a window with four options as shown below. Select the first option and proceed to the next step.
Step 4 − Next, you can see a screen as shown in the screenshot below. Provide the Group Id and Artifact Id and select Finish. This completes the project and Eclipse will create Vaadin for you.

Please note that this step might take some time as it requires the configuration settings. The artefact id is the name of the current project. We have named it as MyFirstApp.
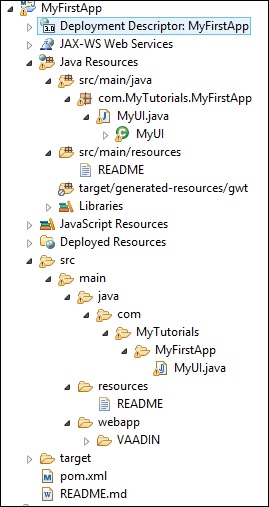
Step 5 − Now, you can find the directory structure of the automated Vaadin project as shown below −
Step 6 − Your first Vaadin application is ready. Run the project in any application server. Once it is ready you can find your screen as shown below −
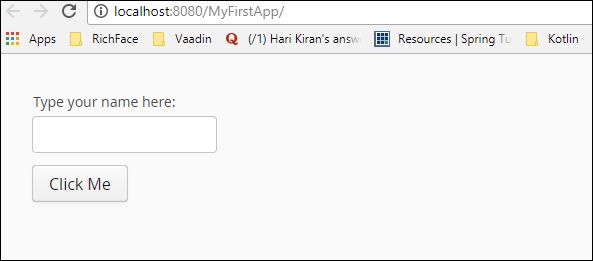
Step 7 − Enter any text in the text box and click on the Click Me button. You can observe the output as shown −

Congratulations! You have successfully created your first Vaadin application.
Vaadin - Architecture
In this chapter, you will learn in detail about Vaadin architecture. Vaadin provides two modules for website development − one for server side and another for client side. The image given below illustrates the entire runtime environment of Vaadin framework.
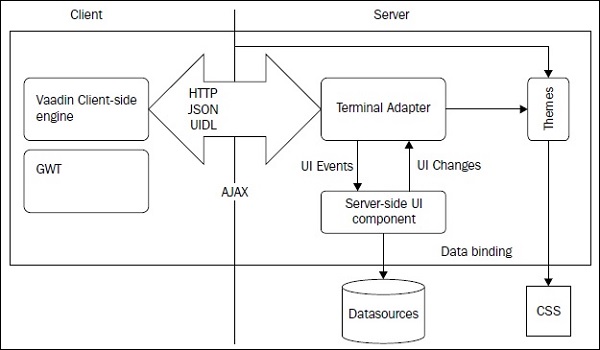
You will have to understand the following points when dealing with Vaadin runtime configuration −
Vaadin client side engine is used to render the output or user action through basic HTTP method and a browser. This generation of representational block is totally automated. You will have to code only the back end, all the mark ups will generate automatically.
Server side handles the business part that receives the event based request and prepare the response for the client. Communication between two tiers occurs through HTTP protocols.
Terminal Adapter receives the request and processes the same using server side UI component, which is a server based JAVA class to generate the response to be rendered using another component GWT. This is also called as Vaadin Servlet API, which extends the properties of servlet, receives requests from different clients, and determines the user’s response.
Vaadin uses GWT (Google Web Tool Kit) and hence renders faster output and enhanced scalability than a conventional Java Script based application.
Vaadin uses JSON as it is faster than conventional XML based application.
Separate components namely CSS and Theme can be used in order to provide wonderful client side response. This component basically separates appearance from representation.
Data Binding module provides the APIs to connect and manipulate with the DB if required.
Vaadin - User Interface Components
Vaadin is used to build rich user interface components in a webpage. In this chapter, you will learn about different user interface components that have been introduced by Vaadin in order to maintain a good quality web page. The first part of the chapter discusses the basic web components and their uses, while the second part talks about binding the components in the backend.
Field Component
Fields are the web components that a user can manipulate through IO operations. Vaadin is based on JAVA, hence in Vaadin all the web components have an implemented class along with Vaadin library functions. The image shown below shows how different field components are inherited from the base class named AbstractField<T>.
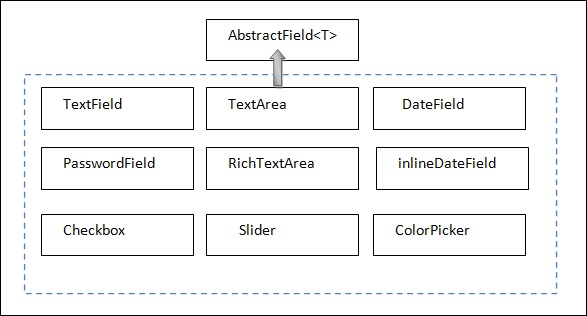
Note that all these modules are similar to that of those in UI development. In Vaadin we have separate class to implement each of them. You will learn in detail about these in the coming chapters.
Label
Label is used to mention any non-editable text in the web page. The example given below shows how to use label in our application. Note that in the given example, we created a JAVA class and named it as LabelExam.javanterface and we will override its init() method to run it.
package com.MyTutorials.MyFirstApp;
import javax.servlet.annotation.WebServlet;
import com.vaadin.annotations.VaadinServletConfiguration;
import com.vaadin.server.VaadinRequest;
import com.vaadin.server.VaadinServlet;
import com.vaadin.ui.HorizontalLayout;
import com.vaadin.ui.Label;
import com.vaadin.ui.UI;
//extending UI
public class LabelExam extends UI {
@Override
protected void init(VaadinRequest request) {
final HorizontalLayout hLayout = new HorizontalLayout(); //creating a Layout
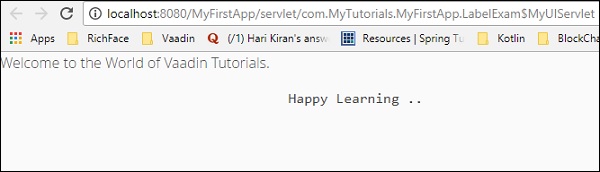
Label l1 = new Label(" Welcome to the World of Vaadin Tutorials.");
Label l2 = new Label("\n Happy Learning .." ,ContentMode.PREFORMATTED); // Content Mode tells JVM to interpret the String mentioned in the label. Hence label2 will be printed in next line because of “\n”.
hLayout.addComponents(l1,l2); // adding labels to layout
setContent(hLayout); // setting the layout as a content of the web page.
}
// Code to control URL
@WebServlet(urlPatterns = "/*", name = "MyUIServlet", asyncSupported = true)
@VaadinServletConfiguration(ui = LabelExam.class, productionMode = false)
public static class MyUIServlet extends VaadinServlet {}
}
In the above example, we have created two labels and at the end we have added that label to our layout. You will learn more about layouts in the upcoming chapters. The VaadinServlet has been implemented in order to control the URL. However, in real life projects, you need not define servlet in every java application as it will be interlinked. Select the file and click Run on Server and code given above will yield the output as shown below.
Link
Link is useful to implement external links to the other website. This class works exactly similar to the hyperlink tag of HTML. In the example given below, we will be using Link to redirect our user to another website depending on an event called Click here. Now, modify the MyUI.java class as shown below.
package com.example.myapplication;
import javax.servlet.annotation.WebServlet;
import com.vaadin.annotations.Theme;
import com.vaadin.annotations.VaadinServletConfiguration;
import com.vaadin.server.ExternalResource;
import com.vaadin.server.VaadinRequest;
import com.vaadin.server.VaadinServlet;
import com.vaadin.shared.ui.ContentMode;

import com.vaadin.ui.Button;
import com.vaadin.ui.HorizontalLayout;
import com.vaadin.ui.Label;
import com.vaadin.ui.Link;
import com.vaadin.ui.TextField;
import com.vaadin.ui.UI;
import com.vaadin.ui.VerticalLayout;

@Theme("mytheme")
public class MyUI extends UI {
   @Override
   protected void init(VaadinRequest vaadinRequest) {
      final VerticalLayout layout = new VerticalLayout();

      final HorizontalLayout hLayout = new HorizontalLayout();

      Link link = new Link("Click Me",new ExternalResource("https://www.tutorialspoint.com/"));
      hLayout.addComponent(link);
      setContent(hLayout);
   }
   @WebServlet(urlPatterns = "/*", name = "MyUIServlet", asyncSupported = true)
   @VaadinServletConfiguration(ui = MyUI.class, productionMode = false)
   public static class MyUIServlet extends VaadinServlet {}
}
In the above example, we have created an external hyperlink to another website. It will give us the following output in the browser.
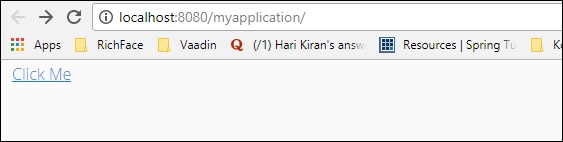
Once users click the link, they will be redirected to www.tutorialspoint.com
Text Field
This section talks about how to generate a text field using Vaadin build in class. For this, update your MyUI.java class as shown below.
package com.example.myapplication;
import javax.servlet.annotation.WebServlet;
import com.vaadin.annotations.Theme;
import com.vaadin.annotations.VaadinServletConfiguration;
import com.vaadin.server.VaadinRequest;

import com.vaadin.server.VaadinServlet;
import com.vaadin.shared.ui.ContentMode;
import com.vaadin.ui.Label;
import com.vaadin.ui.TextField;
import com.vaadin.ui.UI;
import com.vaadin.ui.VerticalLayout;

@Theme("mytheme")
public class MyUI extends UI {
   @Override
   protected void init(VaadinRequest vaadinRequest) {
      final VerticalLayout layout = new VerticalLayout();
      Label l1 = new Label("Example of TextField--\n ",ContentMode.PREFORMATTED);
      TextField text = new TextField();
      text.setValue("----");
      layout.addComponents(l1,text);
      setContent(layout);
   }
   @WebServlet(urlPatterns = "/*", name = "MyUIServlet", asyncSupported = true)
   @VaadinServletConfiguration(ui = MyUI.class, productionMode = false)
   public static class MyUIServlet extends VaadinServlet {}
}
Now, refresh your project and clean build it. You can observe the output shown below in your browser. Remember to restart your browser to get its recent changes.

Text Area
This section explains you how to create a text area in the browser using Vaadin predefined class. Observe the code given below for example.
package com.example.myapplication;
import javax.servlet.annotation.WebServlet;
import com.vaadin.annotations.Theme;
import com.vaadin.annotations.VaadinServletConfiguration;
import com.vaadin.server.VaadinRequest;
import com.vaadin.server.VaadinServlet;

import com.vaadin.ui.Alignment;
import com.vaadin.ui.TextArea;
import com.vaadin.ui.UI;
import com.vaadin.ui.VerticalLayout;

@Theme("mytheme")
public class MyUI extends UI {
   @Override
   protected void init(VaadinRequest vaadinRequest) {
      final VerticalLayout layout = new VerticalLayout();
      final VerticalLayout hLayout = new VerticalLayout();
      TextArea text = new TextArea();
      text.setValue(" I am the example of Text Area in Vaadin");
      hLayout.addComponent(text);
      hLayout.setComponentAlignment(text,Alignment.BOTTOM_CENTER);
      setContent(hLayout);
   }
   @WebServlet(urlPatterns = "/*", name = "MyUIServlet", asyncSupported = true)
   @VaadinServletConfiguration(ui = MyUI.class, productionMode = false)
   public static class MyUIServlet extends VaadinServlet {}
}
The above piece of code will yield below output in the browser −

Date and Time
You can use date picker to populate the date and time in the browser. Observe the example code given below. Here we have used Vaadin predefined Date class to populate the date and time in the browser.
package com.example.myapplication;
import java.time.LocalDate;
import java.util.Locale;
import javax.servlet.annotation.WebServlet;
import com.vaadin.annotations.Theme;
import com.vaadin.annotations.VaadinServletConfiguration;
import com.vaadin.server.VaadinRequest;
import com.vaadin.server.VaadinServlet;
import com.vaadin.shared.ui.ContentMode;
import com.vaadin.ui.Alignment;
import com.vaadin.ui.DateField;
import com.vaadin.ui.Label;
import com.vaadin.ui.UI;
import com.vaadin.ui.VerticalLayout;
@Theme("mytheme")
public class MyUI extends UI {
@Override
protected void init(VaadinRequest vaadinRequest) {
final VerticalLayout layout = new VerticalLayout();
final VerticalLayout hLayout = new VerticalLayout();
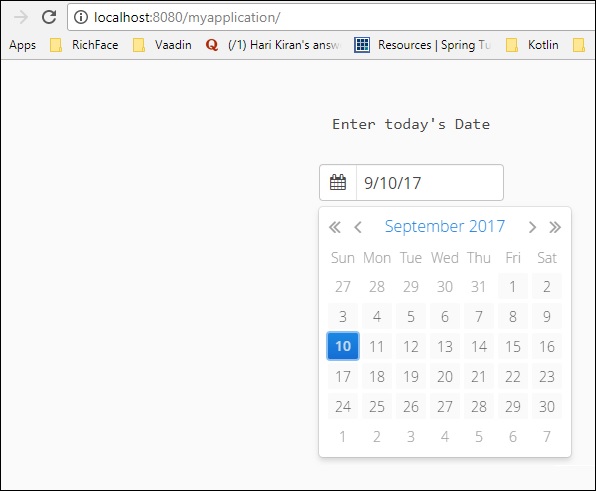
Label l1 = new Label("Enter today's Date\n",ContentMode.PREFORMATTED);
DateField date = new DateField();
date.setValue(LocalDate.now());
date.setLocale(new Locale("en","IND"));
hLayout.addComponents(l1,date);
hLayout.setComponentAlignment(l1,Alignment.BOTTOM_CENTER);
hLayout.setComponentAlignment(date,Alignment.BOTTOM_CENTER);
setContent(hLayout);
}
@WebServlet(urlPatterns = "/*", name = "MyUIServlet", asyncSupported = true)
@VaadinServletConfiguration(ui = MyUI.class, productionMode = false)
public static class MyUIServlet extends VaadinServlet {
}
In the above example, we have used Vaadin predefined date function to populate the date component in the webpage. This code will give you the output as shown in the screenshot below −
Button
The code given below will explain you how to apply a button in the web page. Here, we have used a button named Click Me.
package com.example.myapplication;
import javax.servlet.annotation.WebServlet;
import com.vaadin.annotations.Theme;
import com.vaadin.annotations.VaadinServletConfiguration;
import com.vaadin.server.ExternalResource;
import com.vaadin.server.VaadinRequest;
import com.vaadin.server.VaadinServlet;
import com.vaadin.shared.ui.ContentMode;
import com.vaadin.ui.Alignment;
import com.vaadin.ui.Button;
import com.vaadin.ui.HorizontalLayout;
import com.vaadin.ui.Label;
import com.vaadin.ui.Link;
import com.vaadin.ui.TextArea;
import com.vaadin.ui.TextField;
import com.vaadin.ui.UI;
import com.vaadin.ui.VerticalLayout;
@Theme("mytheme")
public class MyUI extends UI {
@Override
protected void init(VaadinRequest vaadinRequest) {
final VerticalLayout layout = new VerticalLayout();
final VerticalLayout hLayout = new VerticalLayout();
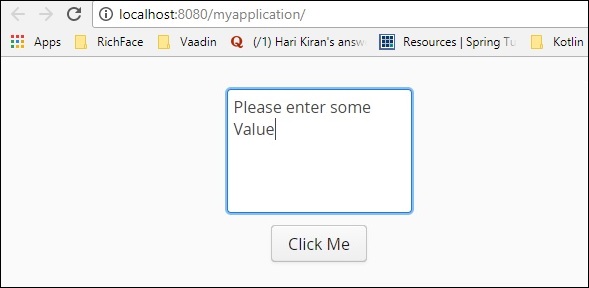
TextArea text = new TextArea();
text.setValue("Please enter some Value");
Button b = new Button("Click Me");
hLayout.addComponent(text);
hLayout.addComponent(b);
hLayout.setComponentAlignment(text,Alignment.BOTTOM_CENTER);
hLayout.setComponentAlignment(b,Alignment.BOTTOM_CENTER);
setContent(hLayout);
}
@WebServlet(urlPatterns = "/*", name = "MyUIServlet", asyncSupported = true)
@VaadinServletConfiguration(ui = MyUI.class, productionMode = false)
public static class MyUIServlet extends VaadinServlet {}
}
The above piece of code will yield the output as shown below.
Check Box
Vaadin also provides inbuilt class to create a checkbox in the webpage. In the below example we will create a checkbox using Vaadin rich web component.
package com.example.myapplication;
import java.time.LocalDate;
import java.util.Locale;
import javax.servlet.annotation.WebServlet;
import com.vaadin.annotations.Theme;
import com.vaadin.annotations.VaadinServletConfiguration;
import com.vaadin.server.VaadinRequest;
import com.vaadin.server.VaadinServlet;
import com.vaadin.shared.ui.ContentMode;
import com.vaadin.ui.Alignment;

import com.vaadin.ui.CheckBox;
import com.vaadin.ui.DateField;
import com.vaadin.ui.Label;
import com.vaadin.ui.UI;
import com.vaadin.ui.VerticalLayout;

@Theme("mytheme")
public class MyUI extends UI {
   @Override
   protected void init(VaadinRequest vaadinRequest) {
      final VerticalLayout layout = new VerticalLayout();
      final VerticalLayout hLayout = new VerticalLayout();
      Label l1 = new Label("Example of Check Box\n",ContentMode.PREFORMATTED);
      CheckBox chk1 = new CheckBox("Option1");
      CheckBox chk2 = new CheckBox("Option2");
      CheckBox chk3 = new CheckBox("Option3");
      hLayout.addComponents(l1,chk1,chk2,chk3);
      hLayout.setComponentAlignment(l1,Alignment.BOTTOM_CENTER);
      hLayout.setComponentAlignment(chk1,Alignment.BOTTOM_CENTER);
      hLayout.setComponentAlignment(chk2,Alignment.BOTTOM_CENTER);
      hLayout.setComponentAlignment(chk3,Alignment.BOTTOM_CENTER);
      setContent(hLayout);
   }
   @WebServlet(urlPatterns = "/*", name = "MyUIServlet", asyncSupported = true)
   @VaadinServletConfiguration(ui = MyUI.class, productionMode = false)
   public static class MyUIServlet extends VaadinServlet {}
}
The code given above will yield output in the browser as shown below. You can also create any number of check boxes for the user. In the subsequent chapters, you will learn about different ways to populate the Check Box in the webpage.

Data Binding
This section explains you how to bind the data from the front end to back end using Vaadin as framework. Note that the code shown below takes input from the front end with the data field. Let us create a bean class in order to bind the data field. Create a java class and name it as Employee.java.
package com.example.myapplication;
public class EmployeeBean {
   private String name = "";
   private String Email = " ";
   public EmployeeBean() {
      super();
      // TODO Auto-generated constructor stub
   }
   public EmployeeBean(String name, String email) {
      super();
      this.name = name;
      Email = email;
   }
   public String getName() {
      return name;
   }
   public void setName(String name) {
      System.out.println("asdassd");
      this.name = name;
   }
   public String getEmail() {
      return Email;
   }
   public void setEmail(String email) {
      Email = email;
   }
}
We have to modify MyUI.java class in order to bind the data field of employee class. Observe the following code for modified class.
package com.example.myapplication;
import javax.servlet.annotation.WebServlet;
import com.vaadin.annotations.PropertyId;
import com.vaadin.annotations.Theme;
import com.vaadin.annotations.VaadinServletConfiguration;
import com.vaadin.data.Binder;
import com.vaadin.server.VaadinRequest;
import com.vaadin.server.VaadinServlet;
import com.vaadin.shared.ui.ContentMode;
import com.vaadin.ui.Alignment;

import com.vaadin.ui.Button;
import com.vaadin.ui.Button.ClickEvent;
import com.vaadin.ui.CheckBox;
import com.vaadin.ui.FormLayout;
import com.vaadin.ui.Label;
import com.vaadin.ui.TextField;
import com.vaadin.ui.UI;
import com.vaadin.ui.VerticalLayout;

@Theme("mytheme")
public class MyUI extends UI {
   @Override
   protected void init(VaadinRequest vaadinRequest) {
      EmployeeBean bean = new EmployeeBean("TutorialsPoint","Abc@TutorialsPoint.com");
      Binder<EmployeeBean> binder = new Binder  <EmployeeBean>();
      final FormLayout form = new FormLayout();
      Label l1 = new Label("Please fill Below Form");
      Label labelName = new Label("Name--");
      TextField name = new TextField();
      binder.bind(name,EmployeeBean::getName,EmployeeBean::setName);
      Label labelEmail = new Label("Email---");
      TextField email = new TextField();
      binder.bind(email,EmployeeBean::getEmail,EmployeeBean::setEmail);
      Button button = new Button("Process..");
      form.addComponents(l1,labelName,name,labelEmail,email,button);
      setContent(form);
      binder.setBean(bean); //auto binding using in built method
   }
   @WebServlet(urlPatterns = "/*", name = "MyUIServlet", asyncSupported = true)
   @VaadinServletConfiguration(ui = MyUI.class, productionMode = false)
   public static class MyUIServlet extends VaadinServlet {
   }
}
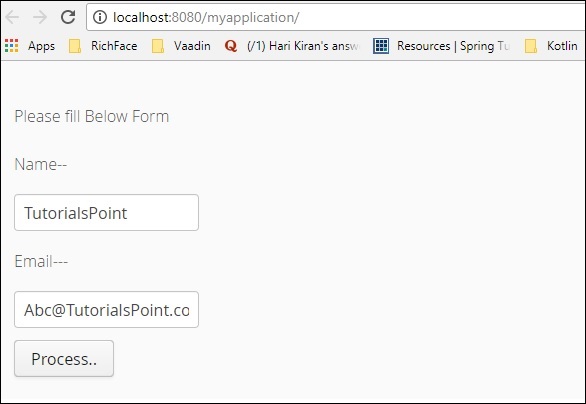
The code given above will yield the following output in the browser.
Table
Table is one of the most usable features of Vaadin. Table cells can include any type of data. Table component is developed for showing all data in a tabular format organized into a row and column structure. However, since Vaadin 8 release table feature has been absolute and the same feature has been modified with the Grid component. If you are still using an older version of Vaadin, then you are free to use table as shown in the format given below.
/* Create the table with a caption. */
Table table = new Table("This is my Table");
/* Define the names and data types of columns.
* The "default value" parameter is meaningless here. */

table.addContainerProperty("First Name", String.class, null);
table.addContainerProperty("Last Name", String.class, null);
table.addContainerProperty("Year", Integer.class, null);

/* Add a few items in the table. */
table.addItem(new Object[] {"Nicolaus","Copernicus",new Integer(1473)}, new Integer(1));
table.addItem(new Object[] {"Tycho", "Brahe", new Integer(1546)}, new Integer(2));
table.addItem(new Object[] {"Giordano","Bruno", new Integer(1548)}, new Integer(3));
table.addItem(new Object[] {"Galileo", "Galilei", new Integer(1564)}, new Integer(4));
table.addItem(new Object[] {"Johannes","Kepler", new Integer(1571)}, new Integer(5));
table.addItem(new Object[] {"Isaac", "Newton", new Integer(1643)}, new Integer(6));
In the upcoming chapter on GRID, you will learn more about Grid creation and populating data using the same.
Tree
Tree Component is used to populate directory structure in the website. In this section, you will learn how to populate a tree in the webpage using Vaadin framework. Update the required MyUI class as shown below.
package com.example.myapplication;
import javax.servlet.annotation.WebServlet;
import com.vaadin.annotations.Theme;
import com.vaadin.annotations.VaadinServletConfiguration;
import com.vaadin.data.TreeData;
import com.vaadin.server.VaadinRequest;
import com.vaadin.server.VaadinServlet;
import com.vaadin.ui.Component;
import com.vaadin.ui.Tree;
import com.vaadin.ui.UI;
import com.vaadin.ui.VerticalLayout;

@Theme("mytheme")
public class MyUI extends UI {
   @Override
   protected void init(VaadinRequest vaadinRequest) {
      VerticalLayout layout = new VerticalLayout();
      Tree<String> tree = new Tree<>();
      TreeData<String> treeData =tree.getTreeData();

      // Couple of childless root items
      treeData.addItem(null, "Option1");
      treeData.addItem("Option1", "Child1");
      treeData.addItem(null, "Option2");
      treeData.addItem("Option2", "Child2");

      // Items with hierarchy
      treeData.addItem(null, "Option3");
      treeData.addItem("Option3", "Child3");
      layout.addComponent(tree);
      setContent(layout);
   }
   @WebServlet(urlPatterns = "/*", name = "MyUIServlet", asyncSupported = true)
   @VaadinServletConfiguration(ui = MyUI.class, productionMode = false)
   public static class MyUIServlet extends VaadinServlet {}
}
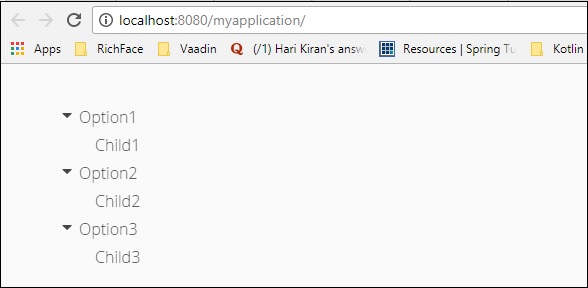
The above piece of code will produce the following output in the browser.
Menu Bar
Menu Bar component helps us to create a menu in the website. It can be dynamic as well as it can be nested. Find below example where we have created a nested menu bar using Vaadin Menu Bar component. Go ahead and modify our class like below.
package com.example.myapplication;
import javax.servlet.annotation.WebServlet;
import com.vaadin.annotations.Theme;
import com.vaadin.annotations.VaadinServletConfiguration;
import com.vaadin.data.TreeData;
import com.vaadin.server.VaadinRequest;
import com.vaadin.server.VaadinServlet;

import com.vaadin.ui.Component;
import com.vaadin.ui.Label;
import com.vaadin.ui.MenuBar;
import com.vaadin.ui.MenuBar.MenuItem;
import com.vaadin.ui.Tree;
import com.vaadin.ui.UI;
import com.vaadin.ui.VerticalLayout;

@Theme("mytheme")
public class MyUI extends UI {
   @Override
   protected void init(VaadinRequest vaadinRequest) {
      VerticalLayout layout = new VerticalLayout();
      MenuBar barmenu = new MenuBar();
      layout.addComponent(barmenu);

      // A feedback component
      final Label selection = new Label("-");
      layout.addComponent(selection);

      // Define a common menu command for all the menu items.
      MenuBar.Command mycommand = new MenuBar.Command() {
         public void menuSelected(MenuItem selectedItem) {
            selection.setValue("Ordered a " +
            selectedItem.getText() +
            " from menu.");
         }
      };

      // Put some items in the menu hierarchically
      MenuBar.MenuItem beverages =
      barmenu.addItem("Beverages", null, null);
      MenuBar.MenuItem hot_beverages =
      beverages.addItem("Hot", null, null);
      hot_beverages.addItem("Tea", null, mycommand);
      hot_beverages.addItem("Coffee", null, mycommand);
      MenuBar.MenuItem cold_beverages =
      beverages.addItem("Cold", null, null);
      cold_beverages.addItem("Milk", null, mycommand);
      cold_beverages.addItem("Weissbier", null, mycommand);

      // Another top-level item
      MenuBar.MenuItem snacks =
      barmenu.addItem("Snacks", null, null);
      snacks.addItem("Weisswurst", null, mycommand);
      snacks.addItem("Bratwurst", null, mycommand);
      snacks.addItem("Currywurst", null, mycommand);

      // Yet another top-level item
      MenuBar.MenuItem services =
      barmenu.addItem("Services", null, null);
      services.addItem("Car Service", null, mycommand);
      setContent(layout);
   }
   @WebServlet(urlPatterns = "/*", name = "MyUIServlet", asyncSupported = true)
   @VaadinServletConfiguration(ui = MyUI.class, productionMode = false)
   public static class MyUIServlet extends VaadinServlet {}
}
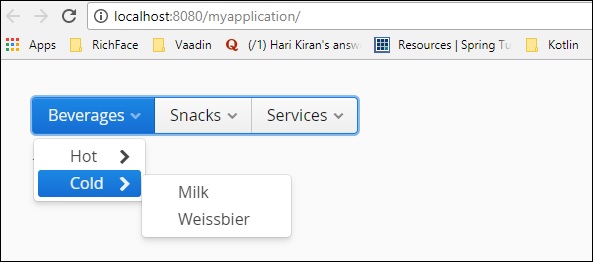
In the example discussed above, we have created a nested menu bar. Run the above piece of code and you can observe the output in your browser as shown below −
Vaadin - Core Elements
Till now you have learnt about different components of Vaadin. In this chapter, you will learn about different core components that Vaadin provides as a part of its library. Vaadin core components are user friendly, easily understandable and compatible with any modern browsers.
Combo BOX
Combo box is a selection component that helps user to select from the drop down menu and it also helps the developer to create the drop down for a particular field. The example shown below explains how to create a combo box. Here we will be populating Planet history using Vaadin combo box.
package com.example.myapplication;
public class Planet {
   private int id;
   private String name;
   public Planet(){}
   public Planet(int i, String name){
      this.id = i;
      this.name = name;
   }
   public int getId() {
      return id;
   }
   public void setId(int id) {
      this.id = id;
   }
   public String getName() {
      return name;
   }
   public void setName(String name) {
      this.name = name; 6. Vaadin – Core Elements
   }
}
Observe the piece of code shown below and update MyUI.java class accordingly.
package com.example.myapplication;
import java.util.ArrayList;
import java.util.Arrays;
import java.util.List;
import javax.servlet.annotation.WebServlet;
import com.vaadin.annotations.Theme;
import com.vaadin.annotations.VaadinServletConfiguration;
import com.vaadin.data.TreeData;
import com.vaadin.server.VaadinRequest;

import com.vaadin.server.VaadinServlet;
import com.vaadin.ui.ComboBox;
import com.vaadin.ui.Component;
import com.vaadin.ui.Label;
import com.vaadin.ui.MenuBar;
import com.vaadin.ui.MenuBar.MenuItem;
import com.vaadin.ui.Tree;
import com.vaadin.ui.UI;
import com.vaadin.ui.VerticalLayout;

@Theme("mytheme")
public class MyUI extends UI {
   @Override
   protected void init(VaadinRequest vaadinRequest) {

      //VerticalLayout layout = new VerticalLayout();
      // List of planets
      List<Planet> planets = new ArrayList();
      planets.add(new Planet(1, "Mercury"));
      planets.add(new Planet(2, "Venus"));
      planets.add(new Planet(3, "Earth"));
      ComboBox<Planet> select =
      new ComboBox<>("Select or Add a Planet");
      select.setItems(planets);

      // Use the name property for item captions
      select.setItemCaptionGenerator(Planet::getName);

      //layout.addComponent(select);
      setContent(select);
   }
   @WebServlet(urlPatterns = "/*", name = "MyUIServlet", asyncSupported = true)
   @VaadinServletConfiguration(ui = MyUI.class, productionMode = false)
   public static class MyUIServlet extends VaadinServlet {}
}
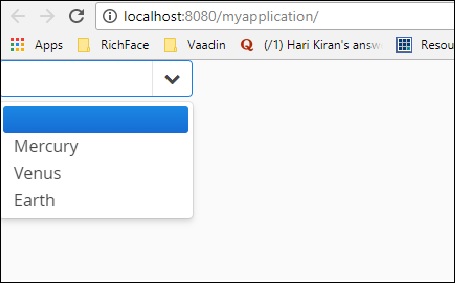
The code given above will yield the following output in the browser.
Context Menu
Context menu is the feature that helps the developer to represent the depended list in the browser. However, this feature has been deprecated in the recent version of Vaadin 8. Note that you can do the same using the Menu bar option. If you want to use the same in your application, you can use the code as shown below. Note that you need to install the polymer using npm directory and use the same in your html code.
<vaadin-context-menu>
   <template>
      <vaadin-list-box>
         <vaadin-item>First menu item</vaadin-item>
         <vaadin-item>Second menu item</vaadin-item>
      </vaadin-list-box>
   </template>

   <p>This paragraph has the context menu provided in the above template.</p>
   <p>Another paragraph with the context menu that can be opened with <b>right click</b> or with <b>long touch.</b></p>
</vaadin-context-menu>
Since this is a Java based tutorial, we would recommend you to use Menu bar option in order to learn Vaadin Context menu.
Date Picker
Date picker is another component that Vaadin supports, which helps the developer to create a website in an easy manner. The following code shows how to create a date picker in the Vaadin UI. Note that this has been deprecated in the recent version of Vaadin 8 and hence we need to use Java date object in order to populate the date field. But if you are using Vaadin web project, you can still use it.
package com.TutorialsMy.myApp;
import java.io.File;
import java.io.FileOutputStream;
import java.io.OutputStream;
import java.time.LocalDate;
import java.util.Arrays;
import java.util.List;
import java.util.Locale;
import javax.servlet.annotation.WebServlet;
import com.vaadin.annotations.Theme;
import com.vaadin.annotations.VaadinServletConfiguration;
import com.vaadin.data.TreeData;
import com.vaadin.icons.VaadinIcons;
import com.vaadin.server.UserError;
import com.vaadin.server.VaadinRequest;
import com.vaadin.server.VaadinServlet;
import com.vaadin.shared.ui.ContentMode;
import com.vaadin.ui.AbsoluteLayout;
import com.vaadin.ui.Alignment;
import com.vaadin.ui.Button;
import com.vaadin.ui.CustomLayout;
import com.vaadin.ui.DateField;
import com.vaadin.ui.FormLayout;
import com.vaadin.ui.Grid;
import com.vaadin.ui.HorizontalLayout;
import com.vaadin.ui.HorizontalSplitPanel;
import com.vaadin.ui.Label;
import com.vaadin.ui.Notification;
import com.vaadin.ui.Panel;
import com.vaadin.ui.TabSheet;
import com.vaadin.ui.TextField;
import com.vaadin.ui.Tree;
import com.vaadin.ui.UI;
import com.vaadin.ui.Upload;
import com.vaadin.ui.Upload.Receiver;
import com.vaadin.ui.VerticalLayout;
import com.vaadin.ui.VerticalSplitPanel;
import com.vaadin.ui.Window;
@Theme("mytheme")
public class MyUI extends UI {
@Override
protected void init(VaadinRequest vaadinRequest) {
final VerticalLayout hLayout = new VerticalLayout();
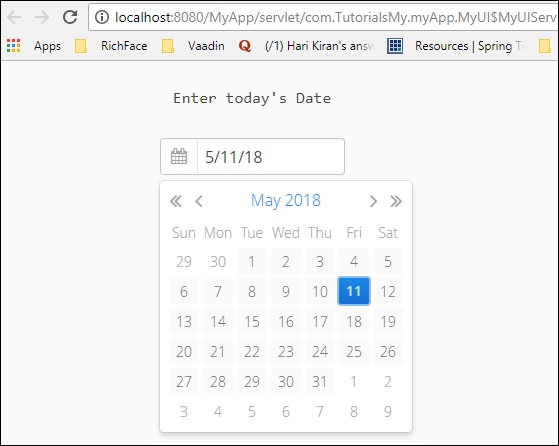
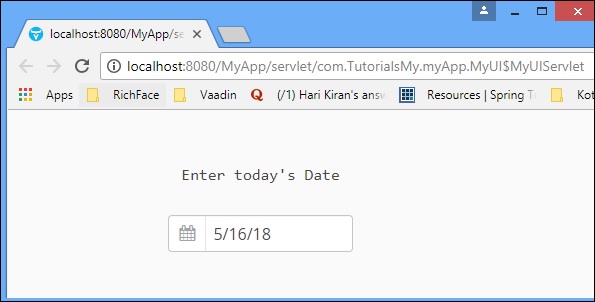
Label l1 = new Label("Enter today's Date\n",ContentMode.PREFORMATTED);
DateField date = new DateField();
date.setValue(LocalDate.now());
date.setLocale(new Locale("en","IND"));
hLayout.addComponents(l1,date);
hLayout.setComponentAlignment(l1,Alignment.BOTTOM_CENTER);
hLayout.setComponentAlignment(date,Alignment.BOTTOM_CENTER);
setContent(hLayout);
}
@WebServlet(urlPatterns = "/*", name = "MyUIServlet", asyncSupported = true)
@VaadinServletConfiguration(ui = MyUI.class, productionMode = false)
public static class MyUIServlet extends VaadinServlet {}
}
When you run the code given above, you can find the following output as shown below −
You can also use Vaadin date picker class from Java directly as shown below which will also yield the same result in the browser.
DatePicker datePicker = new DatePicker();
Note that in order to use DatePicker class, you need to use Vaadin V 3.0 but we are using Vaadin 8.
Data Grid
Data grid means passing a list of data. It acts similar to a tree in the browser. The following example shows how a grid works.
Create a class as shown below and name it MyCharArray.java.
package com.TutorialsMy.myApp;
public class MyCharArray {
   private String c;
   public String getC() {
      return c;
   }
   public void setC(String c) {
      this.c = c;
   }
   public MyCharArray(){} public MyCharArray(String ch){
      this.c = ch;
   }
}
Next, modify the MyUI.java class as shown below −
package com.TutorialsMy.myApp;
import java.io.File;
import java.io.FileOutputStream;
import java.io.OutputStream;
import java.util.Arrays;
import java.util.List;
import javax.servlet.annotation.WebServlet;
import com.vaadin.annotations.Theme;
import com.vaadin.annotations.VaadinServletConfiguration;
import com.vaadin.data.TreeData;
import com.vaadin.icons.VaadinIcons;
import com.vaadin.server.UserError;
import com.vaadin.server.VaadinRequest;
import com.vaadin.server.VaadinServlet;
import com.vaadin.shared.ui.ContentMode;
import com.vaadin.ui.AbsoluteLayout;
import com.vaadin.ui.Button;
import com.vaadin.ui.CustomLayout;
import com.vaadin.ui.FormLayout;
import com.vaadin.ui.Grid;
import com.vaadin.ui.HorizontalLayout;
import com.vaadin.ui.HorizontalSplitPanel;
import com.vaadin.ui.Label;
import com.vaadin.ui.Notification;
import com.vaadin.ui.Panel;
import com.vaadin.ui.TabSheet;
import com.vaadin.ui.TextField;
import com.vaadin.ui.Tree;
import com.vaadin.ui.UI;
import com.vaadin.ui.Upload;
import com.vaadin.ui.Upload.Receiver;
import com.vaadin.ui.VerticalLayout;
import com.vaadin.ui.VerticalSplitPanel;
import com.vaadin.ui.Window;
@Theme("mytheme")
public class MyUI extends UI {
@Override
protected void init(VaadinRequest vaadinRequest) {
VerticalLayout layout = new VerticalLayout();
List<MyCharArray> values = Arrays.asList(
new MyCharArray("First Value"),
new MyCharArray("Second Value"),
new MyCharArray("thired Value"));
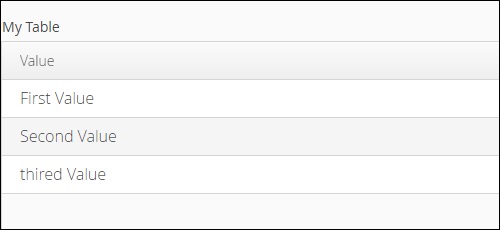
final Grid<MyCharArray> grid = new Grid<>("My Table");
grid.setItems(values);
grid.addColumn(MyCharArray::getC).setCaption("Value");
layout.addComponent(grid);
setContent(layout);
}
@WebServlet(urlPatterns = "/*", name = "MyUIServlet", asyncSupported = true)
@VaadinServletConfiguration(ui = MyUI.class, productionMode = false)
public static class MyUIServlet extends VaadinServlet {}
}
Now, run the above piece of code and you can see the following output in the browser.
Split Layout
Vaadin provides many tools to design a web page according to the choice of the developer. Using split layout, we can customize the entire screen according to our choice. The following example shows you different options to split a layout using Vaadin core component.
Modify the MyUI.java as shown below −
package com.TutorialsMy.myApp;
import java.io.File;
import java.io.FileOutputStream;
import java.io.OutputStream;
import java.util.Arrays;
import java.util.List;
import javax.servlet.annotation.WebServlet;
import com.vaadin.annotations.Theme;
import com.vaadin.annotations.VaadinServletConfiguration;
import com.vaadin.icons.VaadinIcons;
import com.vaadin.server.UserError;
import com.vaadin.server.VaadinRequest;
import com.vaadin.server.VaadinServlet;
import com.vaadin.shared.ui.ContentMode;
import com.vaadin.ui.AbsoluteLayout;
import com.vaadin.ui.Button;
import com.vaadin.ui.CustomLayout;
import com.vaadin.ui.FormLayout;
import com.vaadin.ui.Grid;
import com.vaadin.ui.HorizontalLayout;
import com.vaadin.ui.HorizontalSplitPanel;
import com.vaadin.ui.Label;
import com.vaadin.ui.Notification;
import com.vaadin.ui.Panel;
import com.vaadin.ui.TabSheet;
import com.vaadin.ui.TextField;
import com.vaadin.ui.Tree;
import com.vaadin.ui.UI;
import com.vaadin.ui.Upload;
import com.vaadin.ui.Upload.Receiver;
import com.vaadin.ui.VerticalLayout;
import com.vaadin.ui.VerticalSplitPanel;
import com.vaadin.ui.Window;
@Theme("mytheme")
public class MyUI extends UI {
@Override
protected void init(VaadinRequest vaadinRequest) {
// A 400x250 pixels size layout
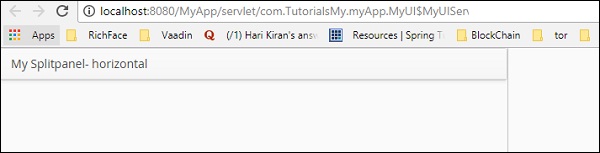
Panel panel = new Panel("Split Panel example");
Panel ex = new Panel("My Splitpanel- horizontal ");
// Have a horizontal split panel as its content
HorizontalSplitPanel hsplit = new HorizontalSplitPanel();
hsplit.addComponent(ex);
panel.setContent(hsplit);
setContent(hsplit);
/* Panel ex1 = new Panel("My Splitpanel- vertical ");
// Have a horizontal split panel as its content
VerticalSplitPanel vsplit = new VerticalSplitPanel();
hsplit.addComponent(ex1);
panel.setContent(vsplit);
setContent(vsplit);*/
}
@WebServlet(urlPatterns = "/*", name = "MyUIServlet", asyncSupported = true)
@VaadinServletConfiguration(ui = MyUI.class, productionMode = false)
public static class MyUIServlet extends VaadinServlet {}
}
In the same way you can split your window in vertical way. When you run the above piece of code, it will yield the following output in the browser.
Upload
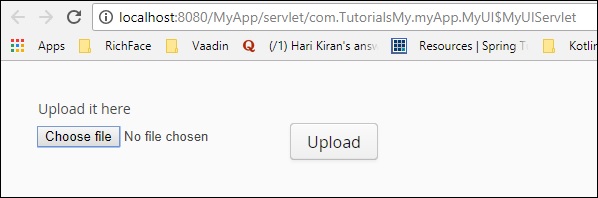
The upload content will help the user to upload the files to server. It has two different modes, immediate mode and non-immediate mode, controlled with Vaadin core framework. In the immediate mode, the upload displays a file name entry box and button for selecting the file. In non-immediate mode, user needs to trigger the upload using upload button.
The following example shows these two modes of upload −
ICON
Vaadin has in built icons that can be used as a general purpose. These icons have many advantages over the images. They reduce the code size and makes compilation faster. The following example shows how to use this in Vaadin.
Update your MyUI.java class as shown below.
package com.TutorialsMy.myApp;
import java.io.File;
import java.io.FileOutputStream;
import java.io.OutputStream;
import java.util.Arrays;
import java.util.List;

import javax.servlet.annotation.WebServlet;
import com.vaadin.annotations.Theme;
import com.vaadin.annotations.VaadinServletConfiguration;
import com.vaadin.icons.VaadinIcons;
import com.vaadin.server.UserError;
import com.vaadin.server.VaadinRequest;
import com.vaadin.server.VaadinServlet;
import com.vaadin.shared.ui.ContentMode;

import com.vaadin.ui.AbsoluteLayout;
import com.vaadin.ui.Button;
import com.vaadin.ui.CustomLayout;
import com.vaadin.ui.FormLayout;
import com.vaadin.ui.Grid;
import com.vaadin.ui.HorizontalLayout;
import com.vaadin.ui.Label;
import com.vaadin.ui.Notification;
import com.vaadin.ui.Panel;
import com.vaadin.ui.TabSheet;
import com.vaadin.ui.TextField;
import com.vaadin.ui.UI;
import com.vaadin.ui.Upload;
import com.vaadin.ui.Upload.Receiver;
import com.vaadin.ui.VerticalLayout;
import com.vaadin.ui.Window;

@Theme("mytheme")
public class MyUI extends UI {
   @Override
   protected void init(VaadinRequest vaadinRequest) {

      // A 400x250 pixels size layout
      VerticalLayout content = new VerticalLayout();
      Panel p = new Panel("Example of Vaadin Upload-");
      TextField name = new TextField("Name");
      name.setIcon(VaadinIcons.USER);
      content.addComponent(name);

      // Button allows specifying icon resource in constructor
      Button ok = new Button("OK", VaadinIcons.CHECK);
      content.addComponent(ok);
      setContent(content);
   }
   @WebServlet(urlPatterns = "/*", name = "MyUIServlet", asyncSupported = true)
   @VaadinServletConfiguration(ui = MyUI.class, productionMode = false)
   public static class MyUIServlet extends VaadinServlet {}
}
This piece of code will run in the browser and it will yield below output in the browser −
Vaadin - Layout Component
Layout components works as a place holder to hold and represent the data in the front end. In this chapter, we will learn about different types of layout component of the VAADIN.
Vertical and Horizontal Layout
Vertical and horizontal layouts are the ordered layouts that help the users to render the data in a vertical or horizontal manner. We have used this concept in many previous examples that we have seen till now. The following example will show you how to use the same in a Vaadin application.
package com.TutorialsMy.myApp;
import javax.servlet.annotation.WebServlet;
import com.vaadin.annotations.Theme;
import com.vaadin.annotations.VaadinServletConfiguration;
import com.vaadin.server.VaadinRequest;
import com.vaadin.server.VaadinServlet;
import com.vaadin.shared.ui.ContentMode;
import com.vaadin.ui.Button;
import com.vaadin.ui.HorizontalLayout;
import com.vaadin.ui.Label;
import com.vaadin.ui.TextField;
import com.vaadin.ui.UI;
import com.vaadin.ui.VerticalLayout;
@Theme("mytheme")
public class MyUI extends UI {
@Override
protected void init(VaadinRequest vaadinRequest) {
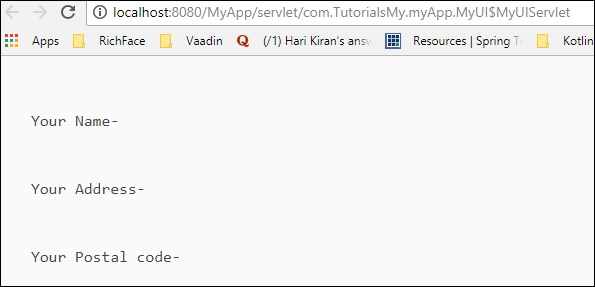
Label l1 = new Label("Your Name-\n",ContentMode.PREFORMATTED);
Label l2 = new Label("Your Address-\n",ContentMode.PREFORMATTED);
Label l3 = new Label("Your Postal code-\n",ContentMode.PREFORMATTED);
final VerticalLayout vLayout = new VerticalLayout();
final HorizontalLayout hLayout = new HorizontalLayout();
vLayout.setDescription("This is a example of vertical layout");
vLayout.addComponents(l1,l2,l3);;
//hLayout.setDescription("This is example of Horizontal layout");
// hLayout.addComponents(l1,l2,l3);
setContent(vLayout);
//setContent(hLayout);
}
@WebServlet(urlPatterns = "/*", name = "MyUIServlet", asyncSupported = true)
@VaadinServletConfiguration(ui = MyUI.class, productionMode = false)
public static class MyUIServlet extends VaadinServlet {}
}
This code will yield below output in the browser.
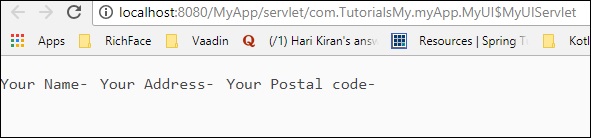
When we use horizontal layout instead of vertical, then the same piece of code will yield below output in the browser.
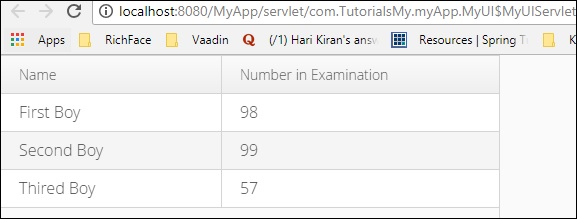
Grid
Grid is another component of Vaadin using which users can represent the tabular data in the browser. In this section, we will learn about Grid and its usage.
First create a class named as “Person”.
package com.TutorialsMy.myApp;
public class Person {
   private String name;
   private int number;
   public Person(){}
   public Person(String string, int i) {

      // TODO Auto-generated constructor stub
      this.name = string;
      this.number =i;
   }
   public String getName() {
      return name;
   }
   public void setName(String name) {
      this.name = name;
   }
   public int getNumber() {
      return number;
   }
   public void setNumber(int number) {
      this.number = number;
   }
}
Now, add the following piece of code in the MyUI.java class −
package com.TutorialsMy.myApp;
import java.util.Arrays;
import java.util.List;
import javax.servlet.annotation.WebServlet;

import com.vaadin.annotations.Theme;
import com.vaadin.annotations.VaadinServletConfiguration;
import com.vaadin.server.VaadinRequest;
import com.vaadin.server.VaadinServlet;
import com.vaadin.shared.ui.ContentMode;

import com.vaadin.ui.Button;
import com.vaadin.ui.Grid;
import com.vaadin.ui.HorizontalLayout;
import com.vaadin.ui.Label;
import com.vaadin.ui.TextField;
import com.vaadin.ui.UI;
import com.vaadin.ui.VerticalLayout;

@Theme("mytheme")
public class MyUI extends UI {
   @Override
   protected void init(VaadinRequest vaadinRequest) {
      HorizontalLayout hLayout = new HorizontalLayout();

      // Have some data
      List<Person> people = Arrays.asList(
      new Person("First Boy", 98),
      new Person("Second Boy", 99),
      new Person("Thired Boy", 57));

      // Create a grid bound to the list
      Grid<Person> grid = new Grid<>();
      grid.setItems(people);
      grid.addColumn(Person::getName).setCaption("Name");
      grid.addColumn(Person::getNumber).setCaption("Number in Examination");
      hLayout.addComponent(grid);
      setContent(hLayout);
   }
   @WebServlet(urlPatterns = "/*", name = "MyUIServlet", asyncSupported = true)
   @VaadinServletConfiguration(ui = MyUI.class, productionMode = false)
   public static class MyUIServlet extends VaadinServlet {}
}
Once both the steps are done, compile and run them. You can observe the following output in the browser −
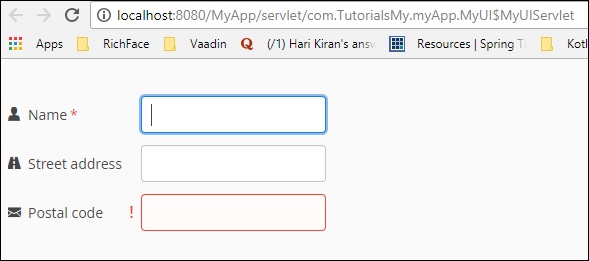
Form Layout
Form layout is another component of the Vaadin which helps us to represent the data in two different column format. It will look just like a form. In this section, you will learn more about this layout.
Edit your MyUI.java file as shown below −
package com.TutorialsMy.myApp;
import java.util.Arrays;
import java.util.List;
import javax.servlet.annotation.WebServlet;

import com.vaadin.annotations.Theme;
import com.vaadin.annotations.VaadinServletConfiguration;
import com.vaadin.icons.VaadinIcons;
import com.vaadin.server.UserError;
import com.vaadin.server.VaadinRequest;
import com.vaadin.server.VaadinServlet;
import com.vaadin.shared.ui.ContentMode;

import com.vaadin.ui.Button;
import com.vaadin.ui.FormLayout;
import com.vaadin.ui.Grid;
import com.vaadin.ui.HorizontalLayout;
import com.vaadin.ui.Label;
import com.vaadin.ui.TextField;
import com.vaadin.ui.UI;
import com.vaadin.ui.VerticalLayout;

@Theme("mytheme")
public class MyUI extends UI {
   @Override
   protected void init(VaadinRequest vaadinRequest) {
      FormLayout form = new FormLayout();
      TextField tf1 = new TextField("Name");
      tf1.setIcon(VaadinIcons.USER);
      tf1.setRequiredIndicatorVisible(true);
      form.addComponent(tf1);
      TextField tf2 = new TextField("Street address");
      tf2.setIcon(VaadinIcons.ROAD);
      form.addComponent(tf2);
      TextField tf3 = new TextField("Postal code");
      tf3.setIcon(VaadinIcons.ENVELOPE);
      form.addComponent(tf3);

      // normally comes from validation by Binder
      tf3.setComponentError(new UserError("Doh!"));
      setContent(form);
   }
   @WebServlet(urlPatterns = "/*", name = "MyUIServlet", asyncSupported = true)
   @VaadinServletConfiguration(ui = MyUI.class, productionMode = false)
   public static class MyUIServlet extends VaadinServlet {}
}
When you compile and run the above code, it will render the following output in the browser −
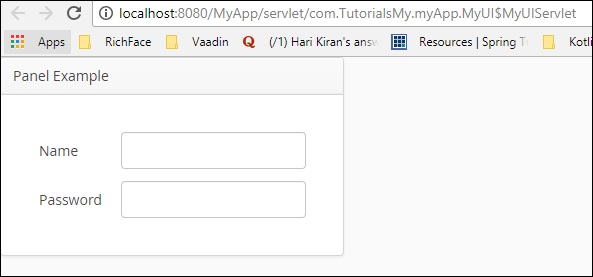
Panel
Panel is a single component container with a frame outlining it. It gives more features to the form layout. In the following example, we will understand how to use panel in the Vaadin.
package com.TutorialsMy.myApp;
import java.util.Arrays;
import java.util.List;
import javax.servlet.annotation.WebServlet;

import com.vaadin.annotations.Theme;
import com.vaadin.annotations.VaadinServletConfiguration;
import com.vaadin.icons.VaadinIcons;
import com.vaadin.server.UserError;
import com.vaadin.server.VaadinRequest;
import com.vaadin.server.VaadinServlet;
import com.vaadin.shared.ui.ContentMode;

import com.vaadin.ui.Button;
import com.vaadin.ui.FormLayout;
import com.vaadin.ui.Grid;
import com.vaadin.ui.HorizontalLayout;
import com.vaadin.ui.Label;
import com.vaadin.ui.Panel;
import com.vaadin.ui.TextField;
import com.vaadin.ui.UI;
import com.vaadin.ui.VerticalLayout;

@Theme("mytheme")
public class MyUI extends UI {
   @Override
   protected void init(VaadinRequest vaadinRequest) {
      HorizontalLayout layout = new HorizontalLayout();
      Panel panel = new Panel("Panel Example ");
      panel.addStyleName("mypanelexample");
      panel.setSizeUndefined(); // Shrink to fit content
      layout.addComponent(panel);

      // Create the content
      FormLayout content = new FormLayout();
      content.addStyleName("mypanelcontent");
      content.addComponent(new TextField("Name"));
      content.addComponent(new TextField("Password"));
      content.setSizeUndefined(); // Shrink to fit
      content.setMargin(true);
      panel.setContent(content);
      setContent(panel);
   }
   @WebServlet(urlPatterns = "/*", name = "MyUIServlet", asyncSupported = true)
   @VaadinServletConfiguration(ui = MyUI.class, productionMode = false)
   public static class MyUIServlet extends VaadinServlet {}
}
When you run the above piece of code, it will yield the following output in the browser
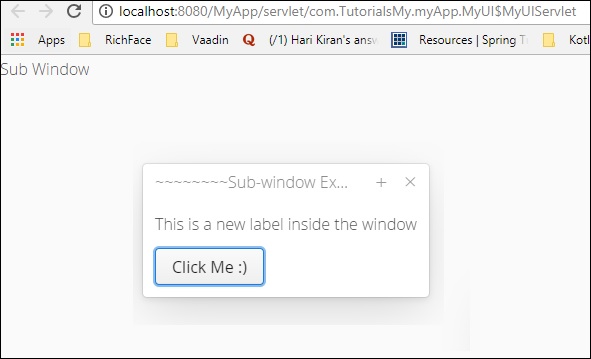
Sub Window
Sub window is a floating panel inside an active browser. This allows the user to segregate the content in to a different window. Like other Layout components, it is also controlled by runtime Vaadin Html codes. In the following example, we will see how sub window panel works.
Change your MYUI code as shown below.
package com.TutorialsMy.myApp;
import java.util.Arrays;
import java.util.List;
import javax.servlet.annotation.WebServlet;

import com.vaadin.annotations.Theme;
import com.vaadin.annotations.VaadinServletConfiguration;
import com.vaadin.icons.VaadinIcons;
import com.vaadin.server.UserError;
import com.vaadin.server.VaadinRequest;
import com.vaadin.server.VaadinServlet;
import com.vaadin.shared.ui.ContentMode;

import com.vaadin.ui.Button;
import com.vaadin.ui.FormLayout;
import com.vaadin.ui.Grid;
import com.vaadin.ui.HorizontalLayout;
import com.vaadin.ui.Label;
import com.vaadin.ui.Panel;
import com.vaadin.ui.TextField;
import com.vaadin.ui.UI;
import com.vaadin.ui.VerticalLayout;
import com.vaadin.ui.Window;

@Theme("mytheme")
public class MyUI extends UI {
   @Override
   protected void init(VaadinRequest vaadinRequest) {
      setContent(new Label("Sub Window"));

      // Create a sub-window and set the content
      Window subWindow = new Window("~~~~~~~~Sub-window Example~~~~~~~");
      VerticalLayout subContent = new VerticalLayout();
      subWindow.setContent(subContent);

      // Put some components in it
      subContent.addComponent(new Label("This is a new label inside the window"));
      subContent.addComponent(new Button("Click Me :)"));

      // Center it in the browser window
      subWindow.center();

      // Open it in the UI
      addWindow(subWindow);
   }
   @WebServlet(urlPatterns = "/*", name = "MyUIServlet", asyncSupported = true)
   @VaadinServletConfiguration(ui = MyUI.class, productionMode = false)
   public static class MyUIServlet extends VaadinServlet {}
}
Once you compile and run the above piece of code you will get below output in the browser.
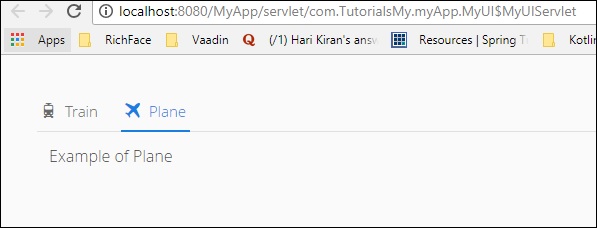
Tab-Sheet
Tab sheet is a multi-component container that allows switching between the components using tabs. All the tabs are organised as a tab bar at the top of the tab sheet. The following code. shows you how to use Vaadin Tab-Sheet.
Please modify your MyUI.java class as shown below.
package com.TutorialsMy.myApp;
import java.util.Arrays;
import java.util.List;
import javax.servlet.annotation.WebServlet;import com.vaadin.annotations.Theme;

import com.vaadin.annotations.VaadinServletConfiguration;
import com.vaadin.icons.VaadinIcons;
import com.vaadin.server.UserError;
import com.vaadin.server.VaadinRequest;
import com.vaadin.server.VaadinServlet;
import com.vaadin.shared.ui.ContentMode;

import com.vaadin.ui.Button;
import com.vaadin.ui.FormLayout;
import com.vaadin.ui.Grid;
import com.vaadin.ui.HorizontalLayout;
import com.vaadin.ui.Label;
import com.vaadin.ui.Panel;
import com.vaadin.ui.TabSheet;
import com.vaadin.ui.TextField;
import com.vaadin.ui.UI;
import com.vaadin.ui.VerticalLayout;
import com.vaadin.ui.Window;

@Theme("mytheme")
public class MyUI extends UI {
   @Override
   protected void init(VaadinRequest vaadinRequest) {
      TabSheet tabsheet = new TabSheet();
      VerticalLayout layout = new VerticalLayout();
      layout.addComponent(tabsheet);

      // Create the first tab
      VerticalLayout tab1 = new VerticalLayout();
      tab1.addComponent(new Label("Eaxmple of Train"));
      tab1.setCaption("Train");
      tabsheet.addTab(tab1).setIcon(VaadinIcons.TRAIN);;

      // This tab gets its caption from the component caption
      VerticalLayout tab2 = new VerticalLayout();
      tab2.addComponent(new Label("Example of Plane"));
      tab2.setCaption("Plane");
      tabsheet.addTab(tab2).setIcon(VaadinIcons.AIRPLANE);
      setContent(layout);
   }
   @WebServlet(urlPatterns = "/*", name = "MyUIServlet", asyncSupported = true)
   @VaadinServletConfiguration(ui = MyUI.class, productionMode = false)
   public static class MyUIServlet extends VaadinServlet {}
}
You can observe the following output in the browser when you run the code given above. Note that you can switch between train and plane depending on your selection in the tab header.
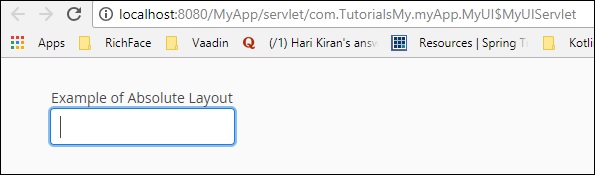
Absolute Layout
Absolute layout lets you to place the content in a selective position in an arbitrary manner. The following code is an example of usage of the absolute.
Update MyUI.java class as shown below.
package com.TutorialsMy.myApp;
import java.util.Arrays;
import java.util.List;
import javax.servlet.annotation.WebServlet;

import com.vaadin.annotations.Theme;
import com.vaadin.annotations.VaadinServletConfiguration;
import com.vaadin.icons.VaadinIcons;
import com.vaadin.server.UserError;
import com.vaadin.server.VaadinRequest;
import com.vaadin.server.VaadinServlet;
import com.vaadin.shared.ui.ContentMode;

import com.vaadin.ui.AbsoluteLayout;
import com.vaadin.ui.Button;
import com.vaadin.ui.FormLayout;
import com.vaadin.ui.Grid;
import com.vaadin.ui.HorizontalLayout;
import com.vaadin.ui.Label;
import com.vaadin.ui.Panel;
import com.vaadin.ui.TabSheet;
import com.vaadin.ui.TextField;
import com.vaadin.ui.UI;
import com.vaadin.ui.VerticalLayout;
import com.vaadin.ui.Window;

@Theme("mytheme")
public class MyUI extends UI {
   @Override
   protected void init(VaadinRequest vaadinRequest) {

      // A 400x250 pixels size layout
      AbsoluteLayout layout = new AbsoluteLayout();
      layout.setWidth("400px");
      layout.setHeight("200px");

      // A component with coordinates for its top-left corner
      TextField text = new TextField("Example of Absolute Layout");
      layout.addComponent(text, "left: 50px; top: 50px;");
      setContent(layout);
   }
   @WebServlet(urlPatterns = "/*", name = "MyUIServlet", asyncSupported = true)
   @VaadinServletConfiguration(ui = MyUI.class, productionMode = false)
   public static class MyUIServlet extends VaadinServlet {}
}
You can observe the following output in your browser when you execute the code given above −
Custom Layout
A custom layout is a layout that you can customize as per your requirements, and hence the name. The following example shows how to create one custom layout for our application.
Change the MyUI.java class as shown below −
package com.TutorialsMy.myApp;
import java.util.Arrays;
import java.util.List;
import javax.servlet.annotation.WebServlet;
import com.vaadin.annotations.Theme;
import com.vaadin.annotations.VaadinServletConfiguration;
import com.vaadin.icons.VaadinIcons;
import com.vaadin.server.UserError;
import com.vaadin.server.VaadinRequest;
import com.vaadin.server.VaadinServlet;
import com.vaadin.shared.ui.ContentMode;
import com.vaadin.ui.AbsoluteLayout;
import com.vaadin.ui.Button;
import com.vaadin.ui.CustomLayout;
import com.vaadin.ui.FormLayout;
import com.vaadin.ui.Grid;
import com.vaadin.ui.HorizontalLayout;
import com.vaadin.ui.Label;
import com.vaadin.ui.Panel;
import com.vaadin.ui.TabSheet;
import com.vaadin.ui.TextField;
import com.vaadin.ui.UI;
import com.vaadin.ui.VerticalLayout;
import com.vaadin.ui.Window;
@Theme("mytheme")
public class MyUI extends UI {
@Override
protected void init(VaadinRequest vaadinRequest) {
// A 400x250 pixels size layout
Panel loginPanel = new Panel("Login");
CustomLayout content = new CustomLayout("layoutname");
content.setSizeUndefined();
loginPanel.setContent(content);
loginPanel.setSizeUndefined();
// No captions for fields is they are provided in the template
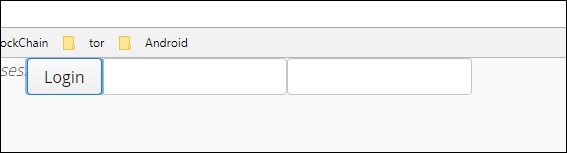
content.addComponent(new TextField(), "username");
content.addComponent(new TextField(), "password");
content.addComponent(new Button("Login"), "okbutton");
//content.addComponent(loginPanel
setContent(loginPanel);
setContent(content);
}
@WebServlet(urlPatterns = "/*", name = "MyUIServlet", asyncSupported = true)
@VaadinServletConfiguration(ui = MyUI.class, productionMode = false)
public static class MyUIServlet extends VaadinServlet {}
}
You can observe the following output in your browser when you run the above piece of code −
Vaadin - Themes
This chapter discusses in detail about another feature of Vaadin, known as Theme. In general, theme means a framework which is customizable at runtime. The content will be dynamic depending on the response received at the server end.
Vaadin provides a cool interface to use a theme with in a second with the help of its own Java based SAAS compiler. Theme feature is given to Vaadin in order to provide customizable style and look to the application. Theme is a pre-made template and developers need to customize it in order to build their own application which saves their time.
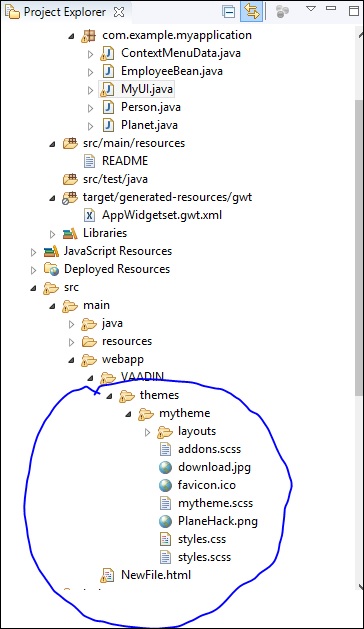
You can find all the themes in Vaadin under the theme folder and each of the sub folders are self-descript able. Hence, it is also very easy to change the code and customize the same. Any theme can have two types of CSS files in it − .saas type and .css type. Although Vaadin does not have any restriction on folder name, it is always recommended to use the folder name as you can notice from the image given above.
There are two kind of themes available − Inbuilt and Custom. This section discusses them in detail.
Built In Theme
Vaadin built in theme is provided by annotating it with a theme name as shown below.
@Theme("mytheme")
public class MyUI extends UI {
All the grey color back ground while running a Vaadin application comes from the inbuilt css files. We can make change those files in order to make them as a custom theme which is another kind of theme. There is nothing we can learn about the Vaadin built in themes. All the above mentioned components are part of Vaadin Theme.
Custom theme – Creating and Using Themes
Custom themes are placed in the VAADIN/themes folder of the web application, in an Eclipse project under the WebContent folder or src/main/webapp in Maven projects. These locations are fixed and recommended not to change for any type of requirement. To define a SAAS theme with the name mytheme , you must place the file in the mytheme folder under theme folder then rebuild your project. Vaadin will automatically create its own .css file on the fly whenever requested by the browser.
You can change the style content in the css file as per your requirement. However, remember to build the project once again and it will start reflecting in progress.
Responsive Theme
Vaadin supports responsive theme too. Responsive web page can automatically set the font size according to the screen size. In the Vaadin application, we need to add a single line of code in order to make the entire application responsive.
Let us consider the following example to learn further about Vaadin. Make changes in the MyUI.java class as shown below.
package com.TutorialsMy.myApp;
import java.io.File;
import java.io.FileOutputStream;
import java.io.OutputStream;
import java.time.LocalDate;
import java.util.Arrays;
import java.util.List;
import java.util.Locale;
import javax.servlet.annotation.WebServlet;

import com.vaadin.annotations.Theme;
import com.vaadin.annotations.VaadinServletConfiguration;
import com.vaadin.data.TreeData;
import com.vaadin.icons.VaadinIcons;
import com.vaadin.server.Responsive;
import com.vaadin.server.UserError;
import com.vaadin.server.VaadinRequest;
import com.vaadin.server.VaadinServlet;
import com.vaadin.shared.ui.ContentMode;

import com.vaadin.ui.AbsoluteLayout;
import com.vaadin.ui.Alignment;
import com.vaadin.ui.Button;
import com.vaadin.ui.CustomLayout;
import com.vaadin.ui.DateField;
import com.vaadin.ui.FormLayout;
import com.vaadin.ui.Grid;
import com.vaadin.ui.HorizontalLayout;
import com.vaadin.ui.HorizontalSplitPanel;

import com.vaadin.ui.Label;
import com.vaadin.ui.Notification;
import com.vaadin.ui.Panel;
import com.vaadin.ui.TabSheet;
import com.vaadin.ui.TextField;
import com.vaadin.ui.Tree;
import com.vaadin.ui.UI;
import com.vaadin.ui.Upload;
import com.vaadin.ui.Upload.Receiver;
import com.vaadin.ui.VerticalLayout;
import com.vaadin.ui.VerticalSplitPanel;
import com.vaadin.ui.Window;

@Theme("mytheme")
public class MyUI extends UI {
   @Override
   protected void init(VaadinRequest vaadinRequest) {
      final VerticalLayout hLayout = new VerticalLayout();
      Label l1 = new Label("Enter today's Date\n",ContentMode.PREFORMATTED);
      DateField date = new DateField();
      date.setValue(LocalDate.now());
      date.setLocale(new Locale("en","IND"));
      hLayout.addComponents(l1,date);
      hLayout.setComponentAlignment(l1,Alignment.BOTTOM_CENTER);
      hLayout.setComponentAlignment(date,Alignment.BOTTOM_CENTER);
      Responsive.makeResponsive(hLayout);
      setContent(hLayout);
   }
   @WebServlet(urlPatterns = "/*", name = "MyUIServlet", asyncSupported = true)
   @VaadinServletConfiguration(ui = MyUI.class, productionMode = false)
   public static class MyUIServlet extends VaadinServlet {}
}
When you run the code given above, you can observe the following output in the browser.
To test the responsiveness of the layout, reduce the browser and you can observe that the panel and layout component will change their size and shape accordingly.
To Continue Learning Please Login