- MuleSoft Tutorial
- MuleSoft - Home
- MuleSoft - Introduction to Mule ESB
- MuleSoft - The Mule Project
- MuleSoft - Mule in Our Machine
- MuleSoft - Anypoint Studio
- MuleSoft - Discovering Anypoint Studio
- Creating First Mule Application
- MuleSoft - DataWeave Language
- Message Processor & Script Components
- Core Components & Their Configuration
- MuleSoft - Endpoints
- Flow Control and Transformers
- Web Services Using Anypoint Studio
- MuleSoft - Mule Error Handling
- MuleSoft - Mule exception Handling
- MuleSoft - Testing with MUnit
- MuleSoft Useful Resources
- MuleSoft - Quick Guide
- MuleSoft - Useful Resources
- MuleSoft - Discussion
MuleSoft - Core Components & Configuration
One of the most important abilities of Mule is that it can perform routing, transforming, and processing with the components, because of which the configuration file of Mule application that combines various elements is very large in size.
Following are the types of configuration patterns provided by Mule −
- Simple service pattern
- Bridge
- Validator
- HTTP proxy
- WS proxy
Configuring the component
In Anypoint studio, we can follow the below steps to configure a component −
Step 1
We need to drag the component we wish to use in our Mule application. For example, here we use HTTP listener component as follows −
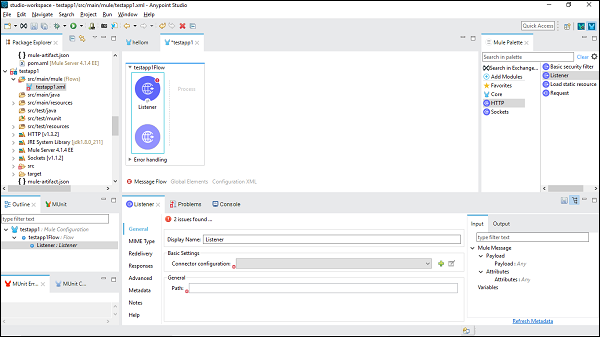
Step 2
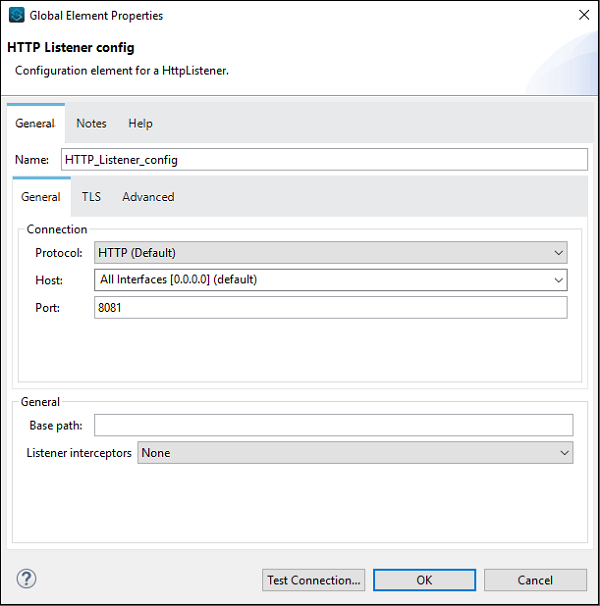
Next, double click on the component to get the configuration window. For HTTP listener, it is shown below −
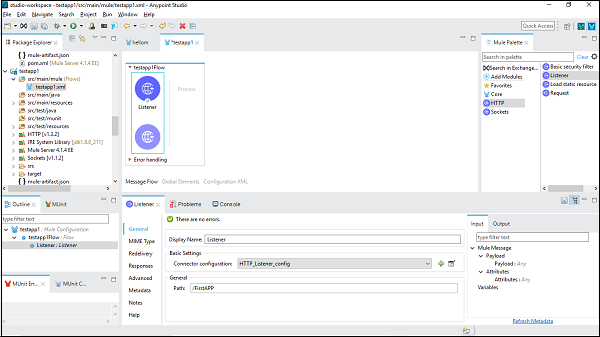
Step 3
We can configure the component as per the requirement of our project. Say for example, we did for HTTP listener component −
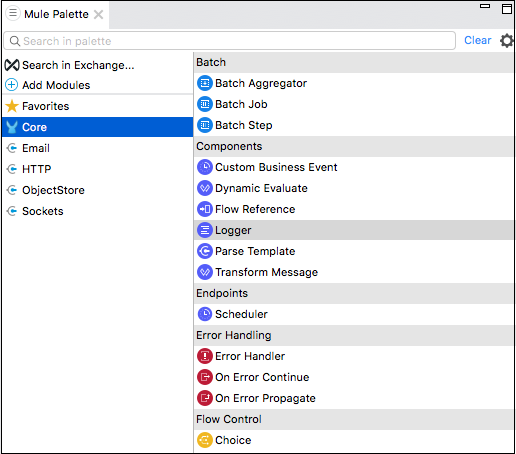
Core components are one of the important building blocks of work flow in the Mule app. The logic for processing a Mule event is provided by these core components. In Anypoint studio, to access these core components, you can click on the Core from Mule Palette as shown below −
Following are various core components and their working in Mule 4 −
Custom Business Events
This core component is used for the collection of information about flows as well as message processors that handle the business transactions in Mule app. In other words, we can use Custom Business Event component to add the following in our working flow −
- Metadata
- Key performance Indicators (KPIs)
How to add KPIs?
Following are the steps to add KPIs in our flow in Mule app −
Step 1 − Follow Mule Palette → Core → Components → Custom Business Event, to add Custom Business Event component to a working flow in your Mule app.
Step 2 − Click on the component to open it.
Step 3 − Now, we need to provide values for Display Name and Event Name.
Step 4 − To capture information from the message payload, add KPIs as follows −
Give a name (key) for the KPI (tracking: meta-data element) and a value. The name will be used in search interface of Runtime Manager.
Give a value that may be any Mule expression.
Example
Following table consists of the list of KPIs with Name and Value −
| Name | Expression/Value |
|---|---|
| Student RollNo | #[payload[‘RollNo’]] |
| Student Name | #[payload[‘Name’]] |
Dynamic Evaluate
This core component is used for dynamically selecting a script in Mule app. We can also use hardcore script through the Transform Message Component but using Dynamic Evaluate component is a better way. This core component works as follows −
- Firstly, it evaluates an expression that should result in another script.
- Then it evaluates that script for the final result.
In this way, it allows us to dynamically select the script rather than hardcoding it.
Example
Following is an example of selecting a script from database through an Id query parameter and storing that script in a variable named MyScript. Now, the dynamic-evaluate component will access the variable to invoke the scripts so that it can add a name variable from UName query parameter.
The XML configuration of the flow is given below −
<flow name = "DynamicE-example-flow">
   <http:listener config-ref = "HTTP_Listener_Configuration" path = "/"/>
   <db:select config-ref = "dbConfig" target = "myScript">
      <db:sql>#["SELECT script FROM SCRIPTS WHERE ID =
         $(attributes.queryParams.Id)"]
      </db:sql>
   </db:select>
   <ee:dynamic-evaluate expression = "#[vars.myScript]">
      <ee:parameters>#[{name: attributes.queryParams.UName}]</ee:parameters>
   </ee:dynamic-evaluate>
</flow>
The script can use context variables like message, payload, vars or attributes. However, if you want to add custom context variable, you need to provide a set of key-value pairs.
Configuring Dynamic Evaluate
Following table provides a way to configure Dynamic Evaluate component −
| Field | Value | Description | Example |
|---|---|---|---|
| Expression | DataWeave expression | It specifies the expression to be evaluated into the final script. | expression="#[vars.generateOrderScript]" |
| Parameters | DataWeave expression | It specifies key-value pairs. | #[{joiner: ' and ', id: payload.user.id}] |
Flow Reference Component
If you want to route the Mule event to another flow or sub-flow and back within the same Mule app, then flow reference component is the right option.
Characteristics
Following are the characteristics of this core component −
This core component allows us to treat the whole referenced flow like a single component in the current flow.
It breaks the Mule application into discrete and reusable units. For example, a flow is listing files on regular basis. It might reference another flow that processes the output of the list operation.
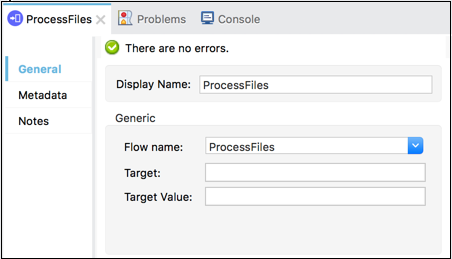
In this way, rather than appending the whole processing steps, we can append Flow References that points to the processing flow. The screenshot below shows that the Flow Reference Core Component is pointing towards a sub-flow named ProcessFiles.
Working
The working of Flow Ref component can be understood with the help of following diagram −
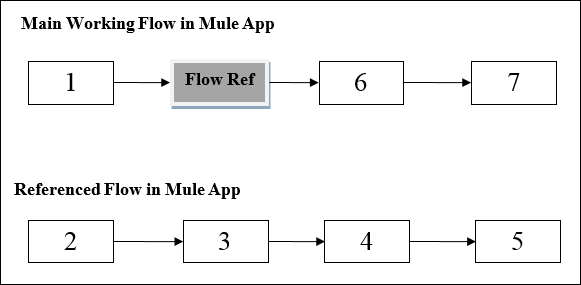
The diagram shows the processing order in Mule application when one flow references another flow in the same application. When the main working flow in Mule application triggered, the Mule event travels all through and executes the flow until the Mule event reaches Flow Reference.
After reaching Flow Reference, the Mule event executes the referenced flow from beginning to end. Once Mule event finishes executing the Ref Flow, it returns to the main flow.
Example
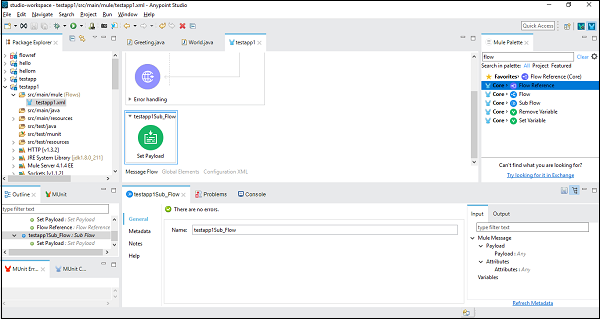
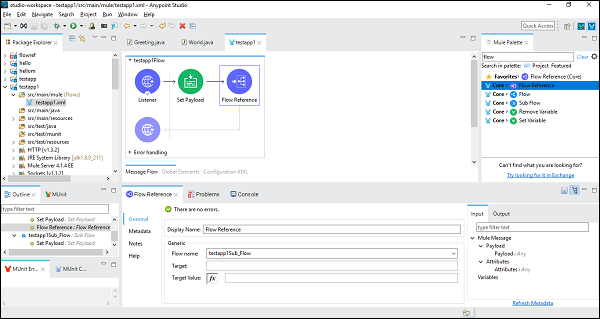
For better understanding, let us use this component in Anypoint Studio. In this example, we are taking HTTP listener to GET a message, as we did in the previous chapter. So, we can drag and drop the component and configure. But for this example, we need to add a Sub-flow component and set Payload component under that, as shown below −
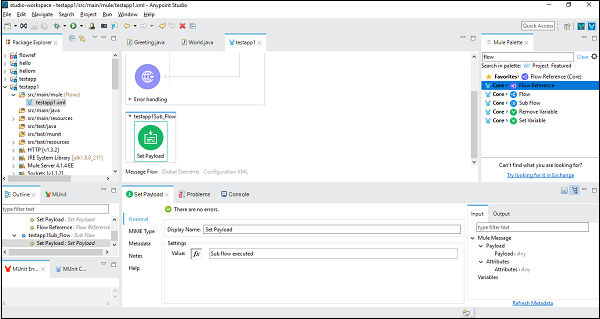
Next, we need to configure Set Payload, by double clicking on it. Here we are giving the value, “Sub flow executed” as shown below −
Once successfully configuring the sub-flow component, we need the Flow Reference Component to set after Set Payload of main flow, which we can drag and drop from the Mule Palette as shown below −

Next, while configuring the Flow Reference Component, we need to choose Flow Name under Generic tab as shown below −
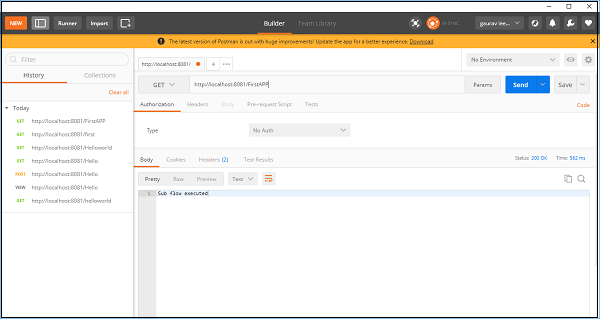
Now, save and run this application. To test this, go to POSTMAN and type http:/localhost:8181/FirstAPP in the URL bar, and you will get the message, Sub flow executed.
Logger Component
The core component called logger helps us to monitor and debug our Mule application by logging important information like error messages, status notifications, payloads, etc. In AnyPoint studio, they appear in the Console.
Advantages
Following are some advantages of Logger Component −
- We can add this core component anywhere in the working flow.
- We can configure it to log a string specified by us.
- We can configure it to the output of a DataWeave expression written by us.
- We can also configure it to any combination of strings and expressions.
Example
The example below displays the message “Hello World” in the Set Payload in a browser and logging the message also.
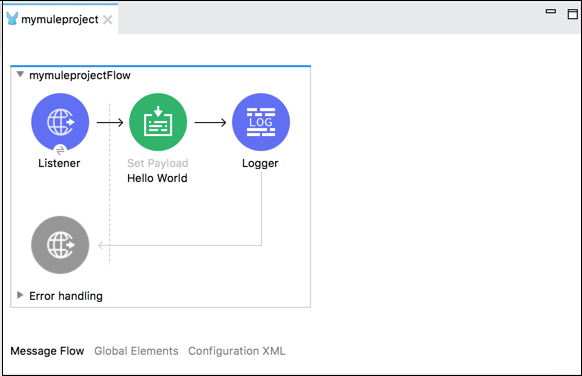
Following is the XML configuration of the flow in the above example −
<http:listener-config name = "HTTP_Listener_Configuration" host = "localhost" port = "8081"/>
<flow name = "mymuleprojectFlow">
   <http:listener config-ref="HTTP_Listener_Configuration" path="/"/>
   <set-payload value="Hello World"/>
   <logger message = "#[payload]" level = "INFO"/>
</flow>
Transfer Message Component
Transform Message Component, also called Transfer component allows us to convert the input data into a new output format.
Methods to build Transformation
We can build our transformation with the help of the following two methods −
Drag-and-Drop Editor (Graphical View) − This is the first and most used method to build our transformation. In this method, we can use this component’s visual mapper to drag-and-drop the elements of the incoming data structure. For example, in the following diagram, two tree views show the expected metadata structures of the input and output. Lines that connect input to output field represents the mapping between two tree views.

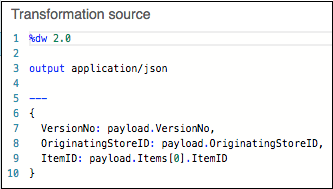
Script View − The visual mapping of Transformation can also be represented with the help of DataWeave, a language for Mule code. We can do coding for some advanced transformations like aggregation, normalization, grouping, joining, partitioning, pivoting and filtering. The example is given below −
This core component basically accepts input and output metadata for a variable, an attribute or message payload. We can provide format-specific resources for the following −
- CSV
- Schema
- Flat file Schema
- JSON
- Object class
- Simple Type
- XML Schema
- Excel Column name and type
- Fixed Width Column name and type
To Continue Learning Please Login