- BabylonJS Tutorial
- BabylonJS - Home
- BabylonJS - Introduction
- BabylonJS - Environment Setup
- BabylonJS - Overview
- BabylonJS - Basic Elements
- BabylonJS - Materials
- BabylonJS - Animations
- BabylonJS - Cameras
- BabylonJS - Lights
- BabylonJS - Parametric Shapes
- BabylonJS - Mesh
- VectorPosition and Rotation
- BabylonJS - Decals
- BabylonJS - Curve3
- BabylonJS - Dynamic Texture
- BabylonJS - Parallax Mapping
- BabylonJS - Lens Flares
- BabylonJS - Create ScreenShot
- BabylonJS - Reflection Probes
- Standard Rendering Pipeline
- BabylonJS - ShaderMaterial
- BabylonJS - Bones and Skeletons
- BabylonJS - Physics Engine
- BabylonJS - Playing Sounds & Music
- BabylonJS Useful Resources
- BabylonJS - Quick Guide
- BabylonJS - Useful Resources
- BabylonJS - Discussion
BabylonJS - Position
Demo
<!doctype html>
<html>
   <head>
      <meta charset = "utf-8">
      <title>BabylonJs - Basic Element-Creating Scene</title>
      <script src = "babylon.js"></script>
      <style>
         canvas {width: 100%; height: 100%;}
      </style>
   </head>

   <body>
      <canvas id = "renderCanvas"></canvas>
      <script type = "text/javascript">
         var canvas = document.getElementById("renderCanvas");

         var engine = new BABYLON.Engine(canvas, true);
         var createScene  = function() {
            var scene = new BABYLON.Scene(engine);
            scene.clearColor = new BABYLON.Color3(0, 1, 0);

            var camera = new BABYLON.ArcRotateCamera("Camera", 1, 0.8, 10, new BABYLON.Vector3(0, 0, 0), scene);
            scene.activeCamera.attachControl(canvas);

            var light = new BABYLON.PointLight("Omni", new BABYLON.Vector3(0, 100, 100), scene);

            var boxa = BABYLON.Mesh.CreateBox("BoxA", 1.0, scene);
            boxa.position = new BABYLON.Vector3(0,0.5,0);

            var boxb = BABYLON.Mesh.CreateBox("BoxB", 1.0, scene);
            boxb.position = new BABYLON.Vector3(3,0.5,0);

            var boxc = BABYLON.Mesh.CreateBox("BoxC", 1.0, scene);
            boxc.position = new BABYLON.Vector3(-3,0.5,0);

            var boxd = BABYLON.Mesh.CreateBox("BoxD", 1.0, scene);
            boxd.position = new BABYLON.Vector3(0,0.5,3);

            var boxe = BABYLON.Mesh.CreateBox("BoxE", 1.0, scene);
            boxe.position = new BABYLON.Vector3(0,0.5,-3);

            var ground = BABYLON.Mesh.CreateGround("ground1", 10, 6, 2, scene);
            ground.position = new BABYLON.Vector3(0,0,0);
            return scene;
         };
         var scene = createScene();
         engine.runRenderLoop(function() {
            scene.render();
         });
      </script>
   </body>
</html>
Output
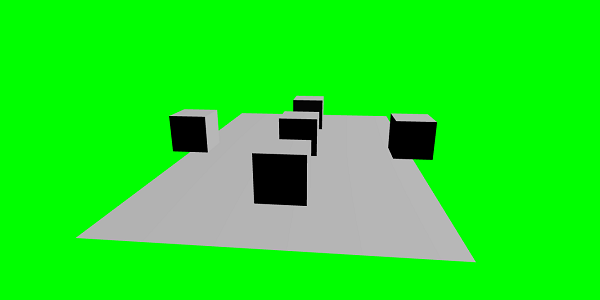
Demo
In the above example,we have created 5 boxes of size 1, i.e., the sides of the boxes will be 1. We have created a ground and placed the ground at the center.
The first box, i.e., boxA is placed in the center above the ground. We can position the shape using new BABYLON.Vector3(x, y, z) or shape.position.x , shape.position.y or shape.position.z. In the above example, we have used the new BABYLON.Vector3(x, y, z).
To place boxA in the center of the ground, we have used x = 0, y = half the height of the box, i.e., 0.5 and z = 0.
boxa.position = new BABYLON.Vector3(0,0.5,0);
The next box - boxb is placed towards x axis; value 3 in x direction.
boxb.position = new BABYLON.Vector3(3,0.5,0);
boxc is placed opposite to the x direction; x is given the -3value.
boxc.position = new BABYLON.Vector3(-3,0.5,0);
boxd is placed along the z-axis and given the value 3 and -3 when placed in opposite direction of z-axis.
boxd.position = new BABYLON.Vector3(0,0.5,3);
boxe.position = new BABYLON.Vector3(0,0.5,-3);
Demo with Sphere and Ground
<!doctype html>
<html>
   <head>
      <meta charset = "utf-8">
      <title>BabylonJs - Ball/Ground Demo</title>
      <script src = "babylon.js"></script>
      <style>
         canvas {width: 100%; height: 100%;}
      </style>
   </head>
   <body>
      <canvas id = "renderCanvas"></canvas>
      <script type = "text/javascript">
         var canvas = document.getElementById("renderCanvas");
         var engine = new BABYLON.Engine(canvas, true);
         var createScene  = function() {
            var scene = new BABYLON.Scene(engine);
            scene.clearColor = new BABYLON.Color3( .5, .5, .5);

            var camera = new BABYLON.ArcRotateCamera("camera1",  0, 0, 0, new BABYLON.Vector3(0, 0, 0), scene);
            camera.setPosition(new BABYLON.Vector3(-100, 0, -100));
            camera.attachControl(canvas, true);

            var light = new BABYLON.HemisphericLight("light1", new BABYLON.Vector3(1, 0.5, 0), scene);

            var pl = new BABYLON.PointLight("pl", new BABYLON.Vector3(0, 0, 0), scene);

            var gmat = new BABYLON.StandardMaterial("mat1", scene);
            gmat.alpha = 1.0;
            var texture = new BABYLON.Texture("images/mat.jpg", scene);
            gmat.diffuseTexture = texture;

            var ground = BABYLON.MeshBuilder.CreateGround("ground", {width: 150, height:15}, scene);
            ground.material = gmat;

            var mat = new BABYLON.StandardMaterial("mat1", scene);
            mat.alpha = 1.0;
            mat.diffuseColor = new BABYLON.Color3(1, 0, 0);
            var texture = new BABYLON.Texture("images/rugby.jpg", scene);
            mat.diffuseTexture = texture;

            var sphere = BABYLON.MeshBuilder.CreateSphere("sphere", {diameter: 5, diameterX:5}, scene);
            sphere.position= new BABYLON.Vector3(-75,2.5,0);
            sphere.material = mat;
            console.log(sphere.position.x);
            scene.registerBeforeRender(function () {
               if (sphere.position.x <=75) {
                  console.log(sphere.position.x);
                  if (sphere.position.x <= -75) sphere.position.x=75;
                  sphere.position.x -= 0.25;
               } else if (sphere.position.x <= -15) {
                  console.log('B');
                  sphere.position.x += 1;
               }
            });
            return scene;
         };
         var scene = createScene();
         engine.runRenderLoop(function() {
            scene.render();
         });
      </script>
   </body>
</html>
Output
The above line of code will generate the following output −
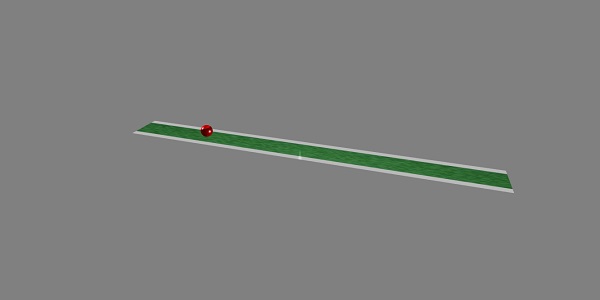
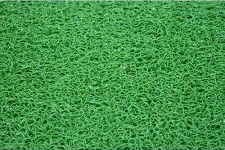
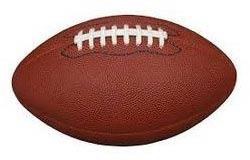
In this demo, we have used two images - mat.jpg and rugby.jpg. The images are stored in images/ folder locally and are also pasted below for reference. You can download any images of your choice and use in the demo link.
The Texture used for ground − images/mat.jpg
The Texture used for sphere − images/rugby.jpg
To Continue Learning Please Login