- Yii - Home
- Yii - Overview
- Yii - Installation
- Yii - Create Page
- Yii - Application Structure
- Yii - Entry Scripts
- Yii - Controllers
- Yii - Using Controllers
- Yii - Using Actions
- Yii - Models
- Yii - Widgets
- Yii - Modules
- Yii - Views
- Yii - Layouts
- Yii - Assets
- Yii - Asset Conversion
- Yii - Extensions
- Yii - Creating Extensions
- Yii - HTTP Requests
- Yii - Responses
- Yii - URL Formats
- Yii - URL Routing
- Yii - Rules of URL
- Yii - HTML Forms
- Yii - Validation
- Yii - Ad Hoc Validation
- Yii - AJAX Validation
- Yii - Sessions
- Yii - Using Flash Data
- Yii - Cookies
- Yii - Using Cookies
- Yii - Files Upload
- Yii - Formatting
- Yii - Pagination
- Yii - Sorting
- Yii - Properties
- Yii - Data Providers
- Yii - Data Widgets
- Yii - ListView Widget
- Yii - GridView Widget
- Yii - Events
- Yii - Creating Event
- Yii - Behaviors
- Yii - Creating a Behavior
- Yii - Configurations
- Yii - Dependency Injection
- Yii - Database Access
- Yii - Data Access Objects
- Yii - Query Builder
- Yii - Active Record
- Yii - Database Migration
- Yii - Theming
- Yii - RESTful APIs
- Yii - RESTful APIs in Action
- Yii - Fields
- Yii - Testing
- Yii - Caching
- Yii - Fragment Caching
- Yii - Aliases
- Yii - Logging
- Yii - Error Handling
- Yii - Authentication
- Yii - Authorization
- Yii - Localization
- Yii - Gii
- Gii – Creating a Model
- Gii – Generating Controller
- Gii – Generating Module
Yii - GridView Widget
The GridView widget takes data from a data provider and presents data in the form of a table. Each row of the table represents a single data item, and a column represents an attribute of the item.
Step 1 − Modify the datawidget view this way.
<?php
   use yii\grid\GridView;
   echo GridView::widget([
      'dataProvider' => $dataProvider,
   ]);
?>
Step 2 − Go to http://localhost:8080/index.php?r=site/data-widget, you will see a typical usage of the DataGrid widget.
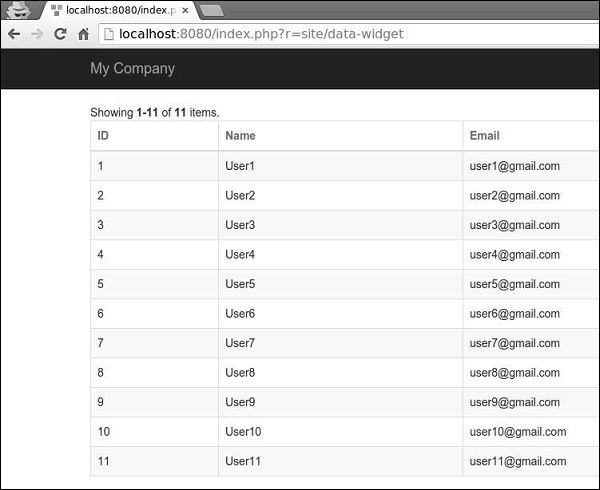
The columns of the DataGrid widget are configured in terms of the yii\grid\Column class. It represents a model attribute and can be filtered and sorted.
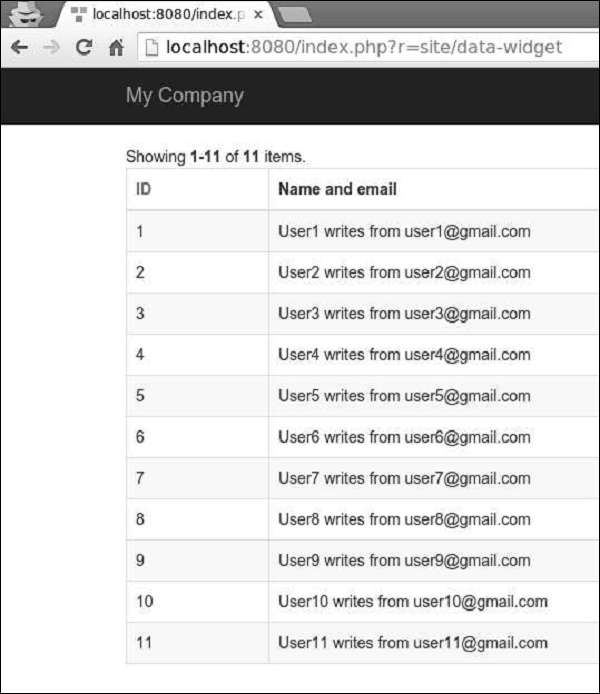
Step 3 − To add a custom column to the grid, modify the datawidget view this way.
<?php
   yii\grid\GridView;
   echo GridView::widget([
      'dataProvider' => $dataProvider,
      'columns' => [
         'id',
         [
            'class' => 'yii\grid\DataColumn', // can be omitted, as it is the default
            'label' => 'Name and email',
            'value' => function ($data) {
               return $data->name . " writes from " . $data->email;
            },
         ],
      ],
   ]);
?>
Step 4 − If you go to the address http://localhost:8080/index.php?r=site/data-widget, you will see the output as shown in the following image.
Grid columns can be customized by using different column classes, like yii\grid\SerialColumn, yii\grid\ActionColumn, and yii\grid\CheckboxColumn.
Step 5 − Modify the datawidget view in the following way.
<?php
   use yii\grid\GridView;
   echo GridView::widget([
      'dataProvider' => $dataProvider,
      'columns' => [
         ['class' => 'yii\grid\SerialColumn'], 'name',
         ['class' => 'yii\grid\ActionColumn'],
         ['class' => 'yii\grid\CheckboxColumn'],
      ],
   ]);
?>
Step 6 −Go to http://localhost:8080/index.php?r=site/data-widget, you will see the following.

