- Yii - Home
- Yii - Overview
- Yii - Installation
- Yii - Create Page
- Yii - Application Structure
- Yii - Entry Scripts
- Yii - Controllers
- Yii - Using Controllers
- Yii - Using Actions
- Yii - Models
- Yii - Widgets
- Yii - Modules
- Yii - Views
- Yii - Layouts
- Yii - Assets
- Yii - Asset Conversion
- Yii - Extensions
- Yii - Creating Extensions
- Yii - HTTP Requests
- Yii - Responses
- Yii - URL Formats
- Yii - URL Routing
- Yii - Rules of URL
- Yii - HTML Forms
- Yii - Validation
- Yii - Ad Hoc Validation
- Yii - AJAX Validation
- Yii - Sessions
- Yii - Using Flash Data
- Yii - Cookies
- Yii - Using Cookies
- Yii - Files Upload
- Yii - Formatting
- Yii - Pagination
- Yii - Sorting
- Yii - Properties
- Yii - Data Providers
- Yii - Data Widgets
- Yii - ListView Widget
- Yii - GridView Widget
- Yii - Events
- Yii - Creating Event
- Yii - Behaviors
- Yii - Creating a Behavior
- Yii - Configurations
- Yii - Dependency Injection
- Yii - Database Access
- Yii - Data Access Objects
- Yii - Query Builder
- Yii - Active Record
- Yii - Database Migration
- Yii - Theming
- Yii - RESTful APIs
- Yii - RESTful APIs in Action
- Yii - Fields
- Yii - Testing
- Yii - Caching
- Yii - Fragment Caching
- Yii - Aliases
- Yii - Logging
- Yii - Error Handling
- Yii - Authentication
- Yii - Authorization
- Yii - Localization
- Yii - Gii
- Gii – Creating a Model
- Gii – Generating Controller
- Gii – Generating Module
Yii - Creating Extensions
Let us create a simple extension displaying a standard Hello world message. This extension will be distributed via the Packagist repository.
Step 1 − Create a folder called hello-world in your hard drive but not inside the Yii basic application template). Inside the hello-world directory, create a file named composer.json with the following code.
{
    "name": "tutorialspoint/hello-world",
    "authors": [
        {
            "name": "tutorialspoint"
        }
    ],
    "require": {},
    "autoload": {
        "psr-0": {
            "HelloWorld": "src/"
        }
    }
}
We have declared that we are using the PSR-0 standard and all extension files are under the src folder.
Step 2 − Create the following directory path: hello-world/src/HelloWorld.
Step 3 − Inside the HelloWorld folder, create a file called SayHello.php with the following code.
<?php
   namespace HelloWorld;
   class SayHello {
      public static function world() {
         return 'Hello World, Composer!';
      }
   }
?>
We have defined a SayHello class with a world static function, which returns our hello message.
Step 4 − The extension is ready. Now create an empty repository at your github account and push this extension there.
Inside the hello-world folder run −
- git init
- git add
- git commit -m initial commit
- git remote add origin <YOUR_NEWLY_CREATED_REPOSITORY>
- git push -u origin master
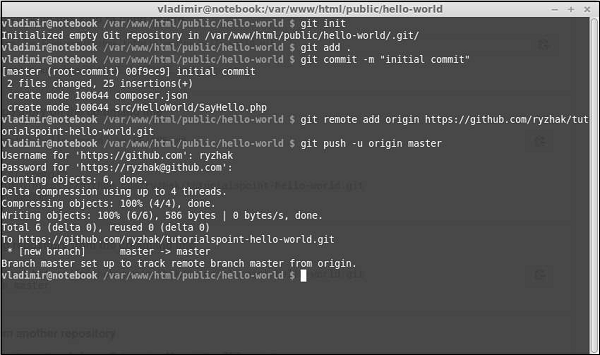
We have just sent our extension to the github. Now, go to the https://packagist.org, sign in and click submit at the top menu.
You will see a page where you should enter your github repository to publish it.
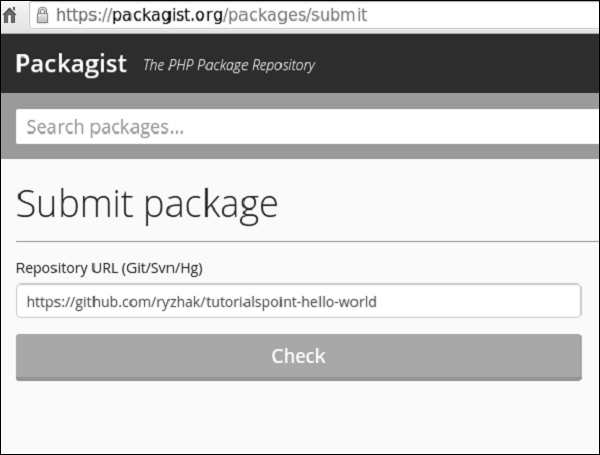
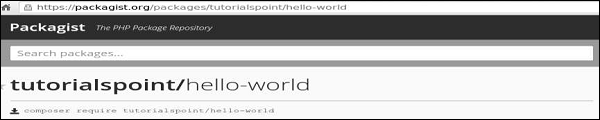
Step 5 − Click the check button and your extension is published.
Step 6 − Go back to the basic application template. Add the extension to the composer.json.
{
   "name": "yiisoft/yii2-app-basic",
   "description": "Yii 2 Basic Project Template",
   "keywords": ["yii2", "framework", "basic", "project template"],
   "homepage": "http://www.yiiframework.com/",
   "type": "project",
   "license": "BSD-3-Clause",
   "support": {
      "issues": "https://github.com/yiisoft/yii2/issues?state=open",
      "forum": "http://www.yiiframework.com/forum/",
      "wiki": "http://www.yiiframework.com/wiki/",
      "irc": "irc://irc.freenode.net/yii",
      "source": "https://github.com/yiisoft/yii2"
   },
   "minimum-stability": "dev",
   "prefer-stable" : true,
   "require": {
      "php": ">=5.4.0",
      "yiisoft/yii2": ">=2.0.5",
      "yiisoft/yii2-bootstrap": "*",
      "yiisoft/yii2-swiftmailer": "*",
      "kartik-v/yii2-widget-datetimepicker": "*",
      "tutorialspoint/hello-world": "*"
   },
   "require-dev": {
      "yiisoft/yii2-codeception": "*",
      "yiisoft/yii2-debug": "*",
      "yiisoft/yii2-gii": "*",
      "yiisoft/yii2-faker": "*"
   },
   "config": {
      "process-timeout": 1800
   },
   "scripts": {
      "post-create-project-cmd": [
         "yii\\composer\\Installer::postCreateProject"
      ]
   },
   "extra": {
      "yii\\composer\\Installer::postCreateProject": {
         "setPermission": [
            {
               "runtime": "0777",
               "web/assets": "0777",
               "yii": "0755"
            }
         ],
         "generateCookieValidationKey": [
            "config/web.php"
         ]
      },
      "asset-installer-paths": {
         "npm-asset-library": "vendor/npm",
         "bower-asset-library": "vendor/bower"
      }
   }
}
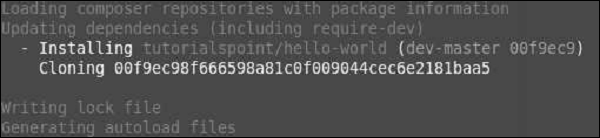
Step 7 − Inside the project root folder, run the composer update to install/update all the dependencies.
Step 8 − Our extension should be installed. To use it, modify the About view of the actionAbout method of the SiteController.
<?php
/* @var $this yii\web\View */
use yii\helpers\Html;
$this->title = 'About';
$this->params['breadcrumbs'][] = $this->title;
$this->registerMetaTag(['name' => 'keywords', 'content' => 'yii, developing, views,
meta, tags']);
$this->registerMetaTag(['name' => 'description', 'content' => 'This is the
description of this page!'], 'description');
?>
<div class = "site-about">
<h1><?= Html::encode($this->title) ?></h1>
<p>
This is the About page. You may modify the following file to customize its content:
</p>
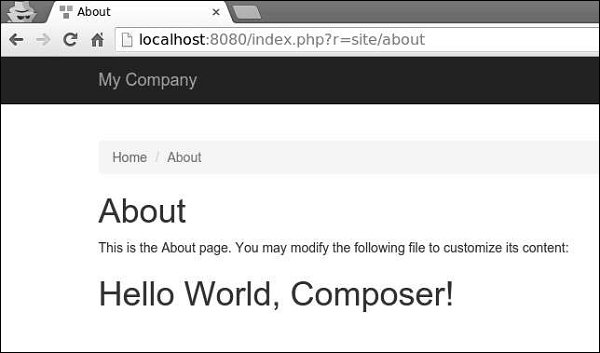
<h1><?= HelloWorld\SayHello::world(); ?></h1>
</div>
Step 9 − Type http://localhost:8080/index.php?r=site/about in the web browser. You will see a hello world message from our extension.