- Vaadin - Home
- Vaadin – Overview
- Vaadin – Environment Setup
- Vaadin – Creating First Application
- Vaadin – Architecture
- User Interface Components
- Vaadin – Core Elements
- Vaadin – Layout Component
- Vaadin – Themes
Vaadin - User Interface Components
Vaadin is used to build rich user interface components in a webpage. In this chapter, you will learn about different user interface components that have been introduced by Vaadin in order to maintain a good quality web page. The first part of the chapter discusses the basic web components and their uses, while the second part talks about binding the components in the backend.
Field Component
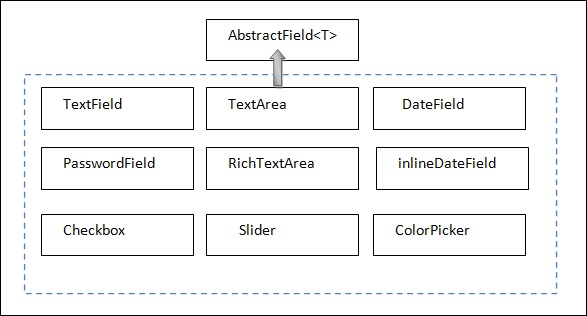
Fields are the web components that a user can manipulate through IO operations. Vaadin is based on JAVA, hence in Vaadin all the web components have an implemented class along with Vaadin library functions. The image shown below shows how different field components are inherited from the base class named AbstractField<T>.
Note that all these modules are similar to that of those in UI development. In Vaadin we have separate class to implement each of them. You will learn in detail about these in the coming chapters.
Label
Label is used to mention any non-editable text in the web page. The example given below shows how to use label in our application. Note that in the given example, we created a JAVA class and named it as LabelExam.javanterface and we will override its init() method to run it.
package com.MyTutorials.MyFirstApp;
import javax.servlet.annotation.WebServlet;
import com.vaadin.annotations.VaadinServletConfiguration;
import com.vaadin.server.VaadinRequest;
import com.vaadin.server.VaadinServlet;
import com.vaadin.ui.HorizontalLayout;
import com.vaadin.ui.Label;
import com.vaadin.ui.UI;
//extending UI
public class LabelExam extends UI {
@Override
protected void init(VaadinRequest request) {
final HorizontalLayout hLayout = new HorizontalLayout(); //creating a Layout
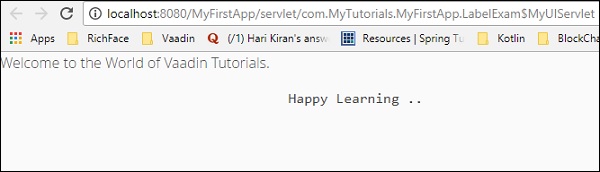
Label l1 = new Label(" Welcome to the World of Vaadin Tutorials.");
Label l2 = new Label("\n Happy Learning .." ,ContentMode.PREFORMATTED); // Content Mode tells JVM to interpret the String mentioned in the label. Hence label2 will be printed in next line because of \n.
hLayout.addComponents(l1,l2); // adding labels to layout
setContent(hLayout); // setting the layout as a content of the web page.
}
// Code to control URL
@WebServlet(urlPatterns = "/*", name = "MyUIServlet", asyncSupported = true)
@VaadinServletConfiguration(ui = LabelExam.class, productionMode = false)
public static class MyUIServlet extends VaadinServlet {}
}
In the above example, we have created two labels and at the end we have added that label to our layout. You will learn more about layouts in the upcoming chapters. The VaadinServlet has been implemented in order to control the URL. However, in real life projects, you need not define servlet in every java application as it will be interlinked. Select the file and click Run on Server and code given above will yield the output as shown below.
Link
Link is useful to implement external links to the other website. This class works exactly similar to the hyperlink tag of HTML. In the example given below, we will be using Link to redirect our user to another website depending on an event called Click here. Now, modify the MyUI.java class as shown below.
package com.example.myapplication;

import javax.servlet.annotation.WebServlet;
import com.vaadin.annotations.Theme;
import com.vaadin.annotations.VaadinServletConfiguration;
import com.vaadin.server.ExternalResource;
import com.vaadin.server.VaadinRequest;
import com.vaadin.server.VaadinServlet;
import com.vaadin.shared.ui.ContentMode;

import com.vaadin.ui.Button;
import com.vaadin.ui.HorizontalLayout;
import com.vaadin.ui.Label;
import com.vaadin.ui.Link;
import com.vaadin.ui.TextField;
import com.vaadin.ui.UI;
import com.vaadin.ui.VerticalLayout;

@Theme("mytheme")
public class MyUI extends UI {
   @Override
   protected void init(VaadinRequest vaadinRequest) {
      final VerticalLayout layout = new VerticalLayout();

      final HorizontalLayout hLayout = new HorizontalLayout();

      Link link = new Link("Click Me",new ExternalResource("https://www.tutorialspoint.com/"));
      hLayout.addComponent(link);
      setContent(hLayout);
   }
   @WebServlet(urlPatterns = "/*", name = "MyUIServlet", asyncSupported = true)
   @VaadinServletConfiguration(ui = MyUI.class, productionMode = false)
   public static class MyUIServlet extends VaadinServlet {}
}
In the above example, we have created an external hyperlink to another website. It will give us the following output in the browser.
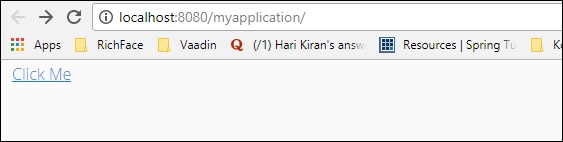
Once users click the link, they will be redirected to www.tutorialspoint.com
Text Field
This section talks about how to generate a text field using Vaadin build in class. For this, update your MyUI.java class as shown below.
package com.example.myapplication;

import javax.servlet.annotation.WebServlet;
import com.vaadin.annotations.Theme;
import com.vaadin.annotations.VaadinServletConfiguration;
import com.vaadin.server.VaadinRequest;

import com.vaadin.server.VaadinServlet;
import com.vaadin.shared.ui.ContentMode;
import com.vaadin.ui.Label;
import com.vaadin.ui.TextField;
import com.vaadin.ui.UI;
import com.vaadin.ui.VerticalLayout;

@Theme("mytheme")
public class MyUI extends UI {
   @Override
   protected void init(VaadinRequest vaadinRequest) {
      final VerticalLayout layout = new VerticalLayout();
      Label l1 = new Label("Example of TextField--\n ",ContentMode.PREFORMATTED);
      TextField text = new TextField();
      text.setValue("----");
      layout.addComponents(l1,text);
      setContent(layout);
   }
   @WebServlet(urlPatterns = "/*", name = "MyUIServlet", asyncSupported = true)
   @VaadinServletConfiguration(ui = MyUI.class, productionMode = false)
   public static class MyUIServlet extends VaadinServlet {}
}
Now, refresh your project and clean build it. You can observe the output shown below in your browser. Remember to restart your browser to get its recent changes.

Text Area
This section explains you how to create a text area in the browser using Vaadin predefined class. Observe the code given below for example.
package com.example.myapplication;

import javax.servlet.annotation.WebServlet;
import com.vaadin.annotations.Theme;
import com.vaadin.annotations.VaadinServletConfiguration;
import com.vaadin.server.VaadinRequest;
import com.vaadin.server.VaadinServlet;

import com.vaadin.ui.Alignment;
import com.vaadin.ui.TextArea;
import com.vaadin.ui.UI;
import com.vaadin.ui.VerticalLayout;

@Theme("mytheme")
public class MyUI extends UI {
   @Override
   protected void init(VaadinRequest vaadinRequest) {
      final VerticalLayout layout = new VerticalLayout();
      final VerticalLayout hLayout = new VerticalLayout();
      TextArea text = new TextArea();
      text.setValue(" I am the example of Text Area in Vaadin");
      hLayout.addComponent(text);
      hLayout.setComponentAlignment(text,Alignment.BOTTOM_CENTER);
      setContent(hLayout);
   }
   @WebServlet(urlPatterns = "/*", name = "MyUIServlet", asyncSupported = true)
   @VaadinServletConfiguration(ui = MyUI.class, productionMode = false)
   public static class MyUIServlet extends VaadinServlet {}
}
The above piece of code will yield below output in the browser −

Date and Time
You can use date picker to populate the date and time in the browser. Observe the example code given below. Here we have used Vaadin predefined Date class to populate the date and time in the browser.
package com.example.myapplication;
import java.time.LocalDate;
import java.util.Locale;
import javax.servlet.annotation.WebServlet;
import com.vaadin.annotations.Theme;
import com.vaadin.annotations.VaadinServletConfiguration;
import com.vaadin.server.VaadinRequest;
import com.vaadin.server.VaadinServlet;
import com.vaadin.shared.ui.ContentMode;
import com.vaadin.ui.Alignment;
import com.vaadin.ui.DateField;
import com.vaadin.ui.Label;
import com.vaadin.ui.UI;
import com.vaadin.ui.VerticalLayout;
@Theme("mytheme")
public class MyUI extends UI {
@Override
protected void init(VaadinRequest vaadinRequest) {
final VerticalLayout layout = new VerticalLayout();
final VerticalLayout hLayout = new VerticalLayout();
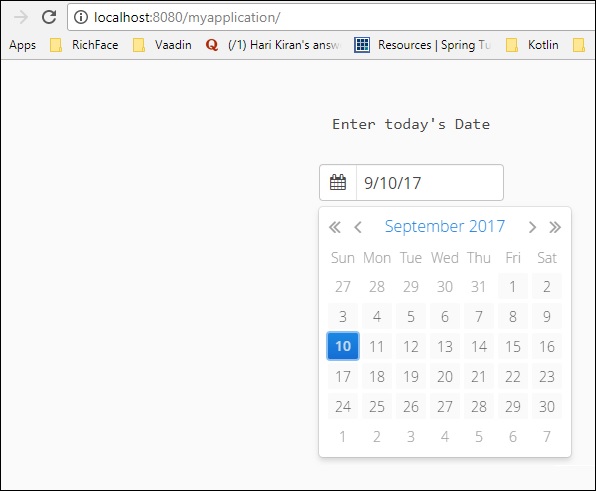
Label l1 = new Label("Enter today's Date\n",ContentMode.PREFORMATTED);
DateField date = new DateField();
date.setValue(LocalDate.now());
date.setLocale(new Locale("en","IND"));
hLayout.addComponents(l1,date);
hLayout.setComponentAlignment(l1,Alignment.BOTTOM_CENTER);
hLayout.setComponentAlignment(date,Alignment.BOTTOM_CENTER);
setContent(hLayout);
}
@WebServlet(urlPatterns = "/*", name = "MyUIServlet", asyncSupported = true)
@VaadinServletConfiguration(ui = MyUI.class, productionMode = false)
public static class MyUIServlet extends VaadinServlet {
}
In the above example, we have used Vaadin predefined date function to populate the date component in the webpage. This code will give you the output as shown in the screenshot below −
Button
The code given below will explain you how to apply a button in the web page. Here, we have used a button named Click Me.
package com.example.myapplication;
import javax.servlet.annotation.WebServlet;
import com.vaadin.annotations.Theme;
import com.vaadin.annotations.VaadinServletConfiguration;
import com.vaadin.server.ExternalResource;
import com.vaadin.server.VaadinRequest;
import com.vaadin.server.VaadinServlet;
import com.vaadin.shared.ui.ContentMode;
import com.vaadin.ui.Alignment;
import com.vaadin.ui.Button;
import com.vaadin.ui.HorizontalLayout;
import com.vaadin.ui.Label;
import com.vaadin.ui.Link;
import com.vaadin.ui.TextArea;
import com.vaadin.ui.TextField;
import com.vaadin.ui.UI;
import com.vaadin.ui.VerticalLayout;
@Theme("mytheme")
public class MyUI extends UI {
@Override
protected void init(VaadinRequest vaadinRequest) {
final VerticalLayout layout = new VerticalLayout();
final VerticalLayout hLayout = new VerticalLayout();
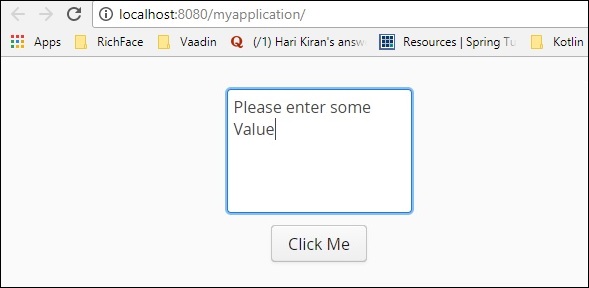
TextArea text = new TextArea();
text.setValue("Please enter some Value");
Button b = new Button("Click Me");
hLayout.addComponent(text);
hLayout.addComponent(b);
hLayout.setComponentAlignment(text,Alignment.BOTTOM_CENTER);
hLayout.setComponentAlignment(b,Alignment.BOTTOM_CENTER);
setContent(hLayout);
}
@WebServlet(urlPatterns = "/*", name = "MyUIServlet", asyncSupported = true)
@VaadinServletConfiguration(ui = MyUI.class, productionMode = false)
public static class MyUIServlet extends VaadinServlet {}
}
The above piece of code will yield the output as shown below.
Check Box
Vaadin also provides inbuilt class to create a checkbox in the webpage. In the below example we will create a checkbox using Vaadin rich web component.
package com.example.myapplication;

import java.time.LocalDate;
import java.util.Locale;
import javax.servlet.annotation.WebServlet;
import com.vaadin.annotations.Theme;
import com.vaadin.annotations.VaadinServletConfiguration;
import com.vaadin.server.VaadinRequest;
import com.vaadin.server.VaadinServlet;
import com.vaadin.shared.ui.ContentMode;
import com.vaadin.ui.Alignment;

import com.vaadin.ui.CheckBox;
import com.vaadin.ui.DateField;
import com.vaadin.ui.Label;
import com.vaadin.ui.UI;
import com.vaadin.ui.VerticalLayout;

@Theme("mytheme")
public class MyUI extends UI {
   @Override
   protected void init(VaadinRequest vaadinRequest) {
      final VerticalLayout layout = new VerticalLayout();
      final VerticalLayout hLayout = new VerticalLayout();
      Label l1 = new Label("Example of Check Box\n",ContentMode.PREFORMATTED);
      CheckBox chk1 = new CheckBox("Option1");
      CheckBox chk2 = new CheckBox("Option2");
      CheckBox chk3 = new CheckBox("Option3");
      hLayout.addComponents(l1,chk1,chk2,chk3);
      hLayout.setComponentAlignment(l1,Alignment.BOTTOM_CENTER);
      hLayout.setComponentAlignment(chk1,Alignment.BOTTOM_CENTER);
      hLayout.setComponentAlignment(chk2,Alignment.BOTTOM_CENTER);
      hLayout.setComponentAlignment(chk3,Alignment.BOTTOM_CENTER);
      setContent(hLayout);
   }
   @WebServlet(urlPatterns = "/*", name = "MyUIServlet", asyncSupported = true)
   @VaadinServletConfiguration(ui = MyUI.class, productionMode = false)
   public static class MyUIServlet extends VaadinServlet {}
}
The code given above will yield output in the browser as shown below. You can also create any number of check boxes for the user. In the subsequent chapters, you will learn about different ways to populate the Check Box in the webpage.

Data Binding
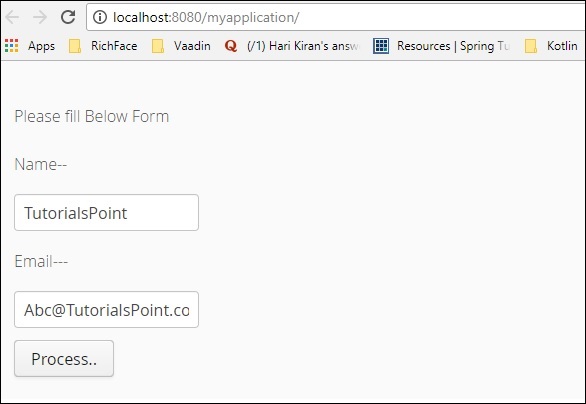
This section explains you how to bind the data from the front end to back end using Vaadin as framework. Note that the code shown below takes input from the front end with the data field. Let us create a bean class in order to bind the data field. Create a java class and name it as Employee.java.
package com.example.myapplication;

public class EmployeeBean {

   private String name = "";
   private String Email = " ";
   public EmployeeBean() {
      super();
      // TODO Auto-generated constructor stub
   }
   public EmployeeBean(String name, String email) {
      super();
      this.name = name;
      Email = email;
   }
   public String getName() {
      return name;
   }
   public void setName(String name) {
      System.out.println("asdassd");
      this.name = name;
   }
   public String getEmail() {
      return Email;
   }
   public void setEmail(String email) {
      Email = email;
   }
}
We have to modify MyUI.java class in order to bind the data field of employee class. Observe the following code for modified class.
package com.example.myapplication;

import javax.servlet.annotation.WebServlet;
import com.vaadin.annotations.PropertyId;
import com.vaadin.annotations.Theme;
import com.vaadin.annotations.VaadinServletConfiguration;
import com.vaadin.data.Binder;
import com.vaadin.server.VaadinRequest;
import com.vaadin.server.VaadinServlet;
import com.vaadin.shared.ui.ContentMode;
import com.vaadin.ui.Alignment;

import com.vaadin.ui.Button;
import com.vaadin.ui.Button.ClickEvent;
import com.vaadin.ui.CheckBox;
import com.vaadin.ui.FormLayout;
import com.vaadin.ui.Label;
import com.vaadin.ui.TextField;
import com.vaadin.ui.UI;
import com.vaadin.ui.VerticalLayout;

@Theme("mytheme")
public class MyUI extends UI {
   @Override
   protected void init(VaadinRequest vaadinRequest) {
      EmployeeBean bean = new EmployeeBean("TutorialsPoint","Abc@TutorialsPoint.com");
      Binder<EmployeeBean> binder = new Binder  <EmployeeBean>();
      final FormLayout form = new FormLayout();
      Label l1 = new Label("Please fill Below Form");
      Label labelName = new Label("Name--");
      TextField name = new TextField();
      binder.bind(name,EmployeeBean::getName,EmployeeBean::setName);
      Label labelEmail = new Label("Email---");
      TextField email = new TextField();
      binder.bind(email,EmployeeBean::getEmail,EmployeeBean::setEmail);
      Button button = new Button("Process..");
      form.addComponents(l1,labelName,name,labelEmail,email,button);
      setContent(form);
      binder.setBean(bean); //auto binding using in built method
   }
   @WebServlet(urlPatterns = "/*", name = "MyUIServlet", asyncSupported = true)
   @VaadinServletConfiguration(ui = MyUI.class, productionMode = false)
   public static class MyUIServlet extends VaadinServlet {
   }
}
The code given above will yield the following output in the browser.
Table
Table is one of the most usable features of Vaadin. Table cells can include any type of data. Table component is developed for showing all data in a tabular format organized into a row and column structure. However, since Vaadin 8 release table feature has been absolute and the same feature has been modified with the Grid component. If you are still using an older version of Vaadin, then you are free to use table as shown in the format given below.
/* Create the table with a caption. */
Table table = new Table("This is my Table");
/* Define the names and data types of columns.
* The "default value" parameter is meaningless here. */

table.addContainerProperty("First Name", String.class, null);
table.addContainerProperty("Last Name", String.class, null);
table.addContainerProperty("Year", Integer.class, null);

/* Add a few items in the table. */
table.addItem(new Object[] {"Nicolaus","Copernicus",new Integer(1473)}, new Integer(1));
table.addItem(new Object[] {"Tycho", "Brahe", new Integer(1546)}, new Integer(2));
table.addItem(new Object[] {"Giordano","Bruno", new Integer(1548)}, new Integer(3));
table.addItem(new Object[] {"Galileo", "Galilei", new Integer(1564)}, new Integer(4));
table.addItem(new Object[] {"Johannes","Kepler", new Integer(1571)}, new Integer(5));
table.addItem(new Object[] {"Isaac", "Newton", new Integer(1643)}, new Integer(6));
In the upcoming chapter on GRID, you will learn more about Grid creation and populating data using the same.
Tree
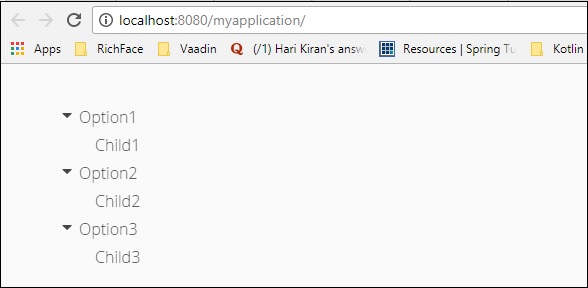
Tree Component is used to populate directory structure in the website. In this section, you will learn how to populate a tree in the webpage using Vaadin framework. Update the required MyUI class as shown below.
package com.example.myapplication;

import javax.servlet.annotation.WebServlet;
import com.vaadin.annotations.Theme;
import com.vaadin.annotations.VaadinServletConfiguration;
import com.vaadin.data.TreeData;
import com.vaadin.server.VaadinRequest;
import com.vaadin.server.VaadinServlet;
import com.vaadin.ui.Component;
import com.vaadin.ui.Tree;
import com.vaadin.ui.UI;
import com.vaadin.ui.VerticalLayout;

@Theme("mytheme")
public class MyUI extends UI {
   @Override
   protected void init(VaadinRequest vaadinRequest) {
      VerticalLayout layout = new VerticalLayout();
      Tree<String> tree = new Tree<>();
      TreeData<String> treeData =tree.getTreeData();

      // Couple of childless root items
      treeData.addItem(null, "Option1");
      treeData.addItem("Option1", "Child1");
      treeData.addItem(null, "Option2");
      treeData.addItem("Option2", "Child2");

      // Items with hierarchy
      treeData.addItem(null, "Option3");
      treeData.addItem("Option3", "Child3");
      layout.addComponent(tree);
      setContent(layout);
   }
   @WebServlet(urlPatterns = "/*", name = "MyUIServlet", asyncSupported = true)
   @VaadinServletConfiguration(ui = MyUI.class, productionMode = false)
   public static class MyUIServlet extends VaadinServlet {}
}
The above piece of code will produce the following output in the browser.
Menu Bar
Menu Bar component helps us to create a menu in the website. It can be dynamic as well as it can be nested. Find below example where we have created a nested menu bar using Vaadin Menu Bar component. Go ahead and modify our class like below.
package com.example.myapplication;

import javax.servlet.annotation.WebServlet;
import com.vaadin.annotations.Theme;
import com.vaadin.annotations.VaadinServletConfiguration;
import com.vaadin.data.TreeData;
import com.vaadin.server.VaadinRequest;
import com.vaadin.server.VaadinServlet;

import com.vaadin.ui.Component;
import com.vaadin.ui.Label;
import com.vaadin.ui.MenuBar;
import com.vaadin.ui.MenuBar.MenuItem;
import com.vaadin.ui.Tree;
import com.vaadin.ui.UI;
import com.vaadin.ui.VerticalLayout;

@Theme("mytheme")
public class MyUI extends UI {
   @Override
   protected void init(VaadinRequest vaadinRequest) {
      VerticalLayout layout = new VerticalLayout();
      MenuBar barmenu = new MenuBar();
      layout.addComponent(barmenu);

      // A feedback component
      final Label selection = new Label("-");
      layout.addComponent(selection);

      // Define a common menu command for all the menu items.
      MenuBar.Command mycommand = new MenuBar.Command() {
         public void menuSelected(MenuItem selectedItem) {
            selection.setValue("Ordered a " +
            selectedItem.getText() +
            " from menu.");
         }
      };

      // Put some items in the menu hierarchically
      MenuBar.MenuItem beverages =
      barmenu.addItem("Beverages", null, null);
      MenuBar.MenuItem hot_beverages =
      beverages.addItem("Hot", null, null);
      hot_beverages.addItem("Tea", null, mycommand);
      hot_beverages.addItem("Coffee", null, mycommand);
      MenuBar.MenuItem cold_beverages =
      beverages.addItem("Cold", null, null);
      cold_beverages.addItem("Milk", null, mycommand);
      cold_beverages.addItem("Weissbier", null, mycommand);

      // Another top-level item
      MenuBar.MenuItem snacks =
      barmenu.addItem("Snacks", null, null);
      snacks.addItem("Weisswurst", null, mycommand);
      snacks.addItem("Bratwurst", null, mycommand);
      snacks.addItem("Currywurst", null, mycommand);

      // Yet another top-level item
      MenuBar.MenuItem services =
      barmenu.addItem("Services", null, null);
      services.addItem("Car Service", null, mycommand);
      setContent(layout);
   }
   @WebServlet(urlPatterns = "/*", name = "MyUIServlet", asyncSupported = true)
   @VaadinServletConfiguration(ui = MyUI.class, productionMode = false)
   public static class MyUIServlet extends VaadinServlet {}
}
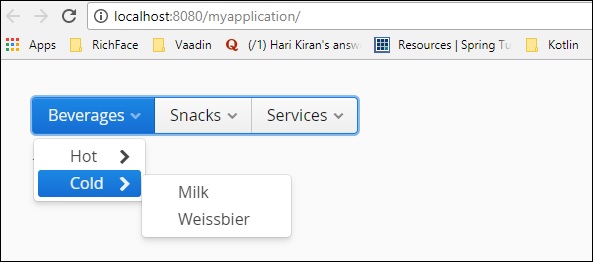
In the example discussed above, we have created a nested menu bar. Run the above piece of code and you can observe the output in your browser as shown below −