- Vaadin - Home
- Vaadin – Overview
- Vaadin – Environment Setup
- Vaadin – Creating First Application
- Vaadin – Architecture
- User Interface Components
- Vaadin – Core Elements
- Vaadin – Layout Component
- Vaadin – Themes
Vaadin - Layout Component
Layout components works as a place holder to hold and represent the data in the front end. In this chapter, we will learn about different types of layout component of the VAADIN.
Vertical and Horizontal Layout
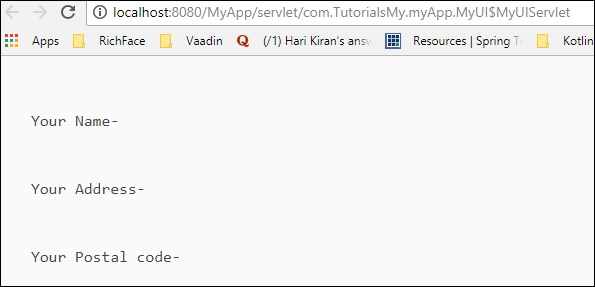
Vertical and horizontal layouts are the ordered layouts that help the users to render the data in a vertical or horizontal manner. We have used this concept in many previous examples that we have seen till now. The following example will show you how to use the same in a Vaadin application.
package com.TutorialsMy.myApp;

import javax.servlet.annotation.WebServlet;
import com.vaadin.annotations.Theme;
import com.vaadin.annotations.VaadinServletConfiguration;
import com.vaadin.server.VaadinRequest;
import com.vaadin.server.VaadinServlet;
import com.vaadin.shared.ui.ContentMode;
import com.vaadin.ui.Button;
import com.vaadin.ui.HorizontalLayout;
import com.vaadin.ui.Label;
import com.vaadin.ui.TextField;
import com.vaadin.ui.UI;
import com.vaadin.ui.VerticalLayout;

@Theme("mytheme")
public class MyUI extends UI {
   @Override
   protected void init(VaadinRequest vaadinRequest) {
      Label l1 = new Label("Your Name-\n",ContentMode.PREFORMATTED);
      Label l2 = new Label("Your Address-\n",ContentMode.PREFORMATTED);
      Label l3 = new Label("Your Postal code-\n",ContentMode.PREFORMATTED);
      final VerticalLayout vLayout = new VerticalLayout();
      final HorizontalLayout hLayout = new HorizontalLayout();
      vLayout.setDescription("This is a example of vertical layout");
      vLayout.addComponents(l1,l2,l3);;
      //hLayout.setDescription("This is example of Horizontal layout");
      // hLayout.addComponents(l1,l2,l3);
      setContent(vLayout);
      //setContent(hLayout);
   }
   @WebServlet(urlPatterns = "/*", name = "MyUIServlet", asyncSupported = true)
   @VaadinServletConfiguration(ui = MyUI.class, productionMode = false)
   public static class MyUIServlet extends VaadinServlet {}
}
This code will yield below output in the browser.
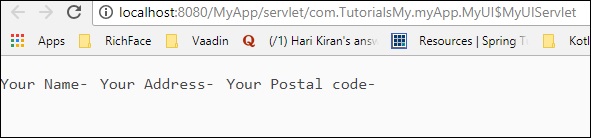
When we use horizontal layout instead of vertical, then the same piece of code will yield below output in the browser.
Grid
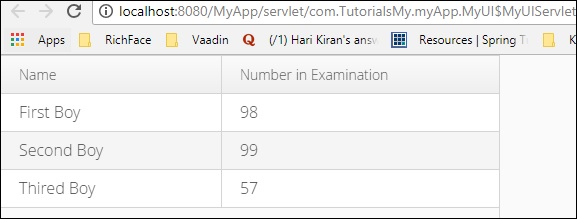
Grid is another component of Vaadin using which users can represent the tabular data in the browser. In this section, we will learn about Grid and its usage.
First create a class named as Person.
package com.TutorialsMy.myApp;

public class Person {
   private String name;
   private int number;
   public Person(){}
   public Person(String string, int i) {

      // TODO Auto-generated constructor stub
      this.name = string;
      this.number =i;
   }
   public String getName() {
      return name;
   }
   public void setName(String name) {
      this.name = name;
   }
   public int getNumber() {
      return number;
   }
   public void setNumber(int number) {
      this.number = number;
   }
}
Now, add the following piece of code in the MyUI.java class −
package com.TutorialsMy.myApp;

import java.util.Arrays;
import java.util.List;
import javax.servlet.annotation.WebServlet;

import com.vaadin.annotations.Theme;
import com.vaadin.annotations.VaadinServletConfiguration;
import com.vaadin.server.VaadinRequest;
import com.vaadin.server.VaadinServlet;
import com.vaadin.shared.ui.ContentMode;

import com.vaadin.ui.Button;
import com.vaadin.ui.Grid;
import com.vaadin.ui.HorizontalLayout;
import com.vaadin.ui.Label;
import com.vaadin.ui.TextField;
import com.vaadin.ui.UI;
import com.vaadin.ui.VerticalLayout;

@Theme("mytheme")
public class MyUI extends UI {
   @Override
   protected void init(VaadinRequest vaadinRequest) {
      HorizontalLayout hLayout = new HorizontalLayout();

      // Have some data
      List<Person> people = Arrays.asList(
      new Person("First Boy", 98),
      new Person("Second Boy", 99),
      new Person("Thired Boy", 57));

      // Create a grid bound to the list
      Grid<Person> grid = new Grid<>();
      grid.setItems(people);
      grid.addColumn(Person::getName).setCaption("Name");
      grid.addColumn(Person::getNumber).setCaption("Number in Examination");
      hLayout.addComponent(grid);
      setContent(hLayout);
   }
   @WebServlet(urlPatterns = "/*", name = "MyUIServlet", asyncSupported = true)
   @VaadinServletConfiguration(ui = MyUI.class, productionMode = false)
   public static class MyUIServlet extends VaadinServlet {}
}
Once both the steps are done, compile and run them. You can observe the following output in the browser −
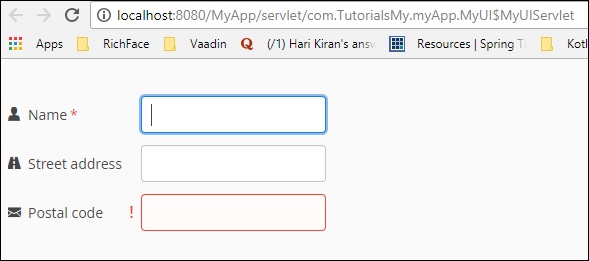
Form Layout
Form layout is another component of the Vaadin which helps us to represent the data in two different column format. It will look just like a form. In this section, you will learn more about this layout.
Edit your MyUI.java file as shown below −
package com.TutorialsMy.myApp;

import java.util.Arrays;
import java.util.List;
import javax.servlet.annotation.WebServlet;

import com.vaadin.annotations.Theme;
import com.vaadin.annotations.VaadinServletConfiguration;
import com.vaadin.icons.VaadinIcons;
import com.vaadin.server.UserError;
import com.vaadin.server.VaadinRequest;
import com.vaadin.server.VaadinServlet;
import com.vaadin.shared.ui.ContentMode;

import com.vaadin.ui.Button;
import com.vaadin.ui.FormLayout;
import com.vaadin.ui.Grid;
import com.vaadin.ui.HorizontalLayout;
import com.vaadin.ui.Label;
import com.vaadin.ui.TextField;
import com.vaadin.ui.UI;
import com.vaadin.ui.VerticalLayout;

@Theme("mytheme")
public class MyUI extends UI {

   @Override
   protected void init(VaadinRequest vaadinRequest) {
      FormLayout form = new FormLayout();
      TextField tf1 = new TextField("Name");
      tf1.setIcon(VaadinIcons.USER);
      tf1.setRequiredIndicatorVisible(true);
      form.addComponent(tf1);
      TextField tf2 = new TextField("Street address");
      tf2.setIcon(VaadinIcons.ROAD);
      form.addComponent(tf2);
      TextField tf3 = new TextField("Postal code");
      tf3.setIcon(VaadinIcons.ENVELOPE);
      form.addComponent(tf3);

      // normally comes from validation by Binder
      tf3.setComponentError(new UserError("Doh!"));
      setContent(form);
   }
   @WebServlet(urlPatterns = "/*", name = "MyUIServlet", asyncSupported = true)
   @VaadinServletConfiguration(ui = MyUI.class, productionMode = false)
   public static class MyUIServlet extends VaadinServlet {}
}
When you compile and run the above code, it will render the following output in the browser −
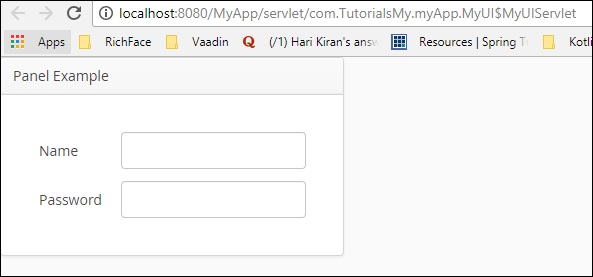
Panel
Panel is a single component container with a frame outlining it. It gives more features to the form layout. In the following example, we will understand how to use panel in the Vaadin.
package com.TutorialsMy.myApp;

import java.util.Arrays;
import java.util.List;
import javax.servlet.annotation.WebServlet;

import com.vaadin.annotations.Theme;
import com.vaadin.annotations.VaadinServletConfiguration;
import com.vaadin.icons.VaadinIcons;
import com.vaadin.server.UserError;
import com.vaadin.server.VaadinRequest;
import com.vaadin.server.VaadinServlet;
import com.vaadin.shared.ui.ContentMode;

import com.vaadin.ui.Button;
import com.vaadin.ui.FormLayout;
import com.vaadin.ui.Grid;
import com.vaadin.ui.HorizontalLayout;
import com.vaadin.ui.Label;
import com.vaadin.ui.Panel;
import com.vaadin.ui.TextField;
import com.vaadin.ui.UI;
import com.vaadin.ui.VerticalLayout;

@Theme("mytheme")
public class MyUI extends UI {

   @Override
   protected void init(VaadinRequest vaadinRequest) {
      HorizontalLayout layout = new HorizontalLayout();
      Panel panel = new Panel("Panel Example ");
      panel.addStyleName("mypanelexample");
      panel.setSizeUndefined(); // Shrink to fit content
      layout.addComponent(panel);

      // Create the content
      FormLayout content = new FormLayout();
      content.addStyleName("mypanelcontent");
      content.addComponent(new TextField("Name"));
      content.addComponent(new TextField("Password"));
      content.setSizeUndefined(); // Shrink to fit
      content.setMargin(true);
      panel.setContent(content);
      setContent(panel);
   }
   @WebServlet(urlPatterns = "/*", name = "MyUIServlet", asyncSupported = true)
   @VaadinServletConfiguration(ui = MyUI.class, productionMode = false)
   public static class MyUIServlet extends VaadinServlet {}
}
When you run the above piece of code, it will yield the following output in the browser
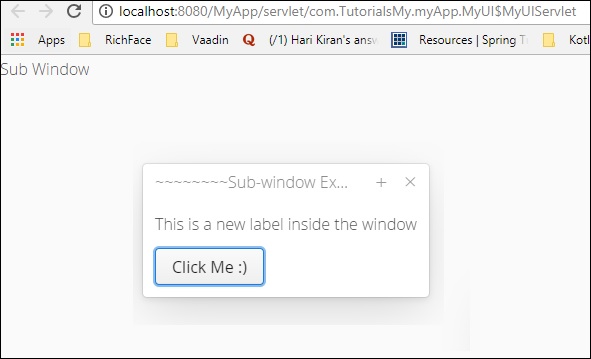
Sub Window
Sub window is a floating panel inside an active browser. This allows the user to segregate the content in to a different window. Like other Layout components, it is also controlled by runtime Vaadin Html codes. In the following example, we will see how sub window panel works.
Change your MYUI code as shown below.
package com.TutorialsMy.myApp;

import java.util.Arrays;
import java.util.List;
import javax.servlet.annotation.WebServlet;

import com.vaadin.annotations.Theme;
import com.vaadin.annotations.VaadinServletConfiguration;
import com.vaadin.icons.VaadinIcons;
import com.vaadin.server.UserError;
import com.vaadin.server.VaadinRequest;
import com.vaadin.server.VaadinServlet;
import com.vaadin.shared.ui.ContentMode;

import com.vaadin.ui.Button;
import com.vaadin.ui.FormLayout;
import com.vaadin.ui.Grid;
import com.vaadin.ui.HorizontalLayout;
import com.vaadin.ui.Label;
import com.vaadin.ui.Panel;
import com.vaadin.ui.TextField;
import com.vaadin.ui.UI;
import com.vaadin.ui.VerticalLayout;
import com.vaadin.ui.Window;

@Theme("mytheme")
public class MyUI extends UI {
   @Override
   protected void init(VaadinRequest vaadinRequest) {
      setContent(new Label("Sub Window"));

      // Create a sub-window and set the content
      Window subWindow = new Window("~~~~~~~~Sub-window Example~~~~~~~");
      VerticalLayout subContent = new VerticalLayout();
      subWindow.setContent(subContent);

      // Put some components in it
      subContent.addComponent(new Label("This is a new label inside the window"));
      subContent.addComponent(new Button("Click Me :)"));

      // Center it in the browser window
      subWindow.center();

      // Open it in the UI
      addWindow(subWindow);
   }
   @WebServlet(urlPatterns = "/*", name = "MyUIServlet", asyncSupported = true)
   @VaadinServletConfiguration(ui = MyUI.class, productionMode = false)
   public static class MyUIServlet extends VaadinServlet {}
}
Once you compile and run the above piece of code you will get below output in the browser.
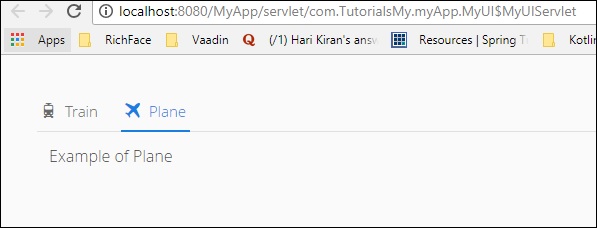
Tab-Sheet
Tab sheet is a multi-component container that allows switching between the components using tabs. All the tabs are organised as a tab bar at the top of the tab sheet. The following code. shows you how to use Vaadin Tab-Sheet.
Please modify your MyUI.java class as shown below.
package com.TutorialsMy.myApp;

import java.util.Arrays;
import java.util.List;
import javax.servlet.annotation.WebServlet;import com.vaadin.annotations.Theme;

import com.vaadin.annotations.VaadinServletConfiguration;
import com.vaadin.icons.VaadinIcons;
import com.vaadin.server.UserError;
import com.vaadin.server.VaadinRequest;
import com.vaadin.server.VaadinServlet;
import com.vaadin.shared.ui.ContentMode;

import com.vaadin.ui.Button;
import com.vaadin.ui.FormLayout;
import com.vaadin.ui.Grid;
import com.vaadin.ui.HorizontalLayout;
import com.vaadin.ui.Label;
import com.vaadin.ui.Panel;
import com.vaadin.ui.TabSheet;
import com.vaadin.ui.TextField;
import com.vaadin.ui.UI;
import com.vaadin.ui.VerticalLayout;
import com.vaadin.ui.Window;

@Theme("mytheme")
public class MyUI extends UI {

   @Override
   protected void init(VaadinRequest vaadinRequest) {
      TabSheet tabsheet = new TabSheet();
      VerticalLayout layout = new VerticalLayout();
      layout.addComponent(tabsheet);

      // Create the first tab
      VerticalLayout tab1 = new VerticalLayout();
      tab1.addComponent(new Label("Eaxmple of Train"));
      tab1.setCaption("Train");
      tabsheet.addTab(tab1).setIcon(VaadinIcons.TRAIN);;

      // This tab gets its caption from the component caption
      VerticalLayout tab2 = new VerticalLayout();
      tab2.addComponent(new Label("Example of Plane"));
      tab2.setCaption("Plane");
      tabsheet.addTab(tab2).setIcon(VaadinIcons.AIRPLANE);
      setContent(layout);
   }
   @WebServlet(urlPatterns = "/*", name = "MyUIServlet", asyncSupported = true)
   @VaadinServletConfiguration(ui = MyUI.class, productionMode = false)
   public static class MyUIServlet extends VaadinServlet {}
}
You can observe the following output in the browser when you run the code given above. Note that you can switch between train and plane depending on your selection in the tab header.
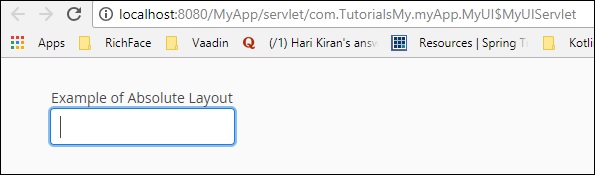
Absolute Layout
Absolute layout lets you to place the content in a selective position in an arbitrary manner. The following code is an example of usage of the absolute.
Update MyUI.java class as shown below.
package com.TutorialsMy.myApp;

import java.util.Arrays;
import java.util.List;
import javax.servlet.annotation.WebServlet;

import com.vaadin.annotations.Theme;
import com.vaadin.annotations.VaadinServletConfiguration;
import com.vaadin.icons.VaadinIcons;
import com.vaadin.server.UserError;
import com.vaadin.server.VaadinRequest;
import com.vaadin.server.VaadinServlet;
import com.vaadin.shared.ui.ContentMode;

import com.vaadin.ui.AbsoluteLayout;
import com.vaadin.ui.Button;
import com.vaadin.ui.FormLayout;
import com.vaadin.ui.Grid;
import com.vaadin.ui.HorizontalLayout;
import com.vaadin.ui.Label;
import com.vaadin.ui.Panel;
import com.vaadin.ui.TabSheet;
import com.vaadin.ui.TextField;
import com.vaadin.ui.UI;
import com.vaadin.ui.VerticalLayout;
import com.vaadin.ui.Window;

@Theme("mytheme")
public class MyUI extends UI {

   @Override
   protected void init(VaadinRequest vaadinRequest) {

      // A 400x250 pixels size layout
      AbsoluteLayout layout = new AbsoluteLayout();
      layout.setWidth("400px");
      layout.setHeight("200px");

      // A component with coordinates for its top-left corner
      TextField text = new TextField("Example of Absolute Layout");
      layout.addComponent(text, "left: 50px; top: 50px;");
      setContent(layout);
   }
   @WebServlet(urlPatterns = "/*", name = "MyUIServlet", asyncSupported = true)
   @VaadinServletConfiguration(ui = MyUI.class, productionMode = false)
   public static class MyUIServlet extends VaadinServlet {}
}
You can observe the following output in your browser when you execute the code given above −
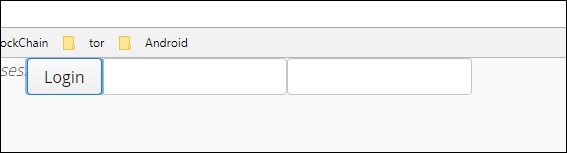
Custom Layout
A custom layout is a layout that you can customize as per your requirements, and hence the name. The following example shows how to create one custom layout for our application.
Change the MyUI.java class as shown below −
package com.TutorialsMy.myApp;

import java.util.Arrays;
import java.util.List;
import javax.servlet.annotation.WebServlet;

import com.vaadin.annotations.Theme;
import com.vaadin.annotations.VaadinServletConfiguration;
import com.vaadin.icons.VaadinIcons;
import com.vaadin.server.UserError;
import com.vaadin.server.VaadinRequest;
import com.vaadin.server.VaadinServlet;
import com.vaadin.shared.ui.ContentMode;

import com.vaadin.ui.AbsoluteLayout;
import com.vaadin.ui.Button;
import com.vaadin.ui.CustomLayout;
import com.vaadin.ui.FormLayout;
import com.vaadin.ui.Grid;
import com.vaadin.ui.HorizontalLayout;
import com.vaadin.ui.Label;
import com.vaadin.ui.Panel;
import com.vaadin.ui.TabSheet;
import com.vaadin.ui.TextField;
import com.vaadin.ui.UI;
import com.vaadin.ui.VerticalLayout;
import com.vaadin.ui.Window;

@Theme("mytheme")
public class MyUI extends UI {

   @Override
   protected void init(VaadinRequest vaadinRequest) {

      // A 400x250 pixels size layout
      Panel loginPanel = new Panel("Login");
      CustomLayout content = new CustomLayout("layoutname");
      content.setSizeUndefined();
      loginPanel.setContent(content);
      loginPanel.setSizeUndefined();

      // No captions for fields is they are provided in the template
      content.addComponent(new TextField(), "username");
      content.addComponent(new TextField(), "password");
      content.addComponent(new Button("Login"), "okbutton");

      //content.addComponent(loginPanel
      setContent(loginPanel);
      setContent(content);
   }
   @WebServlet(urlPatterns = "/*", name = "MyUIServlet", asyncSupported = true)
   @VaadinServletConfiguration(ui = MyUI.class, productionMode = false)
   public static class MyUIServlet extends VaadinServlet {}
}
You can observe the following output in your browser when you run the above piece of code −